1
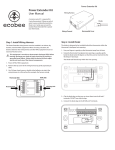
Instruction manual:
JR200-2 Groove Machine
Table of Contents
1. Caution
. . . . . . . . . . . . . . . . . . . . . . . . . . . . . . . . . . . . 1
2. Operation . . . . . . . . . . . . . . . . . . . . . . . . . . . . . . . . . . 1
3. Holder Installation . . . . . . . . . . . . . . . . . . . . . . . . . 2
4. Piping Material Security
. . . . . . . . . . . . . . . . . . . 2
5. Pipe-Cutting and Grooving
. . . . . . . . . . . . . . . . 2
6. Maintenance . . . . . . . . . . . . . . . . . . . . . . . . . . . . . . . 2
Thank you for choosing the
JR200-2 Groove Machine!
© 2011 Sensible Solutions Version 1.1.11
JR200-2 Groove Machine user manual
1 Caution
Before turning on the machine, please read
the instruction manual carefully. Make sure
you understand all the operational and safety
precautions.
220V/50HZ power. Make sure all power
is disconnected before performing any
adjustments and/or repairs.
● Do not store in humid places and avoid direct
contact with water when cleaning.
● Although this machine runs at low speed,
please pay attention to safety. Do not touch
moving parts while the machine is operating, as
this can cause serious injury. Special reminder:
while machine is running, please keep hands
away from the groove blade and cutter!
● This machine is designed for grooving and
● This groove machine uses single-phase
● For safety sake, ensure that the wires do not
make contact with the machine during or after
the process.
Follow this manual strictly for proper operation of
this product.
cutting of Ø200mm plastic pipes. Please
do not use for other than intended purpose
and do not use on pipes made from other
materials.
● If you encounter problems during maintenance,
please contact our company immediately.
Make sure you provide us with the production
serial number and report the malfunction as
accurately as possible. Our technicians will help
you solve the problem
2 Operation
● Track-Position Sign Replacement
Stabilize the JR160-2 groove machine’s
track-position sign at location 160. Take off
sign with scale then take out sign with 200
labeling from Ø200 tool kit. Allow the arrow
on the tract to point at location 160 of the
new sign. Drill in screws (M4) from the two
holes on the new sign.
1
● Feed Component Installation
i Place JR160-2 groove machine with the
200-sign on a flat surface, make sure all
four casters have secure contact with the
ground then lock two casters. Set the feed
track-position at Ø200 then secure the
butterfly nuts (Image 1). Unscrew the
feed handle screws with the supporting
hex wrench (Image 2);
ii Rotate feed handle clock-wise with the left
hand and take out JR160-2 groove machine’s feed component with right hand at
the same time (Pack away in a clean plastic bag then place in the tool box securely
behind the groove machine, to prevent
loss) (Images 3 and 4);
2
3
iii Take out Ø200 groove machine’s feed
device out of the 200 tool kit then insert
feed sleeve. Rotate feed handle counterclock-wise with left hand at the same time
until feed component installs into the feed
sleeve. Secure feed screws;
4
JR200-2 Groove Machine user manual (contd)
2 Operation (contd)
Groove
Blade
● Feed Component Installation (contd)
iv Install cutter and groove blade into
appropriate locations and tighten crews
(Image 5).
3 Holder Installation
● Rotate impact plate clock-wise and allow the
Cutter
Screws
Groove
5
Cutter
clips on the chuck to open to its largest position.
Remove the Ø50 clip on the JR160-2 groove
machine and place in the tool box; (Image 6);
● Aim the bolt on the holder to the dovetail
Dovetail
groove in any clip then insert Ø200 holder into
Ø75 clip (Image 7);
● Hold Ø200 holder with right hand, allowing
Ø200 holder and Ø75 clip to push against each
other. Rotate impact plate counter-clock-wise
hardly with left hand to secure Ø200 holder
(Images 8 and 9). 6
4 Piping Material Security
i
To provide secure support, position the four-leg
support on the far end of the pipe;
ii Lightly tighten holder screws with matching
socket wrench from the back of the chuck.
Adjust the height of the four-leg support so
that the axis of the pipe and holder are the
same height; tighten holder screws tightly.
7
5 Pipe-Cutting and Grooving
i Plug in power supply and turn on the machine;
ii Turn feed handle clock-wise to start cutting and
grooving. Caution: Slow down while cutting and
grooving!
iii Wait until there are no more shavings around
the groove blade, piping material rotates 3-5
more rounds, and the limit bearing beside
the groove blades rotates counter-clock-wise,
rotate feed hander counter-clock-wise;
iv Loosen holder screws with a socket wrench
behind the chuck, take down piping materials
and finish grooving;
v Clean shavings off the groove blade and cutter
with a brush.
8
6 Maintenance
Refer to the JR160-2 groove machine’s
maintenance manual.
9
Bolt