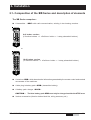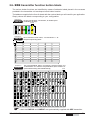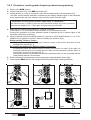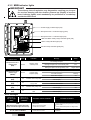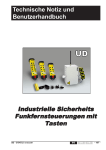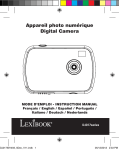
1
Installation and user technical manual Enhanced-safety industrial radio remote control for use in explosible atmosphere XD - 330810E revision 02 EN FR - 57 - - TABLE OF CONTENTS General safety rules ........................................................................................ p. 60 1 Description of XD radio remote control ......................................................... p. 61 2 2.1 2.2 2.3 2.3.1 2.3.2 2.3.3 2.4 2.5 2.5.1 2.5.2 2.5.3 2.5.4 2.5.5 2.5.6 2.5.7 2.5.8 2.5.9 2.6 Installation ....................................................................................................... p. 63 Composition of the XD Series and description of elements .......................... p. 63 Unpacking the products ................................................................................... p. 64 Product identification (according to references) .............................................. p. 65 XDE transmitter ................................................................................................ p. 65 XDR receiver .................................................................................................... p. 66 Accessories ..................................................................................................... p. 67 Delivery configuration ....................................................................................... p. 68 Installation recommendations ......................................................................... p. 69 Implementation of elements ............................................................................ p. 69 Marking of the controlled equipment ............................................................... p. 70 Wiring ............................................................................................................... p. 70 Interference suppression ................................................................................ p. 72 Electrical power supply protection ................................................................... p. 72 Minimum and maximum current of relay outputs ............................................ p. 72 Auxiliary control ................................................................................................. p. 72 Choice of operating radio frequency ................................................................ p. 72 Use of an antenna extension ........................................................................... p. 72 XDE transmitter function button labels ............................................................ p. 73 3 3.1 3.2 3.3 3.4 3.5 3.5.1 3.5.2 3.5.3 3.5.4 3.6 Commissioning ............................................................................................... p. 75 Precautions when commissioning ................................................................. p. 75 Periodic checks and checks performed following maintenance operations . p. 75 First startup of the radio remote control .......................................................... p. 76 Startup block diagram ...................................................................................... p. 77 Configuring the XD radio remote control ......................................................... p. 78 Procedure : «locking-unlocking» access to XDE transmitter programming .. p. 79 Procedure : working frequency programming ................................................. p. 80 Procedure : «Dead man» function time programming ................................... p. 81 Procedure : «Copying electronic key identity code in the XDE transmitter» ... p. 82 Configuring the receiver XDR .......................................................................... p. 83 4 4.1 4.2 4.3 4.3.1 4.3.2 Use and operation ........................................................................................... p. 85 Reminder of the general safety rules .............................................................. p. 85 Starting up the remote control .......................................................................... p. 86 Indicator light functions .................................................................................... p. 87 XDE transmitter indicator lights ....................................................................... p. 87 XDR receiver indicator lights ............................................................................ p. 88 - 58 - EN FR XD - 330810E revision 02 5 5.1 5.2 5.3 5.4 5.5 5.5.1 5.5.2 5.5.3 5.6 5.6.1 5.6.2 5.6.3 5.7 5.7.1 5.7.2 5.7.3 Technical characteristics ............................................................................... p. 89 Definition of markings on ATEX products ........................................................ p .89 Type and specification of function buttons on XDE transmitter ....................... p .91 Function button interlocking ............................................................................. p. 92 Correspondence between XDE function buttons and XDR relays ................. p. 92 XDE transmitter technical characteristics ....................................................... p. 93 Identity code ..................................................................................................... p. 94 Electronic key ................................................................................................... p. 94 «Dead man» function ...................................................................................... p. 95 XDR receiver technical characteristics ............................................................ p. 96 Connection to relays ........................................................................................ p. 97 Relay characteristics ........................................................................................ p. 97 Protection of receiver board and relays ........................................................... p. 99 XDB plug-in battery technical characteristics ................................................ p. 100 Battery pack storage precaution .................................................................... p. 100 Precaution when inserting battery pack in transmitter unit ........................... p. 100 Display of battery pack charge state .............................................................. p. 101 6 Servicing ........................................................................................................ p. 102 7 Warranty ........................................................................................................ p. 103 Appendix : A Receiver XDR detailed internal view ........................................................... p. 104 B Transmitter XDE detailed view .................................................................... p. 105 C Dimensions of elements ............................................................................... p. 106 D Wiring example ............................................................................................. p. 108 E Table of programmable radio frequencies and radio channels ................ p. 109 F CE Declaration of conformity ....................................................................... p. 110 «Help us improve this manual» form ........................................................... p. 111 XD - 330810E revision 02 EN FR - 59 - General safety rules A radio remote control is considered as a machine control device and as a safety component used to stop a machine as specified by the EEC Machinery Directive. All applicable rules must therefore be observed to ensure safe, correct operation of such devices. - For maximum safety when using the radio remote control, we recommend that the operator carefully follow the instructions provided in this manual. - The operator must be appropriately trained and certified to operate machines by radio remote control. - The operator must have uninterrupted visibility of the manoeuvre which he is performing. When the operator's direct field of view is inadequate, the controlled equipment must be equipped with auxiliary devices to improve visibility. When several machines are being moved simultaneously, the equipment must be fitted out to limit to consequences of a possible collision. - The receiver unit must only be started up when closed with all its cover fastening screws in place. - Following any intervention requiring opening of the receiver housing, be sure to apply a layer of silicon grease (supplied with XDR receiver) to the jointing plane of cover seal. - Never leave the transmitter lying around anywhere, in particular when it is powered up. - Never leave the radio control transmitter on the ground or on a metal surface. If doing so becomes indispensable, press the stop palmswitch on the radio control. - If several radio controls are used at the same site, different radio frequencies should be used, spaced by at least two channels (for example, channels 5, 7, 9, etc.). The more space there is between the chosen radio channels, the less the risks of disturbance are. - For safety reasons, remove the electronic key when not in use. Store it in a safe and tracked down place. - Do not forget to recharge the battery pack when discharged. The blue battery pack XDB must only be charged outside the ATEX zone. - In the event of a malfunction, immediately shut down the installation by pressing the «stop palmswitch» on the transmitter and remove the electronic key. - Service your equipment and perform all the periodic checks as may be required by the intensity with which your equipment is used. Follow necessarily the instructions of cleaning described in the chapter «Servicing». - 60 - EN FR XD - 330810E revision 02 1- Description of XD radio remote control Thank y ou and cong tions ffor or pur chasing our XD b uttonyou congrratula tulations purc buttontype industrial rradio adio rremote emote contr or control ol system intended ffor use in «e xplosib es le» a tmospher «explosib es.. xplosible» atmospher tmospheres The XD radio remote control is designed for remote control applications on handling machines and for industrial equipment applications. The radio remote control enables the operator to better focus on his work as it allows him to choose his observation position which is only limited by safety considerations (example: no one should be standing under a load). The radio remote control completes and enhances the classic safety circuits (emergency stop circuits). With the XD series, JAY Electronique satisfies the needs for use of a radio remote control in an explosible “gas” atmosphere, zones 1 and 2, and in an explosible «dust» explosive atmosphere, zones 21 and 22, consistent with the requirements of directive 94/09/CE. By its modular design, Jay Electronique's XD system integrates a number of features in terms of : Number of function buttons Type of function buttons Position of function buttons Number of output relays Programming of relay / buttons assignments Special attention has been given to ensure operator comfort through the following features : Ergonomic transmitters enabling one-hand control Control button accessibility Button touch sensitivity Identification of functions controlled Light-weight, compact transmitter Transmitter endurance, and fast changing battery pack Adaptability to all radio configurations of the environment by possibility for changing frequency by a trained operator Mechanical protection of function buttons to avoid any unintentional action Transmitter carrying strap which hooks onto belt when unit is idle, or removable shoulder strap (optional accessories) To further enhance safety when using this equipment, technical solutions and innovative options are also proposed : Radio remote control shutdown category 3 per EN954-1 and Hamming distance superior or equal to 4 for each transmitted message Access is enabled by electronic key to an authorised operator only Easy maintenance : Customization entirely stored in electronic key Diagnostic aid indicator lights Finally, the UD radio remote controls fully satisfy the safety requirements of the current applicable and draft standards and comply with the following European directives: Manufacturer ATEX 94/9/CE LCIE certificate Machinery Directive, shutdown category 3 per EN954-1 RTTE : microwave equipment and telecommunication terminals (low voltage, electromagnetic compatibility, radio-electric spectrum) ART conformity certificate For any recommendations or questions concerning installation of the XD remote control system, contact us at our customer service department : Tel : +33.(0)4.76.41.44.00 Fax: +33.(0)4.76.41.44.44 Email : [email protected] XD - 330810E revision 02 EN FR - 61 - - 62 - EN FR XD - 330810E revision 02 2- Installation 2.1- Composition of the XD Series and description of elements The XD Series comprises : A transmitter : «XDE» with radio communication, existing in two housing versions : électronique A T T E N T IO N L o rs d e s n e t to y a g e s, d e s c h a rg e s é le ct ro s t a ti q u e s p e u v e n t se s t o c ke r e n s u rf a ce d e s ma t iè r e s p la st iq u e s d e l ’a n t e n n e o u d u b o i tie r é me t te u r, le n e tt o ya g e d e ce s s u rf a ce s d o i t- ê tr e e f fe c t u é a ve c u n c h if fo n h u mid e VERIFIEZ ! La batterie doit être BLEUE 6+2 button version (6 function buttons + 1 «On/Horn» button + 1 «stop palmswitch button») or électronique A T TE N T IO N L o r s d e s n e tt o y a g e s, d e s c h a rg e s é l e ctr o s ta t iq u e s p e u v e n t se s t o c ke r e n s u rf a ce d e s m a t iè re s p la s ti q u e s d e l ’a n t e n n e o u d u b o it ie r é m e tt e u r, l e n e t to ya g e d e ce s s u rf a c e s d o it -ê t re e ff e c tu é a ve c u n ch i f fo n h u mid e VERIFIEZ ! La batterie doit être BLEUE 10+2 button version (10 function buttons + 1 «On/Horn» button + 1 «stop palmswitch button») A receiver «XDR» which decodes the information generated by the remote control and controls movements of the machines. A blue plug-in battery pack «XDB» (transmitter battery). A battery pack charger «UCCU». CAUTION : The blue battery pack XDB must only be charged outside the ATEX zone. Various accessories (function button label kits, wiring accessory etc.) XD - 330810E revision 02 EN FR - 63 - 2.2- Unpacking the elements IMPORTANT When unpacking the products, be sure to : - Write down the electronic key number on the cover page of this manual. This number will allow you to order a new, identical electronic key defined with your parameters. - The transmitter XDE must only be operated with the blue battery pack XDB. - Put the battery pack in load for 7 hours minimum before a first use. The blue battery pack XDB must only be charged outside the ATEX zone. 2nd package 1st package Charger Descriptive label Transmitter XDE électronique Ref : XDE . . . . . . (for charging the XDB battery pack) 0081 II 1 GD Ex ia IIB T5 Ex iaD A20 T100°C IP65 LCIE 07 ATEX 6008 X F 38330 St ISMIER Freq : .... .. ....MHz Serie : .../.... Date : .. / .. 0081 électronique UCCU WARNING - POTENTIAL ELECTROSTATIC CHARGING HAZARD - SEE INSTRUCTIONS électronique A T T E N T IO N L o r s de s n e tto ya g e s, d e s c h a r g e s é l ectr o s ta ti qu e s p e u v en t se s toc ke r e n su rf a ce de s m a t iè re s p la sti qu e s d e l ’an te n n e ou d u b oi tie r é m e tte u r, l e n e tto ya g e de ce s s u rf a ce s d o i t- ê tr e effe c tu é ave c u n chi ffo n h u mid e VERIFIEZ ! La batterie doit être BLEUE electronic key Battery pack1) XDB (1) (blue) label kits U P R E V E R S E F O R W A R D S O U T H N O R T H W E S T E A S T R P M + R P M S U D N O R D O U E S T E S T 1 2 S H U N T • 1 2 3 4 5 6 3 1 1 3+4 4 100-240VAC/5VDC delivered with Euro and UK plugs 3+4 • 3 4 1 • 3 2 1 • 1+2 3 4 2 2 3 • 1+2 7 8 9 • 3 1 2 ON OFF GATE 2 L E F T 4 R I G H T D O W N • (1) = mounted on transmitter at delivery 3rd package 3 seals for cable gland Receiver XDR 15 x 18 18 x 21 Descriptive label électronique F 38330 St ISMIER Ref : XDR . . . . . - . . . Code : . . . . Freq : .... .. ....MHz Serie : .../.... Date : .. / .. Alim : .....V.. 21 x 24 Grease tube (housing closing) - 64 - EN FR 4 colored directional arrows électronique 0081 IP65 Ex dia IIB T6 II 2 GD Ex tD A21 T80°C WARNING - DO NOT OPEN WHEN ENERGIZED WARNING - DO NOT OPEN WHEN AN EXPLOSIVE ATMOSPHERE MAY BE PRESENT 0081 LCIE 07 ATEX 6034 X Technical user manual + safety notes for ATEX housing common wiring accessory XD - 330810E revision 02 2.3- Product identification (according to sales reference) 2.3.1- Transmitter XDE Type of function buttons (2) on first row (starting from bottom of transmitter) Type of function buttons (2) on second row 10+2 button version: Type of function buttons (2) on fourth row or 6+2 button version: write 0 (zero) Type of function buttons(2) on third row X D E Type of communication and version : 0 = Radio 433-434MHz bands 2 = Radio 433-434MHz bands without electronic key (1) A = Radio 869MHz band C = Radio 869Mhz band without electronic key (1) 10+2 button version: Type of function buttons (2) on fifth row or 6+2 button version: write 0 (zero) (1) - Only for auxiliary transmitter. (2)= Types of function buttons per row : 2 9 = COM2, COM3R 1,2 1,2 3 = BPSV, COM2 1 R 1 2 4 = BPSV, COM3 1 A = COM3, COM3R 1 R 1 1 2 1 1 2 R R . 2 = BPDV, BPDV 8 = BPSV, COM3R 1 R R . 1 2 R 1 B = COM3R, COM3R 1 1 2 2 1 R R . 1 = BPSV, BPSV 1 R R . 1 1 7 = COM3, COM3 R 3 . R 1 1 2 2 1 R D = BPSV, BPTR 1 2 E = COM2, BPTR R 1 1 3 1 R . 6 = COM2, COM3 C = Cover, Cover 2 . 5 = COM2, COM2 2 1 1 See §5 «Technical data» for button description See §3.5 concerning programming restrictions due to the use of switches on row 1 and row 2. Example : XDE012600 - Radio transmitter XDE (433-434MHz bands), 6+2 button housing model, with electronic key, button configuration: 1st row BPSV-BPSV, 2nd row BPDV-BPDV, 3rd row COM2-COM3, supplied with label sheets ref.: UWE202 and UWE207. The transmitter is delivered with pre-programmed radio channel nb.01 (433,100 MHz). XD - 330810E revision 02 EN FR - 65 - 2.3.2- Receiver XDR Match-up programming Transmitter XDE buttons – Receiver XDR relays: Number of relays controlled by type BPDV button pairs (double-action pushbuttons) of transmitter 1 = 3 relays controlled or no BPDV on transmitter 2 = 4 relays controlled Power supply: 4 = 12 - 24 VDC A = 24 - 48 VAC B = 115 - 230 VAC X D R C Type of communication: 0 = Radio 433-434MHz bands A = Radio 869MHz band 0 0 Match-up programming Transmitter XDE buttons – Receiver XDR relays: Type of control for BPTR, COM3, COM3R (3-position selector switch) buttons of transmitter 1 = Type: 1/1 + 2/2 or no COM3/COM3R/BPTR on transmitter 2 = Type: 1/OFF/2 3 = Type: 1/2/1+2 Interlocking programming between pushbuttons (BPSV or BPDV type) nb. 1 and nb. 2, nb. 3-nb. 4, and nb. 5-nb. 6: 0 = no interlocking or COM (selector switch) on each row 1 = interlocking with deactivation of the output relays 2 = interlocking with priority to Left button (i.e. button Nb. 1, Nb. 3 and Nb. 5) 3 = interlocking with priority to Right button (i.e. button Nb. 2, Nb. 4 and Nb. 6) Example : XDR0CB00-012 - Radio receiver XDR (433-434MHz bands), 18+3 relays (18 function relays + 2 safety relays + «Horn» relay), 115-230VAC power supply, without programmed interlocking, without BPDV on transmitter; BPTR, COM3 and COM3R buttons, if present, on transmitter are type 1-OFF-2. The receiver is delivered with pre-programmed radio channel nb.01 (433,100 MHz). - 66 - EN FR XD - 330810E revision 02 2.3.3- Accessories IMPORTANT All other accessories for transmitter/receiver not listed on this page (case, strap, etc. ...) must be removed before entering ATEX zone. For XDE transmitter Reference Description UCCU Charger 100-240VAC/5VDC (with Euro and UK plugs) (for battery pack charging) (1) XDB Plug-in blue battery pack (1) (2) UDC1 Wall bracket for stowing and battery pack charging when idle (1) UDWE22 X Programmed electronic key (parameters to be supplied) (1) (3) UWE202 Kit with 6 colour “movement” labels for two-step pushbuttons (double speed) (2) UWE205 Kit with 48 white blank labels + 48 transparent protecting labels for customised marking UWE207 Kit with 90 black/white “movement, special functions and customisation” labels for selector switches and pushbuttons (2) For XDR receiver Reference Description VUB084 1/4 wave antenna straight, BNC (2) VUB086 1/2 wave antenna straight, BNC VUB060 90° BNC elbow for antenna VUB084 or antenna extension (4) VUB105 2 m antenna extension BNC + non-insulated bracket (5) VUB125 5 m antenna extension BNC + non-insulated bracket (5) VUB131 10 m antenna extension BNC + non-insulated bracket (5) UWE001 Adhesive 2-way directional arrows, colour coded, for travelling crane UWE002 Adhesive 4-way directional arrows, colour coded, for travelling crane (2) UDWR12 Common wiring accessory (2) (1)= CAUTION : The blue battery pack XDB must only be charged outside the ATEX zone. (2)= 1 accessory supplied with product (3)= A programmed electronic key is delivered with the receiver, it is however possible to order an electronic key by supplying us the following parameters : - The unique 6-digit number of the old key (written on the cover page of this manual when you unpacked your product). or, if you do not have a key number : - The associated receiver identity code (on receiver descriptive label) and transmitter button configuration. (4)= Not suitable for direct connection to antenna Ref.: VUB086; in this case, use an intermediate antenna extension type VUB1•• (5)= When using an antenna extension, make sure that the structure on which the support bracket is mounted has the same equipotential as the structure on which the receiver unit is mounted. XD - 330810E revision 02 EN FR - 67 - 2.4- Delivery configuration • Radio channel number : - Radio channel nb 01 : 433,100 MHz (433-434MHz bands) or 869,9875 MHz (869MHz band) • Duration of the temporization for the "Dead Man" function (automatic shutdown of remote control in case of prolonged non-use) : - Programmed for 4mn • Button / relay configuration and button interlocking : - According to product definition with order. • Locking of the access to programming of transmitter XDE : The transmitter is supplied "unlocked", programmings (radio channel, "Dead man" function duration and Identity code copy (from electronic to transmitter memory)) can be directly modified by a trained operator (see programming procedures on chapter §3.5). - 68 - EN FR XD - 330810E revision 02 2.5- Installation recommendations Experience shows that the functional efficiency of the system basically depends on the quality of the installation : - Implementation of elements, - Marking of the controlled equipment, - Wiring quality of XDR receiver, - Interference suppression, - Electrical power supply protection, - Minimum and maximum current of relay outputs, - Choice of operating frequency. 2.5.1- Implementation of elements Element dimensions are available for consultation in Appendix C Receiver position The remote control receiver XDR should be mounted as close as possible to the control cabinet, vertical with respect to the machine structure. The receiver should be sheltered from shocks and weather. The antenna should be as far as possible from the class 3 cables and power components (power supply, motor, variable speed drive, etc.) while remaining within an area favorable to radio reception : The antenna should be located at a height, above the operator using the transmitter XDE. No metal object which could create a screen should be located between the operator and the antenna. Be steered downward if it is to place above the operator and upward in the other cases. The antenna orientation is indicated in the figure below : Good Metal Metal XDR Wrong Metal Good XD - 330810E revision 02 EN FR - 69 - 2.5.2- Marking of the controlled equipment If there are several equipment fitted with similar radio remote control systems working in the same neighbourhood (e.g. in a plant), each transmitter shall carry a clear indication which tells the equipment driver which equipment is controlled by the transmitter in question. In this respect, signalling arrows are available as an accessory. Place the different arrows on the equipment to be controlled so that each arrow colour corresponds to that on the associated transmitter control button. The direction of movement of control buttons shall whenever possible be consistent with equipment motion. Symbols shall be fixed in such positions that there is a clear and unambiguous relationship between the action on buttons in the control station and the corresponding direction of motion. The arrows are available in the following versions: Référence : Reference : UWE001 2-way self-adhesive arrows color UWE002 4-way self-adhesive arrows color (Independent symbols) 490 mm 400 mm 180 mm 160 mm brown green brown green blue yellow 2.5.3- Receiver wiring WARNING To avoid any risk of electrocution or explosion, never open the receiver unit when powered up. All the receiver cover fastening screws (14 screws) must be in place before powering up the unit. IMPORTANT During any intervention requiring the opening of the receiver housing, you have to take the necessary precautions in order not to degrade the surface state of the 2 jointng planes of the cover seal. IMPORTANT Following any intervention requiring opening of the receiver housing, be sure to apply a layer of silicon grease (supplied with XDR receiver) to the jointing plane of the cover seal. IMPORTANT Respect the recommendations of the document : «Safety Notes - ATEX Housing» reference : 332200 - 70 - EN FR XD - 330810E revision 02 The electrical connections should be made such that when the main switch is off, the XD remote control receiver is also deactivated. Caution: Power supply terminals strips If flexible stranded wire is used, crimped terminations should be used to avoid false contacts and short circuits. To open the connection terminal strips: - Vertically push the screwdriver (flat tip screwdriver of 1.5 to 3 mm width) on the lever, - Exercise a moderated pressure up to opening the terminal - Insert the wire, - Remove the screwdriver. F1 F2 RS2 RS1 RK C B 22 21 24 VA C 48 VA C 20 23 22 11 5V A 23 C 0V A C + 23 XDR receiver reference : 0V + 12 VD C 24 VD C A N 21 20 23 22 N 21 20 XDR*C400 - *** XDR*CA00 - *** XDR*CB00 - *** 12 - 24 VDC 24/48 VAC 115/230 VAC For the wiring and to determine the correspondence between the action on a function button or switch and the relay controlled, refer to the configuration table supplied with the receiver (label on housing cover) and appendix A. See wiring example in appendix D XD - 330810E revision 02 EN FR - 71 - 2.5.4- Interference suppression In the event of inductive loads on the relay outputs (contactor coils, solenoid valves or electrobrakes), interference suppression devices such as capacitors, RC circuits, diodes, etc. must be placed directly at the terminals of the controlled components using the shortest possible connections. Such devices must only be installed in full observance of the rules and requirements governing the utilization area. 2.5.5- Electrical power supply protection Protection against overcurrents (EN60204-1 § 7.2) resulting from overvoltages. A fuse or other protection device should be provided in the power supply circuit of the receiver (see wiring diagram for standard assemblies, item F• in appendix D). The assigned current is defined in the table at § «XDR receiver technical characteristics». Such devices must only be installed in full observance of the rules and requirements governing the utilization area. 2.5.6- Minimum and maximum current of relay outputs Be sure not to exceed the minimum and maximum characteristics specified in § «XDR receiver technical characteristics» by installing, if necessary, an additional load or intermediate relays (auxiliary contacts in electrical cabinet for power control, for example). Such devices must only be installed in full observance of the rules and requirements governing the utilization area. 2.5.7- Auxiliary control Measures should be taken to ensure, that when the radio control is not in service, another control system can be used to ensure the safety of the operator and the manipulated load. 2.5.8- Choice of operating radio frequency The 64 radio channels in 433-434MHz or 12 channels in 869MHz of the XD provide a broad range of choices among the available frequencies. To ensure good operating quality, it is important that the radio channel used be free (as well as the preceding and the following one) throughout the area in which the machine will be controlled. If several radio remote controls are operating on the same site, frequencies spaced by at least two channels (for example: 5, 7, 9 …) should be used and, if necessary, a frequency plan should be drawn up, specifying the various machines controlled and their working frequency. 2.5.9- Use of an antenna extension When using an antenna extension, make sure that the structure on which the support bracket is mounted has the same equipotential as the structure on which the receiver unit is mounted. - 72 - EN FR XD - 330810E revision 02 2.6- XDE transmitter function button labels The various button functions are identified by means of adhesive labels placed in the recesses provided in the transmitter unit envelope at each button location. The labels are supplied in the form of sheets with the various labels you will need for your application. Simply choose the labels corresponding to your configuration. Reference : Kit of 6 colored labels, «movements», for double speed pushbuttons (2 steps) UWE202 6,4 mm 22 mm black white brown green blue yellow Reference : UWE205 Kit of 48 white blank labels, «customization» + 48 transparent protecting labels. 6,4 mm 22 mm Reference : Kit of 90 white/black labels, «movements, special functions and customization» for switches and pushbuttons (with 16 labels for personalized marking with indelible felt-tip) UWE207 6,4 mm F O R W A R D N O R T H W E S T E A S T R P M + R P M N O R D O U E S T E S T 1 2 1 2 3 4 5 6 3 3+4 4 3 4 • 3 2 1 • 3+4 • 3 4 1+2 1 • 2 • 3 1 7 8 9 4 2 1+2 • GATE 2 1 ON OFF 3 S U D S H U N T 1 S O U T H L E F T 2 U P 22 mm R I G H T R E V E R S E D O W N • Label kits UWE202 and UWE207 are systematically supplied with XDE transmitter. XD - 330810E revision 02 EN FR - 73 - - 74 - EN FR XD - 330810E revision 02 3- Commissioning 3.1- Precautions when commissioning • The installer must : - Ensure that the category of equipment used corresponds to the ATEX requirements for the application, - Ensure that the identity code of the electronic key is identical to that of the receiver, - Ensure that the transmitter radio frequency is identical to that of the receiver, - ensure that the radio channel chosen corresponds to the frequency plan set up for the site, - perform a final check to verify that the desired Button-Relay correspondence is in place. • During the previous check, the installer must check that when the green "On/Horn" button is pressed on startup, only the function relays assigned to the rotary button selections are in the "ON" state. • Verify the priority general shutdown mode (remote control in operation and radio link established): Active stop : When the stop palmswitch button on the transmitter is pressed, the receiver safety relays (RS1 and RS2) should instantaneously change state. Passive stop : When the electronic key is removed from the transmitter in operation, the receiver safety relays (RS1 and RS2) should change state within two seconds max. • "Dead man" function duration : Check the effective duration of the "Dead man" function (automatic shutdown of transmitter) : Start up the remote control and leave it without activating any control. Record the time after which the receiver safety relays (RS1 and RS2) are deenergized and check that this duration corresponds to the standard duration supplied (4min.) or to the new duration defined by a trained and authorized operator in accordance with the procedure described in chapter «Dead man» function time programming. • Radio range limits : Ensure you have good radio transmission coverage throughout the equipment control area. Test the range limit of the transmitter and receiver (by moving about up to the range limit). • Special function: masking of certain function buttons : If button masks are included in the electronic key, check that they properly correspond to the application for which they have been provided. 3.2- Periodic checks and checks performed following maintenance operations In addition to the commissioning checks which should be performed, also check : - That the ergonomic features of the transmitter unit have been preserved, such as: pressure on function buttons, correct rotation of rotary switches, emergency stop button pushes in correctly, etc... - Response time of commands between transmission of a command and resulting movement. XD - 330810E revision 02 EN FR - 75 - 3.3- First radio remote control startup 1- Switch ON the XDR receiver. 2- Plug the blue XDB battery pack (charged) into XDE transmitter housing. 3- Install the electronic key on the transmitter. 4- Copy electronic key identity code to XDE transmitter memory, see procedure on § 3.5.4. 5- Unlock the transmitter stop palmswitch button. 6- Press the green «On/Horn» button until the receiver is started up. (safety relays are activated). To stop the radio remote control : press the XDE transmitter stop palmswitch button.. NB : if this procedure is not observed the transmitter indicates an error with the red and green indicator light : - «3 flashes error type» (The green and red leds flash 3 times, mark a break, then flash 3 times etc.) : resume «identity code copy» procedure described in § 3.5.3. - «5 flashes error type» (The green and red leds flash 5 times, mark a break, then flash 5 times etc.) : Stop or startup error (make sure that the pack battery is correctly inserted in the transmitter housing and resume the radio remote control startup procedure). See startup block diagram on next page - 76 - EN FR XD - 330810E revision 02 XD - 330810E revision 02 OFF Standby 3 states of red indicator light of XDE (battery pack charge state) EN FR Battery pack charge < 10% 90% > Battery pack charge > 10% Battery pack charge > 90 % XDE transmitter green indicator light XDR receiver RS1 and RS2 safety relays 3 states of XDE Active Red stop palmswitch unlocked, Green "On/Horn" XDE transmitter button pressed powered up UTILISATION Charge < 10 % (1) "Dead Man" duration Passive stop : battery pack is discharged Charge < 10 % 90% > Charge > 10 % Last action on function pushbutton (2) T Active stop by pressing stop palmswitch button Or Passive stop if "Dead Man" duration is exceeded (1) or Battery pack is disconnected/discharged (2) or Electronic key removed from XDE transmitter in operation 3.4- Functioning block diagram - 77 - 3.5- XD system configuration and parameter setting The following parameters are configurable from the XDE transmitter unit : • Transmit frequency (radio channel number selection). • The "Dead man" function duration (01 to 98 minutes and infinite). • Copy of electronic key identity code to transmitter memory. These configuration operations use procedures implementing buttons nb 1, nb 2, nb 3, stop plamswitch and "On/Horn" without having to open the transmitter or the receiver. By a specific operating mode, the person in charge of the equipment can lock or unlock the access to the programming (see §3.5.1). Programming button nb 3 Programming button nb 1 5 6 3 4 1 2 Programming button nb 2 "On/Horn" button (Can replace programming button nb 3 in certain cases, see below) Stop plamswitch button Programming limitations by the button type implanted at position «button nb 1», «button nb 2» and «button nb 3» on the XDE transmitter : In order for the four programming functions to be programmable (locking-unlocking of programming, radio frequency, "Dead man" duration and identity code copy), button nb 1 and button nb 2 must be single or double speed pushbuttons (BPSV or BPDV). If not, certain functions may not be accessible to the user. The table below shows the programming modes available in accordance with the buttons nb 1 and nb 2 used : 5 6 3 4 1 2 Button nb 1 Button nb 2 "Lockingunlocking" access to programming of transmitter Working frequency programming "Dead man" function time programming Copying electronic key identity code in transmitter BPSV or BPDV BPSV or BPDV YES YES YES YES BPSV or BPDV Other * NO NO YES NO NO NO NO NO Other button type * * : COM2, COM3, COM3R, BPTR or Cover If programing button nb 3 is not of BPSV or BPDV type, the "On/Horn" button takes then the role of programming button, and substitutes itself for button nb 3. Configuration parameters which cannot be programmed by the user will be taken into account on the sales order and will not be re-configurable once the transmitter is manufactured. However, it is always possible to order an electronic key containing the desired parameters (reference: UDWE22X) - 78 - EN FR XD - 330810E revision 02 3.5.1 Procedure: "Locking-unlocking" access to programming of transmitter XDE 1234- 5678- Switch off the XDR receiver Insert the electronic key in the XDE transmitter unit.. Holding buttons nb 1, nb 2 and nb 3* pressed, unlock the stop palmswitch button (fig.1). Release the buttons. Indicator lights statuses: - XDE transmitter locked : red indicator light on, green indicator light off. - XDE transmitter unlocked : red and green indicator lights on. Select «locked» or «unlocked» by pressing button nb 2; the selected mode is shown by the indicator lights (fig.2&3). Validate the selected mode by pressing the "On/Horn" button (fig.4). The XDE transmitter saves the new mode in the electronic key and switches off the indicator lights. Exit the «locking - unlocking» procedure by pressing the stop palmswitch button (fig.6). Remark: If an operator attempts to program the radio frequency, the «dead man» function duration or an identity code copy with the transmitter locked, the XDE transmitter will indicate an error «Transmitter locked» by its indicator lights which will flash in alternation. LD LD électronique électronique Locking Fig.1 Fig.2 Unlocking Fig.3 DATA Fig.4 Fig.5 Fig.6 * = If the button nb 3 is not pushbutton (BPSV or BPDV) type, use then the green «On/Horn» button. XD - 330810E revision 02 EN FR - 79 - 3.5.2 Procedure : working radio frequency channel programming 1- Switch on the XDR receiver. 2- Insert the electronic key in the XDE transmitter unit. 3- Holding buttons nb 1 and nb 2 pressed, unlock the stop palmswitch on the transmitter (fig.1). The radio channel already selected is indicated by two flashing indicator lights on the transmitter which represent the tens (red indicator light) and units (green indicator light). If transmitter red and green indictor lights flash in alternation : The electronic key is locked. Press the stop palmswitch button and follow procedure described on chapter §3.5.1. Start again this procedure at point Nb.3. 4- Select the new channel using buttons nb 1 and nb 2 (fig.2&3). Press button nb 1 to increment the tens and button nb 2 to increment the units. During these operations, the newly selected channel is displayed by the 2 indicator lights on the transmitter which flash accordingly. 5- Once the desired channel is selected (between 01 and 64 for 433-434MHZ bands or 01 to 12 for 869MHz band), press the "On/Horn" button to validate your selection (fig.4). Briefly pressing "On/Horn" button : the transmitter sends the selected radio channel number to the receiver and saves its new working radio channel (fig. 5). By pressing and holding the "On/Horn" button (3 seconds) : the transmitter sends the selected channel number to the receiver (on each of the radio link channels) and saves its new working channel. Wait until the transmitter indicator lights no longer flash (around 30 seconds) (fig. 5) (this longer procedure is preferable and should be performed when you are not familiar with the initial working channel of the receiver). 6- Exit the "frequency" programming mode by pressing the stop palmswitch button (fig.6). 7- Check that the XDR receiver has changed channel by performing the startup procedure. q +10 +1 Fig.1 Fig.2 Fig.3 LD électronique DATA Fig.4 - 80 - EN FR Fig.5 Fig.6 XD - 330810E revision 02 3.5.3 Procedure : "Dead man" function time programming (Automatic shutdown of transmitter XDE) 1- Switch off the XDR receiver. 2- Insert the electronic key in the XDE transmitter unit. 3- Holding buttons nb 1 and nb 3* pressed, unlock the stop palmswitch button on the transmitter (fig.1). The «Dead man» time is displayed by two flashing indicator lights on the transmitter representing the tens of minute with the red light (0,10 to 90) and the number of minutes with green light (0 to 9). If transmitter red and green indictor lights flash in alternation : The electronic key is locked. Press the stop palmswitch button and follow procedure described on chapter §3.5.1. Start again this procedure at point Nb.3. 4- Select the new time using buttons nb 1 and nb 2 (fig.2&3). Press button nb 1 to increment the tens and button nb 2 to increment the units. During these operations, the new time selected is displayed by the two indicator lights on the transmitter. 5- Once you have selected the desired «Dead man» time (between 01 and 99), press the «On/ horn» button to validate your selection (fig.4). Caution: No. 99 corresponds to an infinite «Dead man» time > This function is then deactivated and forgetting that the transmitter is stopped (by pressing the stop palmswitch button) will result in complete discharge of the battery pack. 6- Exit the «Dead man» time programming mode by pressing the stop palmswitch button (fig.6). électronique électronique +10 mn Fig.2 Fig.1 +1 mn Fig.3 DATA Fig.4 Fig.5 Fig.6 * = If the button nb 3 is not pushbutton (BPSV or BPDV) type, use then the green «On/Horn» button. XD - 330810E revision 02 EN FR - 81 - 3.5.4 Procedure: «Copying electronic key identity code to XDE transmitter memory» Apply this procedure when : - starting the radio remote control for the first time - using a maintenance transmitter - changing the electronic key Reminder : To use the XD radio remote control system, the identity code contained in the transmitter memory must match the identity code in the electronic key which is itself identical to that of the receiver. If a maintenance transmitter is used or if you change electronic key, the information contained in the electronic key must be copied in the XDE transmitter memory (see chapter «technical characteristics/ transmitter XDE) Conditions for using this procedure : The configuration of the maintenance transmitter buttons must be identical to that described in the electronic key (or the original transmitter). 1- Switch off the XDR receiver 2- Insert the electronic key in the XDE transmitter unit. 3- While holding buttons nb 2 and nb 3* pressed, unlock the transmitter emergency stop button (fig. 1): the 2 indicator lights on the transmitter will flash rapidly. 4- Press the «On/Horn» button to perform automatic programming of the identity code: the two indicator lights on the transmitter go off (fig. 2). 5- The «identity code» information is copied from the electronic key to the transmitter memory (fig. 3). 6- Exit the programming mode by pressing the stop palmswitch button (fig.4). DATA electronic key memory Fig.1 Fig.2 Fig.3 XDE transmitter memory Fig.4 * = If the button nb 3 is not pushbutton (BPSV or BPDV) type, use then the green «On/Horn» button. - 82 - EN FR XD - 330810E revision 02 3.6- XDR receiver configuration The following parameters can be configured on the receiver : • Transmitter button interlockings : Factory configured, not programmable by the user. • Transmitter buttons / receiver function relays correspondence : Factory configured, not programmable by the user. • Transmit radio frequency : The radio reception frequency (channel Nb.) can be programmed by the transmitter XDE matched to the receiver XDR implementing the transmitter frequency programming procedure, see §3.5.2. XD - 330810E revision 02 EN FR - 83 - - 84 - EN FR XD - 330810E revision 02 4- Use and operation 4.1- Reminder : General safety rules A radio remote control is considered as a machine control device and as a safety component used to stop a machine as specified by the EEC Machinery Directive. All applicable rules must therefore be observed to ensure safe, correct operation of such devices. - For maximum safety when using the radio remote control, we recommend that the operator carefully follow the instructions provided in this manual. - The operator must be appropriately trained and certified to operate machines by radio remote control. - The operator must have uninterrupted visibility of the manoeuvre which he is performing. When the operator's direct field of view is inadequate, the controlled equipment must be equipped with auxiliary devices to improve visibility. When several machines are being moved simultaneously, the equipment must be fitted out to limit to consequences of a possible collision. - The receiver unit must only be started up when closed with all its cover fastening screws in place. - Following any intervention requiring opening of the receiver housing, be sure to apply a layer of silicon grease (supplied with XDR receiver) to the cover seal. - Never leave the transmitter lying around anywhere, in particular when it is powered up. - Never leave the radio control transmitter on the ground or on a metal surface. If doing so becomes indispensable, press the stop palmswitch on the radio control. - If several radio controls are used at the same site, different radio frequencies should be used, spaced by at least two channels (for example, channels 5, 7, 9, etc.). The more space there is between the chosen radio channels, the less the risks of disturbance are. - For safety reasons, remove the electronic key when not in use. Store it in a safe and tracked down place. - Do not forget to recharge the battery pack when discharged. The blue battery pack XDB must only be charged outside the ATEX zone. - In the event of a malfunction, immediately shut down the installation by pressing the «stop palmswitch» on the transmitter and remove the electronic key. - Service your equipment and perform all the periodic checks as may be required by the intensity with which your equipment is used. Follow necessarily the instructions of cleaning described in the chapter «Servicing». XD - 330810E revision 02 EN FR - 85 - 4.2- Radio remote control start up 1- Switch ON the XDR receiver. Transmitter XDE 2- Take care that XDB battery pack is loaded and is well connected to XDE transmitter back. Battery pack XDB électronique A T TE N T IO N 3- Install the electronic key on the transmitter or take care of its presence on XDE transmitter. L or s de s n et t oy ag e s, d e s ch ar ge s él e ctr os t at i qu es p e uv en t se s to cke r e n s urf ace d es m at ièr es pla st i qu es de l’a n t en ne o u d u b oi t ie r é m et t eu r, l e ne tt o ya ge d e ces su rf ace s d oi t -ê tr e e ff e ct ué a vec un chi f f on h um i d e VERIFIEZ ! La batterie doit être BLEUE Electronic key 4- Unlock the transmitter stop palmswitch button. 5- Press the «On/Horn» button until the receiver is started up. électronique A T TE N T I O N L ors d es ne tt o yag e s, de s c har ges él ect ros ta t iq ues p euv ent se s to cke r e n s urf ace d es m a t ièr es pla st i que s de l ’an t enn e o u d u bo it ie r ém et te u r, le n e tt oya ge d e ces surf a ce s doi t -êt re e ff ec t ué a vec un chi ff o n hu m id e VERIFIEZ ! La batterie doit être BLEUE 6- Use the radio remote control to control the equipment. To stop the radio remote control : press the XDE transmitter stop palmswitch button. NB : If during this procedure, both XDE transmitter indicator light begin flashing, please contact the technical person in charge of the installation. - 86 - EN FR XD - 330810E revision 02 4.3- Product indicator lights function 4.3.1 XDE transmitter indicator lights électronique A T T E N T IO N Lor s d es nett oy age s , de s c har ges él ectr os t atiques peuv e nt se s toc k e r e n s urf ac e des m atièr es pla stiq ues de l’an te nne ou d u boitie r é m etteu r, le ne ttoy a ge de c es s u rf aces doi t-ê tre effec tué ave c un c hiffon h u m id e VERIFIEZ ! La batterie doit être BLEUE RED indicator light Error messages Transmitter state (The transmitter stop palmswitch is unlocked) Before or after "On/horn" button is pressed Before or after "On/horn" button is pressed Before or after "On/horn" button is pressed Red indicator light Green indicator light GREEN indicator light Possible causes of failure Possible remedies - Battery pack is discharged or disconnected - Internal electronic failure - Check battery pack load or - Contact the technical person in charge of the installation continuously ON - Electronic is not connected to transmitter - Bad connection of the electronic key - Electronic key failure - Internal electronic failure - Install electronic key on tranmitter before powering up the transmitter or - Contact the technical person in charge of the installation flash in a alternative way - Access to the transmitter programming is locked - Press the stop palmswitch button and follow procedure described in §3,5,1 or - Contact the technical person in charge of the installation 3 flashes - The transmitter identity code is different from that contained in the electronic key - Internal electronic failure - Reprogramming is required, see procedure in §3.5.4. or - Contact the technical person in charge of the installation 4 flashes - The button configuration is different from that contained in the electronic and the physical configuration on the transmitter - One or several function buttons are defective - Internal electronic failure - Contact the technical person in charge of the installation 5 flashes - Micro power cuts due to a bad battery pack connection - Internal electronic failure 6 flashes - Internal electronic failure 7 flashes - Internal electronic failure 8 flashes - Internal electronic failure continuously OFF Before "On/horn" button is pressed Before or after "On/horn" button is pressed Before "On/horn" button is pressed Before "On/horn" button is pressed Before "On/horn" button is pressed Before "On/horn" button is pressed - Check that battery pack is correctly inserted in transmitter housing or - Contact the technical person in charge of the installation - Contact the technical person in charge of the installation - Contact the technical person in charge of the installation - Contact the technical person in charge of the installation Battery pack charge level Transmitter state (stop palmswitch button unlocked) Before "On/horn" button is pressed Before "On/horn" button is pressed Before "On/horn" button is pressed After "On/horn" button is pressed After "On/horn" button is pressed Red indicator light Green indicator light Function or corresponding message OFF ON Battery pack charge > 90% Flashes SLOW ON 90% > Battery pack charge > LOW BATT level Flashes FAST ON Battery pack charge < or = LOW BATT level OFF Flashes Flashes FAST Flashes Radio transmission Battery pack charge > LOW BATT level Radio transmission Battery pack charge < or = LOW BATT level «LOW BATT» level = low battery (battery pack charge level lower than 10%), the battery pack must be reloaded. XD - 330810E revision 02 EN FR - 87 - 4.3.2 XDR indicator lights IMPORTANT To avoid any risks of explosion, any diagnostics requiring you to open the receiver housing with the receiver powered up (display of receiver board indicator lights) must mandatorily be performed in a workshop outside the ATEX area. Power supply indicator light (red) Microprocessor n°2 indicator light (green) F2 Microprocessor n°1 indicator light (red) F1 RS2 «RS1 and RS2» safety relays indicator lights (red) RS1 «Horn» relay indicator light (red) RK C B Function relay indicator lights (red) A Name and color of indicator light Microprocessor nb 1 indicator light (RED) Microprocessor nb 2 indicator light (GREEN) "Horn" relay ind.light (RED) Power supply ind.light (RED) Safety relays ind.light (RED) Function relays ind.light (RED) Mode Indication Indicates validity of identity code Normal All Status No message reception OFF Message reception with correct identity code OFF Message reception with wrong identity code Regular flashes No radio message reception OFF Poor radio reception Flashing Indicates radio reception quality Normal All Message Good radio reception ON Not activated (OFF) OFF Indicates "Horn" relay state Indicates receiver power supply state All Indicates safety relays state All Indicates each function relays state activated (ON) ON Receiver switched OFF OFF Receiver switched ON ON Not activated (OFF) OFF activated (ON) ON Not activated (OFF) OFF activated (ON) ON Error messages Micro nb 1 indicator light - RED - Micro nb 2 indicator light - GREEN OFF (Mainboard power supplied but power supply red indicator light remains OFF) 2, 3, 4, 5,6 or 7 flashes - 88 - EN FR Possible causes of failure - Melted fuses - Wrong power supply wiring - Internal electronic failure - Internal electronic failure Possible remedies - Check fuse state and calibre - Check power supply wiring diagram according to receiver model or - Contact the technical person in charge of the installation - Contact the technical person in charge of the installation XD - 330810E revision 02 5- Technical data 5.1- Definition of markings on ATEX products Since July 1st, 2003, all Ex products must satisfy the requirements of the directive ATEX 94/9/CE. The new markings on Ex products are defined as follows (example for XDE transmitter) : = Specific marking relative to protection against explosions II = Device group symbol 1 = Category of devices determining utilization area GD = Type of atmosphere, gas (G) and /or dust (D) Ex = Marking satisfies standards CEN/CENELEC ia = Protection mode IIB = Surface industries (II) and gas subdivision (B) T5 = Temperature class Ex iaD A20 T100°C = Maximum test temperature LCIE 07 ATEX 6008 X = LCIE: Laboratory certifying approval in 2007, No. 6008 The tables below explain the ATEX marking: Device group Device group Electrical devices intended for use in firedamp mines => Protection against firedamp Electrical devices intended for all other explosible atmospheres => Protection against explosions Group I Group II Application ATEX classification Explosive atmosphere Zones Permanent presence 0 1 1 Category of equipment Type of atmosphere 20 Intermittent presence G Episodic presence 21 2 2 D G 22 3 D G D G = Gas ; D = Dust XD - 330810E revision 02 EN FR - 89 - protection modes Gas (standards given for information, currently being modified) Protection mode Standard (General requirements EN 50014 - CEI 60079-0) Applicable in ZONE Basic principle 0 1 2 Enhanced safety "e" EN 50019 CEI 60079-7 The components inside the enclosure must not produce arcs, sparks or dangerous temperatures under normal utilization conditions. The enclosure must be tight to IP 54 and withstand impacts. • • Explosion proof "d" EN 50018 CEI 60079-1 The extremely heavy duty envelope contains the explosion inside the device. The explosion proof seals of the device prevent any propagation of the flame outside the enclosure. The seals are regularly serviced. • • The envelope of the device is in explosion proof protection mode and the enclosure for the connectors is in enhanced safety mode. This allows for using type “e” cable glands alone. • • A pressurized gas is introduced in the enclosure to prevent the possibly-explosive surrounding atmosphere from entering the enclosure 29/06/2007. • • Association of above two modes "d+e" "p" EN 50016 CEI 60079-2 Intrinsic safety "i" The actual design of the circuit, where the energy is limited at the entry by a Zener barrier EN 60079-11 or a galvanic insulator makes it impossible for arcs or electrical sparks to form, subdivided CEI 60079-11 into “ia” (resists 2 defects: suitable for zone 0), and “Ib” (resists 1 defect: suitable for zones 1 and 2). Immersion in oil "o" EN 50015 CEI 60079-6 The material or the electrical circuit is immersed in oil. The explosive mixture is located above the liquid and cannot be ignited by the electrical circuit. • • Powdery filler "q" EN 50017 CEI 60079-5 For this protection mode, all the electronics is encapsulated in an inert powdery material to prevent electrical arcs or electrical sparks. • • Encapsulation "m" EN 50028 For this protection mode, all the electronics is encapsulated in an insulating material CEI 60079-18 to prevent electrical arcs or electrical sparks. • • Zone 2 "n" This protection mode is only suitable for devices intended for zone 2 where the risk EN 50021 of explosion is low. It combines the enhanced safety mode “e” with lower protection CEI 60079-15 requirements. • • EN 50039 Design and use of a product implementing protection by intrinsic safety. CEI 60079-25 • • Internal overpressure “i” system SYST • • • Gases and fumes sub-division (non-exhaustive list) CLASSE IIA CLASSE IIB CLASSE IIC Propane Ethane Butane Benzene Pentane Heptane Acetone Hexane Methanol Ethanol Paint thinners Natural gas Ethylene Ethyl ether Cycloprodene Butadiene 1-3 Propylene oxide Ethyl oxide Acetylene Hydrogen Carbon disulfide Gas temperature classes Temperature class T1 T2 T3 T4 T5 T6 MAXIMUM surface temperature of electrical equipment Ignition temperatures of FLAMMABLE materials 450°C > 450°C 300°C > 300°C 200°C > 200°C 135°C > 135°C 100°C > 100°C 85°C > 85°C The maximum temperature of an equipment must always be less than the ignition temperature of the surrounding atmosphere. - 90 - EN FR XD - 330810E revision 02 5.2- XDE transmitter function button type 6 button types can be used on the XDE transmitter : - One-step pushbuttons (single speed) «BPSV» : - Two-step pushbuttons (double speed) «BPDV» : 1,2 - Rotary switches with 2 fixed positions «COM2» : - 1 R 1 2 Rotary switches with 3 fixed positions «COM3» : R 1 - 2 Rotary switches with 3 positions with automatic return «COM3R» : R 3 - Electronic switches with 3 positions «BPTR» : 2 1 1 1 électronique A T T E N T IO N L o r s d e s ne tto y a g e s, d e s c h a rg e s é l e ctr os ta ti q u e s p e u v e n t se s to c ke r e n s u rf a ce d e s m a t iè r e s pla sti q u e s de l ’a n te n ne o u d u b o i tie r é m e tte u r, l e n e tto ya g e d e ce s s u rf a ce s d o it- ê tr e e ffe ctu é a ve c un ch i ffo n h u m id e VERIFIEZ ! La batterie doit être BLEUE button row nb 5 électronique button row nb 4 A T T E N T IO N L o r s d e s n e tto ya g e s, d e s c h a r g e s él e ctr o s ta tiq u e s p e u ve n t se s toc ke r e n s urf a ce d e s m a t ièr e s p la stiq u e s d e l ’an te n n e o u d u b o i tie r é me tte u r, l e ne tto ya g e de ce s s u rf a ce s d o i t- ê tr e e ffe c tu é a ve c u n chi ffo n h u mid e VERIFIEZ ! La batterie doit être BLEUE button row nb 3 button row nb 2 button row nb 1 The following combinations of button pairs by rows are possible : 2 BPSV, BPSV 1 BPSV, COM3R 1 R 1 1 1 COM2, COM3R 1,2 2 R R . BPDV, BPDV 1,2 1 R COM3, COM3R 1 2 2 1 R R . BPSV, COM2 1 1 2 R COM3R, COM3R 1 2 2 1 R R . BPSV, COM3 1 1 1 R R . COM2, COM2 Cover, cover 1 R R . COM2, COM3 1 R 2 1 1 1 3 1 R 2 BPSV, BPTR 1 2 . COM3, COM3 3 2 COM2, BPTR R . 1 1 2 1 1 ATTENTION : Certain configuration operations will not be available if switches or covers are situated in button row 1 or 2 (see § 3.5). XD - 330810E revision 02 EN FR - 91 - 5.3- Function button interlockings The following function button interlocking configurations are possible: 10 9 7 8 5 * 6 3 * 4 1 * 2 (XDE transmitter front panel view) *= 1st button of interlocked pair 1nd button of interlocked pair Acronym Button nb 1 Button nb 1 Button nb 1 Button nb 2 Button nb 2 Button nb 3 Button nb 3 Button nb 4 Button nb 5 Button nb 7 Button nb 7 Button nb 8 Button nb 9 Button nb 2 Button nb 3 Button nb 4 Button nb 3 Button nb 4 Button nb 4 Button nb 5 Button nb 6 Button nb 6 Button nb 8 Button nb 10 Button nb 9 Button nb 10 B1-B2 B1-B3 B1-B4 B2-B3 B2-B4 B3-B4 B3-B5 B4-B6 B5-B6 B7-B8 B7-B10 B8-B9 B9-B10 * * * Standard interlocking configurations defined in sales reference for XDR receiver (see §2.3.2 «product identification»). For each of the desired interlocking configurations, simultaneous action on the two buttons will result in three operating modes which depend on the programs defined : - program «1» : By pressing the 2 button pair, the two commands are deactivated (corresponding relays set to OFF). - program «2» : The first button of the interlocked pair has priority. (ex.: button nb 1 and button nb 2 interlocked: when these two buttons are pressed simultaneously, only button nb 1 is acknowledged). - program «3» : The 2nd button of the interlocked pair has priority. (ex.: button nb 2 and button nb 4 interlocked: when these two buttons are pressed simultaneously, only button nb 4 is acknowledged). 5.4- Correspondence between «transmitter function buttons and receiver relays» In its standard configuration, the "buttons-relays" are assigned naturally by the increasing order of the button numbers and relay numbers : Each «BPSV» button type is assigned 1 relay. Each «BPDV» button type pair is assigned either 3 relays (2 movement relays and a third relay for high speed), or 4 relays. This information is contained in the XDR receiver product reference data (see § «product identification»). Each «COM2» button type is assigned 1 relay. Each «COM3», «COM3R», or «BPTR» button type is assigned 2 relays with the possibility of having the two relays either OFF or ON when the switch is in the center position. This information is contained in the XDR receiver product data (see § «product identification»).. - 92 - For non-standard "button-relay" configurations, be sure to properly fill in the configuration sheet located in the XDR cover. EN FR XD - 330810E revision 02 5.5- XDE transmitter technical characteristics ATEX characteristics Utilization zones Zones 0, 1, 2, 20, 21 and 22 Protection mode intrinsic safety Markings 0081 II 1 GD Ex ia IIB T5 Ex iaD A20 T100°C LCIE 07 ATEX 6008 X WARNING – POTENTIAL ELECTROSTATIC CHARGE HAZARD – SEE INSTRUCTIONS Mechanical, functional and environmental characteristics Housing Weight (with battery pack) Dimensions ABS Choc, yellow - IP65 - Mechanical button protection Housing model "6+2" buttons : 400 g Housing model "10+2" buttons : 490 g Housing model "6+2" buttons : 232x82x64 mm Housing model "10+2" buttons : 288x82x64 mm -20°C to + 50°C Operating temperature range Storage temperature range without battery pack -30°C to +70°C with battery pack -30°C to +35°C Electrical and radio characteristics Power supply Endurance transmit time/buttons typical average use (at +25°C) Transmit frequency (see list in appendix) Transmit power Modulation Average range (XDR receiver with antenna VUB084) Plug-in Li ion battery Frequency 433-434MHz bands: 24 hours / 50% transmit time Frequency 869MHz band: 20 hours / 50% transmit time 64 user-programmable in 433-434MHz bands 12 user-programmable in 869MHz band <10 mW (license not required) built-in antenna FM 100 m in typical industrial environment 300 m in unobstructed area Functional characteristics Functions 6 different kinds of function buttons : - One-step pushbutton (single speed) "BPSV" - Two-step pushbuttons (double speed) "BPDV" - rotary switch with 2 fixed positions "COM2" - rotary switch with 3 fixed positions "COM3" - rotary switch with 3 positions with auto. return "COM3R" - electronic switch with 3 fixed positions "BPTR" - 1 pushbutton "On/Horn" - 1 active priority emergency stop palmswitch "Dead man" function (automatic shutdown of transmitter) Indicator lights Time is user-programmable 1 red "battery level" and "diagnostic" indicator light 1 green "On" and "diagnostic" indicator light (1) = Range will vary according to environment conditions of transmitter and reception antenna (metal frameworks, walls … ). XD - 330810E revision 02 EN FR - 93 - 5.5.1- Identity code XDE transmitter and XDR receiver are linked by an identity code. A receiver can only recognise and execute commands generated by the associated transmitter (with same identity code). - This receiver identity code is contained in the electronic key. can be copied to a transmitter by a trained and authorized user (see procedure in § 3.5.4) The receiver identity code is a unique, fixed code (it can't be reprogrammed). Identity codes have 65536 different combinations. 5.5.2- Electronic key The electronic key used on the XD radio remote control system has a dual function : - It enables start-up of the transmitter by limiting access to the remote control to trained and authorized persons only. - It contains all the information required for operation of the product, including : - the system identity code - the last frequency programmed * - the "dead man" function duration * * = reprogrammable by a trained operator, see §3.5 When the key is removed, it prevents unauthorized use of the transmitter. For this reason, it should be removed (like the battery pack) when the remote control is put away. Preferably, the electronic key should be removed after pressing the stop palmswitch button. Removal of the key before the stop palmswitch button button is pressed will result in a fault indication (2 flashes) and passive shutdown of the receiver. The transmitter cannot be started up without its electronic key. The transmitter XDE also has an internal memory containing an identity code. - If identity code of the electronic key matches the identity code stored in the XDE, the transmitter can be started up. - If the identity code of the electronic key and that of the XDE do not match, the transmitter indicates the problem by its two indicator lights (3 flashes). In this case, perform the programming procedure described in §3.5.4. électronique A T T E N T IO N Lor s de s nett oy age s , de s c har ge s élec tr os ta tiques peuv ent se s toc k e r e n s u rf ace de s m at ièr es pla stiq ues d e l’a nt enne ou d u bo itie r é m etteu r, l e ne ttoy a ge d e ces s urf ac es doit- êtr e effec t ué ave c un c hiffon h um ide XDE can be started up provided : Transmitter identity code = Electronic key identity code VERIFIEZ ! La batterie doit être BLEUE Identity code contained in transmitter XDE Identity code contained in electronic key In the event of a transmitter failure : You can recover the electronic key and connect it on a maintenance transmitter (button configuration should be the same as that as the failed transmitter, in the other case, buttons that are different will be ineffective). To perform this operation, you must reprogram the key identity code in the new transmitter XDE as described in the procedure in §3.5.4. - 94 - EN FR XD - 330810E revision 02 if your electronic key is lost : You can order another electronic key (reference UDWE22X) making sure to specify the following information on the order : - The unique 6-digit number of the old key (written on the cover page of this manual when you unpackaged your product). or, if you do not have N° of key : - the associated receiver identity code (on receiver descriptive lable) and transmitter button configuration This information will allow you to receive an electronic key identical to the old one containing all the parameters indicated above for your radio remote control. 5.5.3- «Dead man» function The "Dead man" safety function deactivates the XDE transmitter (radio transmission cut off) when the pushbuttons (BPSV, BPDV or "On/Horn") have not been actuated for a duration of N minutes or seconds. The N parameter is user-configurable and can take the values 01 to 98 minutes On delivery, the duration is defined for 4 minutes. - If the N value configured is 99 minutes, the transmitter considers that the dead man duration is infinite (until the battery pack is entirely discharged). Restarting the transmitter after the "Dead man" function has been activated: - Press the stop palmswitch button on the transmitter. - Follow startup procedure in §4.2 Changing the dead man duration : The dead man duration or unit N can be modified by a trained operator by performing the procedure described in § 3.5.3. NB : Rotary switches COM2, COM3, COM3R and BPTR do not act on the "Dead man" function The manipulation of these types of buttons does not rearm the temporization). If the operator has to use switches during a long period, the temporization must be lengthened or removed by programming, either the operator will have to rearm the temporization by pressing regularly on the "On/Horn" button or another pushbutton type. XD - 330810E revision 02 EN FR - 95 - 5.6- XDR receiver technical characteristics ATEX characteristics Utilization zones Protection mode Zones 1, 2, 21 and 22 Markings 0081 II 2 GD Ex dia IIB T6 Ex tD A21 T80°C LCIE 07 ATEX 6034 X Explosion proof + intrinsic safety WARNING – DO NOT OPEN WHEN ENERGIZED WARNING – DO NOT OPEN WHEN AN EXPLOSIVE ATMOSPHERE MAY BE PRESENT Mechanical and environment withstand characteristics Housing Weight Dimensions Operating temperature range Storage temperature range Cable lead-out Connection Aluminium alloy – grey RAL7005 - IP65 20 kg (approx.) 280x370x180 mm (not including antenna) -20°C to +50°C -30°C to +70°C 1 PE ¾” metal, with 3 seals 15-18, 18-21 and 21-24 mm Spring-type terminal strips for 0.08² to 2.5² section wires Radio characteristics Characteristics complying with ETS 300 220 64 programmable frequencies in 433-434 MHz bands 12 programmable frequencies in 869 MHz band < -100dBm Reception frequency (see list in appendix) Sensitivity Electrical characteristics Power supply and consumption DC version (1) 12VDC, 0 to +25%, 675mA and 188mA when idle (with 2 safety relays and 10 control 24VDC, -15% to +20%, 675mA and 188mA when idle relays pulled in) AC version n°1 24VAC, -15% to +10%, 850mA 48VAC, -15% to +10%, 400mA AC version n°2 115VAC, -15% to +10%, 180mA 230VAC, -15% to +10%, 85mA 1 "Horn" relay + 18 function relays Control 2 relays with linked and guided contacts Safety On start-up : 0,5s max. Response time On control : 55 ms max. 145 ms max. Active shutdown time 1,1 s max. Passive shutdown time Power supply shutdown time < 2 seconds 1 red "power on" indicator light Indicator lights 1 red + 1 green indicator lights for diagnostic 1 red status indicator light per relay Power supply: Against polarity inversions for DC versions Against overcurrents by fuse Protections (1) = The number of function relays controlled simultaneously is limited to 10 relays - 96 - EN FR XD - 330810E revision 02 A large label in the housing cover gives the following information to facilitate configuration and maintenance of the XD system : - connection point numbers - wiring indication - fuse characteristics - indicator light functions - table showing the "Buttons/Relays/Functions" configurations for the application and the interlocking configuration. 5.6.1- Connection to relays Connections are made on spring terminals with connection points identified by numbers. The flexible wire section is between 0.08 mm square and 2.5 mm square. No common line is provided on the printed circuits (all contacts are potential-free). An accessory, referenced : UDWR12 with 16 connection points provides for easy connection of the common lines desired (supplied as a standard feature with the receiver). 5.6.2- Relay characteristics Summary table Relay function Number of relays Number of connection points per relay Safety relays 2 2 (1 T contact) "On / Horn" 1 2 (1 T contact) Control / Movement 18 2 (1 T contact) Safety relays The two safety relays are activated when XDE transmitter «On/Horn» button is pressed. . These relays are auto-maintained until passive stop (electronic key removed when transmitter is in functioning, or battery pack discharged/disconnected from transmitter, or radio interferences) or active stop (when transmitter stop palmswitch is pressed). • • • • • • • • Contacts : AgNi10+Au5μm Maximum power at cosphi=1 : 2000 VA Maximum current switching : 8 A Maximum voltage switching : 250 VAC Minimum current / voltage advised switching : 50 mA / 12 VDC 100 000 switching cycles at 250 VAC, 8 A, cosphi=1 100 000 switching cycles at 24 VDC, 6 A Tests per EN 60947-5-1 : DC13 at 2 A / 24 VDC AC15 at 3 A / 250VAC XD - 330810E revision 02 EN FR - 97 - «Horn» and control relays The «Horn» relay is activated when XDE transmitter «On/Horn» button is pressed. This relay isn’t auto-maintained. «Control» relays are active when transmitter function buttons are pressed and once XD system started up. • • • • • • • • Contacts : AgNi 0,15 Maximum power at cosphi=1 : 2000 VA Maximum current switching : 8 A Maximum voltage switching : 400 VAC Minimum current / voltage advised switching : 50 mA / 12 VDC 100 000 switching cycles at 250 VAC, 8 A, cosphi=1 50 000 switching cycles at 24 VDC, 8 A Tests per EN 60947-5-1 : DC13 at 0,5 A / 24 VDC AC15 at 3 A / 250VAC Number of switching cycles on various contactors Number of switching cycles Contactor type CA2DN LC1D09 LC1D18 LC2D09 - 98 - EN Physical unit switched by relay Safety relays "Horn" and "control" relay Switching under 230VAC (70VA,cosphi=0,75) 4,5 x 10 6 2 x 10 6 Switching under 110VAC, (70VA,cosphi=0,75) 4,5 x 10 6 1 x 10 6 Switching under 48VAC (70VA,cosphi=0,75) 4,5 x 10 6 0,5 x 10 FR 6 XD - 330810E revision 02 5.6.3- Protection of receiver board and relays Protection of power supplies - AC versions : • Against overcurrents : 1 fuse on phase. • Non-reversible thermal protection of transformer (in the event of overloads at secondary). - DC version : • Against overcurrents : 1 fuse on +V. • Against polarity inversions : 1 diode on +V. RK A B C F2 F1 F1 RS1 RS2 Fuse characteristics F2 Element Fuse characteristics (5x20) Receiver supplied with 12 VDC* 1 A / 250 VAC / T Receiver supplied with 24 VDC* 1 A / 250 VAC / T Receiver supplied with 24 VAC* 1,6 A / 250 VAC / T Receiver supplied with 48 VAC* 800 mA / 250 VAC / T Receiver supplied with 115 VAC* 315 mA / 250 VAC / T Receiver supplied with 230 VAC* 160 mA / 250 VAC / T Safety relays No protection "Horn" relay No protection "Control" relays No protection Loaction of fuse to be used F2 F1 F2 F1 F2 F1 / / / * = Power supply according with XDR receiver model (see receiver reference) XD - 330810E revision 02 EN FR - 99 - 5.7- Technical characteristics of XDB blue plug-in battery pack WARNING - The battery pack must only be charged outside the ATEX area. - Only blue battery packs should be used. Mechanical, functional and environmental characteristics Housing ABS Choc Housing color Blue Tightness IP40 Technology Li ion Dimensions 40x96x23 mm Storage temperature range -30°C to +35°C Slow charge temperature 0°C to +45°C Fast charge temperature 0°C to +35°C 7 hours Complete charge time Resulting endurance in accordance with partial charges (at +20°C) 10 min. of charging provide around 1 hour of endurance (utilization at 100%) 1 hour of charging provides around 8 hours of endurance (utilization at 100%) 6 hours of charging provide around 12 hours of endurance (utilization at 100%) Indicator lights - 1 indicator light on battery pack (charging) Orange = fast charge Green = slow and holding charge - 1 red indicator light on transmitter (battery low) 5 VDC (by charger UCCU) Charge voltage 5.7.1- Battery pack storage precaution XDB battery pack must be stored charged in a proper and dry area with specified temperature range on above table. 5.7.2- Precaution when inserting battery pack in transmitter unit Whenever changing the battery pack XDB, check that it is properly secured in its housing in the back of the transmitter XDE. Insertion of battery pack in the back of transmitter If not, a type 5 fault caused by power supply microcutouts can occur (following fault list generated by the transmitter) - 100 - EN FR XD - 330810E revision 02 5.7.3- Display of battery pack charge state Charging the XDB battery pack WARNING The battery pack must only be charged outside the ATEX area. Charger UCCU 100-240VAC / 5VDC Battery pack red indicator light (power supplied, the battery pack is on charge) Battery pack XDB During the charging period, the battery pack indicator comes on steady and shows the charging status: : Indicator light is orange : ..................... fast charging Indicator light is green : ....................... slow charging and maintenance charging (charging level of battery pack XDB > or = 60%) Only charger ref: UCCU from Jay Electronique are perfectly suited to charge the battery pack XDB. XDE transmitter red indicator light électronique A T TE N TIO N Lo rs des n ettoy a ge s, d es c ha rg es élec tro s tatiq ues pe uv ent s e s to c ke r e n s urf ace des m at ièr es pla s tiques de l’an tenn e o u d u boit ie r é m et teu r, le n et toya ge de ce s s urf ac es d oit- êtr e effe c tué av ec u n chiffo n h um id e VERIFIEZ ! La batterie doit être BLEUE Red indicator light Two battery charge status display functions are provided on the transmitter : • When the remote control is powered up (stop palmswitch button out), the red indicator light on the transmitter XDE shows the battery pack charge level : Red indicator light off : ...................... Battery pack charge > à 90% Red indicator light flashes slowly : ... Battery pack charge is between 90% and 10 % Red indicator light flashes quickly : .. The battery pack must absolutely be charged (battery pack charge level < 10%) • During operation of the remote control (radio transmission), a LOW BATT indication (battery low level, charge < 10%) is given by the red indicator light which flashes quickly. This indication is used to inform the operator that the remote control will soon be unavailable (within around 15 minutes). XD - 330810E revision 02 EN FR - 101 - 6- Servicing BEFORE STARTING ANY SERVICING OPERATION, SWITCH OFF THE MAIN POWER SUPPLY FOR THE SYSTEM CONTROLLED. ELECTROSTATIC CHARGES During cleaning operations (transmitter and receiver), electrostatic charges can accumulate on the surface of the plastic materials of the receiver antenna or of the transmitter housing; these surfaces must be cleaned using a moist rag. Servicing the XDE transmitter : - Housing of the XDE transmitter must not be opened. The transmitter can be dismanteld only be a trained staff, in a "controlled" environment, spare parts can be changed only by identical and original parts. - If one of the membranes of the function buttons or the seal of the transmitter is damaged, the XDE must not be any more used until replacement of these tightness spare parts. In opposite case, any liquid, any dust or any foreign body can damage the transmitter. - The attention of the user is attracted to the risks of the use of the remote control in an environment containing solvents of polymers or glues which can degrade the good functioning of transmiiter mechanical organs. - Verify regularly the good state of the transmitter, paying a special attention to the function button membranes, to the electronic key connector and to the battery pack connector. - Clean the transmitter by eliminating any foreign matter. Only use non aggressive cleaning product on base of soapy solution. Servicing the XDR receiver : IMPORTANT During any intervention requiring the opening of the receiver housing, you have to take the necessary precautions in order not to degrade the surface state of the 2 jointng planes of the cover seal. IMPORTANT Following any intervention requiring opening of the receiver housing, be sure to apply a layer of silicon grease (supplied with XDR receiver) to the jointing plane of the cover seal. IMPORTANT Respect the recommendations of the document : «Safety Notes - ATEX Housing» reference : 332200 - 102 - EN FR XD - 330810E revision 02 Check the following points: - Wiring of receiver to electrical unit on machine. Control relay contacts. Correct operation of stop circuits, active and passive. Condition of cover seal, tightening of screws and cable glands and tightness of antenna, check the antenna connection and check that it is clean and free of any oxidation. - Clean the receiver by eliminating any foreign matter. Only use non aggressive cleaning product on base of soapy solution. - To check operation of the active stop function (XD system started up) : simply press the XDE transmitter stop palmswitch button. Receiver safety relays should immediately deenergise. - To check operation of the passive stop function (XD system started up) : simply remove the electronic key or battery pack from the transmitter or wait until «Dead man» function duration is exceeded ; receiver safety relays should de-energise within 2 seconds. 7- Warranty All our devices are guarantied 2 years as of the date of manufacture indicated on the product, wear parts not included. No repair, modifi cation or replacement of a product during the warranty period can be understood as an extension of the warranty period Limits of warranty : The warranty does not cover defects resulting from : • transport • false manoeuver or non-observance of connection diagrams when setting the equipment into service • insufficient supervision or servicing, utilization not complying with the specifications detailed in the technical manual and, as a general rule, storage, operation or environment conditions (atmospheric, chemical, electrical or other conditions). • Conditions not specified on order of the equipment The warranty shall not apply subsequent to any modifications or additions to the equipment performed by the customer without written approval by JAY Electronique. The JAY Electronique responsability during the warranty period is limited to material and construction defects. This warranty comprises repair in the JAY workshops or replacement, free of charge, of parts recognized to be defective following expert inspection by the Jay Technical Department. The warranty shall not give rise to any compensation for damage claims. Any disputes relative to a supply or settlement thereof shall be ruled by the COURT OF COMMERCE OF GRENOBLE, solely competent, even in the event of an Appeal or a plurality of defendants. XD - 330810E revision 02 EN FR - 103 - Appendix A Receiver XDR V4 A B F2 V2 F1 V1 RS2 V5 C RS1 RK V3 C D B F A E G A- «Power supply» terminal strips XDR receiver terminal strips B- «Safety relay n°2» (RS2) terminals strips Terminal number Function C- «Safety relay n°1» (RS1) terminals strips 3 x 1 to 12 Function relay boards (A, B, C) D- «Power supply and command» cable gland E- «Horn» (RK) relay terminals strips 21 Power Supply* : Neutral / 0 v F- Summary table of the buttons-relays correspondence Power Supply*: 22 G- Relay board(s) (up to 3 relay boards with 6 relays) 230VAC or 48VAC or 24VDC V1- red indicator light "wrong identity code + diagnostic" Power Supply* : V2- green indicator light "radio link established + 23 115VAC or 24VAC or 12VDC diagnostic" V3- «Horn» (RK) relay red indicator light 24 - 25 Safety relay nb 1 (RS1) V4- «receiver power supply» red indicator light 26 - 27 Safety relay nb 2 (RS2) V5- «Safety relays 1 and 2» (RS1 and RS2) red indic. 28 - 29 "Horn" relay (RK) light * = according to receiver model F1-Fuse F2-Fuse - 104 - EN FR XD - 330810E revision 02 Appendix B Transmitter XDE électronique A T T E N T IO N Lor s des ne tto y ag e s, de s c ha rg es éle ctr os t atiq ue s p euv en t se s t oc ke r e n s u rf ace d es m a t iè re s p la sti que s d e l ’a n ten ne ou d u bo itie r é m ette u r, le ne tt oya ge de ce s s u rf a ces do it- êtr e e ffe c tu é avec un ch iffo n h u m id e VERIFIEZ ! La batterie doit être BLEUE A n°9 n°10 B n°7 n°8 i électronique A T T E N T IO N Lo rs de s n etto y a ge s, d e s c ha rg es él ectr os tati que s p eu v en t se s toc ke r e n s urf ace des m at iè re s p la st iqu es de l’an ten ne o u d u bo itie r é m ett eu r, l e n e t toya ge de ce s s urf ace s do it- êtr e effe c tu é ave c u n chiff on h u m id e VERIFIEZ ! La batterie doit être BLEUE C n°5 n°6 D n°3 n°4 J n°5 n°6 n°3 n°4 O E n°1 n°2 K n°1 n°2 F G L M N H «10+2» buttons housing model «6+2» buttons housing model A- Button row nb 5 B- Button row nb 4 C- Button row nb 3 D- Button row nb 2 E- Button row nb 1 F- Red indicator light «battery charge level + diagnostic» G- «On/Horn» green button H- Ring for shoulder strap or carrying clip i- Function label J- Function button K- Green indicator light «ON + diagnostic» L- Electronic key M - Electronic key location N- Stop palmswitch button O- XDB battery pack inserted in transmitter back XD - 330810E revision 02 EN FR - 105 - Appendix C Dimensions Transmitter XDE Housing models : 10+2 and 6+2 buttons 64 mm 82 mm électronique A T TE N T IO N L o r s d es n e tto y a ge s, d e s c h ar g es é l ec tr o s ta tiq u es p e uv en t se s toc ke r e n s u rf ace de s m at ièr e s p la sti qu e s de l ’a n te nn e ou d u bo i tie r é m etteu r, l e ne ttoya g e d e c es s u rf a ce s d oi t- êtr e e ffec tu é av ec u n chi ffon h u m id e VERIFIEZ ! La batterie doit être BLEUE électronique A T T E N T IO N L or s de s n ettoy a ge s, de s c ha r g es é le ctr o s ta ti q ue s p eu v e n t s e s to c k e r e n s urf a ce d e s m a t iè r e s pla sti qu es de l’an te nn e o u d u bo i tie r é m e tteu r, l e n e tto ya g e de ce s s urf a ce s do i t- êtr e e ffe c tu é a ve c u n c hi ffon h u m id e VERIFIEZ ! La batterie doit être BLEUE 232 mm 288 mm Receiver XDR 103,5 mm 14 x CHC 8x25 mm 185 mm 73,5 mm 4 x Ø 10 mm 375 mm 282 mm 105 mm 270 mm - 106 - EN FR 173 mm 250 mm XD - 330810E revision 02 Antennas VUB••• Battery pack XDB 23 mm 40 mm 210 mm 96 mm 335 mm VUB084 1/4 ~ VUB086 1/2 ~ WARNING The blue battery pack XDB must only be charged outside the ATEX zone. Charger UCCU 40 mm 60 mm 100-240 VAC / 5VDC with Euro and UK plugs 28 mm ~ 1,80 m Wall support UDC1 To charger UCCU 127 mm 22 mm 41 mm 56 mm Battery pack XDB électronique Ø4 mm Transmitter XDE 200 mm mini XD - 330810E revision 02 EN FR - 107 - XDR (*) pow. F0 supply + 23 22 U1 F1 RS1 STOP (**) K2 27 26 (**) * K1 25 24 RS2 On/Horn UA NA FA K2 K2 LA K1 K1 (**) ** 29 28 RK Second speed or notch n°2 First speed or notch n°1 NEUTRAL Button postion Button number RA1 1A 2A 3A 4A 5A 6A RA3 nb 2 RA2 nb 1 7A 8A RA4 9A 10A UB NB LB 11A 12A FB K2 K1 RA6 nb 4 RA5 nb 3 RB1 1B 2B 3B 4B 5B 6B RB3 nb 6 RB2 nb 5 7B 8B (**)= Elements wich indicate start of remote controlled machines (ex: horn, rotating / flashing light etc...) ** (**)= K1 and K2 contactors must have guided contacts * (**)=Relay life is increased by the use of surge limiters (ex: RC network for AC, Zener + diodes for DC etc...) UC NC LC FC K2 K1 RB6 11B 12B 2 1 1+2 nb 8 RB5 9B 10B 1 nb 7 RB4 (*)= The power supply connection depends on the type of receiver and the power supply required. (terminals 23 - 21 for power supplies 12VDC, 24VAC, 115VAC or 22 - 21 for power supplies 24VDC, 48VAC, 230VAC) N1 L1 External driven loads U0 21 Connection terminals number on XDR receiver XDR receiver relays XDE transmitter buttons action on the XDR receiver relays External wiring example X D R X D E XDE transmitter buttons Mainboard FR Relay board A EN Relay board B - 108 1 . 1C 2C 3C 4C RC2 1 2 1+2 5C 6C RC3 nb 9 nb 10 RC1 Relay board C XDE022246 transmitter 11C 12C RC6 Appendix D Wiring example, transmitter XDR•C•00 - •11 with receiver XDE•22246 Warning and precautions relative to wiring in § 2.5.3. XD - 330810E revision 02 Appendix E If several radio controls are used at the same site, different radio frequencies should be used, spaced by at least two channels (for example, channels 5, 7, 9, etc.). List of programmable radio channels : (Adjacent channel intervals of 0,025MHz) 433-434 MHz 869MHz Canal Fréquence Canal Fréquence Canal Fréquence Canal Fréquence Channel Kanal Frequency Frequenz Channel Kanal Frequency Frequenz Channel Kanal Frequency Frequenz Channel Kanal Frequency Frequenz 01 02 03 04 05 06 07 08 09 10 11 12 13 14 15 16 17 18 19 20 21 22 MHz 433,100 433,125 433,150 433,175 433,200 433,225 433,250 433,275 433,300 433,325 433,350 433,375 433,400 433,425 433,450 433,475 433,500 433,525 433,550 433,575 433,600 433,625 23 24 25 26 27 28 29 30 31 32 33 34 35 36 37 38 39 40 41 42 43 44 MHz 433,650 433,675 433,700 433,725 433,750 433,775 433,800 433,825 433,850 433,875 433,900 433,925 433,950 433,975 434,000 434,025 434,050 434,075 434,100 434,125 434,150 434,175 45 46 47 48 49 50 51 52 53 54 55 56 57 58 59 60 61 62 63 64 MHz 434,200 434,225 434,250 434,275 434,300 434,325 434,350 434,375 434,400 434,425 434,450 434,475 434,500 434,525 434,550 434,575 434,600 434,625 434,650 434,675 01 02 03 04 05 06 07 08 09 10 11 12 MHz 869,9875 869,9625 869,9375 869,9125 869,8875 869,8625 869,8375 869,8125 869,7875 869,7625 869,7375 869,7125 (1) (1) (1) (1) (1) (2) (1) (2) (2) (1) (2) (2) (1) (2) (2) (1) (2) (2) (1) (2) (2) (2) (2) (2) (2) (2) (2) (2) (2) (2) (2) (2) (2) (2) (2) (2) (2) (2) (2) (2) (2) (2) (2) (2) (2) (2) (1) Frequencies available for Denmark (2) Frequencies available for Singapore XD - 330810E revision 02 EN FR - 109 - Appendix F CE Declaration of conformity (Available also in downloadable version and in other languages on our web site : www.jay-electronique.fr) - 110 - EN FR XD - 330810E revision 02 Améliorons ensemble ce manuel d’installation et d’utilisation ! We can improve this manual with your assistance ! Helfen Sie uns bei der Verbesserung des Installations- und Benutzerhandbuchs ! Informations personnelles / Personal information / Persönliche Angaben: Nom Name Name Société Company Gesellschaft Adresse Address Adresse Ville City Stadt Code postale Post code Postleitzahl Tel Fax E.mail : Page/Seite : ___ Page/Seite : ___ Page/Seite : ___ Page/Seite : ___ Page/Seite : ___ •Merci de nous faire parvenir cette page par courrier ou par fax à l’adresse suivante: •Please send us this form completed either by post or by fax at: •Bitte schicken Sie uns diese Seite per Fax oder per Post an folgende Adresse: JAY Electronique Service documentation - Eric DECHAME ZAC la Bâtie, rue Champrond F38334 SAINT ISMIER cedex Fax : +33.(0)4.76.41.44.44 «MERCI ! / THANKS ! / DANKE !» XD - 330810E revision 02 - 111 - Realisation JAY 330810E-revision02-FR-EN.PMD 07.10.2010 E.D. électronique ZAC la Bâtie, rue Champrond F38334 SAINT ISMIER cedex +33 (0)4 76 41 44 00 - +33 (0)4 76 41 44 44 www.jay-electronique.fr