1
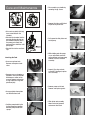
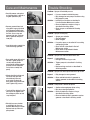
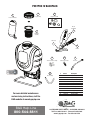
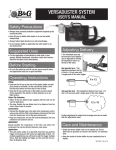
PestPro IV Backpack
USER’S MANUAL
Safety Precautions
• Read owner’s manual completely before
operating this sprayer.
• Always use goggles, gloves, and protective clothing when using sprayer.
• Read and follow all instructions and
cautions on label of products used in
this sprayer.
• Never use flammable liquids, caustics,
acids, or hot water in this tank.
• Do not leave sprayer in the sun when
not in use.
• Always inspect hose and all hose
connections before each use. A damaged hose, or loose hose connection
can result in unintended exposure to
the pressurized chemical, resulting in
serious injury or property damage.
• Do not lift or carry sprayer by the hose,
shut-off valve, or wand extension.
Carry by the handle only.
• Do not pressurize with any mechanical device such as an air
compressor, since this can create a dangerous pressure
level and bursting of parts resulting in serious injury. Only
use original pump.
• Do not store chemicals in this tank.
• Always release pressure when sprayer is not in use and
before performing any maintenance.
• Clean and rinse sprayer thoroughly after each use.
• Never attempt to alter sprayer from original condition.
• Always use replacement parts from original manufacturer.
Operating Instructions
Filling and Spraying
• Always refer to chemical manufacturer for proper mixture.
• Remove the cap from the tank.
• Make sure the filter basket is in place in the neck of the
tank. The filter basket
includes the seal and
must be in place to
prevent leaks.
• Fill the tank with cool
water and chemical to
the desired level.
• Reinstall the cap.
• To begin pressurizing, be sure shut-off lever is not
depressed. Pump handle up and down in a smooth motion.
Operating pressure is reached when pumping becomes difficult, which is no more than
5-7 full pumps. (Do not over-pressurize)
• Direct nozzle away from you and squeeze
shut-off lever to begin spraying.
• To maintain pressure while spraying,
operate pump handle every 8 sec. or
as needed.
Cleaning
• Fill the tank with cool, clean tap water.
Replace the cap and tighten securely.
(Never use hot water for cleaning)
• Agitate the tank to rinse the chemical
from the tank walls.
• Remove the cap and empty the contents
into gravel or bare soil.
• Refill the tank with clean tap water. Replace
the cap and tighten securely.
• Pressurize the tank as described above.
• Direct the nozzle away from you and activate the shut-off for
at least 30 seconds to clean the pressure chamber, hose and
shut-off.
• Remove the cap and empty the contents into gravel or bare
soil.
• Repeat steps 4 - 7 until thoroughly cleaned. Remove nozzle
when flushing pump system. Clean nozzle before replacing.
Care and Maintenance
Nozzle Maintenance
• If nozzle clogs, remove and disassemble the nozzle
assembly.
• Clean the openings of any
obstructions and reassemble.
Pressure Chamber Maintenance
WARNING: Always depressurize
sprayer before cleaning or replacing
pressure chamber by activating
shut-off and spraying out all
pressure.
• Remove the tank cap and strainer.
• Reach into the tank and turn the
chamber 1/4 turn counterclockwise
to unlock the chamber from the
pump then remove chamber from
tank.
95138237 Rev 3/14
Care and Maintenance
• Disassemble carry handle by
removing the (6) screws.
• Remove hitch pin and lift pivot
clip off of the piston rod.
Unlock Chamber
• Rinse out any debris that may
have accumulated in the
chamber.
• Reinstall the chamber into the
pump by aligning the tabs on
the chamber with the slots in
the pump, push firmly into
pump and turn clockwise until
pump stops.
• Reinstall the strainer and tank
cap.
Servicing the Tank
• Unscrew cap from tank.
Remove and replace check
valve.
• Remove pressure chamber as
outlined in Pressure Chamber
Maintenance section of the
manual. Remove and replace
o-ring. Lubricate o-ring with
petroleum jelly.
Remove Chamber
• Pull upward to slide piston rod
out of pump.
• While holding onto the pump,
use an adjustable wrench to
unthread pump nut from pump.
Remove nut, hose and barb
assembly.
• Inspect (2) o-rings on barb
assembly. If damaged, replace
hose assembly.
• Remove pump out of tank.
Remove and replace gasket.
• Unsnap agitator from piston
rod. Remove from tank.
• Position pump handle to the
furthest downward position.
Remove pump handle from
sprayer.
• Slide piston rod assembly
down and out of grommet
and remove from tank.
Care and Maintenance
Trouble Shooting
Problem: Sprayer will not build pressure
• Carefully remove and replace
o-ring from piston. Lubricate oring with petroleum jelly.
• Remove grommet from tank
using pliers to grasp the head
of the grommet while flexing
the grommet out of the hole in
the tank. Press or tap new
grommet into tank. Lubricate
hole in grommet with petroleum jelly.
• Insert piston rod assembly into
tank and through grommet.
Inspect:
• Pressure chamber installed into pump
• Dirty, damaged or worn pump or chamber o-ring
• Dirty poppet in pump
Solution: • Install pressure chamber as described in
Pressure Chamber Maintenance section
• Clean and lubricate or replace o-rings as
described in Servicing section
• Clean sprayer as described in Cleaning
section
Problem: Sprayer will not spray
Inspect:
• Sprayer pressurization
• Shut-off clogged
• Nozzle clogged
Solution: • Pressurize sprayer as described in Pressurizing
and Spraying section
• Clean shut-off as described in Shut-off
Maintenance section
• Clean nozzle as described in Nozzle
Maintenance section
Problem: Sprayer leaks from the bottom of the tank
• Reassemble pump with gasket
into tank. Tighten pump nut
securely with adjustable
wrench while holding pump to
maintain correct orientation.
Push piston assembly into
pump.
Inspect:
• Loose pump nut
• Damaged or worn o-rings or seals
Solution: • Tighten pump nut as described in Servicing
section
• Replace o-rings and seals as described in
Servicing section
Problem: Sprayer leaks where piston rod enters top of tank
• Attach pivot clip to piston rod
and insert hitch pin. Note
orientation of piston rod
must match the pivot clip.
Reassemble carry handle onto
tank. Tighten all (6) screws.
Inspect:
Solution: • Clean and lubricate hole in grommet or
replace grommet as described in Servicing
section
Problem: Pump handle is difficult to operate
Inspect:
• To reinstall the agitator, line the
notch up on the agitator with
the swedge on piston rod and
snap into place.
• Reinstall pressure chamber
as outlined in the Pressure
Chamber Maintenance section.
Replace tank cap, filter and
pump handle.
• Dirty, damaged, or worn grommet
• Swollen or damaged pump piston o-ring
• Dirty, dry or damaged grommet
Solution: • Clean and lubricate or replace o-ring as
described in Servicing section
• Clean and lubricate hole in grommet or replace
grommet as described in Servicing section
PESTPRO IV BACKPACK
1
2
4
Cap Assembly
Backpack Seal Kit
Reservoir Chamber
XR Gun
Rebuild Kit
5
3
Tank Filter
Assembly
Valve Body
7
6
Handle
9
10
8
4 Way Spray Tip Assembly
Strainer/Check Valve
Extension
11
Hose Assembly
For more detailed maintenance
and servicing instructions, visit the
B&G website at www.bgequip.com
B&G Help Line
800-544-8811
#
1
2
3
4
5
6
7
8
9
10
11
Order #
12014261
12014262
12014263
12014264
22037510
22037503
22037501
22045600
22049451
22032551
33000309
Description
Reservoir Chamber
Cap Assembly
Tank Filter Assembly
Backpack Seal Kit
XR Gun Rebuild Kit
Handle
Valve Body
Extension
4 way spray tip assembly
Strainer/Check Valve
Hose Assembly
135 REGION SOUTH DRIVE • JACKSON, GA 30233
Toll Free 800-544-8811 • Phone 678-688-5601
www.bgequip.com • Fax 678-688-5633