1
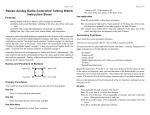
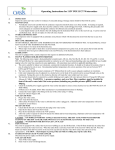
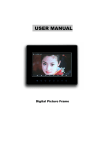
PORTABLE CD SYSTEM
CARE & MAINTENANCE
GENERAL GUIDELINES
• Do not touch the laser lens on the CD player.
• Temperature changes can cause condensation to form on the laser
lens. If condensation forms on the lens, leave the disc compartment
door open (without disc) for an hour to remove condensation.
• Exposure to direct sunlight or extreme heat (such as inside a car
parked in the sun) can cause damage or malfunction.
• To prevent dust from reaching internal parts, keep the compartment
door closed when not using (except when necessary to remove
condensation).
HANDLING THE COMPACT DISC
It's important that you periodically clean the laser lens:
1. Turn off the unit's power and disconnect the AC
power.
2. Open the CD door and remove the disc.
3. Clean the lens with a soft cloth or use an air blower
brush designed for cameras.
4. If you still are not able to remove dirt particles,
moisten a cotton swab with isopropyl alcohol and
gently apply to the face of the laser lens, rubbing
gently until all traces of dirt are removed.
Laser lens
Although the music tracks in the disc are covered with
a protective layer, it is still advisable to treat the disc
carefully. Always pick up discs by the edge and put
them back in their holders immediately after use.
CLEANING THE UNIT
Do not use volatile chemicals on this unit. Clean by lightly wiping with a
soft cloth.
IMPORTANT NOTICES:
• Should the CD door be opened before the reading of the CD is
completed, a jamming noise may occur. This can be resolved by closing
the CD door and then sliding the FUNCTION switch temporarily to
OFF.
• If an abnormal display indication or an operating problem occurs,
disconnect the AC power cord and remove the batteries. Wait at least
5 seconds, then reconnect the AC power cord or reinstall the batteries.
TROUBLE SHOOTING TIPS
CD
Solutions
Problems
System does not turn on • Make sure AC power plug is secure in
the outlet and inlet has power.
Disc in place but unit
• Batteries may be dead. Install new
won't play
batteries.
• Make sure the FUNCTION switch is set
to CD position.
• Make sure disc is clean and undamaged.
• Make sure printed side of disc is facing
up.
• Make sure PAUSE mode is not activated.
• Make sure the unit is on a secure spot.
Vibration or jarring can cause the disc to
skip.
RADIO
Problems
Poor FM reception
Solutions
• Electrical interference in your home can
cause poor reception. Move the unit away
from them (especially those with motors
and transformers).
Poor AM(MW) reception • Reposition or turn the unit for better
reception.
SPECIFICATIONS
GENERAL
Power consumption: 14 W
Power source:
AC 120V~60 Hz (USA and Canada)
AC 220V ~50Hz (China)
AC 220V ~60Hz (Korea)
AC 230V~50 Hz (Europe and Hong Kong)
AC 240V~50 Hz (Australia)
AC 110-120V/220-240V~50/60Hz (Others)
DC 9V (6 x "C" size or UM-2 batteries)
Specifications subject to change without notice.
OPERATING INSTRUCTION
The lightning flash
and arrowhead within
the triangle is a
warning sign alerting
you of "dangerous
voltage" inside the
product.
WARNING: TO REDUCE THE
RISK OF ELECTRIC SHOCK, DO
NOT REMOVE COVER (OR
BACK) NO USER-SERVICEABLE
PARTS
INSIDE.
REFER
SERVICING TO QUALIFIED
SERVICE PERSONNEL.
The exclamation point
within the triangle is a
warning sign alerting
you of important
instructions
accompanying the
product.
WARNING: TO REDUCE THE RISK OF FIRE OR ELECTRIC SHOCK, DO NOT
EXPOSE THIS APPLIANCE TO RAIN OR MOISTURE.
CLASS 1 LASER PRODUCT
CLASS 1 LASER
PRODUCT
CAUTION
INVISIBLE LASER RADIATION WHEN
OPEN AND INTERLOCKS DEFEATED.
AVOID EXPOSURE TO BEAM
This product contains a low power laser device.
SAFETY PRECAUTIONS
Follow the advice below for safe and appropriate operations.
ON PLACEMENT
• Do not use the unit in places which are extremely hot, cold, dusty or
humid.
• Place the unit on a flat and even surface.
• Do not restrict the air flow of the unit by placing it in a place with poor
air flow, by covering it with a cloth, or by placing it on a carpet.
ON SAFETY
• When connecting and disconnecting the AC cord, grip the plug and not
the cord itself. Pulling the cord may damage it and create a hazard.
• When you are not going to use the unit for a long period of time,
disconnect the AC power cord.
ON AC VOLTAGE
• Before use, check that the rated voltage of your unit matches your local
voltage.
• When there is condensation inside the unit, the unit may not function
normally.
• Let it stand for 1 to 2 hours before turning the power on, or gradually
heat the room up and dry the unit before use.
FCC INFORMATION (for USA)
This device complies with part 15 of FCC Rules. Operations are subject to
the following two conditions:
(1) This device may not cause harmful interference, and
(2) This device must accept any interference received, including
interference that may cause undesirable operations.
Should any trouble occur, disconnect the AC power cord and refer
servicing to qualified personnel.
811-138291-031
Printed in China
NAMES OF CONTROLS
ADJUSTING THE SOUND
VOLUME
Adjust the VOLUME control of the stereo system to a desired level.
For private listening
Connect headphones (Ø3.5 mm stereo mini-plug) to the PHONES jack.
When headphones are connected, speakers automatically disconnected.
RADIO OPERATION
You can listen to your favourite radio stations by sliding the FUNCTION
switch to RADIO, and then
1. Slide the BAND switch to choose AM(MW) or FM.
2. Using the TUNING control to choose a desired station.
• Adjust the VOLUME.
AM(MW)/FM
• Repositioning the unit to get better AM(MW)/FM reception.
1.
2.
3.
4.
5.
6.
7.
8.
9.
10.
11.
12.
13.
Handle
CD door
STOP button
PLAY / PAUSE
button
FUNCTION switch
VOLUME control
PHONES jack
Fixed antenna
14.
Tuning control
15.
SKIP
button
16.
button
REPEAT
button
SKIP
Note
After listening, slide the FUNCTION switch to OFF.
CD display
Track number
Play " " indicator
Pause " " indicator
Repeat all " " indicator
Repeat one " " indicator
BAND switch
AC socket
Battery compartment
USING THE CD PLAYER
1. Slide the FUNCTION switch to CD. "
" is shown in the display.
2. Open the CD door. Place a disc in the center with the label side up
and then close the CD door gently. The total number of tracks will
show in the display.
3. Press the PLAY/PAUSE
button to start play. The PLAY " "
indicator will light.
• Adjust the VOLUME.
TO STOP PLAYBACK
• Press the CD STOP button to stop disc play.
POWERING UP
AC POWER
You can power your portable stereo system by plugging the detachable AC power cord into the AC inlet on the back of the unit and into a
wall AC power outlet.
Check that the rated voltage of your unit matches your local voltage.
Make sure that the AC power cord is fully inserted into the unit.
Caution:
To prevent electrical
shock, match wide blade
of plug to wide slot,
fully insert.
To AC inlet
To wall AC outlet
BATTERY POWER
Insert 6 "C" size batteries in the battery compartment. Be sure that the
batteries are inserted correctly to avoid damage to the unit.
• Always remove the batteries when unit will not be used for a long
period of time, as this will cause leakage of the batteries and
subsequently damage to your unit.
• Playback would automatically come to a stop when the batteries
have no more power. Replace all the batteries with new ones.
• Do not mix old and new batteries. Do not mix ALKALINE, standard
(CARBON-ZINC) or rechargeable (NICKEL-CADMIUM) batteries.
TO INTERRUPT PLAYBACK
button while a CD is playing to pause
• Press the PLAY/PAUSE
play (the PAUSE " " indicator will blink).
• Press the PLAY/PAUSE
button again to resume play.
TO SKIP TO THE BEGINNING OF A TRACK
• Press either one of the SKIP
or
button according to the desired
direction. Each press skips one track. During play, the first press on
the skip backwards
button to the beginning of the current track.
• Playback resumes from the selected track.
TO SEARCH THROUGH TRACKS
or
button pressed, according to
• Keep either one of the SKIP
the desired direction, and release at the desired point.
REPEAT PLAY -- in play modes
This function allows one track or all tracks on a disc to be played repeatedly.
TO REPEAT THE SAME TRACK
• Press the REPEAT button once during playback, the REPEAT ONE
" " indicator will blink.
TO REPEAT THE WHOLE DISC
• Press the REPEAT button a second time to repeat all tracks, the
REPEAT ALL " " indicator will light.
TO CANCEL REPEAT PLAY
• Press the REPEAT button until the REPEAT indicator is turned off.
Note
Repeat play can only be done when the unit is in the play mode.