1
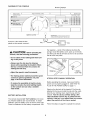
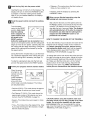
DIAGRAM OF THE CONSOLE
Monitor Displays
L
STEP BY STEP
SPEED
]l
TRAINING
ZONES
[
INSTRUCTIONS
I 0
HEART
TRAINING
/
RATE
ZONES
/
INSERT KEY
I
I
20
I_
PRESSON/RESET
I
BUTTON
I
CALS
I
SET TO DESIRED
F'CALS
SPEED
TIME
DISTANCE
LEVEL
k
_45
16.$
120
138
155
i S°
130
145
110
125
t40
60
105
118
130
[
7O
95
tlo
t25
80
90
_03
115
lf5
50
J[
FAST
Speed Control
12.$
40
0
ON
OFF
If there is a thin sheet of clear
plastic on the console, remove it.
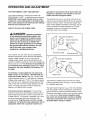
A, CAUTION:
Before operating the
console, read the following
precautions.
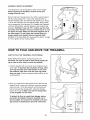
the negative (-) ends of the batteries touching the
springs. Close the battery cover, push up on the tab,
and then push the tab forward as shown. Be sure that
the tab locks into place.
• Do not stand on the walking belt when turning on the power.
Battery
Cover
• Always wear the cli p (see the drawing
above) while operating the tread mill. When
the key is removed from the console, the
walking belt will stop.
Battery
Cover Tab
• Adjust the speed in small increments.
• The training zones marked around the speed
control are general guidelines only. See
page 14 for more information.
• To reduce the possibility of electric shock,
keep the console dry. Avoid spilling liquids
on the console and use only a sealable
water bottle.
BATTERY INSTALLATION
The console requires two "AA" batteries (not included). Alkaline batteries are recommended. To install
batteries, open the battery cover as shown at the right.
Press two batteries into the battery compartment, with
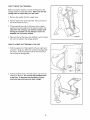
STEP-BY-STEP
CONSOLE OPERATION
Before operating the console, make sure that the
power cord is properly plugged in. (See HOW TO
PLUG IN THE POWER CORD on page 7.)
Stand on the foot rails of the treadmill. Find the clip
attached to the key, and slide the clip onto the waistband of your clothing. Next, insert the key into the
console. Test the clip by carefully taking a few
steps backward until the key is pulled from the
console. If the key is not pulled from the console,
adjust the position of the clip as needed.
Follow the steps on page 9 to operate the console.