1
1 Hardware Introduction
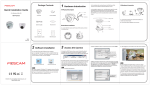
Package Contents
Physical Description
Quick Installation Guide
2. According to the monitored area, install the base of the
camera on the ceiling or wall with expansion screws.
3. Assembly the sphere, cover and decorative ring of the order,
Power
(For Windows & Mac OS)
IP Camera
Power Adapter
Ethernet Cable
according to the monitored area to turn the angle of the
sphere. Finally, fix the decorative ring and the base with screws.
LAN
HD IP Camera
Reset Button
LENS
Array LED
Quick Installation Guide
(For Windows & Mac OS)
Ceiling or wall
HD IP Camera
Quick Installation Guide
Warranty Card
Base
Resource CD
Hardware Installation
1. Loosen the three screws on the base of the camera, remove
the camera base.
Security Warning
Cover
Decorative ring
Foscam cameras and NVRs require good security practices
to safeguard your privacy. You should regularly change
your camera or NVR password which is 8-10 numbers,
letters, symbols combination.
V4.9
EQ985308
Sphere
You should update your camera or NVR regularly. Make
sure your camera or NVR has the latest firmware installed
for your specific model and better experience.
1
Hardware Connection
2
3
2 Software Installation
3 Access the Camera
1. Insert the CD into the CD drive of your computer.
1. Enable the DHCP feature of your router (Enabled by default
normally), then open the Equipment Search Tool program. It
should display the camera’s IP address in your LAN (Local Area
Network).
2. Go to the folder “Equipment Search Tool” and find the folder
“For Windows OS”or “For Mac OS”. Copy and paste the Equipment
Search Tool file to your computer, or drag it onto your desktop.
WPS
1. Connect the camera to the LAN network (Router or Switch)
via network cable.
2. Connect the power adapter to the camera.
Notes:
If your computer ( Windows OS ) supports autorun function,
you can find the corresponding file in the opened control panel.
If your computer doesn’t have CD drive, you can download
the Equipment Search Tool from our website for free.
CE Certificate Website:
http://www.foscam.com/company/ce-certificate.html
2. Double click the camera list here, and your default browser
will open up to the camera’s login page. When logging in for
the first time, you will need to download and install the
add-on. Take Microsoft Internet Explorer as an example. For
Google Chrome, Apple Safari, or Mozilla Firefox, please refer to
the User Manual.
Note:
Doesn't support 64-bit browser.
ShenZhen Foscam Intelligent Technology Co., Ltd
www.foscam.com
4
5
6
4. When you login for the first time, it will request that you
modify the default username and/or password. Input the New
username, New password, and Confirm the password, click
Modify to complete the modification. You will now use the
new username and password to login to the camera in the
future.
Click Install
4 Remote Access
5. After logging in, you should see live video on the interface.
If you want to access your camera by web browser outside of
your LAN, you need to configure some settings.
1. Choose “Settings” on the top of the camera web page, then
go to the “Network > IP Configuration” section on the left side
of the screen, then uncheck the Obtain IP DHCP.
IP Address: Set this in the same subnet as
your computer , or keep it as default.
Subnet Mask: Keep it as default.
Gateway and DNS Server: Set it to the IP
address of your router.
Input the New username,
New password and
Confirm the password.
Notes:
3. After installing the add-on, refresh the browser and click
Login.
2. Enable UPnP and DDNS in the camera’s settings page. We
recommend you to use the DDNS by factory default.
After logging in for the first time, it will go to "Setup
Wizard” automatically. Please set the basic parameters, such
as camera name, camera time and so on.
If you forget your username or password, you can press
and hold the reset button on the bottom of the camera using
a pin for 5 seconds. This resets the camera to factory defaults.
Default user is admin with no
password.
Main stream offers the highest
quality video while Sub stream
offers less quality, but also less
delay when viewing.
Select Yes and click Save.
cg88891.myfoscam.org
Click Enable DDNS and click Save.
The content in the Manufacture’s
DDNS column is the domain name
of your camera.
7
8
3. You can set the port of your camera here. The value of the
port number for each device should be unique.
If there is no UPnP function in your router.
You need to manually add port forwarding, refer to the
following steps. You need go to the “Forwarding > Virtual
Servers” panel for setup.
4. If the UPnP of the router has been enable, you do not need
to perform following steps. Otherwise, you need to select one
of the following methods to configure port forwarding on
your router. For these steps, we will be using the TP-LINK
brand wireless router as an example.
6 Technical Support
Smart Phone
You can add the Foscam IP Camera using a Smartphone like an
iPhone or Android device. Ensure your smartphone is connected
to the internet.
If you have problems with your Foscam IP Camera, please
contact the Foscam reseller you purchased from, or you can
e-mail the Foscam headquarter technical support team:
[email protected]
Your valuable comments and suggestions on improving
Foscam products are welcomed!
443
443
Foscam
Please Note:
If you do not have a QR code app on your phone, you can
simply go to the App Store or Google Play Store and search
for the term "Foscam". Find the app that appears with the
same icon as shown above, and then download it to your
device.
Input the port and IP address
of your camera and click Save.
If there is a UPnP function in your router.
Choose “Forwarding > UPnP”, make sure that the Current
UPnP Status is Enabled.
Add the IP Camera
Run the App, and then register for a Foscam account. Once
logged in, you can tap the "+" button on the App and follow
the setup wizard to add your camera.
Here you have finished the Port
Forwarding setup.
5. Now you can access your IP camera by https://domain
name: HTTPS port via the Internet.
11
5 Access the IP Camera by
Download the Foscam App
If you have a QR Code scanner app on your phone, use it to
scan the code below:
Click Add New.
10
9
12
Only with the “Foscam” APP, you can experience new features
including Online-Update, Message Push,etc. While with any
third-party APP (other than "Foscam") , you do not experience
these features.
13
14