1
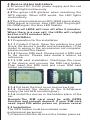
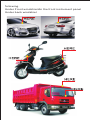
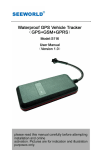
VEHICE GPSTRACKER
User Manual
(Version1.1)
Please read the manual carefully before use the
GPS Tracker so that you can install the device
correctly and activate it quickly on the internet. The
outlook and true color are subject to the actual
1. Accessories
2. Technical parameter
1). GSM : 850/900/1800/1900MHz Quad band
2).GPRS: Class12,TCP/IP
3).Working Voltage: 6-50V DC
4).Working current≈22mA(12vDC)/12mA(24vDC)
5).GPS locating time: cold start≈38s(Open sky)
warm start≈32s
hot start≈2s(Open sky)
6).GPS Precision: 10m(2D RM)
7).Working temperature: -20℃~+70℃
8).Working humidity: 20%~80%RH
9).Measurement: 87(L)×43(W)×14(H)mm
10). weight: 50.5g
1
1
1
1
1
1
1
1
1
3.Out look
GPS Indicator
GSM Indicator
Power Indicator
DeviceID
Wiring
digram
seal
ring
4.Device status indicators
4.1Connect DC 9-24V power supply and the red
LED will light continuously.
4.2The green LED glistens when searching the
GPS signals. When GPS works, the LED lights
continuously.
4.3The intermediate blue LED (GSM signal state)
GSM signal is normal, blue LED light long bright.
No GSM signal, the blue LED flashes.
Remark:all LEDS will turn off after 5 minutes.
When there is a new call, the LEDs will relight
and turn off 5 minutes later.
5.Installation
5.1 Preparation for the installation
5.1.1 Product Check. Open the packing box and
check the device‘s model and accessories. If the
model is wrong or the accessories not complete,
please contact the dealer.
5.1.2 Choose SIM card. Please insert a SIM card
to the device. Please take dealer’s advice as
reference.
5.1.3 SIM card installation. Discharge the cover
of the device and uncover the SIM card holder.
Then insert the SIM card and cover SIM card
holder (as follows).
5.1.4 Put back the front cover and screw it up.
5.1.5 Connect the device to the 9-24Vpower
supply.(he red LED constant glow).
5.1.6 Install the device in the hidden place of the
car.
Remark:The SIM card must be with GPRS
function and enough deposit. If your SIM card
need input PIN when power on, please cancel
5.2 Installation
The GPS tracker must be installed under
professional personnel.
1) Please install the device in the hidden place as
following.
Under Front windshieldIn the front instrument panel
Under back windshiel
3) The device has GSM antenna and GPS antenna
inside. Please ensure the receiving side of the
device is face up and without metal cover.
Remark : The metal cover will lessen the receiving of
GPS signalsThe device connecting requirements.
6. Device wiring requirements
6.1 The device power supply is DC-50V. The red line
is positive pole while the black line is negative pole.
6.2 The negative pole of power supply connectswith
ground or the metals. Please do not connect with
other ground lines.
6.3 When finishing the power supply wire
connection,please make the plug of power supply to
the device.
6.4 if need to add relay control oil circuit, please
install the white line according to the diagram delow.
6.5 if need ACC detection,please connect the green
line to car’s ACC, if need SOS detection, please
connect the green line to ACC button(ACC or SOS
alternative,the default is ACC).
Red
7.The Device Working
7.1 Power on
the device will be power on when connecting to the
current. Then the three LED indicators will light
continuously. The device will upload the data to the
online platform (the default interval of uploading data
is 10seconds). When the car is in static state for a long
time, the device will be in energy saving mode and it
will be more smart and precise.
7.2Power off
Pull off the power plug then power off the device.
8. Operation Instruction
8.1 Administrator(can set two admin users)
1
8.1.1 Adding Admin Users: Firstly Send “710#cell
phone number#”, Secondly Send “711#cell phone
number#”, it will reply “Add admin account 1or2 ok!” .
8.1.2 Deleting Admin Users:Firstly Send “D01#”,
Secondly Send “D02#”, it will reply “dele admin account
ok!” .
8.1.3 Viewing Admin Users:Send SMS “901#”, it will
reply “admin1:admin2:”.
8.2 Authorization (can set there authorized)
8.2.1 Adding Authorized Numbers:Firstly Send
“101#cell phone number#”, Secondly Send “102#cell
phone number#”, Thirdly Send “103#cell phone
number#”, it will reply “add authorization account
1or2or3 ok!”.
8.2.2 Deleting Authorized Numbers:Firstly Send
“D11#”, Secondly Send “D12#”, Thirdly Send “D13#” it
will reply “dele auth account ok!” .
8.2.3 Viewing Authorized Numbers:Send “C10#”, it will
reply “Authorization1:Authorization2: Authorization3:”
8.3 Functions
8.3.1 Cut-off oil and circuit:Send “222#”, it will reply
“fule cut oil ok!”(speed below 20km/h or in static state)
8.3.2 Supply oil and circuit :Send “333#”, it will reply
“resume fule,ok!”
Remark: Only the Admin number or the Authorized
number can control.
8.3.3 Shock Alert:Send “123 level#mode#”(Level is 1-5,
the lower level, the higher sensitivity; Mode: 1. SMS, 2.
Phone, 3. SMS and Phone),it will reply“set vibration
alarm level,ok!”, if need to set up the shock alert
time,Send“V123#minutes#”, (Time is 1-10 minutes, the
default is 5 minutes), it will reply “set vib time, o k!”
8.3.4 Cancel shock alert:Send “456#”, it will reply “close
vibration alarm, ok!”.
8.3.5 Overspeed Alert:Send “SSA#speed#mode#”,
(Speed is 30-220; Mode: 1. SMS, 2. Phone, 3. SMS and
Phone; ),it will reply“set speeding alart ,ok!” if need to set
up the alert interval, Send “STIME#minutes#”, (Time is 160 minutes, the default is 5 minutes)it will reply “set
speeding alart time ok!”.
8.3.6 Cancel overspeed alert:Send “CSA#”, it will reply
“close speeding alart ok!”.
8.4 Platform
8.4.1 Set up IP and Port: Send “803#IP address#port#”, it
will reply “set IP ok!IP:...#...#”.
8.4.2 Device number: the default is IMEI number 11 in the
back.
8.4.3 Set the upload movement interval when ACC on,
Send “730#seconds#”, it will reply “set movement upload
time, ok!”. (Seconds: 10-60s, the default is 15s.)
8.4.4 Set the upload static interval when ACC off, Send
“SUP#minutes#”, it will reply “set static upload time ok!”.
(Minutes: 1-60 minutes, the default is 5 minutes.)
8.4.5 Cancel connecting upload data: Send “NUP#”, it
will reply “close upload gps information ok!”.
8.5 Positioning by SMS:Latitude and longitude location:
Send “666#”, it will reply the link of latitude and
longitude, speed, time, IMEI etc.If gps no fix it will
reply“gps not fixed or pause upload!”
8.6 System Settings
8.6.1 Set APN: Send “802#network name#account name
#password#”, it will reply “set apn ok!”(if APN needn’t
account name and password, needn’t send “account
name#password#”).
8.6.2 Set Time Zone: Send “801#time zone#”, then the
unit will reply “set time zone ok!”, (E8 means Eastern
eight zones, W8 means Western eight zones).
8.6.3 Set language: Send SMS “LANGnumber#”, it will
reply “set lang ok!”. (Number is 1 or 0, 1 means
Chinese, 0 means English, the default is Chinese.)
8.6.4 Restart the device: Send SMS “930#”, it will reply
“Reset system,ok!”.
8.6.5 Factory:Send “940#”, it will reply “reset device,
ok!”.
8.7 Viewing the current information
8.7.1 View the sever’s IP and port: Send “CIP#”, it will
reply the current IP and port.
8.7.2 View the version information:Send “V00#”, it will
reply Version information, generated time, IMEI etc.
8.7.3 View the status information: Send “902#”, it will
reply the current status informaton of device.
8.7.4 View the Parameter: Send “886#”, it will reply
IMEI, APN, IP Port, language, time zone etc.
9. Location Enquiry On Website
Please contact with the dealer who will open login
account , password for you , and provide “user manual
of online platform service” ,if you need location
enquiry service .
10.Trouble shooting
2
10.1The device is not online or offline on the
web platform
2
10.1.1First, please check the three LED working
state. Ifpossible. You can call the device’s
number to check.
2
● If not connected, the device is out of signal. If
the GSM signals cannot reach your location,
pleasedrive to the open sky.
2
● If reminding the device SIM card is out of
deposit, please make deposit by the telecom
● If you can connect to the device when calling,
the SIM card has deposited and please check
with your operator for GPRS function. You also
can check by searching the internet on your
mobile phone.
2
● If reminding the device is power off, please
turn
back the device and proceed as
followings:
2
a)Check if the red LED is in constant glow. If the
LED is dark, please check the power
connecting. If fuse is broken, please return
the device to the seller.
2
b)If the blue GSM LED is not in constant glow,
please check the installation of SIM card.
2
10.1.2 Please check the offline area in order to
judge if the network problem of operators.
2
10.1.2 When GPS cannot receive the signals,
please drive in the open sky and ensure there is
no metal thins on the device.
2
10.3 When the device cannot receive the GSM
signal, please check the SIM card installation. If
the GSM signals cannot reach your location
(such as the basement), please drive to the
open sky.
2
10.4 The red LED is not glow when power on.
11. command
CHAP
8. 1. 1
8. 1.2
8.1.3
8. 2. 1
8. 2. 2
8.2.3
8.3.1
8.3.2
8.3.3
8.3.4
8.3.5
8.3.6
8.4.1
8.4.2
8.4.3
8.4.4
8.4.5
8.5.1
8.6.1
8.6.2
8.6.3
8.6.4
8.6.5
8.7.1
8.7. 2
8.7.3
8.7.4
SMS EXAMPLE
FUNCTION
add administrator1
710#13800138000#
add administrator2
711#13800138001#
delete administrator1
D01#
D12#
delete administrator2
view administrator
901#
101#13800138000#
add authorized1
102#13800138001#
add authorized2
103#13800138002#
add authorized3
D11#
delete authorized1
D12#
delete authorized2
D13#
delete authorized3
view authorized3
C10#
222#
cut off oil and power
s upply oil and power
333#
set vibration alarm
123#2#3#
set vibration alarm time
V123#2#
cancel vibration alarm
456#
SSA#120#3#
overspeed alarm
overspeed alarm time
STIME#5#
CSA#
cancel overspeed alarm
803#121.37.40.44#8881#
set IP and port
set number to pltform IMEI number 11 in the back
730#20#
set sport intervals
SUP#5#
set static intervals
NUP#
cancle intervals
sms tracker
666#
set APN user password
802#CMNET#
801#E8#
set zone
LANG1#
set langue
930#
restart
940#
factory
CIP#
view IP and port
V00#
view version
902#
view status
886#
view param