Transcript
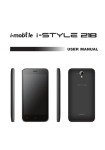
1. PHONE LAYOUT 1.1. Keys and Parts 8 2 3 9 6 4 5 7 4. Volume up key 7. Power Key 5. Volume down key 8. Camera 6. Card SLot 9. Flashlight Power/Lock key Volume Up/Down keys Press to adjust the volume. 1.2. Icons and Indicators Icon 1 1. USB plug 2. Jack plug 3. Receiver to sleep by pressing Power/Lock key; To wake up the touch screen, just press Power/Lock key again, and then drag the lock icon to the up on the screen to unlock according to the clue on the screen. When powering off status, press and hold to turn on the phone; When powering on status, press and hold to enter phone options (Power off, Reboot, screen shot, profile mode and Airplane mode); Prevent accidental touches or when you want to wipe smudges you’re your touch screen, put the touch screen Indicators Icon Indicators Vibrate mode Airplane mode Ringer is silenced Missed call Phone microphone is mute New text or multimedia Pull out the card slot Install T card & micro SIM Micro SIM T-Car d No signal Connected to a Wi-Fi network Alarm is set Battery is very low Battery is charging An open WiFi network is discpmmected 2.2 Inserting micro SIM Card & NANO SIM Card Pull out the card slot Install NANO & micro SIM Micro SIM Nano SIM 2.3 Unlock the Phone You may need to provide PIN, Password, or draw a pattern Uploading data Downloading data to unlock your phone. To unlock the screen: Press the power key to wake up the phone. 2. GETTING STARTED Hold and drag the unlock icon to the up to unlock. 2.1 Inserting the micro SIM Card & T card You may be required to unlock your phone based on the unlock method in settings. To set the unlock method: On the main menu, touch Settings > > Screen lock. Touch set up screen lock. Choose the type of locking as desired. You can set your screen lock on the basis of pattern, PIN, Password or none. 2.4 Menu Icons You have the following menu icons to easily let you access its important features: Opens the dialer Opens the contacts list Opens the main menu Opens messaging Opens the browser 3. CONNECT TO THE INTERNET 3.1. To configure your Internet: Go to Settings> Wireless & Networks >More > Mobile Networks >Data connection. By default, your network provider sends the Access Point Name settings via SMS, or it comes automatically with your SIM card. You may need to install these settings. After this, you can choose from the listed access point names. If the access point names are not listed by default, please contact your network provider for the same. To add any operator Access point Name, go to settings > Network > More > Mobile networks > Sim 1(or Sim 2) > Access Point Name > Tap 4.1. Connect to PC Plug the phone to a computer with the supplied cable. WARNING: to avoid any over cost contact your operator to know more about Access Point Name regarding your subscription. After you have selected or configured the access point name, go to Settings> Wireless & Networks >Data usage >Tap Mobile Data to enable Internet connection. 4. CONNECT TO NETWORKS AND DEVICES Your phone can connect to a variety of networks and devices, including Wi-Fi, GPRS, Bluetooth, devices, such as headsets. You can also transfer files to/from your PC through the data cable. Go to Notifications bar Phone will automatic mark on Media device (MTP) can connect computer This mounts the external SD card and internal memory as USB keys. Then you can manage your files directly from your computer. Once finished, click again (“Turn off USB storage”) to unmount SD card from computer and use it with phone again. WARNING: during USB connection, SD card is no longer available to the phone, all apps using SD card cannot work. Don't erase/move applications data also. 3.2. Access Internet via Wi-Fi To browse the Internet via Wi-Fi: Go to Menu> System settings> wireless & networks and then tap Wi-Fi. Next, go to Menu> settings> wireless & networks > Wi-Fi Settings and then enable Wi-Fi. Next, select the WIFI connection listed under Wi-Fi networks. 4.2. Connect to Internet Refer to section 3 for details. 4.3. Connect to Wi-Fi Networks Refer to Section 3 for details. 4.4. Pair With Bluetooth Devices Go to Settings > Wireless & networks> Bluetooth settings. If Bluetooth is off, check Bluetooth to turn it on. Your phone scans and displays the Bluetooth devices in range. If the device you want to pair with is not in the list, make it discoverable. If your phone stops scanning before you make the other device discoverable, touch Scan for devices. Touch the ID of the other device in the list Settings to pair them. If you are prompted to for a password, enter any password on one device and enter the same password you entered in the other device to be paired.), If the pairing is successful, your phone connects to the device. 4.5. Connect to Internet via your Phone You can browse the Internet on your PC using your mobile phone. To do this: Connect your mobile phone to your PC via the USB cable. Go to Settings> Wireless & Networks>More >Tethering & portable hotspot and then touch USB Tethering. 5. USER GUIDE TO SIGN IN GOOGLE PLAY STORE 1. Go to idle screen and click the Google Play Store icon. If you have Google Account you can click "Existing".If you don't have,you can click "New" to create for new Google Account.Input your Google Account,"Email" and "Password".After completed,the below pop-up will come and Click "Accept" then we will be at Google Play Store. 6. SW UPGRADE (OTA) Notice: Before testing, please make sure: 1. WIFI is available. 2. Battery power is more than 40%. Check the firmware: Check the firmware version before the System Software Update. Settings -> About phone -> Build number Android Mode: 1. Click the icon ““Software Update” in Application Manager Software Update will start to check for update 2. Choose OK, will try to connect to server, 3 cases will happen: Case 1: Connect to server successfully, a new firmware is found on server.Then it will show you the information and description of the new firmware package. Case 2: There is no new firmware available on server. It will pop up” No Update Available”, if you choose ”OK”, the application will exit. Case 3: Fail to connect to server. It will pop up "Network error!", if you choose ”OK”, the application will exit. or if you choose ”Cancel”, the application will exit. 3. Update interface: 3.1 After finish downloading, it will ask you: “Do you want to install now?” 3.2 If choose OK, the phone will reboot, then enter the Recovery Mode.(Pic.8->Pic.9) 3.3 Pic.8, if choose Cancel, Will exit the application. When you enter the application next time, will show you Step 4 directly. Recovery Mode: Some codes and a progress bar will show in phone screen. Phone will reboot after the recovery is finished. Then the phone will enter the Android mode again. Android Mode: Update result: Update successfully Check the firmware again: Check the firmware version again after the System Software Update. Settings -> About phone -> Build number 7. CONDITION OF WARANTY 1. Mobile phone device, portable charger, charger, wireless headset are in-warranty of 12 months after 2. 3. 4. 5. 6. 7. the date of purchase. Battery, headset, USB,memory card, data connector areinwarranty of 6 months after the date of purchase. This warranty shall apply to mobile phone and accessory under “i-mobile” brands that are purchased from Shop namely, I-mobile by Samart and Authorized Distributor or Authorized Service Center as appointed in Thailand only. The condition of the warranty for mobile phone and accessory that are purchased in other countries, except Thailand. It shall be applied in accordance with the applicable law. For Thailand, the purchaser acknowledges the end of warranty period as stated in the warranty sticker or purchase's record of i-mobile system. Within the warranty period, maintenance or parts replacement is free of charge. Should be noted that i-mobile reserves the rights no return the damaged part. i-mobile provides warranty for mobile phone and accessory with the terms and conditions that are stated in the law excluding the commerce, product satisfaction, lost of benefit or expected profit, loss or damages from the violation of personal rights in conversation, and working discontinuance or loss of information arising of the use or inability to use. In cellular network / signal and sounds that are used with mobile phone and accessory is the service of independent operators, not i-mobile. Therefore, i-mobile will not be responsible for the working process, the readiness of the service, and the area covered. 8. 9. 10. Any mobile phone and accessories that are already repaired or had parts replacement, the warranty period will continue from the remaining warranty onward or 60 days from the repaired date whichever is longer. Customer has to pay for the repair cost and cost of replacement parts provided that the said repair are not in the warranty conditions. The warranty sticker on the mobile phone must not be torn, tattered, scraped or crossed out. THIS WARRANTY IS VOID UNDER THE FOLLOWING CONDITIONS 1. Mobile phone and accessory are damaged due to the abnormal use, improper use, being stored in the damped or overheated area, or other inappropriate environment, the interference that can cause damage, including unforeseeable accident, spill with liquid or food, or any actions that cause damages to mobile phone and accessories. 2. Mobile phone and accessory are damaged due to the natural disaster. 3. Mobile phone and accessory are repaired, changed parts, adjusted, modified, connected, customized without any authorization by i-mobile. 4. Using of mobile phone and accessory together with, or connect with the mobile phone or accessory that are neither provided nor certified by i-mobile including any accessory are inappropriate to use together with mobile phone and accessory. 5. Small alteration in the brightness and color on the screen might occur in each mobile phone and accessory, might results in bright or dark dots on the screen. This is called as pixel defect. It can occur when these pixels are malfunction and cannot be modified. The Pixel defect of 2 pixels is considered acceptable. Small alteration in a picture taken by a camera might occur in each mobile phone and accessory is considered normal and it is not the camera module to be deemed as malfunction. 6. Editing, scarping, crossing over the IMEI number of the mobile phone or accessory, including the warranty number will be deemed as the termination of the warranty. 7. Damaging of the label, warranty sticker on the mobile will be deemed as termination of the warranty. 8. i-Mobile will not assure provided that the software from i-mobile will be up to your wishes or the working process of the software will not be discontinued or flawless. 9. i-mobile will not assured provided that the additional software to download or install by you for the purpose of work or entertainment will be up to your wishes without mistakes and flaw that is out of control of i-mobile. 10. The warranty and responsibilities of i-mobile are not covered the malfunction of any software or access of information from virus, or unauthorized access, which cause the damage in the banking transaction, E-banking, or any important information, or using the mobile phone illegally. 11. The warranty will not cover the loss of personal information during the use or during the installation, software remove, including applications, songs, videos, and any memberships that Customer has already purchased. 12. The warranty will not cover the responsibility of the loss of any personal information during the repair at Authorized Service center of i-mobile, including the applications, songs, videos, and any memberships that Customer has already purchased. 13. The warranty will not cover the damage that occurs from the use of any device under “i-mobile brand” with other products which are not the product of i-mobile. 14. The warranty will not cover any expenses in the co-ordination with i-mobile for solving the problem and the process of delivering for examination and repair service.