1
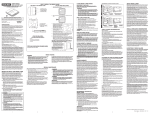
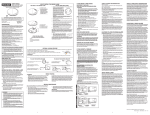
UNDERSTANDING THE INDICATOR LIGHTS
AND ALARM HORN PATTERNS
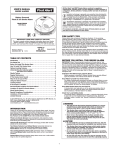
HOW TO INSTALL THIS SMOKE ALARM
USER’S MANUAL
SMOKE ALARMS
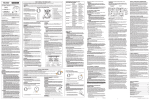
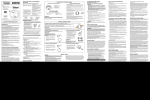
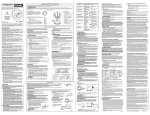
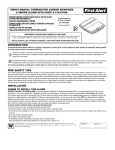
THE PARTS OF THIS SMOKE ALARM
FOLLOW THESE SIMPLE STEPS!
Normal Operation
Flashing Green LED once/minute
No Audible Alarm
Test Condition
Rapidly Flashing Red LED
Audible Alarm
Alarm Condition*
(Initiating Unit)
Rapidly Flashing Red LED
Audible Alarm
Silence Mode
Rapidly Flashing Red LED
Audible Alarm Off
Low Battery
Alarm “chirp’’ approx. once/minute
Latching Alarm
Red LED flashing 2 seconds on,
2 seconds off
Low Battery Latch
Green LED flashing 2 seconds on,
2 seconds off
2
Battery Powered
Photo & Ion Smoke Alarm
1.
Test/Silence button
If you want to lock the battery drawer, or lock the Smoke Alarm to
the mounting bracket, please read the “Optional Locking Features”
section before you begin installation.
2.
Slide-open battery
drawer
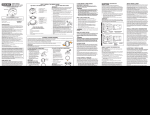
1. Hold base firmly and twist the mounting bracket clockwise to separate
it from the base.
3.
Multi-color Indicator
Light (Red or Green)
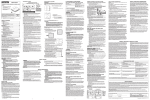
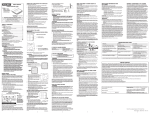
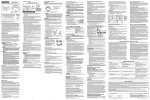
2. Hold the mounting bracket against the
ceiling (or wall) so the two clusters of
universal mounting holes are aligned
approximately at the 9:00 and 3:00 o'clock
positions. See image. Choose one of the
three sets of holes shown, A, B or C (see
A C
B
image) and trace around one of the sets.
C A
B
Be sure to choose a top and bottom slot
on opposite sides so you can rotate the
Universal Mounting Bracket into position
later. This will make it easier in the future
the remove the mounting bracket without
completely removing the screws.
WARNING! Do not install this Smoke Alarm over an existing
electrical box. Only AC powered units are intended for installation
over electrical boxes.
1
Model SA320
with Silence
3
2
1
IMPORTANT! PLEASE READ CAREFULLY AND SAVE.
This user’s manual contains important information about your Smoke
Alarm’s operation. If you are installing this Smoke Alarm for use by
others, you must leave this manual—or a copy of it—with the end user.
CONFORMS TO
Printed in Mexico
M08-0224-012 Q 07/12
UL STD 217
Model SA320
6
INTRODUCTION
Thank you for choosing First Alert® for your Smoke Alarm needs. You have
purchased a state of the art Smoke Alarm designed to provide you with an
early warning of a fire. Please take the time to read this manual and make
this Smoke Alarm an integral part of your family’s safety plan.
Key Features of the SA320 Photo & Ion Combo Smoke Alarm:
Photo & Ion Smoke Sensors: Dual photoelectric and ionization smoke
sensing technologies for optimal sensing of smoke particles produced in
both flaming and smoldering fires.
Optipath 360 TechnologyTM: Patented technology provides 360˚ of direct
access to the smoke sensor.
Two Silence Features: Low Battery Silence temporarily silences low
battery chirp for up to eight hours before replacing low battery.
Alarm Silence silences an unwanted alarm for several minutes.
Two Latching Features: Alarm Latch remembers which unit initiated an
alarm. Low Battery Latch visually identifies which unit is in low battery
condition.
Perfect Mount: Mounting bracket keeps alarm secure over a wide rotation
range to allow for perfect alignment.
© 2012 BRK Brands, Inc. All rights reserved. Distributed by BRK Brands, Inc.
3901 Liberty Street Road, Aurora, IL 60504-8122
Consumer Affairs: (800) 323-9005
www.firstalert.com • www.brkelectronics.com
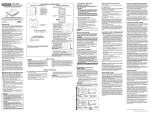
1.
Mounting bracket
2.
Universal Mounting
Holes
3.
Battery Drawer Lock
Pin Hole
4.
Slide-open battery
drawer
3. Put the unit where it won’t get covered with dust when you drill the
mounting holes.
5.
Turn this way to remove
from bracket
4. Using a 3/16” (5 mm) drill bit, drill a hole through the center of the
oval outlines you traced.
6.
Turn this way to attach
to bracket
5. Insert the plastic screw anchors (in the plastic bag with screws) into
the holes. Tap the screw anchors gently with a hammer, if necessary,
until they are flush with the ceiling or wall.
5
6. Install the screws but do not tighten completely. Attach the mounting
bracket by aligning the screws in the open portion of the universal
mounting slots and rotating the bracket into place. Tighten the screws
until they are snug to secure the bracket. Do not over tighten.
Pull Out
4
Mounting Hole Sets
3
7. Install the batteries (included) so the terminals on the battery match
the terminals on the Smoke Alarm. Match “+” to “+” and “-” to “-.”
Push the batteries in until they snap in securely and cannot be shaken
loose. If the batteries are not in completely, the unit cannot receive
battery power.
TOOLS YOU WILL NEED:
This unit is designed to be mounted
on the ceiling, or on the wall if necessary.
NOTE: After you install the batteries, the power indicator light will
flash and the horn will chirp. (If the unit alarms, the light will blink
rapidly, and the horn will repeatedly sound 3 beeps, pause, 3 beeps.)
• Pencil
• Drill with 3/16” (5 mm) drill bit
8. Attach the Smoke Alarm to the bracket. Line up the guides on the
alarm’s base with the guides on the mounting bracket. When guides
are lined up, turn the base clockwise (right).
• Standard flathead screwdriver
• Hammer
• Pliers or utility knife, to activate optional
“tamper-resistant” locking features
NOTE: Once the Smoke Alarm is on the bracket, you can rotate
the Alarm to adjust the alignment.
All First Alert® and BRK® Smoke Alarms conform to regulatory
requirements, including UL217 and are designed to detect particles of
combustion. Smoke particles of varying number and size are produced
in all fires.
9. Test the Smoke Alarm. See “Weekly Testing.”
Ionization technology is generally more sensitive than photoelectric
technology at detecting small particles, which tend to be produced
in greater amounts by flaming fires, which consume combustible
materials rapidly and spread quickly. Sources of these fires may include
paper burning in a wastebasket, or a grease fire in the kitchen.
Photoelectric technology is generally more sensitive than ionization
technology at detecting large particles, which tend to be produced in
greater amounts by smoldering fires, which may smolder for hours
before bursting into flame. Sources of these fires may include cigarettes
burning in couches or bedding.
For maximum protection, use both types of Smoke Alarms on each
level and in every bedroom of your home.
Note: To conserve batteries, both "Latching" features last for 15 minutes
and are then turned off.
•
•
NEVER use an open flame of any kind to test this unit. You might
accidentally damage or set fire to the unit or to your home. The builtin test switch accurately tests the unit’s operation as required by
Underwriters Laboratories, Inc. (UL).
If the Alarm ever fails to test properly, replace it immediately.
Products under warranty may be returned to the manufacturer
for replacement. See “Limited Warranty” at the end of this manual.
DO NOT stand close to the Alarm when the horn is sounding. Exposure
at close range may be harmful to your hearing. When testing, step away
when horn starts sounding.
It is important to test this unit every week to make
sure it is working properly. Using the test button is the
recommended way to test this Smoke Alarm.
Press and hold the Test/Silence button on the cover of the
unit until the alarm sounds (the unit may continue to alarm
for a few seconds after you release the button). If it does
not alarm, make sure the unit is receiving power and test
it again. If it still does not alarm, replace it immediately.
During testing, you will hear a loud, repeating horn pattern: 3 beeps,
pause, 3 beeps, pause. LED flashes once every second.
When testing a series of interconnected units you must test each unit
individually. Make sure all units alarm when each one is tested.
REGULAR MAINTENANCE
This unit has been designed to be as maintenance-free as possible, but there
are a few simple things you must do to keep it working properly:
• Test it at least once a week.
• Clean the Smoke Alarm at least once a month; gently vacuum the
outside of the Smoke Alarm using your household vacuum’s soft brush
attachment. Test the Smoke Alarm. Never use water, cleaners or solvents
since they may damage the unit.
• If the Smoke Alarm becomes contaminated by excessive dirt, dust and/or
grime, and cannot be cleaned to avoid unwanted alarms, replace the
unit immediately.
• Relocate the unit if it sounds frequent unwanted alarms. See “Locations
To Avoid For Smoke Alarms” for details.
• When the batteries become weak, the Smoke Alarm will “chirp” about
once a minute (the low battery warning). This warning should last 7 days,
but you should replace the batteries immediately to continue your
protection.
•
•
IMPORTANT! Read “Recommended Locations for Smoke Alarms” and
“Locations to Avoid for Smoke Alarms” before beginning. This unit monitors
the air, and when smoke reaches its sensing chamber, it alarms. It can give
you more time to escape before fire spreads. This unit can ONLY give an early
warning of developing fires if it is installed, maintained and located where
smoke can reach it, and where all residents can hear it, as described in this
manual. This unit will not sense gas, heat, or flame. It cannot prevent or
extinguish fires.
Know What Smoke Alarms Can and Can’t Do
A Smoke Alarm can help alert you to fire, giving you precious time to
escape. It can only sound an alarm once smoke reaches the sensor.
See “Limitations of Smoke Alarms” for details.
Check Your Local Building Codes
This Smoke Alarm is designed to be used in a typical single-family home.
It alone will not meet requirements for boarding houses, apartment
buildings, hotels or motels. See “Special Compliance Considerations”
for details.
• This Smoke Alarm must have battery power to operate.
The Smoke Alarm cannot work until you install the batteries
in the correct position (Match “+” to “+” and “-” to “-”).
• Never remove the batteries from a battery operated unit to
stop an unwanted alarm (caused by cooking smoke, etc.).
Instead open a window or fan the smoke away from the unit.
The alarm will reset automatically.
• Do not install this unit over an electrical junction box. Only AC
powered units are intended for installation over junction boxes.
• This Smoke Alarm has a battery drawer which resists closing
unless batteries are installed. This warns you the unit will not
operate under DC power without batteries.
• Do not stand too close to the unit when the alarm is sounding.
It is loud to wake you in an emergency. Exposure to the horn at
close range may harm your hearing.
• Do not paint over the unit. Paint may clog the openings to the
sensing chambers and prevent the unit from operating properly.
Keep battery out of reach of children. In the event a battery is
swallowed, immediately contact your poison control center, your
physician, or the National Battery Ingestion hotline at 202-625-3333
as serious injury may occur.
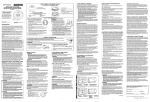
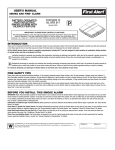
To replace the batteries (without removing Alarm from the ceiling or wall):
1. Open the battery compartment.
2. Press tabs A and B as shown in the diagram
and remove each battery.
3. Insert the new batteries, making sure
they snap completely into the battery
compartment. Match the terminals on the
AB
ends of the batteries with the terminals on
the unit.
4. Close the battery compartment, and then
test the unit by pressing the Test/Silence
button.
Know Where To Install Your Smoke Alarms
Fire Safety Professionals recommend at least one Smoke Alarm on every
level of your home, in every bedroom, and in every bedroom hallway or
separate sleeping area. See “Recommended Locations For Smoke Alarms”
and “Locations To Avoid For Smoke Alarms” for details.
• This unit will not alert hearing impaired residents. It is recommended that you install special units which use devices like
flashing strobe lights to alert hearing impaired residents.
Always use the exact batteries specified by this User’s Manual.
DO NOT use rechargeable batteries. Clean the battery contacts and
also those of the device prior to battery installation. Install batteries
correctly with regard to polarity (+ and -).
Please dispose of or recycle used batteries properly, following any
local regulations. Consult your local waste management authority
or recycling organization to find an electronics recycling facility in
your area. DO NOT DISPOSE OF BATTERIES IN FIRE. BATTERIES
MAY EXPLODE OR LEAK.
Actual battery service life depends on the Alarm and the environment in which
it is installed. All the batteries specified above are acceptable replacement
batteries for this unit. Regardless of the manufacturer’s suggested battery life,
you MUST replace the battery immediately once the unit starts “chirping”
(the “low battery warning”).
Understand The Different Type of Smoke Alarms
Battery powered or electrical? Different Smoke Alarms provide different
types of protection. See “About Smoke Alarms” for details.
Locking Features (Continued)
TO LOCK THE MOUNTING BRACKET
1. Using needle-nose pliers, detach one locking pin from mounting bracket.
To permanently remove either lock, insert a flathead screwdriver between the locking pin and the lock, and pry the pin out of the lock.
TO LOCK THE BATTERY COMPARTMENT
TO UNLOCK THE BATTERY COMPARTMENT
Do not lock the battery compartment until you have installed the
batteries and tested the alarm.
1. Remove the Smoke Alarm from the mounting
bracket. If the unit is locked to the bracket, see
the section “To Unlock the Mounting Bracket.”
2. Insert a flathead screwdriver under the head
of the locking pin, and gently pry it out of the
battery compartment lock. (If you plan to relock
the battery compartment, save the locking pin.)
3. When you attach the Smoke Alarm to the mounting bracket, the locking
pin’s head will fit into a notch on the bracket.
3. To relock the battery compartment, close the
battery door and reinsert locking pin in lock.
TO UNLOCK THE MOUNTING BRACKET
1. Push and hold Test button until the alarm sounds: 3 beeps, pause,
3 beeps, pause. LED flashes once every second.
If the unit does not alarm during testing, DO NOT lock the battery
compartment! Install new batteries and test again. If the Smoke
Alarm still does not alarm, replace it immediately.
2. Using needle-nose pliers or a utility knife, detach one locking pin
from the mounting bracket.
4. Reattach the Smoke Alarm to the mounting
bracket.
When replacing the batteries, always test the Smoke Alarm before relocking
the battery compartment.
• If the unit alarms and you are not testing the unit, it is warning you of a
potentially dangerous situation that requires your immediate attention.
NEVER ignore any alarm. Ignoring the alarm may result in injury or
death.
• Never remove the batteries to quiet an unwanted alarm. Removing
the batteries disables the Alarm so it cannot sense smoke. This will
remove your protection. Instead, open a window or fan the smoke
away from the unit. The Alarm will reset automatically.
• If the unit alarms get everyone out of the house immediately.
If the unit alarms and you are certain that the source of smoke is not a fire—
cooking smoke or an extremely dusty furnace, for example—open a nearby
window or door and fan the smoke away from the unit (Use the Silence Feature
to silence the Alarm). This will silence the alarm, and once the smoke clears the
unit will reset itself automatically.
WHAT TO DO IN CASE OF FIRE
•
•
•
•
•
•
Don’t panic; stay calm. Follow your family escape plan.
Get out of the house as quickly as possible. Don’t stop to
get dressed or collect anything.
Feel doors with the back of your hand before opening them.
If a door is cool, open it slowly. Don’t open a hot door. Keep doors
and windows closed, unless you must escape through them.
Cover your nose and mouth with a cloth (preferably damp).
Take short, shallow breaths.
Meet at your planned meeting place outside your home,
and do a head count to make sure everybody got out safely.
Call the Fire Department as soon as possible from outside.
Give your address, then your name.
Never go back inside a burning building for any reason.
Contact your Fire Department for ideas on making your home safer.
Alarms have various limitations. See "Limitations of Smoke Alarms" for
details.
USING THE SILENCE FEATURE
The Silence Feature can temporarily quiet an unwanted alarm for up to 15
minutes.
The Silence Feature does not disable the unit—it makes it temporarily
less sensitive to smoke. For your safety, if smoke around the unit is dense
enough to suggest a potentially dangerous situation, the unit will stay in
alarm or may re-alarm quickly. If you do not know the source of the
smoke, do not assume it is an unwanted alarm. Not responding to an
alarm can result in property loss, injury, or death.
The Silence Feature on these units can temporarily quiet an unwanted alarm for
up to 15 minutes. To use this feature, press the Test/Silence button on the cover.
If the unit will not silence and no heavy smoke is present, or if it stays in
silence mode continuously, it should be replaced immediately.
SILENCING THE LOW BATTERY WARNING
This Silence Feature can temporarily quiet the low battery warning “chirp” for
up to 8 hours. Press the Test/Silence button on the Alarm cover until you hear
the acknowledge “chirp”.
Once the low battery warning “chirp” silence feature is activated, the unit
continues to flash the green light once a minute for approximately 8 hours.
After 8 hours, the low battery “chirp” will resume. Replace the batteries as
soon as possible; this unit will not operate without battery power!
LATCHING FEATURE
Alarm Latch is activated after an Alarm is exposed to alarm levels of smoke.
After smoke levels drop below alarm levels, the Red LED will begin flashing 2
seconds on, 2 seconds off unless reset by test/silence button. It will continue
to flash or “latch” for about 15 minutes, to give you time to determine which
unit initiated the alarm.
This feature helps emergency responders, investigators, or service technicians
identify which unit(s) in your home were exposed to alarm levels of smoke.
This can help investigators pinpoint the source of smoke.
Low Battery Latch is activated when the Alarm is in the "low battery
condition". When this occurs, the Green LED flashes 2 seconds on, 2
seconds off. This feature is designed to help you identify which Alarm needs
to have the battery replaced. Although, the Alarm will sound the low battery
chirp approximately once every minute, sometimes during the initial stages
of "low battery", the Alarm will chirp in greater intervals than one minute,
sometimes up to several hours, until the battery reaches a steady low battery
level. This innovative feature eliminates the frustration of waiting for and/or
identifying which unit is chirping. It will continue to flash or “latch” for about
15 minutes, to give you time to determine which unit has a low battery.
IF YOU SUSPECT A PROBLEM
Smoke Alarms may not operate properly because of dead, missing or weak
batteries, a build-up of dirt, dust or grease on the Smoke Alarm cover, or
installation in an improper location. Clean the Smoke Alarm as described in
“Regular Maintenance,” and install fresh batteries, then test the Smoke Alarm
again. If it fails to test properly when you use the test button, or if the problem
persists, replace the Smoke Alarm immediately.
• If you hear a “chirp” approximately once a minute, replace the
batteries.
• If you experience frequent non-emergency alarms (like those caused
by cooking smoke), try relocating the Smoke Alarm.
• If the alarm sounds when no smoke is visible, try cleaning or
relocating the Smoke Alarm. The cover may be dirty.
• If the alarm does not sound during testing, try installing new batteries,
and make sure they are installed correctly.
Do not try fixing the alarm yourself – this will void your warranty!
If the Smoke Alarm is still not operating properly, and it is still under warranty,
please see “How to Obtain Warranty Service” in the Limited Warranty.
RECOMMENDED LOCATIONS FOR
SMOKE ALARMS
Installing Smoke Alarms in Single-Family Residences
The National Fire Protection Association (NFPA), recommends one Smoke
Alarm on every floor, in every sleeping area, and in every bedroom. In new
construction, the Smoke Alarms must be AC powered and interconnected.
See “Agency Placement Recommendations” for details. For additional coverage, it is recommended that you install a Smoke Alarm in all rooms, halls,
storage areas, finished attics, and basements, where temperatures normally
remain between 40˚ F (4.4˚ C) and 100˚ F (37.8˚ C). Make sure no door or
other obstruction could keep smoke from reaching the Smoke Alarms.
OPTIONAL LOCKING FEATURES
The locking features are designed to discourage unauthorized removal of the batteries or Alarm. It is not necessary to activate the locks in single-family
households where unauthorized battery or Alarm removal is not a concern.
These Smoke Alarms have two separate locking features: one to lock the battery compartment, and the other to lock the Smoke Alarm
to the mounting bracket. You can choose to use either feature independently, or use them both.
Tools you will need: • Needle-nose pliers or utility knife • Standard Flathead screwdriver.
Both locking features use locking pins, which are molded into the mounting bracket. Using needle-nose pliers or a utility knife, remove
one or both pins from the mounting bracket, depending on how many locking features you want to use.
NFPA 72 Chapter 29
“For your information, the National Fire Alarm and Signaling Code, NFPA 72,
reads as follows:”
•
•
BEFORE YOU INSTALL THIS SMOKE ALARM
RESPONDING TO AN ALARM
During an alarm, you will hear a loud, repeating horn pattern: 3 beeps,
pause, 3 beeps, pause.
•
FIRE SAFETY TIPS
Keep alarms clean, and test them weekly. Replace alarms immediately if they
are not working properly. Smoke Alarms that do not work cannot alert you to a
fire. Keep at least one working fire extinguisher on every floor, and an additional
one in the kitchen. Have fire escape ladders or other reliable means of escape
from an upper floor in case stairs are blocked.
AGENCY PLACEMENT RECOMMENDATIONS
WEEKLY TESTING
Choosing a replacement battery:
Your Smoke Alarm requires two “AA” Duracell MN1500 batteries.
These batteries are available at many local retail stores.
Follow safety rules and prevent hazardous situations: 1) Use smoking
materials properly. Never smoke in bed. 2) Keep matches or lighters away
from children; 3) Store flammable materials in proper containers;
4) Keep electrical appliances in good condition and don’t overload electrical
circuits; 5) Keep stoves, barbecue grills, fireplaces and chimneys greaseand debris-free; 6) Never leave anything cooking on the stove unattended;
7) Keep portable heaters and open flames, like candles, away from flammable
materials; 8) Don’t let rubbish accumulate.
IF THIS SMOKE ALARM SOUNDS
2. Insert the locking pin into the lock located
opposite from the battery drawer as shown
in the diagram.
More specifically, install Smoke Alarms:
• On every level of your home, including finished attics and basements.
• Inside every bedroom, especially if people sleep with the door partly or
completely closed.
• In the hall near every sleeping area. If your home has multiple sleeping
areas, install a unit in each. If a hall is more than 40 feet long (12 meters),
install a unit at each end.
• At the top of the first-to-second floor stairway, and at the bottom
of the basement stairway.
Specific requirements for Smoke Alarm installation vary from state to state
and from region to region. Check with your local Fire Department for current
requirements in your area. It is recommended AC or AC/DC units be interconnected for added protection.
29.5.1* Required Detection.
29.5.1.1* Where required by other governing laws, codes, or standards for a
specific type of occupancy, approved single and multiple-station smoke
alarms shall be installed as follows:
(1)*In all sleeping rooms and guest rooms
(2)*Outside of each separate dwelling unit sleeping area, within 21 ft (6.4 m)
of any door to a sleeping room, with the distance measured along a path
of travel
(3) On every level of a dwelling unit, including basements
(4) On every level of a residential board and care occupancy (small facility),
including basements and excluding crawl spaces and unfinished attics
(5)*In the living area(s) of a guest suite
(6) In the living area(s) of a residential board and care occupancy
(small facility)
(Reprinted with permission from NFPA 72®, National Fire Alarm and Signaling
Code Copyright © 2010 National Fire Protection Association, Quincy, MA
02269. This reprinted material is not the complete and official position of
the National Fire Protection Association, on the referenced subject which is
represented only by the standard in its entirety), (National Fire Alarm and
Signaling Code® and NFPA 72® are registered trademarks of the National Fire
Protection Association, Inc., Quincy, MA 02269).
California State Fire Marshal (CSFM)
Early warning detection is best achieved by the installation of fire detection
equipment in all rooms and areas of the household as follows: A Smoke Alarm
installed in each separate sleeping area (in the vicinity, but outside bedrooms),
and Heat or Smoke Alarms in the living rooms, dining rooms, bedrooms,
kitchens, hallways, finished attics, furnace rooms, closets, utility and storage
rooms, basements, and attached garages.
LOCATIONS TO AVOID FOR SMOKE ALARMS
For best performance, AVOID installing Smoke Alarms in these areas:
• Where combustion particles are produced. Combustion particles form
when something burns. Areas to avoid include poorly ventilated kitchens,
garages, and furnace rooms. Keep units at least 20 feet (6 meters) from
the sources of combustion particles (stove, furnace, water heater, space
heater) if possible. In areas where a 20-foot (6 meter) distance is not
possible – in modular, mobile, or smaller homes, for example – it is
recommended the Smoke Alarm be placed as far from these fuel-burning
sources as possible. The placement recommendations are intended to
keep these Alarms at a reasonable distance from a fuel-burning source,
and thus reduce “unwanted” alarms. Unwanted alarms can occur if a
Smoke Alarm is placed directly next to a fuel-burning source. Ventilate
these areas as much as possible.
• In air streams near kitchens. Air currents can draw cooking smoke into
the sensing chamber of a Smoke Alarm near the kitchen.
• In very damp, humid or steamy areas, or directly near bathrooms with
showers. Keep units at least 10 feet (3 meters) away from showers,
saunas, dishwashers, etc.
• Where the temperatures are regularly below 40˚ F (4.4˚ C) or above
100˚ F (37.8˚ C) including unheated buildings, outdoor rooms, porches,
or unfinished attics or basements.
• In very dusty, dirty, or greasy areas. Do not install a Smoke Alarm directly
over the stove or range. Clean a laundry room unit frequently to keep it
free of dust or lint.
• Near fresh air vents, ceiling fans, or in very drafty areas. Drafts can blow
smoke away from the unit, preventing it from reaching sensing chamber.
• In insect infested areas. Insects can clog openings to the sensing chamber
and cause unwanted alarms.
• Less than 12 inches (305 mm) away from fluorescent lights. Electrical
“noise” can interfere with the sensor.
• In “dead air” spaces. “Dead air” spaces may prevent smoke from reaching
the Smoke Alarm.
AVOIDING DEAD AIR SPACES
“Dead air” spaces may prevent smoke from reaching the Smoke Alarm. To
avoid dead air spaces, follow the installation recommendations below.
On ceilings, install Smoke Alarms as close to the center of the ceiling as
possible. If this is not possible, install the Smoke Alarm at least 4 inches
(102 mm) from the wall or corner.
For wall mounting (if allowed by building codes), the top edge of Smoke
Alarms should be placed between 4 inches (102 mm) and 12 inches (305 mm)
from the wall/ceiling line, below typical “dead air” spaces.
On a peaked, gabled, or cathedral ceiling, install the first Smoke Alarm
within 3 feet (0.9 meters) of the peak of the ceiling, measured horizontally.
Additional Smoke Alarms may be required depending on the length, angle,
etc. of the ceiling's slope. Refer to NFPA 72 for details on requirements for
sloped or peaked ceilings.
2. Pry the Smoke Alarm away from the bracket by
turning both the screwdriver and the Smoke
Alarm counterclockwise (left) at the same time.
LIMITATIONS OF SMOKE ALARMS
Smoke Alarms have played a key role in reducing deaths resulting from home
fires worldwide. However, like any warning device, Smoke Alarms can only
work if they are properly located, installed, and maintained, and if smoke
reaches the Alarms. They are not foolproof.
Smoke alarms may not waken all individuals. Practice the escape plan
at least twice a year, making sure that everyone is involved – from kids to
grandparents. Allow children to master fire escape planning and practice
before holding a fire drill at night when they are sleeping. If children or others
do not readily waken to the sound of the smoke alarm, or if there are infants
or family members with mobility limitations, make sure that someone is
assigned to assist them in fire drill and in the event of an emergency. It is
recommended that you hold a fire drill while family members are sleeping in
order to determine their response to the sound of the smoke alarm while
sleeping and to determine whether they may need assistance in the event
of an emergency.
Smoke Alarms cannot work without power. Battery operated units cannot
work if the batteries are missing, disconnected or dead, if the wrong type
of batteries are used, or if the batteries are not installed correctly. AC units
cannot work if the AC power is cut off for any reason (open fuse or circuit
breaker, failure along a power line or at a power station, electrical fire that
burns the electrical wires, etc.). If you are concerned about the limitations
of battery or AC power, install both types of units.
Smoke Alarms cannot detect fires if the smoke does not reach the
Alarms. Smoke from fires in chimneys or walls, on roofs, or on the other side
of closed doors may not reach the sensing chamber and set off the Alarm.
That is why one unit should be installed inside each bedroom or sleeping
area—especially if bedroom or sleeping area doors are closed at night—and
in the hallway between them.
Smoke Alarms may not detect fire on another floor or area of the
dwelling. For example, a stand-alone unit on the second floor may not detect
smoke from a basement fire until the fire spreads. This may not give you
enough time to escape safely. That is why recommended minimum protection
is at least one unit in every sleeping area, and every bedroom on every level
of your dwelling. Even with a unit on every floor, stand-alone units may not
provide as much protection as interconnected units, especially if the fire starts
in a remote area. Some safety experts recommend installing interconnected
AC powered units with battery back-up (see “About Smoke Alarms”) or
professional fire detection systems, so if one unit senses smoke, all units
alarm. Interconnected units may provide earlier warning than stand-alone
units since all units alarm when one detects smoke.
Smoke Alarms may not be heard. Though the alarm horn in this unit meets
or exceeds current standards, it may not be heard if: 1) the unit is located
outside a closed or partially closed door, 2) residents recently consumed
alcohol or drugs, 3) the Alarm is drowned out by noise from stereo, TV, traffic,
air conditioner or other appliances, 4) residents are hearing impaired or sound
sleepers. Special purpose units, like those with visual and audible alarms,
should be installed for hearing impaired residents.
Smoke Alarms may not have time to alarm before the fire itself causes
damage, injury, or death, since smoke from some fires may not reach
the unit immediately. Examples of this include persons smoking in bed,
children playing with matches, or fires caused by violent explosions
resulting from escaping gas.
Smoke Alarms are not foolproof. Like any electronic device, Smoke Alarms
are made of components that can wear out or fail at any time. You must test
the unit weekly to ensure your continued protection. Smoke Alarms cannot
prevent or extinguish fires. They are not a substitute for property or life
insurance.
Smoke Alarms have a limited life. The unit should be replaced immediately
if it is not operating properly. You should always replace a Smoke Alarm after
10 years from date of purchase. Write the purchase date on the space provided
on back of unit.
ABOUT SMOKE ALARMS
Battery (DC) operated Smoke Alarms: Provide protection even when
electricity fails, provided the batteries are fresh and correctly installed. Units
are easy to install, and do not require professional installation. They do not,
however, provide interconnected functionality.
AC powered Smoke Alarms: Can be interconnected so if one unit senses
smoke, all units alarm. They do not operate if electricity fails.
AC with battery (DC) back-up: will operate if electricity fails, provided the
batteries are fresh and correctly installed. AC and AC/DC units must be
installed by a qualified electrician.
Wireless Interconnected Alarms: Offer the same interconnected functionality
as with hardwired alarms, without wires. Units are easy to install and do not
require professional installation. They provide protection even when electricity
fails, provided the batteries are fresh and correctly installed.
Smoke Alarms for Solar or Wind Energy users and battery backup power
systems: AC powered Smoke Alarms should only be operated with true or
pure sine wave inverters. Operating this Smoke Alarm with most batterypowered UPS (uninterruptible power supply) products or square wave or
“quasi sine wave” inverters will damage the Alarm. If you are not sure about
your inverter or UPS type, please consult with the manufacturer to verify.
Smoke Alarms for the hearing impaired: Special purpose Smoke Alarms
should be installed for the hearing impaired. They include a visual alarm and
an audible alarm horn, and meet the requirements of the Americans With
Disabilities Act. These units can be interconnected so if one unit senses
smoke, all units alarm.
Smoke alarms are not to be used with detector guards unless the
combination has been evaluated and found suitable for that purpose.
All these Smoke Alarms are designed to provide early warning of fires if
located, installed and cared for as described in the user’s manual, and if
smoke reaches the Alarm. If you are unsure which type of unit to install, refer
to NFPA (National Fire Protection Association) 72 (National Fire Alarm and
Signaling Code) and NFPA 101 (Life Safety Code). National Fire Protection
Association, One Batterymarch Park, Quincy, MA 02269-9101. Local building
codes may also require specific units in new construction or in different areas
of the home.
SPECIAL COMPLIANCE CONSIDERATIONS
This Smoke Alarm is suitable for use in apartments, condominiums, townhouses, hospitals, day care facilities, health care facilities, boarding houses,
group homes and dormitories provided a primary fire detection system
already exists to meet fire detection requirements in common areas like
lobbies, hallways, or porches. Using this Smoke Alarm in common areas
may not provide sufficient warning to all residents or meet local fire
protection ordinances/regulations.
This Smoke Alarm alone is not a suitable substitute for complete fire
detection systems in places housing many people—like apartment buildings,
condominiums, hotels, motels, dormitories, hospitals, health care facilities,
nursing homes, day care facilities, or group homes of any kind. It is not a
suitable substitute for complete fire detection systems in warehouses,
industrial facilities, commercial buildings, and special-purpose non-residential
buildings which require special fire detection and alarm systems. Depending
on the building codes in your area, this Smoke Alarm may be used to provide
additional protection in these facilities.
In new construction, most building codes require the use of AC or AC/DC
powered Smoke Alarms only. In existing construction, AC, AC/DC, or DC
powered Smoke Alarms can be used as specified by local building codes.
Refer to NFPA 72 (National Fire Alarm and Signaling Code) and NFPA 101
(Life Safety Code), local building codes, or consult your Fire Department for
detailed fire protection requirements in buildings not defined as “households”.
1. Insert a flathead screwdriver between the
mounting bracket pin and the mounting bracket.
SPECIAL COMPLIANCE CONSIDERATIONS, Continued
FCC Compliance
This equipment has been tested and found to comply with the limits for a
Class B digital device, pursuant to Part 15 of the FCC rules. These limits are
designed to provide reasonable protection against harmful interference in
a residential installation. This equipment generates, uses and can radiate
radio frequency energy and, if not installed and used in accordance with
the instructions, may cause harmful interference to radio communications.
However, there is no guarantee that the interference will not occur in a
particular installation. If this equipment does cause harmful interference to
radio or television reception, which can be determined by turning the equipment off and on, the user is encouraged to try to correct the interference by
one or more of the following measures:
• Reorient or relocate the receiving antenna.
• Increase the separation between the equipment and receiver.
• Connect the equipment into an outlet on a circuit different from that of
the receiver.
• Consult the dealer or an experienced radio or TV technician for help.
Warning: Changes or modifications to the product, not expressly approved
by First Alert / BRK Brands, Inc., could void the user’s authority to operate
the equipment.
This device complies with Part 15 of the FCC Rules. Operation is subject
to the following two conditions: (1) this device may not cause harmful
interference, and (2) this device must accept any interference received,
including interference that may cause undesired operation.
HUD MAP Program
Certain HUD battery powered Smoke Alarm applications, especially those
that fall under HUD 223(f) MAP (Multi-family Accelerated Processing), may
require a 10 Year sealed tamper resistant battery. This alarm does not meet
that requirement. Substitute First Alert SA340B.
Continued...
3. Push the locking pin through the hole near the battery drawer on the
back of the Smoke Alarm.
LIMITED WARRANTY
BRK Brands, Inc., ("BRK") the maker of First Alert® brand and BRK® brand
products, warrants that for a period of ten years from the date of purchase,
this product will be free from defects in material and workmanship.
BRK, at its option, will repair or replace this product or any component of
the product found to be defective during the warranty period. Replacement
will be made with a new or remanufactured product or component. If the
product is no longer available, replacement may be made with a similar
product of equal or greater value. This is your exclusive warranty.
This warranty is valid for the original retail purchaser from the date of initial
retail purchase and is not transferable. Keep the original sales receipt.
Proof of purchase is required to obtain warranty performance.
BRK dealers, service centers, or retail stores selling BRK products do not
have the right to alter, modify or any way change the terms and conditions
of this warranty.
This warranty does not cover normal wear of parts or damage resulting
from any of the following: negligent use or misuse of the product, use on
improper voltage or current, use contrary to the operating instructions,
disassembly, repair or alteration by anyone other than BRK or an authorized
service center. Further, the warranty does not cover Acts of God, such as
fire, flood, hurricanes and tornadoes or any batteries that are included with
this unit.
BRK shall not be liable for any incidental or consequential damages
caused by the breach of any express or implied warranty. Except to the
extent prohibited by applicable law, any implied warranty of merchantability
or fitness for a particular purpose is limited in duration to the duration of
the above warranty. Some states, provinces or jurisdictions do not allow
the exclusion or limitation of incidental or consequential damages or
limitations on how long an implied warranty lasts, so the above limitations
or exclusion may not apply to you. This warranty gives you specific legal
rights, and you may also have other rights that vary from state to state or
province to province.
How to Obtain Warranty Service
Service: If service is required, do not return the product to your retailer.
In order to obtain warranty service, contact the Consumer Affairs Division
at 1-800-323-9005, 7:30 AM - 5:00 PM Central Standard Time, Monday
through Friday. To assist us in serving you, please have the model number
and date of purchase available when calling.
For Warranty Service return to:
BRK Brands, Inc., 25 Spur Drive, El Paso, TX 79906
Battery: BRK Brands, Inc. make no warranty, express or implied, written or
oral, including that of merchantability or fitness for any particular purpose
with respect to battery.
TABLE OF CONTENTS
Introduction . . . . . . . . . . . . . . . . . . . . . . . . . . . . . . . . . . . . . . . . . . . . . . . . . .1
Fire Safety Tips . . . . . . . . . . . . . . . . . . . . . . . . . . . . . . . . . . . . . . . . . . . . . . .1
Before You Install This Smoke Alarm . . . . . . . . . . . . . . . . . . . . . . . . . . . . .1
How To Install This Smoke Alarm . . . . . . . . . . . . . . . . . . . . . . . . . . . . . . .2-3
Optional Locking Features . . . . . . . . . . . . . . . . . . . . . . . . . . . . . . . . . . . .2-4
Understanding the Indicator Lights
and Alarm Horn Patterns . . . . . . . . . . . . . . . . . . . . . . . . . . . . . .4
Weekly Testing . . . . . . . . . . . . . . . . . . . . . . . . . . . . . . . . . . . . . . . . . . . . . . . .4
Regular Maintenance . . . . . . . . . . . . . . . . . . . . . . . . . . . . . . . . . . . . . . . . . .4
If This Smoke Alarm Sounds . . . . . . . . . . . . . . . . . . . . . . . . . . . . . . . . . . . .5
What To Do In Case Of Fire . . . . . . . . . . . . . . . . . . . . . . . . . . . . . . . . . . . . .5
Using the Silence Feature . . . . . . . . . . . . . . . . . . . . . . . . . . . . . . . . . . . . . . .5
Latching Feature . . . . . . . . . . . . . . . . . . . . . . . . . . . . . . . . . . . . . . . . . . . . . .5
If You Suspect a Problem . . . . . . . . . . . . . . . . . . . . . . . . . . . . . . . . . . . . . . .5
Recommended Locations For Smoke Alarms . . . . . . . . . . . . . . . . . . . .5-6
Locations To Avoid For Smoke Alarms . . . . . . . . . . . . . . . . . . . . . . . . . . . .6
About Smoke Alarms . . . . . . . . . . . . . . . . . . . . . . . . . . . . . . . . . . . . . . . . . .6
Special Compliance Considerations . . . . . . . . . . . . . . . . . . . . . . . . . . . .6-7
Limitations of Smoke Alarms . . . . . . . . . . . . . . . . . . . . . . . . . . . . . . . . . . . .7
Limited Warranty . . . . . . . . . . . . . . . . . . . . . . . . . . . . . . . . . . . . . . . . . . . . . .7
First Alert® is a registered trademark of the First Alert Trust.
BRK® is a registered trademark of BRK Brands, Inc.
1
2
3
4
5
6
Printed in Mexico M08-0224-012 Q 07/12
7
MANUAL DEL USUARIO
COMPRENSIÓN DE LOS PATRONES
DE LUZ Y BOCINA
CÓMO INSTALAR ESTE DETECTOR DE HUMO
DETECTORES DE HUMO
SIGA ESTOS PASOS DE PROGRESIÓN SIMPLES!
PIEZAS DE ESTE DETECTOR DE HUMO
Funcionamiento normal
El indicador LED verde destella, una vez/minuto.
La alarma audible no suena.
Condición de prueba
Indicador LED rojo destella rápidamente.
Alarma audible.
2
Detector de Humo de Foto & Ion
Alimentado por Batería
1
Modelo SA320
3
con Silencio
1.
Botón Test/Silence
(Prueba/Silencio)
2.
Compartimento de
apertura automática
para la batería
3.
Si desea bloquear el compartimento de la batería, o bloquear el detector
de humo en el soporte de montaje, sírvase leer la sección "Características
opcionales de bloqueo" antes de iniciar la instalación.
1.
Sujete la base firmemente y gire el soporte de montaje hacia la derecha
para separarlo de la base.
Condición de alarma*
(detector que activa la alarma)
2.
Sostenga el soporte de montaje contra el cielo
(o la pared) de tal forma que los dos grupos
de agujeros universales estén alineados
aproximadamente en las posiciones 9:00 y
3:00 del reloj. Vea la imagen. Escoja uno de
A C
B
los tres grupos de agujeros mostrados, A, B,
o C (vea imagen) y trace alrededor de uno de
C A
B
los grupos. Asegúrese de escoger una ranura
de arriba y abajo en lados opuestos para
poder rotar el Soporte de Montaje Universal
a su posición más tarde. Esto hará más fácil
remover el soporte de montaje en el futuro sin
remover los tornillos. ¡ADVERTENCIA! No instale el detector de humo
sobre una caja eléctrica ya existente. Solo unidades alimentadas con
C.A. están destinadas para ser instaladas sobre cajas eléctricas.
Modo Silence (silencio)
Indicador LED rojo destella rápidamente.
La alarma audible no suena.
Batería baja
Chirrido de alarma aproximadamente
una vez por minuto
Bloqueo del detector
LED rojo destellando 2 segundos
encendido y 2 segundos apagado
Bloqueo de batería baja
LED verde destellando 2 segundos
encendido y 2 segundos apagado
Grupos de montage agujeros
Luz Indicadora
Multicolor
(Rojo o Verde)
2
1
¡IMPORTANTE!
LEA CUIDADOSAMENTE Y CONSERVE ESTAS INSTRUCCIONES.
Este manual del usuario contiene importante información sobre el funcionamiento
del detector de humo. Si se va a instalar esta unidad para que la usen otras
personas, deje el manual o una copia de éste con los usuarios.
CUMPLE CON
LA NORMA
Impreso en México
M08-0224-012 Q 07/12
1.
Soporte de montaje
2.
Agujeros de Montaje
Universal
3.
Modelo SA320
UL 217
4.
6
5.
INTRODUCCIÓN
Gracias por escoger a First Alert® para satisfacer su necesidad de Detectores
de Humo. Usted ha adquirido un avanzado Detector de Humo diseñado para
proporcionarle advertencia temprana sobre un incendio. Tómese su tiempo
para leer este manual y hacer del detector de humo parte integrante del plan de
seguridad de su familia.
Características principales del detector de humo SA320 de combinado foto &
ion:
Sensores de humo fotoeléctricos y de ionización: Tecnologías duales de
detección de humo, fotoeléctrica y de ionización, para lograr una detección óptima
de las partículas de humo producidas en fuegos con y sin llamas.
OptiPath 360 Technology™: Tecnología patentada que brinda 360° de acceso
directo al sensor de humo.
Dos características de silencio: Silenciamiento de la señal de batería baja
silencie temporalmente el chirrido de batería baja por hasta ocho horas antes de
reemplazar la batería con baja carga. Silenciamiento de la alarma silencie una
alarma no deseada por varios minutos.
Dos características de bloqueo: Bloqueo del detector recuerda qué unidad inició
una alarma. Bloqueo de batería baja identifica visualmente qué unidad está en
condición de baja carga de batería.
Montaje perfecto: El soporte de montaje mantiene el detector sujeto en un amplio
ángulo de rotación para permitir una alineación perfecta.
5
4
Nota: Para conservar las baterías, ambas características de “Enclavamiento”
duran 15 minutos y luego se apagan.
Coloque la unidad donde no quede cubierta por el polvo que saldrá al
taladrar los orificios de montaje.
PRUEBA SEMANAL
Compartimento de
apertura automática
para la batería
4.
Con una broca de 3/16 pulg. (5 mm), taladre orificio en cada centro marcado
que dibujó en el cielo raso (o la pared).
•
Gírelo en esta dirección
para quitarlo del
soporte
5.
Inserte los anclajes plásticos para tornillos (incluidos en la bolsa plástica
junto con los tornillos) en los orificios. En caso de que sea necesario,
golpee los anclajes para tornillos suavemente con un martillo, hasta que
queden a ras con el techo o la pared.
Gírelo en esta dirección
para conectarlo al
soporte
6.
3
7.
HERRAMIENTAS NECESARIAS:
Esta unidad está diseñada para ser montada
en el cielo raso o, si fuera necesario, en la pared.
• Lápiz
Instale los tornillos pero no los apriete completamente. Enganche el
soporte de montaje alineando los tornillos a la porción abierta de las
ranuras de montaje universal o rotando el montaje a su posición. Apriete
los tonillos hasta que estén ajustados para asegurar el soporte de montaje.
No los sobre apriete.
Instale las baterías (incluida): Haga coincidir los polos del extremo de la
batería con los polos de la unidad. Cada terminal tiene una marca que indica
la polaridad, un "+" o un "-". Haga coincidir la marca "+" con "+" y la marca
"-" con "-". Una vez que los polos estén correctamente alineados, introduzca
totalmente las baterías hasta que quede firme y no se salga al remecer la
unidad. Si las baterías no se completamente trabada, la unidad no recibirá
alimentación por batería.
NOTA: Después de que usted instale las baterías, la luz indicadora de
potencia parpadeará y la bocina emitirá un chirrido. (Si la unidad pasa
al estado de alarma, la luz parpadeará rápidamente, y la bocina sonará
repetidamente 3 pitidos, una pausa, 3 pitidos.)
• Taladro con broca de 3/16” pulg. (5 mm)
• Destornillador de cabeza plana/estándar
• Martillo
• Pinzas o cuchilla para activar las características opcionales
de bloqueo "resistente a la manipulación indebida"
8.
Conecte el detector de humo al soporte. Alinee las guías de la base de la
alarma con las guías del soporte de montaje. Cuando las guías están
alineadas, gire la base hacia la derecha.
NOTA: Una vez que el detector de humo quede enganchado en el
soporte, puede girar la detector ajustar la alineación.
®
Todas las Alarmas de humo y fuego de First Alert y BRK , conforme a
todos los reglamentos y requerimientos incluyendo UL217 estan diseñados
para detectar particulas de combustión. Las partículas del humo del
número y de la talla que varian se producen en todos los fuegos.
La tecnología de la ionización es generalmente más sensible que tecnología
fotoélectrica en la detección de las partículas pequeñas, que tienden para
ser producidas en mayores cantidades por los fuegos llameantes, qu
consumen los materiales combustibles rápidamente y se separan rápidamente.
Entre las fuentes que originan estos incendios se incluyen papeles quemados en
cestos de basura o incendios provocados por la combustión de grasa en la cocina.
La tecnología fotoeléctrica es generalmente más sensible que tecnología de
la ionización en la detección de las partículas grandes, que tienden para ser
producidas en mayore cantidades los incendios lentos y humeantes, que
despiden humo durante horas antes de estallar en llamas. Entre las fuentes que
originan estos incendios se incluyen los cigarrillos que arden en sofás o camas.
Para obtener una máxima seguridad, instale ambos detectores en cada uno
de los niveles del hogar.
9.
Pruebe la unidad. Vea “Prueba Semanal.”
SUGERENCIAS DE SEGURIDAD EN CASO DE INCENDIO
•
Es importante probar esta unidad todas las semanas para
cerciorarse de que funcione correctamente. Con el botón de
prueba es la manera recomendada de probar este detector.
Presione y mantenga el botón de Prueba/Silencio de la cubierta
hasta que la alarma suene (la unidad puede continuar alarmando
por unos segundos después de que suelte el botón de prueba).
Si la unidad no alarma, asegúrese de que está reciviendo voltaje,
y vuelva a probarla. Si continua sin alarmar, reemplácela inmediamente.
Durante la prueba, usted escuchará un patrón de sonido repetido y fuerte de
3 sonidos, pausa, 3 sonidos, pausa. El LED destella una vez por segundo.
Al probar una serie de unidades interconectadas, cada unidad se debe probar en
forma individual. Al probar cada una de las unidades, cerciórese de que se activen
las alarmas de todas las demás.
MANTENIMIENTO REGULAR
Esta unidad está diseñada para requerir la menor cantidad de mantenimiento
posible, sin embargo se deben seguir ciertos procedimientos para que continúe
funcionando adecuadamente:
• Pruebe la unidad por lo menos una vez a la semana.
• Limpie el detector de humo por lo menos una vez al mes; aspire delicadamente
la cara externa del detector de humo usando el aditamento de cepillo suave de
la aspiradora. Pruebe el detector de humo. No utilice nunca agua, limpiadores o
solventes, ya que podrían dañar la unidad.
• Si el alarmar del humo se contamina por la suciedad excesiva, el polvo y/o el
grime, y no se puede limpiar para evitar alarmar indeseados, reemplazar la
unidad inmediatamente.
• Cambie la localización de la unidad si ésta emite alarmas indeseadas frecuentes.
Encontrará más detalles al respecto en la sección "Lugares donde se debe evitar
localizar los detectores de humo".
• Cuando las baterías se descargada, la unidad emitirá un “chirrido” una vez
por minuto (advertencia de baja potencia). Esta señal dura hasta 7 días, sin
embargo, las baterías reemplazar inmediatamente para asegurar una mayor
protección.
•
•
CARACTERÍSTICAS OPCIONALES DE BLOQUEO
Este detector debe tener la CA o potencia de batería de funcionar.
El Detector de Humo no puede funcionar hasta que usted le instale las
baterías en la posición correcta. (Haga coincidir la marca "+" con "+" y
la marca "-" con "-").
Para quitar permanentemente cualquier bloqueo inserte un destornillador de cabeza llana entre el contacto que bloquea y el bloqueo,
y alzaprime el contacto fuera del bloqueo.
PARA TRABAR EL COMPARTIMIENTO DE LA BATERÍA
PARA DESTRABAR EL COMPARTIMIENTO DE LA BATERÍA
No cierre la gaveta de la batería hasta que haya activado las baterías y
probado el detector.
1.
1.
•
Este detector de humo tiene una gaveta para la batería que no se puede
cerrar si no hay una baterías instalada. Esta medida de seguridad le
advierte que la protección adicional no funcionará sin las baterías.
•
•
No se ubique demasiado cerca de la unidad cuando la alarma esté
sonando. El sonido de la alarma es lo suficientemente fuerte para
despertarlo en caso de emergencia. El exponerse demasiado cerca
a la bocina puede afectar la audición.
•
•
Los detectores tienen diversas limitaciones. Consulte "Limitaciones de los
detectores de humo" para obtener detalles.
CÓMO USAR LA CARACTERÍSTICA DE SILENCIO
La característica del silencio en estas unidades puede callar temporalmente un fo
indeseado del alarmar por hasta 15 minutos.
La característica de silencio no desactiva la unidad; la hace temporalmente
menos sensible al humo. Como medida de seguridad, cuando la cantidad de
humo que detecta la unidad hace suponer que se trata de una situación
potencialmente peligrosa, la unidad no se silenciará, o bien volverá a activar
rápidamente la alarma. Si no sabe cuál es el origen del humo, no piense que
se trata de una alarma no deseada. El no actuar rápidamente durante un
incendio puede causar daños materiales, lesiones graves, incluso la muerte.
La característica del silencio en estas unidades puede callar temporalmente un fo
indeseado del alarmar por hasta 15 minutos. Para utilizar esta característica, presione el botón de Prueba/Silencio en la cubierta. Si la unidad no silencia y no hay
humo pesado presente, o si permanece en modo del silencio continuamente,
debe ser substituido inmediatamente.
SILENCIAMIENTO DE LA ADVERTENCIA
DE BATERÍA DESCARGADA
Esta función de silencio puede silenciar temporalmente el “chirrido” de advertencia
de batería baja durante hasta 8 horas. Pulse el botón Test/Silence (Prueba/Silencio)
de la cubierta del detector hasta que escuche el “chirrido” de acuse de recibo.
Una vez que se active la opción de silenciado del “chirrido” de advertencia de
batería baja, la unidad continúa destellando la luz verde una vez por minuto durante
aproximadamente 8 horas. Después de 8 horas, el “chirrido” de batería baja se
reactiva. ¡Reemplace las baterías lo antes posible; esta unidad nofuncionar
sin baterías cargadas!
CARACTERÍSTICA DE BLOQUEO
Bloqueo del Detector se activa después de que un detector es expuesto a
concentraciones de humo suficientes para dar la alarma. Después de que los
niveles de humo caen por debajo de los niveles de alarma, el LED rojo comienza a
destellar 2 segundos encendido y 2 segundos apagado, a menos que se restablezca
mediante el botón Test/Silence. Continuará parpadeando o “enclavando” por 15
minutos, para darle tiempo de determinar cual de las unidades inició la alarma.
Esta función ayuda al personal de emergencias, a los investigadores o a los
técnicos de servicio a identificar cuál(es) detector(es) de su casa estuvieron
expuestos a concentraciones de alarma de humo suficientes para dar la alerta.
Esto puede ayudar a los investigadores a identificar el origen del humo.
El bloqueo de batería baja se activa cuando el detector está en la "condición
de baja carga de batería". Cuando esto ocurre, el LED destella con luz verde,
2 segundos encendido y 2 segundos apagado. Esta característica está diseñada
para ayudarle a identificar qué detector necesita que se reemplace la batería.
Si bien la alarma suena con el chirrido de batería baja aproximadamente una vez
por minuto, a veces durante las etapas iniciales de la condición de baja carga,
la alarma emite el chirrido a intervalos mayores que un minuto, a veces de varias
horas, hasta que la batería alcanza un bajo nivel de carga constante. Esta novedosa
característica elimina la frustración de esperar y/o identificar qué unidad emite
el chirrido. Continuará parpadeando o “enclavando” por 15 minutos, para darle
tiempo de determinar cual de las unidades tiene una batería baja.
SI SOSPECHA QUE EXISTE UN PROBLEMA
Los detectores de humo no trabajarán adecuadamente si la batería tiene baja
potencia, esta descargada o nó está; el detector esta cubierto tierra, polvo o grasa,
o está instalado en un lugar no adecuado. Limpie el detector como se describe en
“Mantenimiento Regular” e instale las nuevas baterías, luego pruebe el detector.
Si no trabaja adecuadamente, reemplácela de inmediato.
• Si escucha un "chirrido" aproximadamente una vez por minuto, reemplace
las baterías.
• Si experimenta alarmas frecuentes que no son de emergencia (como por
ejemplo, aquellas causadas por el humo que se produce al cocinar),
intente cambiar la localización del detector de humo.
• Si la alarma suena cuando no hay humo visible, intente limpiar o cambiar
la localización del detector de humo. Es posible que la tapa esté sucia.
• Si la unidad no alarma durante la prueba, pruebe instalar baterías nuevas,
y asegúrese de que estén instaladas correctamente.
¡No intente reparar la unidad por sí mismo, ya que ello anulará la garantía!
LUGARES RECOMENDADOS PARA LOCALIZAR
DETECTORES DE HUMO
•
No instale esta unidad sobre una caja de empalmes. Las unidades
alimentadas por CA son las únicas diseñadas para ser instaladas sobre
cajas de empalmes.
•
Conserve la calma. Siga el plan de escape familiar.
Abandone la casa lo más rápido posible. No se detenga a vestirse ni a sacar
nada.
Antes de abrir las puertas, cerciórese de que no estén calientes. Si la puerta
está fría, ábrala lentamente. No abra una puerta caliente, utilice una ruta
alternativa de escape.
Cubra su nariz y boca con un paño (preferiblemente mojado). Respire en forma
corta y poco profunda.
Reúnase con los miembros de su familia en el lugar que han acordado, y
cuéntelos para cerciorarse de que todos estén a salvo
Llame a los bomberos desde afuera lo más pronto posible y deles su nombre
y dirección.
Por ningún motivo vuelva a ingresar a un inmueble que se esté incendiando.
Comuniquese con el departamento de Bomberos para obtener mayor
información sobre como hacer de la casa un lugar más seguro.
Si el detector del humo todavía no está funcionando correctamente, y todavía está
bajo garantía, vea por favor "Cómo obtener servicio de la garantía" en limitado de
la garantía.
Esta unidad no está diseñada para personas con problemas de audición.
Se recomienda instalar unidades especiales que tengan luces estroboscópicas para los residentes con problemas de audición.
•
Mantenga las baterías fuera del alcance de los niños. En el caso de
que una batería sea ingerida, contacte inmediatamente a su centro de
toxicología, su médico, o a la línea de emergencia Nacional de Ingestión
de Baterías al 202-625-3333 ya que pueden ocurrir daños graves.
Para reemplazar las baterías (sin retirar el detector del cielorraso o la pared):
1. Abra el compartimiento de las baterías.
2. Presione las pestañas A y B como se muestra
en el diagrama y retire cada batería.
3. Inserte las baterías nuevas, asegurándose de
que encajen completamente en su compartimiento. Haga coincidir los terminales de los
AB
extremos de las baterías con los terminales de
la unidad.
4. Cierre el compartimiento de las baterías y luego
pruebe la unidad presionando el botón
Test/Silence.
•
Nunca desconecte las baterías para silenciar una alarma no deseada
(por ejemplo humo proveniente de la cocina). Abra una ventana o
puerta cercana y ventile para alejar el humo de la unidad. La alarma se
reinicializará automáticamente una vez que el humo se haya despejado.
Siempre utilice las baterías exactas especificadas por este Manual de
Usuario. NO use baterías recargables. Antes de instalar las baterías limpie
los contactos de las baterías y también los del aparato. Instale baterías
correctamente en cuanto a la polaridad (+ y -).
Por favor, desechar o reciclar adecuadamente las baterías usadas,
siguiendo todas las regulaciones locales. Consulte con su autoridad
local de manejo de desechos o con una organización de reciclaje para
encontrar un centro de reciclaje de productos electrónicos en su área.
NO DESECHE LAS BATERÍAS EN EL FUEGO. LAS BATERÍAS PUEDEN
EXPLOTAR O DERRAMARSE.
El tiempo de vida real depende de el tipo de detector y de el medio ambiente en
donde esté instalado. Todas las baterías especificadas anteriormente son aceptables
para uso en este detector. Independientemente de el tiempo que especifique el
fabricante, usted debe reemplazar la batería inmediatamente despues que comience
el “chirrado” (“advertencia de baja potencia”).
Los sistemas de cierre están diseñados para impedir el retiro no autorizado de las baterías o el detector. No es necesario activar los bloqueos en casas unifamiliares
donde no está una preocupación el retiro desautorizado de las baterías o del alarmar.
Estos detectores de humo cuentan con dos trabas individuales; una para trabar el compartimiento de la batería, y la otra para sujetar la unidad al soporte de montaje. Las trabas
pueden usarse juntas o en forma independiente.
Herramientas necesarias: • Pinzas con puntas de aguja • Destornillador de cabeza plana/estándar
Ambas trabas tienen pasadores de cierre moldeados en el interior del soporte de montaje. Use las pinzas con puntas de aguja para retirar uno o
ambos pasadores del soporte de montaje, según la cantidad de trabas que va a utiliza.
•
NUNCA pruebe esta unidad con una llama. Puede dañar o incendiar la
unidad o la casa. El interruptor incorporado prueba el funcionamiento de
la unidad tal como lo exige Underwriters Laboratories Inc. (UL).
Si el alarmar no puede siempre probar correctamente, substitúyalo inmediatamente. Los productos bajo garantía se pueden volver al fabricante para
el reemplazo. Vea " garantía limitada " en el extremo de este manual.
No se ubique demasiado cerca de la unidad cuando la alarma esté sonando. El
exponerse demasiado cerca a la bocina puede afectar la audición. Al probar la
unidad, aléjese cuando comience a sonar la bocina.
ANTES DE INSTALAR ESTE DETECTOR
¡IMPORTANTE! Antes de comenzar, lea las secciones “Lugares recomendados para
localizar detectores de humo” y “Lugares donde se debe evitar localizar detectores
de humo”. Esta unidad controla el aire y, cuando el humo llega hasta la cámara de
detección, hace sonar la alarma. Puede brindarle suficiente tiempo para escapar
antes de que el fuego se propague. Esta unidad SOLO está diseñada para proporcionar una advertencia oportuna si se instala, mantiene y ubica donde el humo
pueda llegar a ella, y donde todos los residentes puedan oírla, tal como se describe
en este manual. Esta unidad no detectará gases, calor ni llamas. No puede impedir
ni apagar incendios.
Conozca los diferentes tipos de detectores de humo
¿Alimentado con batería o eléctrico? Los diferentes tipos de detectores de
humo proporcionan diferentes tipos de protección. Encontrará más detalles al
respecto en la sección "Acerca de los dectectores de humo".
Sepa dónde debe instalar los detectores de humo
Los profesionales de seguridad en caso de incendio recomiendan por lo
menos un detector de humo en cada nivel de su hogar, en cada dormitorio
y en cada pasillo que conduce a un dormitorio o área independiente donde
alguien duerma. Encontrará más detalles al respecto en los apartados "Lugares
recomendados para localizar detectores de humo" y "Lugares donde se debe
evitar localizar detectores de humo".
Sepa lo que los detectores de humo pueden y no pueden hacer
Un detector de humo puede ayudarle a alertarle con respecto a un incendio,
dándole el tiempo necesario para escapar. Este sólo puede emitir una alarma
una vez que el humo llegue al sensor. Encontrará más detalles al respecto en
la sección "Limitaciones de los detectores de humo".
Consulte sus códigos de construcción locales
Este detector de humo está diseñado para ser usado en una típica casa de
familia. Por sí solo no cumplirá con los requisitos para casas de huéspedes o
pensiones, edificios de apartamentos, hoteles o moteles. Encontrará más
detalles al respecto en la sección "Consideraciones especiales de cumplimiento".
EN CASO DE INCENDIO
•
•
•
Mantenga los detectores limpios y pruébelos semanalmente. Reemplácelas de
inmediato si no están funcionando correctamente. Los detectores de humo que no
funcionan no pueden alertarle en caso de incendio. Mantenga al menos un extintor
de incendios en cada piso y uno adicional en la cocina. Tenga escaleras de escape
de incendios u otros medios confiables de escape de un piso superior en caso de
que las escaleras queden bloqueadas.
• Si escucha una alarma y no está probando la unidad, significa que el
detector le está advirtiendo de una situación potencialmente peligrosa
que requiere su atención inmediata. No ignore NUNCA la alarma. Ignorar
la alarma en una situación de emergencia podría dar como resultado
lesiones graves o la muerte.
• Nunca retire las baterías para silenciar una alarma no deseada.
Al hacerlo se desactivará la unidad y su hogar quedará sin protección.
Luego abra una ventana o puerta cercana y ventile para alejar el humo
de la unidad. La alarma se silenciará y se reinicializará automáticamente
una vez que el humo se haya despejado.
• Si la unidad hace sonar la alarma haga que toda la familia salga inmediatamente de la casa.
Si la unidad hace sonar la alarma y se conoce el origen del humo, por ejemplo
humo proveniente de la cocina o de una caldera con mucho polvo, use la
característica que sirve silenciar la alarma, abra una ventana o puerta cercana y
ventile para alejar el humo de la unidad. (Use la característica que sirve silenciar la
alarma). La alarma se reinicializará automáticamente una vez que el humo se haya
despejado.
•
Cómo elegir una batería de repuesto:
El detector de humo requiere dos baterías “AA” Duracell MN1500.
Estas baterías se venden en tiendas al menudeo.
Siga las normas de seguridad y evite situaciones peligrosas: 1) Use en forma
correcta todos los materiales relacionados con el hábito de fumar. Nunca fume
en la cama; 2) Mantenga los fósforos y encendedores lejos del alcance de los
niños; 3) Almacene los materiales inflamables en envases adecuados; 4) Mantenga
en buenas condiciones los artefactos eléctricos y no sobrecargue los circuitos
eléctricos; 5) Mantenga las cocinas, parrillas para asados, y chimeneas sin grasa
ni mugre; 6) Nunca deje algo cocinándose sin atender; 7) Mantenga las estufas
portátiles y toda llama abierta, como las de las velas, lejos de materiales
inflamables; 8) No deje que se acumulen desperdicios.
CÓMO PROCEDER EN CASO DE ALARMA
Durante una alarma, usted escuchará un patrón de sonido repetido y fuerte de
3 sonidos, pausa, 3 sonidos, pausa.
•
•
3.
Extraer
Pull Out
© 2012 BRK Brands, Inc. Todos los derechos reservados.
Distribuido por BRK Brands, Inc., 3901 Liberty Street Road, Aurora, IL 60504-8122
Atención al consumidor: (800) 323-9005
www.firstalert.com • www.brkelectronics.com
®
6.
Agujero de Clavija del
Seguro de la Gaveta de
la Batería
Indicador LED rojo destella rápidamente.
Alarma audible.
SI SE ACTIVA LA ALARMA
Mantenga pulsado el botón de Prueba en la cubierta del detector
de humo hasta que la alarma suene: 3 sonidos, pausa, 3 sonidos, pausa.
El LED destella una vez por segundo.
2.
Retire el detector de humo del soporte de montaje. Si la
unidad está trabada al soporte, consulte la sección “Para
destrabar la traba” al reverso de esta página.
Introduzca un destornillador de cabeza plana debajo de la
cabeza del pasador de cierre y haga palanca suavemente
a fin de retirarlo de la traba del compartimiento de la
batería. Guarde el pasador si va a trabar nuevamente el
compartimiento).
Si la alarma no suena durante la prueba, NO trabe el compartimiento,
reemplace las baterías y vuelva a probar la alarma; si aún así no suena,
reemplácela inmediatamente.
3.
Para volver a trabar el compartimiento, cierre la puerta
de éste e introduzca nuevamente el pasador de cierre
en la traba.
2.
4.
Conecte nuevamente la unidad al soporte de montaje.
Use las pinzas con puntas de aguja y desenganche un pasador de cierre del
soporte de montaje.
No pinte la unidad. La pintura puede obstruir los orificios de la cámara
de detección e impedir que la unidad funcione correctamente.
(Continuación)
Cómo instalar detectores de humo en residencias para una sola familia
PARA ACTIVAR LA TRABA
La NFPA (Asociación Nacional de Protección contra Incendios) recomienda instalar
como mínimo una unidad en cada piso, y en cada área de descanso. En construcciones nuevas, se deben instalar detectores de humo interconectados y alimentados
por CA. Para obtener mayor información, consulte la sección "Ubicaciones
recomendadas por organismos de seguridad". Para obtener protección adicional,
se recomienda instalar unidades en todas las habitaciones, pasillos, despensas,
áticos y sótanos habitables, donde las temperaturas fluctúan generalmente entre
los 4,4˚ C y 37,8˚ C (40˚ F y 100˚ F). Cerciórese de que ninguna puerta u otra
obstrucción impidan que humo llegue hasta el detector.
1.
2.
3.
Inserte el perno de cierre en el cierre
ubicado enfrente del cajón de baterías
como se muestra en el diagrama.
Al conectarse el detector de humo al soporte de montaje, la cabeza del
pasador de cierre queda encajada dentro de la muesca del soporte.
PARA DESTRABAR LA TRABA
1.
Introduzca un destornillador de cabeza plana entre
el pasador del soporte de montaje y éste último.
2.
Para retirar el detector del soporte, haga palanca
en la unidad y gírela simultáneamente junto con el
destornillador en sentido de las manecillas del reloj.
Al reemplazar las baterías, siempre pruebe el detector de humo antes de volver
a trabar el compartimiento.
Continúa...
3.
Use las pinzas con puntas de aguja y desenganche un pasador de cierre del
soporte de montaje.
Más específicamente, se deben instalar detectores de humo:
• En cada nivel de la casa, incluso en áticos y sótanos habitables.
• En todos los dormitorios, especialmente si las personas duermen con la puerta
parcial o totalmente cerrada.
• En el pasillo cerca de cualquier dormitorio o área de descanso. Si la casa tiene
varios dormitorios, instale una unidad en cada uno de ellos. Si el pasillo mide
más de 12 metros (40 pies) de largo, instale una unidad en cada extremo.
• En la parte superior de la escalera entre el primer y el segundo piso. En la
parte inferior de la escalera del sótano.
Los requisitos específicos de instalación de detectores de humo varían en cada
estado y región. Consulte al cuerpo de bomberos sobre los requisitos actuales de
su localidad. Si instala unidades alimentadas por CA o CA/CC, se recomienda
interconectarlas para brindar protección adicional.
UBICACIONES RECOMENDADAS POR
ORGANISMOS DE SEGURIDAD
NFPA 72 Capítulo 29
“Para su información, el Código Nacional de Alarmas y Señalización, NFPA 72,
dice lo siguiente:”
29.5.1* Detección Requerida.
29.5.1.1* Donde sea requerido por las leyes, códigos, o estándares que rigen para
un tipo de ocupación específica, se instalarán detectores de humo individuales o
de estación-múltiple de la siguiente manera:
(1)*En todos los dormitorios y cuartos de huésped
(2)*Afuera de cada unidad de vivienda dormitorio, dentro de 6.4 m (21 pies) de
cualquier puerta de un dormitorio, con la distancia medida según la trayectoria
del recorrido
(3) En cada piso de la vivienda
(4) En cada nivel de una ocupación de pensión residencial o de cuidado (instalación
pequeña), incluyendo sótanos y excluyendo semisótanos y áticos sin acabar
(5)*En el/las área(s) habitable(s) de un suite
(6) En el/las área(s) habitable(s) de una ocupación pensión residencial o de cuidado
(instalación pequeña)
Reimpreso con permiso del NFPA 72®, el Código Nacional de Alarmas y
Señalización Derechos de autor © 2010 Asociación Nacional de Protección contra
el Fuego, Quincy, MA 02269. Este material reimpreso no es la posición completa
y oficial de la Asociación Nacional de Protección Contra el Fuego, en cuanto al
tema referenciado el cual sólo es representado por el estándar en su totalidad),
(El Código Nacional de Alarmas y Señalizació® y NFPA 72® son marcas registradas
de la Asociación Nacional de Protección Contra el Fuego Inc., Quincy, MA 02269).
Jefe de bomberos del estado de California (CSFM)
Para obtener una mejor detección y advertencia oportuna de incendios, se
recomienda instalar equipos de detección de incendios en todas las piezas y áreas
de la casa de la siguiente forma: Se debe instalar un detector de humo en cada
área de descanso (inmediatamente al lado, pero no dentro, de los dormitorios) y un
detector de calor o humo en la sala de estar, comedor, dormitorios, cocina, pasillos,
áticos habitables, cuarto de calderas, armarios, áreas de servicio y despensas,
sótanos y garajes adosados.
LUGARES DONDE SE DEBE EVITAR LOCALIZAR
DETECTORES DE HUMO
Para obtener un funcionamiento óptimo, se recomienda EVITAR la
instalación de detectores de humo en las siguientes áreas:
• Donde se produzcan partículas de combustión. Estas partículas se forman
al quemarse objetos. Entre estas áreas se incluyen cocinas, garajes y cuartos
de calderas poco ventilados. Si es posible, mantenga la unidad a por lo menos
6 metros (20 pies) de las fuentes de producción de partículas (horno, cocina,
calentador de agua, calefacción). En áreas donde no es posible obtener una
distancia de 6 metros (20 pies) – por ejemplo en casas modulares, móviles o
más pequeñas – se recomienda instalar el detector lo más lejos posible de
aparatos que consuman combustible. Estas recomendaciones de ubicación
se proporcionan para instalar los detectores a una distancia razonable de los
aparatos que consuman combustible y así evitar alarmas "no deseadas". Las
alarmas no deseadas pueden activarse si se instala el detector inmediatamente
al lado de uno de estos aparatos. Estas áreas deben permanecer lo más ventiladas posibles.
• En corrientes de aire cerca de cocinas. Es posible que las corrientes normales
de aire impulsen el humo de la cocina hacia la cámara de detección de una
unidad que esté cerca de ella.
• En áreas muy húmedas, o con mucho vapor, o directamente cerca de baños
con duchas. Mantenga las unidades a por lo menos 3 metros (10 pies) de
duchas, saunas, lavavajillas etc.
• En áreas donde la temperatura es normalmente inferior a 4,4˚ C (40˚ F) o
superior a 37,8˚ C (100˚ F), incluyendo edificios sin calefacción, piezas
exteriores, terrazas, áticos o sótanos no habitables.
• En áreas con mucho polvo, suciedad o grasa. No instale el detector de humo
de la cocina directamente sobre el horno. Limpie regularmente el detector de
la sala de lavado de ropa para mantenerlo libre de polvo o hilachas.
• Cerca de orificios de ventilación de aire, ventiladores de cielo raso o en áreas
demasiado expuestas a corrientes de aire. Las corrientes de aire pueden alejar
el humo de la unidad, impidiendo que éste llegue a la cámara de detección.
• En áreas con demasiados insectos. Los insectos pueden obstruir los orificios
de la cámara de detección y hacer sonar alarmas no deseadas.
• A menos de 305 mm (12”) de luces fluorescentes. El “ruido” eléctrico puede
interferir con el funcionamiento del detector.
• En areas sin aire. Vea “Cómo evitar espacios sin aire.”
CÓMO EVITAR ESPACIOS SIN AIRE
Los espacios sin aire pueden evitar que el humo llegue al detector. Para evitarlos,
siga las siguientes instrucciones.
En techos, instale los detectors lo más cerca de el centro. Si no es posible,
instalelos a más de 102 mm (4”) de la pared.
Para instalar en pared (si está permitido) la orilla de arriba de el detector debe
de estar separada de el techo de 102 a 305 mm (4-12”).
En techos de catedral o con forma de pico, instale el detector a 0.9 m (3 pies)
de el centro de el techo, midiendo horizontalmente. Se podrían requerir detectores
adiccionales dependiendo de la longitud, angulo etc de el techo. Consulte el código
72 de la NFPA para detalles adiccionales.
ACERCA DE LOS DETECTORES DE HUMO
Unidades alimentadas por batería: Brindan protección aun cuando se interrumpe
el suministro de electricidad, siempre que las baterías no estén descargadas y estén
correctamente instaladas. Las unidades se pueden instalar fácilmente sin la ayuda
de un profesional. No proporcionan, no obstante, la funcionalidad de interconexión.
Unidades alimentadas por CA: Se pueden interconectar de modo que si una
unidad detecta humo, sonarán las alarmas de todas las demás. Las unidades no
funcionarán si se interrumpe el suministro de electricidad. Unidades alimentadas
por CA y con batería de respaldo: Funcionarán aun si se interrumpe el suministro
de electricidad, siempre que las baterías no estén descargadas y estén correctamente instaladas. Las unidades deben ser instaladas por un electricista calificado.
Detectores con interconexión inalámbrica: Ofrecen la misma funcionalidad de
interconexión que los detectores con cableado físico, pero sin cables. Las unidades
son fáciles de instalar y no se requiere una instalación profesional. Proporcionan
protección incluso cuando se interrumpe el suministro eléctrico, siempre que las
baterías estén cargadas y correctamente instaladas.
Detectores de humo para usuarios de energía solar o eólica y sistemas de
alimentación con batería de respaldo: Use los detectores de humo alimentados
por CA sólo con inversores auténticos de ondas sinusoides. No use el detector con
fuentes de alimentación ininterrumpible a baterías (UPS), ni con inversores de onda
cuadrada o cuasisinusoide, pues podría dañar el detector. Si tiene dudas sobre
el uso de algún tipo de inversor o UPS, solicite información al fabricante de estas
unidades.
Unidades para personas con problemas de audición: Los residentes con
problemas de audición deben instalar unidades especiales. Cuentan con una
alarma visual y una bocina, y cumplen los requisitos que exige la ley sobre
personas discapacitadas (Americans With Disabilities Act). Esta unidad se puede
interconectar de modo que si una unidad detecta humo, se activarán las alarmas
de todas las demás. Las unidades no funcionarán si se interrumpe el suministro de
electricidad. Deben ser instaladas por un electricista calificado.
Los detectores de humo no se usan con protecciones del detector salvo que la
combinación de ambos dispositivos se haya evaluado y calificado como adecuada
para ese objetivo.
Todas las unidades están diseñadas para advertir oportunamente de incendios, si
se ubican, instalan y cuidan tal como se describe en el manual del usuario y si el
humo llega hasta ellas. Si no está seguro sobre qué tipo de unidad instalar, consulte
el Capítulo 2 de la norma 72 del Código Nacional de Alarmas y Señalización
(National Fire Alarm and Signaling Code) y la norma 101 del Código de Seguridad
Personal (Life Safety Code) de la Asociación Nacional de Protección contra
Incendios: “National Fire Protection Association, Batterymarch Park, Quincy, MA
02269-9101.” Puede que las normas de construcción locales exijan instalar
unidades específicas en construcciones nuevas o en diferentes áreas de la casa.
CONSIDERACIONES ESPECIALES
DE CUMPLIMIENTO
Este Detector de Humo es adecuado para usarse en apartamentos, condominios,
casas adosadas, hospitales, guarderías, centros de salud, pensiones, hogares
colectivos y dormitorios siempre que ya exista un sistema de detección de fuego
primario para satisfacer los requisitos en áreas comunes como vestíbulos, pasillos,
o pórticos. Usar este Detector de Humo en áreas comunes puede que no provea
suficiente aviso a todos los residentes o cumplir con las ordenanzas/reglamentos
locales de protección contra el fuego.
Esta unidad por sí sola no reemplaza los sistemas completos de detección de
incendios en lugares donde habita una gran cantidad de personas, como edificios
de departamentos, condominios, hoteles, moteles, residencias de grupos,
hospitales, clínicas, asilos de ancianos, guarderías infantiles u hogares en que
residen varias familias. No reemplaza los sistemas completos de detección de
incendios en bodegas, instalaciones industriales, edificios comerciales y edificios
no residenciales para propósitos especiales que requieren sistemas de alarma y
de detección de incendios especiales. Es posible que esta unidad se pueda usar
para proporcionar protección adicional en este tipo de instalaciones según las
normas de construcción de su localidad.
En construcciones nuevas, la mayoría de las normas de construcción exigen el uso
de detectores de humo alimentados por CA o CA/CC solamente. Los detectores
de humo alimentados por CA, CA/CC o CC se pueden usar en construcciones
actuales tal como lo especifican las normas de construcción de su localidad. Para
conocer detalladamente los requisitos de protección contra incendios en edificios
no clasificados como "residenciales", consulte las normas 72 del Código Nacional
de Alarmas y Señalización (National Fire Alarm and Signaling Code) y 101 del
Código de Seguridad Personal (Life Safety Code) de la NFPA (Asociación Nacional
de Protección contra Incendios), las normas de construcción locales o al cuerpo
de bomberos de su localidad.
Programa de MAP de HUD
Algunas aplicaciones de Detectores de Humo alimentados por baterías, especialmente aquellos que se incluyen en HUD 223(f) MAP (Procesamiento Acelerado
Multi-familiar), pueden requerir una batería de 10 Años sellada y resistente a la
manipulación. Este detector no llena ese requisito. Sustituya con First Alert SA340B.
Continúa...
Empuje el perno de cierre a través del orificio que hay cerca del cajón de
baterías en la parte trasera del detector de humo.
CONSIDERACIONES ESPECIALES DE CUMPLIMIENTO, Continuación
Cumplimiento con la FCC
Este equipo ha sido probado y se ha encontrado que opera dentro de los límites
para un dispositivo digital Clase B, según la Parte 15 de las reglas de la FCC.
Esos límites están diseñados para proporcionar una protección razonable de la
interferencia perjudicial en instalaciones residenciales. Este equipo genera, usa y
puede irradiar energía de radiofrecuencia y, si no se instala y se usa de acuerdo
con las instrucciones, puede causar interferencia perjudicial a las comunicaciones
de radio.
Sin embargo, no hay ninguna garantía de que la interferencia no ocurra en una
instalación particular. Si este equipo crea una interferencia perjudicial a la recepción
de radio o televisión, la cual se puede determinar encendiendo y apagando el
equipo, se le alienta al usuario a intentar corregir la interferencia por medio de las
siguientes medidas:
• Reorientar o recolocar la antena de recepción.
• Incrementar la distancia entre el equipo y el receptor.
• Conectar el equipo en una toma de un circuito diferente al del receptor.
• Consulte con el concesionario o un técnico de radio o televisión para ayuda.
Advertencia: Los cambios o las modificaciones al producto, no expresamente
aprobados por First Alert / BRK Brands, Inc., pueden anular la autorización del
usuario de operar el equipo.
Este dispositivo cumple con la Parte 15 de las Reglas de la FCC. La operación
está sujeta a las siguientes dos condiciones: (1) este dispositivo no debe causar
interferencia perjudicial, y (2) este dispositivo debe de aceptar cualquier interferencia
recibida, incluyendo interferencia que pueda causar una operación no deseada.
LIMITACIONES DE LOS DETECTORES DE HUMO
Los detectores de humo han contribuido a reducir la cantidad de muertes provocadas por incendios en hogares del mundo entero. Sin embargo, como todo
dispositivo de advertencia, sólo pueden funcionar si se ubican, instalan y mantienen
en forma correcta, y si el humo llega hasta ellos. Los detectores no son infalibles.
No todas las personas se pueden despertar con los detectores de humo.
Practique el plan de escape al menos dos veces por año, asegurándose que todas
las personas participen, desde los más pequeños hasta los ancianos. Espere a que
los niños dominen la planificación y la práctica del escape de incendios antes de
realizar in ejercicio de incendios durante la noche cuando estén durmiendo. Si los
niños u otras personas no se despiertan rápidamente ante el sonido del detector
de humo o si hay bebés o miembros de la familia con limitaciones de movilidad,
asegúrese que se les asigne alguien para que les ayude en el ejercicio de incendio
y en el caso de una emergencia. Se recomienda realizar el ejercicio de incendio
mientras los miembros de la familia estén durmiendo para determinar cuál es
su reacción ante el sonido del detector de humo durante el sueño y si pueden
necesitar ayuda en el caso de una emergencia.
Los detectores de humo no funcionan si no están conectados a una fuente
de alimentación. Las unidades de baterías no funcionarán si las baterías no están
puestas o están desconectadas o descargadas, si no se usa el tipo adecuado de
batería o si no se instalan adecuadamente. Las unidades alimentadas por CA no
funcionarán si se ha interrumpido la fuente de alimentación (fusible fundido o
cortacircuito abierto, falla en el tendido eléctrico o en la central generadora de
potencia, incendio que queme los alambres, etc.). Si le preocupan las desventajas
que presentan las unidades alimentadas por baterías o por CA, instale ambos tipos
de detectores.
Los detectores de humo no pueden detectar un incendio si el humo no llega
hasta ellos. Es posible que el humo proveniente de incendios en chimeneas,
paredes, techos o al otro lado de puertas cerradas no llegue hasta la cámara de
detección y haga sonar la alarma. Debido a ello, se deben instalar detectores en
cada dormitorio o área de descanso, especialmente si las puertas permanecen
cerradas durante la noche y en el pasillo que da a ellos. Los detectores de humo
no pueden detectar un incendio si el humo no llega hasta ellos.
Es posible que los detectores de humo no detecten un incendio en otro piso
o área de la casa. Por ejemplo, puede que una unidad independiente instalada en
el segundo piso no detecte el humo proveniente del sótano hasta que el fuego se
haya propagado. Es posible que esta situación no le dé suficiente tiempo para
escapar en forma segura. Para obtener un mínimo de protección se debe instalar
por lo menos una unidad en cada área de descanso de cada nivel de la casa.
Incluso con una unidad en cada piso, puede que las unidades independientes no
proporcionen suficiente protección como lo hacen las unidades interconectadas,
especialmente si el incendio se origina en un área aislada de la casa. Algunos
expertos en seguridad recomiendan interconectar unidades alimentadas por CA
con batería de repuesto (consulte la sección "Acerca de los dectectores de humo")
o sistemas profesionales de detección de incendios, de modo que si una unidad
detecta humo, sonarán las alarmas de todas las demás. En algunos casos, es
posible que las unidades interconectadas adviertan sobre un incendio antes que
las unidades independientes, ya que al detectar la presencia de humo todas las
unidades hacen sonar sus alarmas.
Puede que no escuche la alarma de los detectores de humo. A pesar de que
las bocinas de estas alarmas cumplen o exceden las normas actuales, puede que
no se escuchen si: 1) la unidad está ubicada al otro lado de una puerta parcial o
totalmente cerrada, 2) los residentes han consumido drogas o alcohol, 3) el ruido
del sistema estereofónico, TV, tráfico, acondicionador de aire u otros artefactos no
permite oír la alarma, 4) los residentes presentan problemas de audición o tienen el
sueño profundo. Los residentes con problemas de audición deben instalar unidades
especiales que tengan alarmas visuales y sonoras.
Debido a que el humo de algunos incendios no llega inmediatamente a la
unidad, puede que los detectores de humo no tengan suficiente tiempo para
hacer sonar la alarma antes de que el incendio provoque daños, lesiones o
la muerte. En este tipo de incendios se incluyen aquellos provocados por
personas que fuman en la cama, niños que juegan con fósforos, o por
explosiones violentas de gas.
Los detectores de humo no son infalibles. Como todos los aparatos electrónicos,
en su fabricación se han usado compuestos que pueden desgastarse o fallar en
cualquier momento. Las unidades se deben probar semanalmente para asegurar
una protección adecuada. Los detectores de humo no pueden impedir o apagar
incendios. No reemplazan los seguros de propiedad o de vida.
Los detectores de humo tienen una vida útil limitada. Este unidad se deberá
reemplazar de inmediato si no funciona correctamente. Se recomienda le substituye
un detector del humo después de 10 años. Anote la fecha de adquisición en el
espacio proporcionado en la parte posterior de la unidad (detector de humo).
GARANTÍA LIMITADA
BRK Brands, Inc. (“BRK”), el fabricante de los productos marca First Alert® y
BRK®, garantiza que por un período de 10 años a partir de la fecha de compra
este producto estará libre de defectos de material y de fabricación. BRK, a su
elección, reparará o reemplazará este producto o cualquiera de sus componentes
que esten defectuosos, durante el período de vigencia de su garantía. El reemplazo
sera hecho con un producto o componente nuevo ó reparado. Si el producto ya
no estuviera disponible, el reemplazo sera hecho con un producto similar de
igual o mayor valor. Esta es su garantía exclusiva.
Esta garantía es válida para el comprador original, a partir de la fecha de
compra y no es transferible. Conserve el recibo de compra original. Se requiere
comprobante de compra para hacer válida su garantía. Representantes de BRK,
centros de servicio o tiendas al menudeo que vendan productos de BRK no
estan autorizados a alterar, modificar o cambiar en modo alguno los términos
y condiciones de esta garantía.
Esta garantía no cubre el desgaste normal de las partes o el daño como resultado
de lo siguiente: uso negligente o mal uso de el producto, uso con voltaje o
corriente incorrecto, uso contrario a las instrucciones de operación, desensamble,
reparación o alteraciones hechas por personal o centro de servicio no autorizado
por BRK. Ademas, esta garantía no cubre actos impredecibles como incendio,
inundaciones, huracanes y tornados o las baterías que estan incluidas en la
unidad.
BRK no sera responsable por daños accidentales o a consecuencia de el
incumplimiento de cualquier garantía expresa o implícita. Excepto hasta donde lo
prohiba la ley vigente, toda garantía implícita de comercialidad o idoneidad para
fines particulares esta limitada en duración al período de la garantía actual.
Algunos estados, provincias o jurisdicciones no permiten la exclusión o limitación
de daños accidentales o consecuenciales, ni un límite en la duración de una
garantía implícita, por lo que las limitaciones o exclusiones anteriores pueden no
ser pertinentes para su caso particular. Esta garantía le otorga derechos legales
específicos, y puede que tenga otros derechos que varien de una jurisdicción a
otra.
Cómo obtener el servicio de garantía
Servicio: Si requiere de servicio, no regrese el producto a la tienda en donde lo
compró. Para obtener el servicio de garantía, comuníquese con el departamento
de Atención al Cliente (Consumer Affairs Division) al teléfono 1-800-323-9005,
de 7:30 AM a 5:00 PM, tiempo del centro (Estados Unidos), de Lunes a Viernes.
Para poder brindarle un mejor servicio, por favor tenga a la mano el numero de
modelo y fecha de compra al momento de llamar.
Para servicio de garantía, devolver a:
BRK Brands, Inc., 25 Spur Drive, El Paso, TX 79906
Batería: BRK Brands, Inc., no ofrece garantías expresas o implícitas, escritas ni
orales, incluyendo las de comercialización o idoneidad para fines particulares
respecto a la batería.
CONTENIDO
Introducción . . . . . . . . . . . . . . . . . . . . . . . . . . . . . . . . . . . . . . . . . . . . . . . . . . . . . . .1
Sugerencias de seguridad en caso de incendio . . . . . . . . . . . . . . . . . . . . . . . . .1
Antes de instalar este detector . . . . . . . . . . . . . . . . . . . . . . . . . . . . . . . . . . . . . . .1
Cómo instalar este detector de humo . . . . . . . . . . . . . . . . . . . . . . . . . . . . . . . .2-3
Características opcionales de bloqueo . . . . . . . . . . . . . . . . . . . . . . . . . . . . . . .2-4
Comprensión de los patrones de luz y bocina . . . . . . . . . . . . . . . . . . . . . . . . . . .4
Prueba semanal . . . . . . . . . . . . . . . . . . . . . . . . . . . . . . . . . . . . . . . . . . . . . . . . . . . .4
Mantenimiento regular . . . . . . . . . . . . . . . . . . . . . . . . . . . . . . . . . . . . . . . . . . . . . .4
Si se activa la alarma . . . . . . . . . . . . . . . . . . . . . . . . . . . . . . . . . . . . . . . . . . . . . . .5
En caso de incendio . . . . . . . . . . . . . . . . . . . . . . . . . . . . . . . . . . . . . . . . . . . . . . . .5
Cómo usar la característica de silencio . . . . . . . . . . . . . . . . . . . . . . . . . . . . . . . .5
Característica de bloqueo . . . . . . . . . . . . . . . . . . . . . . . . . . . . . . . . . . . . . . . . . . .5
Si sospecha que existe un problema . . . . . . . . . . . . . . . . . . . . . . . . . . . . . . . . . . .5
Lugares recomendados para localizar detectores de humo . . . . . . . . . . . . . .5-6
Lugares donde se debe evitar localizar detectores de humo . . . . . . . . . . . . . . .6
Acerca de los dectectores de humo . . . . . . . . . . . . . . . . . . . . . . . . . . . . . . . . . . .6
Consideraciones especiales de cumplimiento . . . . . . . . . . . . . . . . . . . . . . . . .6-7
Limitaciones de los detectores de humo . . . . . . . . . . . . . . . . . . . . . . . . . . . . . . .7
Garantía limitada . . . . . . . . . . . . . . . . . . . . . . . . . . . . . . . . . . . . . . . . . . . . . . . . . . .7
First Alert® es una marca registrada de First Alert Trust.
BRK® es una marca registrada de BRK Brands, Inc.
Impreso en México M08-0224-012 Q 07/12
1
2
3
4
5
6
7