1
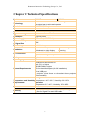
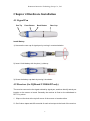
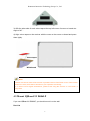
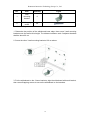
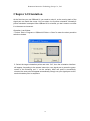
IQBoard UI V7.0
User Manual
Copyright(C) 2003-2013 Returnstar Interactive Technology Group Co., Ltd.
Web: www.recoverystar.com; www.iqboard.net
Tel: 0086-591-87274373
Fax: 0086-591-87274383
E-mail: [email protected]
Returnstar Interactive Technology Group Co., Ltd.
Statement
This manual is for IQBoard UI V7.0.
Use this product strictly according to the detailed operation instruction in this manual
so as to ensure proper use. Please read this manual carefully before you install this
product.
Opening the package means you have agreed to purchase this product, Returnstar
will not accept returns of opened packages.
The product specifications may be subject to change without prior notice. The sample
pictures in this User Manual may differ from the real product.
Returnstar reserves all rights to charge the fee at anytime for product replacement,
revision and update. The information in this manual is subject to regular change
without prior notice. Returnstar will make no warranties with respect to this product
and disclaims any warranties, whether express or implied, of merchantability and
fitness for a particular purpose.
Trademark Notice
Returnstar and IQBoard are registered trademarks of Returnstar Interactive
Technology Group Co., Ltd.. Windows is a registered trademark of Microsoft
Corporation.
Recycling
Always return your used electronic products, batteries, and packaging materials to
separate collection. This way you help prevent uncontrolled waste disposal and
promote the recycling of materials.
2
Returnstar Interactive Technology Group Co., Ltd.
TABLE OF CONTENTS
STATEMENT ................................................................................................................................... 2
TRADEMARK NOTICE ................................................................................................................... 2
RECYCLING .................................................................................................................................... 2
CHAPTER 1 PRODUCT INTRODUCTION ............................................................................................... 4
CHAPTER 2 TECHNICAL SPECIFICATIONS ............................................................................................. 6
CHAPTER 3 MODEL DESCRIPTION ....................................................................................................... 7
CHAPTER 4 HARDWARE INSTALLATION .............................................................................................. 8
4.1 SIGNAL PEN ....................................................................................................................................... 8
4.2 RECEIVER (FOR IQBOARD UI D006XP ONLY) .......................................................................................... 8
4.3 MOUNT IQBOARD UI D006LP............................................................................................................. 9
4.4 CONNECT RECEIVER WITH CONTROLLER ................................................................................................ 11
4.5 CONNECT CONTROLLER WITH PC ......................................................................................................... 11
4.6 ADJUST PROJECTION AREA ................................................................................................................. 12
CHAPTER 5 INSTALL AND UNINSTALL DRIVER ................................................................................... 13
5.1 INSTALL ........................................................................................................................................... 13
5.2 UNINSTALL ....................................................................................................................................... 13
CHAPTER 6 ORIENTATION ................................................................................................................. 14
CHAPTER 7 SETUP HOTKEYS ............................................................................................................. 16
CHAPTER 8 WRITING SETTINGS ........................................................................................................ 18
CHAPTER 9 OPERATION .................................................................................................................... 19
9.1 SIGNAL PEN ..................................................................................................................................... 19
9.2 HOTKEYS ......................................................................................................................................... 20
CHAPTER 10 FAQ .............................................................................................................................. 22
CHAPTER 11 CAUTIONS AND MAINTENANCE ................................................................................... 24
11.1 RECEIVER AND CONTROLLER.............................................................................................................. 24
11.2 USB CABLE .................................................................................................................................... 24
11.3 TRANSPORT ................................................................................................................................... 24
11.4 PART REPLACEMENT ........................................................................................................................ 24
3
Returnstar Interactive Technology Group Co., Ltd.
Chapter 1 Product Introduction
IQBoard UI is a portable and low cost device which can transform any flat surface
(including normal whiteboard, display, and even wall) into interactive working place.
Simply attach IQBoard UI to any whiteboard or display, connect your PC and aim your
projector, you instantly have an interactive platform. Pick up the signal pen which
behaves like a mouse, you can now write in digital ink and control desktop
applications directly from the board.
IQBoard UI has the following features:
Portable Design
Besides the magical power of transforming any flat surface into interactive platform,
the entire system weighs less than 2kg. So you can have an interactive whiteboard
whenever and wherever you go.
Easy Set-up
Simply attach IQBoard UI to any flat surface and enjoy your interactive experience.
The whole set-up and orientation process can be done by anyone within a few
minutes.
Interactive Mouse Pen
While providing you the most natural writing feel, the ergonomic signal pen can also
behave like mouse in performing left-click, right-click, double click and other mouse
functions. You will find that controlling your interactive whiteboard has never been
easier.
Save Everything on Board
Whether written in digital ink or by dry erase marker, IQBoard UI can save everything
written on board to editable files, from every single stroke to the whole teaching
process. Your extraordinary moment can become eternity.
Convenient Hotkeys
Provide 14 keys on the left side of whiteboard surface to achieve certain frequently
used functions. The functions of some keys can be customized.
4
Returnstar Interactive Technology Group Co., Ltd.
Powerful IQBoard Software
Specially designed for interactive teaching and presentation, IQBoard Software is a
powerful yet easy-to-use tool that brings your lesson and conference to life.
With IQBoard Software, you can easily create a colorful courseware that captures
students’ eyes. You can enrich your lesson with dynamic multimedia elements and
unlimited resources from our Resource Library; you can use various tools to show
your ideas freely; you can also save the whole teaching process and share with
others…
5
Returnstar Interactive Technology Group Co., Ltd.
Chapter 2 Technical Specifications
Model
D006XP
Technology
Ultrasonic localization & infrared tracking;
use signal pen to write and operate
Resolution
9600×9600, 600 dpi
Precision
0.05mm
Active area
1.5m×2.0m (80" diagonal)
Signal Tracking Rate
8m/s
Orientation
4 and 9 points
Power Supply
USB cable (<5V/500mA)
Power Consumption
of Signal Pen
≤2W
Pen Battery
1 AAA battery
Installation
Mount at the top left corner of Wall mounting or stand
whiteboard or other display
mounting
PC Connection
D006LP
Standard: 3m USB cable
Optional: USB signal amplifier for 10m USB cable
Hotkeys
Optional
Operating Systems
Windows XP/2003/Vista/7, Linux, Mac 10.X
System Requirements
Windows XP/2003/Vista/7/8
Intel C2.1 or higher
256 MB RAM or higher
1G free hard disk space (for full installation)
1 free USB port
1 projector (short throw or ultra-short throw projector
recommended)
Storage
Temperature and Humidity Temperature: -40℃~60℃; Humidity: 0%~95%.
Requirements
Operation
Temperature: 0℃~40℃; Humidity: 15%~85%
Certifications
CE, FCC, RoHS, ISO 9001. ISO 14001, ISO 14021
Warranty
3 years for Receiver and Controller upon registration;
1 year for Signal Pen and USB cable
6
Returnstar Interactive Technology Group Co., Ltd.
Chapter 3 Model Description
IQBoard UI includes 2 versions: IQBoard UI D006XP and IQBoard UI D006LP. Each
version contains different components.
IQBoard UI D006XP
IQBoard UI D006XP is a compact, portable, and easy-to-use device that turns your
whiteboard, RP TV or even wall into an interactive platform.
IQBoard UI D006LP
IQBoard UI D006LP is the perfect combination of IQBoard UI D006XP and normal
whiteboard, which can support soft hotkeys on the left side.
7
Returnstar Interactive Technology Group Co., Ltd.
Chapter 4 Hardware Installation
4.1 Signal Pen
Pen Tip
Front Button
Back Button
Rear Cap
Install Battery
1) Unscrew the rear cap of signal pen by turning it counterclockwise.
2) Insert 1 AAA battery with the plus (+) side up.
3) Screw the battery cap back by turning it clockwise.
4.2 Receiver (for IQBoard UI D006XP only)
The receiver can receive the signal emitted by signal pen, and then identify actual pen
location on the screen or board. Generally the receiver is fixed on the whiteboard or
RP TV by velcro.
1) Wipe out the dust at the top left corner of the screen or board surface.
2) Get 2 velcro tapes and affix one side of each velcro tape to the back of the receiver.
8
Returnstar Interactive Technology Group Co., Ltd.
3) Affix the other side of each velcro tape at the top left corner of screen or board at a
angle of 45°.
4) Align velcro tapes on the receiver with the ones on the screen or board and press
them tightly.
Velcro tapes
Whiteboard
Note:
1. Make sure the two sides of the receiver is parallel to those of the frame corner. If the receiver
inclines too much, there will be deviation in your operation and writing.
2. To ensure sound signal transmission, please avoid using the receiver on soft curtain or
rough wall.
4.3 Mount IQBoard UI D006LP
If you use IQBoard UI D006LP, you should mount it on the wall.
Part List
9
Returnstar Interactive Technology Group Co., Ltd.
No.
Item
Quantity
1
Wall
mounting
bracket
6
Self-tapping
screw
Installation Steps
2
Figure
24
1. Determine the position of the whiteboard lower edge, then screw 3 wall mounting
brackets onto the wall at this height. The distance between each 2 adjacent brackets
shall be about 60 cm.
2. Screw the other 3 wall mounting brackets 122 cm above.
3. Put the whiteboard on the 3 lower brackets, align the whiteboard with each bracket,
then use self-tapping screws to secure the whiteboard on the brackets.
10
Returnstar Interactive Technology Group Co., Ltd.
4.4 Connect Receiver with Controller
The receiver and the controller are connected through 6-pin S-terminal cable.
Connect the S-terminal cable of receiver to the PS/2 port of the controller. In case you
want to hang the controller on the wall, you need to drill two holes on the wall, screw in
the anchor bolts and wall hanging screws (included in the wall hanging suite), then
hang the controller on the wall hanging screws.
Note:
1. To avoid stumble, please do not place the cable on the ground. If you have to do so,
please straighten and stick them on the ground with colored adhesive tape and wire.
2. When retracting the IQBoard UI, please disconnect controller and computer, then
disconnect receiver and controller.
4.5 Connect Controller with PC
You can connect the controller of IQBoard UI with computer through USB cable.
Ports on USB Cable
11
Returnstar Interactive Technology Group Co., Ltd.
USB Port A for connecting PC
USB Port B for connecting controller
1. Connect Port A of the USB cable with the USB port on PC.
2. Connect Port B of the USB cable with the USB port on controller. Then the indicator
on controller should turn red.
4.6 Adjust Projection Area
In case you use a projector, connect the projector to your PC, and adjust the
projection image to make it centered and within the projection area. Then use the
trapezoid rectification function of the projector to make the projection image quadrate.
This blue area is the projection area. Its
range should be within 40-80 inch. For
whiteboards with soft hotkeys, the
projection area should not exceed the
hotkeys.
Note:
Please do not look at the projector directly to avoid its strong light damaging your
eyesight.
12
Returnstar Interactive Technology Group Co., Ltd.
Chapter 5 Install and Uninstall Driver
5.1 Install
Run “IQBoard UI Driver” on the installation CD to install the driver. The computer will
automatically find a new hardware and install the driver. After the installation, the
indicator on the controller should be green.
5.2 Uninstall
Select “Start > Programs > IQBoard UI Driver > Uninstall” to uninstall the driver. You
also can open Control Panel, select “Add/Remove Programs”, and in the list of
Currently Installed Programs, select “IQBoard UI Driver”, then click “Remove” to
remove the driver and orientation program.
13
Returnstar Interactive Technology Group Co., Ltd.
Chapter 6 Orientation
At the first time you use IQBoard UI, you need to orient it, so the moving track of the
signal pen can match the cursor. You can select 4 or 9 points orientation. Normally 9
points orientation is adopted. After IQBoard UI is oriented, you don’t need to re-orient
it in the same environment.
Operation is as follows:
1. Select “Start > Programs > IQBoard UI Driver > Orient” to enter the orient precision
selection window.
2. Select the target orientation points and click “OK”, then the orientation interface
will appear. According to the arrows instruction, use signal pen to press the green
center of the flickering red “+” on the surface. After one point is successfully
oriented, the next point will appear automatically. Simply use your signal pen to click
each orientation point in sequence.
14
Returnstar Interactive Technology Group Co., Ltd.
3. The orientation interface will close automatically after the orientation. Then you
can use signal pen to operate IQBoard UI normally.
Note:
1. If you missed the accurate central point or clicked the wrong point, or the next point
appeared without press, please press “ESC” key on the keyboard to exit this orientation
and re-orient the board. Otherwise, you can’t operate the whiteboard accurately.
2. In case the relative position of the whiteboard and projector is changed, the driver is
updated, or the monitor resolution is altered, please re-orient the board.
15
Returnstar Interactive Technology Group Co., Ltd.
Chapter 7 Setup Hotkeys
At the first time you use the whiteboard with soft hotkeys, you need to set these
hotkeys.
Operation is as follows:
1. Select “Start > Programs > IQBoard UI Driver > Hotkey Settings” to enter the setting
window.
2. Select “Enable hotkeys”, and click “Adjust hotkey function”, then the soft hotkeys
setting interface will appear as follows.
3. Follow the indication on the screen to click relevant hotkeys in sequence. After the
setting is completed, you can use these hotkeys.
16
Returnstar Interactive Technology Group Co., Ltd.
Note:
When setting the soft hotkeys, if some error occurs, you can press “ESC” key on the
keyboard to exit the setting process, and then reset the hotkeys.
17
Returnstar Interactive Technology Group Co., Ltd.
Chapter 8 Writing Settings
You can select Favor Smoothness or Favor Speed for writing. Favor Smoothness is
focus on writing smoothness, but the writing speed will be a little slow. While Favor
Speed is focus on writing speed, but the writing smoothness is not as good as Favor
Smooth.
Operation is as follows:
1. Select “Start > Programs > IQBoard UI Driver > Writing Settings” to enter the
Writing Settings window.
2. Select the one you like, then click “OK”.
18
Returnstar Interactive Technology Group Co., Ltd.
Chapter 9 Operation
9.1 Signal Pen
Tips for using the signal pen:
1. Write at proper strength to guarantee that the signal pen can emit writing signal
(slight buzz can be heard when you close your ear to the signal pen).
2. Try your best to make sure the signal pen and whiteboard is perpendicular (angle:
90°±15°).
3. In order not to block the signal, you fingers should not cover the signal emitter when
writing with signal pen.
You can use the signal pen to do the following operations:
Signal Emitter
Front Button
Back Button
When in Windows Mode
Front Button:
Press the button once to execute left-click function.
Back Button:
Press the button once to execute right-click function;
If IQBoard Software is not started, press the button twice to start IQBoard Software.
19
Returnstar Interactive Technology Group Co., Ltd.
When in Board Mode, annotating on desktop, playing page, or reviewing
operation
Front Button:
If Select function is not activated, press the button once to use Select function;
If Select function is not activated, press the button twice to use Move Page function
(only available in Board Mode);
If Select function is activated, press the button once to execute left-click function.
Back Button:
If no Freehand Drawing Tool is selected, press the button once to select a Freehand
Drawing Tool;
If no Freehand Drawing Tool or Eraser is selected, press the button twice to select an
Eraser;
If any Freehand Drawing Tool is selected, press the button once to select an Eraser;
If any Eraser is selected, press the button once to select a Freehand Drawing Tool.
Note:
1.
The default drawing tool and eraser are Pencil and Normal Circle Eraser.
2.
System will automatically memorize the type of drawing tool or eraser used last time.
For example, if Washing Brush was used last time, then it would be selected again
when pressing the button to switch to Freehand Drawing Tool.
9.2 Hotkeys
IQBoard UI provides hotkeys on the left side of the whiteboard surface. Hotkey
functions are as follows:
20
Returnstar Interactive Technology Group Co., Ltd.
Add Page
: In Windows Mode, press this key to clear all annotations on screen. In
Board Mode, press this key to add a new page in current .cdf file.
Save File
: In Windows Mode, press this key to save all annotations on screen to a
page in current file. In Board Mode, press this key to save the current .cdf file.
Previous Page
Next Page
Mouse
: Press this key to go to the previous page.
: Press this key to go to the next page.
: Press this key, you can use signal pen to achieve click, double-click, and
drag function. When using IQBoard Software, press this key to switch between
Windows Mode and Board Mode.
Pen: There are four pen keys in different colors on the hotkey bar. Press one of these
keys, you can write on board in corresponding color. Press any pen key twice to
modify its properties.
Eraser
: Press this key, you can erase the writing content on board. In Windows
Mode, press this key twice to popup Shut down Windows window.
Tools
: Press this key to popup a quick access bar including shortcut icons for
frequently used tools in IQBoard Software. You can add up to 8 shortcut icons onto
this bar. Press this key again to close the quick access bar.
Applications
: Press this key to popup a quick access bar including shortcut icons
for frequently used applications. You can add up to 8 shortcut icons onto this bar.
Press this key again to close the quick access bar.
Orient
: Press this key to popup the orientation interface. Press this key again to
close the orientation interface.
Start
: Press this key to start IQBoard Software.
Note:
Except the “Start” and “Orient” keys, all other hotkeys are functional only after IQBoard
Software is started.
21
Returnstar Interactive Technology Group Co., Ltd.
Chapter 10 FAQ
1. The whiteboard indicator is not lighting or turns green but without response
during operation.
1) The receiver and controller, or the controller and computer are not well connected,
please check and re-connect.
2) The USB port of computer is damaged, please try another one. In case you are
using desktop computer, please use its rear USB port.
3) IQBoard UI Driver hasn’t been correctly installed. Please uninstall the driver, restart
computer, and re-install the driver. After the installation is completed, please
reconnect the USB cable with computer.
2. I can’t use signal pen to operate or write on the projection area.
1) IQBoard UI Driver hasn’t been started, please restart your computer or run
“RSBoardUI.exe” in the installation folder directly.
2) IQBoard UI Driver hasn’t been correctly installed. Please uninstall the driver, restart
computer, and re-install the driver. After the installation is completed, please
reconnect the USB cable with computer.
3) There is an object in front of the receiver that blocks the signal. Please remove the
object.
4) Signal Pen runs out of battery (if the buzz is weak when pressing the pen tip, or
Low Battery window pops up continually when the signal pen is being normally used,
it means the battery is running out). Please replace the battery.
5) IQBoard Software hasn’t been started, please start IQBoard Software first.
3. Signal pen can only control part of the virtual whiteboard.
1) Orientation is not precise enough, please try to re-orient.
2) The projection area is too large. Please keep it within 40’’ to 80’’.
4. I fail to draw a line properly or find it difficult to control.
1) Orientation is not precise enough, please try to re-orient.
22
Returnstar Interactive Technology Group Co., Ltd.
2) The signal pen runs out of battery. Please try after you replace the battery.
5. When I operate and write on the whiteboard, the system response is slow, or
the stroke is intermittent.
1) The computer is not under normal running or the memory is occupied too much.
Please close some applications or restart the computer.
2) Check if there is interference source nearby, such as flashing red light and
continuous metal crash. Please try to keep a distance from the interference source.
3) The signal pen runs out of battery. Please try after you replace the battery.
For other questions, please consult our service center or local dealer.
23
Returnstar Interactive Technology Group Co., Ltd.
Chapter 11 Cautions and Maintenance
11.1 Receiver and Controller
1. Please do not use sharp or pointed objects to touch the signal receiving area in
front of the receiver.
2. To avoid short circuit and other problems, please do not use wet cloth to clean the
receiver or controller.
3. Please do not use and install IQBoard UI in dusty, foggy, wet and inclement
environment. Keep it away from sharp objects, heat source, corrosive chemicals, fire,
and water.
4. Please firmly secure the receiver and controller to avoid falling and damaging the
parts.
11.2 USB Cable
Do not put the USB cables on the floor where people might stumble over them. If you
have to do so, straighten them and use insulated adhesive tape or cable with contrast
color to tie them up. Please don’t bend the USB cable excessively. Exposing the USB
cable outside for a long time may shorten its life-span and cause other unnecessary
damages, so please keep it carefully. If you use the whiteboard in the meeting room or
classroom, please fix the cable along the cable alley.
11.3 Transport
Please handle with care, and do not put any weight on the receiver so as to avoid
damaging the parts. For long distant transportation, it is suggested to repack the
whiteboard with the original packing. If the original packing is unavailable, insert
some protective padding between the components to protect them from intense
vibration or crash. Please avoid vibration, dampness, electricity, water and pressure
in transportation.
11.4 Part Replacement
Please do not disassemble the device or modify its inner structure so as to prevent
accident or trouble. For maintenance or part replacement, please resort to our
authorized technician. Make sure that you use our designated part or the one with
same specification when replacing.
24