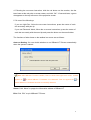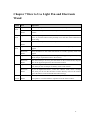
1
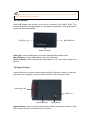
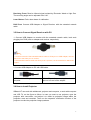
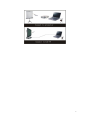
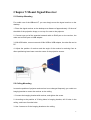
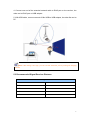
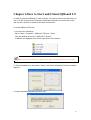
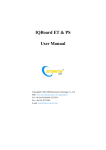
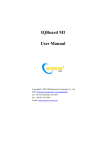
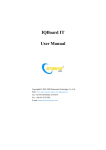
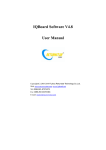
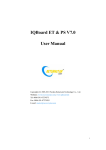
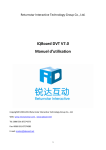
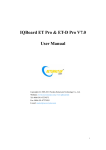
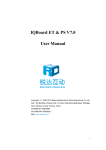
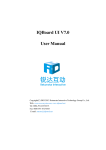
IQBoard LT V7.5
User Manual
Copyright(C) 2003-2011 Fuzhou Returnstar Technology Co., Ltd.
Web: www.recoverystar.com; www.iqboard.net
Tel: 0086-591-87274373
Fax: 0086-591-87274383
E-mail: [email protected]
Statement
This manual is for IQBoard LT.
Use this product strictly according to detailed operation instruction in this manual so
as to ensure proper use. Please read this manual carefully before you install this
product.
Opening the package means you have agreed to purchase this product, Returnstar
will not accept returns of opened packages.
The product specification may be subject to change without prior notice. The sample
pictures in this User Manual may differ from the real product.
Returnstar reserves all rights to charge the fee at anytime for product replacement,
revision and update. The information in this manual is subject to regular change
without prior notice. Returnstar will make no warranties with respect to this product
and disclaims any warranties, whether express or implied, of merchantability and
fitness for a particular purpose.
Trademark Notice
Returnstar and IQBoard are registered trademarks of Fuzhou Returnstar Technology
Co., Ltd.. Windows is a registered trademark of Microsoft Corporation.
Recycling
Always return your used electronic products, batteries, and packaging materials to
separate collection. This way you help prevent uncontrolled waste disposal and
promote the recycling of materials.
Temperature and Humidity Requirements
Storage
Temperature: -40°C ~ 60 °C
Operation
Temperature: 0°C ~ 40 °C
Humidity: 0% ~ 95%
Humidity: 15% ~ 85%
Content
Chapter 1 Product Introduction......................................................................................1
Chapter 2 Specifications ................................................................................................2
2.1 Performance: .....................................................................................................2
2.2 System Requirement: ........................................................................................2
Chapter 3 How to Install Hardware ...............................................................................3
3.1 How to Install Electronic Wand ........................................................................3
3.2 How to Install Light Pen ...................................................................................3
3.3 USB Adapter .....................................................................................................3
3.4 Signal Receiver .................................................................................................4
3.5 How to Connect Signal Receiver with PC:.......................................................5
3.6 How to Install Projector ....................................................................................5
Chapter 4 Install and Uninstall Drivers .........................................................................7
4.1 Install Drivers....................................................................................................7
4.2 Uninstall Drivers...............................................................................................7
Chapter 5 Mount Signal Receiver..................................................................................8
5.1 Desktop Mounting ............................................................................................8
5.2 Ceiling Mounting ..............................................................................................8
5.3 Recommended Signal Receiver Distance .........................................................9
Chapter 6 How to Start and Orient IQBoard LT ..........................................................10
Chapter 7 How to Use Light Pen and Electronic Wand...............................................12
Chapter 8 FAQ ..........................................................................................................13
Chapter 9 Cautions and Maintenance ..........................................................................15
Chapter 1 Product Introduction
IQBoard LT is a portable virtual whiteboard adopting infrared technology. When
connecting with computer, IQBoard LT can transform the projection area (curtain,
whiteboard or wall) into an interactive presenting screen. User can use Light Pen or
Electronic Wand to operate the computer directly on the projection area.
With IQBoard LT, marvelous interactive communicating effects can be achieved in live
demonstration,
teaching,
communication,
news
product
broadcast,
exhibition,
securities
business
evaluation,
conference,
military
video
command,
entertainment, medical consultation, engineering design, competition tactics analysis,
weather analysis, etc.
IQBoard LT is provided with powerful IQBoard Software, which makes your operation
on interactive whiteboard more convenient. Through IQBoard Software, various
interactive teaching and demonstrating functions can be achieved, such as write,
erase, label (in character, line, dimension and angle), drag, zoom, reveal screen,
spotlight, screen capture and save, screen record and playback, handwriting
recognition, on-screen keyboard, text input, text to speech, hyperlink to video, sound
and webpage, and remote conference by NetMeeting. IQBoard Software also has
colorful object animation effects, page switching effects and interactive questions.
Therefore, with IQBoard Software, users can make more interactive courseware by
designing unique object animation, adding sound or hyper linking.
IQBoard Software also includes 500M IQBoard Resource Library covering more than
30 subjects, such as math, physics, chemistry, biology, gymnasium, etc. User can
customize the installation by selecting subjects. The software also provides common
line, shape, character, symbol, decoration graph, background template, Flash
courseware, and other resources. Moreover, the software supports importing various
picture files and DOC(X), PPT(X), XLS(X), PDF files. The page and file created by
IQBoard Software can be saved as and freely converted to various picture files as well
as DOC(X), PPT(X), XLS(X), PDF, html files, etc.
We provide continuous upgrading service for IQBoard Software. For more information
and detailed operation about IQBoard Software, please refer to IQBoard Software
User Manual in the installation CD.
1
Chapter 2 Specifications
2.1 Performance:
Signal Receiver
Digitalizing Technology
Infrared
Active Area (max projection size)
150 inch diagonal
Resolution
9600×9600
Refresh Rate
80 fps
Signal Tracking Rate
320 cm/s
Signal Processing Rate
360 dot/s
PC Connection
Connect PC to IQBoard with USB cable, then
converts into RJ45 network cable (which can be
extended to 40m by option) through USB
adapter, external power is not needed.
Calibration
9 or 12 points
Power Consumption
Less than 1W
Retractable Electronic Wand
Digitalizing Technology
Infrared
Control Buttons
1 button
Power
Battery AA x2
Working Current
40-50 MA
Length
78cm in total, with 63cm retractable wand body.
30-120cm wand body is optional
Light pen
Digitalizing Technology
Infrared
Control Buttons
1 button
Power
Re-charge by USB port
Working Current
40-50 MA
Length
16.6 cm
2.2 System Requirement:
Windows XP/2003/Vista/7
Pentium166 CPU (Pentium II or higher recommended)
64 MB RAM (128 MB recommended)
1G free hard disk space (for full installation)
1 free USB port
1 projector (short focus or ultra-short focus projector recommended)
2
Chapter 3 How to Install Hardware
3.1 How to Install Electronic Wand
1. Unscrew the battery cap by turning it counterclockwise.
2. Insert 2 AA batteries with the plus (+) side up.
3. Screw the battery cap back by turning it clockwise
4. Screw the retractable body clockwise into the holder.
Note:
1. You can press the interactive button in the holder to achieve single click, double click and
right click functions.
2. .Please do not bend Electronic Wand since it has precise electronic components inside.
3. Please don't tweak the button on the wand; otherwise its performance may be affected.
3.2 How to Install Light Pen
Button
Indicator
Pen tip
USB charging port
USB charging port: Re-charge light pen by connecting pen with computer through
USB cable. Charging for 2 minutes can support about 3 hours’ using and 72 hours’
stand-by. (Input voltage: DC4.5V~5.5V. Maximum input current: 450mA)
Button: Press the button once to achieve double click function.
Indicator: When pen tip or button is pressed, indicator will light up. Please re-charge
the pen if indicator is dim or off.
Pen tip: Made of wear resistant material, it’s durable. Press the pen tip on surface for
writing or operation.
3
Note: Single and double click functions can be achieved by pressing button on pen
body or pressing pen tip on surface.
3.3 USB Adapter
With USB adapter, the transfer mode can be converted from USB to RJ45. This
transfer mode has such advantages as long-distance transmission, high transmission
speed and strong extendibility.
RJ45 Port
Mini USB Port
Power Indicator
RJ45 port: connect USB adapter to receiver with extended network cable.
Mini USB port: connect USB adapter to PC with USB cable.
Power indicator: after connecting the USB adapter to PC, the power indicator will
light up.
3.4 Signal Receiver
Signal Receiver can receive infrared signal emitted by Electronic Wand or Light Pen,
thus determine its position, and sent the information to PC through the cable.
Receiving Front
RJ45 Port
Signal Indicator
Laser Button
Signal Indicator: When receiving infrared signal emitted by Electronic Wand or Light
Pen (or other devices), this indicator will turn green.
4
Receiving Front: Receive infrared signal emitted by Electronic Wand or Light Pen.
The receiving angle can be adjusted from 0-30°.
Laser Button: Emit a laser beam for calibration.
RJ45 Port: Connect USB Adapter to Signal Receiver with the extended network
cable.
3.5 How to Connect Signal Receiver with PC:
1. Connect USB Adapter to receiver with the extended network cable, both ends
plugging into RJ45 ports on adapter and receiver respectively.
Note:
1. Connect one end of the extended network cable to RJ45 port on USB adapter, and the
other end to the RJ45 port on receiver.
2. The extended network cable with RJ45 ports is optional, can be extended to 40M at the
longest.
2. Connect USB Adapter to PC with USB cable.
USB Standard-A Plug for connecting Mini USB port for connecting the relevant
computer
port on one end of the adapter
3.6 How to Install Projector
IQBoard LT can work with whiteboard, projector and computer, or work with computer
and LCD TV, as the figure as follow. In case you want to use projector, open the
projector after connection, and adjust it to make its projection image within the
projection area and centered. Then use the trapezoid rectification function of the
projector to make the projection image quadrate.
5
6
Chapter 4 Install and Uninstall Drivers
4.1 Install Drivers
Run “IQBoard LT Drivers V7.5” in the installation CD, and install the drivers according
to the prompt. The computer will automatically find a new hardware and install the
drivers.
Note : The driver is also applicable to IQBoard LT V6.0 , but you need run
“CP210xVCPInstaller.exe” in the “USB Drivers” folder in the installation CD.
4.2 Uninstall Drivers
Select “Start > Programs > IQBoard LT Drivers V7.5 > Uninstall” to uninstall. You can
also open Control Panel, select “Add/Remove Programs”, and in the list of currently
installed Programs, select “IQBoard LT Drivers V7.5”, then press the “Remove” button
to remove the drivers.
7
Chapter 5 Mount Signal Receiver
5.1 Desktop Mounting
For mobile use of the IQBoard LT, you can simply mount the signal receiver on the
desktop.
1. Place the signal receiver on the desktop at a distance of approximately 1.5 times of
the width of the projection image, or on top of or next to the projector.
2. Connect one end of the extended network cable to RJ45 port on the receiver, the
other end to RJ45 port on USB adapter.
3. With USB cable, connect one end of Mini USB to USB adapter, the other flat end to
PC.
4. Adjust the position of receiver and the angle of the receiver’s receiving front to
direct positioning laser beam onto the centre of the projection screen.
5.2 Ceiling Mounting
In case the position of projector and receiver is not changed frequently, you could use
hanging bracket to mount the receiver on the ceiling
1. Connect the hanging bracket with receiver, and tighten the screw.
2. According to the position of 3 fixing holes in hanging bracket, drill 3 holes in the
ceiling, and insert 3 anchor bolts.
3. Use 3 screws to fix the hanging bracket on the ceiling.
8
4. Connect one end of the extended network cable to RJ45 port on the receiver, the
other end to RJ45 port on USB adapter.
5. With USB cable, connect one end of Mini USB to USB adapter, the other flat end to
PC.
Note: If the ceiling is too high, you can use the extension pole to prolong the hanging
bracket.
5.3 Recommended Signal Receiver Distance
Recommended Signal Receiver distance
Screen Size
Distance between Receiver and Screen
70″
2.0-2.5 m
100″
2.5-3.0 m
120″
3.0-3.5 m
150″
4.0-4.5 m
9
Chapter 6 How to Start and Orient IQBoard LT
In order to make the IQBoard LT work normally, you need to orient at the first time you
use it. So the moving track of Electronic Wand and Light Pen can match the cursor,
and you don’t need to re-orient at the same environment.
To orient IQBoard LT drivers:
1. Do one of the followings:
Select “Start > Programs > IQBoard LT Drivers > Start”,
Click the desktop shortcut of “IQBoard LT Drivers”.
A taskbar icon appears at the lower right corner of the screen.
Note: The “Orient” taskbar icon appears only after connecting the receiver correctly.
2. Click the taskbar icon and select “Orient”, the Select Orientation Precision window
appears.
3. Select orientation precision and click “OK”.
10
4. Following the on-screen instruction, click the red button on the receiver, aim the
laser beam at the red point on screen center, and click “OK”. 12 seconds later, a green
dot appears on the top left corner of the projection screen.
5. Do one of the followings:
If you use Light Pen, follow the on-screen instructions, press the center of each
dot accurately with pen tip.
If you use Electronic Wand, follow the on-screen instructions, press the center of
each dot accurately with the wand tip and press the button on the wand holder.
The functions of other items on the taskbar icon menu are as follows:
Auto-run Setting: You can decide whether to run IQBoard LT Drivers automatically
when the system is started.
Note: After IQBoard LT Drivers installed, if the icon at the lower right corner of the taskbar
appears as
, it means IQBoard LT hardware is not detected. If the icon appears as
, it
means IQBoard LT hardware has been successfully detected.
About: Click “About” to popup the information window of IQBoard LT.
Exit: Click “Exit” to quit IQBoard LT Drivers.
11
Chapter 7 How to Use Light Pen and Electronic
Wand
Action
Tool
Operation
Single
Click
Light Pen
Raise the pen tip about 1-2mm from the surface, then press the surface once.
Electronic
Wand
Aim the wand tip to the surface, then press the button on the wand once and
release.
Double
Click
Light Pen
Raise the pen tip about 1-2mm from the surface, then press the surface
twice, or press the button on the pen body once. The time interval should not
be too long.
Electronic
Wand
Aim the wand tip to the surface, then press the button on the wand twice.
Light Pen
Press the pen on the surface and hold for 2 seconds, right-key menu will
appear.
Electronic
Wand
Press the button on the wand and hold for 2 seconds, right-key menu will
appear.
Light Pen
Use the pen to press on an item and drag it to the appointed position (during
which the pen tip should not leave the surface).
Electronic
Wand
Aim the wand tip to an item, press the button on the wand and hold, drag the
item to the appointed position, then release the button.
Light Pen
If you use IQBoard Software, switch into “Board” mode, select a writing
tool, then you can use the pen to directly write on the surface.
Electronic
Wand
If you use IQBoard Software, switch into “Board” mode, select a writing
tool, then you can use the electronic wand to directly write on the surface
(press the button on the wand and hold when writing).
Electronic
Wand
When you use Electronic Wand, the wand tip needn’t touch the surface, you
can operate in a certain distance. Operations are the same as above.
Right
Click
Drag
Write
Remote
Control
12
Chapter 8 FAQ
1. I can’t use Light Pen or Electronic Wand to operate or write on the
operating surface.
1) IQBoard LT Drivers has not been correctly installed. Please uninstall the driver and
re-install.
2) IQBoard LT Drivers has not been started, or IQBoard LT has not been oriented.
Please start the drivers and orient IQBoard LT.
3) The light signal emitted by Light Pen or Electronic Wand is blocked from being
received by receiver. Please do not block the light. Generally it will be fine so as the
light from projector is not blocked.
4) The power of Light Pen or Electronic Wand are low. Please replace the batteries for
Electronic Wand, or re-charge Light Pen.
5) IQBoard Software hasn’t been started, please start IQBoard Software.
6) The receiver and computer is not well connected. Please check and re-connect.
2. I can use Light Pen or Electronic Wand to operate or write only on part
of the operating surface..
The orientation is not precise. Please re-orient.
3. When writing or operating by Light Pen or Electronic Wand, the
response is slow or inconsecutive.
1) The computer is not under normal running or the memory is occupied too much.
Close some running applications or restart the computer.
2) The power of Light Pen or Electronic Wand are low. Please replace the batteries for
Electronic Wand, or re-charge the Light Pen.
3) The posture of holding Light Pen is not correct. Please keep the angle between
light pen and operating surface 50 degrees, in order not to block the light signal from
light pen.
4. The orientation point or cursor moves weirdly.
1) The projection area has trapezoid distortion, please use the trapezoid correction
function of projector, or replace the projector.
2) There is sunlight or other strong light in the room. Please pull down the curtain, and
adjust the light intensity or just shut down the strong light. Avoid direct exposure to
sunlight or other strong light in the room, especially for projector screen.
5. How to determine whether there is light interference?
1) When not operating with Light Pen or Electronic Wand, if the signal indicator on the
receiver is still red, it means there is light interference.
2) When orientating, if the red cross moves automatically, and after you cover the
receiving area with your hand, the cross tops moving, it means there is light
interference.
13
6. When orientating, some orientating points do not respond.
1) When selecting coordinate sampling points, the lasers emitted by receiver didn’t
emit at the correct place. Adjust the elevation of receiving head and the position of
receiving box, to ensure that the 2 lasers would be emitted on middle-left corner and
middle-right corner of the screen separately (3-5cm outside the 2 indicating arrows).
2) If the projection area is within 120-150 inch, please use Exposure Time Setting Tool
to reset the exposure time of receiver above 300 (see Chapter 10), and re-orient.
3) The receiver and computer are not well connected. Please check and re-connect.
For other questions, please consult our service center or local dealer.
14
Chapter 9 Cautions and Maintenance
9.1 Signal Receiver
1. Please do not use sharp or pointed objects to touch the signal receiving area in
front of the receiver.
2. Please do not use wet cloth to clean the receiver or controller to avoid short circuit
and other problems.
3. Please do not use and install IQBoard LT in dusty, foggy, wet and inclement
environment. Keep it away from sharp object, heat source, corrosive chemicals, fire,
and water.
9.2 USB Cable and Extended Network Cable
Do not put the USB cable and Extended Network Cable on the floor where people
might stumble over them. If you have to do so, straighten them and use insulated
adhesive tape or cable with contrast color to tie them up. Please handle carefully and
avoid over-bending. Exposing the USB cable and Extended Network Cable outside
for a long time may shorten their life-span and cause other unnecessary damages, so
please keep them carefully. If you use the whiteboard in the meeting room or class
room, please fix the cables along the cable alley.
9.3 Projection
Face the whiteboard when operating and writing on the projected image, stand aside
when you turn back to face the students. Please do not look at the projector directly to
avoid its strong light damaging your eyesight. Instruct students how to use the
whiteboard, tell them do not to face the projector directly.
9.4 Transport
Please handle with care, and do not put any weight on the receiver and adapter so as
not to damage the parts. In long distance transportation, it is suggested to repack the
whiteboard with the original packing. If the original packing is unavailable, insert
some protective padding between the components to protect them from intense
vibration or crash. Avoid vibration, dampness, electricity, water and pressure in
transportation.
15
9.5 Part Replacement
Please do not disassemble the device or modify its inner structure so as to prevent
accident or trouble. For maintenance or part replacement, please resort to our
authorized technician. Make sure that you use our designated part or the one with
same specification when replacing.
16