1
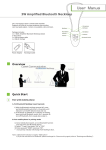
DIGIMAX RF TV Listening System TV Listening System USER MANUAL 1-888-327-1299 www.EarTechTVAudio.com How to use: Digimax RF with under-the-chin headset receiver 1. Plug in transmitter (base station). Transmitter 1. Turn on your sound source (e.g. TV). 2. Insert battery into bottom of receiver. 2. Adjust the volume level on the headset initially to a low volume to protect your hearing. The volume increases when you turn the dial toward “5” and it decreases when you turn the dial in the direction of “0”. + L + 3. Put the headset on. The headset switches on automatically when you spread the arms. The green LED indicates that the receiver is switched on. 4. The blue LED bar in the transmitter is illuminated as soon as the transmitter is communicating with the receiver. 5. Set the desired volume on your headset. 3. Place receiver in transmitter base to charge overnight (or at least 8 hours). 8 HRS 6. When you remove the headset, it will switch off automatically. We recommend that you put the headset back into the transmitter cradle when not in use, to ensure that the battery is always charged. How to use: Digimax RF neckloop CAUTION: If you have a heart pacemaker, contact your physician or the manufacturer of the pacemaker before using the neckloop, to ensure that the pacemaker is not subject to interference. 1. Turn on your sound source (e.g. TV), and switch your hearing aids to T-coil setting. 2. Adjust the volume level on the neckloop initially to a low volume to protect your hearing. The volume increases when you turn the dial toward “5” and it decreases when you turn the dial in the direction of “0”. 3. Ensure that the neckloop lock has been closed completely. The neckloop lock is used to comfortably wear the device and to minimize accidents. 4. Check to see which type of audio output your TV has. Connect transmitter to TV by following one of the illustrations in the set-up guide. 4. Turn on the neckloop receiver by using the ON/OFF switch on the back of the receiver. The green LED on the receiver indicates that the receiver is switched on. 5. The blue LED bar on the transmitter is illuminated as soon as the transmitter is communicating with the receiver. 6. Set the desired volume on your neckloop receiver. 5.Enjoy! 7. Switch the receiver off after use. We recommend that you put the neckloop receiver back into the transmitter cradle when not in use, to ensure that the battery is always charged. REMEMBER:Always switch the neckloop receiver off after use to avoid discharging the battery. 2 EarTech TV Audio DIGIMAX RF User Manual3 Safety lock in the neckloop Tone control (Neckloop version only) (Digimax RF headset receiver and Digimax RF neckloop) Please ensure that the safety lock is completely closed in the neckloop to guarantee proper functioning. The tone control is used to adjust the frequency response independently in the left and right ears on the headset. For the neckloop, the (R) tone control adjusts the sound of both the right and left equally. Ensure the receiver is worn correctly. Listening with the 3.5 mm stereo output (neckloop) Balance control (Digimax RF headset receiver and the 3.5 mm stereo output of the neckloop receiver.) BAL L + L + CONNECT TONE R R ear buds or headphones BAL 3.5 mm stereo output connector L R + + L CONNECT TONE R Important! The overall operating time of the receiver can be reduced significantly depending on the listening volume and the accessories connected to the output. We recommend the purchase of an additional battery to guarantee longer operating time. The balance controls the volume distribution between the right and the left ear with the headset or when the 3.5 mm stereo output is used on the neckloop with earbuds, headphones or induction hooks. Adjust the balance so that you have the same volume level in both ears. Note regarding neckloop: If using with T-coil equipped hearing aids, you can adjust the volume and tone, but not the balance. 4 EarTech TV Audio DIGIMAX RF User Manual5 Volume control Battery charging Set the volume to a comfortable listening level by scrolling the volume control from low to high (0-5). Once the battery is fully charged, it can be used up to six (6) hours. The red LED on the receiver starts flashing once the battery is almost empty, indicating it’s time to charge it. The operating time may vary, depending on the listening v olume. Transparent cover A transparent cover (included) may be installed to protect the volume control against unintended adjustments and against contamination by dust or fluids. 2 3 2 3 4 4 After use, put the receiver into the charging cradle of the transmitter, without a pplying pressure. Ensure that the receiver is placed correctly. If the receiver is charging, the red LED at the left side of the receiver is illuminated. The LED is illuminated green as soon as the battery in the receiver is charged. For first time operation, it is recommended that the battery be charged for eight (8) hours. To install, remove both rubber covers and click the transparent cover into the openings. Range Digimax RF uses the newest 2.4GHz technology. In optimal cases the range is up to 145 feet. The 2.4GHz radio frequency technology also works through walls. The range depends greatly on the building and the environment. An additional battery can be charged in the transmitter. Additional batteries are available through your EarTech TV Audio distributor. The additional battery can be inserted into the side charging bay. Please ensure that the sloped side points upward and that you insert it without applying too much force. The LED on the base is illuminated red when the battery is charging. If the LED is green, the battery is fully charged. We recommend that you exchange the battery in the receiver with the optional spare battery in the transmitter weekly. This ensures that the batteries are used regularly and that they achieve a maximum service life. 6 EarTech TV Audio DIGIMAX RF User Manual7 Cleaning and care DIGIMAX RF TV Listening System Cleaning the transmitter and the receiver If the device becomes dusty or dirty, you can clean it with a clean, damp cloth. Disconnect the transmitter from the power supply before cleaning. How to set up your additional receiver You can use a combination of up to four receivers with the same transmitter. Cleaning the silicone ear adapters The receiver that came with your original system is already paired with that system’s transmitter. Additional receivers must be paired with that transmitter. Pairing allows the transmitter and receivers to recognize each other so they can send/receive the encrypted data. This is required only once for each additional receiver. + 1. Be sure the transmitter has power and is properly connected to the TV. L + 2. Insert battery into bottom of receiver. 3. Turn on your receiver. You can remove the ear adapters from the headset. Clean the ear adapters with mild soapy water. Dry the ear adapters thoroughly and reattach them. Replacing the silicone ear adapters The hypoallergenic silicone ear adapters should be replaced if they become worn or damaged. New silicone adapters can be ordered from your EarTech TV Audio distributor. Important information To turn the Headset receiver on, simply spread the arms and position the earbuds in your ears. You will see a green light blinking, which means it is not yet paired with the transmitter. Note: The headset turns off automatically when you remove it. If using the neckloop receiver, first be sure that the safety lock in the neckloop is connected properly. The lock is used to comfortably wear the neckloop and to prevent accidents. To turn the Neckloop receiver on, use the ON/OFF switch on the back of the receiver. You will see a green light blinking, which means it is not yet paired with the transmitter. Chemical solvents Product damage caused by improper handling as well as damage due to contamination are excluded from the warranty. This device is not protected against moisture. Do not place objects that are filled with fluids on or near the device, e.g. vases. Open fire sources such as burning candles, should not be placed on or near the transmitter. CAUTION – PACEMAKER USERS: If you have a heart pacemaker, contact your doctor or the manufacturer of the pacemaker to ensure that the pacemaker is not subject to interference from the neckloop. Warranty continue to step #4 Refer to the warranty card included in the product package. 8 EarTech TV Audio DIGIMAX RF User Manual9 Troubleshooting 4. Press “Connect” on the back of the transmitter. • The blue band starts blinking. Symptoms Cause Resolution Receiver charge indicator lamp is not illuminated, despite the fact that the receiver is inserted in the charging station. No contact between battery in the receiver and the charging station in transmitter. Make sure the receiver is in the proper orientation in the transmitter charging cradle. No battery inserted into the receiver. Insert battery in receiver. Receiver does not work; no sound transmission. The transmitter is not connected or not connected correctly to the TV set or the stereo system. Check the cable and the plug connection between the transmitter and the TV or stereo device. Use the operating instructions of the TV or stereo device to check whether the output is correctly connected. 5. Press “Connect” on the back of the receiver. • The green light on the receiver changes to a steady glow. • The blue band on the transmitter changes to a steady glow. TV set or stereo system is not switched on. Pairing was lost. Re-pair transmitter and receiver. (see pg. 6) Receiver is not switched on. (Digimax RF neckloop) Switch the receiver on by using the ON/OFF switch on the back of the neckloop receiver. No battery in receiver. Insert battery in receiver. Battery in receiver is not charged. Charge battery or insert fully charged battery. Receiver is too far away from transmitter. Move receiver closer to the transmitter. The battery energy is almost totally consumed. Charge battery or insert fully charged battery. The sound transmission is interrupted for a short time and works well afterwards Receiver is too far away from transmitter. The environment (e.g. walls) distort the reception. Move the receiver closer to the transmitter. Battery will only work for a short time. Battery is not completely charged or defective and therefore no longer operational. Charge battery or insert fully charged or new battery. Charge indicator lamps do not illuminate – despite battery inserted into the charge station of the transmitter. No power to transmitter. Check that the power supply is connected to the electrical outlet and the transmitter. Also check that the electrical outlet is working and that no fuse or breaker was triggered. No contact between battery and charging station in transmitter. Insert the batteries correctly and completely into transmitter. The sound transmission is distorted. Success! Your additional receiver is now paired with the transmitter. 6. Adjust the volume, tone, and balance using the controls on the receiver. 7. Place the receiver back into the cradle of the transmitter when not in use to ensure that the battery is always charged for your next use. 10 EarTech TV Audio DIGIMAX RF User Manual11 DIGIMAX RF TV Listening System 1-888-327-1299 [email protected] www.EarTechTVAudio.com P.O. Box 1516 Johnson City, TN 37605-1516 ©ETC ETTA DIG USER MNL ENG 1213