1
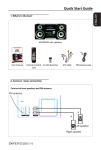
User manual 52E 102mini 102E 202E 150Combo 250Combo English WARNING !!! Ferguson satellite receivers support recording on external hard disk drives (HDDs) and flash memories (pendrives). In all instances, the correct operation of the recording function depends on the type of connected memory! You must read the following limitations. REMEMBER: 1. In order to use an external USB memory, the memory must support the USB 2.0 standard. To ensure stable recording and playback, you must use a memory with a recording speed of 9.0 MB/s or greater. Slower hard disk drives and flash memories may not function properly, have problems with recording (image jitter), or not function at all!!! 2. Only disks with one basic NTFS or FAT32 partition (we recommend using the NTFS format) will function properly. If you do not have such a format, prepare the disk on your computer before connecting it to the receiver. 3. Highly fragmented or used memories may also not operate smoothly or correctly. 4. External hard disk drives should be autonomously powered, since the built-in USB port is unable to provide sufficient power. 5. Only one of the two USB ports can be used at the same time! CAUTION 1. Under no circumstances should you disconnect the USB device from the receiver during recording or playback. Disconnecting during operation may cause damage to the receiver and/or flash memory, and to the recorded data. 2. Do not touch the working device (and in particular the USB connector) with wet hands. Risk of electric shock and permanent damage to the receiver! 2 SAFETY MEASURES We request that you read the instruction manual and recommendations set forward therein. Also remember to correctly position the satellite antenna! In order to avoid an electric shock, never open the housing. Damage to the warranty seal shall void the warranty. Disconnect the device from the mains during thunderstorms or when it is not to be used for an extended period of time. Please remember that the warranty does not cover damage to the equipment caused by a lightning strike. Do not expose the device to direct sunlight. Place it away from sources of heat and humidity. Do not cover ventilation ducts, in order to ensure the correct circulation of air. Place the device horizontally on a flat, even and stable surface. If you move the device from a room that is warm to one that is cold (or vice versa), wait at min. 1 hour before connecting it to the mains. Otherwise, problems may arise. The device should be placed away from vases, bottles, aquariums and other water containers in order to avoid damage. Do not touch the mains plug with your bare hands. Do not place any objects on the housing of the device. This may cause overheating and reception problems. Before commencing maintenance or installation work, disconnect the receiver from the mains. Do not clean the receiver with alcohol or liquids containing ammonia. If necessary, clean it with a soft, lint-free cloth wetted with a gentle solution of water and soap. • Do not connect any cables when the mains plug is in the socket. • Check the condition of your cables. Damaged cables may cause a fire. • Please disconnect the receiver from the mains before connecting any cables. DOWNLOADABLE SOFTWARE Ferguson has taken every effort to provide users with software updates in order to ensure that the parameters of the satellite television receiver are up to date. Ferguson reserves itself the right to amend, change or modify the software used in the satellite television receiver as it shall choose and without prior notification. The latest version of the software is available on the website http://www.ferguson-digital.eu 3 ABOUT THE INSTRUCTION MANUAL Ferguson has made every effort to provide the most current information about its products. Ferguson does not grant any guarantee as to the contents of the present instruction manual and disclaims any implied guarantees concerning market value or suitability for specific purposes. The information contained herein is an instruction intended to enable the correct usage and maintenance of the receiver. Ferguson reserves itself the right to introduce amendments, changes or translations of the instruction manual without prior notification thereof. For this reason, we recommend you regularly visit our website in order to obtain the latest information. MARKINGS AND SIGNS APPLIED TO THE RECEIVER Digital signal transmission logo. This logo informs that the receiver conforms to the Digital Video Broadcasting standards. Risk of electric shock - do not open. This notice warns the user not to open the receiver housing. The housing may be opened solely by authorized service technicians. CE logo. The logo informs that the receiver conforms to Directive 2004/108/EC concerning observance by regulating electromagnetic compatibility, and to Directives 2006/95/EC concerning observance by regulating low voltage electricity and safety with operation of electrical equipment. the terms and Member States the terms and Member States relation to the conditions of of provisions conditions of of provisions handling and Hot surface mark CAUTION: HOT SURFACE. DO NOT TOUCH. The top surface over the internal heat sink may become hot when operating this product continuously. Do not touch hot areas, especially around the “Hot surface mark” and the top panel. Double insulation logo. This logo informs that the receiver is an electrically safe device, provided that it is used in accordance with the recommendations set forward in the chapter concerning safety. Take an active part in protecting the natural environment! • Your device is made from materials that can be processed or recycled. • To this end, you should deliver it to a designated collection point. 4 BASIC INFORMATION ABOUT THE RECEIVER 1. Main features ✔ Reception of high definition channels ✔ Scaling of PAL signals to a resolution of 720p or 1080p ✔ Availability of programmable timers ✔ Separate lists of favourite, TV and Radio channels ✔ Quick channel search function (QuickFind) ✔ Teletext and on-screen captions ✔ DiSEqC 1.0, 1.1 and DiSEqC 1.2, USALS ✔ MPEG-2, MPEG-4, MPEG-4 AVC/H.264 standards ✔ Compatible with DVB-S, DVB-S2 and DVB-T systems ✔ Card reader for pay-per-view television ✔ Common Interface 2. Contents of box Unpack the receiver and check whether all of the following elements are present ✔ 1 x remote control unit ✔ 1 x instruction manual ✔ 1 x receiver 3. Important instructions concerning handling of the receiver The screen menu (OSD) simplifies operation of the receiver and has made it possible to reduce the number of keys on the remote control. All of the functions are displayed on the screen and may be controlled by means of a small number of keys. Common functions have been connected in one "MENU". The selected function is coloured. Depending on the selected option, various "function keys" are displayed: red, yellow, green, blue and white in the form of graphics and descriptions. The colours represent various functions in individual "Menus". The selected function is activated by pressing a key on the remote control unit. The so-called function keys are active only when in the appropriate field there is information about it. The user interface makes it possible to navigate within a menu and between functions in a number of different ways. Certain buttons on the remote control allow direct access to functions. The buttons are multi-functional, i.e. their functions depend on previously activated elements. NOTE: Please keep in mind that new software may change the functionality of the receiver. Photographs and descriptions included in the instruction manual are for informational purposes only. If you should notice an error, please report it - we shall make every effort to have it rectified. 5 4. Remote control Due to the standardization of Ferguson equipment, the majority of these devices use the same remote control unit RCU540 or RCU650. This means that not all keys are used by this equipment model! RCU 52E 102mini 102E 202E 150Combo 250Combo 540 540 540 540 540 650 Turns the receiver on and sets it in standby mode. Switches the sound on and off. back Returns to the previous submenu, or exits the menu. Returns to the previously displayed channel. guide Displays the electronic programme guide. menu Displays the main menu on-screen. F1 Switching between the list of television and radio programmes. F2 Changes the active satellite for the channel list. F3 Used to switch between the resolution selected in the menu and the default resolution of 576i. Allows the user to restore proper functioning of the receiver following the selection of a resolution not supported by the television. F4 Returns to the previously displayed channel. pvr Displays the USB menu, if a USB memory device has been connected. fav Displays a selection of favorite channel lists. Used to change the volume level (lower, higher). Switches to the next or previous channel. info Displays information about the current programme. text Switches on the teletext on-screen, if this is available. audio Switching between soundtrack versions, if these are available. sub Switches the on-screen captions on and off, if these are available. find A quick search for channels according to successive name letters. edit Not used. ratio Change the aspect ratio of 16:9, 4:3, etc.. Buttons used to operate the recording, playback and time shift mode functions. 6 RCU650 RCU650 is 5 in 1 universal remote control is suitable for TV sets, A/V receivers, tuners, BD/DVD players, CD players, DVR players, various STBs (satellite, cable, terrestrial, IPTV), amplifiers and other devices from common manufacturers. The universal remote control can execute basic device functions. Power button turns on the device or sets it in standby mode. Blue LED flashes to show that button is pressed. Predefined stb button for Ferguson Ariva STBs. It is not possible to setup another code set or use learning function. Device buttons can be used for device of your choice. You can setup any code set and/or use learning function. 1, 2, 3, 4, 5, 6, 7, 8, Select particular channel number on a channel list. 9, 0 Enter numeric values. enter the device code during set up Learn a new code from original remote control WEB Direct access to internet services offered by receiver. To make your remote control ready for use, you need to carry out one of the following steps: Set up device via auto search 1. Switch on the device that you like to control. 2. Point the remote control at your device. Press and hold down the device button (e.g. TV) for 5 seconds. The LED turns on and after a moment LED start flashing, that means RCU650 is in auto search mode and you can release device button. 3. The “Volume+” signal is automatically transmitted from the remote control to the device (code scan). As soon as the volume of the device (e.g. TV) changes, immediately press device button to stop the auto search. If the device you are searching for is a CD player, Tuner, TAPE, or AUX then “Power” (instead of “Volume+”) signal is automatically transmitted from the remote control to the device. As soon as the device turns off, press device key to stop the search. You need to turn on the device by Power button before you check other button function. 4. Check the function of the other buttons on the remote control. If none of the buttons function (i.e. the search was not be stopped in time) or the majority of the buttons do not function correctly, restart the search (see steps 2 to 4) to find a suitable code. If the majority of the buttons function correctly, set- up has been successful. Re-press the device button (e.g. TV) to save the code and to terminate the set-up mode. Note: • Entering the auto searching mode, it will search forward from the current code. • Sometimes, remote control does not work properly just because auto search was not stopped in time. In this case, just enter into manual search again, and press Vol– button approx. every 1.5 seconds to search backward the code database. • If you are not satisfied with certain buttons assignments, or some functions are missing, then you can use additionally learning function. 7 Setup device via brand name code 1. Switch on the device that you like to control. 2. Find the code number of your device brand in the code list (e.g. Ferguson 1244) from the relevant device group (e.g. DVB-T). 3. Press and hold the device button (e.g. AUX) for three seconds. Release the device button as soon as LED lights up, now it is in set up mode. 4. Enter the 4-digit device code (e.g. 1244 for Ferguson DVB-T) within 10 seconds. If an entry is not made within 10 seconds, the set- up mode is automatically terminated. 5. The LED turns off if the remote accepts the code. If the LED flashes three times, that means the code may be wrong, and the remote control remains in set-up mode, enter the correct code from the list again in good time. 6. Check the function of the buttons on remote control. If it does not function correctly, try another 4-digit device code from the list under the same brand. Repeat steps 3 to 6 until all the basic functions operate correctly. 7. Exit the set-up mode by pressing the device button. Note: • If you are not satisfied with certain buttons assignments, or some functions are missing, then you can use additionaly learning function. • mode is automatically terminated if no button is pressed for 10 seconds. Setup device via manual search 1. Switch on the device that you like to control. 2. Point the remote control at the device. Press and hold down the device button (e.g. TV) for 3 seconds. The LED lights up and the remote is in manual set-up mode, release the device button now. 3. Press the Vol+ button approx. every 1.5 seconds. 4. As soon as the volume of the device (e.g. TV) changes or the device turns off, check whether the other buttons on the remote control function correctly. If the majority of the buttons does not function correctly, press the Vol+ approx. every 1.5 seconds to initiate the reactive code (manual search is continued, see steps 3 to 4). 5. If the majority of the buttons on the remote control functions correctly, save the code by pressing the device button (e.g. TV) to terminate the manual search. Note: • If you are not satisfied with certain buttons assignments, or some functions are missing, then you can use additionaly learning function. • Sometimes, remote control does not work properly just because manual search was not stopped in time. In this case, just enter into manual search again, and press Vol– button approx. every 1.5 seconds to search backward the code database. • The Manual Search is automatically terminated if no entry occurs during 30 seconds period. • Manual search mode, search forward from the current code. Learning Function The learning function is used to extend the pre-programmed codes. The standard code list already provides you with the most important functions, but it is possible to add a few additional functions. A fully functional original remote control is required for learning programming. Please use fresh batteries for both the Learning Remote Control and the Original Remote Control. 8 1. Press down and hold the device button which you wanted to learn (e.g. BD player), and press find button at the same time, when LED turns on then release the both pressed keys, now remote control is in learning mode for BD codes. 2. Point the IR transmitter of the original remote control remotes face to the IR receiver of your RCU650 remote by approximately 30 mm apart. Keep two remotes at the same straight line to make the learning process more accurate. 3. Press and release the target button on your RCU650 remote control which you want to learn (e.g. info), the LED starts to flash. 4. Press the one button (For example, info button) from your original remote control, when you see LED on new universal remote control flashes three times and stop, it means RCU650 has accepted new code and now you can start to learn another new code from original remote. 5. Repeat step 3 to 4 to learn another code from original remote control. 6. When you finish learning all buttons you want to have, press find button to store all commands you have learnt from original remote and exit from Learning remote. Note: • You can learn limited set of buttons on RCU. Available buttons are shown on the image. • When you can not choose any more buttons from new universal remote control for learning, it means new remote memory is full (RCU650 has limit for total 60 buttons). • The learning mode is automatically terminated if no entry occurs during 14 seconds period. • Press TV button and Number 6 button can delete all codes you have learnt for all devices. Display device code 1. Press and hold the device button, simultaneously press button 1 to display the thousands of the 4-figure code, Count how often the LED flashes, if the LED does not flash, 1. then the number is zero. 2. Press and hold the device button, simultaneously press button 2 to display the hundreds of the 4-figure code. 3. Press and hold the device button, simultaneously press button 3 to display the tens of the 4figure code. 4. Press and hold the device button, simultaneously press button 4 to display the ones of the 4-figure code. For example for code 0169 for TV: 1. Press TV and 1 LED flashes Zero time 2. Press TV and 2 LED flashes One time 3. Press TV and 3 LED flashes Six times 4. Press TV and 4 LED flashes Nine times Reset / Delete Function Just simply press TV button and Button 0 together, when LED flashes three times, now all settings will be deleted, and remote go back to factory default settings. 9 4.1 Installation of batteries Remove the cover of the battery compartment on the rear panel of the remote control unit; slide it downwards and put it aside. Insert two AAA (R03) batteries into the compartment, observing the indicated polarity. Do not mix old and new batteries, or batteries of different types. Replace the battery compartment cover. Slide it upwards until it locks in place. 5. Front panel *illustrative photo 52E 102mini 102E 202E 150Combo 250Combo POWER - - - - OK - MENU - BACK - CA - 1 1 1 1 1 CI - - - 1 - 1 CA: Socket for a subscriber's card – always insert with the chip facing down! 10 5.1. CAM module and subscriber's card Inserting the module and subscriber's card The conditional access module resembles a PC card (known as the PCMCIA) for laptop computers. There are different types of CI modules, suitable for various encoding systems. 1. First, turn off the receiver. 2. Insert the subscriber's card into the conditional access module. 3. Open the tab on the front panel and insert the CI CAM module, forcing it home into the socket on the right side of the front panel. If you want to remove the CAM module, press the black button next to the CAM socket. 4. After correctly inserting the module, turn on the receiver. From now on you will be able to watch coded television channels available through this module and card. Note: Check whether the subscriber's card has been correctly inserted into the module. Incorrect insertion of the card may cause damage to the conditional access module. Warning: Do not attempt to remove or insert the module and/or card when the receiver is turned on!!! 6. Rear panel Depending on your receiver has inputs / outputs as shown below: 52E 102mini 102E 202E 150Combo 250Combo LNB IN LNB-OUT - - ANT IN - - - - LOOP-OUT - - - - HDMI LAN - USB 1 1 1 2 2 2 SCART - 2x RCA analog audio - - 1 x RCA video (cvbs) - - - - - 1 x SPDIF - - - 1 x OPTICAL - - - - RS232 ON/OFF power button - - 11 7. Connecting the satellite antenna In order to check the correctness of connection of external equipment, for example a satellite antenna or converter, read the installation manual or hire a professional technician! Good reception is conditional on the precise placement of the antenna. Even the best antenna will cause reception problems if it is incorrectly adjusted. Even slight placement errors may render reception impossible or considerably impair image/sound quality. Before installation make sure that the location is suitable. The proper direction may be initially determined by making a comparison with other antennas. There should be no objects directly in front of the antenna, for these may block the signal from reaching the bowl! Once you select an optimal location for the antenna, fix and adjust it initially, and then proceed to a precise adjustment. Each antenna is fitted with regulating screws that make it possible to correct its vertical and horizontal placement. Adjusting is somewhat more difficult in the case of digital tuners. You cannot perform adjustments on the basis of the image, because this appears with a certain delay. What is more, the indicators available in the settings menu also act with a delay, and therefore adjustment may take considerable time and be very imprecise. An antenna signal meter will be indispensable for setting up the antenna. The meter must be connected to the antenna cable between the converter and the receiver. This will confirm the presence of a voltage that switches the converter from the tuner and show the signal strength for individual satellites. We strongly recommend hiring a professional technician! 7.1 Connecting an antenna system with a positioner USALS type positioners manufactured by Stab will guarantee the correct operation of your Ferguson receiver. In order to connect an antenna system to a USALS positioner, you should connect the positioner out to the LNB IN of the Ferguson receiver. The role of the positioner installed between the mast and the antenna is to turn the bowl in such a way as to ensure that it is directed to various satellite positions. The USALS function considerably simplifies configuration of the antenna. The Ferguson receiver requires that you enter the geographical coordinates of the antenna in order to automatically calculate the angle of revolution of the motor for individual satellites. The receiver activates the positioner automatically and turns the antenna to the selected satellite. When a signal is locked on, you should precisely adjust the antenna's elevation and azimuth settings in order to optimise signal reception. When correcting the azimuth, the entire antenna assembly and positioner revolve with respect to the mast. If initially the antenna was not directed precisely south, you can correct this now. When you have finished with the first satellite, all other satellites will be remembered automatically, provided that you have introduced their satellite position values correctly. Without the USALS function, programming of the system is much more difficult. To this end you should use the DiSEqC 1.2 function, which turns the antenna to the selected satellite in a nearly identical manner. Since, however, it does not take into consideration the local geographical coordinates, the movement is effected on the basis of the prime meridian and the equator. Therefore it is necessary to introduce corrections separately for each satellite. Due to these difficulties, manufacturers of DiSEqC 1.2 positioners frequently provide useful software on their websites, using which you can easily calculate the location of the satellite. 8. Connecting the terrestrial antenna (Combo models only) There are no special antennas for DVB-T. For collection of digital television, the same antennas as analog TV reception. There is no need to change the antenna system. It is worth to check the quality and condition of the plant, which has so far been used for analog TV reception. Reception problems can be weathered with old antenna systems, or grid antennas. It is recommended to use directional antennas with signal amplifier, depending on the particular situation you may also establish impedance transformer. Indoor antenna may be used only in areas with high signal intensity. 12 9. Connecting the receiver The following illustrations show cable connections for a television and other devices connected with the receiver. If you require any assistance in connecting individual devices, contact your local technician. Before connecting or altering cabling, disconnect the receiver from the mains !!! Note: Availability and type of connection depends on your receiver model! Not all of the connections are applicable for your receiver! 9.1 Connection by means of an HDMI cable (recommended) 1. Connect the antenna to the LNB IN socket of the receiver. 2. Connect the HDMI to the receiver out and the television in. Connection by means of an HDMI cable allows you to obtain the highest image quality. If you have an amplifier with an HDMI out and in, which supports sound sent over HDMI, connect the devices by two HDMI cables. As in the following figure: one cable to the amplifier, and the other from the amplifier to the television set. 13 9.2 Connection by means of SCART cables 1. Connect the antenna to the LBN IN socket of the receiver. 2.Connect the television to the port in accordance with the description. We recommend using shielded SCART cables. 9.3 Connect composite port 1. Connect LNB IN port on a receiver to a satellite dish. 2. Connect the video and audio by means of three cinch cables to the television set. One cable, colored yellow used to send video. The two remaining cable, red and white, are used to connect sound (right and left channel). 14 9.4 Connection of an audio system • Digital sound (including surround sound, if broadcast) can be obtained from two sockets: coaxial (1) or optical SPDIF (2). • Stereo sound may be obtained by connecting cinch cables (white and red) for the left and right channels 9.5 Connection of an external memory 1. The receiver supports all types of hard disk drives in housings that are equipped with an independent power supply. The sole condition is that the hard disk has to have a single basic partition that is formatted in the NTSF (recommended) or FAT32 system. 2.We recommend that you regularly archive data on your PC computer. A large number of files with recordings may slow down cooperation with the receiver (slow loading of the file list). WiFi is supported only when plugged into the USB port is free WiFi USB adapter based on Ralink chipset Rt5370. Available as a separate accessory. 15 9.6 Connection of another receiver Another receiver may be connected through the LNB OUT socket. Please keep in mind, however, that only one device may be used at one time! Permanent damage may result if both are turned on simultaneously. NOTE: LOOP OUT in all Combo receivers is the only signal loop-through. This is not a modulator, so the receiver will not let go of the image decoding (DVB-T and USB) in the form of an analog signal on this connector. 9.7 Connection to the LAN local network In order to connect the receiver to a local network, use an RJ45 cable. We recommend that you restart the receiver whenever the network settings are changed. 16 9.8 Connection to the computer by means of an RS232 Null Modem cable For connection to a computer, use a Null Modem cable. FIRST STEPS 1. Insert the plug of the receiver and other additional devices to a wall socket. 2. Select AV signal source of your television set. 3. The satellite receiver is supplied with reinstalled television channels. In order to watch other, i.e. non-default channels, you should use channel search function. Note: check all of the connections, i.e. antenna cables, audio and video signal cables, before connecting the receiver to the mains! INFORMATION ABOUT THE USER MENU The user interface allows you to use numerous settings and receiver functions. Some buttons on the remote control unit enable direct access to functions of the device. Certain of these buttons have been described, for example Guide, MENU, OK, or coloured for ease of usage. Other buttons are multi-functional and their operation depends on the type of device selected by the user. Hereunder we have presented a brief description of how to use certain device functions available through the user menu. 1. The up/down arrow keys on the remote control are used to move the cursor up and down on the menu. 2. The left/right arrow keys on the remote control are used to move the cursor left and right, and to switch on submenus 3. The OK button is used to enter submenus. 4. The BACK button is used to exit menus or functions. 5. When using a submenu, the OK button is used to confirm your selection; a green background informs that a function is active. 17 10. Main menu Press the MENU button on the remote control in order to display the following main menu, which contains six items: 1. 2. 3. 4. 5. 6. editing channel lists installation system settings tools entertainment recording settings 11. Installation The installation menu is used to set antenna installation parameters and to search for channels on a satellite. 11.1 Antenna connection Select one of the two available options, depending on your system. Two options are available: a fixed antenna (a typical system with a single converter) and an antenna with a positioner. 11.2 Satellite list In this menu select the satellites that you want to use. Select a satellite by pressing the up/down arrow keys. Mark by pressing OK. Each selected satellite will be accompanied by the symbol. The remaining menu options will be available only for selected satellites. 18 11.3 Antenna setup This menu is used to set detailed operating parameters for previously selected satellites, depending on your antenna system. Select a satellite by pressing the left/right arrow keys. Only satellites marked on the list of satellites will be available. Now select the converter type (usually, you do not have to change this option and may leave it set to "universal"). Next, if you have a switch for more than one satellite, set the required port. Depending on the type of switch, these will be options for DiSEqC 1.0 or DiSEqC 1.1 (do not activate these two options simultaneously). The correct setting of the antenna is indicated by bars presenting the strength and quality of the signal. Both should indicate more than 80% for channel reception to be free of interference. In order to check the strength and quality settings, use the "transponder" option in order to alter the frequency and verify whether each V and H polarization is operative. Confirm the settings by pressing BACK. If as the antenna connection menu will have a different positioner: USALS or DiSEqC correct longitude and latitude 19 you have selected: antenna with positioner, the antenna settings appearance. Two operating standards will be available for the 1.2. We recommend using USALS positioners, for which only the must be given. 11.4 Single satellite search In this menu you can search for channels from one selected satellite. To this end, select a satellite by pressing the left/right arrow keys. Only satellites marked on the list of satellites will be available. Next, select whether you want to search only for free to air channels or for all channels, or for radio channels, television channels, or all channels. Three search modes are available: 1. Auto scan – a so-called blind scan, which consists in an automatic search for available satellite frequencies, which are then scanned in turn. 2. Preset scan – according to the TP list – the receiver searches through only frequency by frequency, in accordance with a list recorded for the selected satellite. This list may be edited in a separate menu. 3. FastScan - receiver scans the channels of the selected provider bucket. You can add channels to an existing list or replace an existing list. Please note that the search result and working of this function depends solely on the provider. 11.5 Multi satellite search In this menu you can search for channels from a few satellites. The satellites will be searched automatically one after another in the order in which they were entered in the list of satellites. Options concerning settings and search functions are the same as in the menu: search one satellite. The names of satellites that are to be searched are visible in the lower part of the window. 20 11.6 List of transponders Channels on satellites are located in "sets". Such a "set" of channels comprises a transponder. A list of transponders is a list of frequencies available on a given satellite. In this menu you can edit, add and remove individual frequencies. Select a satellite by pressing the left/right arrow keys, and the desired frequency using the up/down arrow keys. How do I search for a new channel? In order to search for a new channel, you must know the basic channel parameter, i.e. the frequency on which it is broadcast. This parameter may be obtained from the broadcaster, on the internet, in the press, etc. Next proceed to the list of transponders, select a satellite and choose the desired frequency (if it is not on the list, use the function: add – green button on the remote control unit). Now click OK for the selected frequency or the blue button on the remote control, in order to call out the window for searching this frequency. Use the up/down buttons to change search options and confirm by means of the OK button. A search will be started. Newly found channels from this frequency will be added at the end of the list of channels. 21 11.7 Terrestrial Automatic Scan (Combo models only) In this menu, you can search for channels automatically - the receiver searches only frequency by frequency according to the saved list of DVB-T. This list can not be edited in a separate menu. 11.8 Terrestrial Manual Scan (Combo models only) There are two search options manually. Choose the right depending on whether we know the channel or frequency with which it is assigned a channel search. 11.9 Aerial Adjustment (Combo models only) In this menu, set the detailed parameters of the terrestrial antenna. By setting or fixing the antenna you should remember that the signal bars appear with a delay! The correct setting of the antenna is indicated by bars presenting the strength and quality of the signal. Both should indicate more than 80% for channel reception to be free of interference. 22 12. System settings 12.1 Language This menu is used to define the language in which the receiver's menu is displayed. The preferred and second language options refer to audio soundtracks. If a given channel supports more than one audio soundtrack, the receiver will by default search for soundtracks in the selected languages in this order. The language of subtitled – as in the case of audio soundtracks, this determines the language of subtitles to be used, provided that such subtitles are available and active. Teletext - defines the character coding page for the teletext. 12.2 TV System This menu is used to set the image parameters. Above all, you should determine the resolution of the image sent over the HDMI connection. Select the highest possible resolution supported by your HD television set in order to obtain the best image quality. The following resolutions are available: 480i, 480p, 576i, 576p, 720p (50Hz), 720p (60Hz), 1080i (50Hz), 1080i (60Hz), 1080p (50Hz), 1080p (60Hz). If you select an unsupported resolution, your image will be lost or become illegible – you can always use the F3 key to return to the basic resolution, i.e. 576i. If you are using a component cable connection, then for the majority of television sets we recommend a resolution of 720p (50Hz) or 720p (60Hz), depending on your television set, and the YUV video out. Note: if you change the video out to RGB, no video signal will be output over the component connection! If you are using a SCART connection, then for the majority of older television sets we recommend setting the video out to YUV. If your television supports RGB, then activate this option in order to obtain better image quality over the SCART connection. Additionally, in this menu you can choose the format in which the receiver will send sound over the digital connections. We recommend using LPCM in order to also receive a stereophonic signal over the digital connections. 23 12.3 Display setting This menu is used to adjust the image displayed by the receiver. You can change the brightness, contrast and colour saturation. By default, all of these values are set to 50. 12.4 Local time settings This menu is used to set the time and date. The receiver can automatically download the time and date from the satellite (recommended), or you may set the time and date manually. If you are using GMT, you should select the correct time shift value (for example +1 hour for Poland) and turn on or off the summer time, depending on the time of year. The manual editing of the time and date is effected by means of the numerical buttons. 24 12.5 Parental lock In this menu you may specify whether the receiver is to use a parental block or not. In addition, you can turn on or off the password protection function for selected menu options and change the default password. The default password is four zeros: 0000. 12.6 OSD settings In this menu you can define the basic parameters of the on-screen menu (OSD). The first option concerns support for the subtitles. If the subtitles are turned on, the receiver will display them for channels that transmit such subtitles. By default, they are displayed in the language specified in the language selection menu for the subtitles. Another option determines the time for which information bars will be displayed; the default setting is 5 seconds. In addition, you can specify the transparency of the menu to suit your preference. 12.7 Startup channel In this menu you can specify the television or radio channel to which the receiver will be switched on. This function is switched off by default, and this means that the receiver will switch to the channel on which it was turned off. 25 12.8 Other In this menu you can change the remaining options, such as the power supply of the tuners, select the types of channels played, and how the receiver is to behave when switching channels. Clock In Standby enables or disables the clock on the front panel display in standby mode. Note: only if the clock in standby mode is off the receiver draws less than 1W of energy!!! Radio Equalizer enables or disables the audio graphic equalizer display while listening to radio stations. Auto Standby run this option will automatically turn off the receiver after 3 hours of inactivity. 26 13. Tools 13.1 Information In this menu you can obtain detailed information about your software version. The software structure is divided into a number of independent databases. The most important of these from the point of view of the user is the userdb, which archives current settings and channel lists. The receiver's software version is a symbol placed next to maincode. 13.2 Factory settings In this menu you can restore the default settings of the receiver. Note: Restoration of default settings results in the removal of all user settings and the recall of a default channel list; in some cases, no channel list will be available. All changes introduced by the user, including the channel list and configuration of satellite antenna settings, will be removed!!! 13.3 Updating by RS232 This menu allows you to send software, settings or channel lists from one receiver to another receiver of the same type. Connect the receivers using an RS232 Null Modem cable. Select allcode in order to send all of the software, or userdb to send only current settings and the channel list. 27 13.4 Conditional access In this menu you can obtain additional information about the subscriber's card in the card reader. The information presented depends on the type and version of your card. 13.5 Upgrade by USB This menu is used to update the receiver. The latest software is available on the manufacturer's website. The downloaded file needs to be unpacked and recorded to an external USB memory device. Next, select it by means of the LEFT/RIGHT buttons and press start in order to commence the update. 13.6 Local network settings This menu serves to configure addresses and DNS servers. These options concern the Ethernet port, which enables the exchange of data over the network. 28 13.7 Upgrade by network The receiver allows you to update software over the Internet. Detailed information about current connection parameters can be found on the manufacturer's website. 13.8 Network DDNS Setting A popular application of dynamic DNS is to provide a residential user's Internet gateway that has a variable, often changing, IP address with a well known hostname resolvable through standard DNS queries. 29 14. Entertainment The receiver allows access to certain network services and embedded games. • Tetris (classic arranging of successive levels using blocks of various shapes). • Othello (a logical game, which consists in the placement of your colour on a board and changing your opponent's colour; the person whose colour dominates, wins). • Sudoku (the game consists in completing diagrams with numbers from 1 to 9 in such a way that each column and each line contains each number from 1 to 9). The availability of these services depends on their suppliers. The manufacturer is not responsible for any lack of access to additional functionality. 15. PVR – recording configuration 15.1 Storage info This menu displays basic information about the connected USB memory device. An additional option allows you to format the memory device. Press the yellow button in order to select the file system in which the device is to be formatted. Two options are available: FAT and NTFS. Both file systems are supported correctly, however due to the lack of limitations regarding the size of written files and greater reliability, we recommend using the NTFS system. DVRSet - to set the partition to be used for recording. 30 15.2 DVR configuration In this menu you can adapt preferences concerning recording to an external USB memory device. In the first option you decide whether you want to use the time shift option. This mode makes it possible to stop the current transmission at any moment by pressing the PAUSE button and resume it after a break by pressing the PLAY button. Another option allows you to switch on or off the buffering of data gathered by the TimeShift function. This means that once you press the REC button, the contents of the buffer will be recorded and the recording shall be continued. This option is inactive by default, which means that once you press the REC button, the receiver will start recording from that moment on. In this menu you can also determine the type of recorded files. All data are recorded in TS (transport stream) format or in an abbreviated version, with only the default sound and video in PS (program stream) format. We recommend using the TS format, which records the audio soundtracks, video, subtitles and teletext. The “Jump” option concerns the playback of recordings. It defines the time of rapid movement by means of they / forward/back keys, respectively, during playback. Duration - the default duration of the manual recording. After the Timer Record - the behavior of the receiver after recording a scheduled event. Recordings are automatically split the recording and combined automatically during playback. The "TS file size" specifies the amount of data, after which the recording is split. 15.3 Timer settings This menu serves to programme up to 32 different events. Events enable the automatic switching on and off of the receiver to a previously planned programme. 31 Select the event that you want to programme and press OK. Set the timer activation frequency. Select the channel (press OK to display the simplified channel list). Next set the date, start time and duration. Select ‘record’ to return to the events list. A new item has been added. 15.4 Media Player The receiver is equipped with a simple multimedia player. You can use it to listen to music, watch photographs and films, and - first and foremost - play back recordings. The player is available through a menu option or directly, by pressing the PVR button. Music In this tab you can support a number of popular formats of music files, such as MP3, FLAC or OGG. There are a few additional functions that can be operated by means of the functional keys described in the lower part of the screen. Photos In this tab, you can view photographs in JPEG, BMP format. There are a few additional functions that can be operated by means of the functional keys described in the lower part of the screen. When viewing photographs, you may listen to music. To this end, activate the playback of music files and pass to the photograph tab using the LEFT/RIGHT buttons. 32 Web radio The receiver support system for receiving audio in the form of a data stream - the so-called Internet Radio. This feature works only with a properly configured connection to the Internet. Press [Yellow] button to get a current list of radio stations in chosen category. Categories can be changed by selecting [Red] button. Files with lists of each category are saved on connected USB memory. They can be freely modified thus creating your own lists of radio stations. It should be remembered that each press [Yellow] button will overwrite selected list file. Internet radio playback depends on network connection speed and stability. Note that some of the servers can be full when trying to access them, in this case radio will not be played. The maximum number of simultaneous listeners allowed depend on server settings. Video In this tab, you can play back movie files. Also high resolution files can also be played back. Recognized multimedia file extensions are listed below. Not all files with those extensions are playable - some files may include not supported codecs and/or settings. Video files containers: AVI, MKV, MPEG, MPG, M2TS, VOB, TS, TRP, MP4, DVR (default record format) | |-> video codec supported in containers: mpeg2, XVID, H.264 (up to 8 RF) |-> audio codec supported in containers: MP3, AC3 C A U T I O N !!! • Playback of some files may fail or be incorrect. • Copy protected content is not playable. • Playback may suffer temporary interruptions (image freeze, faster/slower playback, etc) when the audio language (audio track) is changed. • A damaged movie file may not be played correctly. • Videos with resolution higher than 1920x1080@25/30P or 1280x720@50/60P may not work properly. • We do not guarantee smooth playback of movies encoded in profiles level 4.1 or higher in H.264. • Playback of movie files with video bitrate over 30 Mbps may be incorrect. 33 Recordings This tab is used to play back recordings made using the receiver. Each recording may be blocked by a password, deleted, or its name changed. Options available during playback (subtitles, teletext, audio soundtracks) depend on the selected recording format!!! During playback, press the INFO button in order to display the information bar. There are a few different methods of quick viewing/scrolling a recording: 1. Use the Fast forward and Rewind buttons to navigate within a current recording and press the PLAY button in order to start viewing from a selected moment. 2. You can set the red cursor by means of the LEFT/RIGHT buttons and confirm with OK in order to start viewing from a selected moment. 3. Another method consists in moving by means of the / keys. Scrolling is effected by the number of minutes defined in the DVR configuration menu. Keep in mind that this function is available only when the time of the recording exceeds the selected scroll time. 4. Another option of quick scrolling a recording is based on usage of the numerical keys. This results in scrolling in accordance with the value applied, i.e. 4 in order to pass to 40% of the recording, 5 in order to pass to 50% of the recording, etc. 15.5 Safe removal of a USB device This function allows you to rapidly and, what is most important, safely remove any USB memory device connected to the receiver. In the case of flash memories or portable disks, this prevents the loss of data when disconnecting the USB memory device. Always use this option before disconnecting a USB memory device! 34 16. Edit channels 16.1 TV channels list In this menu you can edit the list of television channels. Editing is effected by means of the coloured buttons on the remote control unit. The raised colour function is active - select OK on the selected channel in order to use it. BACK, in order to save. How do I move a channel? Proceed to the editing of channel lists. Select a channel and press OK in order to see a preview in a small window. Press the yellow button in order to turn on the channel movement function and then once again press OK on the selected channel (you can select multiple channels). A symbol comprising two arrows will appear next to the channel name. Press [Yellow] button and use the up / down arrows move the cursor to the desired position. Press OK to confirm the move. Next press the yellow button again in order to switch off the channel movement function. Once you are finished, press BACK. A message will appear asking you to confirm the changes made. If you fail to do this, changes in the channel list will not be saved. 35 How do I delete a channel? Proceed to the editing of channel lists. Select a channel and press OK in order to see a preview in a small window. Press the blue button in order to pass to the channel edition menu. Press the blue button in order to switch on the channel delete function and OK on the channel that you want to remove. The symbol X will appear next to the channel name. Next press the blue button again in order to switch off the channel delete function. In this way you can mark one or more channels that you want to delete with the X symbol. Once you are finished, press BACK. A message will appear asking you to confirm the changes made. If you do not do this, the channel(s) will not be deleted. How do I add to the group of favourites? Proceed to the editing of channel lists. Select a channel and press OK in order to see a preview in a small window. Press the FAV button in order to switch on the add-to-favourite-groups function. A window will appear with a list of favourite groups (names of favourite groups are changed in a separate menu). Use the up/down arrows to select the group to which the selected channel is to be added. Next press OK to confirm. Select a channel and press OK on this channel in order to add it to the group. The heart symbol, , will appear next to the channel name. Once you are finished, press FAV in order to switch off the add-to-favourite-groups function. Having completed the addition of channels to successive favourite groups, press BACK. A message will appear asking you to confirm the changes made. If you fail to do it, the changes made will not be saved! 36 How do I change a channel name? Proceed to the editing of channel lists. Select a channel and press OK in order to see a preview in a small window. Press the blue button in order to pass to the channel edition menu. Press the green button in order to switch on the channel name change function. Use the numerical keyboard in order to change the channel name. Confirm the new name by pressing the yellow button. Next press the green button again to switch off the channel name change function. In this way you can change the name of one or more channels. Once you are finished, press BACK. A message will appear asking you to confirm the changes made. If you fail to do it, the changes made will not be saved! 37 16.2 Radio channel list In this menu you can edit the list of radio channels. Editing is effected by means of the coloured buttons on the remote control unit. The raised colour function is active - select OK on the selected channel in order to use it. BACK, in order to save. 16.3 Delete all This option allows you to remove all channels from the channel list. Note: This operation cannot be reversed! Make sure that you are certain that you want to remove all of the channels? Having selected this option, you should wait a while for all of the options available for the channel list to be highlighted as unavailable. 16.4 Favorite The receiver allows you to define up to 32 different groups of favourite channels. In this menu you can change the names of all of them. 38 In order to change a name, select the favourites group and press OK. Next use the numerical and coloured buttons to input the name. Confirm the changes by pressing the yellow button on the remote control. 17. Basic functions supported by the remote control 17.1 Guide This function displays a programme guide. The contents of current, future and detailed information depend on what a given station broadcasts. Having selected a programme, you can use the timer function (green button) to automatically plan the viewing or recording of a given programme. Select the desired programme and press info in order to view detailed information about the programme. Keep in mind that the availability of the said information depends on what a given television station is broadcasting. 17.2 FIND The FIND button calls up the quick channel search function. Enter successive letters by choosing them one by one. The results list is updated after each successive letter is added. Press the blue button in order to proceed to the list containing results of the search procedure and select the desired channel. 39 17.3 TXT - teletext This function displays the teletext, provided that it is broadcast by the selected television station. Keep in mind that the correct code page (diacritical marks) is displayed depending on the language settings made in the language settings menu! 17.4 AUDIO The green audio button displays a window with available audio soundtracks. You can select any of the broadcast soundtracks. Please keep in mind, however, that audio soundtracks with AC3 surround sound may be played back solely through an amplituner connected to the digital audio out – Coaxial or Optical. soundtrack. This function is also available when playing back a recording, provided that the material was recorded in TS format. Audio soundtracks other than those recorded by default will be available during playback only if they are not scrambled or scrambled in the same way as the default recorded Option [level] can adjust the volume of the channel. This option works independently for each channel. 17.5 SUBTITLE The yellow button displays a window with available on-screen captions /subtitles. You can select any of the broadcast subtitles. If subtitles for a given language have been activated in the menu, these will be marked as default on the list. You can, however, select any of the broadcast subtitles. Keep in mind that the availability of subtitles and the way in which they are displayed depends on the broadcaster! This function is also available when playing back a recording, provided that the material was recorded in TS format. 40 17.6 REC - recording This function is available only when an external USB memory device is correctly connected!!! 1. Select a channel and press the REC channel will now be recorded. ● button. The present 2. If you press the REC button again, a list of options will be displayed, where you can determine the duration of the recording (by default, this is 2 hours). 3. The information bar indicates which programme you are recording and viewing. 4. In order to terminate recording, press the STOP button and confirm your decision. Keep in mind that during recording, the information bar may be hidden by means of the BACK button. In order to restore the bar, press REC again. Browsing through a recording – during recording. 1. The contents of a recording are available for browsing in the course of recording. 2. Use the Fast forward and Rewind buttons to navigate within a current recording and press the PLAY button in order to start viewing from a selected moment. 3. You can set the red cursor by means of the LEFT/RIGHT buttons and confirm with OK in order to start viewing from a selected moment. 4. Another method consists in moving by means of the / keys. Scrolling is effected by the number of minutes defined in the DVR configuration menu. Keep in mind that this function is available only when the time of the recording exceeds the selected scroll time. 5. Another option of quick scrolling a recording is based on usage of the numerical keys. This results in scrolling in accordance with the value applied, i.e. 4 in order to pass to 40% of the recording, 5 in order to pass to 50% of the recording, etc. SEMI-TWIN TUNER The receiver is equipped with a so-called SEMI-TWIN TUNER; during recording, this function allows you to watch a different channel broadcast on the same frequency. 1. When recording a channel, press OK in order to display a list of channels available from this transponder. 2. If the recorded channel is not scrambled (FTA) - select any other channel, which you want to watch. 3. If the recorded channel is scrambled - select any other not scrambled (FTA) channel, which you want to watch. 4. You can stop recording at any time by pressing the STOP button. 41 17.7 PAUSE - time shift This function is available only when an external USB memory device is correctly connected!!! The time shift mode allows the user to control the television broadcast by "pausing" and then resuming it from the same point. From the moment you switch on the time shift mode, the Ferguson receiver will constantly record the signal from the satellite in a buffer. The buffer is created automatically on the external USB memory device. Pausing the television broadcast 1. Press PAUSE 2. The time elapsed bar will now be visible on the screen 3. Press the PLAY button in order to resume the television broadcast. The Ferguson receiver continues to record the television broadcast when viewing the previously broadcast programme. Keep in mind that during buffer playback, the information bar may be hidden by means of the BACK button. In order to restore the bar, press PAUSE/PLAY again. Scrolling the contents of the time shift buffer (playback of an earlier television broadcast) 1. Switch on the time shift mode by pressing PAUSE. 2. The contents of the time shift buffer can now be scrolled through. 3. Use the Fast forward and Rewind buttons to navigate through the time shift buffer and press PLAY in order to start playback. 4. You can set the red marker by means of the LEFT/RIGHT buttons and confirm with OK in order to start playback from a selected moment. 5. Another method consists in moving by means of the / keys. Scrolling is effected by the number of minutes defined in the DVR configuration menu. Keep in mind that this function is available only when the buffer time exceeds the selected scroll time. 42 Recording the time shift buffer 1. This option is available only if previously switched on in the receiver's menu. 2. Switch on the time shift mode by pressing PAUSE. 3. Press REC in order to record the existing buffer and continue recording the channel. 4. Perform further operations in accordance with description given for the recording function. 5. It is also possible to view the contents of the current recording as above. Switching off the time shift mode Switch off the time shift mode by means of the STOP button. Keep in mind: when no external memory device is connected to the USB port, the PAUSE button is used to temporarily pause the image, i.e. freeze-frame. 17.8 INFO Pressing the INFO button will call up the information bar for the current channel. This contains information about the current and next programmes (if such information is made available by the broadcaster) If you press it twice, the receiver will display detailed information about the current and next programme – provided that such information is made available by the broadcaster (select by pressing the LEFT/RIGHT buttons) If you press it three times, the receiver will display complete weekly information the program – provided that such information is made available by the broadcaster. 17.9 FAV – favourites If you press the FAV button, the receiver will display a window with groups of favourites (provided that the user has created such groups). 43 ATTACHMENT A - GLOSSARY OF TERMS CA - Conditional Access – a coding system used in order to protect transmitted data against unauthorised access. Access to protected channels is available only to subscribers. CAM - Conditional Access Module – an electronic device, usually fitted with card slots, that allows access to coded pay-perview channels on a receiver equipped with a CI socket. CI - Common Interface – CI sockets of digital receivers are used for the installation of CAM conditional access modules, and thus allow you to view coded pay-per-view channels through these modules. DVB-S the Digital Video Broadcasting standard that defines modulation and error correction in satellite transmissions. In DVB-S, both the MCPC and SCPC modes can be used by the operator to transmit channels. MPEG-2 is used as the transport stream. Guide - Electronic Programme Guide – a service that displays detailed information about current and future programmes on the television screen. FTA - Free-to-air – uuencoded radio and television channels that may be received on any television set. LNB - low-noise block converter – a converter - it converts satellite signals, and then sends them to the tuner through a coaxial cable. The basic parameters are: gain, noise factor and power consumption. MCPC - multiple channels per carrier – more than one signal (channel) is transmitted on a given frequency (transponder). All of these channels comprise a single data stream, which is transmitted on one frequency following modulation. Monoblock – a device that comprises two converters and a DiSEqC switch in a single housing, which receives signals from two satellites on similar orbits. Pay-TV – Pay-per-view digital television, to which only subscribers have access. The service is provided by satellite, cable, over the ground or through the network. SCPC - Single channel per carrier – only one signal (channel) is transmitted over a given frequency (transponder). STB - Set-top box – an electronic device connected to the television set, which processes the signal received from the ground-based, cable or network satellite antenna. It enables the playback of video and sound. TP - Transponder – a type of wireless communication device (transmitter), which automatically receives, modulates, strengthens and responds to a signal coming in real time over a specific frequency. The term is derived from the words "transmitter" and "responder". Usually, each transponder transmits numerous compressed digital channels. DiSEqC - (Digital Satellite Equipment Control) a communication protocol, used between a satellite receiver and equipment such as switches or positioners, which supports switching between television signal sources and antenna control. USALS – (Universal Satellites Automatic Location System) – a communication protocol used between satellite receivers and positioners, which makes it possible to control the positioner through the receiver. Used in connection with the DiSEqC 1.2 protocol. ATTACHMENT B – RCU650 Device Brand Code List Long list of models can be downloaded from www.ferguson-digital.eu Ferguson: RCU RCU-200 RCU-580 RCU150 RCU310 AV-770 Code 1244 1246 1247 1245 1248 Device DVB-T DVD HDplayer HDplayer TUNER TV AEG AIWA AKAI AMSTRAD BANG & OLUFSEN BARCO BAUER BEKO BIAZET BLAUPUNKT CARREFOUR CASIO CLATRONIC 0083 0643 0015 0057 0538 0056 0035 0508 0000 0000 0064 0021 1094 0056 0014 0057 0057 0057 0041 0520 0501 0010 0056 0034 0049 0051 0056 0083 0057 0111 0503 0507 0538 0539 0540 0568 0016 0041 0045 0050 0051 0052 0035 0061 0056 0101 0038 0106 0504 0505 0507 0508 0539 0544 0586 0178 0560 0042 0036 0038 0057 0056 0085 0063 0506 0542 0002 0015 0024 0026 0057 0059 0503 0056 0517 0503 0507 0508 0520 0526 0532 0542 DAEWOO 0006 0016 0050 0051 0052 0055 0056 0062 0063 0079 0081 0086 0087 0096 0057 0507 0532 0128 0129 0132 0135 0562 0595 0616 DELL ECHOSTAR ELEMIS 0516 0051 0056 0006 0038 0056 FINLUX 0019 0020 0038 0044 0051 0052 0056 0063 0057 0035 0501 0504 0233 0510 0511 0512 0526 0532 0558 0568 0582 0585 0586 FUNAI 0051 0063 0095 0056 0024 0104 0049 0038 0503 GOLDSTAR 0007 0036 0088 0532 GRUNDIG HAIER HISENSE 45 0057 0056 0006 0083 0532 0008 0043 0089 0543 0009 0042 0056 0549 0016 0057 0097 0586 0006 0017 0021 0023 0025 0002 0051 0053 0063 0064 0065 0060 0058 0098 0038 0116 0117 0507 0624 0014 0015 0026 0044 0061 0091 0086 0100 0101 0109 0511 0526 0547 0564 0572 0057 0009 0023 0057 0342 HITACHI LG LOEWE MARANTZ MEDION MITSUBISHI NAD NEC NISSAN NOKIA NORDMENDE ORION PACKARD BELL PANASONIC PHILIPS PIONEER RADIOSHACK RCA ROYAL SABA SAMSUNG SANYO 0056 0032 0002 0525 0575 0007 0036 0088 0532 0146 0000 0056 0057 0127 0599 0182 0000 0057 0060 0024 0062 0053 0056 0006 0033 0057 0527 0148 0008 0043 0089 0128 0586 0043 0532 0085 0129 0600 1001 0056 0109 0008 0045 0035 0528 0605 0009 0042 0056 0129 0624 0056 0586 0081 0538 0601 1073 0005 0501 0009 0080 0111 0529 1078 0016 0057 0097 0132 0012 0060 0112 0128 0013 0062 0504 0130 0020 0068 0510 0133 0022 0069 0514 0542 0027 0074 0517 0568 0030 0083 0522 0574 0006 0051 0058 0134 0017 0053 0098 0543 0021 0063 0038 0135 0023 0064 0116 0549 0025 0065 0117 0565 0002 0060 0507 0145 0065 0501 0532 0551 0586 0177 0056 0503 0507 0509 0523 0529 0530 0553 0556 0562 0571 0586 0591 0598 0602 0603 0607 0643 0861 0174 0176 0015 0024 0033 0038 0050 0051 0060 0517 0520 0532 0534 0551 0051 0005 0054 0082 0072 0057 0039 0059 0050 0056 0517 0536 0591 0183 0049 0083 0035 0521 0147 0002 0010 0011 0012 0013 0037 0040 0063 0067 0056 0083 0057 0085 0501 0515 0527 0528 0532 0559 0570 0571 0574 0172 0005 0038 0597 0026 0114 0041 0049 0051 0059 0063 0056 0021 0057 0016 0056 0000 0078 0525 0125 0006 0094 0526 0126 0047 0075 0084 0002 0038 0106 0107 0108 0054 0537 0569 0579 0580 0016 0097 0532 0128 0018 0099 0542 0132 0025 0026 0046 0071 0073 0076 0057 0056 0105 0110 0501 0513 0545 0559 0562 0586 0674 0124 0143 0057 0092 0093 0013 0046 0532 0132 0133 0574 0576 0586 0060 0057 0056 0521 0051 0049 0041 0056 0006 0021 0001 0040 0571 0004 0056 0115 0129 0146 0000 0504 0128 0003 0056 0574 0006 0058 0118 0131 0654 0056 0505 0130 0010 0063 0616 0007 0059 0119 0132 0168 0006 0510 0131 0011 0012 0013 0016 0028 0031 0037 0002 0501 0527 0528 0559 0568 0570 0008 0060 0503 0134 0207 0024 0512 0542 0036 0070 0504 0542 0045 0016 0507 0135 0049 0077 0520 0546 0051 0057 0532 0549 0052 0102 0127 0554 0053 0103 0128 0140 0033 0036 0052 0083 0102 0103 0517 0519 0520 0521 0524 0526 0138 0571 46 SCHAUB LORENZ SCHNEIDER SHARP SIEMENS SKYWORTH SONY TATUNG TCL TECHNICS TECHNIKA TECHNISAT 0016 0063 0000 0041 0083 0586 0006 0592 0015 0607 0005 0520 0006 0064 0051 0041 0057 0030 0002 0006 0046 0094 0616 0024 0036 0056 0016 0051 0097 0049 0169 0017 0056 0099 0050 0170 0018 0057 0105 0026 0160 0024 0129 0016 0056 0101 0519 0051 0171 0021 0059 0110 0053 0509 0025 0071 0508 0035 0550 0026 0073 0532 0080 1071 0035 0076 0538 0088 0038 0078 0574 0033 0048 0502 0517 0519 0130 0137 0147 0056 0077 0029 0105 0504 0507 0517 0519 0130 0131 0136 0555 0571 0149 0421 0052 0005 0040 0056 0504 0532 0568 0586 0054 0047 0051 0056 TELEFUNKEN 0001 0011 0012 0013 0016 0021 0028 0037 0040 0057 0056 0531 0532 0533 0132 0133 0552 0554 0559 0570 0571 0574 0583 0594 TEVION 0057 0063 0056 0532 THOMSON 0001 0031 0528 0589 0003 0037 0531 0591 0002 0038 0532 0616 0010 0040 0533 0173 0056 0136 0102 0009 0586 0033 0139 0056 0038 0596 0034 0564 0025 0083 0132 0045 0063 0083 0511 0517 0130 0541 0141 0142 0144 0584 0593 1017 0806 0354 0739 0812 0822 0822 0762 0759 ECHOSTAR 0882 ENIGMA 0358 FINLUX 0766 GLOBECAST 1135 GOLDEN INTERSTAR 0205 GOLDSTAR 0776 GRANVISION 0350 GRUNDIG 0398 HEAD 0361 HIRSCHMANN 0739 0812 TOSHIBA UNIMOR VESTEL 0011 0061 0552 0166 0012 0013 0014 0019 0028 0067 0085 0090 0113 0527 0559 0570 0571 0574 0583 0167 0057 0056 0532 0542 0548 0553 0556 0214 0215 SAT AMSTRAD ARION BLAUPUNKT BSKYB CANAL SATELLITE CANAL+ COMAG 47 0349 0353 0363 0760 0770 0829 0830 0831 0832 0833 0870 0881 0769 0784 0849 0351 0399 0722 0738 0739 0772 0780 0784 0845 0775 0793 0810 0815 1161 1155 HITACHI HUMAX ITD(SAGEM) ITT/NOKIA KATHREIN LG MEDIASAT MEDION MITSUBISHI NEC NOKIA NORDMENDE OCTAGON OPENBOX OPTEX PACE PHILIPS PIONEER POLSAT PREMIERE SAGEM SAGEM TNTSAT SAMSUNG SCHNEIDER 0784 0773 0311 0753 0383 0381 0734 0382 0820 1125 0739 0785 0753 0720 0720 0204 0758 1225 1234 1243 0739 0397 0789 0398 0846 0742 0846 0331 0378 0754 0802 0790 0323 0784 0393 0394 0822 0384 0833 0360 0365 0366 0802 0739 0783 0345 0848 0856 0867 0208 0776 0385 0730 0742 0768 0778 0786 0788 0800 0834 0857 0364 0873 0877 1167 1133 1132 0784 0825 0784 0806 0819 0724 0763 0784 0846 0722 0755 0880 0338 1219 1220 1221 1222 1223 1224 1226 1227 1228 1229 1230 1231 1232 1233 1235 1236 1237 1238 1239 1240 1241 1242 0784 0796 0812 0816 0856 0399 0400 0736 0754 0755 0772 0778 0780 0784 0808 0817 0822 0825 0847 0854 0822 0758 0807 0822 0876 0391 0395 0396 0720 0731 0207 0786 0833 0834 SCHWAIGER 0382 0385 0386 0387 0388 0725 0732 0735 0740 0784 0788 0820 0826 0827 0828 0834 0855 0867 1160 1145 1141 1128 1127 SEG SKY DIGITAL SKY+ TECHNISAT TOPFIELD VANTAGE VESTEL 0720 0812 0812 0386 0781 0362 0214 0744 0806 0867 0869 0738 0797 0344 0822 0860 0782 0343 0215 DVB CANAL+ ECHOSTAR FREEVIEW GRUNDIG HUMAX MEDION PACE 1163 0989 0747 0751 0752 0771 0787 0798 0843 1159 0532 0877 0752 0796 48 PHILIPS PIONEER PREMIERE SAGEM SONY TCM THOMSON 0843 0858 0843 0876 1137 0747 1121 1080 0798 DVB-T FERGUSON CableBox BT CANAL PLUS MOTOROLA PIONEER SAMSUNG SCIENTIFIC ATLANTA 1244 0811 0765 0779 0791 0792 1142 0794 0795 UPC 1137 AEG AIWA AKAI AUDIOVOX BLAUPUNKT CAMBRIDGE DAEWOO DENON DENVER DK DIGITAL ELTA FERGUSON FINLUX FUNAI GOWELL GRUNDIG HARMON/KARDON HITACHI HYUNDAI JBL JVC LG MARANTZ 0670 0698 0670 1031 0704 0697 0683 0455 0701 0686 0670 1246 0681 0674 0429 0670 0712 0408 0681 0712 0690 0411 0690 0667 0688 1007 1097 DVD MEDION 49 1001 0703 0680 0694 0702 1001 0684 0685 0700 1001 1084 0691 0702 1001 0687 0680 0697 0699 0700 0409 0413 0419 0680 0692 0693 0705 0709 0717 0421 1062 0671 0695 1008 1098 1051 0452 1104 0673 0453 1009 1099 1089 0453 1056 0674 0675 0676 0677 0681 0682 0686 1000 1001 1002 1003 1004 1005 1006 1021 1023 1046 1118 1119 1120 1096 1100 PACKARD BELL PANASONIC PIONEER RCA SAMSUNG SANYO SCHAUB LORENZ SCHNEIDER SCHWAIGER SHARP SONY TEAC TECHNICS TECHNIKA TOSHIBA VESTEL X-BOX YAMAHA 1028 0412 0403 1124 0404 0704 0413 0414 1001 0670 0679 0406 0410 0670 0716 0686 0407 0680 0716 0706 HITACHI JVC LITEON MEDION PACKARD BELL PHILIPS SHARP SONY THOMSON TOSHIBA YAMAHA 0705 1089 1046 1002 1029 1060 1087 1066 0689 0690 1060 AIWA AKAI BLAUPUNKT DAEWOO FINLUX FUNAI GRUNDIG HITACHI JVC LG LOEWE MARANTZ 0608 0611 0621 0616 0621 0674 0610 0621 0645 0624 0621 0621 PHILIPS 1029 0718 0407 1123 0693 0716 0418 0670 1110 0680 1116 1085 1055 0416 0420 0674 0690 0445 1060 1061 1062 1105 1054 1058 0673 0692 1016 1050 0680 0699 0681 0682 0686 0700 1001 0415 0680 0711 0451 1087 0417 0719 1066 1067 1068 0693 0704 0422 0690 1017 1057 1117 1122 0441 0443 1060 1061 DVR 1090 1046 1100 1085 1061 1124 1105 1067 1068 1057 1117 1061 VCR 0643 0612 0625 0627 0622 0613 0666 0626 0630 0652 0662 0393 0647 0621 0628 0646 0455 0625 0630 0626 0705 0717 0457 0630 0636 0630 0631 0639 0640 0641 0657 0455 0456 0459 0460 0462 0472 0481 0459 0461 0470 0475 0479 0662 50 MEDION MITSUBISHI NEC PANASONIC PHILIPS PIONEER SAMSUNG SANYO SHARP SONY TECHNICS THOMSON TOSHIBA AUX/TUNER/TAPE AIWA DUAL ELTA FERGUSON GRUNDIG HARMON/KARDON IPOD JVC LG MEDION NAD ONKYO PACKARD BELL PANASONIC PHILIPS PIONEER PREMIERE SAMSUNG SONY SONY NETWORK TEAC TECHNICS THOMSON YAMAHA HDD, HDplayer AMSTRAD BSKYB ECHOSTAR FERGUSON HUMAX HYUNDAI 51 0608 0621 0645 0625 0610 0478 0621 0654 0622 0636 0618 0625 0614 0621 0477 0625 0629 0643 0673 0642 0645 0647 0656 0660 0662 0458 1055 0614 0621 0630 0639 0657 0664 0454 0465 0473 0645 0673 0634 0665 0651 0463 0469 0476 1050 0638 0467 0464 0652 0653 0655 0719 0468 0477 0616 0645 0646 0650 0663 0627 0643 0659 0690 0456 0462 0466 0471 0474 0480 0698 0948 0671 0677 0695 0908 0935 0958 0978 0990 0886 1248 0911 0895 0998 1051 1056 0671 1096 0929 0955 1116 0807 0925 1054 0807 0945 0931 0746 0443 0949 0846 0924 0887 0935 0925 0926 0896 0677 0695 0908 0935 0964 0965 0966 0978 1120 1098 0930 0926 1058 1016 0932 0933 0940 0941 0942 0943 0944 0979 0946 0947 0812 0812 0882 1245 1247 0878 0774 MEDION PACE PACKARD BELL PHILIPS SAGEM SCHWAIGER SIEMENS SKY+ SONY THOMSON TIVO TOPFIELD TOSHIBA 0730 0752 1085 0614 1137 0788 1148 0812 0545 0614 0614 0782 1117 0788 0873 1167 1046 1125 1118 1100 0812 FREEBOX TV ORANGE SAGEM SAMSUNG THOMSON TPS ADSL UPC 1162 1166 1163 1143 1166 1165 1166 1137 1124 1145 1127 1066 1068 0663 0798 ADSL CD/LD AKAI DENON GRUNDIG HARMON/KARDON HITACHI JVC KENWOOD LG MARANTZ MEDION MITSUBISHI NAD NAIM ONKYO PANASONIC PHILIPS PIONEER ROTEL SAMSUNG SHARP SONY TEAC TECHNICS TELEFUNKEN 0985 0619 0658 0897 0898 0900 0901 0884 0928 0887 0972 0658 0658 0928 0906 0883 0910 0658 0928 0945 0889 0888 0957 0909 0658 0986 0987 0658 0885 0894 0928 0899 0983 0902 0891 0892 0927 0934 0935 0936 0959 0960 0963 0980 0888 0929 0907 0909 0928 0982 0890 0893 0916 0917 0918 0919 0920 0933 0937 0938 0939 0922 0983 52 TOSHIBA YAMAHA Blu-Ray, DVD DENON LG MARANTZ NAD ONKYO OPPO PANASONIC PHILIPS PIONEER SAMSUNG SHARP SONY YAMAHA 53 0923 0916 0921 0947 1186 1191 1192 1193 1194 1190 1196 1197 1198 1199 1200 1201 1202 1203 1204 1207 ATTACHMENT C - SPECIFICATION Ariva Dimension Net Weight Input Voltage 102mini W: 11 cm D: 7 cm H: 1.8 cm 0.3 kg DC 12V Power Consumption Max 24W Standby 52E W: 22 cm D: 15.3 cm H: 4 cm 102E W: 26 cm D: 15 cm H: 4.5 cm 202E W: 26 cm D: 18 cm H: 4.5 cm 1.1kg 1.4 kg 0.8 kg 150Combo W: 26 cm D: 18 cm H: 4.5 cm 1.4 kg 250Combo W: 26 cm D: 18 cm H: 4.5 cm 1.5 kg AC 175-250V~ 50Hz/60Hz Max 30W < 1W 1.Main Chip Sets CPU frequency 400MHz Flash Memory 1PC 32Mbit/8Mbyte SPI FLASH DDR II Memory 2.DVBS Tuner Tuner Type 1PC 64MX16bit/128Mbyte STV6110A+3501 ON BOARD Frequency Range 950 ~ 2150MHz Input Impedance LNB Power and Polarization Input Level Range 75Ω Vertical 13VDC;Horizontal 18VDC @ 400mA (max) 22KHz±0.4KHz(0.6V±0.2V)tone, Overload Protection -65dBm ~ -25dBm Loop-Through Signal loop through 3.DVBS Channel Decoder DVBS Demod DVB-S, DVB-S2 standard DVBS Demodulation QPSK, 8PSK DVBS Symbol Rate DVBS Code Rate 4.TS Demux Demultiplexer Input Bit Rate 5.Video Decode Video Decode Video Resolution 6.Audio Decode Audio Decode Sound Mode 2 ~ 90MSPS(Code Rate 1/2) 1/2,2/3,3/4,5/6,7/8 for DVBS, 1/4,1/3,2/5,1/2,3/5,2/3,3/4,5/6,8/9,9/10 for DVBS2 MPEG2 ISO/IEC 13818-1 Max 100Mbit/s MPEG2 ISO/IEC 13818-2 MP@ML, H.264(MPEG4 part 10) main and high profile level 4.1/MPEG-2 MP@HL 1920×1080,1280×720,720×480 MPEG-1 layerI/II,PCM downmix,IEC958 SPDIF,Dolby 5.1 channel,Dolby downmix 2 channel,Dolby Prologic2 LEFT/RIGHT/STEREO/MONO Sampling Frequency 32KHz、44.1KHz、48KHz 7.AV Output Video Bandwidth SD:5.0MHz(-3dB),HD:30MHz(-3dB) Video Impedance 75Ω Video Voltage Level 1.0 Vp-p Audio Freq. Range 20~20KHz Audio Impedance 600Ω Audio Voltage Level 2V rms(5.6Vp-p) 8.Environment Temperature 0~40℃ Humidity <95% 54