1
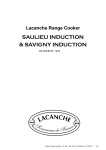
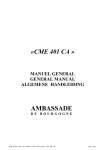
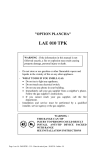
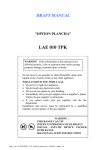
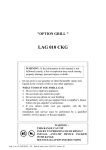
"SALAMANDERS"
LSE 610
Salamandre - Ft 101a - GB - Rév 02 - Modifié le : 22/06/2012
1/18
TECHNICAL DATA SHEETS, MEASUREMENTS AND DIMENSIONS
—————————————————————————————————————————3
INSTALLER MANUAL
5
SITTING
—————————————————————————————————————————7
ELECTRIC CONNECTION
—————————————————————————————————————————8
REPARATIES
—————————————————————————————————————————9
ELECTRIC CIRCUIT DIAGRAMS
—————————————————————————————————————————10
USER’S MANUAL
11
SALAMANDER’S USE
—————————————————————————————————————————15
CLEANING AND MAINTENANCE
—————————————————————————————————————————17
Information regarding the elimination of electric and electronic waste
—————————————————————————————————————————18
Salamandre - Ft 101a - GB - Rév 02 - Modifié le : 22/06/2012
2/18
TECHNICAL DATA SHEETS, MEASUREMENTS
AND DIMENSIONS
SALAMANDER : Wall-mount electrical Salamander.
550
487
490
732
► Z8C17 stainless steel casing and enamelled
steel.
► 3 kW resistance heater.
► Variable power controller and 0-120 minute
timer.
► Four-level, 50 mm pitch flatware support
► Brackets. 380 x 250 mm heating area.
100
150
200
250
INSTALLER MANUAL
Salamandre - Ft 101a - GB - Rév 02 - Modifié le : 22/06/2012
3/18
FICHE TECHNIQUE, COTES ET DIMENSIONS
Accessories :
► One removable tray support.
► One stainless steel 1/1 GN tray.
► One toasting grid.
Optional accessories :
Rotisserie with spit support.
Power supply :
230 V 1N~ 50 Hz + T. Complete with standard, plugless cable.
Directives :
Low Voltage : 2006/95/CEE.
CEM : 2004/108/CEE.
INSTALLER MANUAL
Salamandre - Ft 101a - GB - Rév 02 - Modifié le : 22/06/2012
4/18
"SALAMANDER"
INSTALLER MANUAL
Appliances must be installed in a workmanlike manner in accordance with the instructions in this
manual and locally applicable regulations.
This manual will be handed over to the user after installation.
Salamandre - Ft 101a - GB - Rév 02 - Modifié le : 22/06/2012
5/18
SITTING
Cautions :
The purchaser undertakes to install or arrange for his/her equipment to be installed in a workmanlike
manner and in accordance with the applicable regulations and standards.
Any servicing or repair work on appliance must be performed by a qualified technician.
Shipment-Packaging :
Carton packing crate on wooden palette
Unpack and check the appliance is in good condition. In case of damage, note any reservations on the
delivery note and confirm them within 48 hours by registered letter with confirmation of delivery to the
carrier.
◊ Recommendations :
→ Install this unit with 100/120 mm clearance on all sides.
→ Do not install this unit near combustible walls, partitions, pieces of furniture or decorative material
unless these are covered with adequate thermal insulation of the noncombustible type. Making sure
the resulting installation meets local fire regulations.
��
��
◊ Attaching the hanging rail :
mounting rail
������������
��
��
���
��
INSTALLER MANUAL
���
���
Salamandre - Ft 101a - GB - Rév 02 - Modifié le : 22/06/2012
7/18
ELECTRIC CONNECTION
Appliances must be installed in a workmanlike manner in accordance with the instructions in this manual
and locally applicable regulations. This manual will be handed over to the user after installation.
Before connection, check :
ü
ü
That the electrical supply of the system is compatible with the voltage and power of the range.
That the user’s fixed installation includes an approved all-pole cut-out device.
Alimentation électrique
230 V 1N~ 50 Hz + T. Complete with standard, plugless cable
Connection : CAUTION :
- If this unit is permanently connected to a fixed electrical cable, the cable should be equipped with a fault
leak protector.
- If this unit is connected to a wall outlet, the outlet should be permanently.
- Install a 16A standard power plug on the unused cable
A.
- Connect the plug to a wall socket.
A
It is hazardous to put the appliance into service without connecting it to suitable
No liability can be accepted for accidents resulting from non-compliance with this
requirement or incorrect grounding.
INSTALLER MANUAL
Salamandre - Ft 101a - GB - Rév 02 - Modifié le : 22/06/2012
8/18
REPARATIES
All work on or repair of an appliance must be carried out by a qualified installer.
Access to electrical components :
→ Loosen and remove the 4 holding screws
→ Tilt strip outward to remove.
A
on either side of the control strip.
Changing the mains cord :
1- Use a flexible cord and a standard, 2-pole-earthed plug (type 245 IEC 57 or 245 IEC 66, hight
température, 180°C min.).
2- Connect the power supply cable to terminal block
3- Secure the cable by means of cable clamp
C.
B.
A
C
B
11
22
L
N
�
230 V 1N ~ 50 Hz
INSTALLER MANUAL
Salamandre - Ft 101a - GB - Rév 02 - Modifié le : 22/06/2012
9/18
ELECTRIC CIRCUIT DIAGRAMS
For references and descriptions of the various components refer to table 9 in appendix 0
INSTALLER MANUAL
Salamandre - Ft 101a - GB - Rév 02 - Modifié le : 22/06/2012
10/18
"SALAMANDER"
USER’S MANUAL
IMPORTANT
This appliance must be installed in accordance with the applicable regulations and standards in an
adequately ventilated room.
Any changeover to a gas other than that for which the appliance is set up must be carried out by a qualified
installer.
Any changeover to a voltage other than that for which the appliance is set up must be carried out by a
qualified installer.
WARRANTY
The warranty is stated on the sales contract. Please contact your approved Dealer if any work has to be
carried out under warranty.
This warranty excludes damage resulting from incorrect installation, improper use or inadequate servicing.
Salamandre - Ft 101a - GB - Rév 02 - Modifié le : 22/06/2012
11/18
USER’S MANUAL
SALAMANDER’S USE
—————————————————————————————————————15
CLEANING AND MAINTENANCE
—————————————————————————————————————17
Information regarding the elimination of electric and electronic waste
—————————————————————————————————————18
This range has the
marking, i.e. it meets the essential requirements of the European safety directives to which it is subject.
Salamandre - Ft 101a - GB - Rév 02 - Modifié le : 22/06/2012
13/18
SALAMANDER’S USE
Before using for the first time, remove the plastic protection, carefully clean the vessel with
water plus a non-aggressive washing agent.
Use :
A
is the power ON/OFF signal lamp.
Set timer
D
to the required time delay and set dial
B
Lower the setting and load the oven when signal lamp
has been reached.
to maximum power during preheating.
C
lights to show the required temperature
Note: Heating is switched off when timer 0 times out.
Position I : Only the central element operate.
Position II : The central element and the back element work.
Position III : The central element + the back element work + behind element work.
A
D
B
C
Useful hint
CAUTION :
→ Keep a careful eye on the food you are cooking; grilling generally does not take long.
→ Always place the tray in its supports to catch the juices.
→ Lightly oil meats and fish before placing them on the grid to prevent spattering
→ Increase the distance between the heating element of the grill and the food to be grilled depending
on its thickness in order to avoid overcooking the outer surface without cooking the inside of the
food.un intérieur non cuit.
→ Set the dial to quarter-power between oven loads to prevent overheating and save power.
DANGER :
Do not touch the resistance and the metal parts under and near the heating area with the unit
in operation. The salamander must not be left unattended while in use
Wear muffs to handle the tray or support.
Do not place plates directly onto the unit lest they break. Do not place or leave any flammable
object on or near the unit.
USER’S MANUAL
Salamandre - Ft 101a - GB - Rév 02 - Modifié le : 22/06/2012
15/18
SALAMANDER’S USE
Rotisserie option :
► Position the engine block A and the support arm of the spindle
salamander
► Connect the power cable to the motor.
B
on the chosen level of the
Mise en service du tourne broche :
► Spit the meat, insert farthest spit end in motor socket in oven backwall, resting nearest end on
support
► Place the flat surface C and the plate
► Switch on motor using dial.
D.
The various components of the salamander should be positioned horizontally
A
B
D
C
Cooking time
Dish
Toasts
Toasted ham
sandwiches
Chipolatas
Chicken fillets
Chiken 4/4 (~ 1,2 kg)
Power control setting
Max.
Max.
Level
3
3
Top
1’30’’
3’ – 4’
Bottom
3’
3’ – 4’
Max.
Max.
Max.
3
3
1-2
* 15’
10’
**60’
10’
*Turn frequently while roasting
**Rotisserie
Settings approximate and function of level and thickness.
USER’S MANUAL
Salamandre - Ft 101a - GB - Rév 02 - Modifié le : 22/06/2012
16/18
CLEANING AND MAINTENANCE
Before any cleaning work, isolate from the mains supply
Do not use a steam cleaner to clean the appliance.
WAIT for the salamander to COOL DOWN before CARRYING OUT ANY
WORK
Brass trim :
Use a special brass-cleaning product (e.g. MIROR®) and a soft cloth. If the product runs onto the
enamel do not rub (these products generally contain abrasives). Rinse immediately with clean water
without rubbing.
Another solution is to use solid soap (Pierre d’argent, Pierre d’argile) applied with a damp sponge to
the zones to be cleaned.
This solution is also very effective for cleaning and bringing a shine back to brass or chrome
surfaces.
Enamelled surfaces :
Use a sponge soaked in soapy water or a window-cleaning product but never scouring powder.
You can also use methylated spirit but only when the range is cold.
Body :
Use special stainless steel cleaners (ZIP INOX®, JOHNSON INOX®, PPZ INOX®, for instance). Do
not use abrasive cleaners.
The resistance heater is hinge-mounted to permit easy cleaning of the removable
deflector
CAUTION
Use NO chlorinated cleasers to clean this unit.
Carefully read the precautions and recommendations for applying the products you
use to clean and maintain the range. Follow the instructions for use.
USER’S MANUAL
Salamandre - Ft 101a - GB - Rév 02 - Modifié le : 22/06/2012
17/18
Information regarding the elimination of
electric and electronic waste
Government Order No. 2005-829 dated 20 July 2005 relative to the composition of
electrical and electronic equipment and the elimination of waste resulting from such
equipment implementing European Directives 2002/95/EC and 2002/96/EC.
q
Electrical and electronic equipment (EEE) and Waste from Electric and Electronic
Equipment (WEEE) are regulated in Europe by two directives whose aim is to limit the
use of hazardous substances in EEEs and to encourage the reuse, recycling and other
forms of recovery of WEEEs in order to reduce the quantity of waste to be eliminated.
Each item of electrical and electronic equipment marketed after 13
August 2005 must display this sign.
The sign means that the equipment should not be thrown away with
other waste, that it is collected separately in order to be recovered,
reused or recycled.
q
q
Users of electrical and electronic equipment must not throw WEEEs away along with
unsorted municipal waste.
Users are provided with suitable waste collection systems.
By complying with these Orders users of electrical and electronic equipment avoid
effects that are potentially harmful to the environment and public health. They also help
preserve natural resources.
USER’S MANUAL
Salamandre - Ft 101a - GB - Rév 02 - Modifié le : 22/06/2012
18/18