1
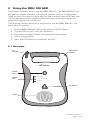
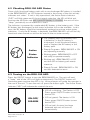
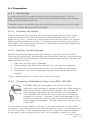
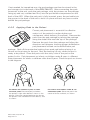
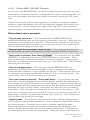
Defibtech DDU-100 Semi-Automatic External Defibrillator User Manual Addendum Changes to Chapter 4 (Using the DDU-100 AED) of the Defibtech User Manual have been made to reflect the latest version of Defibtech software (V2.0). Chapter 4 has been reprinted in this Addendum with changes marked in grey. Please keep this Addendum with your User Manual. DAC-510E (I-02) Rev. B Notices Defibtech shall not be liable for errors contained herein or for incidental or consequential damages in connection with the furnishing, performance, or use of this material. Information in this document is subject to change without notice. Names and data used in the examples are fictitious unless otherwise noted. Limited Warranty The information in the Defibtech AED User Manual does not constitute any warranty as to the Defibtech AED or any related products. The “Limited Warranty” shipped with Defibtech AED products serves as the sole and exclusive warranty provided by Defibtech L.L.C. with respect to these products. Copyright Copyright 2001-2006 Defibtech, L.L.C. All rights reserved. No part of this documentation may be reproduced or transmitted in any form by any means without the express written consent of Defibtech, L.L.C. CAUTION : Federal law (USA) restricts this device to sale by or on the order of a physician DAC-510E (I-02) Rev. B Contents 4 Using the DDU-100 AED................................................................ 1 4.1 4.2 4.3 4.4 Overview....................................................................................1 Checking DDU-100 AED Status.....................................................2 Turning on the DDU-100 AED........................................................2 Preparation..................................................................................3 4.4.1 4.4.2 4.4.3 4.4.4 4.4.5 4.4.6 Call for Help............................................................................... 3 Preparing the Patient................................................................... 3 Opening the Pad Package............................................................. 3 Connecting Defibrillation Pads to the DDU-100 AED........................ 3 Applying Pads to the Patient......................................................... 4 Follow DDU-100 AED Prompts..................................................... 5 4.5 Heart Rhythm Analysis..................................................................6 4.6 Delivering the Shock.....................................................................7 4.7 No Shock Required.......................................................................8 4.8 Post-Shock CPR...........................................................................9 4.9 Post Use Procedures...................................................................10 4.10Operational Environment.............................................................10 10 Contacts....................................................................................... 11 DAC-510E (I-02) Rev. B DAC-510E (I-02) Rev. B 4 Using the DDU-100 AED This chapter describes how to use the DDU-100 AED. The DDU-100 AED was designed for simple operation, allowing the operator to focus on the patient. There are only two control buttons and four light emitting diode (LED) indicators. Concise and easily understandable voice messages and prompts guide the operator through the use of the unit. The following sections describe in detail how to use the DDU-100 AED. The basic steps for use are: Turn the DDU-100 AED ON by pressing the ON/OFF button. Connect pads to AED if not yet connected. Place pads on patient (follow instructions on pad package). Follow voice prompts. Press SHOCK button if instructed by the AED. 4.1 Overview Pad Connector Active Status Indicator ON/OFF Button check pads Indicator LEDs do not touch patient analyzing Shock Button Speaker DAC-510E (I-02) Rev. B Page of 11 4.2 Checking DDU-100 AED Status Once a fully functional battery pack with a non-discharged 9V battery is installed in the DDU-100 AED, an LED indicator located in the corner of the unit actively indicates unit status. If unit is fully operational, the Active Status Indicator (“ASI”) will blink green and if the unit needs attention, the ASI will blink red. Anytime the ASI blinks red and a good 9V battery is installed, the unit will also “beep” periodically to call attention to itself. The indicator is powered by a replaceable 9V battery in the battery pack. If the 9V battery has discharged, active status indication will not be available. In this case, the 9V battery should be immediately replaced to restore active status indication. If only the 9V battery is depleted, the DDU-100 AED will still be fully functional when turned on and can be used in the on-state normally. • Off: Battery pack not installed, AED is defective, or the 9V battery is discharged. Install functional battery pack or replace the 9V battery in the battery pack. Active Status Indicator • Steady-On green: DDU-100 AED is ON and operating normally. • Blinking green: DDU-100 AED is OFF and ready to operate normally. • Blinking red: DDU-100 AED is OFF and the AED or battery pack needs attention. • Steady-On red: DDU-100 AED is ON and has detected an error. 4.3 Turning on the DDU-100 AED Press the ON/OFF button to turn the DDU-100 AED on. The unit will emit a “beep” and all the LEDs will light up temporarily. The ON/OFF button will illuminate green anytime the AED is on. Voice prompts will guide the operator in the use of the unit. To turn the unit off, press the button again. The Active Status Indicator (“ASI”) will indicate the state of the unit. • ASI off or blinking: The Device is OFF. Press green ON/OFF button to turn the device ON. ON-OFF/ DISARM • ASI on (green): The device is ON. Press green ON/OFF button to turn device OFF. • ASI on (red): An error has been detected and unit will turn off automatically. DAC-510E (I-02) Rev. B Page of 11 4.4 Preparation 4.4.1 Call for Help As soon as the AED is turned on the unit will prompt the user to “call for help”. This indicates that the first step in a rescue should always be to contact professional emergency services. If another person is available, the user should direct that person to call for help and then continue the rescue without delay. 4.4.2 Preparing the Patient Prepare the patient by removing any clothing from the patient’s chest. Wipe away moisture from the chest if necessary (the defibrillation pads will stick better on dry skin). If necessary, shave excessive chest hair, which can prevent effective patient-electrode contact. To ensure that electrode pads fully contact the patient’s skin, check that no jewelry or other objects are directly underneath where the pads will be placed. 4.4.3 Opening the Pad Package Remove the pad package from the pad storage slot at the back of the AED. Open the pad package by tearing along the dotted line, starting at the black arrow (follow directions on the package). Pull the protective backing from the pads and check that the pads are: • • • • Free from obvious signs of damage Clean of excessive debris (for example, dirt if the pad was dropped) Not dried out, and that the gel is sticky and will adhere to the patient Not expired. Do not use pads after the expiration date printed on the package If any of these conditions is found, use a new set of pads. 4.4.4 Connecting Defibrillation Pads to the DDU-100 AED The DDU-100 AED is designed to be stored with the defibrillation pad connector attached to the unit, while the pads themselves remain sealed in their package. This reduces the time needed to setup and start treatment in an emergency. The Defibtech AED should be stored with the pad connector plugged into the unit. However, if pads were damaged or not properly connected, you may need to substitute a new set of pads during an emergency. The pad connector is on the corner of the AED. To remove an old set of pads, pull firmly on the pad connector. Do not reuse used pads. Insert the connector for the new pads as shown. The connector will only fit in one way – if the connector does not fit, rotate the connector before trying again. Insert connector firmly until it is completely seated in the unit. DAC-510E (I-02) Rev. B Page of 11 If not needed for immediate use, the pad package can then be stored in the pad storage slot in the back of the DDU-100 AED. After connecting the pads connector to the unit, push the pad package, with the pictures on the package facing up and out, rounded end first, into the pad holder compartment on the back of the AED. When the pad pack is fully inserted, press the pad cable into the groove in the back of the unit to hold it in place and tuck any excess cable behind the pad package. 4.4.5 Applying Pads to the Patient Correct pad placement is essential for effective analysis of the patient’s cardiac rhythm and subsequent shock delivery (if required). Remove the pads from the pad package by tearing the package along the dotted line near the top of the package. Remove the pads from the package and follow the directions and diagram showing proper defibrillation pad placement located on the defibrillation pad package. Peel off the protective backing from each pad before placing it as shown on the picture on the pad. Peel the backing off only when the pad is ready to be placed. Place the pads with the sticky side of the pad on the patient’s skin. Pad placement on infants or children under 8 years is different than placement for adults or children older than 8 years. Place the pads as shown in the diagram. For adults and children 8 years or older use adult pads: Place one pad just below the patient’s right collar bone as shown in the picture. Place the second pad over the ribs on the patient’s left side below the left breast, also as shown. DAC-510E (I-02) Rev. B Page of 11 For infants and children under 8 use child/infant pads: Place one pad in the center of chest and back, as shown. 4.4.6 Follow DDU-100 AED Prompts At this point, the DDU-100 AED will check to make sure that the pads are well connected to the patient and that an adequate ECG signal is being received. Do not touch the patient, eliminate any patient movement, and cease CPR at this time. If there is a problem with the pad connection, connector connection, patient motion or other interference, the AED will guide the operator with audible and visual prompts. Visual prompts consisting of flashing LEDs with associated labeling reinforce the audio prompts and aid in high ambient noise environments. Pad related voice prompts: “Plug in pads connector” – This indicates that the DDU-100 AED has determined that the pads are not properly connected to the unit. Check that the connector is fully inserted into the unit. If the prompts continue, try removing and reinserting the pads connector or try a new set of pads. The “check pads” LED will flash red during this message. “Remove pads from package in back of unit” – This indicates that the user should remove and tear open the pad package located in the back of the unit. “Apply pads to patient’s bare chest as shown” – This indicates that the DDU100 AED has determined that the pads are not placed on the patient. Place pads on the patient following instructions on the pad package. If the prompts continue, try replacing the pads with a new set. The “check pads” LED will flash red during this message. “Plug in and apply pads” – This indicates that the DDU-100 AED has determined that the pads are not plugged in and not applied to the patient. Check that the connector is fully inserted into the unit. If the prompts continue, try removing and reinserting the pads connector or try a new set of pads. The “check pads” LED will flash red during this message. “Poor pad contact to patient,” “Press pads firmly” – This indicates that the pads are not making proper contact with the patient and that the impedance is out of range for proper ECG analysis and shock delivery. Check that the pads are properly placed and fully adhering to the patient and that there are no air bubbles between the pads and the patient. Make sure that the pads are not touching each other. If the pads are not sticking due to moisture, dry the patient. If the pads are not sticking due to excessive hair, shave or clip excessive chest hair. If the prompts continue, try replacing the pads with a new set. The “check pads” LED will flash red during this message. “Replace pads” – This indicates that the pads are not making proper contact with the patient and that the impedance is out of range for proper ECG analysis and shock delivery. If another set of pads is available, replace the pads, otherwise check that the pads are properly placed and fully adhering to the patient. Make sure that the pads are not touching each other. If the pads are not sticking due to moisture, dry the patient. If the pads are not sticking due to DAC-510E (I-02) Rev. B Page of 11 excessive hair, shave or clip excessive chest hair. If the prompts continue, try replacing the pads with a new set. The “check pads” LED will flash red during this message. “Check pads” – This indicates that the pads are making improper contact with the patient or touching each other and that the impedance is out of range for proper ECG analysis and shock delivery. Check that the pads are not touching each other and that the patient is dry. If the prompts continue, try replacing the pads with a new set. The “check pads” LED will flash red during this message. “Pausing for CPR” – This indicates that the user should stop attempting to resolve problems with the pads and assess the condition of the patient. The user will be prompted to begin CPR, if needed, for a two-minute period. Motion / Interference related voice prompts: “Stop motion” – This indicates that the DDU-100 AED has detected motion in the patient. Stop all patient motion, including CPR, in response to this message. If the patient is being transported, stop the vehicle to stop the motion. The “do not touch patient” LED will flash red during this message. “Stop interference” – This indicates that the DDU-100 AED has detected interference on the ECG signal. Eliminate any radio or electrical sources of interference. Check the pads to make sure they are adhering properly to the patient. If the environment is very dry, minimize movement around the patient to reduce static discharges. The “do not touch patient” LED will flash red during this message. “Pausing for CPR” – This indicates that the user should stop attempting to resolve motion and/or interference problems and assess the condition of the patient. The user will be prompted to begin CPR, if needed, for a two-minute period. 4.5 Heart Rhythm Analysis Once the DDU-100 AED has determined that the pads are making a good connection to the patient, the AED will start the ECG rhythm analysis. The unit analyzes the ECG signal and determines whether a shockable or non-shockable rhythm is present. While analyzing, the AED will continue to monitor the pad connections and will abort analysis if it detects any pad problems. It will also continue to monitor for excessive motion or interference and will abort analysis if those conditions are detected. Analysis related voice prompts: “Analyzing heart rhythm” – This indicates that the DDU-100 AED is actively analyzing the patient’s ECG signal. The AED will continue analyzing until it has determined whether a rhythm is shockable or non-shockable or analyzing is interrupted for some reason. The “analyzing” LED will flash green during this period. “Do not touch the patient” – This indicates that the DDU-100 AED is trying to analyze the patient’s heart rhythm and that the operator should not touch the patient. This message will be spoken at the beginning of the analysis period and also if DAC-510E (I-02) Rev. B Page of 11 motion or interference has been detected. The “do not touch patient” LED will flash red during this message. “Analyzing interrupted” – This indicates that the DDU-100 AED has determined that accurate ECG analysis is not possible and has ceased analyzing. The operator is prompted to resolve the problem – see “Follow DDU-100 AED Prompts” section. Once the problem is resolved, the unit will enter analysis mode again. The “analyzing” LED will not be illuminated during this message. “No shock advised” – This indicates that the DDU-100 AED has determined that a shock is not required. The unit will not charge and the SHOCK button will not be enabled. The user will be prompted to begin CPR, if needed, for a period of two minutes. “Shock advised” – This indicates that the DDU-100 AED has determined that a shock is recommended and the unit will begin charging in anticipation of a defibrillation shock. Analysis will continue and the “analyzing” LED will continue to flash green. 4.6 Delivering the Shock If the DDU-100 AED ECG analysis algorithm has determined that a shock is required, the unit will automatically charge in preparation for shock delivery. While the AED charges, the unit will continue to analyze the patient’s heart rhythm. If the unit detects that the heart rhythm has changed to one that does not require a shock, the unit will abort the charging process and will prompt the user to begin CPR, if needed, for a period of two minutes. Also while charging, the AED will continue to monitor the pad connections and will abort charging if it detects any pad problems. It will also continue to monitor for excessive motion or interference and will abort charging if those conditions are detected. The user can abort at any time by pushing the ON/OFF button to turn the unit off. Shock related voice prompts: “Charging” – This indicates that the DDU-100 AED has determined that a shock is recommended and is charging the unit in anticipation of a defibrillation shock. Analysis will continue during this phase and the “analyzing” LED will continue to flash green. A tone will sound to indicate charging progress. If the unit detects a rhythm change to a non-shockable one, charging will abort and the user will be prompted to begin CPR, if needed, for a period of two minutes. “Stand Clear” – This indicates that the DDU-100 AED is charging and that the operator and others should stand clear of the patient. Analysis will continue during this phase and the “analyzing” LED will continue to flash green. A tone will sound to indicate charging progress. If the unit detects a rhythm change to a non-shockable one, charging will abort and the user will be prompted to begin CPR, if needed, for a period of two minutes. “Press flashing shock button” – This indicates that the DDU-100 AED has fully charged, that the heart rhythm analysis algorithm still indicates a shock is recommended, and the unit is ready to deliver a shock. The operator should press the SHOCK button to deliver the shock. The “Shock” button will flash during this phase. DAC-510E (I-02) Rev. B Page of 11 • Off: No Shock indicated. Button is disabled, pressing the button will do nothing. SHOCK • Flashing: Shock is recommended. The device is charged and ready to shock. Button is enabled. Press the button to administer shock. “Shock ‘x’ delivered” – This indicates that the DDU-100 AED has delivered the shock. The ‘x’ indicates the number of shocks that have been delivered since the unit was turned on (note: if the unit delivers more than 15 shocks during one on period, the count will get reset to “one” on the sixteenth shock). After each shock, the AED will enter Post-Shock CPR mode (see below). “Shock cancelled” – This indicates that the DDU-100 AED has aborted shock mode and internally discharged. If while waiting for the shock button to be pressed, the unit detects a rhythm change to a non-shockable rhythm, the unit will cancel the shock. Also, if the shock button is not pressed within 30 seconds of the initial “press flashing shock button” prompt, the unit will automatically cancel the shock. Note: The DDU-100 AED will not automatically deliver a shock – the user must press the SHOCK button. Note: At any time during the charging process or after the AED has been charged, the operator may disarm the unit by pressing the ON/OFF button. 4.7 No Shock Required If the DDU-100 AED ECG analysis algorithm has determined that a shock is not required, it will not charge the unit and the SHOCK button will not be enabled. The operator will be prompted to begin CPR, if needed, for a period of two minutes. The unit will not be monitoring the patient’s ECG rhythm during this two minute CPR period. During this two-minute period, the AED will not advise the user to “stop motion” even if motion is present. During the two-minute period, the AED will announce time remaining in 15-second intervals. At the end of the two-minute period, the unit will enter normal Analyzing mode. No Shock Required Voice Prompts: “It is safe to touch the patient” - This indicates that the DDU-100 AED analysis algorithm has determined that no shock is required. The unit will not charge and the SHOCK button will not be enabled. The user will be prompted to begin CPR, if needed, for a period of two minutes. The “analyzing” LED will remain off to indicate that background rhythm monitoring has been suspended. “Check airway”, ”Check breathing” – This indicates that the user should check the condition of the patient in order to determine if it is appropriate to perform CPR. DAC-510E (I-02) Rev. B Page of 11 “If needed, begin CPR” – This indicates that the user should begin CPR, if needed, for two minutes. The unit will not be monitoring the patient’s ECG rhythm during this two minute CPR period. The “analyzing” LED will remain off to indicate that background rhythm monitoring has been suspended. “Continue for ‘x’ Seconds” or “Continue for 1 Minute ‘x’ Seconds” This indicates that the user should continue CPR, if needed, for ‘x’ more seconds or, for 1 minute and ‘x’ more seconds, respectively. The unit will not be monitoring the patient’s ECG rhythm during this two minute CPR period. The “analyzing” LED will remain off to indicate that background rhythm monitoring has been suspended. “Continue” – This indicates that the user should continue CPR, if needed. This phrase is spoken between the “continue for ‘x’ seconds” or “continue for 1 minute ‘x’ seconds” prompts to let the operator know that the unit is still operating normally. The unit will not be monitoring the patient’s ECG rhythm during this two minute CPR period. The “analyzing” LED will remain off to indicate that background rhythm monitoring has been suspended. “Continue for 5, 4, 3, 2, 1”, “Stop CPR” – This indicates that the user should finish performing CPR. This phrase is spoken during the last several seconds of the two-minute CPR period to let the operator know that the unit is still operating normally and that the two-minute period is ending. “Stop now”, “Do not touch the patient” – This indicates that the two-minute CPR period has ended and the user should stop CPR. The unit will enter Analyze mode and the “analyzing” LED will flash. 4.8 Post-Shock CPR If the DDU-100 AED has delivered a shock, the unit will require a mandatory two-minute CPR period. No patient ECG rhythm monitoring will be done during this period. Once the two-minute period is complete, the AED will continue in Analyzing mode. Post-Shock CPR Voice Prompts: “It is safe to touch the patient” - This indicates that it is safe for the user to touch the patient. The unit will not be monitoring the patient’s ECG rhythm during this required two minute CPR period. The “do not touch patient” LED will be off to indicate that it is safe to touch the patient. “Begin CPR now” – This indicates that the user should perform CPR for two minutes. The unit will not be monitoring the patient’s ECG rhythm during this required two minute CPR period. The “analyzing” LED will remain off to indicate that background rhythm monitoring has been suspended. “Continue for ‘x’ Seconds” or “Continue for 1 Minute ‘x’ Seconds” This indicates that the user should continue performing CPR for ‘x’ more seconds or, for 1 minute and ‘x’ more seconds, respectively. The unit will not be monitoring the patient’s ECG rhythm during this required two minute CPR period. The “analyzing” LED will remain off to indicate that background rhythm monitoring has been suspended. DAC-510E (I-02) Rev. B Page of 11 “Continue” – This indicates that the user should continue performing CPR. This phrase is spoken between the “continue for ‘x’ seconds” or “continue for 1 minute ‘x’ seconds” prompts to let the user know that the unit is still operating normally. The unit will not be monitoring the patient’s ECG rhythm during this required two minute CPR period. The “analyzing” LED will remain off to indicate that background rhythm monitoring has been suspended. “Continue for 5, 4, 3, 2, 1”, “Stop CPR” – This indicates that the user should finish performing CPR. This phrase is spoken during the last several seconds of the required two-minute CPR period to let the user know that the unit is still operating normally and the two-minute period is ending. “Stop now”, “Do not touch the patient” – This indicates that the mandatory twominute CPR period has ended and the user should stop CPR. The unit will enter Analyze mode and the “analyzing” LED will flash. 4.9 Post Use Procedures After the DDU-100 AED has been used on a patient, the unit should be cleaned following procedures in the “Cleaning” section and prepared for the next use. The following steps should be performed: • • • • Remove battery pack. Remove DDC if installed. Replace with a new DDC. Reinsert battery pack. Check that the battery insertion self-test passes. Connect a new pad package (check to make sure the package is not expired). • Hold ON/OFF button down for at least five seconds to initiate a manually initiated Self-Test. Unit will report status of self-test and shut off. • Check to make sure that the Active Status Indicator is flashing green. 4.10 Operational Environment The Defibtech AED is designed to operate in a wide range of environmental conditions. To ensure the reliability and safety of the AED in a given environment, refer to the “Environmental” section for a detailed list of approved environmental conditions. DAC-510E (I-02) Rev. B Page 10 of 11 10 Contacts Defibtech, L.L.C. 741 Boston Post Road Guilford, CT 06437 Tel.: Fax : (866) 333-4241 (Toll-free within North America) (203) 453-4507 (203) 453-6657 Emails: [email protected] (Sales) [email protected] (Medical Device Reporting) [email protected] (Service and Repair) European Authorized Representative: Emergo Europe Molenstraat 15 2513 BH The Hague The Netherlands Tel.: +31 70 345 8570 Fax: +31 70 346 7299 0197 DAC-510E (I-02) Rev. B Page 11 of 11 Patents pending. This product and its accessories are manufactured and sold under one or more of the following United States patents: D514,951; 6,955,864; D499,183; D498,848; 6,577,102. This product and its accessories are manufactured and sold under license to at least one or more of the following United States patents: 5,591,213; 5,593,427; 5,601,612; 5,607,454; 5,611,815; 5,617,853; 5,620,470; 5,662,690; 5,735,879; 5,749,904; 5,749,905; 5,776,166; 5,800,460; 5,803,927; 5,836,978; 5,836,993; 5,879,374; 6,016,059; 6,047,212; 6,075,369; 6,438,415; 6,441,582. DAC-510E (I-02) Rev. B


![DGID Software [EN]](http://vs1.manualzilla.com/store/data/005717670_1-65b44a14cec330296683d17d94da3fca-150x150.png)