1
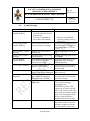
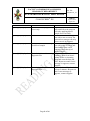
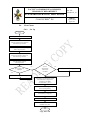
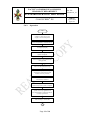
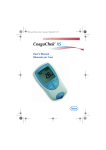
UNIVERSITY OF MALTA
FACULTY OF MEDICINE & SURGERY
PHARMACY DEPARTMENT
Ref. No.
SOP/PD/211_01
STANDARD OPERATING PROCEDURE
COAGUCHEK® XS
Valid for:
2 years from
approval
Table of Contents
Page
1.
2.
3.
4.
5.
6.
7.
8.
9.
Scope
Objective
Definitions
Responsibility
Procedure
Precautions
References
Appendices
Revision History
2
2
2
3
4
15
15
15
15
Original
Authorised Copy
for:
Reading Copy
Written by:
Signature/Date:
Reviewed by:
Signature/Date:
Approved by:
Signature/Date:
Page 1 of 16
UNIVERSITY OF MALTA
FACULTY OF MEDICINE & SURGERY
PHARMACY DEPARTMENT
Ref. No.
SOP/PD/211_01
STANDARD OPERATING PROCEDURE
COAGUCHEK® XS
Valid for:
2 years from
approval
1. Scope
This Standard Operating Procedure (SOP) applies to the staff and students
using the CoaguChek® XS in the Pharmacy Practice Resource Unit (PPRU) at
the Pharmacy Department, University of Malta.
2. Objective
To describe the procedure for the configuration, operation, maintenance and
troubleshooting of the CoaguChek® XS.
3. Definitions
3.1.
Battery Compartment [F]: The area in which four 1.5V alkalimanganese batteries type AAA are inserted in.
3.2.
CoaguChek® XS: A point-of-care testing device used to quantitatively
determine prothrombin time using capillary blood from a fingertip or
untreated venous whole blood.
3.3.
CoaguChek® XS PT Test Strips: Have a lyophilised reagent
containing thromboplastin and a peptide substrate. When a blood
sample is applied to the test strip, the thromboplastin activates
coagulation leading to the formation of thrombin which goes on to
cleave the peptide substrate, generating an electrochemical signal. The
valid measuring ranges for the strips are 0.8-8.0 for INR, 120-5 for %Q
(quick percentage value) and 9.6-96 for Sec (seconds).
3.4.
Code Chip: Provides the device with important information about the
test method, the lot number and the expiry date of the test strips being
used. Each pack of test strips comes with a new code chip that should
be inserted into the device when the new pack of strips is to be used.
3.5.
Code Chip Slot [G]: The area in which the code chip is inserted.
3.6.
Display Screen [A]: Displays the results and the information symbols.
3.7.
Infrared Window [I]: Used to transfer data stored in the device via an
infrared interface.
Page 2 of 16
UNIVERSITY OF MALTA
FACULTY OF MEDICINE & SURGERY
PHARMACY DEPARTMENT
Ref. No.
SOP/PD/211_01
STANDARD OPERATING PROCEDURE
COAGUCHEK® XS
Valid for:
2 years from
approval
3.8.
M Button [B]: The memory button used to recall results from memory
and to change device settings. Also used to confirm the code number
displayed before each test.
3.9.
Memory: Saves the latest 100-value readings in chronological order,
with the latest result first, together with the relevant time and date.
3.10. On/Off Button [C]: To turn the device On or Off.
3.11. Set Button [H]: To set the various monitor configuration parameters.
3.12. Set Mode: Allows the device to be set according to the user’s
preferences (see SOP/PD/211_01/A1).
3.13. Test Strip Guide [E]: The area in which the test strip is inserted.
3.14. Test Strip Guide Cover [D]: To be removed whenever the test strip
guide requires cleaning.
4. Responsibility
4.1.
The members of the Department of Pharmacy (staff and students) are
responsible for following this SOP.
4.2.
The designated Laboratory Officer or Laboratory Assistant is
responsible for ensuring that this SOP is followed.
Page 3 of 16
UNIVERSITY OF MALTA
FACULTY OF MEDICINE & SURGERY
PHARMACY DEPARTMENT
Ref. No.
SOP/PD/211_01
STANDARD OPERATING PROCEDURE
COAGUCHEK® XS
Valid for:
2 years from
approval
5. Procedure
5.1.
Diagram of CoaguChek® XS
5.2.
Configuration
5.2.1.
5.2.2.
5.2.3.
5.2.4.
5.2.5.
5.2.6.
5.2.7.
5.2.8.
Insert the batteries accordingly into the battery compartment
[F].
Press the On/Off button to switch the device On.
Check that the number on the code chip to be inserted into the
device corresponds to the number on the label of the test strip
container.
Slide the code chip into the code chip slot [G] until it snaps into
place.
Check that the displayed code chip number corresponds to the
number on the label of the test strip container.
Press the M button to confirm code chip number.
If [Error] and [Code] are displayed, the code chip is incorrectly
inserted.
Press the Set button [H] if the device does not automatically
enter into Set Mode.
Page 4 of 16
UNIVERSITY OF MALTA
FACULTY OF MEDICINE & SURGERY
PHARMACY DEPARTMENT
Ref. No.
SOP/PD/211_01
STANDARD OPERATING PROCEDURE
COAGUCHEK® XS
5.2.9.
5.2.10.
5.2.11.
5.2.12.
5.2.13.
5.3.
Valid for:
2 years from
approval
Repeatedly press the Set button to scroll between the different
configuration parameters available in the Set Mode (see
SOP/PD/211_01/A1).
Press the M button to change the setting that is currently
flashing.
Repeatedly press the M button until the desired setting is
displayed.
Press the Set button to confirm the selected setting.
Press the On/Off button to exit Set Mode at any time.
Operation
5.3.1.
5.3.2.
5.3.3.
5.3.4.
5.3.5.
5.3.6.
5.3.7.
5.3.8.
5.3.9.
5.3.10.
5.3.11.
5.3.12.
5.3.13.
5.3.14.
Place the device on a level stable surface or hold it in such a
way as to be roughly in a horizontal position.
Press the On/Off button to switch the device On.
Check that all of the display symbols are displayed properly
since results may be misread if a segment of the display is
missing.
Wait until a flashing test strip symbol is displayed.
Insert a test strip into the test strip guide [E] with the lettering
“CoaguChek XS PT” facing upwards.
Wait until a beep tone is heard to indicate that the device has
detected the test stip.
Check that the displayed code chip number corresponds to the
code number printed on the label of the test strip container.
Press the M button to confirm that the two values are identical.
Wait until a beep tone is heard to indicate that test strip warmup time is complete.
Wait until both the blood drop symbol and the symbol for the
test strip application test area start flashing to indicate that the
device is ready to perform a test. A blood drop must now be
applied to the test strip in 180 seconds.
Apply the first drop of blood to the semicircular, transparent
sample application area of the test strip or else touch the blood
drop against the side of the sample application area to draw the
blood via capillary action.
Hold the blood drop to the test strip until the flashing blood
drop symbol disappears and a beep tone is heard.
Wait until a tick appears next to [QC] to indicate that the test
strip has passed the automatic quality control check of the
meter.
Wait until the result is displayed.
Page 5 of 16
UNIVERSITY OF MALTA
FACULTY OF MEDICINE & SURGERY
PHARMACY DEPARTMENT
Ref. No.
SOP/PD/211_01
STANDARD OPERATING PROCEDURE
COAGUCHEK® XS
Valid for:
2 years from
approval
5.3.15. Repeatedly press the Set button while the result is being
displayed until the desired unit of measurement is displayed, if
the current unit is not the desired one. Result is automatically
saved in memory.
5.3.16. If result is displayed in INR and an up (too high) or down (too
low) arrow is also displayed, this indicates that the value is
outside the defined target range.
5.3.17. If [c] is displayed along with the result, this indicates that the
haematocrit value was very low or that the blood used was
erroneously collected. Repeat the measurement checking that
hands are completely dry.
5.3.18. If [>] or [<] is displayed next to the result, this indicates that
the result is outside the valid measuring ranges of the test strips.
5.3.19. Remove the test strip from the test strip guide.
5.3.20. Press the On/Off button to switch the device off.
5.3.21. Discard the used test strip in the sharps container.
5.3.22. Accessing Memory
5.3.22.1. Press the M button while the device is switched off.
5.3.22.2. Wait until the display is stabilised and the most
recent value is displayed.
5.3.22.3. Repeatedly press the M button to scroll through the
saved readings.
5.3.22.4. Repeatedly press the Set button while viewing a
result in memory, if the displayed unit is not the
desired one, to temporarily change the unit in which
the result is being displayed.
5.3.23. Erasing Memory
5.3.23.1. Press and hold the M button while the device is
switched off.
5.3.23.2. Press and hold the On/Off button.
5.3.23.3. Keep both buttons pressed for at least 5 seconds.
5.3.23.4. Wait until [mem] and [clr] are displayed together
with the number of results in memory on the upper
right hand corner of the display.
5.3.23.5. Press the On/Off button to exit the Erase Mode
without erasing the results.
5.3.23.6. Press the M button to confirm.
5.3.23.7. Wait until the displayed number of results in
memory is set to 0 and [---] are displayed in the
Page 6 of 16
UNIVERSITY OF MALTA
FACULTY OF MEDICINE & SURGERY
PHARMACY DEPARTMENT
Ref. No.
SOP/PD/211_01
STANDARD OPERATING PROCEDURE
COAGUCHEK® XS
Valid for:
2 years from
approval
centre of the display to indicate that the entire
memory has been erased.
5.4.
Maintenance
5.4.1.
5.4.2.
5.4.3.
Check that the device is switched off before performing any
maintenance procedures.
Replace all 4 batteries if no bars are left in the battery symbol
on the lower left hand corner of the display.
Clean/disinfect the device whenever it becomes contaminated
with blood.
5.4.3.1.
5.4.3.2.
5.4.3.3.
5.4.3.4.
5.4.3.5.
5.4.3.6.
5.4.3.7.
5.4.3.8.
5.4.3.9.
Wipe the exterior with a piece of cloth moistened in
70% alcohol.
Wipe away any residual moisture with a lint-free
cloth.
Press the front edge of the test strip guide cover
upwards to remove it.
Wipe the test strip guide cover with a piece of cloth
moistened in 70% alcohol.
Hold the device upright with the test strip guide
facing downwards.
Clean the accessible white area with a cotton bud
moistened in 70% alcohol.
Wipe away any residual moisture with a dry cotton
bud.
Allow all wiped areas to dry for at least 10 minutes
before performing a test.
Re-attach the test strip guide cover.
Page 7 of 16
UNIVERSITY OF MALTA
FACULTY OF MEDICINE & SURGERY
PHARMACY DEPARTMENT
Ref. No.
SOP/PD/211_01
STANDARD OPERATING PROCEDURE
Valid for:
2 years from
approval
COAGUCHEK® XS
5.5.
Troubleshooting
Error
[error] test strip
symbol flashing
Cause/s
- Test strip was already
inserted when device was
switched on
- Test strip is unusable or
not of the correct brand
[error] temperature
symbol flashing
Device is too cold or too
warm to measure correctly
[error] battery symbol
flashing
[error] cover symbol
flashing
[error] infrared
symbol flashing
Battery level is too low to
perform test
Test strip guide cover is not
closed properly
Error during communication
via an infrared interface
caused by stray light
Test strip failed internal
quality control check
[error] [QC] flashing
[error] [code] flashing
[error] [000]
displayed
[error] [3] displayed
[error] [4] displayed
Code chip is missing, not
properly inserted or damaged
Maximum allowed time of
180 seconds for applying
blood has been exceeded
Test strip is beyond its
expiry date
Test strip is unusable
Page 8 of 16
Solution/s
- Remove test strip
-
Remove test strip and
repeat test with a new or
correct one
Switch device off and allow to
stand for about 30 minutes at
room temperature (+15oC to
+32oC)
Replace batteries with a new
set
Arrange test strip guide cover
accordingly
Keep away from sources of
stray light while using the
infrared interface
Switch device off and remove
test strip. Repeat test with a
new test strip
Insert code chip or remove
and re-insert it
Switch device off, remove test
strip and start new test using
the same test strip
First check that date setting is
correct. If not, arrange
accordingly (see
SOP/PD/211_01/A1) and
repeat test. If correct, switch
device Off, remove code chip
and repeat test with a test strip
from a new lot together with
the new code chip that is
supplied with new test strips
Switch device off, remove test
strip and re-insert it. If error
message re-appears, discard
test strip and use a new one.
UNIVERSITY OF MALTA
FACULTY OF MEDICINE & SURGERY
PHARMACY DEPARTMENT
Ref. No.
SOP/PD/211_01
STANDARD OPERATING PROCEDURE
COAGUCHEK® XS
Error
[error] [5] displayed
Cause/s
Blood not correctly applied
to test strip
[error] [6] displayed
Measurement error
[error] [7] displayed
Measurement error resulting
from blood sample
[error] [8] displayed
Error during internal
diagnostic test
[error] [9] displayed
Error during internal
diagnostic test
Page 9 of 16
Valid for:
2 years from
approval
Solution/s
Repeat test with a new test
strip and follow the steps on
correctly applying blood
sample more carefully
Switch device off and repeat
test with a new test strip. Do
not touch or remove test strip
when a test is in progress.
Switch device off and repeat
test with a new test strip and
blood taken from a new
puncture site at the tip of
another finger.
Switch device off and remove
batteries. Wait for at least 1
minute before re-inserting
them and reset the date and
time. Repeat test and if error
message re-appears, contact
supplier
Switch device off and wait for
at least 2 minutes. Repeat test
and if error message reappears, contact supplier.
UNIVERSITY OF MALTA
FACULTY OF MEDICINE & SURGERY
PHARMACY DEPARTMENT
Ref. No.
SOP/PD/211_01
STANDARD OPERATING PROCEDURE
Valid for:
2 years from
approval
COAGUCHEK® XS
5.6.
Flow Charts
5.6.1.
Set Up
Start
Press On/Off button to switch device On
Check that number on
code chip corresponds to number on
label of test strip container
Slide code chip into code chip slot [G]
until it snaps into place
Check that displayed code chip
number corresponds to number on
label of test strip container
Press M button to confirm
code chip number
No
Device
automatically
entered into
Set Mode
[Error] and [Code]
displayed
Yes
Remove and re-insert code chip
Yes
Repeatedly press Set button to scroll
between different configuration
parameters in Set Mode
(see SOP/PD/211_01/A1)
Press M button to change setting
that is currently flashing
Repeatedly press M button until
desired setting is displayed
Press Set button to confirm
Press On/Off button to exit
Set Mode at any time
End
Page 10 of 16
No
Press Set button [H]
UNIVERSITY OF MALTA
FACULTY OF MEDICINE & SURGERY
PHARMACY DEPARTMENT
Ref. No.
SOP/PD/211_01
STANDARD OPERATING PROCEDURE
COAGUCHEK® XS
5.6.2.
Operation
Start
Place device on level stable surface
or hold it in such a way as to be
roughly in a horizontal position
Press On/Off button to switch device On
Check that all display symbols
are displayed properly
Wait until a flashing test strip
symbol is displayed
Insert test strip into test strip guide [E]
with the lettering “CoaguChek XS PT”
facing upwards
Wait until beep tone is heard to indicate
that device has detected test strip
Check that displayed code chip
corresponds to code number printed
on label of test strip container
Press M button to confirm that
both values are identical
Wait until beep tone is heard to indicate
that test strip warm-up time is complete
Wait until both blood drop symbol and
symbol for test strip application test
area start flashing to indicate that device
is ready to perform test
A drop of blood must now be applied
to the test strip in 180 seconds
1
Page 11 of 16
Valid for:
2 years from
approval
UNIVERSITY OF MALTA
FACULTY OF MEDICINE & SURGERY
PHARMACY DEPARTMENT
Ref. No.
SOP/PD/211_01
STANDARD OPERATING PROCEDURE
Valid for:
2 years from
approval
COAGUCHEK® XS
1
Apply first drop of blood to application
test area of strip or else touch blood
drop against side of application test area
to draw blood via capillary action
Hold blood drop to test strip until
flashing blood drop symbol disappears
and a beep tone is heard
Wait until a tick appears next to [QC] to
indicate that test strip has passed
automatic quality control check
Wait until result is displayed
No
Repeatedly press Set button
until desired unit of
measurement is displayed
Desired unit of
measurement
displayed
Yes
Result is automatically saved
No
No
Result displayed
in INR
[<] or [>]
displayed next
to result
[c] displayed next
to result
Yes
Yes
Yes
No
Up or Down arrow
displayed next to
result
Haematocrit value is very low or blood
used was erroneously collected
Repeat measurement checking
that hands are completely dry
Yes
Value is outside target range
Remove test strip from test strip guide
Press On/Off button to switch off meter
2
Page 12 of 16
Result is outside valid measuring
ranges of test strips
No
UNIVERSITY OF MALTA
FACULTY OF MEDICINE & SURGERY
PHARMACY DEPARTMENT
Ref. No.
SOP/PD/211_01
STANDARD OPERATING PROCEDURE
Valid for:
2 years from
approval
COAGUCHEK® XS
2
Discard used test strip
in sharps container
No
No
Need to access
memory
Yes
Need to erase
memory
3
Yes
Press M button while device
is switched off
Press and hold M button while
device is switched off
Wait until display is stabilised and most
recent value is displayed
Press and hold the On/Off button
Keep both buttons pressed for
at least 5 seconds
Repeatedly press M button to scroll
through saved readings
Wait until [mem] and [clr] are displayed
No
Desired unit of
measurement
displayed
Yes
Repeatedly press
Set button until
desired unit is
displayed
No
Need to exit
Erase Mode
Yes
Press On/Off button
3
End
Page 13 of 16
Press M button to confirm
Wait until number of results in
memory is set to 0 and three
bars are displayed in centre of
display to indicate that entire
memory has been erased
UNIVERSITY OF MALTA
FACULTY OF MEDICINE & SURGERY
PHARMACY DEPARTMENT
Ref. No.
SOP/PD/211_01
STANDARD OPERATING PROCEDURE
COAGUCHEK® XS
5.6.3.
Maintenance
Start
Check that device is switched off before
performing any maintenance procedures
No
Bars left in
battery symbol
Replace all 4 batteries
Yes
No
Device
contaminated
with blood
Yes
Wipe exterior with a piece of cloth
moistened in 70% alcohol
Wipe away any residual moisture
with a lint-free cloth
Press front edge of test strip guide
cover upwards to remove it
Wipe test strip guide cover with a piece
of cloth moistened in 70% alcohol
Hold device upright with test strip
guide facing downwards
Clean accessible white area with a
cotton bud moistened in 70% alcohol
Wipe away any residual moisture
with a dry cotton bud
Allow all wiped areas to dry for at least
10 minutes before performing a test
Re-attach test strip guide cover
End
Page 14 of 16
Valid for:
2 years from
approval
UNIVERSITY OF MALTA
FACULTY OF MEDICINE & SURGERY
PHARMACY DEPARTMENT
Ref. No.
SOP/PD/211_01
STANDARD OPERATING PROCEDURE
COAGUCHEK® XS
Valid for:
2 years from
approval
6. Precautions
6.1.
6.2.
6.3.
6.4.
6.5.
6.6.
6.7.
Operate the device in an ambient temperature of 15oC to 32oC.
Always close the test strip container as soon as a strip is removed since
external influences such as humidity may deteriorate the test strips.
Do not store the device in damp and humid conditions.
Do not remove or insert a code chip while the meter is performing a
test.
Do not use a different code chip from the one supplied with the test
strips that are being used.
Always operate the device with the correct set time and date.
Do not wait for more than 15 seconds after lancing the fingertip before
applying the blood to the test strip since longer times would falsify the
result as the coagulation process would already have begun.
7. References
Roche Diagnostics. CoaguChek® XS User’s Manual. Mannheim: Roche
Diagnostics GmbH; 2010.
8. Appendices
SOP/PD/211_01/A1 – Configuration Parameters Table
9. Revision History
Version Number
01
Amendments/ Reasons for change
Initial Release
Page 15 of 16
UNIVERSITY OF MALTA
FACULTY OF MEDICINE & SURGERY
PHARMACY DEPARTMENT
Ref. No.
SOP/PD/211_01
STANDARD OPERATING PROCEDURE
COAGUCHEK® XS
Valid for:
2 years from
approval
SOP/PD/211_01/A1 – Configuration Parameters Table
Setting
Display Symbol
Date Format
[xx-xx-xx]
Date
[xx-xx-xx]
Time Format
[24h] or [12hr]
Time
[xx:xx]
Unit
[INR], [%Q] or
[Sec]
Beep Tone
[On] or [Off]
Therapeutic Range
(with INR)
[On] or [Off] and
[x.x]
Page 16 of 16
Function
To select between:
Day-Month-Year
Month-Day-Year
Year-Month-Day
To enter the date in the following
order: Year, Month, Day
To select between a 24-hour or a
12-hour time format with a.m. and
p.m.
To enter the time in the following
order: Hours and Minutes
To select the desired coagulation
unit. If INR is selected,
therapeutic target range can also
be inputted.
To select between switching On
or Off the beep tone signal.
Device will beep in the following
situations:
- When it detects strip
- When pre-heating of test strip
is complete and sample needs
to be applied
- When it detects sample
- When result is displayed
- When an error occurs
To select between switching On
or Off the option of displaying
whether result is outside
therapeutic range.
Set lower limit within the
therapeutic range of 1.5-3.5 INR.
Set upper limit within the
therapeutic range of 2.5-4.5 INR.