1
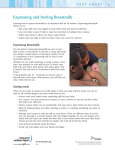
Part # 000046 Rev C
Whittlestone Breast Expresser
Instruction Manual
TM
Whittlestone, Inc.
Toll Free (877) 608-6455
Toll Free Fax (877) 609-6455
www.whittlestone.com
WHITTLESTONE, INC.
P.O. Box 2237
Antioch, CA. 94531
Toll Free (877) 608-MILK
Toll Free Fax (877) 609-MILK
www.whittlestone.com
READ ALL INSTRUCTIONS BEFORE USE
IMPORTANT SAFEGUARDS:
When using electrical products, especially when children are present, basic safety precautions should always be followed, including the
following:
DANGER: To reduce risk of electrocution:
Always unplug this product immediately after use.
Do not use while bathing or showering.
Do not use or store this product where it can be pulled or fall into a tub or sink.
Do not place in or drop into water or other liquid.
Do not reach for an electrical product that has fallen into water. Immediately unplug the product.
WARNING: To reduce the risk of burns, electrocution, fire, or injury to persons.
This product should never be left unattended when plugged in.
Safety precautions should always be observed when using electrical products, especially when children or invalids are present.
Use product only for its intended use as described in this instruction manual.
Do not use attachments not recommended by manufacturer.
For accessories and user replaceable components, contact Whittlestone Customer Service.
Never operate this product if it has a damaged cord or plug, if it is not working properly, if it has been dropped or damaged, or
dropped into water. Call Whittlestone Customer Service to return for examination and repair.
To prevent damage, keep all components and power cord away from heated surfaces.
Keep air openings on Motor Assembly free of lint, hair, and other foreign material.
Never use while sleeping or drowsy. Never insert or drop objects into openings or tubing.
The Power Supply is furnished with a polarized AC power cord plug (one blade is wider than the other). As a safety feature, this plug
will fit in a polarized outlet only one way. If the plug does not fit full in the outlet, reverse the plug. If it still does not fit, contact a
qualified electrician. Do not attempt to defeat this safety feature.
There are no user-serviceable parts in Motor Assembly. DO NOT ATTEMPT TO REPAIR THE MOTOR ASSEMBLY YOURSELF.
USE:
The Expresser Power Supply is designed to operate at outlet voltages between 110-220 VAC. It provides a 24 VDC, 1.5 Amp lowvoltage output. The Whittlestone Expresser is designed for a 20 minute “on” and 40 minute “off” cycle.
For storage after use, place all components in carrying bag including placing the power supply and cord at bottom between collection
bottles. When not in use, it is recommended that the product be stored at or near room temperture.
Warning: When cleaning the Power Supply, use a cloth dampened with cleaning alcohol on the outside of the enclosure only. Do not
immerse product in water or a safety hazard could arise during use.
Warning: Do not use the Power Supply supplied with the Whittlestone Expresser in the presence of flammable anesthetics.
SAVE THESE INSTRUCTIONS
Technical Issues or Product Repair
For all technical issues, servicing, repair, or maintenance information, call your rental facility or:
Whittlestone Customer Service — Toll Free (877) 608-6455.
Owner’s Record (Applicable to purchasers only)
The lot number is located on the top of the Motor Assembly.
For easy reference, fill in lot number: Lot#
When contacting Customer Support, you will need this information. Always contact Customer Service to obtain a return authorization
(RA) number before sending to Whittlestone for repair. There are no user-serviceable parts in the Motor Assembly!
Accessories and Replacement Parts
Contact Whittlestone, Inc. Customer Service department to obtain approved replacement components for Express Kits.
See the Accessories and Replacement Parts List included in this manual.
Page 2
WHITTLESTONE BREAST EXPRESSER ™
What is an Expresser? How does it work?
The Whittlestone Breast Expresser™ represents a true innovation in the technology of breastfeeding support. The Whittlestone
Breast Expresser™ provides a gentle pulsating massage action to the nipple area that encourages the expression of more breastmilk
with less suction pressure. This makes breastmilk expression more efficient, comfortable and enjoyable than using traditional breast
pumps that harshly tug at the nipple area.
The Whittlestone Breast Expresser™ is supplied with an instructional video and manual showing how to disassemble, clean, reassemble
and use the Expresser.
Items included with your Expresser ™
•
•
•
•
•
•
•
•
•
•
•
•
•
•
2 Express Kits™
Motor
Tubing*
2 Cooler Packs
4 Extra Milk Collection Bottles With Covers
Power Supply
2 Bottle Holders/Cup Covers
Cleaning Brush**
Extra Filter Cap**
Extra Blue Washer**
Blue Vacuum Port Cap (allows for single expressing)**
Instructional Video
Instruction Manual
Carrying Bag
* Tubing comes in sealed polybag.
** Cleaning Brush, Extra Filter Cap, Extra Blue Washer, Blue Vacuum Port Cap, and two Collection Bottle caps come provided in
sealed polybag.
Express Kit ™
The Express Kit applies stimulation to the breast and transports milk to the storage bottle. Low vacuum brings the nipple/areola into
contact with the soft, sheer liner, applying a gentle massage that accomplishes efficient milk expression. Each Express Kit consists of
the following parts:
•
•
•
•
•
•
Milk Collection Bottle
2 Blue Washers
Connector
Filter Cap
Filter Cap Washer
Express Cup
NOTE: The Blue Washers are identical, therefore interchangeable for use.
Express Cup ™
The Express Cup is the part of the Express Kit that contacts the breast. The Express Cup consists of the following parts:
•
•
•
•
Silicone Liner
Comfort Pad
Cup
Blue Pulsation Port Cap
Page 3
CLEANING INSTRUCTIONS
Quick Wash
(Recommended after each use)
1.
2.
3.
4.
5.
6.
Unscrew Bottle.
Remove Filter Cap by pulling straight up from Connector (See Figure 1) - leave
Tubing connected to Filter Cap. NOTE: If milk contacts Filter Cap, remove
tubing from Filter Cap and rinse Filter Cap with hot water.
Remove Express Cup from Connector by pulling straight away (See Figure 2).
Cover port on Express Cup with attached blue cap. See Figure 3.
Thoroughly rinse Express Cup and Connector with hot water.
Air or towel dry before reassembly.
Figure 1
Note: There is no need to remove either of the Blue Washers or the Filter Cap
*For
firstonuse,
hotConnector.
water with mild soap
Washer
the wash
top ofinthe
Full Disassembly and Wash
(Recommended at least once per week)
Figure 2
Disassemble as follows:
1.
2.
Unscrew Bottle.
Remove Filter Cap by pulling straight up from Connector – leave Tubing
connected to Filter Cap. See Figure 2.
NOTE: If milk has contacted Filter Cap, remove Tubing from Filter Cap
and rinse Filter Cap with hot water.
3. Remove Express Cup from Connector by pulling straight away. See Figure 3.
4. To disassemble Express Cup, gently pinch outside edge of liner at wide end,
removing from groove. See Figure 4.
5. Locate notch at small end of Express Cup and roll off liner with thumb. See
Figure 5.
6. Push small end of liner through nipple channel, pulling liner out from wide end.
See Figure 6.
7. Remove blue Comfort Pad.
8. You do not have to remove all three washers. If you do - take care not to lose/
misplace.
9. Hand-wash all components thoroughly (Except Filter Cap - See below for
*Filter Cap maintenance) with hot water and mild soap. A brush is provided
for cleaning channels of connector. Note: Never wash tubing unless milk or water
accidentally gets inside.
10. Shake off excess water and lay out to dry.
11. To clean motor case, spray a non-abrasive, general purpose cleaner onto a cloth
and wipe exterior of case only. Do not spray liquid directly on motor case!
*Filter Cap maintenance — Always keep Express Kits in an upright
position when milk is in the bottle. The filter cap protects the motor from
breastmilk overflow. A dry, clean filter cap will insure the Expresser
performs at its peak efficiency. If milk contacts the filter material, or if the
filter material otherwise becomes soiled, thoroughly rinse with hot water
until clean. Do not use any brush or abrasive material to clean filter. Before
reassembly of Express Kit, tap the filter cap to be sure all surfaces and
channels are free of moisture. The filter material is welded to the plastic
cap. Any effort to remove the filter material will destroy it. If filter
material is torn, replace with new Filter Cap.
IMPORTANT NOTE: Although all parts of the Express Kit may be boiled
and are dishwasher safe, these cleaning methods are harsh and will reduce
product life. To insure longevity, it is always recommended to hand wash all
plastic and silicone parts with mild soap. We also recommend carrying mild
soap in a pocket of the carrying bag for washing away from home. Note:
Most offices and public restrooms provide anti-bacterial soaps that may be
harmful to baby’s delicate system.
Page 4
Figure 3
Figure 4
Figure 5
Figure 6
Assembly of Express Kit
Make sure all parts are dry before assembly
1.
2.
3.
Insert Comfort Pad into Cup. Press firmly until evenly seated.
Push small end of Liner through Comfort Pad and nipple channel.
Place large end of Cup on a flat surface and fold reinforced portion of liner
into groove at small end of Cup. See Figure 7.
4. Next, reverse position of cup and fold liner into groove at large end of cup
insuring liner is not twisted in nipple channel. See Figures 8 & 9.
5. Carefully inspect to insure both ends of Liner are securely attached in their
grooves. See Figure 10.
6. Make sure a blue Washer is inserted into both ends of the Connector. See Figure 11.
7. Hold Express Cup at large end and push into Connector until firmly seated,
insuring notch mates to rim slot in connector.
8. Screw Bottle firmly into Connector, again insuring that a blue washer is firmly
seated between Bottle and Connector.
9. Apply Filter Cap Washer onto Connector, insuring it is properly seated in
groove at top of Connector.
10. To attach Filter Cap, line up the pulsation port with the corresponding hole in
the Filter Cap and press firmly in place. See Figure 12 (edge of Filter Cap
Washer should not be visible under bottom edge of Filter Cap. If visible repeat this step).
Figure 7
Figure 8
IMPORTANT NOTE: Always examine assembled Express Kit for firm and
proper fit. An airtight fit is essential to proper operation.
How Long to Express?
Figure 9
Double Expressing will produce more milk in the same time and may cut expression time in
half. Average expressing sessions will vary per individual. Refer to Use Instructions on page 2.
Successful expressing is a learned art and practice sessions are recommended. It is also highly
recommended that you drink plenty of water and always remain well hydrated.
When expressing full-time, it is well known that regularly emptying the breast stimulates and
maintains milk supply. The Whittlestone Breast Expresser is uniquely designed to mimic this
effect.
Breast Expressing Tips:
Figure 10
If breast
lactation
expressing is difficult for you, try some of these time-tested tips or contact a
professional or health-care provider for assistance.
Use deep breathing techniques to relax and assist with letdown.
Apply a warm compress to your breast 10 minutes before expressing.
If letdown is difficult, drink plenty of water or juice before, during and after
expressing sessions.
Gentle circular massaging of the breast prior to expressing will help the natural
letdown reflex.
Get as comfortable as possible, preferably seated with your feet up and your back
supported.
Figure 11
Remember to take good care of yourself! Eat a balanced diet, drink plenty of fluids
and try to get lots of rest.
Page 5
Figure 12
Expressing Milk
Instructions for expressing both breasts at the same time
Place Expresser on a flat surface such as a desk or table.
1.
2.
3.
4.
5.
6.
Remove the Express Kits from the Carrying Bag.
If necessary, insert tubing into Filter Caps (See Figure 13) — blue to blue, clear
to clear. Plug opposite ends into Motor — blue to blue, clear to clear. Plug 6’
cord into Power Supply. Plug opposite end into electrical outlet. Then, plug single
prong pin into Motor near ON/OFF switch. Turn vacuum dial clockwise to
maximum setting, then back one full turn.
Turn on the Expresser motor by pressing the on/off switch located on the motor
case. The initial start-up sound is normal.
You are now ready! While holding the Express Kits, center the Express Cups onto
your nipples, taking care to make full contact with breasts.
Be patient. It may take time for your body to get used to an Expresser instead of
your baby or the harsh vacuum of a traditional breast pump.
Adjust vacuum dial for maximum comfort.
Figure 13
ATTENTION: Always operate Expresser with the carrying bag flap OPEN.
When finished expressing milk, turn off the motor. Lean forward and remove the Express
Kits from your breasts. Place the Express Kits in the bottle holders, taking care to keep
them upright. Next, unscrew and cap the bottles. Place them into the cooling compartment
of the carrying bag. Store them in a refrigerator or freezer.
When finished expressing, place all components into Carrying Bag for storage. Always
disconnect the tubing from the Motor and the Filter Cap and place in plastic bag provided.
Roll tubing to prevent kinking.
Single Breast Expression
If single expressing, remove one set of Tubing from port on Motor; cover the exposed blue
port with the narrow blue port cap provided. Leave clear port uncovered. See Figure 14.
Breastmilk Storage Recommendations
♥ The following storage recommendations are for healthy, full-term infants
using mature milk:
Human breastmilk varies in color, consistency and odor, depending on the mother’s diet and
type of storage container used. Breastmilk is not homogenized; therefore the fat will
separate and rise to the top of the container. Breastmilk may be safely stored by carefully
following these guidelines:
* Breastmilk can be stored at room temperature for 6-8 hours (66°-72° F/19°- 22° C).
* Breastmilk can be stored in a refrigerator for 6-8 days (32°- 39° F/0°- 4° C).
The Whittlestone Collection Bottles™ are ideal for short-term storage. For longterm storage, the Whittlestone Milk Storage Bags™ are recommended.
Freezing Breastmilk
For longer storage, freeze your breastmilk. Frozen breastmilk may be stored in a refrigerator
freezer for six months or in a deep freeze (-200 C) for up to 12 months. Fill the container
only ¾ full to allow room for expansion during freezing. Freeze the milk in 2 oz. to 4 oz.
portions. These smaller amounts will thaw quicker. If your baby doesn’t drink the entire
portion, there is less waste.
♥ When freezing breastmilk, place storage container in middle of freezer – not on the door.
♥ To thaw breastmilk in refrigerator, place container in a clean bowl. Use within 24 hours.
For quick thawing, place container in a clean bowl of warm water until thawed. Breastmilk
should be fed at room temperature.
♥ Do not microwave or boil breastmilk; doing so will destroy live cells and important
nutrients. Also, it may heat unevenly and possibly burn your baby during feeding.
♥ Breastmilk may separate with fat rising to the top. If so, gently swirl container to re-mix.
♥ Label container with date and amount of milk collected; be sure to use oldest milk first.
Page 6
Figure 14
Accessories and User Replaceable Components
For Accessories and User Replaceable Components contact your Lactation
Professional or Whittlestone Customer Service Toll Free (877) 608-6455.
Power Supply (800137)
•
•
Universal 110 - 220 VAC to 24 VDC
1.5 Amp Power Supply
6’ Power Cord
Power Supply (800137)
Connectors (800138)
•
•
2 Connectors
Cleaning Brush
Connectors (800138)
Tubing (800139)
•
2 Tube sets that connect Express Kit to Motor
Express Cup (800140)
•
•
•
•
Tubing (800139)
Silicone Liner
Comfort Pad
Cup
Blue Pulsation Port cap
Express Cup (800140)
Filter Caps (800141)
•
2 Filter Caps included
Filter Caps
(800141)
Express Cup Liners (800142)
•
2 Liners included
Washers (800143)
•
•
Express Cup Liners
(800142)
4 Blue Washers
2 Filter Cap Washers
NOTE: The Blue Washers are identical, therefore
interchangeable for use.
Washers (800143)
Caps (800144)
•
•
2 Blue Pulsation Port Caps
Blue Port Cap
Caps (800144)
Bottle Holders (800145)
•
Bottle Holders (800145)
2 Bottle Holders/Cup Covers included
Cooler Packs (800146)
•
•
2 Cooler Packs
2 Cooler/Bottle Bags
ITEMS
Power Supply (800137)
Connectors (800138)
Tubing (800139)
Express Cup (800140)
Filter Caps (800141)
Express Cup Liners (800142)
Washers (800143)
Caps (800144)
Bottle Holders (800145)
Cooler Packs (800146)
RETAIL PRICE*
$55.00
$8.00
$6.00
$16.00
$6.00
$8.00
$5.00
$6.00
$4.00
$10.00
* Prices do not include $5.95 shipping and handling charge.
Page 7
Whittlestone, Inc.
Toll Free (877) 608-6455
Toll Free Fax (877) 609-6455
P.O. Box 2237 Antioch, CA 94531
www.whittlestone.com
© Copyright 2001 Whittlestone, Inc.
Whittlestone™ and Whittlestone Breast Expresser™ are trademarks of Whittlestone, Inc.