1
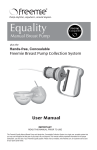
For Your Well-Being
Breast Milk Removal and Storage
Selecting the method of breast milk removal
If you’ll be away from your baby during a feeding, you may need another way to empty your breasts. You can
do this by hand (hand expression) or use a breast pump. Talk with your breastfeeding resource person to help
you decide what will work best for you. Here are some points to consider when choosing a method:
• Purpose/frequency: Will you do this daily (e.g., if you are returning to work) or occasionally
(e.g., when you go out for the evening)?
• Affordability: How much are you willing or able to spend? Will you use the pump again for future children?
• Hand expression: Free
• Breast pumps range in price and may include:
– Manually operated pumps
– Electric pumps
– Hospital-grade pumps,
– Battery-operated pumps
usually available as a rental
• Availability of pump and replacement parts in your area
• Ease of pumping: How much time will you have to pump your breasts? Some pumps will allow for double
pumping, decreasing the time spent and increasing the amount of milk.
• Ease of use: Is it easy to assemble and clean? Is it dishwasher safe and/or can it be sterilized if necessary?
• Do you need an electrical outlet? Is one available where you plan to pump?
• The most efficient way to remove breast milk is suckling by a healthy baby. Pumping is not a good way
to determine the volume of milk your baby is taking. (See “Baby is Getting Enough Breast Milk When ...”)
Which breast pump is best for you?
The following chart is provided as a guideline for selecting a breast pump. However, it is strongly
recommended that you meet with a lactation consultant such as an IBCLC (International Board Certified
Lactation Consultant).
Which breast pump is best for you?
Do you need a pump for:
Manual Small battery or electric Working grade Hospital grade
Occasional use
A missed feeding
An evening out from baby
Working part time
Best
Best
Good
Better
Better
Best
Daily use
Best
Working full time
Premature or hospitalized baby
Best
Best
Medical reasons
Low milk supply
Sore nipples or engorgement
Good
Latch-on problems or breast infection
Good
Drawing out flat or inverted nipples
Better
Best
Good
Best
Best
Best
Best
Best
Continued
X13548 (Rev. 04/13) ©AHC
Breast Milk Removal and Storage, Page 2
Milk letdown
Suggestions of times to express milk
Pumping and hand expression take practice and
become easier with time. Here are some hints on
how to help your milk begin to flow when baby is
not at the breast.
• If you are away from the baby, try to express
milk when the baby would eat and as often as the
baby eats.
• Expressing for storing extra milk can be done
when you are fuller or if baby did not empty both
sides in a feeding.
• Express milk one to two hours after baby has fed.
• Express milk on one breast while baby is nursing
on the other breast. Pumping may be easier
because the milk is already flowing.
• Have a picture of the baby to look at and/or a
piece of the baby’s clothing to stimulate your
senses.
• Arrange a comfortable place to sit: rocking chair,
easy chair, someplace with privacy.
• Relax. See your relaxation handouts.
• Talk positively about the baby with someone.
• Skin to skin contact helps the milk let down.
(See “Gentle Massage” section.)
• Set a specific routine for removing milk.
Preparing to pump with a breast pump
• Read the instruction sheet in the kit before using
the pump for the first time.
Caution: All pumps must suck and release (like
a baby feeds) when pumping.
• Wash the parts of the breast pump that touch
the breast or the expressed milk with clean hot
soapy water. Rinse well and air dry.
• Wash hands before handling any of the breast
pump parts, the breasts, or expressed breast milk.
• Center the breast shield over the nipple so the
nipple can move in and out without rubbing
against the sides. Some pumps have adapters to
fit different size nipples.
• Turn on pump after positioning the breast
shield. Always start pumping on minimum with
pumps that have suction regulators. Increase
suction to your comfort level; it should not be
painful.
• If single pumping, switch pump from side to side
when the milk flow decreases (or about every
5 minutes) until you have pumped both breasts
two to three times. Alternating sides is more
stimulating and can result in a higher volume
of milk.
• Drink enough fluid and get enough rest. Drink to
thirst or get into the habit of having something to
drink each time you sit down to pump.
• Your baby is better than a pump at removing
milk from the breast. The amount you pump is
not a true way to tell how much milk your baby
gets when breastfeeding, especially when you
are first learning.
Gentle massage
Massage the milk
producing cells and ducts
by pressing the breast
firmly with the flat of the
fingers into the chest
wall, beginning at the top.
Move fingers in a circular
motion, concentrating on
one spot at a time for a few seconds before moving
on to another spot. Spiral around the breast
toward the areola as you massage. The motion is
similar to that used in a breast examination.
Continued
X13548 (Rev. 04/13) ©AHC
Breast Milk Removal and Storage, Page 3
Hand expression of breast milk (Marmet technique)
(Information and diagrams used with permission from Medela, Inc.)
Draining the milk
1. Position the thumb (above the nipple) and first
two fingers (below the nipple) about
1 to 11/2 inches from the nipple, though not
necessarily at the outer edges of the areola.
Use this measurement as a guide, since breasts
and areolas vary in size from one woman to
another. Be sure the hand forms the letter “C”
and the finger pads are at 6 and 12 o’clock in
line with the nipple. Avoid cupping the breast.
Incorrect Positioning
Correct Positioning
2. Push straight into the chest wall. Avoid
spreading the fingers apart. For large breasts,
first lift and then push into the chest wall.
3. Roll thumb and fingers forward at the same time.
This rolling motion compresses and empties milk
without injuring sensitive breast tissue. Note
the position of thumb and fingernails during the
finish roll as shown in the illustration.
4. Repeat rhythmically.
Position, push, roll ...
Position, push, roll ...
Push into chest wall
Roll
Right hand
Finish roll
Left hand
5. Rotate the thumb and fingers to milk other
areas, using both hands on each breast.
Avoid these motions:
• Do not squeeze the breast, as this can
cause bruising.
• Sliding hands over the breast may cause
painful skin burns.
• Avoid pulling the nipple, which may
result in tissue damage.
Squeeze
Slide
Pulling
Continued
X13548 (Rev. 04/13) ©AHC
Breast Milk Removal and Storage, Page 4
Storage of breast milk
• Store breast milk in clean, closed or covered, plastic or glass containers. If using plastic bottle liners,
you may want to use two liners to prevent the chance of them breaking. Plastic should be food grade.
Bisphenol A (BPA or BisA) may pose a health risk and should be avoided.
• Leave about an inch of room at the top of the container, as milk expands when frozen.
• If your baby is in the Intensive Care Unit, sterile, heavy plastic containers should be used.
• Freeze in small quantities - about 2 ounces. This makes it easier to thaw the breast milk and there is
less waste if your baby does not drink much at a feeding.
• Cool freshly obtained milk before adding to already frozen milk. This can be done if obtaining small
amounts at a time to reach two ounces.
• Use a non-toxic marker to label container with date and time pumped. (Oldest milk should be used
first.) Label with baby’s name if taking milk to the day care center, sitter or hospital.
Breast milk storage
Infant
at home
Freshly expressed
breast milk
Thawed breast milk
(previously frozen)
Room temperature
77˚ F (25˚ C)
Refrigerator
40˚ F (4˚ C)
Home freezer
(2-door refrigerator)
Freezer
-4˚ F (-20˚ C)
Up to 6 hours*
8 days*
6 months
12 months
Up to 4 hours
24 hours
Never refreeze
thawed breast milk
Never refreeze
thawed breast milk
* Researchers state that freshly expressed breast milk can be left at room temperature for up to 6 hours.
However, it is preferable to refrigerate breast milk as soon as possible after pumping.
Thawing breast milk
• Place milk in refrigerator the night before you are going to use it. Refrigerator thawing takes about
12 hours.
• Place frozen milk in a pan of warm water or under warm running water to thaw.
• Do not use hot water or boiling water as this can destroy some of the milk’s ability to fight infection.
• Never microwave as this will cause hot spots that can burn your baby. It can also change the
composition of the milk.
• Do not refreeze thawed breast milk.
• Fat in breast milk will separate and rise to the top. By gently swirling the container, you can mix any fat
that may have separated.
• The color, consistency and odor of your breast milk may vary depending upon your diet.
• Discard any milk left in the bottle after 1 hour.
Intake guidelines
If your baby isn’t eating any solids (if he’s younger than 4 to 6 months, he shouldn’t be), a general
guideline to determine your baby’s daily milk or breast milk intake range is to multiply your baby’s
weight by two. This is the lower end of how many ounces he needs in a 24 hour period. Then multiply
his weight by 2.5. This is the upper range of ounces required.
Breastfed babies usually eat in frequent small amounts. The amount you feed your baby depends on
your baby’s size, age and appetite. Call your baby’s health care provider if you are concerned about your
baby’s eating, weight gain or health.
The information presented is intended for general information
and educational purposes. It is not intended to replace the
advice of your health care provider. Contact your health care
provider if you believe you have a health problem.
AuroraHealthCare.org
X13548 (Rev. 04/13) ©AHC