1
El símbolo ---M determina la distancia mínima al objeto iluminado. La distancia entre el foco de luz
y el objeto iluminado no debe ser superior a 0.5 m.
Asegúrese que el área bajo la zona de instalación está bloqueada al paso durante el proceso de
colgado, descolgado de la unidad.
Asegure siempre la unidad con un cable de seguridad.
La máxima temperatura ambiente no debe exceder de T
Maneje la unidad sólo después de familiarizarse con sus funciones. No permita su manejo a personas
no cualificadas. Muchas averías son causadas por ello.
Utilice el embalaje original para transportar el dispositivo.
Considere que las modificaciones no autorizadas en el dispositivo, están prohibidas por motivos de seguridad.
Si el dispositivo se maneja de manera diferente a la descrita en este manual, puede dañarse y anular
la garantía, ya que puede provocar, cortocircuitos, fuego, descargas eléctricas, etc.
a
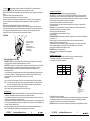
(1) Porta filtro de color
(2)Clip de sujección
(3) Carcasa
(4) Asa de montaje
(5) Tornillo del asa
(6) Aro de fijación
(7) Rejilla protectora
INSTALANDO/SUSTITUYENDO LA LAMPARA
PELIGRO. Instale la lámpara sólo con la unidad apagada. Desconecte antes el cable de red. Durante su
funcionamiento, la lámpara alcanza los 600ºC.
PRECAUCION La lámpara ha de ser sustituida cuando esté dañada o deformada por el calor. Antes de
sustituirla, desconecte la red y deje que se enfrie (aprox. 5 minutos).
Durante la instalación no toque con los dedos el cristal de la lámpara. Sigua las instrucciones del fabricante
No instale lámparas de superior potencia, estas lámparas general temperaturas para las que la unidad no
ha sido diseñada. Los daños causados por la no observancia de estas normas, no están sujetas a
garantía.
Para la instalación necesita una lámpara 230V PAR 56 con un máximo de 300W
Procedimiento
Paso 1: Mueva el filtro de color del frontal pulsando sobre el clip.
Paso 2: Si cambia la lámpara. Quite el clip de presión, gire el chasis y la lámpara se desprenderá. Quite la
lámpara antigua del portalámparas estirando.
Paso 3: Inserte una nueva lámpara 230V 300W PAR 56
Paso 4: Vuelva a colocar el portafiltros en el frontal.
Colgando la unidad
PELIGRO Considere la norma EN 60598-2-17 y las respectivas normas nacionales durante la instalación, la
cual debe ser llevada a cabo por un distribuidor autorizado.
La instalación del proyector de ser construida de tal manera que pueda soportar 10 veces su peso durante
1 hora sin deformarse.
La instalación siempre debe ser reforzada con un segundo sistema de seguridad.
Este segundo sistema debe ser construido de manera que no forme parte de la instalación principal
de manera que actúe si falla en anterior.
Cuando cuelgue, descuelgue o repare la unidad, está prohibido permanecer bajo ella.
KIT PAR 56
User Manual/Manual de uso
-6-
Installing/Procedure:
The projector should be installed outside areas where persons may walk by or be seated.
IMPORTANT! OVERHEAD RIGGING REQUIRES EXTENSIVE EXPERIENCE, including (but not
limited to) calculation working load limits, installation material being used, and periodic safety
inspection of all installation material and the projector. If you lack these qualifications, do not attempt
the installation yourself, but instead use a professional structural rigger. Improper installation can
result in bodily injury or damage to property.
The projector has to be installed out of the reach of people.
If the projector shall be lowered from the ceiling or high joists, professional trussing systems have to be
used. The projector must never be fixed swinging freely in the room.
Caution: Projectors may cause severe injuries when crashing down! If you have doubts concerning
the safety of a possible installation, do NOT install the projector!
Before rigging make sure that the installation area can hold a minimum point load of 10 times the
projector’s weight.
DANGER OF FIRE! When installing the device, make sure there is no highly-inflammable material
(decoration articles, etc.) within a distance of min. 0.5 M.
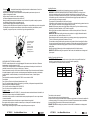
Mount the projector with the mounting-bracket to your trussing system using an appropriate clamp.
The hole in the mounting bracket has a diameter of 13 mm.
For overhead use, always install a safety-rope that can hold at least 10 times the weight of the fixture.
You must only use safety-ropes with screw-on carabines. Pull the safety-rope through the hole in the
mounting-bracket and over the trussing system etc. Insert the end in the carabine and tighten the
safety screw.
Adjust the desired inclination-angle via the mounting-bracket and fix the fixation screws.
DANGER TO LIFE! Before taking into operation for the first time, the installation has to be approved
by an expert!
Installing /Connection with the mains
DANGER TO LIFE! The electric connection must only be carried out by a qualified electrician!
In order to connect the device to the mains, you have to install a power-plug.
The occupation of the connection-cables is as follows:
Cable
Brown
Blue
Pin
International
Live
L
Neutral N
Yellow/Green Earth
The earth has to be connected!
Connect the device to the mains with the power-plug.
If the device will be directly connected with the local power supply network, a disconnection switch with
a minimum opening of 3 mm at every pole has to be included in the permanent electrical installation.
In general, lighting effects should not be connected to dimming-packs.
DANGER TO LIFE! Before taking into operation for the first time, the installation has to be approved
by an expert!
KIT PAR 56
User Manual/Manual de uso
-3-