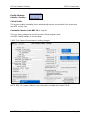
1
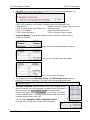
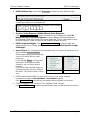
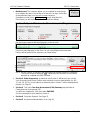
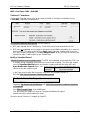
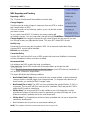
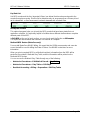
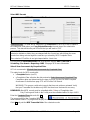
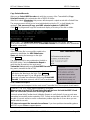
Hi-Tech Software Solutions MDS 3.0 Instructions For more information contact: [email protected] 474-7122 G:\HITECH\Documentation\MDS 3.0 Docs\MDS 3.0 Instructions.doc Revised 9/21/2010 Printed 9/21/2010 1:36 PM Hi-Tech Software Solutions MDS 3.0 Instructions Table of Contents Where to Find MDS 3.0 Processing ........................................................................................ 4 Edit MDS............................................................................................................................. 5 Enter a Resident’s MDS 3.0 ............................................................................................ 5 Entering MDS information ................................................................................................... 8 Navigation Buttons .......................................................................................................... 9 Other MDS 3.0 Features ................................................................................................. 9 Section V. Care Area Assessment (CAA) Summary .......................................................13 Section X. Correction Request .......................................................................................15 Section Z. Assessment Administration ...........................................................................16 When You End out of an MDS ...........................................................................................17 Check for MDS Data Conflicts............................................................................................17 Print the MDS 3.0...............................................................................................................19 How to Remove an MDS 3.0 ..............................................................................................20 Create the Resident’s Next MDS 3.0..................................................................................21 MDS 3.0 Statuses ..............................................................................................................22 Auto-Complete Printed MDS 3.0 ....................................................................................22 Section X: Corrections .......................................................................................................23 Modify a Submitted Record ............................................................................................23 Inactivate a Submitted Record........................................................................................24 MDS 3.0 Notes ..................................................................................................................25 MDS > Scheduling.................................................................................................................26 Medicare ............................................................................................................................26 Other Payers ..................................................................................................................27 MDS Reporting and Tracking .............................................................................................29 Change Register ............................................................................................................29 Activity Log .....................................................................................................................29 G:\HITECH\Documentation\MDS 3.0 Docs\MDS 3.0 Instructions.doc Page 2 Hi-Tech Software Solutions MDS 3.0 Instructions Correction Policy ............................................................................................................29 Assessment Alert ...........................................................................................................29 Edit List ..........................................................................................................................30 Key Date List ..................................................................................................................31 Incomplete Sections .......................................................................................................31 Medicaid MDS Review (MaineCare only) .......................................................................31 Submit the MDS 3.0 ..............................................................................................................32 Select MDS Records ......................................................................................................33 Two Other Submission Options ......................................................................................35 Copy Selected Records ..................................................................................................36 Print Submission Report .................................................................................................36 Libraries ................................................................................................................................37 MDS Libraries ....................................................................................................................37 MDS Security .................................................................................................................37 Link CATs to Problems ...................................................................................................37 Facility Libraries .................................................................................................................38 Clinical Profile.................................................................................................................38 Crosswalk: Edit Medical Record to the MDS 3.0 ................................................................40 Crosswalk: Libraries to the MDS 3.0 ..................................................................................40 Form Types and Assessment Code Combinations .........................................................41 How to Prepare for the Transition to the MDS 3.0 .................................................................42 Where to Find MDS 2.0 Processing Programs ...................................................................42 The MDS 3.0 and Care Plans ................................................................................................43 G:\HITECH\Documentation\MDS 3.0 Docs\MDS 3.0 Instructions.doc Page 3 Hi-Tech Software Solutions MDS 3.0 Instructions Where to Find MDS 3.0 Processing After you install Release 10.08, your MDS / Care Plan menus will look like the menus below: MDS 3.0 Processing and CAA documentation tools. You will complete the CAA (Section V) through Edit MDS. MDS 3.0 Reporting MDS 3.0 Submission G:\HITECH\Documentation\MDS 3.0 Docs\MDS 3.0 Instructions.doc Page 4 Hi-Tech Software Solutions MDS 3.0 Instructions MDS / Care Plans > MDS > Edit MDS Enter or select the Resident ID. • When you select an existing resident, MDS 2.0 records will be listed. • You cannot access MDS 2.0 records from this screen. To access MDS 2.0 records select: MDS / Care Plans > MDS 2.0 Processing. Enter a Resident’s MDS 3.0 NOTE: When you create a resident’s first MDS 3.0, you start with a blank record. Previous MDS 2.0 responses will not be transferred into the MDS 3.0. TIP: Edit MDS will automatically copy several items from the resident’s Face Sheet (Edit Medical Record) and your facility’s Profiles (under Libraries > Facility) into each new MDS 3.0. If these items are completed and correct in the original locations, this will save time and help you avoid data entry errors in each new MDS 3.0. If you manually enter or change these items in an MDS 3.0, the responses will not copy over to the next new MDS 3.0 for this resident. You will need to enter it again in each new MDS. To learn which items are copied into each new MDS, see Crosswalk: Edit Medical Record to the MDS 3.0 on Page 40 and Crosswalk: Libraries to the MDS 3.0 on Page 40. Hi-Tech recommends that you add and change this information in the original locations. Enter or select the Resident ID. As shown above, previous MDS 2.0 records will be displayed to help you identify which scheduled MDS 3.0 is due next. The sample screen above lists the resident’s previous Significant Change MDS 2.0. The next scheduled record for this resident would be an MDS 3.0 OBRA Quarterly. NOTE: Our MDS Scheduling Reports will help you determine the first MDS 3.0 that is due for each of your residents. See MDS Scheduling Reports on Page 26. To enter the next scheduled MDS, at the bottom right corner, click Create New Assessment. This will display the opening screen on which you provide the Assessment Reference Date (ARD) and the Type of Assessment. See the next page. G:\HITECH\Documentation\MDS 3.0 Docs\MDS 3.0 Instructions.doc Page 5 Hi-Tech Software Solutions MDS 3.0 Instructions Enter the A2300. Assessment Reference Date (ARD) and select the Type of Assessment. This will be a combination of the choices on the screen. The Type of Assessment determines which items you will answer in the MDS. If you select a valid combination for the Type of Assessment, a form code will be displayed at Item Subset. Example1: On the above screen, the following choices display Item Subset NQ for OBRA Quarterly: A0310A 02, A0310B 99, A0310C 0 and A0310F 99 Example 2: for a new Medicare resident, you must still complete a comprehensive Admission Assessment for either the 5-day or 14-day PPS. To make the 5-day the Admission Assessment, select: A0310A (OBRA) 01-Admission and A0310B PPS Assessments 01-5-day. Item Subset NC (comprehensive form). For the14-day, you will select: A0310A 99 (not OBRA) and A0310B 02-14-day. Item Subset NP (PPS MPAF form). TIP: Because of shortened completion and submission deadlines, you might consider combining the 5-day and the Admission to allow more time to complete the MDS and the required CAA Summary. G:\HITECH\Documentation\MDS 3.0 Docs\MDS 3.0 Instructions.doc Page 6 Hi-Tech Software Solutions MDS 3.0 Instructions Example 3: to create a Discharge Record (see Note below), A0310A (OBRA) 99-Not OBRA required and A0310B 99-Not PPS assessment and A0310F. 10-Discharge not Anticipated or 11-Discharge Anticipated. Item Subset ND (Discharge form). NOTE: CMS requires this coding even though a Discharge Record is an OBRA Required assessment. You must complete a Discharge assessment for every resident who is discharged, including for admission to the hospital or other care setting, or for hospital observation greater than 24 hours. This is regardless of whether the facility discharges or formally closes the record. Example 4: As of 10/01/2010, each time a resident is admitted or re-admitted, you must complete and submit an Entry Tracking Record (NT). You may not combine this with any other assessment type. Make the following selections to create an Entry Tracking Record: A0310A = 99 A0310B = 99 A0310C = 0 A0310E = No (not accessible) A0310F = 01-Entry Item Subset = NT, Entry Tracking record. See the screen below. For invalid combinations: • Item Subset will not display a form code. • Continue button will be grayed out so you cannot continue. See Form Types and Assessment Code Combinations on Page 41 for more details. IMPORTANT: Hi-Tech Support cannot provide guidance on coding assessment types. Please learn valid assessment combinations through state-sponsored MDS training, the MDS 3.0 RAI User’s Manual, and your state MDS Contacts and Help Desk. G:\HITECH\Documentation\MDS 3.0 Docs\MDS 3.0 Instructions.doc Page 7 Hi-Tech Software Solutions MDS 3.0 Instructions Entering MDS information After you select a valid Type of Assessment and click Continue, the program will display Section A. Identification Information. This screen demonstrates features that you will see throughout the Edit MDS program. • Provider Numbers automatically transfer from your Accounting and Clinical Profiles (under Libraries > Facility) These numbers must be accurate. • A200 Type of Provider is “hard-coded” as 1 Nursing Home (SNF/NF), and you cannot change the response. Because of this answer, you will not have access to 310D. Is this a Swing Bed clinical change assessment? (a Skip pattern). • You answered 310 A-C and E-F on the opening screen when you created the record. You can only change the answer at item E. If you discover that the other responses are not correct, End out of the record and start a new record with the correct coding. Then remove the incorrect record. See instructions for removing an MDS 3.0 on Page 20. • 410. Submission Requirement defaults to the response that you will choose most frequently. Change the response if it is not correct for this record, for example some assessments for a Medicare C plan resident. • When you complete the first MDS 3.0 for an existing resident, you must respond to new questions that might require some initial research: A1100. Language, A1700. Type of Entry and A1800 Entered from. These responses will be transferred to the resident’s next MDS 3.0 if you choose to copy all responses from an existing MDS 3.0 into a new MDS. See Page 21 for more details. G:\HITECH\Documentation\MDS 3.0 Docs\MDS 3.0 Instructions.doc Page 8 Hi-Tech Software Solutions MDS 3.0 Instructions Navigation Buttons Each screen includes groups of Navigation buttons (shown on the right) that help you move around the record. • Each screen displays buttons for the items included on each screen in that Section. See the Section A buttons on right. The button for the displayed screen will be grayed out. Click a button to move to that range of items, i.e. click A1550 – A2100 to see item A1800. • Click Back and Next to move sequentially through the screens. • To move to the first screen in another section, click the Section letter in the column on the right side of the screen. The displayed Section and sections to be skipped will be grayed out. For example, on the right, Section A is currently displayed. Sections F and V are not completed for a Quarterly assessment. • Click Help to view descriptions of the items on the screen. The descriptions match those on the printed MDS form for the Comprehensive Form type (NC). Some items might not apply to other form types. • Click Cancel to undo changes not yet saved. Leaving the screen saves all changes. • Click Note to open the Edit Resident Notes program so you can add a Note for this Section. See more about Notes on Page 25. • Click End to exit the MDS record. The program will calculate the case mix and RUG scores for the assessment and check it for errors. See Page 17 for more detail. Other MDS 3.0 Features • Skip Patterns. The Type of Assessment often determines which items will be answered or skipped. Certain responses will also determine whether you will answer or skip other items. If you encounter an item that is grayed out and will not allow you to respond, review the instructions on the MDS form or the RAI manual to see why these items are to be skipped. Example: B0700 Makes Self Understood = 0,1 or 2. Complete the Brief Interview for Mental Status from C200-C500. At C600, answer that the resident completed the interview. The program will not allow access to the Staff Assessment for Mental Status because the resident has already answered these questions. G:\HITECH\Documentation\MDS 3.0 Docs\MDS 3.0 Instructions.doc Page 9 Hi-Tech Software Solutions • MDS 3.0 Instructions Case Mix: Items used to determine Case Mix (RUG IV) scoring are displayed in red: RUG III will continue to use the items below that will not be displayed in red: I 4300 Aphasia I 5500 Traumatic Brain Injury (Maine only) J1550 C. Dehydrated J1500 D Internal Bleeding • M0300 A. Number of Stage 1 pressure ulcers N0300 Injections O0600 Physical Examinations O0700 Physician Orders changed Response Ranges: The program will limit responses based on related previous responses. Example: If Not Assessed, program input Not Assessed If No, you can only select from two options. If Yes, you can select all options. • The program will calculate Summary Scores and Total Severity Scores after you respond to all items in a question. You need not do the calculations manually. • Section # Complete (Optional feature). When you complete all the items in a section, you can checkmark it complete. When you return to the assessment, the Select Starting Section will indicate which Sections have been marked Completed. You can then concentrate on the incomplete items. This feature is useful when different persons complete different parts of the MDS. You can select Reporting > MDS > Incomplete Sections to list the MDS that still have sections to be completed. G:\HITECH\Documentation\MDS 3.0 Docs\MDS 3.0 Instructions.doc Page 10 Hi-Tech Software Solutions • MDS 3.0 Instructions A2400. Medicare Stay: checkmark Ongoing if resident receives skilled therapy. This will print dashes on the printed form: • Section I. Active Diagnoses, I8000 Additional Active Diagnoses: Click Reset from Face Sheet to import the resident’s first 10 diagnoses from Edit Medical Record > Physicians/Diagnoses. Remove diagnosis already selected at I0100 through I6500, and include only current diagnoses. (This is a good time to move resolved Diagnosis Codes to History in the resident’s Medical Record.) • K0200. Height and Weight: Click Import Height and Weight to copy in height and weight recorded up to 30 days prior to the ARD (under Edit Medical Record > Height and Weight.) • None of Above. On a Comprehensive assessment you can access all responses for an item, including None of the above. Another type of assessment might give access to a subset of these same responses. If you selected None in the previous assessment, that response will be cleared so you can select another response. If you do not select another response, you might not have access to None of Quarterly MDS Comprehensive MDS the Above. This will not cause a “None” error. • O0250 Influenza and O0300 Pneumococcal Vaccine. If you record residents’ inoculations through the Documentation > Inoculations program, click View Inoculations to display the inoculations that the resident has received. • O0400. Therapies. If you use the Hi-Tech Software Rehab Therapy, click Import HTS Therapy to import recorded therapy days and minutes into this section. G:\HITECH\Documentation\MDS 3.0 Docs\MDS 3.0 Instructions.doc Page 11 Hi-Tech Software Solutions • MDS 3.0 Instructions Not Assessed: This response allows you to complete an assessment for a resident who was in the facility for a few hours or days. Select Not Assessed when there is not a more accurate response. Sometimes you will select – Not Assessed from a drop-down list. Other times you will checkmark a Not Assessed box (below): Not Assessed responses will give Warnings on the error list: If there are only Warnings on the Error List, you can still print the assessment. Dashes will be printed as the response, as shown below: NOTE: Section C0600. Should the Staff Assessment for Mental Status be Conducted? The correct response would be 0-No, rather than Not Assessed, if the resident was able to complete the BIMS interview. • Section S. State Assessment. A state that uses Section S will have its own version. Your Accounting and Clinical Profiles must include the correct state identifier (i.e. ME, VT, NH, PA, IN, etc.) in the address to determine which Section S will be displayed and printed. See Page 39. • Section V. This is the Care Area Assessment (CAA) Summary required with all Comprehensive Assessments (NC). You will now complete the CAA from within Edit MDS. See the next page for more detail on Section V. • Section X. Correction Request. See Page 15. • Section Z. Assessment Administration. See Page 16. G:\HITECH\Documentation\MDS 3.0 Docs\MDS 3.0 Instructions.doc Page 12 Hi-Tech Software Solutions MDS 3.0 Instructions Section V. Care Area Assessment (CAA) Summary You must complete Section V with each Comprehensive MDS 3.0. Typically, you will not complete the Section V while you enter the MDS, and when you end out of the record you will receive the errors on the right. If there are no other errors, you can print the MDS, which will give the record a status of Open-V meaning that Section V is still Open and must be completed and printed before you can submit the MDS. Research the triggered CAAs Research the triggered CAAs to decide if you will proceed or not proceed with care planning. • Select MDS / Care Plans > MDS > CAA Trigger Test to list the MDS responses that triggered the CATs. IMPORTANT: To print the CAA Trigger Test for an MDS, it must have a status of Open-V, Printed or Completed, which is displayed in the Status column in the Edit MDS program. This assures that you are researching supporting documentation for a finished assessment. See more about Statuses on Page 22. • CAA Indicators will be available in a future update or Patches. (These are known as RAP Guideline Worksheets under the MDS 2.0.) Return to the record through Edit MDS. When you select Section V, the program will Update CATs and Summary Data (see screen on right). G:\HITECH\Documentation\MDS 3.0 Docs\MDS 3.0 Instructions.doc Page 13 Hi-Tech Software Solutions MDS 3.0 Instructions The program first displays Item V100, which imports information from the previous MDS 3.0, if there is one. You cannot change these responses. 10/05/2010 V100 is created once from the most previous records: • Remove invalid MDS records so they will not be used to update the next MDS. • After it is created, V100 will not be updated by changes to the previous record. • If there is no previous MDS 3.0, this will be blank. It will not cause errors on the error list. Click Next to display the CAA Summary screen. The triggered CAAs are checked under A. Trig. Under B In CP (care plan), you must select either Y(es) or N(o) or N/A (not addressed You can click the check box under Notes to open the Edit Resident Notes screen to enter a CAA note that documents your decision. See Page 25 for more instructions on Notes. G:\HITECH\Documentation\MDS 3.0 Docs\MDS 3.0 Instructions.doc Page 14 Hi-Tech Software Solutions Under Location/Date of CAA Info: the program will display the text selected in your Clinical Profile (screen on the right under Libraries > Facility). You can change this entry on the CAA screen. MDS 3.0 Instructions CAT Summary Default Text See RAP/CAA Guideline Worksheet and/or Notes See Supporting Documentation See Briggs Forms Blank Click Next to display V200, the Signature area. Complete this information. When you End out of the record, it will be checked for errors. If no errors are found, it will display the Print Form screen. Select All Changed Pages to print the Section V and any other pages that have not been printed, or changed since they were printed. This will assign the MDS a Printed or Completed Status, if applicable, so it can be submitted. See Print the MDS 3.0 on page 19. See MDS 3.0 Statuses on Page 22. Section X. Correction Request Section X is included and printed with every MDS record. If this is not a Correction Request (Modification or Inactivation), item X 100. Type of Record will be coded as 1. Add new record and you will not be able to change it. See page 23 for more information on doing a Correction Request. G:\HITECH\Documentation\MDS 3.0 Docs\MDS 3.0 Instructions.doc Page 15 Hi-Tech Software Solutions MDS 3.0 Instructions Section Z. Assessment Administration Secton Z is updated each time you End out of the MDS Record so it may not be accurate for the changes you have just made to this record. IMPORTANT: You must answer Z100 C. Is this a Medicare Short Stay assessment. Leaving Z 100C blank will cause an error. Answer Z 100C according to the CMS regulations for the Medicare Short Stay. Complete the final screen in Section Z--items Z 400 and Z500 at which you “sign” and date the form. Enter a name under Signatures. You should also sign the printed Chart Copy. Click End or Next to exit the record. See When You End out of an MDS on Page 17. G:\HITECH\Documentation\MDS 3.0 Docs\MDS 3.0 Instructions.doc Page 16 Hi-Tech Software Solutions MDS 3.0 Instructions When You End out of an MDS When you end out of an MDS the program will calculate the ADL and the Medicaid and Medicare Case Mix scores. Old: the score prior to any changes just made. New: the score for the existing record. You can choose to have the record checked for Errors, Warnings and Data Conflicts. You can then Print the form if it is error free. See Print the MDS 3.0 on Page 19. If you usually uncheck these items each time you end out of the record, you can change the default to be unchecked. See Changing MDS Defaults on Page 38. Click Continue to proceed. The program will copy the case mix groups back into the record to Section Z. Check for MDS Data Conflicts Data Conflict Checking allows you to review MDS responses that seem to conflict with each other, even though they are not considered to be errors. The program will list this combination as a conflict so that you can review and confirm that both responses are correct. Example: I 5800 Depression (checked) and N0400 C. Antidepressant (unchecked) The program checks for more than 100 conflicting responses, and provides a variety of reporting formats. This process helps you to locate, verify and correct conflicts that your surveyors might find. It will also help you identify areas to reconsider and report more accurately to raise your case mix index. You can run the data conflict checking from the following selections: • From the Edit MDS program when you end out of a record. • From the Print MDS program when you select pages to be printed. • From the MDS / Care Plans > MDS menu shown on the next page. G:\HITECH\Documentation\MDS 3.0 Docs\MDS 3.0 Instructions.doc Page 17 Hi-Tech Software Solutions MDS 3.0 Instructions MDS / Care Plans > MDS > Print the Data Conflict List Select the MDS records that you want to check for data conflicts, and select the report format. See screen on right. Print Data Conflict Trends Print a 12-month trend report that lists the number of times a particular conflict has occurred for assessments dated within that month. Use this report to see that your nursing and data entry staff are responding to data conflicts and changing their assessment and recording methods. Edit Data Conflict Items In MDS records already scanned for conflicts, you can flag specific data conflicts as “exceptions”. These items will no longer be listed on data conflict reports unless you choose to Include Exceptions. For example: • a conflict is an exception for this resident (Individual). • a conflict is an exception for just This MDS. • a conflict is an exception for the entire facility (Global). G:\HITECH\Documentation\MDS 3.0 Docs\MDS 3.0 Instructions.doc Page 18 Hi-Tech Software Solutions MDS 3.0 Instructions MDS / Care Plans > MDS Print the MDS 3.0 NOTE: You can also print an MDS from Edit MDS when you end out of the record, if the record has no errors. Warnings will not stop an MDS from being printed. Select the resident and the MDS. This will display the pages for that Type of Assessment. IMPORTANT: To mark an MDS as Printed or Complete and ready for submission, you must select either: All Pages or All Changed Pages*. Selecting individual pages will NOT prepare an MDS for submission. Click Ok. The program will allow you to select another resident and MDS and display your selections under: When you have no more selections, click Print. *All Changed Pages If you have not yet printed an MDS, this choice will print the entire record and mark the record Printed or Complete. If you change a printed record, this changes the Printed or Complete status back to Open. Select All Changed Pages to print just the pages that have been changed and replace the original pages in the chart copy. This will change the status back to Printed or Complete. To reprint the entire record, choose All Pages. You can only submit MDS with a Complete status. See Auto-Complete Printed MDS 3.0 on Page 22. To print a blank form that you can use to gather responses on paper, click the BLANK button. Specify the number of copies and the Type of Assessment. Click Ok. G:\HITECH\Documentation\MDS 3.0 Docs\MDS 3.0 Instructions.doc Page 19 Hi-Tech Software Solutions MDS 3.0 Instructions MDS / Care Plans > MDS > Edit MDS How to Remove an MDS 3.0 If you have created an MDS that you do not need to complete and submit, or you created an MDS with the wrong type of assessment codes, you can remove it. • Select the MDS, and on the next screen, click Remove. At Do you wish to delete this record? Click Yes. • If the record has been submitted and rejected, on the following screen select Rejected and click OK. G:\HITECH\Documentation\MDS 3.0 Docs\MDS 3.0 Instructions.doc Page 20 Hi-Tech Software Solutions MDS 3.0 Instructions MDS / Care Plans > MDS > Edit MDS Create the Resident’s Next MDS 3.0 In Edit MDS, select the resident and click Create New Assessment at the lower right corner. This will display the screen below: Option 1: Copy responses from an existing MDS 3.0 into the new assessment. In the drop down box, select the number of the assessment listed on the screen behind the blue pop-up screen. This will copy many of the previous responses into the new record. Review each item to verify that the response has no changes. With MDS 3.0 Subsets, only the completed responses will pull forward from the selected assessment into the new assessment. So, if you select an NP form (PPS), only the NP responses will pull into the new assessment. Option 2: To start the new MDS as a blank assessment without prior MDS responses. Both options will import several items from the resident’s face sheet and your facility libraries when you create a new record. See Page 40 for a list of these items. G:\HITECH\Documentation\MDS 3.0 Docs\MDS 3.0 Instructions.doc Page 21 Hi-Tech Software Solutions MDS 3.0 Instructions MDS 3.0 Statuses Open Complete and print the MDS so you can submit it. Open (V) Complete and print Section V (Care Area Assessment) so you can submit the MDS. Printed Record is printed. You must identify it as Complete so it can be submitted. See more below. See Auto-Complete Printed MDS 3.0 below. Complete Record is ready to be submitted. See more below Submitted MDS was submitted on the date in the Submit column. No action required unless the MDS was rejected or a Modification or Inactivation is needed. SubmittedModified MDS was submitted and now you want to modify it. You cannot access this record. Make changes through the Open-Modification Request record. OpenModification Request You chose to modify a submitted MDS (see Submitted Modified above), and this is a copy of that record that you will change, complete Section X, and resubmit. Print it to give it a Complete- or Printed–Modification Request status. When submitted it will be given a Submitted- Modification Request status. SubmittedInactivate You chose to inactivate a Submitted MDS. You cannot access this record. Complete Section X in the Open-Inactivation Request record. Open-Inactivation Request You chose to inactive a submitted MDS. This is the copy in which you will complete Section X, and then print and submit the record. Auto-Complete Printed MDS 3.0 IMPORTANT: You can submit only those MDS that have a Complete status. • In Libraries > Facility > Clinical Profile, Auto-complete Printed MDS 3.0 will be checked. When you print an MDS, the program will mark it as Complete so it can be submitted. • If you want more control over MDS records to be marked as Complete, you can uncheck that item in the Clinical Profile. When you print an MDS it will be given a Printed status. When you consider the MDS complete and ready to submit, in Edit MDS you must select the MDS and click Complete to give it a Complete Status. • When you select records for submission, only the records tagged at Complete will be selected for submission. Print MDS defaults to All Changed Pages which will assign a Printed or Complete status to the printed MDS. You can also select All Pages to assign a Printed or Complete status. Selecting individual pages will not assign the Printed or Complete status, and an Open record will remain open. Also see Print the MDS 3.0 on Page 19. G:\HITECH\Documentation\MDS 3.0 Docs\MDS 3.0 Instructions.doc Page 22 Hi-Tech Software Solutions MDS 3.0 Instructions MDS / Care Plans > MDS > Edit MDS Section X: Corrections If a record is Rejected due to error, or you want to Modify or Inactivate a submitted record, in Edit MDS, select the Submitted MDS. 10/05/2010 10/15/2010 Rejected-Submission was rejected: use this option if: a. MDS was rejected due to Fatal Error(s). Correct the error(s) and resubmit the record. b. MDS was not submitted and you want to change the record before submitting it, or remove it from your files. This will give the MDS an Open status. Make the changes and re-process the CAA Summary if necessary. Print All Changed Pages. When you copy the record to the submission folder, it will be given a new Submit Date. Modify a Submitted Record Modify-Submitted record contains errors. The MDS was submitted and accepted by CMS, but it contains wrong information that you want to correct and re-submit. This gives the original record a Submitted-Modified status and creates a new record with the same ARD and Open-Modification Request status. You cannot access the original record. In the Open record, make the necessary corrections and complete Section X. Note that 100. Type of Record = 2 Modify existing record. Complete 900. Reasons for Modification and 1100 RN Assessment Coordinator Attestation of Completion. Print All Changed Pages of the Modification. This will change the status to Printed or Complete-Modification Request. Submit it through normal submission steps. See more about Printed vs. Complete on Page 22. G:\HITECH\Documentation\MDS 3.0 Docs\MDS 3.0 Instructions.doc Page 23 Hi-Tech Software Solutions MDS 3.0 Instructions Inactivate a Submitted Record Inactivate-Inactivate a submitted record. The MDS was submitted and accepted by CMS, and you want to inactivate that record in the CMS system. This gives the original record a status of Submitted-Inactivate and creates an Open-Inactivation Request record. Complete Section X in the Open record. At Section X, note that 100. Type of Record = 3 Inactivate existing record. Complete 1050. Reasons for Inactivation and 1100 RN Assessment Coordinator Attestation of Completion. Select All Changed Pages to print the Correction Request. This will change its status to Printed- or Complete-Inactivation Request. Submit the record through normal MDS submission. See more about Printed vs. Complete on Page 22. G:\HITECH\Documentation\MDS 3.0 Docs\MDS 3.0 Instructions.doc Page 24 Hi-Tech Software Solutions MDS 3.0 Instructions MDS 3.0 Notes There are two ways to create MDS Notes: 1. On an MDS screen, click the Notes button. 2. On the Section V. CAA screen check the box in the Notes column for a triggered CAA. The Note will be identified by the MDS ARD and Section or CAA. Enter the note at Add Note. Click OK to record the note. The program will ask if you want to lock the note so it cannot be changed. You can leave it unlocked so you can make changes, and lock it later. Submitting the MDS will lock the note. You can print the Notes when you print the MDS for the chart. You can also access and print Notes through Edit Medical Record > Notes or Documentation > Notes. Finish the note and click OK, End or Cancel to return to the prior MDS screen. To copy text from a previous Note: 1. Click the binocular icon under Existing Notes to list existing Notes (on right). 2. Select the note you want to copy to display it. 3. Click Copy Text. This will copy the text to the Add Note area where you can edit it. G:\HITECH\Documentation\MDS 3.0 Docs\MDS 3.0 Instructions.doc Page 25 Hi-Tech Software Solutions MDS 3.0 Instructions MDS / Care Plans > MDS > Scheduling Medicare When you create a Stay Record for a Medicare or other insurance PPS stay, this creates a schedule of required MDS records based on admit date and number of days available. This Medicare scheduling report will help you track the completion of MDS required for PPS billing. As you print these MDS, they update the Stay Table with the MDS date and type of assessment. When you submit the MDS, RUG rates will update the stay table, making this information ready to include on PPS billing. IMPORTANT: Only residents with Stay Table records and MDS schedules will be included. Print Scheduled or Completed. Use From and Thru dates that match the billing period. Scheduled (Due to be completed) The Medicare MDS scheduling report will not consider the payment issue of an MDS 2.0 assessment not paying for days in October. To maximize reimbursement on an individual basis, CMS suggests you consider the 3 options below for residents with Medicare A or Medicare C. • Use grace days when appropriate and do a 3.0 in October to cover days in September. • Do a second assessment so you have a 2.0 and 3.0 that cover days for a specific period of time. • Accept the default rate for October days until the next 3.0 assessment is scheduled. See Completed version on the next page. G:\HITECH\Documentation\MDS 3.0 Docs\MDS 3.0 Instructions.doc Page 26 Hi-Tech Software Solutions MDS 3.0 Instructions Completed *Day does not match AA8b or A310B identifies an MDS with a type of assessment outside the required Observation period. For example a 30-day with an ARD in the 14- or 60-day Observation Period date range. MDS / Care Plans> MDS > Scheduling/ Pre-Asmnt > Other Payers Use this program to print a list of nonMedicare and non-PPS MDS records that are due. Print this listing at least once a week-it can change from day to day as records are completed, and as residents are admitted and discharged, or have a significant change in status. IMPORTANT: If the list includes a resident who is no longer in the facility, verify that the resident has a discharge date on the Demographics screen of Edit Medical Record. Verify that you have completed a Discharge Assessment for the resident. The Report Date will print at the top of the report. It is not used to select records. Due Thru Date: the date for which assessments should be completed. To include MDS that are due and already started, uncheck Skip Assessments in Process.. To include Medicare residents check Include Medicare Stays. This will include the next assessment due for this resident, based on the OBRA schedule. If you leave this item unchecked and Medicare residents are included, verify that you have an accurate Medicare Stay Table record for the resident, and that you have completed all required Medicare assessments. If you want a listing of Medicare and PPS Assessments that are due, print the Medicare report described on Page 26. To include residents whose face sheet codes at Level of Care other than 1 and 2 uncheck Nursing Levels Only (1+2). You can Sort by Unit and select a specific unit. Or Sort by Date (Next Assessment due date). Click Print. Continue on next page. G:\HITECH\Documentation\MDS 3.0 Docs\MDS 3.0 Instructions.doc Page 27 Hi-Tech Software Solutions MDS 3.0 Instructions NOTE: The report will not reference assessments that are over one year old New Admits. If a new admit does not have an existing assessment, the program schedules the Admission assessment 13 days after the Admit date in the resident’s face sheet record. If your Clinical and Resident Billing Systems are integrated, the resident might not be listed until after the census program has been run to input admit dates. Existing residents: The program looks at each resident’s existing MDS records and finds the most recent Complete MDS. Within the most recent record, the program finds the Assessment Reference Date (or MDS 2.0 R2b) and calculates the Next Asmnt Due Date using the Quarterly Review Days recorded in the Facility Profile-Clinical record. See Page 39. If the three most recent assessments are quarterly records, the next assessment scheduled will be an Annual. Discharges: If the most recent record is a Discharge--Return Not Anticipated, the resident will not be included on the list. If the most recent record is Discharge--Return Anticipated the next Assessment Reason will be listed as an Entry Tracking Record (or MDS 2.0 Re-entry). The Re-entry/Entry suggestion will be dropped from the report 30 days after the discharge date. In Process: If the program finds that a new assessment has already been started before the Due Date, the Next Asmnt column will provide the Type of Assessment and the Assessment Date. The Comments column will indicate In Process. • Program will calculate next assessment date based on the ARD in the previous record depending on the type of assessment (in the MDS 2.0: R2b and VB2). Examples: • Annual: ARD of previous OBRA comprehensive plus 366 days. (MDS 2.0: VB2 + 366) • Quarterly: ARD of previous OBRA assessment plus 92 days. It will use the Libraries > Facility > Clinical Profile > Quarterly Review Days entry to schedule quarterly assessments. The default is 90 days and you can change it if you want to schedule the quarterly earlier. • The report will also alert you if an annual is due within 30 days of the next suggested quarterly date, and if the next suggested quarterly is the 4th, 5th or 6th quarterly. • If the reason is a Quarterly MDS, the Next Annual Due date will be printed in the Comment column. • If there is a Discharge Date in a resident’s face sheet, and you have not completed a Discharge Assessment, this resident will be listed as requiring that record as the Next Assessment. IMPORTANT: MDS 3.0 scheduling is based on ARD to ARD. This is different from the MDS 2.0. G:\HITECH\Documentation\MDS 3.0 Docs\MDS 3.0 Instructions.doc Page 28 Hi-Tech Software Solutions MDS 3.0 Instructions MDS Reporting and Tracking Reporting > MDS > The 7-Column Worksheet will be available at a future date. Change Register Print this report to review changes in responses from one MDS to another and changes within an MDS. There are several sort and selection options so you can limit the records you want to review. As you create several MDS 3.0 subsets, the change register will accumulate changes. You can purge older changes through File Utilities > Purges > MDS Change Register. We suggest you purge through a date at least one year ago so you don’t lose change records you might want to review. This does NOT delete MDS records. Activity Log Review which users access which residents’ MDS 3.0 records and at what time of day. Removed MDS records will be identified. Edit List (see next page) Correction Policy Print the RUG and Case Mix Scores of MDS records that have been Modified or Inactivated. Use this information to make corrections for billing. Assessment Alert List residents and MDS records that need your attention. Enter Alert Date: check MDS records with Assessment dates up through this date. Select Include Assessments flagged as Do Not Submit to check MDS that are coded with a 2 or 3 at A0410. Submission Requirement. This report will identify the following conditions: • Not Printed (Chart Copy): Open records that have not been printed, or were printed and changed, and the changed pages have not been printed. To complete and submit any of these records, you must print All Changed Pages. • Not Printed (Sec V only): The MDS has been printed but the required Section V (CAA) is not printed. This record is still Open and cannot be submitted. Finish and print the CAA to make the MDS ready for submission. • 90 Day Alert: The most recent MDS for this resident is not a Discharge form, and the Assessment Reference Date on the record is approaching or beyond 90 days old. A nonMedicare resident is probably due for the next assessment. • 14 Day Alert: This Completed record has not been submitted and it is near or beyond the submission deadline date. • New Residents who do not have an assessment started yet NOTE: This program will not list assessments that are over one year old. G:\HITECH\Documentation\MDS 3.0 Docs\MDS 3.0 Instructions.doc Page 29 Hi-Tech Software Solutions MDS 3.0 Instructions Edit List M362 Select Report Option Most Recent Complete MDS: The most recent printed record for each resident. Incomplete MDS List: Open MDS records that must be finished and printed before they can be submitted. Not Changed Since List: Printed MDS records with ARDs before the date that you enter at List Active Residents that have not had an Assessment Since. If you enter a date that is 3 months old, this will list residents now due for OBRA assessments. MDS not Printed List: Open MDS records that must be printed before they can be submitted. BIMS (Brief Interview for Mental Status) List: residents’ most recent BIMS score, and the previous score when available. Example below: 13/13 for current and previous assessments. All Printed List: all printed MDS. Current MDS with RUG Weight and ADL: Discharge Tracking Exception List: residents who have a Discharge Date in Edit Medical Record > Demographics and who do not have an MDS Discharge Tracking Assessment with an equal or later discharge date Select the date range of the assessments you want to print. Decide if you want to Include Discharged Residents. Uncheck any MDS Item Sets you do not want to include on the list. G:\HITECH\Documentation\MDS 3.0 Docs\MDS 3.0 Instructions.doc Page 30 Hi-Tech Software Solutions MDS 3.0 Instructions Key Date List List MDS records and the Key (important) Dates (see below) that have been assigned to the records through processing. Use this list to determine why an assessment has not been picked up for submission, or if an assessment is already stamped with a Submit Date. Incomplete Sections This optional program helps you to track the MDS records that have been started but not marked as complete. It is especially helpful in facilities where different staff members complete different parts of the MDS. In Edit MDS, at the end of each section, you can check mark the Section as Complete. This report lists assessments with sections not checked as complete. Medicaid MDS Review (MaineCare only) For use with MaineCare MIHMS billing, this report lists the OBRA assessments and case mix scores that will be used for billing the State of Maine. See MIHMS instructions for more information. When you print a required MDS for a Medicaid resident, information from the MDS will be posted to the resident’s Medicaid Stay Table, and this information will be printed on the Medicaid MDS Review. You can access the Medicaid Stay Table through any of the following: • Admission Procedures > Edit Medical Record > Stay Tables • Admission Procedures > Stay Tables > Edit Stays • Resident Accounting > Billing > Preparation > Edit Stay Tables G:\HITECH\Documentation\MDS 3.0 Docs\MDS 3.0 Instructions.doc Page 31 Hi-Tech Software Solutions MDS 3.0 Instructions Submit the MDS 3.0 MDS records must have a Complete Status to be submitted. Depending on the settings in your Clinical Profile, a record will be assigned a Completed status when you do one of the following: • Print the record. • Select the printed record through Edit MDS and click Complete. See more about these two options under Auto-Complete Printed MDS 3.0 on Page 22. WARNING: To meet the MDS submission deadline of 14 days (after completion date for some assessment types and after Entry Date or Discharge Date for other assessment types) Hi-Tech recommends that you submit MDS records at least once a week. See RAI manual, Chapter 2 page 15 & 16 IMPORTANT: • Complete this process from Select MDS Records through transmission to CMS. • When you Select MDS Records, it erases the previous file of selected MDS records. If you do not Copy Selected Records, this file will be lost and you must reselect those records. • When you Copy Selected Record, they get stamped with a Submit Date. If you do not transmit the file to CMS, the records will still be marked as submitted. Transmit the file before you copy the next submission file to the submission/disk or folder. If you copy over a submission file that you have not submitted, you can recreate the submission file by selecting Re-Submit Prior Date (see Page 35). • Verify that CMS receives your transmission before you Select MDS Records again. G:\HITECH\Documentation\MDS 3.0 Docs\MDS 3.0 Instructions.doc Page 32 Hi-Tech Software Solutions MDS 3.0 Instructions Select MDS Records Submission Date: This date will be stamped as the Submit Date on each MDS that is copied to the submission folder when you Copy Selected Records, the next step of the submission process. This date will also be part of the file that you will send to CMS. IMPORTANT: If this submission is coded as Production, when MDS are copied to the submission diskette or folder, they are stamped with the Submit Date, which keeps the same records from being selected again the next time you submit by MDS Completion Date. Files coded as Test files do not get stamped with a Submit Date. You can print the Assessment Alert now or at any time through MDS / Care Plan > Scheduling / Pre-Asmnt or Reporting > MDS. See page 29 for more information. Submit New Assessments by Completed Date Hi-Tech recommends Submit New Assessment (by Completed Date). This option looks for MDS records with: • a Completed status (see 22). • a Completion Date on/before the date entered at Select Assessment Completed Thru. Completion dates are determined by the type of record. See the RAI OBRA-required Assessment Schedule from page 2-15 and 16 of the RAI Manual. WARNING: This process could select records that have not yet been reviewed. Verify that your Transmittal List includes only MDS that have been reviewed for accuracy. REMEMBER: Most MDS records must be submitted within 14 days of Completion date. Entry Tracking and Death in the Facility must be submitted within 14 days of ARD. Enter the Completed Thru date and click OK. The program will find the Completed MDS that meet the date criteria. The program will display the number of records selected. Click OK and print the MDS Transmittal List of the selected records. G:\HITECH\Documentation\MDS 3.0 Docs\MDS 3.0 Instructions.doc Page 33 Hi-Tech Software Solutions MDS 3.0 Instructions On the Transmittal List, verify that the list includes the records you want to submit. • Does it include any records that have been printed and completed, but not yet reviewed by your staff? • Are records missing that you thought would be selected? If the list is not correct, do NOT proceed. You can do any of the following: a. Re-run the program with a different completed through date to create another file. b. Return to Edit MDS to adjust the records. c. Print MDS to print records that you would like to include in this submission. If the list is accurate, proceed to Copy Selected Records on Page 36. IMPORTANT: If you proceed with the submission process, keep the Transmittal List as a record of the MDS that you submit. Compare it to the Submission Report that you print after you Copy Selected Records. The two reports should match. Compare Transmittal and Submission reports to Validation Reports that you receive from CMS after you successfully transmit the file. Verify that all records were accepted. If any records are rejected, use Edit MDS to correct the issue. • Select the assessment (it will have a Submitted Status). • Select Rejected-Submission was Rejected. This will open the record. • Make the necessary corrections. • Print the Changed Pages • Resubmit the record. • Verify that it is accepted. NOTE: a common mistake is to create a Modification Request for a rejected record. This will result in the rejection of the Modification Request because the original record was never accepted into the CMS system, so there is not a record to modify. G:\HITECH\Documentation\MDS 3.0 Docs\MDS 3.0 Instructions.doc Page 34 Hi-Tech Software Solutions MDS 3.0 Instructions Two Other Submission Options Select by Resident Select by Resident to submit specific records. You can select completed and previously submitted records. (Previously submitted records will be rejected as duplicates.) Enter a Resident ID number and press the [Enter] key to display the residents’ Completed records. Select the MDS and click Done. The selected records will be displayed at the top right corner of the screen under Residents Selected. You can select additional residents and MDS records. Click OK when ready to create the file. The program will display the number or records selected. Print and verify the Transmittal List, and if accurate, proceed to Copy Selected Records. See Page 36. Resubmit Prior Date Use Re-Submit Prior Date if the MDS submission disk is damaged or the file gets lost during the transmission process so you are not able to transmit the records to CMS. Create the same file again. Submission Date: This can be the current date. This will not change the original Submission date of the records that you are reselecting. At Select Prior Submission Date, enter the original submission date. You can find that date on the original Transmittal List printed when you created the first file. Click Ok. The program will display the number of records selected. Click Ok. Print and review the Transmittal List for accuracy. If correct, proceed to Copy Selected Records. See Page 36. G:\HITECH\Documentation\MDS 3.0 Docs\MDS 3.0 Instructions.doc Page 35 Hi-Tech Software Solutions MDS 3.0 Instructions Copy Selected Records After you run Select MDS Records and verify the accuracy of the Transmittal list, Copy Selected Records to the submission disk or MDSSUB folder. If the file is coded Production, this process will stamp each copied record with a Submit Date. The program screen will tell you to insert a diskette drive into the PC, or it will display the message: This process will copy your MDS submission data to C:\MDSSUB. Click Ok. The program will copy the records and display a Directory of the disk or folder. IMPORTANT: The current date and time should be displayed for MDS3XMIT.ZIP file. If not current, this might be an older file. Select MDS Records to re-create the MDS submission file with a current date. Click Ok. If the submission file is successfully copied to the submission disk/folder, the MDS Submission Status will display the message on the right. Click Continue. The submission file is now contained on the disk or MDSSUB folder. Print the Submission Report to verify that the file matches the most recent Transmittal List printed through Select MDS Records. If they match, transmit the file to CMS. WARNING: If a file was not copied to the disk, the program will display the Warning to the right. Click Continue. Run the program again. If you still get the WARNING message, recreate the submission file through Select MDS Records. If that does not work, call Hi-Tech for assistance. Print Submission Report Print this report and compare it to the most recent Transmittal List. These reports should match. TRANSMIT THE FILE via the method defined by your state. When you log in to the AT&T Global Dialer there will be icons for both the MDS 2.0 and MDS 3.0. Choose the correct icon for the type of MDS. Print and review Initial Feedback and Validation Reports to verify that all of your records were transmitted successfully and accepted by CMS. Correct and resubmit rejected MDS as soon as possible. It is much easier to correct a submission problem right after it occurs when you are familiar with the records. HTS does not support the transmission software. If you have problems transmitting please call CMS or your hardware support person. G:\HITECH\Documentation\MDS 3.0 Docs\MDS 3.0 Instructions.doc Page 36 Hi-Tech Software Solutions MDS 3.0 Instructions Libraries MDS Libraries Libraries > MDS / Care Plans > MDS Security Enter or select a User ID that has already been created through the Edit User ID program. You can then allow this user access to All Sections, specific sections, or specific questions. To restrict a user from the entire MDS, save a record with no items checked. Link CATs to Problems This program links triggered CAAs to Problems in the Care Plan Library to suggest problems for care planning a triggered CAA. This is explained more completely in our Care Planning Webinars and instructions. G:\HITECH\Documentation\MDS 3.0 Docs\MDS 3.0 Instructions.doc Page 37 Hi-Tech Software Solutions MDS 3.0 Instructions Facility Libraries Libraries > Facility > Clinical Profile This screen contains information that is automatically input to new residents’ face sheets and new MDS records. See Crosswalk: Libraries to the MDS 3.0 on Page 40. There are many settings that control how other clinical programs work. See MDS Default settings on the next page. Call Hi-Tech Support for assistance in making changes. NOTE: MDS 3.0 Grouper Tables for your state will be installed with Release 10.08. G:\HITECH\Documentation\MDS 3.0 Docs\MDS 3.0 Instructions.doc Page 38 Hi-Tech Software Solutions MDS 3.0 Instructions MDS Defaults Should be checked if your state has a Section S. Release 10.08 will check this field if your State uses Section S. Verify that the correct State is recorded in the facility address. Leave the Default Print items checked to these items on the screen that displays each time you end out of an MDS. If you tend to uncheck these items when you end out of a record, uncheck them here. See Page 17. Also see Auto-Complete Printed MDS 3.0 on Page 22. Determines the Grouper used to assign RUG and Case Mix scores to your residents’ MDS 3.0 records. Release 10.08 will assign the groupers used by your state. Leave checked to look for data conflicts when you: • exit an MDS • print a full MDS • exceptions See Page 17. For use on the Other Payers Report (Page 27) to schedule the next OBRA quarterly 90 days after the previous MDS completion date for the MDS 2.0 or the ARD for the MDS 3.0. Reduce the number of days to schedule the quarterly a few days earlier. Check if you do not want more than one MDS per resident submitted in the same file. This is necessary in states where multiple assessments for the same resident are not be copied into the state system in the right order and cause an error, so you have to submit them separately. The selected item will be displayed in Section V on the CAA Summary screen. G:\HITECH\Documentation\MDS 3.0 Docs\MDS 3.0 Instructions.doc Page 39 Hi-Tech Software Solutions MDS 3.0 Instructions Crosswalk: Edit Medical Record to the MDS 3.0 Edit Medical Record > Demographics First Name, Last Name, Middle Name, Suffix Room Number Nickname/Preferred Name Social Security Number Date of Birth Admit Date Gender Marital Status Race Room Number Discharge Date MDS 3.0 item Legal Name of Resident A0500A, A0500B, A0500C, A0500D A1300B Room Number A1300C Name by which resident prefers to be called A0600A Social Security Number A0900 Birth Date A1600 Entry Date A0800 Gender A1200 Marital Status A1000 Race/Ethnicity A1300B Room Number A2000 Discharge Date Edit Medical Record > Insurance Select the Insurance ID: • 0004 or 0005 for Medicare • 0001 for Medicaid Enter resident’s Contract/Claim number Edit Medical Record > Physicians/Diagnoses ICD9 Diagnoses codes and descriptions Edit Medical Record > Height and Weights Height Weight (most recent recorded weight) MDS 3.0 Items A0600B Medicare Number A0700 Medicaid Number MDS 3.0 Items Click Reset from Face Sheet to import to I8000 Additional Diagnoses MDS 3.0 Items K0200A Height K0200B Weight Program will import weight recorded up 30 days prior to the ARD. Program will round up if .5 pounds or more. Edit Medical Record > Inoculations MDS 3.0 Items Resident’s Inoculation record. Click View Inoculations to see if resident has received Influenza or Pneumococcal vaccine. Crosswalk: Libraries to the MDS 3.0 MDS 3.0 Items Libraries > Facility > Accounting Profile A0100A. National Provider ID (NPI) National Provider ID A0100B. CMS Certification Number (CCN) CCN/Medicare Number A0100C. State Provider Number Medicaid Number. If multiple Medicaid numbers use Levels 1, 2, 3, 4 Medicaid numbers Libraries > Facility > Clinical Profile State Determines which Section S and Groupers will be used. Some of our users can also click the Import Care Tracker and Import Therapy buttons to import data from those two systems. G:\HITECH\Documentation\MDS 3.0 Docs\MDS 3.0 Instructions.doc Page 40 Hi-Tech Software Solutions MDS 3.0 Instructions Form Types and Assessment Code Combinations Source: CMS’ RAI Version 3.0 Manual, Page 2-66, June 2010 G:\HITECH\Documentation\MDS 3.0 Docs\MDS 3.0 Instructions.doc Page 41 Hi-Tech Software Solutions MDS 3.0 Instructions How to Prepare for the Transition to the MDS 3.0 Attend training sponsored by your state or Health Care Association. Hi-Tech Software will not provide training on how to code your residents’ MDS 3.0 records. Access free training material on the CMS website at www.cms.gov/NursingHomeQualityInits/45_NHQIMDS30TrainingMaterials.asp Attend Hi-Tech Software workshops and Webinars that teach you the mechanics of recording, printing and submitting the MDS 3.0. PLEASE NOTE: Hi-Tech cannot instruct you on how to code the MDS 3.0. That training must come from qualified MDS instructors and your state MDS Help Desk. Determine which residents have MDS 2.0 records due before the October deadline. Use MDS Scheduling programs to ensure that you complete and submit these record on time. Complete, print and submit the MDS 2.0 records according to CMS regulations. Where to Find MDS 2.0 Processing Programs After you install Release 10.08, you will access MDS 2.0 processing from different menus in the Clinical Records System. See below. You can still complete and submit MDS 2.0 records with Assessment Reference dates through September 30, 2010. Select MDS / Care Plans > MDS 2.0 Processing. Edit and Print the MDS 2.0 -----------------Work the RAPS, edit and print the RAP Summary ------------------Select and submit MDS 2.0 Records. G:\HITECH\Documentation\MDS 3.0 Docs\MDS 3.0 Instructions.doc Page 42 Hi-Tech Software Solutions MDS 3.0 Instructions MDS 2.0 Reporting: Miscelleneous MDS 2.0: Security, Quality Assurance and Quality Indicators The MDS 3.0 and Care Plans See the separate instructions on the MDS 3.0 and Care Plans. G:\HITECH\Documentation\MDS 3.0 Docs\MDS 3.0 Instructions.doc Page 43