1
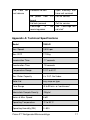
User Manual C2500-R C2500-R-230V Lit M00502 July 2012 v2 1. Table of Content Safety Precautions.............................................................. 1 2. 1.1. Operation Safety Precautions..................................... 1 General Description ............................................................ 3 3. 2.1. Features .................................................................... 3 Getting Started .................................................................... 3 4. 5. 3.1. Unpacking.................................................................. 3 3.2. Initial Operation.......................................................... 4 3.3. Opening and Closing the Lid ...................................... 5 3.4. Loading the Rotor ...................................................... 5 3.5. Starting and Stopping a Run....................................... 6 3.6. Emergency Lid Release ............................................. 7 Overview.............................................................................. 8 Operation............................................................................10 6. 5.1. Setting the Time (TIME) ............................................10 5.2. Setting the Speed (RPM)...........................................10 5.3. Setting the Centrifugal Force (RCF) ..........................11 5.4. Setting the Temperature (TEMP) ...............................11 5.5. Cooling .....................................................................11 5.6. Quick-Spin Operation ................................................13 5.7. Changing the Settings During a Run .........................13 Service and Maintenance...................................................13 6.1. Centrifuge Service ....................................................13 6.2. Cleaning the Centrifuge.............................................14 6.3. Cleaning the Rotor ....................................................14 6.4. Disinfection ...............................................................14 6.5. Replacing the Rotor ..................................................14 6.6. Replacing fuses ........................................................15 7. Troubleshooting.................................................................15 Appendix A: Technical Specifications ........................................17 Appendix B: Warranty..................................................................18 1. Safety Precautions Before using the Prism R refrigerated microcentrifuge for the first time, please read this entire operating manual carefully. To guarantee problem free, safe operation, it is essential to observe the following points: 1.1. Operation Safety Precautions 1. When using infectious, radioactive, toxic and other solutions which may pose health risks, please observe the appropriate safety precautions. 2. Do not use this machine in a potentially explosive environment or with potentially explosive chemicals. 3. Install the machine in location free of excessive dust. 4. Avoid placing the machine in direct sunlight. 5. Choose a flat, stable surface capable of withstanding the weight of the machine. 6. Install the machine in the room temperature 15~30°C, relative humidity 20~80%. 7. Don’t block the air vents. 8. Make sure the power source conforms to the required power supply specifications. 9. To avoid electric shock, make sure the machine is plugged into a grounded electric outlet. 10. Do not allow water or any foreign objects to enter the various openings of the machine. 11. Switch off the power switch before cleaning or performing any service on the machine, such as replacing the fuses. 12. The rotor and the rotor lid must always be installed securely on the motor shaft. 13. Always load the rotor symmetrically. Each tube should be counterbalanced by another tube of the same type and weight. Prism R Refrigerated Microcentrifuge 1 14. To guarantee sufficient ventilation, ensure that the centrifuge has at least 30 cm of free space on all sides, including the rear. 15. Repair should be carried out by Labnet International' authorized service personnel only. 16. Use original spare parts and accessories only. Warning Label: Please be aware of the danger of electric shock or other dangers. 2 2. General Description The Prism R refrigerated microcentrifuges is a compact, bench-top centrifuge which is suitable for both research and clinical laboratories. The motor is brushless and requires no routine maintenance. It is supplied with a 24 x 1.5/2.0 ml rotor for micro samples. The maximum speed of Prism R is 13,500 rpm (17,135 rcf). The temperature range is from –10°C to 40°C. 2.1. Features Brushless motor drive, control speed up to 13,500rpm/17,135xg Powerful refrigeration system, maintain 4°C at max. speed Includes unique easy access rotor (24 x 1.5ml) Exceptionally quiet and compact Optional StripSpin adapter available for 0.2ml tubes and strips Compact, ergonomic design User-friendly operation interface. Quick button for instant run without setting Low noise level Complies with CE, RoHS 3. Getting Started 3.1. Unpacking The centrifuge is delivered in an external carton and an internal carton with protective PE foam cushions. Remove the centrifuge from each carton. All packaging should be retained until it has been established that the centrifuge is working properly. Prism R™ Refrigerated Microcentrifuge 3 Open the Prism R refrigerated microcentrifuge package and confirm that all items are included: Prism R unit with a 24 x 1.5/2ml rotor and a rotor lid Electric fuses (7A &3.15A) Rotor wrench Operation manual Warranty card Power cord If there are any items missing, damaged, or not according to your order, please contact your distributor or sales representative immediately. Note: Please use 7A fuse in power source 100~120/50~60Hz countries, while 3.15A fuse is for power source 200~230V/50~60Hz countries. 3.2. Initial Operation Place the machine on a stable, flat table. Please keep the machine at least 30 cm from the surrounding area or objects. Mains power and frequency “MUST” be compatible with the information given on the product label on the rear of the centrifuge. Connect the power cord to the power socket of the centrifuge, then to the power source. Switch the Power On/Off switch to turn on the centrifuge. After the LCD display is on and the buzzer beeps twice, the centrifuge is ready to operate. 4 3.3. Opening and Closing the Lid The lid can be opened only when the centrifuge is powered on. Press button to open the lid. The lid will be locked automatically when the user presses down the front edge of the lid. Note: Do not slam the lid! 3.4. Loading the Rotor For safety reasons, the rotor must be loaded with centrifuge tubes symmetrically. The difference in the weight between the tubes should not exceed 0.1 gram. The centrifuge tubes should be loaded in pairs opposite each other and each should contain roughly the equal weight of sample. One or two additional loaded tubes may need to be added to achieve this. Please refer Figure 1 to see an example of a properly loaded rotor. Attention: To reduce air friction and noise, the rotor lid should be attached to the rotor during centrifugation. Make sure that the rotor lid snaps securely into place, by pressing down on center catch. Prism R™ Refrigerated Microcentrifuge 5 Securing screw Figure 1. Loading the rotor 3.5. Starting and Stopping a Run Please refer Chapter 5 Operation to set up your preferred settings of time, speed and temperature. To start a run, press down the (START/STOP) knob. When the pre-set time expires, the centrifuge will stop automatically. To stop the centrifuge prior to the expiration of set time, press the (START/STOP) knob again. When the time is set as “continuous”( - - ), the centrifuge will run continuously. To stop the continuous run, press the (START/STOP) knob. By pressing and holding the 6 button, the centrifuge will continue a short-run of set speed. The short-run will stop if the button is released. Note: 1. For safety reasons, the (START/STOP) knob will be ” will be inactivated when the lid is open. A symbol “ flashing until the lid is closed. 3.6. Emergency Lid Release When the lid can’t be opened by pressing the button, users can open the lid manually. First, turn off the power of the centrifuge. Second, use a flat-head screw driver or other tool to remove the Emergency Lid Release Plug ( Please refer Figure 2 ) on the right-hand side of the machine. Third, pull the wire (attached to the plug) while gently pushing downward on the lid. The lid willnow release. Prism R™ Refrigerated Microcentrifuge 7 4. Overview This section presents an overview of the Prism R microcentrifuge’s various components and control panel (see Figure 2) as well as the symbols and indicators on the LCD display (see Figure 3). Lid lock hole Air vents Power On/Off switch & fuse box Emergency lid release plug Figure 2. Prism R refrigerated microcentrifuge overview START/STOP knob Figure 3. LCD display panel 8 Keypad Function Button Symbol START/STOP Value and Adjustment Knob Function Description Start/Stop a run by pressing Rotate to Increase/decrease the down values of time, temperature, speed or g force TIME button To adjust run time setting RPM button To adjust speed setting RCF button To adjust RCF setting TEMP button To adjust temperature setting LID button Open the lid QUICK button Quick-Spin centrifugation Audible Signals The audible signals are beneficial when you are familiarizing yourself with the operating procedure of the Prism R refrigerated microcentrifuge. They can also be disabled if desired by pressing button six times. The audible signal function can be resumed by pressing button six times again. Definition of the audible sounds are shown in the table below. Audible Sound Operation 2 beeps Power on machine 3 beeps End of a run Prism R™ Refrigerated Microcentrifuge 9 5. Operation Users can pre-set the time, temperature and speed (RPM/RCF) before a run. Attention: Never attempt to operate the centrifuge with rotors or adapters that show signs of corrosion or mechanical damage. Never centrifuge strongly corrosive materials that may damage the rotors, accessories or bowl of the unit. 5.1. Setting the Time (TIME) Operating time can be selected from 0.5 min to 99 min or “continuous”. Press button to change the time setting. The 2 digits of TIME on the display will flash. Turn the (START/STOP) knob to increase or decrease the value. Press button again to confirm the selection or press (START/STOP) knob to store and run the selection. The flashing of time value will stop and the time value will be stored automatically if no button is pressed after 6 seconds of the adjustment. Operating time can be set as “continuous” by turning the (START/STOP) knob clockwise or counter-clockwise to make the 2 digits of TIME to display “- -“. When the time is set as “Continuous”, the centrifuge will continue to run without a stop. Press (START/STOP) knob to end the continuous operation. 5.2. Setting the Speed (RPM) The speed (RPM) can be selected from 500 to 13,500 rpm. Press button to change the speed setting. The 5 digits of speed (RPM) on 10 the display will flash. Turn the decrease the value. Press or press (START/STOP) knob to increase or button again to confirm the selection (START/STOP) knob to store and run the selection. The flashing of RPM value will stop and the RPM value will be stored automatically if no button is pressed after 6 seconds of the adjustment. 5.3. Setting the Centrifugal Force (RCF) The speed can be selected from 20 to 17,200 x g, too. Press button to change the RCF setting. The 5 digits of RCF on the display will flash. Turn the the value. Press (START/STOP) knob to increase or decrease button again to confirm the selection or press (START/STOP) knob to store and run the selection. The flashing of RCF value will stop and the RCF value will be stored automatically if no button is pressed after 6 seconds of the adjustment. 5.4. Setting the Temperature (TEMP) The temperature can be selected from -10 to 40°C. Press button to change the temperature setting. The 2 digits of temperature on the display will flash. Turn the (START/STOP) knob to increase or decrease the value. Press button again to confirm the selection or press (START/STOP) knob to store and run the selection. The flashing of TEMP value will stop and the value will be stored automatically if no button is pressed after 6 seconds of the adjustment. 5.5. Cooling The temperature can be set from -10 °C and + 40 °C. The set Prism R™ Refrigerated Microcentrifuge 11 temperature can also be changed during the run. Pre-Cooling Pre-Cooling starts a temperature-control run at 6,000RPM. It allows the rotor to be cooled down to the new, pre-set temperature quickly. Cooling down from room temperature to 4 °C takes approximately 8 min. (max. 16 minutes.) To activate Pre-Cooling function, press and hold button, then press (START/STOP) key. Both “RPM” and “TEMP” icons will flash during Pre-Cooling. The Pre-Cooling can be stopped by pressing the (START/STOP) key. The Pre-Cooling will function only when the set temperature is lower than the ambient temperature. Standby Cooling When the centrifuge is powered on, the refrigeration system will cool down the chamber to the pre-set temperature before or after the run if the chamber temperature is above the pre-set temperature. Note: 1. To extend the life cycle of the compressor, always remember to inactivate the Standby Cooling (by increasing the set temperature above room temperature) or power off the centrifuge when it is not in use. 2. When the lid is open, the Standby Cooling will stop after 3 minutes. 12 5.6. Quick-Spin Operation The centrifuge can be operated for a short run by pressing and holding the the button. The centrifuge will continue to run as long as button is depressed and the time, in seconds, will count up on the time display. The Quick-Spin speed and temperature is based on the last run settings remaining in the memory. The icon “RPM” will flash during Quick-Spin operation. 5.7. Changing the Settings During a Run Users can change the settings while the rotor is running. Through a one-time pressing of any function buttons ( , , , ) , the current value will switch into the pre-set value mode. The to-be-changed value flashes, and can then be changed. Once the display switches into the current value mode after completion of the entered values, the new values are activated. The new values are stored and executed by pressing the function button again or by waiting 6 seconds. 6. Service and Maintenance Always unplug the power plug before service and maintenance. 6.1. Centrifuge Service The brushless motor in the Prism R requires no routine maintenance. Any required service should be performed by authorized, qualified Prism R™ Refrigerated Microcentrifuge 13 personnel only. Repairs performed by unauthorized personnel may void the warranty. 6.2. Cleaning the Centrifuge Always keep the centrifuge housing, rotor chamber, rotor and rotor accessories clean. All parts should be wiped down periodically with a soft cloth. For more thorough cleaning, use a neutral cleaning agent (pH between 6 and 8) applied with a soft cloth. Excessive amounts of liquid should be avoided. Liquid should not come into contact with the motor. After cleaning, ensure that all parts are dried thoroughly by hand or in a warm air cabinet ( Maximum temperature: 50°C). 6.3. Cleaning the Rotor The rotor should be cleaned after each use. When spinning samples containing phenol or phenol chloroform, the rotor should be cleaned immediately after use 6.4. Disinfection Should a spill of infectious materials occur within the rotor or chamber, the unit should be disinfected. This should be performed by qualified personnel with proper protective equipment. 6.5. Replacing the Rotor The Prism R comes complete with a standard 24-place rotor installed. To remove the rotor, remove the rotor securing screw from the motor shaft by turning the screw, using the rotor wrench on two holes of the securing screw (Please refer Figure 1). Lift the rotor directly upward in a straight vertical motion. 14 To replace rotor, first make sure the motor shaft and rotor mounting hole are clean. Place the rotor on the motor shaft. Reinstall the rotor securing screw on the motor shaft by turning it clockwise. Hold the rotor with one hand and tighten the rotor securing screw, using the rotor wrench. 6.6. Replacing fuses Check fuse when it is recommended in the Technical Specifications of this manual. The fuse holder is located in the power inlet on the right-hand side of the unit. Disconnect the power cord from the power inlet. Open the fuse holder drawer by inserting a small screwdriver under the tab and prying it open. Remove the innermost (operative) fuse from its retaining tabs and replace the fuse if necessary. A spare fuse is located in the outer most chamber of the fuse drawer. Replace only with a fuse of the exact same value as the original. 7. Troubleshooting To ensure the product’s quality and performance, the Prism R refrigerated microcentrifuge is 100% inspected by the manufacturer. Error messages will appear on the display if the Prism R refrigerated microcentrifuge fails to perform the attempted action properly. In the case of Error (Err) messages or faults, please refer to the solutions in the following table to clear the error messages or faults. If the following solutions are not able to resolve the problem, please contact Labnet International Inc.’ Service Department to arrange for Prism R™ Refrigerated Microcentrifuge 15 authorized service. Symptom Possible Cause Solution “ Press Close the lid ” Error (START/STOP) knob when Lid is open. Defective sensor “ ” Error (rotor imbalance) lid lock Call for service Tubes are not inserted symmetrically in rotor holes Load tubes symmetrically Sample liquid in tubes not properly balanced Make sure that the same volume of liquid is in each tube Defective or improperly adjusted balance Call for service sensor Rotor is stuck when a run starts Call for service Centrifuge cannot be started, although power is on Lid not closed correctly Close lid correctly No speed or time has been selected Set speed time Centrifuge will not start No power supply Blown fuse 16 Check and/or power source Check the power cord connection Check the power cord quality Check the fuse and replace if necessary Lid Lock will not release Defective lid lock No power board from Open manually and have unit serviced PC Lid lock jammed Centrifuge is receiving power Call for service Call for service not See “Centrifuge will not start” Appendix A: Technical Specifications Model C2500-R Max. Speed 13,500 rpm Max. RCF 17,135 g Acceleration Time < 17 seconds Deceleration Time < 18 seconds Temperature Range –10°C to 40°C Max. Rotor Capacity 24 x 2.0/1.5ml tubes Rotor Lid Easy snap-on type Time Range 0.5 to 99 min. or “continuous” Admissible Sample Density 1.2Kg/ml Noise at Max. Speed 56 dB Operating Temperature 5°C to 30°C Operating Humidity (RH) 20~80% Prism R™ Refrigerated Microcentrifuge 17 100V/50~60 Hz, 6.0A Power Supply 110V/ 50~60 Hz, 5.5A 230V/ 50~60 Hz, 2.8A Dimensions (W x L x H) 280 x 430 x 248 mm Weight (with Rotor) 22 Kgw Certification Complies with CE, Class B (EN60101-1-2, EN 55011) Complies RoHS Note: 1. Specifications are subject to change without prior notice Appendix B: Warranty Prism R refrigerated microcentrifuges are covered by a warranty for two years against defects in materials and workmanship. This period begins from the date of purchase, and within this period all defective parts will be replaced at no charge by Labnet International Inc. The warranty does not cover defects caused by excessive wear and tear or damage due to shipping, accident, abuse, misuse, problems with electrical power, or usage not in accordance with product instructions, or if other than original spare parts supplied by the manufacturer have been used. Each Prism R refrigerated microcentrifuge is tested and documented by the manufacturer before shipping. Labnet International Inc.’ Quality Control System guarantees that the performance of the Prism R refrigerated microcentrifuge you have purchased is within its specifications. 18 Declaration of Conformity Number: CE 00502 Manufacturer: Labnet International, Inc,., 31 Mayfield Ave., Edison, NJ 08837 USA Labnet International declares that the devices described below are in conformity with the EC directives listed. In the event of unauthorized modification of any of the devices listed below, this declaration becomes invalid. Prism R Refrigerated Microcentrifuge Device Name: Device Models Numbers: C2500-R C2500-R-230V Relevant EC Directives: Low Voltage Directive 2006/95/EC EMC Directive 2004/108/EC RoHS 2002/95/EC WEEE 2002/96/EC Harmonized Standards: EN 61010-1:2010 EN 61010-2-020:2006 EN 61326-1:2006 EN 55011:2007 IEC 61000-3-3:1995+A1:2001 + A2:2005 IEC 61000-4-2:1995 + A1: 1998 + A2:2000 IEC 61000-4-3:2006 IEC 61000-4-4:2004 IEC 61000-4-5:2005 IEC 61000-4-8:1993 + A1:2000 IEC 61000-4-11:2004 Date: July 1, 2012 ______________________________ Peter Will Product Line Manager 11 LIMITED WARRANTY Labnet International, Inc. warrants that this product will be free from defects in material and workmanship for a period of two (2) years from date of purchase. This warranty is valid only if the product is used for its intended purpose and within the guidelines specified in the supplied instruction manual. Should this product require service, contact Labnet International, Inc.’s Service department at 732-417-0700 to receive a return authorization number and shipping instructions. Products received without proper authorization will be returned. All items returned for service should be sent postage prepaid in the original packaging or other suitable carton, padded to avoid damage. Labnet International, Inc. will not be responsible for damage incurred by improper packaging. Labnet International, Inc. may elect for onsite service for larger equipment. This warranty does not cover damage caused by accident, neglect, misuse, improper service, natural forces or other causes not arising from defects in original material or workmanship. This warranty does not cover motor brushes, fuses, light bulbs, batteries or damage to paint or finish. Claims for transit damage should be filed with the transportation carrier. ALL WARRANTIES INCLUDING THE IMPLIED WARRANTY OF MERCHANTABILITY AND FITNESS FOR A PARTICULAR PURPOSE ARE LIMITED IN DURATION OF 24 MONTHS FROM THE ORIGINAL DATE OF PURCHASE. LABNET INTERNATIONAL, INC.’S SOLE OBLIGATION UNDER THIS WARRANTY IS LIMITED TO THE REPAIR OR REPLACEMENT, AT LABNET INTERNATIONAL, INC. DISCRETION, OF A DEFECTIVE PRODUCT. LABNET INTERNATIONAL, INC. IS NOT LIABLE FOR INCIDENTAL OR CONSEQUENTIAL DAMAGE, COMMERCIAL LOSS OR ANY OTHER DAMAGES RESULTING FROM THE USE OF THIS PRODUCT. Some states do not allow limitation on the length of implied warranties or the exclusion or limitation of incidental or consequential damages. This warranty gives you specific legal rights. You may have other rights which vary from state to state. No individual may accept for, or on behalf of Labnet International, Inc., any other obligation of liability, or extend the period of this warranty. Mail Warranty Registration to : or Labnet International, Inc. 31 Mayfield Ave. Edison, NJ 08837 Register online at www.labnetinternational.com cut along the dotted line To validate the warranty, complete and return this card within 10 days. Model ____________________________________________________________________________ Serial No. ______________________________ Date Tested________________________________ Date Rec’d _____________________________ PO#______________________________________ Name/Title ________________________________________________________________________ Phone ___________________________________________________________________________ Institution _________________________________________________________________________ Address __________________________________________________________________________ City ______________ State _____ Zip/Postal Code ____________ Country __________________ Purchased from (distributor) __________________________________________________________ How would you rate the quality of this product? Excellent Good Fair Poor What feature(s) on this product made you purchase it? ____________________________________ What feature(s) would you change to improve the performance of this product? __________________ 31 Mayfield Avenue. Edison.NJ.08837 (p) 732.417.0700 (f) 732.417.1750)