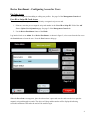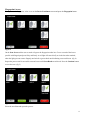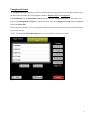
1
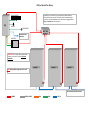
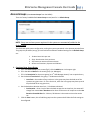
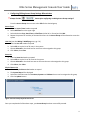
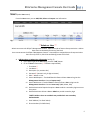
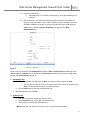
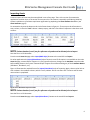
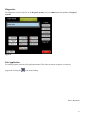
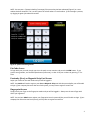
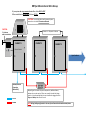
KEYper Monarch and Ultra Set-up If your system has a top mounted control box, it is a MONARCH If the control box is side mounted, it is an ULTRA CAUTION: For multiple cabinet, wall mounted systems, ensure there is at least 2" between wallboards CAUTION: "Add-on" or "Expansion" cabinets 3" minimum wall to control box 3" CABINET 1 CABINET 2 CABINET 3 Control Cabinet Up to 8 cabinets Network/Internet Connection (White RJ45) CAT 5/6 POWER Depending on the number of system components, additional battery backup units may be required. These are normally included with larger systems. It is recommended that the control cabinet be plugged into the Surge and Backup side of the of the unit NOTE: Wiring/cabling configuration is the same for wall mounted and stand mounted systems KEYper Select Plus Set-up BIO KEYBOARD Depending on the number of system components, additional battery backup units may be required. These are normally included with larger systems. It is recommended that the PC and monitor be plugged into the Surge and Backup side of the of the unit MOUSE FOB READER Network/Internet Connection MONITOR CAUTION: For multiple cabinet, wall mounted systems, ensure there is at least 2" between wallboards NOTE: Wiring/cabling configuration is the same Up to 8 cabinets may be connected POWER SERIAL CABLE VGA USB CAT 5/6 Elite Series Management Console User Guide KEYper® Systems Rev.4 May 2013 Elite Series Management Console User Guide Vol 1 Contents Dashboard ……………………………………………………………………………………………………………………………… 2 Access Groups ………………………………………………………………………………………………………………………… 3 Users ………………………………………………………………………………………………………………………………………. 5 Assets ……………………………………………………………………………………………………………………………………… 8 Installing Fob Reader Drivers ………………..……………………………………………………………………… 8 Importing Assets …..……………………………………………………………………………………………………… 9 Adding Assets …………………………………………………………………………………………………………….. 10 Deleting Assets …………………………………………………………………………………………………………… 13 Reporting ……………………………………………………………………………………………………………………………… 14 Asset Attributes …………………………………………………………………………………………………………………….. 15 Settings ……………………………………………………………………………………………………………………………….... 17 Alerts ………………………………………………………………………………………………………………………… 17 Email …………………………………………………………………………………………………………………………. 17 Issue Reasons ……………………………………………………………………………………………………………. 17 Lot Location/Lot Blocking ………………………………………………………………………………………….. 17 Support ………………………………………………………………………………………………………………………………….. 19 IMPORTANT ADVISORY: It is very important to clean the lens of the fingerprint device frequently using transparent tape ONLY!! (i.e. Scotch tape) Press on and peel off to remove oils, dirt, etc. Repeat as necessary. 1 Elite Series Management Console User Guide Vol 1 To connect to the web service running on the key system, which is where the Management Console lives, from a PC on the same network, open a browser in Internet Explorer and enter the IP address of the key system in the URL bar (ex. 192.168.25.15) The Dashboard The Dashboard is the Home Screen of the Management Console. It provides an “at a glance” view of the status of the key system. The menus located at the top of the Management Console window provide navigation to all other windows. There are four indicators on the dashboard: - Assets In – Count of assets that are physically in the key system(s). Clicking this button provides a current Assets by Status view, filtered by a status of In Assets Out – Count of assets checked out to users. Clicking this button provides a current Assets by Status view, filtered by a status of Out Assets Overdue - Count of assets checked out to users past the allowed time limit. Clicking this button provides a current Assets by Status view, filtered by a status of Overdue Unregistered Assets – Key Fobs that are in the database, but not programmed to an asset. Clicking this button provides a current Assets List view, filtered by asset type Unregistered The default display lists the last 10 transactions and warranty expiration information. Figure 1: The Dashboard 2 Elite Series Management Console User Guide Vol 1 Access Groups (select Access Groups from the MENU) There is a factory loaded default Access Group named, wait for it…Default Group. Figure 2: Access Group Home Screen NOTE: Every user and every asset registered in the system are automatically added to the Default Group This facilitates rapid system configuration, making the system operational in the shortest period of time. The group may be edited, see pg. 4, but should not be deleted. Standard settings for the Default Group are: 1. 2. 3. 4. 10 Asset Issue Limit per user 20 Hr. Out Duration Limit per Asset 24/7 access to remove and return Assets Access to all Locations, Systems and Cabinets 1. Creating a New Access Group a. b. c. d. From the Access Group home screen (fig.2), click the Add button in the upper right. Fill In the desired Name for the access group. (ex. Managers) Fill in the Description for the access group. (ex. 3rd Shift Manager Access) *not a required entry Set the desired Issue Limit for the group, **0 indicates unlimited. i. Issue limit – the number of keys each user in the group may have checked out of the system at any given time. Ex: if the limit is 10, each user in the group may have up to 10 keys checked out at any given time, e. Set the desired out duration time limit, **0 indicates unlimited. i. Out Duration – Once a key has been checked out past the set time limit, the assets will change from status Out to Overdue and an alert will be sent to all recipients on the Out Duration Exceeded Alert list. 24 Hours, 59 Minutes is the maximum time that can be set. f. Click the Save button, this will add the group into the system and will allow the final settings to be configured. 3 Elite Series Management Console User Guide Vol 1 2. Configuring/Editing Access Group Settings & Restrictions ** Always click the button after configuring or editing Access Group settings!! From the Access Groups home screen select Edit for the desired group Access Times a. Click the Access Times header to expand b. Select Add Time from the upper right c. Select the desired Day, Start Time and End Time (utilize 24 hr. format) and click OK. d. Repeat the process for each day of the week that users in the Access Group will be allowed to access the system User List (see also Adding & Modifying users, pg. 5-6) a. Click the User List header to expand b. Select Edit to see the list of all users in the system c. Choose Select All or the check box for each user to be assigned to this group d. Click Select, then Close Asset List a. Click the Asset List header to expand b. Select Edit to see the list of all assets in the system c. Choose Select All or the check box next to all assets that are to be assigned to this group d. Click Select, then Close Physical Access List a. Click the Physical Access List header to expand b. The System Map will be displayed. c. Select the check box next to all Locations, Systems and Cabinets that are to be assigned to this group d. Click the Update button. Figure 3: Access Group Physical Access List Once you completed all of the above steps, your Access Group has been successfully created. 4 Elite Series Management Console User Guide Vol 1 Users (select Users menu) From the Users menu you can Add, Edit, Delete and Import user information. Figure 4: User Home Screen ** Admin vs. User ** Admins can access the KEYper® Management Console. Admins override all Access Group restrictions. Admins have access to the Admin functions of the kiosk. Users cannot access the KEYper® Management Console. Users adhere to assigned Access Group restrictions. Users can only Check In, Check Out and Identify assets at the kiosk 1. Add New User or Update User Information (see fig. 5) a. In the upper right of the Users page, click the “Add” button. b. Fill in the Users information (** indicates required field) i. First Name** ii. Last Name** iii. Description (i.e. position title) iv. Password** (Numeric only, 6 digit minimum) v. Role** Admin or User vi. Access Web Reports – if marked True this feature allows a User to log into the Management Console and access Reports only! vii. Access Web Assets- if marked True this feature allows a User to log into the Management Console and access Assets only! (Add, Delete, Edit) viii. Dual Authentication Required-requires a User to obtain a secondary login to access the system ix. Dual Authenticator-allows a User or Admin to provide secondary login *NOTE: Neither a User nor an Admin can provide their own secondary Authentication x. Email Address ( For Email Alerts) xi. Phone Number (For SMS Alerts) 5 Elite Series Management Console User Guide Vol 1 xii. Carrier (For SMS Alerts) 1. If desired carrier is not listed, contact KEYper® to see about adding it as a selection xiii. Prox or Swipe ID – for system incorporating either a proximity card reader or a magnetic strip card reader. If the number is known it may be entered at the time the User is added to the system. Primarily this field will be auto-filled when the User’s card is read during Device Enrollment. See page 3 of the Kiosk Administration tab. Figure 5 Scroll to the very bottom of the Add New User window to Edit the Access Group membership of the User. Remember, Admins have no restrictions. Access Group membership may also be configured by editing your Access Groups. (see pg. 4) 2. Modifying a User a. From the main User List page, find the User you wish to modify in the list of Users. i. You can enter any part of a user’s first or last name in the search bar, and then click Filter to find entries that contain the typed characters. b. Click the Edit button to the right of the desired user c. Make adjustments and click Save. 3. Deleting a User a. Find the user you wish to delete in the list of users. b. Click the Delete button to the right of the desired user c. Confirm that you wish to the delete the user. NOTE: Deleting a user does not remove the user’s history from the database. 6 Elite Series Management Console User Guide Vol 1 4. Importing a User List (figs. 6-8) a. A group or list of users can be imported into the system. Except for biometric registration, this eliminates the individual addition of users. b. The file must be saved in .CSV format. (Comma Separated Value) c. The User info in the CSV file must to be in the format shown in figure 6. In those cases where users will be using proximity cards to access the system, the Prox column is where card number is entered Figure 6: User Import Format d. In the upper right of the Users screen, select Import e. Browse to the user file you have created, select the file and click the Import button. f. If the file is created and formatted correctly, you will see all of the users in the users screen. Figure 7: Import User Button Figure 8: Import User Screen NOTE: Column headers (row 1) are for reference only and must be deleted prior to import 7 Elite Series Management Console User Guide Vol 1 Assets (select Assets from the menu) Loading Fob Reader Drivers When the Asset menu is selected after logging into the Management Console for the first time, look for a popup on the screen requesting an Active X control be installed. Depending on the operating system, browser, network restrictions, etc., the Active X prompt may not appear. If it does, install the control. Also, you may see a pop-up referring to intranet settings not being configured. Select the option to turn intranet settings on. Now click on the Identify Asset button. You should see the text depicted in figure 10. Figure 9: Fob reader drivers If you have Windows 7, determine if your operating system is a 32 or 64 bit system by going to Start and right clicking Computer and selecting Properties. The hi-lighted area shown in figure 11 will display the system you have. Figure 10: Determine 32 or 64 bit OS 8 Elite Series Management Console User Guide Vol 1 Importing Assets A manual import of assets may be accomplished in one of two ways. There is the version for automotive applications and then there is the version for everyone else. This feature is especially useful during initial key system installation as it facilitates rapid asset registration by populating the Asset Attribute databases. (see Asset Attributes, pg.15) For automotive imports the data must be in the format shown in figure 11. There may not be information in every column, in fact the “Code” column is always empty, and that is fine. What’s important is that there are 8 columns. Figure 11: Vehicle Import Format NOTE: Column headers (row 1) are for reference only and must be deleted prior to import Save the file as a CSV document. From the main Asset List page select Import(DMS Style). Browse to the saved CSV and Import. For other applications the Import(6 Attributes) style of import is used. If this option is not available on the main Asset List page, contact KEYper® Support. It is very important that any changes to the Attribute names be made before adding assets to the system. Contact KEYper® Support for assistance editing any of the 6 Attribute Names (Attribute 1, Attribute 2, etc.). Figure 12 illustrates the required format for Import(6 Attributes) style of importing. Again, there may be little or even no data in the attribute columns, which is not a problem. Just be sure there are 7 columns and the asset name column is populated. Figure 12: 6 Attributes Import Format NOTE: Column headers (row 1) are for reference only and must be deleted prior to import Save the file as a CSV document. From the main Asset List page select Import(6 Attributes). Browse to the saved CSV and Import. 9 Elite Series Management Console User Guide Vol 1 Adding Assets There are three methods for adding assets: 1. Add – blank record 2. Filter – imported data 3. Unregistered Asset – using “empty” fobs stored in cabinet(s) Figure 13: Asset List Main Page 1. Adding Assets from a blank record (fig. 14) a. Click the Add option in the upper right area of the Asset List page b. Fill in the Asset Information (** Indicates Required Field) i. Name**- (ex. Stock Number, Unit Number, etc.) ii. Description - (for automotive applications, the model is suggested here) iii. Fob Number**- (hold fob on the Fob Reader and select Read Fob) iv. Status – not editable v. Registered Type- always select Registered c. Fill in Asset Attributes if desired i. Select a value from the drop down menus ii. If your desired value is not in the drop down menu, select the Enter option to allow manual entry of a value d. Select the Access Group(s) to which the asset will be assigned e. If label printing is a feature in use at your site, select Print Asset Label. Upon clicking Save you will be directed to a label in PDF format and given the option to print the label f. Click Save 10 Elite Series Management Console User Guide Vol 1 Figure 14: Add Asset from blank record 2. Adding Imported Assets a. Utilizing the Filter feature on the main Asset List page, find the unregistered Asset. Click the Edit option. b. Verify imported information is correct. Make any desired changes to Asset Information and/or Asset Attributes. If your desired value is not in the drop down menu, select the Enter option to allow manual entry of a value c. Assign a fob to the asset (place the fob on the reader and select Read Fob to assign the fob to the asset) d. Ensure Registered Type is set to Registered!! e. Select the Access Group(s) to which the asset will be assigned f. If label printing is a feature in use at your site, select Print Asset Label. Upon clicking Save you will be directed to a label in PDF format and given the option to print the label g. Click Save. Figure 15: Add Imported Asset 11 Elite Series Management Console User Guide Vol 1 3. Adding Unregistered Assets – this method is for systems where unused fobs (no keys connected and Registered Type is Unregistered) are stored in the key cabinet(s) and are checked out as needed to add new assets to the system. a. Log into the key system kiosk (must be an administrator). Tap Unregistered Assets button. A list of all unregistered assets (unused or empty fobs) is displayed. Select as many displayed entries as needed and check out. b. From the Management Console go to Assets, place unregistered fob on reader and click Identify Asset. The page depicted in figure 16 will be brought up. Select Edit. Figure 16: Identify Unregistered Asset c. Fill in the Asset Information (** Indicates Required Field) i. Name**- (ex. Stock Number, Unit Number, etc.) ii. Description - (for automotive applications, the model is suggested here) iii. Fob Number**- (hold fob on the Fob Reader and select Read Fob) iv. Status – not editable v. Registered Type- always select Registered d. Fill in Asset Attributes if desired i. Select a value from the drop down menus ii. If your desired value is not in the drop down menu, select the Enter option to allow manual entry of a value e. Select the Access Group(s) to which the asset will be assigned f. If label printing is a feature in use at your site, select Print Asset Label. Upon clicking Save you will be directed to a label in PDF format and given the option to print the label g. Click Save 12 Elite Series Management Console User Guide Vol 1 Figure 17: Add Unregistered Asset Deleting Assets The procedure for deleting of assets is the same for all industries utilizing a KEYper® Asset Management System. The following is an example of the procedure for automotive applications. When an asset (vehicle) leaves inventory, whether sold, traded or otherwise, cut the tamper seal securing the key(s) to the fob and discard. The key(s) will obviously go with the vehicle. The fob should be placed in a container designated for the purpose. At whatever intervals are required, a key system administrator, or a user with proper permissions, will “disassociate” the fob from the asset, thereby making the fob ready to be associated with another asset and releasing the asset from the Issue Limit total of the user who checked the key out of the system. From the Management Console Assets menu, place the fob on the fob reader, click Identify Asset then Delete. Alternatively, you may filter or scroll through the Asset List page, locate the asset and select Delete. 13 Elite Series Management Console User Guide Vol 1 Reporting The reporting section consists of the following reports and a report builder. 1. Asset Transactions Report a. Provides real time reporting on User/Asset transactions. b. Asset Transactions can be filtered to search for desired data. Filters i. User ii. Asset iii. System (Networked Systems) iv. Cabinet (Multi-Cabinet Systems) v. Date Range Any combination of these filters may be used to filter specific events. 2. Assets By Status a. Provides the current Status, (In, Out, or Overdue) of all assets in the system. b. Select Assets by Status from the Reports menu. c. Set any filters to view desired data. d. Filters available for searching i. Status – In, Out and Overdue ii. System iii. Cabinet iv. Individual Asset Name 3. KS Scan Dashboard (must be using IMS feature & Adobe Flash**) a. Displays a graphical representation of inventory scans b. Contains further instruction for report features 4. KS Scan Details (must be using IMS feature) a. Displays inventory scan details filterable by: i. Stock Number ii. Status (Scanned, Not Scanned, etc.) iii. User iv. Scan Date v. Print/Export reports 5. Parking Lot Maps (must have Lot Blocking enabled) a. Displays uploaded map files and current status of each parking space ** Alternatively, if Lot Location is enabled, you will see “Assets by Lot Location” 14 Elite Series Management Console User Guide Vol 1 6. Parking Lot Lists (must have Lot Blocking enabled) a. Displays information about spaces in the selected lot: i. Space ID ii. Asset Count – number of assets assigned to the space iii. Asset Info - empty space, stock number(s) of vehicle(s) associated with the space and whether or not the vehicle(s) keys are currently in the key system or checked out 7. Report Builder – create customized reports. See tabbed addendum in manual 8. Reprint Receipt (if enabled) – provides the option during checkout to print a receipt with information regarding the checkout transaction. It also allows you to view and/or print a receipt from the Management Console for any previous checkout transaction. 9. View Kiosk Photos (if system is camera equipped and enabled) – a snapshot is taken with every successful and unsuccessful login. The view provides information about each login and the ability to view and/or print photos. Asset Attributes Asset Attributes are descriptive values that are associated with assets. Attributes can provide additional information about assets stored in the system. (ex. Stock #, Make, Model , Unit #, Building #) All Asset Attribute databases are empty by default configuration. They may be populated manually (see below), by asset import (pg. 9) and “on-the-fly” (pg. 10). Note: Assigning attributes to assets is required if the Filter Assets method of check out at the Kiosk is to be utilized There are two different types of attributes 1. Collections (limit 6) a. These are attributes that will be stored in a group. These values may apply to many different assets. (ex. Make, Model, Floor, Building) 2. Single Value Attributes (limit 1) a. These attributes are associated only with the record it is assigned to. These would not be assigned to more than one key. (ex. VIN numbers, Key Codes) Attribute Names can be customized to meet your preferences (This must be done with the assistance of an authorized KEYper® Technician). WARNING! Changing Attribute Names After They Have Been Associated With Assets Will “Break” Any Asset Reports Containing Previous Attribute Names ! 15 Elite Series Management Console User Guide Vol 1 You can manage your Attribute Collections by clicking the Edit Collection option. From here you can edit values, correct misspellings, add and delete values. (You cannot delete a value once it has been assigned to a record.) Fig 18: Attributes for Automotive Applications Fig. 19: Attributes for Other Applications Notice in Attribute Collection for automotive applications that the Make is the Parent Attribute to the Model collection. This means that if you are adding models to the collection, ensure you have selected the appropriate Parent Make. (Fig. 20) Figure 20: Edit Attributes 16 Elite Series Management Console User Guide Vol 1 Settings Some settings are password protected; only KEYper® Systems personnel can access these menus. The following items fall under the Settings menu. 1. Alert Settings There are 7 different alerts that will trigger an email and/or SMS alert from the KEYper® System. Any User that is configured in the system can receive these alerts. Phone number, phone service carrier, and email addresses are configured during User setup. To add a User to a specific alert, select the Edit button in the upper right of the desired alert, select the check box next to the desired user name(s), click Save, then Close. a. Illegal Asset Removal – an asset has been removed without following the proper checkout procedure. b. Out Duration Exceeded - an asset has not been returned to the system in the allotted time allowed as specified by the user’s Access Group (pg. 3) c. Door Open - a user has opened a door to the system and failed to close it within the allotted time allowed. d. Nightly Reports - a report of assets in ‘Out’ status as of the time the alert is sent. e. System Maintenance – used by KEYper® tech support f. Double Parked Assets – a space has been assigned to more than one vehicle. Alert is sent immediately. (must have Lot Blocking enabled) g. Assets Without Parking Space – keys are returned and no parking space is entered for the vehicle(s). Alert is sent immediately. (must have Lot Blocking enabled) 2. Email Settings a. Email settings are configured to allow alerts to be sent out from the KEYper® System via email. b. The KEYper® System does not receive emails, it only sends. c. The KEYper® System comes with a default SMTP server, user name and password that can be used in most instances. Certain network security protocols will not allow the default settings to forward emails, and in this case the end user must provide SMTP Server and Authentication information. d. To test the email functionality, enter an email address into the box under Test Settings, click Send Test Message, check to see if the test message is received. 3. Issue Reasons (must be enabled by KEYper® Systems) a. Edit, add to and delete from the default IRL (Issue Reason List) b. Create additional IRL’s if required 4. Lot Location or Lot Blocking (one or the other must be enabled) a. Lot Location allows the addition of parking lots to the system. When an asset is checked into the system, the user will be required to choose the parking lot in which the vehicle is located. 17 Elite Series Management Console User Guide Vol 1 To add a lot got to Lot Locations under the Settings menu. Simply enter the name of the lot and any further description desired and click Add Location. Figure 21: Lot Locations b. Lot Blocking is a feature that allows the addition of parking lots and individual parking spaces. If a vehicle is in a parking space that is blocked by one or more other vehicles, the system will issue the blocking vehicle’s keys along with the desired vehicle key(s). This is done through a system of related lot maps and routes. Lot maps are simple representations of parking lots, the number of spaces in each lot and space identifiers. A route is a spreadsheet listing all parking spaces for a lot in the first column; followed in the second column by any spaces that are blocking any of the spaces in the first column; followed in the third column by any spaces that are blocking spaces in the first two columns, etc. Blocking entries are made adjacent to the spaces they are blocking. Careful planning and consideration must be applied to setting up this feature. Utilize the Lot Blocking Template example contained in this manual to become familiar with how to set up lots and spaces. Vehicles are initially assigned parking spaces in one of three ways. With any of these options, lot maps and routes must first be created and imported. a. Spaces are assigned as the vehicles are programmed into the system b. Spaces are assigned as assets are physically checked into the system c. A spreadsheet(.csv) containing current vehicle inventory stock numbers and their parking spaces is imported (Asset & Parking Spaces Assignment file) When ready to create a parking lot go to Settings > Lot Blocking Import. Click “Click here to download sample Lot, Parking Spaces and Routes file.” This will open the three page worksheet required to create lots and spaces. Once complete, save the file, browse to the saved location, select the file and select “Import Lot, Parking Spaces and Routes.” Lot blocking templates can only be imported one at a time. 18 Elite Series Management Console User Guide Vol 1 Figure 22: Lot Imports To assign parking spaces to the inventory en masse, create an Excel type spreadsheet listing all stock numbers in the first column, the parking space ID for each in the second column. All lots can be included on one sheet. Save the spreadsheet. Support Under the Support menu you will find the following links: 1. 2. 3. 4. 5. Email Support – send support questions directly to KEYper® Support How To Videos – direct link to tutorials on the KEYper® web site Remote Support – opens a web page that will allow KEYper® Support to connect to your PC System Manual – opens the system user guide Shop at KEYper® Systems – a direct link to the online KEYper® store where supplies and accessories may be purchased 6. Zebra Printer Drivers – provides label printer drivers for installation Rev.4 May 2013 19 Elite Series Kiosk Administration Guide Rev.3 May 2013 This Guide is intended for Administrators (Admins) of the Keyper® Systems Asset Management System. It explains features available to Admins only. ADVISORY: It is very important to clean the lens of the fingerprint device frequently using transparent tape ONLY!! (ie. Scotch tape) Press on and peel off to remove oils, dirt, etc. Repeat as necessary. If the screen is displaying the desktop, start the KEYper® kiosk program by double tapping the KS icon. Figure 1 1 Login The methods for logging into the kiosk are via Pin Code, Proximity (Prox) Card or Magnetic Strip Card and Fingerprint. As the Admin, you will setup the appropriate access type(s). See Device Enrollment on page 3. After you log in, the screen will display 2 rows of buttons as shown in figure 1. NOTE: Users only see the top row. Figure 2 Check In, Identify Asset, Check Out On the main screen, the top row of buttons (Check In, Identify Asset, and Check Out) behaves the same for both Admins and Users. See page 5 of the Kiosk User tab. Device Enrollment, Unregistered Assets, Diagnostics, Exit Application This row of buttons is available to Admins only. 2 Device Enrollment - Configuring Access for Users Pin Code Access Pin Codes are configured when adding or editing user profiles. See page 5 of the Management Console tab. Prox ID or Swipe ID Card Access There are two ways to setup a user with a proximity or magnetic strip access card. 1. If known, enter the prox or magnetic strip card number in the “Prox ID or Swipe ID” field of the Add New or Update User Information page. See page 5 of the Management Console tab. 2. Use the Device Enrollment feature of the Kiosk. Log into the kiosk as an Admin. Press Device Enrollment. As shown in figure 2, select a user from the list or use the Search button to locate the user. Press the Prox button to bring up Figure 3 When the Prox Scan screen appears, place the selected user’s prox card over the card scan device or pass the magnetic strip card through its reader. The device will beep and the number will be displayed indicating successful enrollment. Thereafter the card will be used for login. 3 Fingerprint Access To register user’s fingerprint, select a user on the Device Enrollment screen and press the Fingerprint button. Figure 4 On the Scan Screen ask the user to touch a finger to the fingerprint reader lens. Cover as much of the lens as possible with fingertip and press flatly and firmly. A red light will come briefly on in the lens when touched; when the light goes out remove fingertip and wait for a green check mark indicating a successful scan. (fig. 4) Repeat the process until 4 successful scans and a successful Scan Result are achieved. Press the Continue button to save the scan. (fig. 5) Figure 5 Select the next User and repeat the process. 4 Unregistered Assets An Unregistered Asset is defined as a fob in a cabinet that may or may not have keys attached and may or may not have data associated with it in the database, but has a Registered Type of Unregistered. If the Dashboard in your Management Console indicates there are Unregistered Assets in your system (see page 2 of the Management Console tab), log into the kiosk, select the Unregistered Assets button, highlight the entries and Check Out. Follow the same procedure if you are storing unused fobs in the system and retrieve them as needed to add new assets to the system. NOTE: The optional Check Out Receipt feature is not available for Unregistered Assets. Figure 5 5 Diagnostics The diagnostics screen is only for use by Keyper® Systems, or by an Admin under the guidance of Keyper® Systems. Figure 6 Exit Application To end the program, touch the Exit Application button. Then either restart the computer or restart the program by clicking the icon on the desktop. Rev.3 May 2013 6 Elite Series Kiosk User Guide KEYper Systems Rev.3 May 2013 Contents Login ........................................................................................................................................................................... 2 Pin Code Access ..................................................................................................................................................... 3 Proximity Card (Prox Card) Access ......................................................................................................................... 3 Fingerprint Access .................................................................................................................................................. 3 Reset Kiosk ............................................................................................................................................................. 4 Unable to Login ...................................................................................................................................................... 4 Check In ...................................................................................................................................................................... 4 Single Cabinet Check In ...................................................................................................................................... 4 Multi-Cabinet Check In....................................................................................................................................... 4 Identify Asset ............................................................................................................................................................. 5 Check Out ................................................................................................................................................................... 5 CHECKOUT – BY NAME……………………………………………………………………………………………………………………………………..6 CHECKOUT – BY LIST .............................................................................................................................................. 7 CHECKOUT – FILTER ASSETS................................................................................................................................... 8 Unable to Locate or Check Out an Asset?............................................................................................................ 11 Logout ...................................................................................................................................................................... 11 Optional Features .................................................................................................................................................... 12 Issue Reason and Comment................................................................................................................................. 12 Print Receipt......................................................................................................................................................... 13 Print Receipt with Digital Signature ..................................................................................................................... 14 ADVISORY: It is very important to clean the lens of the fingerprint device at least once per day using transparent tape ONLY!! (ie. Scotch tape) Press on and peel off to remove oils, dirt, etc. Repeat as necessary. NOTE: The word “Admin” is short for Administrator. In this manual, Admin refers to the person or persons at your company that have been assigned to manage the KEYper® Systems Asset Management System. 1 If the screen is displaying the desktop, start the KEYper® kiosk program by double tapping the KS icon. Login When the system is ready, you will see the main screen shown in Figure 1. The main screen shows the current system status. On this screen, you will see if the system can connect to the Primary Web Service (WS) or the Primary Database (DB) under the logo in the upper left. Both of these must have the status of CONNECTED displayed on the main screen for the system to function properly. If the Lot Location or Lot Blocking feature is activated, the View Last Check Out button will display the stock number and vehicle location of the most recent check out(s). The Print Last Check Out will print that information. On the top right of the screen you will see the status of your assets in the cabinet. Use this for a quick look to be sure all assets are in at the end of the day or just to check and see how many assets are out as you walk by the system. Figure 1: Login Screen The methods for logging into the kiosk are via Pin Code, Proximity (Prox) Card or Magnetic Strip Card and Fingerprint. An Admin from your company will help you register for the system in one of these ways. Your Admin will setup the appropriate access type. 2 NOTE: You may see a “System Initializing” message if the system has just been rebooted (Figure 2) or a new cabinet has been installed. This is so the system can relearn what is in each cabinet. If this message is present, try logging in again after about 30 seconds. Figure 2: System Initializing Screen Pin Code Access To login with your pin code, simply type it on the touch-screen monitor and press the LOGIN button. If you press a wrong number, use the backspace button (left arrow), or clear all of your numbers by pressing “C” for Clear. Proximity (Prox) or Magnetic Strip Card Access Swipe your card over the card reader and you will be logged in. NOTE: Your Admin will need to register your Prox or Magnetic Strip card with the system before you will be able to login. If your company has more than one kiosk system, you may have to register at each one. Fingerprint Access Simply touch your finger to the fingerprint reader and you will be logged in. Always use the same finger with which you registered. NOTE: You and your Admin must register your fingerprint into the system before you will be able to login. If your company has more than one kiosk system, you may have to register at each one. 3 Reset Kiosk After 3 failed login attempts while the system is initializing, you may see the option to restart the system as shown in Error! Reference source not found.. If you have waited and the kiosk is not responding, press “Yes” to estart the system. In some software versions the popup does not appear and restart will occur automatically. Unable to Login Common reasons are: Incorrect PIN entered; Login at the current time of day or day of week is not allowed; Account disabled by admin Check In Single Cabinet Check In To return a key to the cabinet, log in and press Check In and the door will unlock. Open the door and insert the key fob into any lighted holder. Close the door. You will be logged out when you close the door. Multi-Cabinet Check In Log in and press Check In. Choose one or more cabinets from the Cabinet Selection Screen as shown in Figure 6. The wait screen will appear and the door on the first cabinet will unlock. Open the door and insert the key fob into any lit fob holder. Close the door. If additional cabinets were selected, the next cabinet will unlock, and so forth. You will be logged out when you close the last door. Figure 3: Multi-cabinet Check In 4 Identify Asset To get information on a fob in your possession, log into the kiosk and press the Identify Asset button the main screen. Once on the Identify Asset screen, hold the fob against the fob reader on the kiosk, and press the Read button. The screen will display information about that fob. Figure 4: Identify Asset Check Out To check out an asset, log into the kiosk, or if already logged in, press the Main button. Press the Check Out button. You will have 3 options for checking out an asset: By Name, By List or by Filtering. Figure 5: Checkout Screen NOTE: Regardless of the checkout method used, if Issue Reasons has been activated on the system you will be required to choose an issue reason for each asset being checked out of the system. The Issue Reason screen will appear when an asset has been selected, then highlighted, for checkout. 5 CHECKOUT BY NAME (figures 6 - 8) When you press “Check Out By Name”, you will see the Add Asset screen. Note: The asset list is empty (blank) until assets are added. Figure 6 Press the Add button at the bottom to see the keyboard screen. Figure 7 Enter the complete asset name with the keyboard. Press the Continue button. NOTE: The search performed is an exact match search. You must type the full name in the system to find the asset. If the name is found it is shown in the list (Figure 11). You can press the Check Out button now or press Add to return to the keyboard screen and find additional assets. If you have more assets than can be displayed on one page, the buttons on the right side of the screen will allow you to navigate the list. All lists in the system function in the same manner. Top and Bottom will take you to the first and last pages while Up and Down will move one page at a time. Clear List will remove items from the list. 6 Be sure to select the assets you want to check out. Assets that are selected will have a blue background. Assets with a white background are not selected. You can press the Select All and Deselect All buttons to change every asset in the list. To select or deselect one asset, press on that row to toggle the selection on and off. Along the bottom of the screen are four (4) buttons: Main, Check Out, Add and Logout. Pressing Main will ignore any selected assets and switch back to the main screen. Press Check Out to remove the chosen asset(s). Add will allow you to add more assets to your list. Logout will ignore any selected assets and immediately log you out. Figure 8 CHECKOUT BY LIST (figure 9) Pressing Check Out By List will display a list of all assets currently in the cabinet(s) that you are allowed to access, which is based on your Access Group restrictions . Press each record (row) you wish to checkout. The asset name will always be shown first, to the left side of the list. If the administrator has added more information for an asset, it will be shown. Examples are Year, Make, Model, Exterior Color, Interior Color, Type, and VIN. Press Select All and all records will be selected, even if there are many pages. Likewise, Deselect All will deselect every record that was selected. The buttons on the right side of the screen assist in scrolling through a list that is longer than one (1) page. The total number of registered assets in the cabinet is shown above those buttons. Along the bottom of the screen are three (3) buttons: Main, Check Out, and Logout. Pressing Main will ignore any selected assets and switch back to the main screen. Press Check Out to remove chosen asset(s). Logout will ignore any selected assets and immediately log you out. 7 Figure 9: Check Out By List CHECKOUT – FILTER ASSETS (figure 10) Filter Assets is used to search for assets by attributes, such as make, model, year, color, etc. NOTE: This example is from a system setup for the automotive industry. Your filter attributes may differ. To search for assets by filtering attributes, enter an attribute value, then press the applicable filter button. For example, enter a year (4 digits), then press the Year filter button. Note: to add an asset for checkout by name on this screen, enter the full name and press the Add button. Figure 10: Filter Screen 8 Now the Year filter button says “2012” and the green message box indicates the filter narrowed the total to two (2) assets (figure 11). Figure 11 Continuing the example, the Year is filtered on “2012” and before the Review button is pressed, the Ext. Color is filtered on “RED”. Figure 12 9 Now in figure 13, the green message box indicates the list has been narrowed to one (1) asset. Figure13 Figure 14 Pressing Review shows the filtered asset (figure 14). Selecting the asset and pressing the Check Out button opens the cabinet. Note: Once in the Review Assets screen, you must Check Out, Logout, or go back to the Main screen. You cannot go directly back to the filtering screen. 10 Multi-Cabinet Check Out When 2 or more cabinets are attached to the Kiosk, it is a multi-cabinet system. When you check out several assets at one time, they may be stored in several cabinets. The cabinets will unlock one at a time. The second cabinet will not unlock until the first cabinet has been opened and closed. The 3rd will not unlock until the 2nd has been opened and closed, and so on. Unable to Locate or Check Out an Asset? If you are unable to Checkout a particular asset, consider these common reasons Asset already checked out by someone else Asset moved to another Kiosk Checkout at the current time of day or day of week is not allowed Asset limitation rules Asset permission disabled by admin Asset not registered by admin Logout To logout from the Main screen, simply press the Logout button in the lower right corner. Figure 16 11 Optional Features This section describes the use of optional features available for the system. Some or all of these features may not be applicable to your system. Issue Reason and Comment If the system is configured to require an Issue Reason during check out, the screen depicted in figure 17 will appear (your Issue Reasons may differ). Select a reason from the list. Choose Continue to return to the Checkout menu and finish the Checkout process. Figure 17 Note: Your admin can choose to make the selection of an Issue Reason mandatory or not. If you are checking out multiple assets and the Issue Reason will be the same for all, press the “Use For All” button instead of Continue. Thereafter, you can select more assets without returning to this screen. After selecting a reason, you may type a comment about this Issue Reason by pressing in the white Comment box. The on screen keyboard will appear, allowing you to type a comment. The comment will be saved by the system and displayed on in the Asset Transaction Report. 12 Print Receipt If Print Receipt is activated, during Checkout the system will show 2 Checkout buttons if receipt printing is optional. If receipt printing is mandatory, only the Check Out/Print Receipt button will be shown. Using the Check Out/Print Receipt button will create and print a list of assets checked out. A sample is shown in Figure 19: Sample Receipt. Figure 18 Figure 19: Sample Receipt 13 Print Receipt with Digital Signature If your system is configured to capture digital signatures via a signature pad, using the Check Out/Print Receipt button allows the capture of a signature before printing the receipt. The cabinet door will unlock and the asset(s) can be removed. When the blue window appears (figure 20), sign using the signature pad device. Press the Done button. The Clear button can be used to erase the signature and try again. NOTE: The signing can be before, during, or after the asset(s) are removed from the cabinet(s). Figure20: Digital Signature Window 14