1
Published on Documentation (http://127.0.0.1)
Home > Using eggPlant
Using eggPlant Functional
Using eggPlant Functional
eggPlant Functional is TestPlant's test automation tool. Many of the articles in "Using eggPlant Functional" provide instructions for accomplishing
specific tasks in eggPlant Functional; others discuss more general issues or bring together information that is a little bit outside the realm of a
reference manual. You can read this manual from beginning to end, or just refer to individual sections when a need arises.
PDF Version
If you want to access the documentation offline, you can download a PDF version of this manual from the following link:
Click Here for PDF Documentation [1]
Table of Contents
The eggPlant Functional Workflow [2]
Creating a Connection from eggPlant Functional [3]
Troubleshooting Connection Issues [4]
Creating Tests with eggPlant Functional [5]
Image Capture Best Practices [6]
Finding Images [7]
Creating an Image Collection [8]
Image Update Tools [9]
Finding Text [10]
Working with OCR [11]
Appendix: Writing a Text Image Generator (TIG) [12]
Typing on the SUT [13]
Re-using Code [14]
Gathering and Using Data [15]
Error Recovery with Omega13 [16]
Improving Script Efficiency [17]
Running Scripts [18]
Running from the Command Line [19]
Command Line Options [20]
Reading Test Results [21]
Organizing Your Testing [22]
Using eggPlant Functional for Keyword-Driven Testing [23]
eggDrive [24]
About eggDrive [25]
Using eggDrive [26]
Example Scripts [27]
Java Example Script [28]
Ruby Example Script [29]
Python Example Script [30]
Help and Additional Information
Manuals
You can access all of the following manuals online through the TestPlant Documentation website [31]. You can also access documentation within
individual products by going to Help > Documentation.
Getting Started [32] provides instructions for a basic eggPlant Functional set up to get you started using this testing tool and familiarize you with
its functionality.
Using eggPlant Functional [33] is a collection of articles that delve into the eggPlant Functional workflow and explain a variety of important tasks
and concepts such as how to organize your testing process and how to use eggDrive to integrate scripts from other testing tools.
eggPlant Functional Reference [34] describes the eggPlant Functional interface and scripting processes, and the SenseTalk commands, functions,
and global properties that are unique to eggPlant Functional.
SenseTalk Reference [35] is a comprehensive guide to the SenseTalk scripting language used with eggPlant Functional. This manual discusses all
aspects of the SenseTalk language that are used for general scripting purposes. Commands and functions that are unique to eggPlant
Functional are also described here.
The eggPlant Performance [36] manual describes how to set up, run tests, and view results with eggPlant Performance, a load and performance
testing tool.
The eggPlant Manager [37] manual provides instructions for a basic set up of eggPlant Manager, a test management system. Learn how to
schedule and execute tests and view results.
The eggCloud [38] manual describes how to deploy and administer eggCloud, a test-reservation system. You'll also learn how to make
reservations and how to connect through eggCloud.
The eggMan [39] reference helps you set up and get started using this free tool for manual testing.
The eggBox [40] manual describes this appliance, which comes with a range of pre-installed TestPlant tools and related applications, and shows
how you can use it to easily set up and run a test lab.
The eggPlant Network [41] reference describes the eggPlant Network appliance and how to use it to emulate network conditions when testing
with eggPlant Functional and eggPlant Performance.
Connecting to SUTs [42] is a reference for everything you need to know about how to connect to and test against mobile devices with eggPlant
Functional using either eggOn or iOS Gateway.
The Knowledge Base [43] is a collection of articles from different contributors that describe a variety of techniques and approaches to using
eggPlant Functional, as well as best practices and use-case scenarios.
Further Resources
The Examples section
[44]
of the TestPlant documentation provides a variety of example scripts using SenseTalk to run eggPlant Functional tests,
1
which you can adapt to fit your testing needs.
The FAQ section [45] gathers common problems and solutions for TestPlant products.
Online eggPlant Functional Tutorials: [46] This series of four interactive tutorials introduces the scripting environment and some frequently used
commands and functions.
eggPlant Functional User Forum: [47] Use this forum to ask questions of other eggPlant Functional users, help your peers, and share ideas and
approaches for using the product.
eggPlant Functional Examples Forum: [48] This forum is a collection of eggPlant Functional scripts written in SenseTalk that address a variety of
scripting problems.
The eggPlant Functional Workflow
The eggPlant Functional Workflow
Overview
This section describes the basic steps of testing with eggPlant Functional, in order:
1. Create a connection to a SUT from eggPlant Functional
2. Capture images and write scripts [49].
3. Run scripts [18].
4. Read results [21].
[3]
.
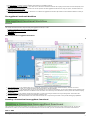
Main Components of eggPlant Functional
1. The Connection List [50]: This window allows you to create VNC connections to various systems under test (SUTs), whether via a direct
connection over Wi-Fi or USB, or a relayed connection through eggCloud or the iOS Gateway.
2. The Viewer Window [51]: This window allows you to see the SUT that you are currently connected to. You can have multiple Viewer windows open
at once, if you have multiple connections to different SUTs. The toolbar icons at the top of the window are used as part of the assisted scripting
functionality.
3. The Suite Window [52]: This window contains the script editor, as well as providing an interface for image management. This window also
provides access to the Turbo Image Capture functionality available in v15.
4. The Run Window [53]: This window shows a live view of the test results as a script is being executed. It also provides debugging capabilities.
Creating a Connection from eggPlant Functional
Creating a Connection from eggPlant Functional
The Connection List provides an interface for managing your connections from eggPlant Functional to systems under test (SUTs). To open the
Connection List, where you can add or edit connection details and connect to SUTs, go to the Connection menu and select Connection List .
VNC vs. RDP
With eggPlant Functional, you can connect to a SUT in one of two ways:
2
Virtual Network Computing (VNC)
Remote Desktop Protocol (RDP)
Each method has its benefits and best use cases, as outlined below.
When to Use VNC
VNC is a cross-platform connection method, working equally well on Mac OS X, Windows, and Linux, making it a good choice to use for eggPlant
Functional environments where you'll be testing multiple operating systems. You have to install a VNC server on each SUT you want to test, but
there are many such products available for free download. For more information about this process, visit Installing a VNC Server [54].
When to Use RDP
RDP is a native Windows remote connection method; therefore, it is available for connecting only into Windows environments. It is generally faster
than VNC, so you're likely to see less latency when working remotely through RDP. Also note that you don't have to install anything additional on the
Windows environment. However, you must enable Windows SUTs to receive RDP connections; check your Windows documentation for how to do this.
Switching Between VNC and RDP
If you have existing scripts created through one connection method, you can switch the connection method to execute the same test. However, note
that because VNC and RDP use different methods for drawing the screen, you will most likely need to capture new images in the SUT with the new
connection method before the script will execute successfully.
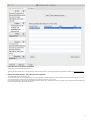
Adding or Editing a SUT in the Connection List
For SUTs that you use frequently in eggPlant Functional, you can save the connection details in the Connection List so that you can easily make
connections either from the Connection List or from within scripts.
To add a new connection, click the Add button at the bottom of the Connection List. To edit an existing connection, select it in the list, then click the
Edit button. Then, fill in the fields of the add/edit panel with the SUT's connection information.
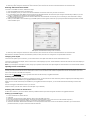
To add a new connection in the Connection List, fill in the appropriate fields
Display Name: Enter a name for this connection as you want it to appear in the Connection List. You can then use this name to reference the
specific connection or device from your scripts when using the Connect [55] command.
Server (IP Address, Host Name, or Android Device): Enter the SUT's IP address or hostname, such as vine.testplant.com. For information
on the Android Device option, please see eggOn Installation for Android [56].
Port: The port number used to connect to the SUT; a default number is entered based on the Connection Type.
Password: See below for requirements for VNC or RDP connections.
Username: See below for requirements for VNC or RDP connections.
Connection Type: The type of connection you are making. Options include:
VNC Automatic: Detects and assigns the appropriate VNC connection type.
VNC Mobile: This option is included with eggPlant+Mobile licenses.
VNC Standard and VNC Legacy: Different versions of the RFB protocol that the VNC Server is using, for use when connecting to certain
servers.
RDP: Select for connections via RDP.
Color Depth: The depth of color with which the Viewer Window draws a SUT. To read about changing this setting, please see Changing Color
Depth [57] below.
Skip Availability Check: Select this checkbox if you don't want eggPlant Functional to poll the listed server to see if it's available. (Not
available for RDP connections.)
Connect Securely (SSH): This checkbox is available only for Mac OS X, though SSH connections are still possible on Windows. Selecting this
checkbox allows you to create a secure connection via SSH. (Not available for RDP connections.) To read more about creating a secure
connection and to learn about using SSH on Windows, please see Opening Secure Connections [58] below, as well as VNC Security [59].
Scale Remote Screen: Select this checkbox to scale mobile VNC servers by 50 percent in each dimension. This option provides better
performance when you're using mobile devices with large screens or high resolution. Note: This option works only with iOS Gateway and
eggPlant Functional's built-in VNC server for Android devices.
Blend Scaled Screen: Select this option to blend pixel colors when you're using Scale Remote Screen. This option should be used only for
backward compatibility with older scripts or images that were captured using blending/scaling through the eggOn mobile VNC server.
Cancel: This button closes the add/edit panel without saving any changes.
Connect: This button instructs eggPlant Functional to attempt to make a connection with the current settings.
Save: This button saves the current SUT settings. Saved SUTs appear in the main Connection List window.
Remember This Connection: This option is enabled (the checkbox is selected) by default. With this option enabled, eggPlant Functional
saves this connection in the Connection List for use in the current and future eggPlant Functional sessions. If you disable this option, eggPlant
Functional creates the connection as a temporary connection for the current session only; it will not be available in future sessions. Temporary
connections display with their names in italics in the Connection List.
Entering VNC Connection Details
To create a saved VNC connection, follow these steps:
1. Open the add/edit panel of the Connection List.
2. Enter the display name you want to use and the IP address or hostname of the SUT you want to connect to.
3. For the connection port, the default number of 5900 is entered automatically, but you can switch to a different port number for this connection
if necessary.
4. For VNC connections, the Password and Username fields refer to the VNC server on the SUT; if this information is required to connect to the VNC
server, enter it here.
3
5. Select the appropriate VNC Connection Type from the drop-down list; VNC Automatic is the default.
6. Make any other changes or selections for this connection, then click Save to save the connection details to the Connection List.
Entering RDP Connection Details
To create a saved RDP connection, follow these steps:
1. Open the add/edit panel of the Connection List.
2. Enter the display name you want to use and the IP address or hostname of the SUT you want to connect to.
3. For Connection Type, select RDP from the drop-down list. With RDP selected, the connection port changes automatically to 3389, but you can
switch to a different port number for this connection if necessary.
4. For RDP connections, the Password and Username fields refer to the Windows user account you're connecting to; this information is always
required for RDP connections.
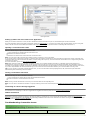
5. When you select RDP as the connection type, the RDP Options section appears, which lets you specify the Width and Height at which the RDP
session window opens.
RDP Options available while adding a new connection
6. Make any other changes or selections for this connection, then click Save to save the connection details to the Connection List.
Remember that for RDP connections, the Windows system (the SUT) also has to be configured to accept the RDP connection.
Changing Color Depth
To increase the speed of your connection, you can decrease the color depth with which the Viewer window draws a SUT.
To increase or decrease color depth, choose a value in the Color Depth pop-up menu. Choose Default to draw the SUT with the same color depth you
see on its native display.
Note: If you change the color depth of a SUT, images you captured at the former color depth might not match the SUT in the current Viewer window.
Opening Secure Connections
Secure Shell (SSH) is a network protocol that uses data encryption to transfer information securely. For eggPlant Functional to connect to a SUT
securely, the SUT must be able to host an SSH tunnel or have a secure connection with another computer that can host an SSH tunnel. (You must
have a user account on the SSH host computer.)
Please visit our VNC Security
[59]
page for general information on VNC Security in eggPlant Functional.
Enabling SSH on Windows
To enable SSH-encrypted VNC connections in eggPlant Functional, you need to have an SSH connectivity tool that supports port forwarding (such as
OpenSSH for Windows) installed on your eggPlant Functional computer.
When you have an SSH connectivity tool installed on your eggPlant Functional computer, you can enable SSH with the following command-line
option:
defaults write Eggplant SSHTaskPath "Path to your SSH tool"
(Replace "Path to your SSH tool" with the actual file path of your SSH tool.)
Enabling SSH on Mac OS X and Linux
On Mac OS X and Linux, you do not need to install any additional tools to open SSH-encrypted connections in eggPlant Functional.
Setting up an SSH Login
1.
2.
3.
4.
5.
6.
In the Connection List, select the SUT.
Click Edit.
Select the Connect Securely (SSH) checkbox, which opens the SSH Login pane.
Fill in the Username and Password fields. (Username and Password refer to your user account on the SSH host computer.)
In the SSH Host field, enter the IP address or hostname of the SSH host computer.
Select the Remember SSH Password checkbox to save the password of the user account on the SSH host; otherwise, you must enter the
password whenever you open a connection with the SSH host.
4
SSH Login Panel
Setting up SSH in the SUT's VNC Server Application
When you use SSH to connect to a SUT, the SUT's firewall must allow connections on port 22, the standard port for SSH connections.
For more information about secure VNC Connections, please see VNC Security [59], or see the SUT's VNC server documentation. (If you're using Vine
Server, see the Vine Server User Manual, available on the Vine Download Page [60]. See the section on "Allowing VNC Connections.")
Opening a Connection with a SUT
There are several ways to open a connection with a SUT:
In the Connection List, double-click the name of the SUT.
Select the SUT and click Connect.
Select the SUT and choose Connect from the Connection menu.
Note: You can open a VNC connection from within a script by inserting a Connect command.
If you use the Connect command to connect to a SUT that isn't saved in the Connection List, the connection is treated as an ad-hoc connection: The
connection shows up in the Connection List while it is active (during the script run), and is removed from the list when it is no longer being used; the
connection isn't saved.
For more information, please see The Connect Command [55].
Note: RDP connections allow only one user connection at a time. If you attempt an RDP connection to a Windows system that already has a
connected user, it gives you the opportunity to ask the other user to log off or to cancel your log on attempt. If another user attempts to access a
SUT while you're logged on via RDP, you'll receive a Windows system message in the SUT asking if you want to log off to allow the other user access;
if you don't respond within 30 seconds, Windows logs you off—which can have unintended results if you're in the middle of running a test.
Tip: If you're running a script that switches between SUTs, you can save execution time by keeping both (or all) connections open rather than
disconnecting and reconnecting with each switch.
Closing a Connection with a SUT
There are two ways to close a connection manually:
In the Connection List, select the SUT and click the Disconnect button.
Choose Connection > Disconnect from the menu.
Note: Closing a Viewer window does not close your connection with the corresponding SUT.
Note: You can close a connection from within a script by inserting a Disconnect command (found in eggPlant Functional Commands and Functions
[61]).
Connecting to a Device through eggCloud
For instructions on connecting to a device in eggCloud from eggPlant Functional, please see the eggCloud documentation
.
[62]
Mobile Connections
Depending on the type of mobile connection, the steps for adding a connection can vary from the above instructions. Please see iOS Connection
Methods [63] for an explanation of the methods for connecting to different iOS versions. For connections to devices running Android OS, please see our
documentation on Android Connection Methods [64].
Troubleshooting Connection Issues
Troubleshooting Connection Issues
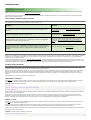
Connection error
Possible Cause
Solution
5
Connection error
Possible Cause
Solution
FAILED: No such host
eggPlant Functional does not recognize the
network name you are using.
Try using the SUT’s IP address instead.
If you are on Mac OS X, in Finder, choose Go menu > Connect to
server to see if your computer can find that name.
FAILED: Temporarily
unable to connect:
Operation timed out
eggPlant Functional cannot see the IP address.
Open the Network Utility and try to ping the IP address. If you can’t
ping the IP address, then you could be using the wrong IP address.
Make sure that the SUT’s firewall is allowing VNC connections.
FAILED: Temporarily
unable to connect:
Connection refused
The IP connection to the SUT has been established,
The IP connection to the SUT has been established, but eggPlant
but eggPlant Functional cannot connect to the VNC
Functional cannot connect to the VNC server on the SUT.
server on the SUT.
FAILED: Remote Login
Failed - Password
Rejected
The password in the Connection List is incorrect, or
Re-enter the password in the Connection List.
the password in the VNC server was typed
Try retyping the password in the VNC server on the SUT.
incorrectly.
Viewer window updates
are very slow in Live
Mode.
This is probably a network issue.
Discuss the issue with your system administrator. (As a test, create a
direct connection between eggPlant Functional and the SUT to see if
this improves performance.)
Creating Tests with eggPlant Functional
Creating Tests with eggPlant Functional
There are a number of ways to create your tests. Scripting with eggPlant Functional is easy, and a variety of workflows are possible. Read on to learn
about the different approaches to script creation, and find the approach that works best for you and your team.
The Suite window [52] and Viewer window [51] are essential to script creation. The Suite window is where all of your scripts and images are managed,
and the Viewer window is where you capture your images for use with your scripts. This can be done manually, using the Turbo Capture, or using
assisted scripting, as described below.
Suites
Before you can create your first script, you must create a suite. EggPlant Functional organizes and stores your scripts, images, results and schedules
in folders called "suites."
To create a new suite, choose File > New Suite in the eggPlant Functional application. This opens the Suite window with the Guide page by default.
For information about the Suite window and how to use it, see Suite window [52].
eggPlant Functional creates each suite folder with the following subfolders by default: Images, Results, Scripts and TableScripts. You can use the
Default Suite Directory General Preference [65] to specify the location where you want eggPlant Functional to create your suite folders. When you
create your scripts and save them, eggPlant Functional stores them in the suite's Scripts subfolder. After you run a script or scripts, eggPlant
Functional stores the results and information about the run in the suite's Results subfolder.
Note: You cannot put scripts into subfolders within the Scripts folder. If you want to further organize your scripts, you should place them in separate
suites.
Scripts
Before scripts can be arranged into larger tests, they must be created using eggPlant Functional, with one of the possible script creation workflows.
These workflows are:
Turbo Capture [66]
Assisted Scripting [67]
Manual Script Creation [68]
Once scripts have been created, they can be combined to create larger tests, and these script structures can be managed using a master script
using eggPlant Manager [37], or with Keyword Driven Testing [23].
,
[69]
Turbo Capture
Turbo Capture facilitates script creation by recording your mouse and keyboard actions as you execute them against a live SUT. It then facilitates the
image capture process and generates SenseTalk code according to the actions executed.
Turbo Capture allows the creation of "Sessions". Sessions facilitate image capture and script generation.
Step-by-Step: Using Turbo Capture to Create Scripts
To create a test using Turbo Capture, follow the steps below:
6
1. Create a Connection
Create a connection to a SUT from eggPlant Functional.
For more information on how to do this, please see Creating a Connection from eggPlant Functional
[3]
.
2. Start a Turbo Capture Session
Start a Turbo Capture Session. There are multiple ways to do this:
Begin a session through the Suite window
Click the Sessions button in the lower left corner of an open Suite window.
Click the Start Turbo Capture button in the open Sessions tab.
Begin a session through the Viewer window
In the Viewer window, click the Start Session icon.
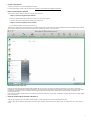
This will bring up the active SUT connection in the Viewer window, with an active session. This is indicated by the Viewer window being outlined
with a green rectangle, and the End Session button being visible in the toolbar, as shown below:
3. Manually Execute Your Test
Execute your test manually through the Viewer window the way you want your script to execute it. All actions such as clicks, scroll wheel
movements, and keystrokes are recorded automatically. To capture mouse movement, hold the Shift key down while moving the mouse. When
the Shift key is released, mouse movements will no longer be recorded, and the session will go back to recording click, scroll wheel, and
keyboard events only.
During session creation, screen captures are taken along with each action that is executed, and these screenshots will be used to create images
later in the process.
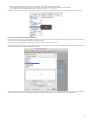
4. Stop the Turbo Capture Session and Name It
Click the Stop Session icon in the Viewer window toolbar, or click Stop Session in the Suite window Sessions tab.
A new session will be created in the Sessions tab of the Suite, with the name of the session ready to edit, as shown below. Give your session a
name.
7
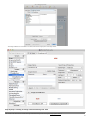
5. Open the Session for Script Generation
Select your session and click Open Session.
This will put the Sessions tab in script generation mode. For information on the script generation mode interface, please see The Suite Window
[52].
6. Modify and Name Images, and Edit TypeText Commands
The session will open in the Sessions tab.
On the left hand side, the first screenshot from your recorded session will be displayed. If the first action you took interacted with the UI, it will
show an approximate Capture Area for the image to be used in the first line of your script.
On the right hand side, a file browser will be displayed with a field ready to accept the name of your image. The image preview will be displayed
below the image browser, along with the script.
8
a. Modify the Capture Area for the image in the view on the left hand side of the session view, using best image capture practices
.
[70]
If you are working with a TypeText command, the screen of the SUT will show on the left hand side as it appeared at the time the typing
was executed, but no capture area will be proposed.
b. Name the image on the right hand side and adjust the search settings and timing as desired.
TypeText commands will bring up a different editing view, in which you can modify the keys that the script will be typing, or approve them
as they are.
c. Press the Return key on your keyboard or click Next after each change to move on to the next line of code.
Tip: When you do this, the session's current state is saved, so you can leave the session to do other work, and come back to finish it later.
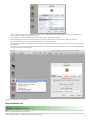
7. Once all of your images have been sized and named, and all TypeText commands have been modified as needed, click Generate Script.
eggPlant Functional will go through each step in the script, generating images and code.
8. When the generation process is finished, eggPlant Functional will open the generated script as a new tab in the same Suite window. The script
will automatically be given the same name as the session.
9
Note: Turbo Capture Sessions take up a fair amount of space on your machine, since full-resolution screenshots are captured at each stage of
execution. Once a script has been generated from a session, it is advisable to delete the session from the sessions list. Multiple sessions can be
selected at once for mass removal.
Step-by-Step: Using Assisted Scripting to Create Scripts
The Viewer window provides assisted scripting functionality to generate scripts while capturing images. This process uses the toolbar icons included
as part of the Viewer window.
To read about all of the individual icons and what they do, please see The Viewer Window
.
[51]
To capture images and write scripts using the assisted scripting icons in the Viewer window, follow the steps below:
1. Open a new Suite window, and create a new Script.
2. Open a Connection to an SUT from eggPlant Functional.
3. In the eggPlant Functional Viewer window (the live view to the SUT), click on the icon that says "Enter Capture Mode".
Entering into Capture Mode [71] will take you out of the live interactive state, and darken the screen of the SUT. You will now see that a lighter
box with a red cross-hair inside of it has appeared on the screen. This is the capture area, and the red cross-hair is the hot-spot.
4. Move the capture area over a screen element with which you want to interact, and re-size it to capture an image according to best image
capture practices [6].
For more information about Live Mode, Capture Mode, the Capture Area, and the Hot-Spot, please see The Viewer Window
.
[51]
Re-Using Images
To use an existing image with an action represented by one of the Viewer Window toolbar icons, with any toolbar icon that requires use of an image,
follow these steps:
On Mac
Option-Click the toolbar icon with the action you want to execute. This will bring up a file browser that allows you to choose the image you want to
use.
On Windows
Click the Use Image button, and choose the image you want to use in the file browser. Select the action you want to execute from the drop-down list.
Manual Script Creation
10
You can always create scripts manually from scratch by creating a new eggPlant Functional script in the Script Editor [72] and writing your own
SenseTalk code. In addition, after you generate code through one of the methods described above, most scripts will require some further
organization and editing, which you can also accomplish in the Script Editor. For more complex workflows, manual SenseTalk scripting is required.
There are several ways to insert commands and images into a script:
Type commands, functions, and image names in the Script Editor.
Choose commands from the Control menu.
Choose commands from the Insert drop-down list on the Script Editor toolbar.
Use the SenseTalk Broswer [73] in the right sidebar of the Script Editor to find and insert commands, functions, and code snippets.
Copy, cut, and paste with the Edit menu or associated keyboard shortcuts.
Drag image, script, suite, and SUT names into the Script Editor from other windows.
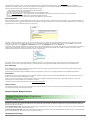
Auto-Completion
The Script Editor includes a code completion feature. When you have typed at least one character in the Script Editor, auto-completion attempts to
finish your current word. Suggested completions include variables, commands and functions, and names of scripts or images from your current suite.
Suggested word or code completions appear in a pop-up box:
To select an item from the list of options, you can use your arrow keys, your mouse, or keep typing until the item you want is the first in the list.
(Note that, by default, the first item is selected for you.) To insert the selected item, hit Tab (the default choice) or Enter. Note: To change autocompletion preferences, go to eggPlant > Preferences, and select the Completion pane on the Scripts tab.
The bottom part of the auto-completion pop-up box shows you what will be inserted for each option. Note that you can insert blocks of code with this
method, such as if/then/else structures or repeat loops. In such cases, the inserted code typically has variables or tokens that you will need to
replace with the specific values appropriate to your script, as shown below:
If you don't want to use any of the suggested auto-completion options, you can just keep typing, or press Escape to dismiss the pop-up box.
Remember, you can use the preferences settings to control what items are suggested and other details about how auto-completion works.
Auto Indenting
Auto indenting puts tab or space characters inside control structures to make scripts easier to read. (Control structures include handlers, repeat
loops, if/then/else and try/catch commands.)
By default, the Script Editor updates indentation when you press Return or Tab. (You can change this behavior in Script Editor preferences.)
Colorization
By default, each type of script element (such as command, variable, and image name) is written with a different color in the Script Editor. This can
make it easier to track what is happening in the script.
If you use incorrect syntax (that is, code that doesn’t make sense to eggPlant Functional) the entire line or block that contains the error is not
colored; this is a visual cue that there is a problem in the script.
Colorization can be customized extensively in the Script Editor preferences [74].
Menu Features
The Edit and Format menus contain many of the features you find in word processors. Use these menus for standard editing tasks such as finding
text, cutting and pasting, and changing font styles.
Image Capture Best Practices
Image Capture Best Practices
Setting up Image Captures
In the Viewer window, you can move the Capture Area by clicking the desired location, dragging the Capture Area, or pressing the arrow keys.
(Pressing an arrow key alone moves the Capture Area one pixel in the given direction; to move the Capture Area in 10-pixel increments, hold down
Shift as you press an arrow key.)
To resize the Capture Area , drag the edges or corners of the Capture Area, or press Alt + arrow (Option + arrow on Mac OS X) keys. Add the shift
key to resize the Capture Area in 10-pixel increments.
To move the image hot spot , hold down Control (Command key on Mac OS X) and click the desired location, drag the hot spot, or press the arrow
keys. (Add the shift key to move the hot spot in 10-pixel increments.)
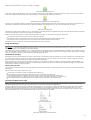
Identifying Good Images
11
An easy way to keep eggPlant Functional scripts as robust as possible is to capture images with just enough content to uniquely identify an interface
element. For example, here is an image of a folder on a desktop:
Folder with desktop background
If you capture some of the desktop in your image, you always have to rely on the desktop color to be the same for a match. Even if you can always
count on the desktop being the same color, in this example, it is shaded when the folder icon is selected:
Selected folder with dark blue area in the background
Of course, you could always capture an image of the folder with the selected background as well, but since the icon itself does not change, this is an
unnecessary complication. If you capture the icon without the desktop in the background, you can cover both states with one image:
Folder with no background
This image may look less like a folder icon to you, but shape isn’t especially important to eggPlant Functional. As long as the inside of the image does
not match anything else on the screen, the edges are not important.
When you have the Capture Area in roughly the size and position you need, you can use the Arrow keys to fine tune it:
To nudge the Capture Area one pixel at a time, press the Arrow keys.
To adjust the size of the Capture Area one pixel at a time, press Alt-arrow (Option-arrow on Mac OS X) keys.
To nudge the hot spot one pixel at a time, use Control-arrow (Command-arrow on Mac OS X) keys.
Add Shift to any of these shortcuts to make the adjustments in ten-pixel increments.
Using the Hot Spot
The hot spot [75] is the point that eggPlant Functional targets for mouse actions such as Click, DoubleClick, and MoveTo. It is also the point used to
describe the location of an image found in the Viewer window.
The position of the hot spot is defined as an (x, y) offset relative to the upper-left corner of the captured image. For example, if you capture an image
that is 20 pixels wide and 10 pixels high, and you leave the hot spot at its default location in the center of the image, the hot spot location is reported
as (10, 5)—10 pixels to the right of and 5 pixels down from the upper-left corner.
The Relative Hot Spot
Although the hot spot is associated with an image, it doesn’t have to be inside the image. For example, if you need to select text in a text field, there
is no way to do an image match unless you know in advance what the text is going to be. Instead, you can capture an image of only the text field’s
label, and set the hot spot a few pixels over, where the actual text field begins.
Another example is a Country pop-up menu that can display any one of dozens of countries. Instead of capturing an image of each possibility, you
could capture the label Country with the hot spot on the actual pop-up menu. Since the pop-up menu is not included in the image, the country that is
displayed has no bearing on the image match.
Moving the Hot Spot
You can change in image’s hot spot in the Viewer window, the Capture Image panel, an image property list in a script, and in the Images pane of the
Suite Editor.
There are several easy ways to move a hot spot:
Control-click in or around an image. (Command-click on Mac OS X.)
Control-drag the red cross hairs that indicate the hot spot. (Command-drag on Mac OS X.)
Press Control-arrow keys to nudge the hot spot one pixel at a time. (Use Command-arrow on Mac OS X.)
Press Shift-Control-arrow to nudge the hot spot ten pixels at a time. (Use Shift-Command-arrow on Mac OS X.)
In the Viewer window, re-size the Capture Area to snap the hot spot back to the center of the image.
Choosing the Best Search Type
When you save an image, the Capture Image panel gives you a choice of five search types. eggPlant Functional tries to automatically detect the
appropriate search type for your image, but in some cases you may want to override the default setting.
Typically, eggPlant Functional chooses the Tolerant setting whenever it can. The Tolerant setting works well for most images, and allows for some
variation in the colors of the image when it is found. A good example is a semi-transparent window or menu. In the images below, you can see
objects in the background through the menu on the right. The Tolerant setting allows eggPlant Functional to accurately locate menu items, even if
the screen behind the menu is in a different state than it was when the image was captured.
Basic menu appearance
Menu with desktop items showing through
12
Pulsing buttons, such as the Save buttons in Mac OS X, can also be detected automatically by eggPlant Functional. The Pulsing setting causes
eggPlant Functional to use a “mask” on the image to filter out the pixels that are changing.
Light end of pulse
Dark end of pulse
Captured image with Pulsing mask applied
Text Search Types
The last two search types are Text and Text&Pulsing. These search types are designed to deal with text and buttons that sometimes change their
appearance subtly; primarily due to Mac OS X text anti-aliasing. If you are testing against Mac OS X systems, using the Text (or Text&Pulsing) search
type can make a big difference in your images that include text.
Note: The Text and Text&Pulsing search types are never selected automatically by eggPlant Functional.
If an eggPlant Functional script suddenly fails to find an image that it found on a previous run, you can always try changing the images search type
in the Info panel of the Images pane. Search type changes are saved immediately, and the new search type is used the next time a script calls that
image.
Capturing Tooltips and Other Transient GUI Elements
The following steps make it much easier to capture images of tooltips (and other objects that come and go quickly).
1.
2.
3.
4.
Move the mouse to a position that brings up the tooltip, and press Control (Command on Mac OS X) to toggle into Capture Mode.
Close your connection to the SUT, to “freeze” the Viewer window before the tooltip disappears.
In the Connection List, Control-click or right-click the name of the SUT, and choose View Window.
Capture your image by clicking the Capture Image button or double-clicking the Capture Area. (The command buttons are not available when
there is no connection open.)
Keeping the Tooltip During Script Execution
By default, if eggPlant Functional fails to find an image it is looking for on the first search, it moves the mouse to the lower right-hand corner of the
screen, to make sure the image is not being obscured by the cursor.
When you are trying to capture a tooltip, moving the mouse out of the way actually causes a problem, because the tooltip disappears as soon as the
mouse moves away. Fortunately, you can temporarily disable this behavior by setting the shouldRepositionMouse global property [76] to no.
Examples: Changing the value of a global property
setOption shouldRepositionMouse, No //SetOption command, followed by the global property name, and the new value
set the shouldRepositionMouse to No //Set command, followed by "the" and the global property name, then "to" and the new value
To write a handler that changes a global property as needed and then changes it back to its starting value, see the FastImageFound example in
Optimizing Script Performance [77].
Comparing Images with Graphics Software
If eggPlant Functional continuously fails to find a particular image, and you have ruled out search type and timing problems using the Image Update
Tools [9], it may be that the SUT is not displaying the image consistently.
In these rare cases, it is sometimes helpful (or at least informative) to be able to perform a detailed comparison of the captured image to one being
displayed by the SUT.
The procedure outlined below describes how to view the differences between these images on a pixel-by-pixel basis. (PhotoShop Elements is used
here, but you can convert this technique to whichever graphics program you typically use.)
1. Open both images. In the graphics program, open the saved image and the Screen_Error file for a script run that failed because of this image.
2. Overlap the images. Copy the saved image, and paste it on top of the Screen_Error file. (In PhotoShop, the copied image is automatically
pasted into a separate layer.)
3. Align the images. Use the Move tool to drag the saved image to its corresponding location in the Screen_Error file. Then zoom in and adjust
the image further by nudging it with the arrow keys.
4. Highlight the differences. In the Layers palette, click the Blending Mode pop-up menu and choose Difference.
5. Evaluate the differences. Pixels that match perfectly are displayed as black. For other pixels, look at the Info panel to see the RGB values for
each image. The greatest difference between the three values is the tolerance eggPlant Functional must allow to consider that pixel a match in
both images. (For example, if a pixel in the saved image has RGB values (99, 99, 135), and the same pixel in the Screen_Error has (100, 100,
150), the search tolerance must be at least 15- the difference between the blue values.)
Reusing Captured Images
When you are scripting, you often need to use the same image more than once within a suite or script. For example, you may click the File menu
repeatedly, or open a number of dialogs with OK buttons.
Here are four easy ways to insert a previously-saved image into your script:
Alt-click (Option-click on Mac OS X) : In the Viewer window toolbar, Alt-click (Option-click on Mac OS X) a command button. Instead of
capturing an image, the command opens a Use Image panel so you can select an existing image. (The command that you click is both added to
the script and performed on the SUT.)
Insert Pop-up Menu: In the Script Editor, choose a command (or Additional Image for no command) from the Insert pop-up menu, then select
your image in the file browser. (A command you choose here is not performed on the SUT.)
Drag-and-drop: Drag an image from the Images pane of the Suite Editor to the script.
Copy and paste: Copy and paste from another part of the script.
Of course, you can always type an image name in quotation marks, too.
13
Finding Images
Finding Images
eggPlant Functional is an image based testing tool, so it relies heavily on the images that you capture as you create your test. The most reliable
images will be those captured using Best Image Capture Practices [6].
This section discusses common image matching problems and methods of working with images once they have already been captured using the
best practices mentioned above.
Most Common Image Matching Problems
The most common image matching problems and their solutions are:
Problem
Solution
The element of the screen is in a different state than when the image of it was
captured.
Use an Image Collection to Find an Image with Several
Possible States [78].
The element of the screen does not appear quickly enough, so that it appears after
eggPlant Functional has completed a search for it.
Use best practices to avoid timing problems
Multiple instances of the same image are appearing on the screen, and eggPlant
Functional is interacting with the wrong one.
Either use the EveryImageLocation() function, or search a
specific part of the screen. Both of these approaches are
described in Working with Multiple Instances of the Same
Image [80].
The element of the screen is displaying at a different size than it was when the
image was captured. This could be because the test is being run against a different
SUT than the SUT used to create it, or because the resolution of the SUT was
changed.
Search for the image using Image Scaling
.
[79]
.
[81]
Finding an Image with Several Possible States
When you are scripting, you can’t always count on images on the SUT to stay the same after you capture them. For instance, if you want to click the
close button on a window, that window may or may not be in an active state. On Windows, a close button may appear red or grey depending on
whether or not the window is active.
To deal with situations like this, you can create an Image Collection [8]. An Image Collection allows eggPlant Functional to search for more than one
image with a single image search. It can then run the same line of code against whichever image in the collection happens to be present. This is part
of what gives eggPlant Functional the unique ability to run the same script across multiple browsers, platforms, and/or devices.
Avoiding Timing Problems
Sometimes a script which has run successfully a number of times suddenly reports that it is unable to find an image in the Viewer window. More
often than not, this is a timing issue, rather than a problem with image recognition.
There is a quick test to determine whether or not it is a timing problem: select the failed line and click the Run Selection button in the Script Editor. If
the line runs successfully, then it is likely that eggPlant Functional tried to search for the image before it became visible on the screen. This is a
timing issue. (If the image is still not found, examine the Viewer window for changes in the image, or try changing the search type of your saved
image.)
The following tips can help you prevent timing problems:
The WaitFor Command
The WaitFor [82] command actually holds up the next line of the script until the given image is found. This is particularly helpful when the preceding
step opens a new application or web page. (It is not usually needed when you open other parts of an application that is already open.)
Example: Using the WaitFor Command
Click "SaveAs"
WaitFor 5, "SaveDialog" -- Waits for up to 5 seconds for SaveDialog.
TypeText "FileName"
In this example, the script waits up to five seconds for the Save dialog to appear before attempting to type in it. (If the Save dialog does not appear
within five seconds, the script fails.)
Be generous in the amount of time you allow for a WaitFor; you don’t need to try and guess exactly how long a wait you need. Since the script
proceeds as soon as the image is found, you don’t lose any time on a success. A good rule of thumb is to set the MaxWait time for as long as you
think a reasonable user would wait; if that is not enough time, you have probably found a problem in your application.
WaitFor vs. Wait
The Wait [61] command pauses the script for length of time you specify in the time parameter: (A number by itself represents seconds; you can also
type the words minutes and milliseconds.)
During the Wait command, eggPlant Functional does nothing. This is useful if you just want to pause the script at a certain point, but if you are
waiting for something to happen on the SUT, you can get more reliable (and potentially faster) results with the WaitFor command.
When you use the WaitFor command, the time you specify is a maximum time, not an absolute time. If the image appears before the maximum time,
the script continues immediately.
Example: Comparing Wait and WaitFor commands
Wait 8 -- Pauses the script for 8 seconds.
14
WaitFor 8.0,"OK Button" -- Pauses the script until the image is found, up to 8 seconds.
Remote Work Interval
If you are having frequent, random timing problems with a SUT, you might need to slow eggPlant Functional down a little. You can do this by
increasing the Remote Work Interval, the time eggPlant Functional waits between commands sent to the SUT. There are two ways to do this: change
the Remote Work Interval in Run Option preferences, or set the RemoteWorkInterval [83] global property.
Remote Work Interval Preference
If most of your SUTs are having frequent timing problems, change the default Remote Work Interval in Run Option preferences.
1. Select Preferences > Run Option > System.
2. Increase the Remote Work Interval in small amounts- one or two tenths of a second may be all the difference you need.
The RemoteWorkInterval Global Property
If you only need to slow down the SUT in particular scripts (or parts of scripts) try setting the RemoteWorkInterval global property on a case-by-case
basis.
Examples: Changing the RemoteWorkInterval
add .1 to the remoteWorkInterval
subtract .1 from the remoteWorkInterval
setOption remoteWorkInterval, .1
To write a handler that changes a global property as needed and then changes it back to its starting value, see the FastImageFound example in
Optimizing Script Performance [77].
Image Search Time
Image Search Time is the approximate maximum time eggPlant Functional can search for an image before reporting a failure; however, the actual
time it takes for a successful search might well be much less because when it finds the image, the search stops. So, it only reaches the Image Search
Time limit if the image isn't found.
You can change the default Image Search Time value in Run Option preferences, or on a case-by-case basis within a script using the
ImageSearchTime [84] global property. Be careful about setting the Image Search Time too high because this can make your script runs very long if
images aren't found.
Note: When you change the Image Search Time, the Search Count and Search Delay values are also changed, and vice versa. Image Search Time is
always equal to the product of the Search Delay and one less than the Search Count values:
Image Search Time = (Search Delay) * (Search Count - 1)
Image Search Time Preference
If your Image Search Time is consistently too low, you can change the default value in Run Option preferences. (A side effect of increasing the Image
Search Time as a preference is that conditional blocks take a lot longer.)
1. Select Preferences > Run Option > Screen.
2. Increase the Image Search Time in small increments- no more than a half-second.
The ImageSearchTime Global Property
If you only need to increase the Image Search Time temporarily (which is usually the best option), you can set the ImageSearchTime
property as needed.
[84]
global
Example: Changing ImageSearchTime() temporarily
put getOption (ImageSearchTime) into IST --Stores the starting ImageSearchTime value.
set the ImageSearchTime to 2 -- Changes the ImageSearchTime value.
(*Proceed with the script here, then...*)
setOption ImageSearchTime, IST -- Restores the starting ImageSearchTime value.
Working with Multiple Instances of the Same Image
When identical images appear in more than one place on the screen, you often need a way to specify which one you need. There are a few different
approaches to this, and which one you choose will depend on the situation. A few of these methods are described below.
Use a Relative Hot Spot
The hot spot associated with an image is a movable point, and it does not need to stay within the bounds of the image capture.
If you are searching for a folder on the desktop, instead of using EveryImageLocation() or specifying a searchRectangle, capture an image of the
folder's label, and move the hot spot to the location of the folder relative to its label. Assuming that the label is unique, this will be the easiest way to
interact with the folder icon.
For more information, please see Using the Hot Spot [85] in Best Image Capture Practices.
Use EveryImageLocation()
The EveryImageLocation() [86] function returns a list of every instance of an image match on the screen. This can be used to determine how many
instances of an image are on the screen, or find them all in order to specify a particular instance of an image to interact with.
Since eggPlant Functional searches the screen of the SUT from the top left corner to the bottom right corner as if it is reading English text, that is the
order in which the images will be listed in the result of the EveryImageLocation() function.
For example, if there are multiple instances of an image on the screen, and you know that you will always need to interact with the third instance,
you might use code like this:
Put EveryImageLocation("MyImage") into FoundImages
Click item 3 of FoundImages
Searching Part of the Screen
15
You can search part of the screen by setting the SearchRectangle
[87]
global property.
The SearchRectangle global property takes two pairs of screen coordinates as parameters; these points define two diagonal corners of the search
area. (The top-left corner of the screen is 0,0.)
The purpose of the sample script shown below is to click the Customize button (crossed hammer and wrench) in the active window. Since the
Customize button in the active window is identical to the Customize buttons in other windows, there is no guarantee that a “Customize” image you
find is the right one; however, the red Close button in the top-left corner of the active window is unique. (It is colorless in background windows.) If
you make the red Close button the top-left corner of your search rectangle, eggPlant Functional (searching left-to-right, top-to-bottom) surely finds
the Customize button on the same window first.
Example: Adjusting the search rectangle
put ImageLocation("CloseButton") into UpperLeft
put RemoteScreenSize() into LowerRight
Set the SearchRectangle to(UpperLeft, LowerRight)
Click "Customize"
Set the SearchRectangle to () -- Restores the search rectangle to the full SUT screen.
Image Scaling
By default, all images are found at their native resolution (a scale of 1.0). You can override this by setting the defaultScale [88] global property.
Single images can be scaled in-line with the image search. There are three methods for scaling images in-line:
Scaling by a Factor [89]
Scaling to a Size [90]
Dynamic Scaling [91]
Scaling by Factor
This method of scaling images scales the image by a factor of its original size, using the Scale parameter. To do this, set the Scale parameter with
any image search. For instance, it can be used with a Click command as shown in the examples below.
Examples: Scaling by Factor
Click (image: "OK_button", scale: 0.5) -- Looks for the image at 50% scale
Click (image: "OK_button", scale: (0.5, 1.0, 1.5)) -- Looks for the image at all 3 sizes
Click (image: "OK_button", scale: 0.5 to 1.5 by .25) -- Looks for that range of sizes, incrementing by .25 (.5, .75, 1.0, 1.25, 1.5)
Notes: The Image parameter must be used when image scaling is specified in-line.
If the defaultScale [92] global property is set, this will override it.
If you want to use the defaultScale in addition to a custom scale with a specific image search, you can use code similar to that in the example below.
Example: Using the defaultScale with a custom scale search
Click (image: "OK_button", scale: (0.5, 1.0, “Default”)) -- Looks for the image at half-size, regular-size and the current “default” size
Determining Scale Factors
In some cases, it may be difficult to tell what the scale factor is when moving from one device to another or changing the size of elements on the
SUT (one use case of this would be testing against the Dock on Mac).
To deal with scenarios like this, you can start with a range of scale factors (as shown in the examples for Scaling by Factor [93] above) and get some
additional information to determine what the correct factor was using the foundImageInfo() [94] function. The scale factor at which an image is found
is recorded in the result returned by the foundImageInfo() function.
Example: Determining the scale factor at which an image was found
Click "OK_Button"
Log foundImageInfo().Scale -- Logs the scale at which the image was found
Scaling to a Size
This method of scaling images allows you to specify a specific size for the new image, using the scaleToSize parameter. To do this, set the scaleToSize
parameter with any image search. For instance, it can be used with a MoveTo command as part of an imageLocation() function.
Example: Scaling to a size
MoveTo imageLocation(Image:"anImage", scaleToSize:(300,100))
Note: This can result in variations of image dimensions if the new dimensions specified are not in proportion to the original image capture, so that
16
the image appears distorted.
Dynamic Scaling
Starting in eggPlant Functional v12.20, eggPlant Functional records the screen size of the SUT (System Under Test) at the time of image capture.
This recorded size can then be used to automatically scale an image based on the difference between the screen size of the SUT at time of capture,
compared to the screen size of the SUT at the time of the image search.
To do this, you can specify either the Proportional or Stretch parameter. Neither of these will search for the image at its original capture size.
Proportional: The image will scale the same amount in both directions (width and height), keeping its proportions. It will scale proportional to the
smallest change in SUT height or width, so if the screen size of the SUT has changed more in one dimension than the other, this image will scale
according to the smaller difference.
Stretch: The image will scale in both directions (width and height), not necessarily keeping the same proportions as the original captured image.
Example: Dynamic Scaling
Click (image: "OK_button", scale: (“Proportional”, 1.0, 1.5)) -- Looks for the image at all 3 sizes.
Note: A scale of 1 must be included if you want eggPlant Functional to search for the image at its original capture size.
Note: Images captured prior to eggPlant Functional v12.20 will not have a recorded screen size for the SUT at time of capture. You can set the
capture size of old images on the Images Tab of a Suite (in bulk if necessary). You can also set the DefaultCaptureScreenSize [95], which it will use if
there is no recorded SUT size.
Image Rotation
If you expect an image to appear at a different angle than was originally captured, you can set a rotation parameter with your image search.
The examples below show how to use the Rotate parameter with a Click command.
Examples:
Click (name: "appIcon", rotate: 180) -- Searches for appIcon at 180 degrees from its original angle
Click (name: "appIcon", rotate: 45 to 90 by 5) -- Searches for appIcon tilted 45 to 90 degrees, in 5 degree increments
Creating an Image Collection
Creating an Image Collection
There are two ways to create an image collection. They are both described below.
Step-by-Step: Creating an Image Collection During Script Creation
This section talks about how to create an image collection with no previously captured images. This can be done during script creation using the
assisted scripting functionality of eggPlant Functional.
1. Capture an Image
Open a Viewer Window showing an active connection to your System Under Test (SUT). Enter Capture Mode and move the capture area to
select the image you want to capture. In this case, a browser window is open in an active state, so that the close button appears red.
Choose the action you want to execute in your script with that image. For example, choose the "Click" icon on the Viewer Window to capture an
image of the close button on a window and click it.
The image capture panel will open. Name the image. When naming, keep in mind that this will be the name of your image collection (though
17
this can always be changed later). Click "Save". Three things will happen simultaneously:
The captured image will be saved into the images folder of your suite with the name specified.
The action will be executed on the SUT (in this case, the close button will be clicked on the open browser window).
A line of SenseTalk code will be inserted into the script (in this case, Click "CloseButton" ).
In the suite, the captured image can be seen in the Images pane, and the SenseTalk code is shown in the script editor for the current script.
2. Capture a second image to create the collection
On the SUT, make sure that the second instance of the image is present on the screen. In the Viewer Window, go into capture mode, and move
the capture area so that it highlights the image you want to capture.
Capture a second image using the "Capture Image" icon in the toolbar of the Viewer Window.
The image capture panel will open. In the file browser area of the panel, select the first image you captured. The "Make Collection" button at the
bottom of the panel will be enabled. Click "Make Collection".
This will create a collection folder within your images folder, and move the first image into the collection folder. Re-name the image uniquely (in
this case "CloseButton_Inactive"), to distinguish it from the first image. Then click the "Save" button at the bottom of the panel.
18
The image collection is now visible in the Suite, both in the Images pane and Image Viewer.
Step-by-Step: Creating an Image Collection During Run Time
This section talks about how to create an image collection during run time using the Image Update Tools [9].
19
The below script and previously captured image will be used in this example:
If you are doing this intentionally to create a collection, then open a remote connection in the Viewer Window that is active, and bring up the
instance of the image that you want to add to a collection using the initial image. Run the line of code referencing the image in question.
Otherwise, run a script, and if an image is encountered that cannot be found with the current search settings and you would like to use an Image
Collection to resolve the issue, follow the steps below.
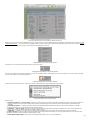
1. When the image search fails, the Update Image Panel will be brought up. (See our documentation on the Image Update Tools [9] for more
information.)
2. Click "Stop the Clock" to stop the automatic timer. Then either click "Diagnose and Fix the Problem", or simply click on the Diagnostics tab
above. This will take you into the Diagnostics tab:
3. The Image Doctor will conduct a variety of diagnostic searches to see which search types can be used to find the image, the results of which will
be displayed in the panel.
The locations of found images will be highlighted in the Viewer Window in colors corresponding to the different search types and settings that
the Image Doctor is using.
It is possible that multiple search types will find the image, or that multiple instances of the same image will be found with a single search type.
At this point there are a few options for how to create the image collection.
a. If there is only one instance found and you wish to use that search type to create your image collection, select it from the list. This will
enable the "Fix","Recapture", and "Add Rep" buttons.
20
Choose "Add Rep", which stands for "Add Representation". This is what will create the collection folder within the images folder of the
current suite and add this newly captured image to it.
Click "Try Again" to continue execution of the script using the newly created image collection.
b. Select the highlighted square in the Viewer Window that corresponds with the image you want to use to create the collection.
Click the little arrow to the right of the image capture box to open a drop down menu.
Select "Add Representation "<Image Name> and Try Again" to create the image collection and continue execution of your script using that
new collection.
The name used for the new image is determined by what is in the "New Representation" name field on the "Start" tab of the Update Image
panel as shown in the screenshot below.
You have now created an Image Collection!
Image Update Tools
Image Update Tools
Note: The Image Update Tools are available in eggPlant v14.10+. The Image Doctor is a previously existing feature that is now one of a set of tools
dedicated to image updating and management.
The Image Update Tools are available to help you manage, modify, and work with your previously existing images. They also assist in capturing new
images, creating collections, and replacing previously existing images.
21
Please see the Run Menu [96] in the eggPlant Functional Reference [34] manual for information on image search settings and selecting diagnostic
searches.
The Image Update Panel
The Update Image Panel allows you to work with the Image Doctor functionality right from within the alert panel that pops up when an image is not
found. Depending on the selected settings, this panel will also appear when multiple instances of an image are found, and multiple instances were
not anticipated by the script.
Note: This panel will not pop up if the Image Doctor settings are set to “Off” or “Auto”. This is for “Manual” only. To modify these settings, please
see the Run Menu [96].
The Start Tab
The Start Tab, visible in the Update Image Panel
The Start Tab is what shows when the panel first appears because an image was not found. The error will show in red, and the image that was not
found will be displayed in the upper portion of the panel.
Towards the bottom of this panel, there is a “New Representation” field. If you choose to add a new representation of this image to a collection, the
name in this field will be used. If you alter the naming convention used in this field, it will remember the convention for further image updates.
The Diagnostics Tab
22
The Diagnostics Tab, visible in the Update Image Panel
The Diagnostics Tab shows the Image Doctor, which conducts a variety of diagnostic searches to see what settings can be adjusted or what search
types can be used in order to find the image on the screen.
The diagnostic searches conducted are:
Standard Search: Searches for the image again using the original specifications. A result for this search means that the image has appeared
since the first failure to find the image. Most likely this means that the timing of the script at the step needs to be adjusted to allow more time
for the desired image to appear.
Dynamic Tolerance: Searches for the image while increasing the RGB color tolerance value up by a particular increment (default = 5) until a
match is found. A result for this diagnostic means that the RGB values of the image have shifted.
Alternate Types: Searches for the image while using the different SearchType filters, which are Text, Pulsing, and Text and Pulsing. If the
image is text-based, a result indicating Text suggests that the SUT is using anti-aliasing in its text. A result for Pulsing or Text and Pulsing
suggests that the background portion of the image either has a pulsing effect or perhaps another effect such as a variable gradient.
Scaling Search: Searches for the image at a different scale than the original image.
Discrepancy Search: Performs the search while allowing a certain percentage of the pixels in the image to differ.
OCR Search: Scans the original captured image for text, and then conducts a search for that text. For example, if the original image is of a
button that says "Search" on it, this search will use OCR to look for the word "Search" on the screen.
Prior Location: References the results for the current script in which the current line of code was successfully run. Highlights the location on
the screen where the image was found in that successful run of this test. The results that this search uses can be specified manually using the
"Mark As Prior Run" button in the results portion of the suite for any script. Note: This search is not used when the Image Doctor is set to
"Auto".
Original Location: Lists the coordinate pair of the location at which the image was first captured.
To use the "Fix", "Recapture", or "Add Rep" (which stands for "Add Representation") buttons, select an appropriate diagnostic search that returned
positive results. For instance, in this case, the “Alternate Types” search can be used to “Fix” the image:
The Diagnostics Tab, with a Diagnostic Search selected
In this example, selecting the Original Location or Prior Location will enable the Recapture and Add Rep options:
23
The Diagnostics Tab, with the Original Location selected
"Recapture" will capture the image again using the location where the selected search type is finding the image. "Add Rep" will add a representation
of the image to an image collection, or create a collection if one does not already exist.
The Properties Tab
The Properties Tab, visible in the Update Image Panel
This tab gives you the ability to manually adjust different image settings without permanently altering the state of the captured image in your suite.
You can change the Search Type, Tolerance, Discrepancy, Scale, and Rotation in this panel and press return to conduct a search of the current active
connection to see what settings work best. The original settings will show to the right in red. To fix the image permanently, click “Save Changes”. To
revert to the original settings, click “Revert Changes”.
The Collection Tab
The Collection Tab, when image selected is not in an existing image collection
24
If the image is not already part of a collection, the Collection Tab will give you the option to create a new collection using the currently selected
image.
The Collection Tab, when image selected is part of an existing image collection
If the image is already in a collection, all of the images in that collection will show in the lower portion of the panel. If the image doctor was working
with the first image in the collection and that is not the image you want to work with during this re-training process, select the proper image in the
lower portion of the window and click “Try Again”.
The Guide Toggle
The Guide Toggle Button, visible in the Update Image Panel
The Guide toggle button can be clicked at any time to bring up the image doctor guide. This guide gives context specific help about the image you
are working with. This information includes:
Image Not Found: This gives more specifics about the error message shown on the Start tab.
Timing: This section gives information about the current timing settings used when this image search failed and whether or not the problem
appears to be a timing issue.
Diagnostics: This gives more specifics about the information shown in the Diagnostics tab.
Property Exploration: This section gives more specifics about the information shown in the Properties Tab.
Collection: This section lets you know whether the image searched for is part of a collection or not.
Conclusion: This section provides some suggestions for next steps.
Working with Images in the Viewer Window
25
The Viewer Window during an Image Doctor Diagnostic Search
When an image is not found, or multiple instances of an image are found, and the Update Image panel appears, the Image Doctor conducts a variety
of diagnostic searches [97], and the results are highlighted in the remote screen window. Boxes of corresponding colors are shown in every location on
the screen of the SUT where an image is found with one of the diagnostic searches.
Image Matches shown in the Viewer Window
Hovering over one of these colored squares will turn the square white.
A Highlighted Image Match in the Viewer Window
If clicked, the capture area will snap to that box, and you can use that to add a representation for an image collection, or fix the current image that
you are working with in the Update Image panel.
A Selected Image Match in the Viewer Window
Clicking the arrow to the right of the capture area in this instance will bring up the following drop down menu:
The Context Menu in the Viewer Window
Options are to:
Add Representation … and Try Again: Captures an image using the selected image-capture bounds and adds it to the current collection or
creates a collection using the current image and the newly captured image. Then, it tries the search again with the new/updated image
collection.
Add Representation …: Captures an image using the selected image-capture bounds and adds it to the current collection or creates a
collection using the current image and the newly captured image.
Recapture … and Try Again: Captures an image using the selected image-capture bounds and replaces the current image with this new
image. Then, it tries the search again with the newly captured image.
Recapture …: Captures an image using the selected image-capture bounds and replaces the current image with this new image.
Capture Image: Captures an image using the selected image-capture bounds and brings up an image capture panel so you can name the
image and adjust any other settings as desired before saving.
Show Update Image Panel: This brings up the Update Image panel if it is not currently displayed.
26
Tip: The arrow to the right of the capture area that reveals this drop-down menu is disabled when you hold down the Cmd or Ctrl key to move the
hot spot’s location relative to the capture area. This is to enable more precise placement of the hot spot, especially when using captured images to
create search rectangles [97], as might be done with an OCR search.
Finding Text
Finding Text
There are multiple ways of finding text on the SUT. This section discusses all of the different ways text can be found:
Image Searches [98]
Optical Character Recognition (OCR) [99]
Text-Image Generators (TIGs) [100]
Image Searches
In many cases, you can find text on the SUT the same way you would find any other item on the SUT– by capturing an image and searching for it in
your script. Captured images are easy to use, and very reliable.
For images that contain text, there is a search setting called "Text", which accounts for anti-aliased text that may appear in the image. This allows
for more successful image matches of images that contain text.
Example:
Click "HelpMenu" //Finds the image of the Help menu; then clicks it.
For more information on image searches and the Text search type, please see
Optical Character Recognition (OCR)
When you can't capture an image of your text because the content is dynamic (the text content can't be predicted in advance, or the possible values
are too numerous too make image capture practical), the primary solution is to use the Optical Character Recognition functionality of eggPlant
Functional.
The OCR uses an interpretive algorithm to decipher pixel patterns on the screen, and determine the textual content by comparing what it finds with
a dictionary library.
The OCR can be used to either read or find text. To read text off the screen of the SUT using the OCR, utilize a ReadText() command. All of the
possible parameters for reading text with the OCR can be found under the documentation for the ReadText() function [101]. To find text with the OCR,
pair a Text: parameter with any eggPlant Functional command.
Example:
Click (Text:"Help") //Finds the word "Help" with any appearance; then clicks it.
For more information on how to use the OCR, please see Working with Optical Character Recognition (OCR) [11].
Text-Image Generators (TIGs)
Another approach to use when you can't capture an image of your text you can use a Text Image Generator to dynamically generate an image of the
text content during the script run.
The Text-Image Generator (TIG) takes a text property list, which describes the content and appearance of text on the SUT.
Example:
Click (Text:"Help", textPlatform:"Win7", textStyle:"Menu") //Generates an image of the word Help in the Menu text style, finds the generated image; then clicks it.
Working With Optical Character Recognition (OCR)
Working with Optical Character Recognition (OCR)
This article refers to the Generic OCR text platform, which is the default text search engine specified in the eggPlant Functional Text Preferences [102].
Because eggPlant Functional is designed to work with images, it is best to use images as a primary search tool if at all possible. They are the fastest
and most reliable type of search that eggPlant Functional conducts. However, OCR can be a very useful tool in situations where images cannot be
used. Such a situation is most likely to occur when searching for dynamic text.
Using the OCR
You can use the OCR almost any time you need to search for text on the SUT. This functionality is especially well-suited to the following situations:
You do not know the text you are looking for ahead of time, but the script will have access to that information by the time the search is
conducted.
The font, size, or color of the text is varying.
You need to read a text value off of the SUT and bring that information back into your script for further testing or to record in an external data
file.
How the OCR Engine Works
When you search for text through a generic text property list, the OCR engine finds each instance of text on the SUT, and reads the text values to
find the string you are looking for. You don't have to describe the appearance of your text, because text formatting is not taken into account.
27
Parameterizing OCR searches
In order to improve the reliability of the OCR in a given situation, here are a few parameters that can be added to the search:
SearchRectangle [103]
Contrast and ContrastColor [104]
ValidCharacters [105]
IgnoreSpaces [106]
Language [107]
SearchRectangle
It is almost always helpful to add a search rectangle. When the OCR searches the entire screen, it is not only slower but also less accurate because it
is likely to come up with extra possible matches, or no matches at all.
A search rectangle can be specified with exact coordinates, but it is more common in eggPlant Functional to use images to define the rectangle, in
case the location of the text is not always the same. This might happen, for instance, if the window it is in doesn’t appear in the same location on the
screen every time the test is run.
When using images to define the boundaries of the search rectangle, keep in mind that the points used to set the rectangle are based on the hot
spot, which can be moved outside of the image.
Example
A test might navigate to the Google Finance page, search for a specific company, and then read the stock price. To make sure that the OCR reads
the value of the price reliably, and nothing else, a search rectangle can be defined using images. The code used could be as simple as this:
Log ReadText ("TLImage","BRImage") -- Of course this can be made more complex, depending on the desired outcome.
Two images need to be captured for the above code to work; In this example, "TLImage" and "BRImage", to define the top left and bottom right
corners of the search rectangle. To capture these images, choose one or more elements of the screen that will be stable in relation to the text the
OCR will be reading. This example uses a single element of the screen; The "Company" label.
"TLImage" is an image of the "Company" label, with the hot-spot moved to the upper left corner of the area where the stock price will be displayed.
Without even moving the capture area, "BRImage" is captured with the hot-spot moved to the bottom right corner of the area where the stock price
will be displayed.
Once the images are captured and the SenseTalk code written, the above example will be able to successfully read the stock price for any company
in Google Finance.
"TLImage" and "BRImage" are used to set the search rectangle for a successful ReadText() search using the OCR .
28
If it is not possible to use images to set the search rectangle, coordinates can also be used. The Cursor Location toolbar icon is helpful in this
endeavor because it shows the current location of the mouse on the SUT. See Contrast [104] below for instructions on adding Cursor Location to the
toolbar.
Contrast
If the background color of the sought text is known, the Contrast parameter can be used to set the contrast.
This parameter causes eggPlant Functional to see in black and white only. Whatever color is being used as the ContrastColor (the background color)
will be turned white, and everything else will be turned black. For black text on a white background, the code would look like this:
Click (Text: “hello”, Contrast:On, ContrastColor: White, ValidCharacters: “hello”, Searchrectangle: (“UpperLeftImage”, “LowerRightImage”))
In this situation, every pixel close to white (within the tolerance range of 45 on either side) will be turned white, and everything else will be read as
black. This can help the OCR to more clearly read the text.
What it actually sees is this image, free of any anti-aliasing:
What OCR Sees with the Contrast On
When looking for text on a grey background (or another color of medium value), it can get a little more complex. It is good to set the
ContrastTolerance a little lower (down to 20 or so), which narrows the number of pixels that the OCR might try to turn white (notice in the image
above, a pixel between the “h” and the “e” in “hello” turned black, joining the two letters together. In this instance, the OCR was still able to read the
letters, but in some other circumstances, this could make the letters even more difficult for the OCR to process. This is why it is always a good idea
to try things out and see how they work before running a full script.
Click (Text:"hello", Contrast:On, ContrastColor: White, ContrastTolerance: 20)
Determining the Background Color
If the background/contrast color is not known, there are two ways to find the RGB values of the background color in a specific location on any
platform.
The first method is to use the color picker. This can be found by clicking on the Find Text icon in the toolbar of the remote screen window, and enable
contrast. Then enable color and click on the color box to the right to choose a specific color. When this window comes up, click on the magnifying
glass, and sample some of the background color next to the text (be sure not to capture the anti-aliasing). Note: On Mac OS X 10.10 Yosemite, the
magnifying glass icon has been changed to an eyedropper.
Finding the Contrast Color on Mac, Using the Magnifying Glass
The second method is to use the ColorAtLocation() function. To do this, bring up the remote screen window in Live Mode. If the Cursor Location
toolbar icon is not already on the toolbar, it can be added by clicking the arrows to the right of the toolbar, selecting “Customize” and then selecting
the Cursor Location Icon. Move the mouse over the background of which the RGB color value is desired. Using the coordinates of this mouse location
(shown in the field of the Cursor Location toolbar icon), run this line of code in the ad hoc do box (AHDB) found at the bottom of the run window, or in
your script:
put colorAtLocation(x,y) — where (x,y) refers to the coordinates found in the remote screen window
Running this line of code will return the RGB value for the color at the location specified.
29
ValidCharacters
Another parameter that is often helpful is ValidCharacters. ValidCharacters tells the OCR which characters to take into account, and it will ignore all
other characters. For example, this can often be used to prevent the OCR from mis-reading “O” as “0″ or vice versa.
This can be done manually for optimal control of your script, or by using validCharacters:”*” to automatically set the validCharacters to the text being
searched for.
To continue with the example above searching for “Brown”, the following code might be used to set the validCharacters manually:
Click (Text: ”Brown”, ValidCharacters: ”Brown”, SearchRectangle: (“UpperLeftImage”,”LowerRightImage”))
It is also possible to use ValidCharacters with a variable like in this example, where the desired characters are first stored into the variable MyText:
Put “Brown” into MyText
Click (Text: MyText, ValidCharacters: MyText)
To set the validCharacters to the text being searched for, the following code would be used:
Click (Text:”Brown”, ValidCharacters:”*”, SearchRectangle:(“UpperLeftImage”,”LowerRightImage”))
IgnoreSpaces
As a parameter in a text search, IgnoreSpaces can be used to do exactly that – ignore any spaces within the search. This can be helpful because
spacing between characters is not consistent and sometimes the OCR will see spaces where there are not any, or ignore spaces where they exist.
Setting IgnoreSpaces to ON will cause the OCR to match “flowerpot” with a search for “flower pot” and vice versa. When this parameter is used, the
OCR will strip both the string that it is searching for and the string that it finds of spaces to come up with a match.
Click (Text:”flower pot”, validCharacters:”*”, ignoreSpaces:ON, searchRectangle:(“UpperLeftImage”,”LowerRightImage”))
Language
As a parameter in a text search, Language can be used to search for text of the specified language or languages. For a list of supported languages,
see OCR Language Support. [108]
You can also specify more than one language, for example, for cases where you have characters of different languages in the same sentence.
"ReadText((475,179,608,212),Language:"Japanese,English") to read
" 4 6
")
Tips for Working with the OCR
Tip 1
When the OCR isn’t finding some text that you think it should, try running the readText() function to see what it is seeing. Once you know what it is
seeing, you will be better equipped to fix the problem. For instance, if you discover that the readText() function is returning “hello” when the text you
want is a password that actually reads “hell0″, specifying validCharacters:”hell0″ might improve your results.
Tip 2
The Ad Hoc Do Box (AHDB) can be used when trying to verify your script and make sure it is doing what it is supposed to be doing. Other helpful
information can also be found by using the AHDB. A good example of this is prompting it to return a list of the colors that eggPlant Functional knows,
along with their RGB values. To get this list, go to the AHDB and type put the namedColors .
What OCR Sees with the Contrast On
Improving the Speed of OCR Searches
The flexibility of OCR text searches comes with a trade-off: OCR text searches are not as fast as image searches. To keep your scripts running as
efficiently as possible, follow these best practices:
1. Use the search rectangle. If you can narrow down the general location of the text you are looking for (e.g. in the taskbar, or within a particular
window), limit your search to that location. (For more information, see "Additional text properties" [109], above; or "Searching part of the screen"
[110].)
2. Minimize "clutter" on the SUT. It never hurts to keep a neat SUT (i.e.close unnecessary windows, use a simple desktop background), and when
your script includes OCR text searches, a neat desktop can save you valuable seconds or even minutes of execution time.
Taxonomy:
Using eggPlant [111]
Working with Text Image Generators (TIGs)
Working with Text-Image Generators (TIGs)
Platforms that use SUT-specific Text-Image Generators (TIGs) provide a very targeted way to search for text; they use the information in your text
30
property list to create an image of your text as rendered by your SUT. Then eggPlant Functional searches for that image as if it were a regular
captured image with the search type set to Text.
TIG images can be as reliable as captured images, but they require that you know specific information about the text you are looking for: font name,
size, text color, and background color. TestPlant provides TIGs for several widely-used operating systems. These can be found on the downloads
page [112] of our website. If there is no available TIG for your SUT, you can create a scripted TIG, (see Scripted TIGs [113], below), or try using the Optical
Character Recognition (OCR) [11].
When to Use a TIG
As a general rule, it is easier to use the Generic OCR text platform than to set up a platform-specific text platform using TIG; however, there are
several occasions in which the latter might be preferred:
You
The
The
You
know the exact font, size, and color of the text you are looking for, and don't expect it to vary.
formatting of your text is part of what you are testing.
Generic OCR text platform does not read your current text consistently.
need faster text searches than you can perform with the Generic OCR text platform.
Text-Images in a Script
When you insert a text-image into a script, you can see that it is actually a property list that contains the text and formatting information you
provided.
Example: Text-Image Property List
Click (Text:"Help", TextSize:"12", TextFont:"Chicago") //Searches for the word "Help" in Chicago font, 12 pt., and clicks it.
Changing the Content of a Text-Image
When you insert a Text Image into your script, you can always edit its content (or any text attributes) in the Script Editor. In fact, when you create
similar Text Images later, it is often faster to copy, paste, and edit the original Text Image than it would be to start again from the Text Image panel.
In the example shown below, a Help menu Text Image is edited to represent other menus in the same application. The new Text property can be
another string (in quotation marks), or a variable (without quotation marks).
Example: Changing the content of a Text-Image
Click (Text:"Help", TextSize:"12", TextFont:"Arial") //Searches for the string "Help" in Chicago font, 12 pt., and clicks it.
Click (Text: MenuName, TextSize:"12", TextFont:"Arial") //Searches for the word indicated by the MenuName variable, and clicks it.
Reusable Text Styles
The first time you are creating a particular kind of text-image, you have to be able to identify the font, size, and color of the text you want to match. If
you save this information as a text style, you can save yourself the trouble of having to find it again next time.
Example: Condensing text properties into a text style
(Text:"Save", TextFont: "Helvetica", TextSize: "10", TextColor: "blue", Bold: "yes") // Describes the properties of a button's text
(Text:"Save", TextStyle: "Button")
Text styles also make your scripts easier to maintain. If the appearance of your text changes, you can update all of the affected Text Images at once
by editing the text style; otherwise, you would have to go through your scripts and edit each Text Image individually.
Step-by-Step: Creating a Text Style
1. On the eggPlant Functional Preferences > Text [102] pane, choose the platform for which you are creating a text style from the Platform dropdown list at the top.
2. Click the Add button immediately below the Platform drop-down list, and name your text style.
3. Use the menus and checkboxes to select the properties of your text style.
Tip: If you are creating a new text style that is based on a style you already have, view the base style before you click the Add button. The text
properties have the same initial values as the last style you viewed.
31