1
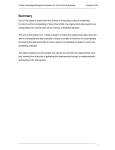
RayBio® Mouse Protein G Series Array Protocol RayBio® Mouse Protein Array G Series Glass–chip-based protein arrays RayBio® Mouse Protein Array Target List Please visit our website http://www.raybiotech.com/ to download the list of targets printed on glass slides. RayBio® Mouse Protein Array Map Template User Manual Please visit our website http://www.raybiotech.com/ to download the map template. (Revised December 04, 2015) Additional Custom Protein Array Services We Provide For detecting protein–protein interactions, antibody specificity, auto-antibodies, protein modifications, and small molecule– protein interactions RayBio® Mouse Protein Array G Series (Cat # PAM-G2) RayBio Custom Mouse Protein Array G Series (Cat # PAM-CUST-G) RayBio® Mouse Protein Array G Series Service (Cat # PAM-SERV-G) ® We also offer the completely customized protein arrays with many options that can be requested by a customer. We can help with experimental design in selecting the most appropriate array for your needs, designing the experiment to detect your sample of need, or just help with technical questions. For more information, please contact us. 1. Experiment Design: RayBiotech’s protein array experts can assist you in your experiment design based on your project purpose. 2. Customized Arrays • Select your targets from our RayBio® Mouse Protein Array lists. RayBiotech, Inc. We Provide You with Excellent Protein Array Systems and Service Tel: 1-888-494-8555, 770-729-2992 Fax: 1-770-206-2393 Website: www.raybiotech.com E-mail: [email protected] • Send your targets to us, such as proteins, synthesized polypeptides, DNA, lipids, and any other molecules. • If your targets are not available on the market, we can produce recombinant proteins using our rapid bacterial gene expression system or mammalian cell gene expression system. For small polypeptides, we also provide peptide synthesis service. 3.Full Testing Services: You can send your samples to us, and our expert staff will run the experiments and provide you with the fully analyzed results. 2 RayBio® Mouse Protein G Series Array Protocol RayBio® Mouse Protein G Series Array Protocol I. Introduction RayBio® Protein Arrays are a series of products developed by RayBiotech, Inc., The Protein Array Pioneer Company. Native or recombinant proteins are spotted onto the surface of a solid glass slide support. The kits can be applied in screening protein-protein interactions, monitoring the presence of auto-antibodies, determining antibody specificity, identifying protein modifications, and/or detecting small molecule-protein interactions. Protocol for RayBio Mouse Protein Array G Series ® TABLE OF CONTENTS I. Introduction II. Materials Provided ……..……… ……… ……… ……… ……… ……… ……… ……… ……… ……… ……… ……… ……… ……… ……… ……… ……… ……… ………… ……… ……… ……… ……… ……… ……… ……… ……… ……… ……… ……… ……… ……… ……… ……… ……… ……… ……… ……… ……… ……… ……… ……… ……… ……… ……… ……… ……… ……… ……… ……… ……… ……… ……… ……… ……… ……… ……… ……… … ………… ……… ….…… ……… ……… .…….. … … ……… ……… ……… ……… ……… ……… ……… … ………… ……… ……… ……… ……… ……… ……… ……… ……… ……… ……… ……… ……… ……… ……… ……… ……… ……… ……… ……… ……… ……… ……… ……… ……… ……… ……… ……… ……… ……… ……… ……… ……… ……… ……… ……… ……… ……… ……… ……… … ………… ……… ……… ……… ……… ……… …..… … Additional Materials Required ……… ……. …….….. ……… ……… ……… ……… …… ……… ……… ……… ……… ……… ……… ……… ……… ……… ……… ……… ……… ……… ……… ……… ……… ……… ……… ……… ……… ……… ……… ……… ……… ……… ………… ……… ……… ……… ……… ……… ……… ………. 3 7 Fully customizable protein arrays are also available from RayBiotech, Inc. You can select your own proteins of interest from our available list, or provide your own proteins, and RayBiotech, Inc., then produces your custom protein arrays for you. 7 Applications 6 III. Overview and General Considerations A. Preparation of Samples B. Handling Glass Chips ……… ……… ……… … ………… ……… ……… ……… ……… ……… ……… ……… ……… ……… ……… ……… ……… ……… ……… ……… ……… ……… ……… ……… ……… ……… ……… ……… ……… ……… ……… ……… ……… ……… ……… ……… ……… ……… ……… ……… ……… ……… ……… ……… … ………… ……… ……… ……… ……. ………… ……… ……… ……… ……… … ………… ……… ……… ……… ……… ……… ……… ……… ……… ……… ……… ……… ……… ……… ……… ……… ……… ……… ……… ……… ……… ……… ……… ……… ……… ……… ……… ……… ……… ……… ……… ……… ……… ……… ……… ……… ……… ……… ……… ……… … ………… ……… ……… ……… …... C. Incubation …… ……… ……… ……… ……… ……… ……… ……… ……… ……… ……… ……… ……… ……… ……… ……… ……… ……… ……… ……… ……… ……… ……… ……… ………… ……… ……… ……… ……… ……… ……… ……… ……… ……… ……… ……… ……… ……… ……… ……… ……… ……… ……… ……… ……… ……… ……… ……… ……… ……… ……… ……… ……… ……… ……… ……… ……… ……… ……… ……… ……… ……… ……… ……… … ………… ……… ……… ……… …... D. Layout of Mouse Glass Chips ……………… ……… ……… ……… ……… ……… ……… ……… ……… ……… ……… ……… ……… ……… ……… ……… ……… ……… ……… ……… ……… ……… ……… ……… ……… ……… ……… ……… ……… ……… … ………… ……… ……… ……… ……… ………. E. Incubation Chamber Assembly … ……… ……… ……… ……… ……… ……… ……… ……… ……… ……… ……… ……… ……… ……… ……… ……… ……… ……… ……… ……… ……… ……… ……… ……… ……… ……… ……… ……… ……… ……… … ………… ……… ……… ……… ……… …... 8 Since RayBio® protein arrays have multiple applications, which require different procedures, only some examples of the potential uses of our protein array are given here. 8 9 9 IV. Protocol A. Detection of Protein–Protein Interactions ………… ……… ……… ……… ……… ……… ……… ……… ……… ……… ……… ……… ……… ……… …… ………… ……… ……… ……… ………. . B. Characterization of Antibody Specificity 15 C. Detection of Auto-antibodies 20 … …… ……… ……… ……… ……… ……… ……… ……… ……… ……… ……… ……… ……… ……… ……… ……… … ………… ……… ……… ……… ….. ………… ……… ……… ……… ……… ……… ……… ……… ……… ……… ……… ……… ……… ……… ……… ……… ……… ……… ……… ……… ……… ……… ……… ……… ……… ……… ……… ……… ……… ……… ……… ……… ……… ……… ………… ……… ……… ……… ……..... D. Detection of Small Molecule–protein Interaction 24 E. Detection of Protein Modifications 25 … ……… ……… ………… ……… ……… ……… ……… ……. V. 10 Data Extraction and Analysis ………… ……… ……… ……… ……… ……… ……… …… ……… ……… ……… ……… ……… ……… ……… ……… ……… ……… ……… ……… ……… ……… ……… ……… ………… ……… ……… ……… ……… ………. . ………………… ……… ……… ……… ……… ……… ……… ……… ……… ……… ……… ……… ……… ……… ……… ……… ……… ……… ……… ……… ……… ……… …… ……… ……… ……… ……… ……… ………… ……… ……… ……… ……… ……… ……… ……… ……… ……. 26 VI. Troubleshooting Guide 28 VII. Reference List 29 ………………… ……… ……… ……… ……… ……… ……… ……… ……… ……… ……… ……… ……… ……… ……… ……… ……… ……… ……… ……… ……… ……… ……… ……… ……… ……… ……… ……… ……… ……… ……… ……… ……… ……… ……… ……… ……… ……… ……… ……… … ………… ……… ……… ……… ……… ……… ………. ……… ……… ……… ……… ……… ……… ……… ……… ……… ……… ……… ……… ……… ……… ……… ……… ………… ……… ……… ……… ……… ……… ……… ……… ……… ……… ……… ……… ……… ……… ……… ……… ……… ……… ……… ……… ……… ……… ……… ……… ……… ……… ……… ……… ……… ……… ……… ……… ……… ……… ……… ……… ……… ……… ……… ……… … ………… ……… ……… ……… ……… ……… ………. . 1. Detection of protein-protein interactions. The kit can be used to screen novel protein-protein interactions, validate the previously known protein-protein interactions, and investigate the molecule interaction conditions. 2. Characterization of antibodies. The kit can be used to test the specificity of an antibody for research and therapeutic antibody development and find out the potential crossreaction to other proteins. 3. Target identification. The kit can be used to screen the small molecule-protein interaction for target identification, drug discovery and toxicity study. 4. Detection of auto-antibodies. The kit can be used to detect and characterize auto-antibodies from body fluids. RayBio® is the trademark of RayBiotech, Inc. 3 4 RayBio® Mouse Protein G Series Array Protocol RayBio® Mouse Protein G Series Array Protocol 5. Detection of protein modifications. The kit can also be used to determine protein modifications such as phosphorylation. II. Materials Provided 6. Detection of protein-DNA interaction. In some cases, the kit can be used to detect DNA binding proteins. Storage: Upon receipt, all components in the kit should be stored at -20 ºC to -80 ºC until just before the experiment. If stored at -20 ºC to -80 ºC, the kit will retain complete activity for up to 6 months. Please use within 6 months of purchase. Features of RayBio® Protein Arrays 1. High-throughput approach allows simultaneous detection of multiple protein functions, including protein-protein interactions, protein modifications, antibody specificity, presence of auto-antibodies, and small molecule-protein interactions. 2. Affordable, quick and simple to use. Low sample consumption: as little as 25 µL of original sample required per array. 3. Fully customizable: create a custom array from our list of targets. 4. High sensitivity: both biotin-streptavidin pair fluorescent detection enable the most sensitive assay. and Once thawed, protein array glass slide (Item A) and Blocking Buffer (Item F) should be kept at -20 ºC and all other components (Items B-E, G, & H) should be stored at 4 ºC. Use within 3 months after reagents have been thawed. Kit Components: Item 6. Large dynamic range of detection (4 orders of magnitude) with highly accurate data that can be normalized between arrays. Cat #. PAM-G2-2 Cat #. PAM-G2-4 Cat #. PAM-G2-8 A RayBio® Human Protein Array Glass Slides 1 slide 2 slides 4 slides B 1,000 X Biotin-conjugated AntiMouse IgG, 1.5 μl/vial 1 vial 2 vials 3 vials C 1,000 X Biotin-conjugated AntiRabbit IgG, 1.5 μl/vial 1 vial 2 vials 3 vials 1 vial 2 vials 3 vials 1,000 X Biotin-conjugated AntiHuman IgG, 1.5 μl/vial 1,500 x HiLyte 555 Streptavidin Fluor, 1 μl/vial Blocking Buffer 8 ml/bottle 20 X Wash Buffer I 30 ml/bottle 20 X Wash Buffer II 30 ml/bottle 1 vial 2 vials 3 vials 1 bottle 1 bottle 2 bottles 1 bottle 1 bottle 2 bottles 1 bottle 1 bottle 2 bottles I Adhesive Plastic Strips 1 strip 2 strips 4 strips J 30 ml Centrifuge Tube 1 tube 1 tube 1 tube K User Manual Please download online (www.raybiotech.com) L Array Target List Please download online (www.raybiotech.com) M Array Map Template Please download online (www.raybiotech.com) D E 5. High efficiency and accuracy: high throughput screening of multiple targets in a single assay. Each slide can test up to 2 samples simultaneously, and contains internal positives to normalize between slides, thereby minimizing the variation from assay to assay. Additionally, the assay duration is less than 6 hours. Description F G H Notes: Items B-E: dilute with Blocking Buffer (Item F) prior to use. Items G & H: dilute with ddH2O prior to use. 5 6 RayBio® Mouse Protein G Series Array Protocol RayBio® Mouse Protein G Series Array Protocol B. Handling Glass Chips Additional Materials Required: Depending on your specific purpose, different additional materials may be needed, such as: • • • • • • Small plastic boxes or containers Pipettors, pipette tips and other common lab consumables Orbital shaker or oscillating rocker Aluminum foil ddH2O Laser scanner for fluorescence detection III. Overview and General Considerations • The microarray slides are delicate. Do not touch the array surface with pipette tips, forceps or your fingers. Hold the slides by the edges only. • Handle the slides with powder-free gloves and in a clean environment. • Remove reagents/sample by gently applying suction with a pipette to corners of each chamber (see picture, right). Do not touch the printed area of the array, only the sides. C. Incubation A. Preparation of Samples Depending on your experimental purpose, different sample types may be used. To detect protein-protein interaction, you may use your protein of interest as a probe either by labeling your protein (with biotin or another reporter) or by using an antibody specific for your protein. To profile auto-antibodies, you need to prepare your serum or plasma. Optimal sample dilutions and amounts will need to be determined by each experimenter empirically. Blocking Buffer (Item F) can be used to dilute samples if necessary, but PBS or other buffers may yield better results depending on the protein of interest. Normalize samples by loading equal amounts or equal dilutions. Optimization of experimental conditions: If you experience high background, you may need to further dilute your sample and/or to wash slides in Wash Buffer I overnight at 4 °C. If the signal is too weak, you may need to increase the amount of your sample and/or increase incubation times of one or more steps. 7 • Completely cover array area with sample or buffer during incubation steps. • Cover the incubation chamber with adhesive strips (Item I) during incubation or plastic sheet protector to avoid drying, particularly when incubation lasts more than 2 hours or less than 400 µL of sample or reagent is used. • During incubation and wash steps avoid foaming and remove any bubbles from the sub-array surface. • Perform all incubation and wash steps under gentle rotation or rocking motion (~0.5 to 1 cycle/second). • Avoid cross-contamination of samples to neighboring wells. To remove Wash Buffers and other reagents from chamber wells, you may invert the Glass Slide Assembly to decant and aspirate the remaining liquid (see picture above). • Several incubation steps such as blocking, sample incubation, biotin-conjugated antibody incubation or fluorescenceconjugated streptavidin incubation may be done at 4 ºC overnight. Before overnight incubations cover the incubation chamber tightly to prevent evaporation. • Protect glass slides from direct, strong light and temperatures above room temperature. 8 RayBio® Mouse Protein G Series Array Protocol D. Layout of Mouse Glass Arrays RayBio® Mouse Protein G Series Array Protocol IV. Protocols • Each slide contains identical sub-arrays (see picture, right). • Don’t touch the printed surface of the glass slide, which is on the same side as the barcode. A. Detection of Protein-Protein Interactions Sub-array Several strategies can be used for detection of protein-protein interaction as shown in Figure 1. Sub-array E. Incubation Chamber Assembly After finishing your experiment and disassembling the incubation chamber, if you need to repeat any of the incubation or wash steps, you must first re-assemble the glass slide into the incubation chamber by following the steps as shown in the figures below. To avoid breaking the printed glass slide, it is recommended that you first practice assembling the device with a standard glass histology or microscope slide. • Apply slide to incubation chamber, barcode facing upward (Image A). • Gently snap one edge of a snap-on side (Image B). • Gently press other of side against lab bench and push in lengthwise direction (Image C). 1. Blocking and Sample Incubation • Repeat with the other side (Image D) A C Figure 1. Three common strategies for detection of protein-protein interactions using RayBio Protein Array kits. 1.1 Take the package containing the Assembled Glass Slide (Item A) from the freezer. Place unopened package on the bench top for approx. 15-30 minutes, and allow the Assembled Glass Slide to equilibrate to room temperature. B D 9 1.2 Open the package, and take the Assembled Glass Slide out of the sleeve (Do not disassemble the Glass Slide from the chamber assembly). Place glass slide assembly in laminar flow hood or similar clean environment for 1-2 hours at room temperature. 10 RayBio® Mouse Protein G Series Array Protocol Note: Protect the slide from dust or others contaminants. 1.3 Block sub-arrays by adding 400 µL of Blocking Buffer (Item F) into each well of Assembled Glass Slide (Item A) and incubating at room temperature for 30 minutes. Ensure there are no bubbles on the array surfaces. Note: Only add reagents to wells printed with proteins. Do not forcefully pipette any buffers/samples/etc onto the arrays. Slowly pipette these reagents down the sides of the well. 1.4 Decant the Blocking Buffer from each well. Add 400 µL protein probe to each well. Remove any bubbles on array surfaces. Incubate arrays with gentle rocking or shaking at room temperature for 1 to 2 hours or at 4 °C overnight, or other condition as appropriate. Note: We recommend using 1 to 100 µg of total probe protein in your experiment. If background is high, use less amount of probe protein. If the signals are weak, use more protein. Different protein-protein interactions may need different binding buffers. Note: Blocking Buffer (Item F) can be used to dilute samples if necessary, but PBS or other buffers may yield better results depending on the protein of interest. 1.5 Dilute 20× Wash Buffer I (Item G) to 1× with ddH2O. Decant the samples from each well, and wash 5 times with 800 µL of 1× Wash Buffer I at room temperature with gentle shaking, 5 minutes per wash. Completely remove 1× Wash Buffer I in each wash step as recommended in section “Handling Glass Slide Chips”, Part B. RayBio® Mouse Protein G Series Array Protocol 1.6 Dilute 20× Wash Buffer II (Item H) to 1× with ddH2O. Wash 2 times with 800 µL of 1× Wash Buffer II at room temperature with gentle shaking, 5 minutes per wash. Completely remove 1× Wash Buffer II in each wash step. 2. Detection of associated protein Depending on the different strategies in the experimental design, different protocols can be used. 2.1 Briefly spin the vial containing 1,500× Fluorescenceconjugated Streptavidin (Item E) prior to use, add 1.5 mL of Blocking Buffer (Item F) and mix well. Spin the vial briefly and add 400 µL of diluted Fluorescence-conjugated Streptavidin to each sub-array. 2.2 Cover the incubation chamber with adhesive strips (Item I). Cover the plate with aluminum foil to avoid exposure to light or incubate in dark room. 2.3 Incubate at room temperature for 1 to 2 hours with gentle rocking or shaking. Note: Incubation may be done at 4 ºC overnight. 2.4 Wash with 1× Wash Buffer I as described in Step 1.5 and 1× Wash Buffer II as described in Step 1.6, above. Continue on Step 3.1. Note: Avoid solution flowing into neighboring wells. 11 If a biotin-labeled protein sample is used as the probe (Step 1.4 above; Figure 1, bottom panel), follow the procedures described below. If a non-labeled protein sample is used as the probe (Step 1.4 above; Figure 1, top and center panels), follow the 12 RayBio® Mouse Protein G Series Array Protocol RayBio® Mouse Protein G Series Array Protocol procedures described below. However, the following assay requires an antibody against the probe protein or its fused tag(s). User will need to purchase or create these antibodies, as they are not provided in the kit. down. Add 400 µL of diluted Fluorescence-conjugated Streptavidin to each sub-array. 2.1 Add 400 µL of appropriately diluted antibody against the probe protein or its fused tag(s) into each well. Incubate at room temperature for 2 hours. Note: Incubation may be done at 4 ºC for overnight. Usually 1 ng/mL to 1,000 ng/mL of antibody will be used. You will need to optimize the dilution factor for your particular antibody in this experiment. Blocking Buffer (Item F) can be used for dilution. 2.7 Cover the incubation chamber with adhesive strips (Item I). Cover the plate with aluminum foil to avoid exposure to light or incubate in dark room. 2.8 Incubate at room temperature for 1 hour with gentle rocking or shaking. 2.9 Wash with 1× Wash Buffer I as described in Step 1.5 and 1× Wash Buffer II as described in Step 1.6, above. 3. Fluorescence Detection 2.2 Wash with 1× Wash Buffer I as described in Step 1.5 above and 1× Wash Buffer II as described in Step 1.6, above. 2.3 Add 400 µL of 1,000-fold diluted Biotin-labeled antibody to each well. The choice of biotinylated secondary antibody will depend on the antibody chosen for protein recognition. For example, choose Biotin-labeled Anti-Mouse IgG (Item B) if the probe antibody derives from mouse; choose Biotinlabeled Anti-Rabbit IgG (Item C) if the probe antibody derives from rabbit, etc. To prepare 1,000-fold diluted Biotin-labeled Anti-IgG, spin down the vial containing Biotin-labeled Anti-IgG briefly, add 1.5 mL of Blocking Buffer (Item F) and mix well. 3.1 Decant excess 1× Wash Buffer II from wells. 3.2 Carefully disassemble the glass slide from the incubation frame and chamber by pushing clips outward from the sides, as shown below. Carefully remove the glass slide from the gasket. Note: Be careful not to touch the printed surface of the glass slide, which is on the same side as the barcode. 2.4 Incubate at room temperature for 1 hour. 2.5 Wash with 1× Wash Buffer I as described in Step 1.5 and 1× Wash Buffer II as described in Step 1.6, above. 2.6 Briefly spin down the vial containing 1,500× Fluorescenceconjugated Streptavidin (Item E) prior to use, and add 1.5 mL of Blocking Buffer (Item F) and mix well. Briefly spin vial 13 3.3 Place the whole slide in a 30-mL Centrifuge Tube (Item J). Add enough 1× Wash Buffer I (about 30 mL) to cover the whole slide and gently shake or rock at room temperature for 10 minutes. Decant 1× Wash Buffer I. Repeat washing step with 1× Wash Buffer I once. 14 RayBio® Mouse Protein G Series Array Protocol RayBio® Mouse Protein G Series Array Protocol 3.4 Wash with 1× Wash Buffer II (about 30 mL) with gentle shaking at room temperature for 10 minutes. 3.5 Rinse the glass slide with 30 mL of ddH2O for 5 minutes. Remove glass slide and decant water from 30-mL Centrifuge Tube. 3.6 Remove excess liquid from 30-mL Centrifuge Tube, and place glass slide back into the tube. Centrifuge at 1,000 rpm for 3 minutes to remove water droplets on glass slide and then let slide air-dry completely at least 20 minutes (protect from light). Note: Make sure the slides are absolutely dry before starting the scanning procedure or storage. 3.7 Capture the signals using laser scanner (such as Axon GenePix) using the cy3 (green) channel. Note: Although we recommend scanning slides right after experiment, you also can store the slide at room temperature or -20 0C in dark place for several days. Cy3 fluors dye used in this kit is very stable at room temperature and resistant to photo bleaching on completed glass slides. If you do not have a laser scanner, please send your slides to us and we can scan them for you for free. Figure 2. Determination of interest antibody specificity using RayBio Protein Array kits The following protocol is for use with the biotin-conjugated anti-human, mouse or rabbit IgG secondary antibody provided in this kit (Items B, C, and D). 1.Blocking and Sample Incubation B. Characterization of Antibody Specificity 1.1 Take the package containing the Assembled Glass Slide (Item A) from the freezer. Place unopened package on the bench top for approx. 15 - 30 minutes, and allow the Assembled Glass Slide to equilibrate to room temperature. Several strategies can be used for detection of antibody specificity as shown below in Figure 2. If needed, RayBiotech can assist you in your experiment design and provide testing services for your project. Please feel free to contact us with your questions so that we can assist in your project. 1.2 Open package, and take the Assembled Glass Slide out of the sleeve (Do not disassemble the Glass Slide from the chamber assembly). Place glass slide assembly in laminar flow hood or similar clean environment for 1-2 hours at room temperature. Note: Protect the slide from dust or others contaminants. 15 16 RayBio® Mouse Protein G Series Array Protocol 1.3 Block sub-arrays by adding 400 µL of Blocking Buffer (Item F) into each well of Assembled Glass Slide (Item A) and incubating at room temperature for 30 minutes with gentle shaking. Ensure there are no bubbles on the array surfaces. RayBio® Mouse Protein G Series Array Protocol vial containing Biotin-labeled Anti-IgG, add 1.5 mL of Blocking Buffer (Item F) and mix well. 1.8 Incubate at room temperature for 1 hour. Note: Only add reagents to wells printed with proteins. 1.9 Wash with 1× Wash Buffer I as described in Step 1.5 and 1× Wash Buffer II as described in Step 1.6, above. 1.4 Decant Blocking Buffer from each well. Add 400 µL of test antibody sample to each well. Remove any bubbles from the array surfaces. Incubate arrays with gentle rocking or shaking at room temperature for 1 to 2 hours, overnight at 4 °C, or other condition as appropriate. 1.10 Briefly spin the vial containing 1,500× Fluorescenceconjugated Streptavidin (Item E) prior to use. Add 1.5 mL of Blocking Buffer (Item F) and mix well. Add 400 µL of diluted Fluorescence-conjugated Streptavidin to each subarray. Note: Blocking Buffer (Item F) can be used to dilute samples if necessary. 1.11 Cover the incubation chamber with adhesive strips (Item I). Cover the plate with aluminum foil to avoid exposure to light or incubate in dark room. 1.5 Dilute 20× Wash Buffer I (Item G) to 1× with ddH2O. Decant the samples from each well, and wash 5 times with 800 µL of 1× Wash Buffer I at room temperature with gentle shaking, 5 minutes per wash. Completely remove 1× Wash Buffer I in each wash step. 1.12 Incubate at room temperature for 1 hour with gentle rocking or shaking. 1.13 Wash with 1× Wash Buffer I as described in Step 1.5 above and 1× Wash Buffer II as described in Step 1.6, above. Note: Avoid solution flowing into neighboring wells. 1.6 Dilute 20× Wash Buffer II (Item H) to 1× with ddH2O. Wash 2 times with 800 µL of 1× Wash Buffer II at room temperature with shaking, 5 minutes per wash. Completely remove 1× Wash Buffer II in each wash step. 1.7 Add 400 µL of 1,000-fold diluted appropriate Biotin-labeled secondary antibody. For example, choose Biotin-labeled Anti-Mouse IgG (Item B) if the probe antibody derives from mouse; choose Biotin-labeled Anti-Rabbit IgG (Item C) if the probe antibody derives from rabbit, etc. To prepare 1,000fold diluted Biotin-labeled Anti-IgG, briefly spin down the 17 2. Fluorescence Detection 2.1 Decant excess 1× Wash Buffer II from wells. 2.2 Carefully disassemble the glass slide from the incubation frame and chamber by pushing clips outward from the sides, as shown below. Carefully remove the glass slide from the gasket. 18 RayBio® Mouse Protein G Series Array Protocol RayBio® Mouse Protein G Series Array Protocol laser scanner, please send your slides to us and we can scan them for you for free. Note: Be careful not to touch the printed surface of the glass slide, which is on the same side as the barcode. 2.3 Place the whole slide in a 30-mL Centrifuge Tube (Item J). Add enough 1× Wash Buffer I (about 30 mL) to cover the whole slide and gently shake or rock at room temperature for 10 minutes. Decant 1× Wash Buffer I. Repeat wash step with 1× Wash Buffer I once. C. Detection of Auto-antibodies The following strategy can be used for detection of mouse autoantibody as shown in the following Figure 3. RayBiotech can assist you in your experimental design and provide testing services for your project. Please feel free to contact us with any questions. 2.4 Wash with 1× Wash Buffer II (about 30 mL) with gentle shaking at room temperature for 10 minutes. Decant 1x Wash Buffer II. 2.5 Rinse the glass slide with 30 mL of ddH2O for 5 minutes. Remove glass slide and decant water from 30-mL Centrifuge Tube. 2.6 Remove excess liquid from 30-mL Centrifuge Tube, and place glass slide back into the tube. Centrifuge at 1,000 rpm for 3 minutes to remove water droplets on glass slide and then let slide air-dry completely at least 20 minutes (protect from light). Note: Make sure the slides are absolutely dry before starting the scanning procedure or storage. 2.7 Capture the signals using laser scanner (such as Axon GenePix) using cy3 (green) channel. Note: Although we recommend scanning slides right after experiment, you also can store the slide at room temperature or -20 0C in dark for several days. Cy3 fluors dye used in this kit is very stable at room temperature and resistant to photo bleaching on completed glass slides. If you do not have a 19 Figure 3. Detection of auto-antibodies using RayBio Protein Array kits 1. Blocking and Sample Incubation 1.1 Take the package containing the Assembled Glass Slide (Item A) from the freezer. Place unopened package on the bench top for approx. 15 – 30 minutes, and allow the Assembled Glass Slide to equilibrate to room temperature. 1.2 Open package, and take the Assembled Glass Slide out of the sleeve (Do not disassemble the Glass Slide from the chamber assembly). Place glass slide assembly in laminar flow hood or similar clean environment for 1-2 hours at room temperature. 20 RayBio® Mouse Protein G Series Array Protocol RayBio® Mouse Protein G Series Array Protocol temperature with gentle shaking, 5 minutes per wash. Completely remove 1× Wash Buffer II in each wash step. Note: Protect the slide from dust or others contaminants. 1.3 Block sub-arrays by adding 400 µL of Blocking Buffer (Item F) into each well of Assembled Glass Slide (Item A) and incubating at room temperature for 30 minutes. Ensure there are no bubbles on the array surfaces. 1.7 Add 400 µL of 1,000-fold diluted Biotin-labeled Anti-Mouse IgG (Item B) to each well. To prepare 1,000-fold diluted Biotin-labeled Anti-Mouse IgG, briefly spin down the vial containing Biotin-labeled Anti-Mouse IgG (Item B). Add 1.5 mL of Blocking Buffer (Item F) and mix well. Note: only add reagents to wells printed with proteins. 1.8 Incubate at room temperature for 1 hour. 1.4 Decant Blocking Buffer from each well. Add 400 µL of appropriately diluted mouse serum, plasma or other sample fluids to each well. Remove any bubbles on array surfaces. Incubate arrays with gentle rocking or shaking at room temperature for 1 to 2 hours or overnight at 4 °C, or other condition as appropriate. Suggested dilution of serum or plasma is 10 to 200-fold. Note: Since auto-antibody concentrations in mouse serum and plasma may vary widely, you may need to optimize this dilution for your samples. We usually use 100-fold dilution in our own experiments. Note: Blocking Buffer (Item F) can be used to dilute samples if necessary, but PBS or other buffers may yield better results. 1.5 Dilute 20× Wash Buffer I (Item G) to 1× with ddH2O. Decant the samples from each well, and wash 5 times with 800 µL of 1× Wash Buffer I at room temperature with gentle shaking, 5 minutes per wash. Completely remove 1× Wash Buffer I in each wash step. 1.9 Wash with 1× Wash Buffer I as described in Step 1.5 and 1× Wash Buffer II as described in Step 1.6, above. 1.10 Briefly spin the vial containing 1,500× Fluorescenceconjugated Streptavidin (Item E) prior to use, add 1.5 mL of Blocking Buffer (Item F) and mix well. Add 400 µL of diluted Fluorescence-conjugated Streptavidin to each subarray. 1.11 Cover the incubation chamber with adhesive strips (Item I). Cover the plate with aluminum foil to avoid exposure to light or incubate in dark room. 1.12 Incubate at room temperature for 1 hour with gentle rocking or shaking. 1.13 Wash with 1× Wash Buffer I as described in Step 1.5 above and 1× Wash Buffer II as described in Step 1.6, above. 2. Fluorescence Detection 2.1 Decant excess 1× Wash Buffer II from wells. Note: Avoid solution flowing into neighboring wells. 1.6 Dilute 20× Wash Buffer II (Item H) to 1× with ddH2O. Wash 2 times with 800 µL of 1× Wash Buffer II at room 21 2.2 Carefully disassemble the glass slide from the incubation frame and chamber by pushing clips outward from the sides, 22 RayBio® Mouse Protein G Series Array Protocol RayBio® Mouse Protein G Series Array Protocol as shown below. Carefully remove the glass slide from the gasket. Note: Although we recommend scanning slides right after experiment, you also can store the slide at room temperature or -20 0C in dark for several days. Cy3 fluors dye used in this kit is very stable at room temperature and resistant to photo bleaching on completed glass slides. If you do not have a laser scanner, send your slides to us and we can scan them for you. Note: Be careful not to touch the printed surface of the glass slide, which is on the same side as the barcode. 2.3 Place the whole slide in a 30-mL Centrifuge Tube (Item J). Add enough 1× Wash Buffer I (about 30 mL) to cover the whole slide and gently shake or rock at room temperature for 10 minutes. Decant 1× Wash Buffer I. Repeat wash step with 1× Wash Buffer I once. 2.4 Wash with 1× Wash Buffer II (about 30 mL) with gentle shaking at room temperature for 10 minutes. Decant 1x Wash Buffer II. D. Detection of Small Molecule-Protein Interaction Several strategies can be used for detection of small moleculeprotein interaction as outlined and suggested in Figure 4. RayBiotech can assist you in your experiment design and provide service for your project. Please contact us with questions or suggestion on experimental design. 2.5 Rinse the glass slide with 30 mL of ddH2O for 5 minutes. Remove glass slide and decant water from 30-mL Centrifuge Tube. 2.6 Remove excess liquid from 30-mL Centrifuge Tube, and place glass slide back into the tube. Centrifuge at 1,000 rpm for 3 minutes to remove water droplets on glass slide and then let slide air-dry completely at least 20 minutes (protect from light). Note: Make sure the slides are absolutely dry before starting the scanning procedure or storage. 2.7 Capture the signals using laser scanner (such as Axon GenePix) using cy3 (green) channel. 23 Figure 4. Detection of small molecule-protein interaction using RayBio Protein Array kit 24 RayBio® Mouse Protein G Series Array Protocol RayBio® Mouse Protein G Series Array Protocol V. Data Extraction and Analysis E. Detection of Protein Modifications RayBio® Mouse Protein Arrays may also be used to detect protein modifications, such as protein phosphorylation modifications (Figure 5). Figure 5. Detection of mouse protein phosphorylation modifications using RayBio Protein Array kit RayBiotech can assist you in your experiment design and provide service for your project. Please contact us with your questions or for suggestions on experimental design. The captured array signal can be extracted with most of the microarray analysis softwares (GenePix, ScanArray Express, ArrayVision, etc.) associated with the laser scanner. The signal intensities obtained from laser scanner can simply be analyzed by importing the fluorescence values into our analysis tool (Cat. # 02PAM-G2). RayBiotech supports each array kit by offering Excel-based analysis software tools for the automatic computation of the extracted numerical data obtained from the array image. Features include sorting, averaging, background subtraction, positive control normalization, and histogram graphing for easy visual comparison. This analysis tool is very simple and affordable, which will not only assist in compiling and organizing your data, but also reduces your calculations to a “copy and paste” step. Data normalization The raw data normalization is used to compare data between arrays (i.e., different samples) by accounting for the differences in signal intensities of the positive control spots on those arrays. The positive control is a controlled amount of biotinylated protein printed on the arrays in triplicate. The amount of signal from each of those spots is dependent on the amount of the reporter (Cy3streptavidin) bound to biotinylated protein. Since the reporter amount proportionally affects the signal intensity of every spot on the array, the differences in the positive control signals between arrays will accurately reflect the differences between other spots on those arrays. To normalize the data, one array must be defined as the “Reference Array (r)” to which the signals of other Sample Arrays (s) are 25 26 RayBio® Mouse Protein G Series Array Protocol normalized. It is up to the customers to define which array should be the reference. The normalized values are calculated as follows: RayBio® Mouse Protein G Series Array Protocol VI. Troubleshooting Guide Problem • Pr: the average signal density of the positive control spots Weak Signal on the reference array (r) • Ps: the average signal density of the positive control spots on the sample array (s) • Xs: the signal density for a particular spot (X) on sample array (s) • High Background nXs: the normalized Xs value Cause Inadequate detection Increase laser power and PMT parameters Inadequate reagent volumes or improper dilution Check pipettes and ensure correct preparation Short incubation times Ensure sufficient incubation time or change sample incubation to an overnight step Protein or antibody concentrations in sample are too low Dilute starting sample less or concentrate sample Improper storage of kit Store kit as suggested temperature; Don’t freeze/thaw the slide Excess of protein or antibody Further dilute protein or antibody Excess of streptavidin Further dilute streptavidin Overexposure Lower the laser power Dust Minimize dust in work environment before starting experiment Slide is allowed to dry out Dark Spots Caution for interpretation of results 1. The in vitro and in vivo protein function may behave differentially. Some recombinant proteins contain a tag sequence. Some recombinant proteins on the array lack certain domains of the total protein, particularly hydrophobic domains. The folding status of those proteins is largely unknown. All these may affect protein-protein interactions. 2. Almost all membrane proteins arrayed on glass slides contain extracellular and cytoplasmic domains, but lack transmembrane domains. 3. Different proteins may require distinct conditions for their optimal function, recognition, or antibody binding. Therefore, investigators in some cases may need to use different conditions for array testing. 4. Always perform control experiments since both IgG and streptavidin may bind to some proteins. 27 Recommendation Take additional precautions to prevent slides from dying out during experiment Completely remove wash buffer in each wash step Insufficient wash Increase wash time and use more wash buffer Bubbles formed during incubation Handle and pipette solutions more gently; Degas solutions prior to use Uneven Signal Reagent evaporation Arrays are not completely covered by reagent Cover the incubation chamber with adhesive film during incubation Prepare more reagent and completely cover arrays with solution Feel free to call us if your question doesn’t match this table. 28 RayBio® Mouse Protein G Series Array Protocol RayBio® Mouse Protein G Series Array Protocol VII. Reference List • Chen,G., Wang,X., Yu,J., Varambally,S., Yu,J., Thomas,D.G., Lin,M.Y., Vishnu,P., Wang,Z., Wang,R., Fielhauer,J., Ghosh,D., Giordano,T.J., Giacherio,D., Chang,A.C., Orringer,M.B., El-Hefnawy,T., Bigbee,W.L., Beer,D.G., and Chinnaiyan,A.M. (2007). Auto-antibody profiles reveal ubiquilin 1 as a humoral immune response target in lung adenocarcinoma. Cancer Res. 67, 3461-3467. • Huang,R.P. (2003a). Cytokine antibody arrays: a promising tool to identify molecular targets for drug discovery. Comb. Chem. High Throughput. Screen. 6, 769-775. • Huang,R.P. (2003b). Protein arrays, an excellent tool in biomedical research. Front Biosci. 8, D559-D576. • Zhu,H., Bilgin,M., Bangham,R., Hall,D., Casamayor,A., Bertone,P., Lan,N., Jansen,R., Bidlingmaier,S., Houfek,T., Mitchell,T., Miller,P., Dean,R.A., Gerstein,M., and Snyder,M. (2001). Global analysis of protein activities using proteome chips. Science 293, 2101-2105. Note: RayBio® is the trademark of RayBiotech, Inc. This product is intended for research purposes only and is not to be used for clinical diagnostics. Our products may not be resold, modified for resale, or used to manufacture commercial products without written approval by Raybiotech, Inc. Under no circumstances shall RayBiotech be liable for any damages arising out of the use of the materials. Products are guaranteed for three months from the date of purchase when handled and stored properly. In the event of any defect in quality or merchantability, RayBiotech’s liability to BUYER for any claim relating to products shall be limited to replacement or refund of the purchase price. This product is for research use only. ©2015 RayBiotech, Inc. 29 30