1
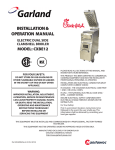
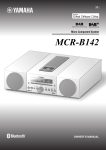
Henny Penny
Chick-fil-A Controls
Henny Penny
Chick-fil-A Controls
Chick-fil-A Controls
TABLE OF CONTENTS
Section
Section 1.
Section 2.
Section 3.
Page
INTRODUCTION ........................................................................................... 1-1
1-1
Introduction ........................................................................................... 1-1
1-2
Assistance ............................................................................................. 1-1
1-3
Safety ................................................................................................... 1-2
.............................................................................................................
OPERATION ................................................................................................... 2-1
2-1
Operating Controls ................................................................................ 2-1
2-2
Clock Set .............................................................................................. 2-3
2-3
Diagnostic Mode and Special Functions ................................................. 2-5
2-4
Warnings and Error Messages ............................................................... 2-8
2-5
Basic Operations ................................................................................... 2-11
2-6
Clean-Out Mode ................................................................................... 2-16
2-7
Manually Setting New or Used Peanut Oil ............................................. 2-17
2-8
Checking Temperature Probe Calibration ............................................... 2-17
TROUBLESHOOTING ................................................................................... 3-1
3-1
Introduction ........................................................................................... 3-1
3-2
Troubleshooting ..................................................................................... 3-1
3-3
Diagnostic Mode Details ........................................................................ 3-10
3-4
Information Mode Details ...................................................................... 3-26
Warranty
FM01-908-A
602
i
Henny Penny
Chick-fil-A Controls
SECTION 1. INTRODUCTION
1-1. INTRODUCTION
The Chick-fil-A controls for the Henny Penny models 500 (electric)
and 600 (gas) have many features to allow the Operator to produce
consistent, quality products. The controls monitor not only cooking
times and temperatures, but also peanut oil condition, product
weights, product temperatures, and many other operational variables. The controls may vary the actual peanut oil temperature and
cook times, based on changes of the operational variables.
The controls also have very extensive self-diagnostic functions
which alert the Operator to both component and procedure
problems.
Some unique features of the fryer are listed below:
• Diagnostic Function-provides summary of fryer and
Operator performance. See section 2-4.
• Alarms and Error Messages-provide immediate feedback for
Operator error or fryer malfunction. See section 2-5.
• Status Mode-allows the Operator to view basic fryer information and status. See section 2-4.
• Information Mode-gathers and stores historic information on
the fryer and Operator performance, and can be viewed by the
Operator. See section 2-4.
• Oil Filter Enforcement-prevents the Operator from exceeding
approved number of cook cycles before filtering the peanut oil.
See section 2-4.
• Manual Program Mode-Operator can set time and temperature for nonstandard products. See section 2-4.
• Easy toggle between English and Spanish operation. See
section 2-4.
• Clean-Out Mode-a preprogrammed function for cleaning the
frypot. See section 2-14.
1-2. ASSISTANCE
1-1
Should you require outside assistance, just call Henny Penny
Corporation at 1-800-417-8405, or 937-456-8405.
602
Henny Penny
Chick-fil-A Controls
SECTION 2. OPERATION
2-1. OPERATING CONTROLS
Figure Item
No.
No.
Description
Figure 2-2 shows the location of following computer control
items.
Function
2-2
1
Lights when the control calls for heat and the peanut oil should
start heating.
2-2
2
2-2
3
Lights when the solenoid closes and pressure starts to build inside
frypot.
2-2
4
Flashes when the peanut oil temperature is NOT at the proper
temperature for dropping product into the frypot.
2-2
5
Lights when the peanut oil temperature is 5°F below setpoint to
15°F above the cooking temperature, signaling product can now
be be cooked.
2-2
6
Press to display current fryer information and status. If pressed in
the Program Mode, shows previous settings. Pressing this along
with
accesses the Information Mode which has
Digital Display
Shows all the functions of the cooking cycle, Program Mode,
Diagnostic Mode and alarms.
historic information on the Operator and fryer performance.
2-2
7
Used to adjust the value of the currently displayed setting in the
Program Modes.
2-2
8
Press to access Program Mode. Once in the Program Mode, it is
used to advance to the next setting. If pressed along with
it
accesses the Information Mode which has historic information on
the Operator and fryer performance. It also allows access to
the English-Spanish settings, diagnostics, Clean-Out Mode, and
Manual Mode, if pressed before the appropriate button.
2-2
602
9
Used to start and stop cooking cycles and to stop the timer at the
end of a holding cycle. It is also used to program a Manual
Program for nonstandard products.
2-1
Henny Penny
Chick-fil-A Controls
2-1. OPERATING CONTROLS
(Continued)
2-2
10
Menu Card
2-2
11
Product Select
Shows name of food product selected. The menu card strip is
located behind the decal.
Press to select food products to be cooked, as well as, answering
display prompts. Also,
accesses the diagnostics;
, the
Clean-Out Mode; and
toggles between English and Spanish
display.
(Press
before entering any of the above modes.)
2-2
12
Cook/Pump Switch
2-2
13
Unit Identification
Window
13
12
2
10
1
3
A 3-way switch with a center OFF position. Turn the switch to
COOK to operate the fryer. Turn the switch to PUMP to operate the filter pump. Certain conditions must be met before
operating the filter pump. These conditions are covered later in
this section.
The unit’s model number and the control’s hardware and software
version numbers appear here.
4
5
6
11
7
8
9
Control Decal
Figure 2-2
2-2
602
Henny Penny
Chick-fil-A Controls
2-2. CLOCK SET
Upon initial start-up or PC board replacement, if “CLOCK SET”
automatically appears in the display, skip steps 1, 2 and 3.
1. Press and hold
display.
2. Release
for 5 seconds until “LEVEL 2” shows in
, then press
twice. “CLOCK SET” then
“ENTER CODE” shows in display.
3. Press
.
.
4. Display shows “CS-1” then “SET” then “MONTH”, with the
month flashing.
5. Press
6. Press
to change the month.
. Display shows “CS-2 then SET then DATE” with the
date flashing.
7. Press
8. Press
to change the date.
. Display shows “CS-3 then SET then YEAR” along
with the year flashing.
9. Press
10. Press
to change the year.
. Display shows “CS-4 then SET then HOUR” shows
with the hour and “AM” or “PM” flashing.
11. Press
to change the hour and AM/PM setting.
12. Press
. Display shows “CS-5, SET, MINUTE” with
the minutes flashing.
13. Press
602
to change the minutes.
2-3
Henny Penny
2-2. CLOCK SET
(Continued)
Chick-fil-A Controls
14. Press
. Display shows “CS-6” then “CLOCK MODE”
along with “1.AM/PM”.
15. “1.AM/PM” is 12 hour time, “2.24-HR” is 24 hour time. Press
to change.
16. Press
. Display shows “CS-7” then “DAYLIGHT
SAVINGS ADJ” along with “2.US”.
17. Press
to change to the following:
a. “1.OFF” = No automatic adjustments for Daylight Savings
Time.
b. “2.US” = Automatically applies United States Daylight Savings
Time adjustment. DST activated on the first Sunday in April.
DST de-activated on the last Sunday in October.
c. “3.EURO” = Automatically applies European (CE) Daylight
Saving Time adjustment. DST activated on the last Sunday in
March. DST de-activated on the last Sunday in October.
18. Clock Set is now complete. Press and hold
2-4
to exit.
602
Henny Penny
2-3. DIAGNOSTIC MODE
AND SPECIAL
FUNCTIONS
Chick-fil-A Controls
Diagnostic Mode
To view summaries of the fryer and Operator performance, press
then
. Press
to view the following functions:
D1 - Adjust product color for all products (not individually)
D2 - The age of the peanut oil and life remaining
D3 - Outlet voltage monitoring
D4 - Fryer’s heating performance
D5 - Slow or oversized product batches
D6 - Cook cycles started before temperature recovered
D7 - Cook cycles stopped more than 10 seconds before end of
cycle
D8 - Cook cycles not ended within 20 seconds after expired time
D9 - Number of times loading product took too long
D10 - Programmed variables changed by Operator
On several of the screens you may have to press
respond to questions asked.
Press
or
to
at any time to exit and return to normal operation.
See section 5-3 for more details of the Diagnostic Mode.
Peanut Oil Life Function
Based on the number of cook cycles of specific products and the
amount of time the fryer idles, the controls tell the Operator when to
change the peanut oil.
“CHANGE OIL SOON” shows on the display when the controls
determine it’s time to change peanut oil. Unless the peanut oil is smoking or has a burnt flavor, the peanut oil does not need to be changed
before this message shows on the display. After cleaning the frypot,
using the Clean-Out Mode (section 3-14), this function resets.
Language Selection
Pressing
then
allows the Operator to choose to have the
information on the display in English or Spanish.
602
2-5
Henny Penny
2-3. DIAGNOSTIC MODE
AND SPECIAL
FUNCTIONS
(Continued)
Chick-fil-A Controls
Manual Mode
This allows the Operator to quickly program a time and temperature for
nonstandard products that are not on the menu card. This is to be a
temporary setting and disables most of the advanced features of the
controls. To enter Manual Mode:
1. Once out of the Melt cycle, press
2. Use
3. Press
4. Press
.
to set cook time.
and use
to set temperature.
to start Manual Mode. Display shows “MANUAL”
and you start a cook cycle by pressing
5. Press
then
.
to exit Manual Mode.
Status Mode
Pressing
during idle time, allows Operator to view:
a.
b.
c.
d.
e.
The temperature of the peanut oil
The temperature setpoint and any offset
The average peanut oil temperature during last cook cycle
The rate of temperature rise or fall
Date and Time
Pressing
during a cook cycle allows the Operator to view:
a. The temperature of peanut oil, plus the degrees and rate the Load
Compensation has affected the cook cycle (slows down or speeds
up the timer)
b. The cooking step, the time left in cook cycle, setpoint temperature
and whether pressure is on
c. The average peanut oil temperature in cook cycle so far
d. The rate of temperature rise or fall
e. Date and Time
After 5 seconds, the control exits the Status Mode and the pressure
fryer returns to normal operation.
Peanut oil Filter Enforcement
Prevents the Operator from exceeding the set number of cook cycles
before filtering the peanut oil. The number in the center of the display
shows how many cook cycles remain before the Filter Lockout occurs.
For example, “5X” means the Operator can run 5 more cook cycles
before filtering. This function cannot be bypassed and greatly increases
the life of the peanut oil.
2-6
602
Henny Penny
2-3. DIAGNOSTIC MODE
AND SPECIAL
FUNCTIONS
(Continued)
Chick-fil-A Controls
Information Mode
This mode gathers and stores historic information on the fryer and
Operator performance. Press
and
at the same time and
“*INFO MODE*” shows on display. Press
steps and press
or
to access the
to view the statistics within each step.
Information Mode is intended for technical use, but the Operator can
view the following information:
1. E-LOG - last 10 errors and time they occurred
2. P-LOG - time of last 10 power-ups
3. HEAT-UPS - time of day and maximum heating rate (°/second) for
the last 10 heat-ups
4. COOK DATA - information on the last cook cycle
5. TODAY’S DATA - data since the start of day (not including the
last cook cycle)
6. PREV-DAY-SUN - creates a log of the last 7 days, using the
information in TODAY’S DATA.
7. 7-DAY TOTALS -totals the information from the last 7 days
8. OIL DATA - information on the current peanut oil, not including
today’s cooking information
9. PREV OIL DATA - information on last batch of peanut oil
10. INP - provides test of fryer inputs
11. OUTP - shows the state of heater and pressure
12. POT TMP - temperature of peanut oil
13. CPU TMP - temperature of PC board
14. ANALOG - status of controller’s a-to-d converter
15. AC VOLTS - status of the line voltage to fryer
16. AMPS (Electric models only) - the present amp readings to
heaters.
See section 5-4 for more details of the Information Mode.
602
2-7
Henny Penny
Chick-fil-A Controls
2-4. WARNINGS AND
ERROR MESSAGES
The controls monitor procedure problems and system failures with
warnings and error codes. The display shows the warning or error
code, and an alarm sounds.
Pressing
cancels most warnings, and pressing any control button
stops most Error Code alarms. But there are some exceptions (see
below). The display shows the error until the situation is corrected.
WARNINGS
DISPLAY
CAUSE
CORRECTION
“W-1”
“LOW
VOLTAGE”
Incoming supply voltage too low.
Have voltage at plug and receptacle checked.
“W-2”
“SLOW
HEAT-UP”
Faulty components or connections.
Have elements, connections, and contactors
checked.
“W-3”
“WAS NOT
READY”
Product loaded into frypot
before
lights.
Wait until peanut oil is at proper temperature
before loading product.
“W-4”
“SLOW
COOKING”
Frozen or too much product
in frypot.
Do not overfill or place frozen product
into the frypot.
“W-5”
“SLOW
COOKING”
Product loaded into frypot
before
lights.
Wait until peanut oil is at proper temperature
before loading product.
“W-6”
“SLOW
COOKING”
Faulty components or connections.
Have elements, connections, and contactors
checked.
“W-7”
LOW AMPS
Faulty components or connections.
Have elements, connections, and contactors
checked.
“W-9”
“DISCARD
PRODUCT”
Product overcooked. (May
appear after a Slow Cooking
warning.)
Discard product immediately.
Didn’t allow peanut oil to drop
down to current product’s setpoint
temperature.
Cancel button will not stop this warning. Once
the peanut oil temperature drops to setpoint
temperature, the alarm automatically stops.
“OIL TOO
HOT”
2-8
602
Henny Penny
Chick-fil-A Controls
2-4. WARNINGS AND
ERROR MESSAGES
(Continued)
ERROR CODES
DISPLAY
“E-4”
“CPU TOO
HOT”
CAUSE
CORRECTION
PC board too hot.
Check ventilation louvers on side of fryer for
obstructions. If louvers are clear, have PC
board checked. Check cooling fan if present.
“E-5”
“FRYER TOO
HOT”
Controls sensing 405°F
or above.
Have heat components and temperature probe
checked.
“E-6” (A or B)
“FRYER
TEMP
SENSOR
FAILED”
Faulty temperature probe or
connection.
Have temperature probe and connection
checked.
“E-10”
“HIGH LIMIT
TRIPPED”
Peanut oil temperature too hot,
drain valve opened while heat was
on, or faulty high limit.
Reset high limit. Check peanut oil temperature
for overheating. Have heat components
checked if high limit continues to trip.
“E-15”
“DRAIN IS
OPEN”
Drain is open or faulty microswitch.
Close drain. Have drain microswitch checked
if error code persists.
Wrong or faulty elements or wiring
problem.
Have electrical supply, wiring, and elements
checked.
(500 fryer only)
“E-25”
“HEAT AMPS
WERE TOO
HIGH
Because of the seriousness of this error code,
turn the Cook/Pump switch OFF and back
to COOK to cancel.
602
2-9
Henny Penny
Chick-fil-A Controls
2-4. WARNINGS AND
ERROR MESSAGES
(Continued)
ERROR CODES
DISPLAY
(500 fryer only)
“E-26”
“HEAT AMPS
ARE
LOCKED ON”
CAUSE
CORRECTION
Faulty contactors or PC board.
Have the contactors and PC board checked.
This error code could be displayed even with
the Cook/Pump switch turned OFF. Unplug
fryer or shut off the wall circuit breaker to
disconnect electrical power to fryer.
“E-41”
“SYSTEM
DATA LOST”
Memory scrambled. An individual
product program may be scrambled.
Ex: “E-41 -2- DATA LOST”. This
means product #2 program is
scrambled.
Turn the Cook/Pump switch OFF and back to
COOK. If error code persists, have the PC
board checked or re-initialized.
“E-46”
“DATA SAVE
FAILED”
Faulty eprom or PC board.
Turn the Cook/Pump switch OFF and back to
COOK. If error code persists, have the PC
board checked or re-initialized.
“E-70”
“PWR SW
OR WIRES
FAILED”
Faulty Cook/Pump switch
or switch wiring. Faulty
I/O board.
Have Cook/Pump switch checked, along with
its wiring. Have I/O board checked.
“E-92”
“24 VOLT
FUSE”
Blown 24 volt controller fuse, or
bad 14-pin cable connection.
Have the 14-pin cable connector checked or
have the fryer checked for a short to ground in
components such as the drain switch, solenoid,
or high limit.
Have solenoid checked and cleaned.
Stuck or clogged solenoid valve.
2-10
602
Henny Penny
2-5. BASIC OPERATION
Chick-fil-A Controls
The following procedures should be followed on the initial start-up of
the fryer, and each time the fryer is brought back into operation from a
cold or shut down condition. These are basic, general instructions.
1. Check to see that the Cook/Pump switch is turned OFF.
2. Make sure the drain valve and filter valve are closed.
3. Remove the fry basket from the frypot and leave lid up.
4. Make sure the peanut oil is filled to the proper level in the frypot;
1/4 to1/2 inch (6.4-12.7 mm) below level indicator line.
5. Connect power to the fryer.
6. On gas models, light the pilot light.
7. Turn the Cook/Pump switch to COOK. Upon initial start-up
“CLOCK SET” shows in display. Set the clock to your time,
following prompts on the display, or see section 3-3 for help. Then
display asks if the peanut oil is NEW or OLD. The controls automatically adjust the peanut oil temperature to the age of the peanut oil. Use
to set the number of days of old peanut oil.
8. Unit automatically goes into the melt cycle, until the peanut oil
temperature reaches 230°F (110°C). Then the controls go into
the heat cycle and heats the peanut oil to preset temperature.
Once melted peanut oil reaches the proper level in the frypot,
the melt cycle can be bypassed by pressing and holding one of
the Product buttons.
Do not bypass the melt cycle unless enough melted peanut
oil completely covers the elements in electric fryers or the
curved frypot surface in gas fryers. Excessive smoking or
fire could result.
9. Stir the peanut oil as it is heating up from a “cold” start. Be sure to
stir down into the bottom of the frypot.
602
2-11
Henny Penny
2-5. BASIC OPERATION
(Continued)
Chick-fil-A Controls
10. Once out of the melt cycle,
flashes until 5° before setpoint
temperature ( plus any offset temperature). Then
and the selected product shows on the display.
lights
The heat cycles on and off about 4 degrees before the
setpoint temperature to help prevent overshooting the
setpoint temperature (proportional control).
11. If the peanut oil was not filtered the night before at shutdown,
filter the peanut oil now. Refer to section 3-9.
12. Follow the steps in Chick-fil-A’s training materials to load the
product.
Before loading product, make certain
is lit, indicating
that the peanut oil is at the correct cooking temperature
for the type of product being cooked. The actual temperature
may vary 20 degrees or more depending peanut oil age,
product weights, product temperature, and other operational
variables.
Do not overload, or place product with extreme moisture
content into the basket. 12-14 lb (5.44-6.35 kgs.) is the
maximum amount of product. Failure to follow these instructions can result in peanut oil overflowing the frypot, causing
burns or damage to the fryer.
13. Close the lid quickly, latching the lid.
Do not press
until lid is closed, or the lid will try to lock as
it is being tightened down.
14. Tighten the lid spindle clockwise, sealing the lid. Align the red
knob on the spindle with the red knob on the latch.
2-12
602
Henny Penny
Chick-fil-A Controls
2-5. BASIC OPERATION
(Continued)
PRESSURIZED
LATCH THE LID PROPERLY AND ALIGN THE RED
BALLS OR SEVERE BURNS WILL RESULT.
15. Press the desired Product button to start a cook cycle. The
display counts down the cooking time.
To check the peanut oil temperature press
cook cycle, press
.
. To stop a
The cook times may vary, compensating for peanut oil age,
product weights, product temperature, and other operational
variables.
16. Within a few minutes, the pressure gauge should increase to the
OPERATING ZONE. If not, recheck the Installation and Operation procedures.
17. Near the end of the cook cycle, the fryer automatically depressurizes. Then at the end of the cook cycle, an alarm sounds, and the
display flashes “DONE”. Press
to stop the alarm.
DEPRESSURIZE
CHECK THE PRESSURE GAUGE READING. DO NOT
ATTEMPT TO OPEN THE LID UNTIL THE PRESSURE
DROPS TO ZERO. OPENING THE LID WHEN THE
FRYPOT IS PRESSURIZED ALLOWS HOT PEANUT OIL
AND MOISTURE TO ESCAPE FROM THE FRYPOT,
RESULTING IN SEVERE BURNS.
18. After pressure drops to zero, turn the spindle counterclockwise.
Do not flip or spin the spindle cross arm when opening
because it could damage the acme nut inside the cross bar.
602
2-13
Henny Penny
2-5. BASIC OPERATION
(Continued)
Chick-fil-A Controls
19. Unlatch and raise the lid quickly to allow most of the condensation
on the lid to drain through the drain channel and not into the
peanut oil.
Do not let lid slam up against its backstop because this
could damage the hinge.
20. Follow the steps in Chick-fil-A’s training materials to unload the
product and check for doneness.
After the cook cycle, if the product needs to cook more,
place basket back into frypot and press
for an additional
45 seconds.
21. Before frying next load, allow for the peanut oil to reheat and
lights.
In the Cook mode, when “FILTER SUGGESTED”, shows in
the display, the operator has the option to filter at this time, or
to continue cooking. But, if the operator continues cooking, a
Filter Lockout occurs within the next cook cycle, or two.
When “FILTER LOCKOUT” , then “YOU *MUST*
FILTER NOW........” shows in the display,
is the only
button that functions, until the peanut oil is filtered. Follow
Chick-fil-A’s training materials on filtering.
Discard peanut oil if display shows “CHANGE OIL SOON”
or if peanut oil shows signs of excessive foaming or smoking. With prolonged use, the flashpoint of peanut oil is
reduced. Discard peanut oil if it shows signs of excessive
smoking or foaming, or serious burns, personal injury, fire
and/or property damage could result.
2-14
602
Henny Penny
2-6. CLEAN-OUT MODE
Chick-fil-A Controls
The Chick-fil-A control has a Clean-Out Mode to clean the frypot upon
initial start-up and every change of shortening.
Follow the steps in Chick-fil-A’s training materials on Cleaning the
Frypot.
When heating the cleaning solution, turn the Cook/Pump switch to
COOK. Press
then
. “CLEAN-OUT ?” then
“1=YES 3=NO” shows in display. Press
to start Clean-Out
Mode. The fryer displays “*CLEAN-OUT MODE*” and heats up to
a preprogrammed temperature, then automatically begins a 15-minute
timed countdown. Use
, if necessary to adjust the temperature
and keep the cleaning solution from boiling over.
NEVER PRESSURIZE FRYER TO CLEAN. LEAVE THE
LID OPEN. WATER UNDER PRESSURE IS SUPER
HEATED AND CAUSES SEVERE BURNS IF IT COMES IN
CONTACT WITH SKIN.
DO NOT let the cleaning solution boil. If the cleaning solution in the frypot starts to foam and boil over, IMMEDIATLY
TURN THE COOK/PUMP SWITCH TO OFF. DO NOT try
to contain it by closing the lid or severe burns could result.
602
2-15
Henny Penny
2-7.
MANUALLY SETTING
NEW OR USED
PEANUT OIL
FUNCTION
Chick-fil-A Controls
1. Turn the Cook/Pump switch to off.
2. Press and hold
while turning the Cook/Pump switch to
COOK, until “IS OIL NEW OR USED?” shows in the display.
3. Press
4. If
Press
for new peanut oil, or
for used peanut oil.
was pressed, “OIL IS NEW?” shows in the display.
for YES, and “THANK YOU” shows in the display,
and controls resume normal operation.
5. If
6. Press
7. Press
8. Press
was pressed, “OIL IS USED?” shows in the display.
for YES, and “HOW OLD IS OIL?” shows in display.
to set the age of the peanut oil.
. “THANK YOU” shows in the display and controls
resume normal operation.
2-8. CHECKING
TEMPERATURE PROBE
CALIBRATION
1.
Heat peanut oil and stir completely until peanut oil temperature
has stabilized and
is on.
2. Place and electronic thermometer about 3 inches below the
peanut oil’s surface, in the center of the frypot. Let the
temperature stabilize and remember the reading.
3. Press
to see the probe’s temperature reading.
If the displayed temperature is less than 5 degrees from the electronic thermometer’s temperature, see D 1, Color Adjustment on
page 5-11. If temperature differs from 5 to 15 degrees, or still
can’t get the correct color, have the probe calibrated. If temperature differs by more than 15 degrees, have probe replaced.
2-16
602
Henny Penny
Chick-fil-A Controls
SECTION 3. TROUBLESHOOTING
3-1. INTRODUCTION
This section provides troubleshooting information in the form of an easy
to read table.
If a problem occurs during the first operation of a new fryer, recheck
the installation and operation sections of this manual.
3-2. TROUBLESHOOTING
To isolate a malfunction, proceed as follows:
1. Clearly define the problem (or symptom) and when it
occurs.
2. Locate the problem in the Troubleshooting table.
3. Review all possible causes. Then, one-at-a-time work
through the list of corrections until the problem is solved.
4. Use the Diagnostic Mode to identify the problem and make
possible adjustments.
If a problem keeps reoccurring, have a qualified service technician check the fryer for other causes.
602
3-1
Henny Penny
Problem
Chick-fil-A Controls
Cause
Correction
COOKING SECTION
Product Color Not
Correct:
A. Too Dark (some batches)
B. Too Dark (all batches)
• Temperature programmed too hot
• See Diagnostic Mode D 10,
page 5-24. If temperature
settings have been changed,
have the controls reintialized.
• Breading product too far
• Bread product just before frying.
• Done alarm ignored for more
than 20 seconds
• If the fryer hasn’t been used
since the problem batch, see
Information Mode 4 H, page
5-27. For more information on
this problem, see Information
Modes 5 U, 6 U, 7 R, or 8 R,
pages 5-28 to 5-31.
• Wrong Product button pressed
• Be sure to press the correct
product button. If the fryer
hasn’t been used since the
problem batch, see Information
Mode 4 B, page 5-27 to see
what product button was
pressed.
• Temperature probe out of
• Check temperature probe
calibration.
• Peanut oil too old.
calibration. See section 4-6.
a.If less than 5° off, see Diagnostic Mode D 1, page 5-11.
b.If between 5 and 15 degrees off,
calibrate probe. If more than 15
degrees off, replace probe.
• If peanut oil is smoking or has
burnt taste, change peanut oil.
• See Diagnostic Mode D 2,
page 5-12. Change peanut oil
if controls indicate it should be
changed.
• Peanut oil too dark.
• Filter peanut oil.
• Change peanut oil.
• Faulty probe. “E6”
• If probe can’t be recalibrated,
have probe replaced.
3-2
602
Henny Penny
Problem
C. Too Light (all batches)
Chick-fil-A Controls
Cause
Correction
COOKING SECTION (Continued)
• Slow fryer heat-up/recovery.
• See Diagnostic Mode D 4,
page 5-15 for present day’s
performance. Or see Information Modes 5, 6, 7, 8, and 9 for
more information on this problem, pages 5-28 to 5-32.
• Low voltage. See Diagnostic
Mode D 3, page 5-13 for
present day’s voltage performance. See Information Modes
4, 5, 6, 7, 8, 9, and 14 for more
information on this problem,
pages 5-27 to 5-32.
• Low gas pressure. Have gas
pressure checked going to
burners, on gas fryers.
• Temperature probe out of
calibration.
D. Too Light (some batches)
• Check temperature probe
calibration. See section 4-6.
a.If less than 5° off, see Diagnostic Mode D 1, page 5-11.
b.If between 5 and 15 degrees off,
calibrate probe. If more than 15
degrees off, replace probe.
• Oil usage wasn’t set for new
peanut oil.
• See Diagnostic Mode D 2 for
the age of the oil. See section
3-7 for setting the age of the oil.
•Temperature programmed too low
• See Diagnostic Mode D 10,
page 5-24. If temperature
settings have been changed,
without authorization, have the
controls reintialized.
• Product placed in peanut oil
• If fryer hasn’t been used since
before proper temperature
• Wrong cook button pushed.
the problem batch, see Information Mode 4 C, page 5-27. For
more information on this see
Information Modes 5 S, 6 S,
7 P, or 8 P, pages 5-28 to 5-31.
• If fryer hasn’t been used since
problem batch, see Information
Mode 4 B, page 5-27 to see
what product was selected.
602
3-3
Henny Penny
Chick-fil-A Controls
Problem
Cause
Correction
COOKING SECTION (Continued)
B. Too Light (Continued)
• Cook cycle aborted before alarm
and “DONE” flashes.
• See Diagnostic Mode D 7, page
3-20, to see how many times
the cook cycle was stopped
before the end of the cycle.
• Frozen product placed in
• Use fresh or thawed product.
peanut oil
Dryness of Product
• Moisture loss prior to cooking
See Diagnostic Mode D 5, page
3-17, to see if the controls
sensed any frozen or overloaded
batches.
• Use fresh product.
• Cover product with plastic wrap,
reducing evaporation.
• Over-cooking the product.
• Done alarm ignored for more
than 20 seconds. If the fryer
hasn’t been used since the
problem batch, see Information
Mode 4 H, page 3-27. For
more information on this problem, see Information Modes
5 U, 6 U, 7R, or 8 R, pages
3-28 to 3-31.
• Time of cook eycle set too long
• See Diagnostic Mode D 10,
page 3-24. If time settings have
been changed, have the controls
reintialized.
• Wrong cook button pushed.
• If fryer hasn’t been used since
problem batch, see Information
Mode 4 B, page 3-27 to see
what product was selected.
Burned Taste
3-4
• Low operating pressure
• Check pressure gauge reading.
Check for pressure leaks.
• Burned Peanut oil flavor
• Replace Peanut oil
• Peanut oil needs filtering
• Filter peanut oil more often.
• Frypot not properly cleaned.
• Drain and clean frypot.
602
Henny Penny
Problem
Chick-fil-A Controls
Cause
Correction
COOKING SECTION (Continued)
Product not done
• Cook cycle aborted before alarm,
and “DONE” flashes.
• See Diagnostic Mode D 7, page
5-20, to see how many times
the cook cycle was stopped
before the end of the cycle.
• Frozen product placed in
peanut oil
• Use fresh or thawed product.
See Diagnostic Mode D 5, page
5-17, and if the controls sensed
frozen or overloaded batches.
• Wrong cook button pushed.
• If fryer hasn’t been used since
problem batch, see Information
Mode 4 B, page 5-27 to see
what product was selected.
• Temperature programmed too low
or not prorammed properly.
• See Diagnostic Mode D 10,
page 5-24. If temperature
settings have been changed,
have the controls reintialized.
• Temperature probe out of
calibration.
• Check temperature probe
calibration. See section 4-6.
a.If less than 5° off, see Diagnostic Mode D 1, page 5-11.
b.If between 5 and 15 degrees off,
calibrate probe. If more than 15
degrees off, replace probe.
• Slow fryer heat-up/recovery.
• See Diagnostic Mode D 4,
page 5-15 for present day’s
performance. Or see Information Modes 5, 6, 7, 8, and 9 for
more information on this problem, pages 5-28 to 5-32.
• Low voltage. See Diagnostic
Mode D 3, page 5-13 for
present day’s voltage performance. See Information Modes
4, 5, 6, 7, 8, 9, and 14 for more
information on this problem,
pages 5-27 to 5-32, and 5-35.
• Low gas pressure. Have gas
pressure checked going to
burners, on gas fryers.
• Product too thick.
602
• Make sure chicken filets have
been fileted.
3-5
Henny Penny
Chick-fil-A Controls
Problem
Cause
Correction
POWER SECTION
With Cook/Pump Switch in
Cook position, fryer is
completely without power
• Open Circuit.
• Check to see if fryer is plugged
in.
• Check wall circuit breaker or
fuse.
• Have a qualified service technician check power supply and
Cook/Pump switch.
PRESSURE SECTION
Pressure will not
exhaust at end of
cooking cycle.
• Exhaust line from solenoid
valve to exhaust tank
clogged.
• Solenoid valve clogged.
• Turn unit off and allow fryer to
cool to release pressure from
frypot; have all pressure lines,
exhaust stacks, and exhaust
tank cleaned.
• Have solenoid checked and
cleaned.
Operating pressure too high
• Dead weight clogged.
• Turn unit off and allow fryer to
cool to release pressure from
frypot; remove dead weight and
clean, per section 3-16.
PRESSURIZED
DO NOT OPERATE
UNIT IF HIGH PRESSURE CONDITIONS
EXIST, SEVERE
INJURIES AND BURNS
WILL RESULT. PLACE
THE COOK/PUMP
SWITCH IN THE “OFF”
POSITION IMMEDIATELY. RELEASE THE
PRESSURE BY ALLOWING UNIT TO COOL.
THE PRESSURE WILL
THEN DROP. DO
NOT RESUME USE OF
UNIT UNTIL CAUSE OF
HIGH PRESSURE HAS
BEEN FOUND AND
CORRECTED.
3-6
• Exhaust line to stack clogged.
• Clean exhaust line to stack.
602
Henny Penny
Chick-fil-A Controls
Problem
Pressure does not
build
Cause
Correction
PRESSURE SECTION (Continued)
• Not enough product in fryer
• Place proper quantity of
or product not fresh.
• Metal shipping spacer not
removed from dead weight.
fresh product within frypot to
generate steam.
• Remove shipping spacer.
See Unpacking Section.
• Lid open or not latched.
• Close and latch lid.
• Solenoid valve leaking or
• Have solenoid valve checked or
not closing.
• Dead weight valve leaking.
cleaned.
• Have Dead weight valve
repaired.
• Pressure not programmed.
• See Diagnostic Mode D 10,
page 3-24. If pressure
settings have been changed,
have the controls reintialized..
• Lid gasket leaking.
• Reverse gasket or lid needs
adjusted.
• Safety relief valve leaking.
• Check and replace if necessary.
FILTER SYSTEM SECTION
Filter motor runs
but pumps peanut oil
slowly
Filter switch on,
motor does not run
602
• Pump clogged
• Have pump cleaned.
• Filter line connection
loose.
• Tighten all filter line
connections.
• Solidified peanut oil
in lines
• Clear all filter lines of solidified
peanut oil.
• Defective Cook/ Pump switch
• Have switch checked.
• Defective motor
• Have motor checked.
• Motor thermal protector tripped
• Reset thermal protector.
3-7
Henny Penny
Chick-fil-A Controls
Problem
Cause
Correction
FILTER SYSTEM SECTION (Continued)
Motor hums but
will not pump.
• Clogged lines or pump
• Have pump and lines removed
and cleaned.
• Have pump seal, rotor
and rollers replaced.
HEATING OF PEANUT OIL SECTION
Peanut oil will not heat
• Blown fuse or tripped circuit
breaker
• Faulty cord and plug.
• Check cord and plug and
Check power at receptacle.
power at wall receptacle.
• Faulty PC Board.
• Have control panel checked.
• Faulty or tripped high limit. “E10”
• Reset high limit per section 3-1.
If high doesn’t reset, have it
checked.
• Drain valve open. “E15”
• Close drain valve.
• Possible faulty probe. “E6”
• Have temperature probe
checked.
• Possible faulty contactor
• See Diagnostic Modes D 4,
(electric models)
3-8
• Reset breaker or replace fuse.
circuit breaker at supply box.
page 5-15. See if “CHECK
COILS, CONTACTORS
AND WIRING” shows on
display.
• Gas Valve knob turned to the Off
position (gas models)
• Make sure the Gas Valve knob
is turned to ON.
• Faulty Thermocouple
(gas models)
• Have thermocouple checked.
• Faulty Cook/Pump switch.
• Faulty drain switch. “E15”
• Possible faulty gas control
• See Information Mode10, page
5-35 and check to see if the
input code is present. If not,
have fryer checked by a
certified service technician.
602
Henny Penny
Problem
Chick-fil-A Controls
Cause
Correction
HEATING OF PEANUT OIL SECTION (Continued)
Peanut oil heating slowly
• Low or improper amps
• See Infomation Mode 16, page
5-35, for present amperage. Or
see Information Modes 4, 5, 6,
7, 8, 9, for more information
on this problem, pages 5-27 to
5-32. Diagnostic Mode D 4
gives present day’s heating
performance.
• Low or improper voltage
• See Diagnostic Modes D 3 &
D 4, pages 5-13 & 5-15 for
present day’s voltage and
heating performance. Or see
Information Modes 4, 5, 6, 7, 8,
9, and 15 for more information
on this problem, pages 5-27 to
5-32 and 5-35.
• Weak or burnt out
elements (elec. model)
• See Diagnostic Modes D 4,
page 5-15. See if “CHECK
COILS, CONTACTORS
AND WIRING” shows on
display. If so, have fryer
• Burnt or charred connectors.
• Faulty contactor (electric models)
602
checked by a certified service
technician.
• Wire(s) loose
• Have wires tightened
• Supply line too small - low
gas volume. (gas models)
• Increase supply line size.
Refer to installation
instructions.
• Improper ventilation
system. (gas models)
• Refer to installation
instructions.
3-9
Henny Penny
3-3. DIAGNOSTIC MODE
DETAILS
Chick-fil-A Controls
The Chick-fil-A fryer controllers provide Diagnostic functions that let an
Operator review operating and performance data for the fryer.
The information provided by Diagnostic Mode can be used to monitor
procedural errors, such as, not waiting for the Ready light before
starting a cook cycle, canceling cycles early, etc.
In addition, Diagnostic Mode allows slight adjustment to product color,
reports the age and accumulated wear of the oil, and reports information about the performance of the line voltage supply.
Accessing Diagnostic Mode
To activate Diagnostic Mode, press the
button, then press
button. The controller displays the following message:
“ *DIAGNOSTIC* “
“ *REPORT* “
When this introduction message is finished, the controller displays
Diagnostic step D 1 (see below).
are used to step through the report items. Press
step forward to the next item. Press
the report items.
to
to step backward through
The report information is grouped into sections, D 1 through D 10.
Most sections have several related items.
To toggle between English and Spanish Display Mode, press
button then press
.
To exit Diagnostic Report Mode at any point, press
3-10
.
602
Henny Penny
3-3. DIAGNOSTIC MODE
DETAILS (Continued)
Chick-fil-A Controls
D 1: Color Adjustment
This step lets the user make slight adjustments to the product color.
The color adjustment is performed by increasing or decreasing the
regulating temperature of the fryer.
The first step of this item asks “IS PRODUCT COLOR OK?”
If product color is okay and no change is desired press
to move on to the next item, or press
If a change is desired, press
or
to exit Diagnostic Mode.
(i.e. color is not okay). The
controller shows “ADJUST DARKNESS”, then displays the darkness
control slider:
“ LT - - - - - + - - - - - DK”
A blinking asterisk (*) indicates the current position.
and
are used to adjust the darkness setting.
To make the product darker, press
toward the DK (darker) side.
to move the blinking “ * “
To make the product lighter, press
toward the LT (lighter) side.
to move the blinking “ * “
When done adjusting, press
operating mode.
to exit and return to normal
Any temperature adjustment activated by the Color Adjustment feature
will be reflected in the normal setpoint display as part of the offset from
the basic product cook temperature. To view the present regulating
temperature, press
twice.
In the example, “SETPT = 315°F + 6” the product cook temperature is
315°F and has an additional offset of 6°F to compensate for the age of
the oil, how long the fryer sits idle, and any color adjustments.
602
3-11
Henny Penny
3-3. DIAGNOSTIC MODE
DETAILS (Continued)
Chick-fil-A Controls
D 2: Oil Wear Report
This section displays information about the age of the present batch of
peanut oil.
The first step shows how many days of use this oil has:
“D2: THIS OIL IS “
“D2: 4 DAYS OLD “
The controller only counts days in which the fryer is in use.
Press
to move on to the second step. This step shows the age of
the peanut oil by percentage of its expected lifetime. The peanut oil’s
present, accumulated wear is compared to the wear setting at which the
controller will prompt for the oil to be changed.
“D2: THIS OIL IS “
“D2: 16% USED “
This information can be used as the oil nears the end of its life (i.e.
95%), to plan ahead for when a clean-out will be required.
Press
3-12
to move on to the next section.
602
Henny Penny
3-3. DIAGNOSTIC MODE
DETAILS (Continued)
Chick-fil-A Controls
D 3: Line Voltage Performance Report
This section displays information about how good the line voltage
supply has been for the present day and for the present batch of oil.
The controller continually monitors the line voltage supplied to the fryer
(when the fryer is on). If the line voltage drops below [90%] of its
nominal value, the controller signals a “LOW VOLTAGE” alarm. This
alarm sounds at the end of each cook cycle for which low voltage has
been detected. While not cooking, the Low Voltage alarm can sound
as frequently as every 30 minutes.
“[ ]” around a value, such as [90%], means this value is
programmable and might change with later software versions.
Voltage Report for Today
If no Low Voltage warnings have been detected for the present day, the
controller shows, “D3: VOLTAGE OK, D3: TODAY “
If one or more Low Voltage warnings have been detected for the
present day, the following sequence example could be displayed:
“D3: YOU HAD 3”
“D3: LOW VOLTAGE”
“D3: WARNINGS”
“D3: TODAY”
(Press
)
“D3: MIN VOLTAGE”
“D3: TODAY = 83%”
(Press
)
“D3: MAX VOLTAGE”
“D3: TODAY = 101%”
(Press
602
)
3-13
Henny Penny
Chick-fil-A Controls
“D3: ARE OTHER”
“D3: FRYERS”
“D3: HAVING THIS”
“D3: PROBLEM”
“D3: TODAY?”
3-3. DIAGNOSTIC MODE
DETAILS (Continued)
Press
If
or
.
is pressed (other fryers are having this problem):
“D3: FACILITY”
“D3: OR UTILITY”
“D3: PROBLEM”
If
is pressed (other fryers are not having this problem):
“D3: CHECK CORD,”
“D3: WIRING,”
“D3: AND BREAKER”
In either case, press
to move on to the next step.
Voltage Report for Present Batch of Peanut Oil
This report for the present batch of oil does not include data from the
today. It includes data for all days on the present batch of oil before
today.
For example, if Low Voltage warnings started appearing today but had
not been displayed before, the previous item might report “3 LOW
VOLTAGE WARNINGS TODAY” while this step reports
“VOLTAGE OK SINCE LAST OIL CHANGE”.
If no Low Voltage warnings have been detected before today for the
present batch of oil, the controller shows:
“D3: VOLTAGE OK”
“D3: SINCE LAST”
“D3: OIL CHANGE”
3-14
602
Henny Penny
3-3. DIAGNOSTIC MODE
DETAILS (Continued)
Chick-fil-A Controls
If one or more Low Voltage warnings have been detected before today,
the following sequence is displayed:
“D3: BEFORE TODAY”
“D3: 27 LOW VOLT”
“D3: WARNINGS”
“D3: ON THIS OIL”
(Press
)
“D3: MIN VOLTAGE”
“D3: BEFORE TODAY”
“D3: = 85%”
(Press
)
“D3: MAX VOLTAGE”
“D3: BEFORE TODAY”
“D3: = 105%”
Press
to advance to the next section.
D 4: Heating Capacity Report
This section reports the present status of the heating system.
The controller examines a history of heat-up data and determines
whether or not the heating system is operating normally. The “Heat
Capacity” is said to be bad only if the most recent heat-up failed to
meet the expected heat-up rate and three of the last four heat-ups also
failed to achieve the expected rate. That is, a single slow heat-up will
not trigger a “Slow Heat” warning. The Slow Heat warning is activated
only after repeated low-rate heat-ups is observed.
The controller can’t assess the integrity of the heating system if the fryer
has been experiencing voltage problems. Low heat rates observed in
this situation might be due to voltage problems rather than heater
problems.
602
3-15
Henny Penny
3-3. DIAGNOSTIC MODE
DETAILS (Continued)
Chick-fil-A Controls
If the fryer has witnessed two or more Low Voltage warnings today, the
following report is displayed:
“D4: CAN’T TEST”
“D4: HEAT CAPACITY”
“D4: DUE TO”
“D4: VOLTAGE”
“D4: PROBLEMS”
Otherwise, if the assessed Heat Capacity rating is presently “good” and
there has been at most one heat-up today that failed to achieve the
expected rate, the following report is displayed:
“D4: HEATING”
“D4: CAPACITY”
“D4: IS FINE”
Otherwise, if the Heat Capacity is presently assessed as “bad”, or
presently assessed as “good” but two or more heat-ups today have not
reached the expected heat-up rate, the following report sequence is
generated:
“D4: YOU HAD 75%”
“D4: SLOW HEATS”
“D4: TODAY”
(Press
)
“D4: HAVE 20%”
“D4: SLOW HEATS”
“D4: THIS OIL”
(Press
)
“D4: HAD 0%”
“D4: SLOW HEATS”
“D4: LAST OIL”
(Press
)
If the Heat Capacity is assessed as bad (low heat-up rate on last heatup, and on three of the last four heat-ups), then the heating coils are
suspect and the following message is displayed:
“D4: CHECK COILS,”
“D4: CONTACTORS,”
“D4: AND WIRING”
3-16
602
Henny Penny
3-3. DIAGNOSTIC MODE
DETAILS (Continued)
Chick-fil-A Controls
Otherwise, the heating coils are presumed to be good and the following
messages appear:
“D4: HEATER COILS “
“D4: APPEAR OK “
(Press
)
“D4: CHECK
“
“D4: CONTACTORS, “
“D4: CONNECTIONS, “
“D4: AND WIRING “
D 5: Cook Times (Slow Cooks) Report
This section summarizes the “Slow Cooking” status for each product.
Actual cook times for cook cycles can vary from the programmed cook
time setting, due to the Load Compensation feature. Load
Compensation slows the cook timer down when the actual peanut oil
temperature is below a reference value, and speeds up the cook timer
countdown when peanut oil temperature is above the reference.
When the peanut oil temperature is lower than expected during a cook
cycle, the overall cook time will be longer than normal. If the actual
cook time stretches beyond a programmed limit, the controller counts a
“SLOW COOK” event and sounds an alarm at the end of the cook
cycle.
If low voltage or low amps are detected during the cook cycle, the
warning message indicates “LOW VOLTAGE” or “LOW AMPS”, but
the cycle will still count as a “slow cook”. If the voltage and amps have
been fine during the cook cycle but the cycle was started before the
Ready light came on, then the warning message indicates “SLOW
COOK — WAIT FOR READY LIGHT”. Otherwise, the slow
cooking problem will be attributed to a “bad batch” of product: cooking
too much in one load, or cooking product that is too cold (i.e. frozen
product on a pressure fryer when the product should be fresh).
If none of the products has more than 5% slow cook cycles today, the
following report is made:
“D5: COOK TIMES”
“D5: LOOK OK”
“D5: TODAY”
602
3-17
Henny Penny
3-3. DIAGNOSTIC MODE
DETAILS (Continued)
Chick-fil-A Controls
Otherwise, if one or more cook products have generated a “Slow
Cook” warning more than 5% of the time, but four or more Low
Voltage or Slow Heat-up warnings (any combination) have been
generated today, then the report is as follows:
“D5: SOME SLOW”
“D5: COOKS TODAY”
“D5: MAYBE DUE TO”
“D5: VOLTAGE OR”
“D5: COIL PROBLEMS”
Such a report is saying the slow cooking may be the result of low
voltage (which significantly reduces heat capacity) or the result of other
problems with the heating system. In this case, the “slow cook”
problems might not have anything to do with user error.
Otherwise, the slow cooking is generally attributed to user error:
cooking too much product in one load, cooking frozen product (in the
pressure fryer) when it should be fresh, or cooking before the Ready
light illuminates, etc.
An individual “XXXXX IS COOKING SLOWLY TODAY” report
item is generated for each product that has had more than 5% “Slow
Cook” warnings today. This report item is triggered based solely on the
number of slow cooks for that product, whether those slow cooks are
due to voltage or heating problems, or due to cooking before ready,
cooking too much, or cooking frozen product.
“D5: “FILET”
( <— Product Name )
“D5: COOKING SLOW”
“D5: TODAY”
(Press
)
If any of the slow cooks for this product are suspected as being due
user error, a second, “bad batch” report is generated for the product.
“D5: “NUG-STRP” ( <— Product Name )
“D5: COOKING SLOW”
“D5: TODAY”
(Press
3-18
)
602
Henny Penny
3-3. DIAGNOSTIC MODE
DETAILS (Continued)
Chick-fil-A Controls
“D5: POSSIBLE”
“D5: OVERSIZED”
“D5: OR FROZEN”
“D5: BATCH OF”
“D5: “NUG-STRP” “
“D5: DETECTED”
“D5: 3 TIMES”
“D5: TODAY”
(Press
( <— Product Name )
)
“D5: POSSIBLE”
“D5: OVERSIZED”
“D5: BATCH OF”
“D5: “FRIES”
“D5: DETECTED”
“D5: 5 TIMES”
“D5: TODAY”
D 6: “Cooked Before Ready” Report
This section shows how many cook cycles were started before the
Ready light was on. This is strictly a user error.
It is understood that the peanut oil temperature could be in the Ready
range when the user begins loading product, and could drop out of the
Ready range by the time the user finishes loading, closes the lid, and
starts the cook timer. This is normal, acceptable operation. The
controller accepts a cook cycle as “ready” if the peanut oil temperature
was in the Ready range at any time in the [90] seconds before the
button was pressed to start the cook cycle.
A “WAS NOT READY” warning is generated at the start of a cook
cycle only if the oil temperature was not in the ready range at any time
during the [90] second period before the cook timer was started. The
number of times this has happened today is indicated by the following
report item:
“D6: COOKED”
“D6: BEFORE READY”
“D6: 11 TIMES”
“D6: TODAY”
(Press
602
)
3-19
Henny Penny
3-3. DIAGNOSTIC MODE
DETAILS (Continued)
Chick-fil-A Controls
The number of “WAS NOT READY” warnings for this batch of peanut
oil is also reported. Note that this value does not yet include the Not
Ready warnings generated today.
“D6: BEFORE TODAY,”
“D6: COOKED”
“D6: BEFORE READY”
“D6: 8 TIMES”
“D6: ON THIS OIL”
(Press
)
Finally, the controller identifies how many times the Not Ready warning
was generated for the previous batch of peanut oil:
“D6: LAST OIL,”
“D6: COOKED”
“D6: BEFORE READY”
“D6: 24 TIMES”
D 7: “Stopped Too Soon” Report
This section shows how many cook cycles were stopped early by the
user, before the cook timer had counted down to 0:00 and the
“*DONE*” indication was given. This is strictly a user error.
Cycles that are canceled after cooking for less than 30 seconds are not
counted here. For example, if a cycle is accidentally started, and the
cook cycle is canceled after just a few seconds, this cycle will not be
counted as a “Stopped Too Soon” cycle.
Also, some allowance is given for stopping a cycle a little early. The
user can cancel the cycle up to 10 seconds early without penalty.
Otherwise, however, any cycle that was stopped with more than 10
seconds remaining (0:10) on the cook clock with be counted as a
“STOPPED TOO SOON” cycle.
The first item displays what percent of cycles today were stopped with
more than 0:10 remaining. All products are grouped into one count.
“D7: 8% OF LOADS”
“D7: WERE STOPPED”
“D7: TOO SOON”
“D7: TODAY”
(Press
3-20
)
602
Henny Penny
3-3. DIAGNOSTIC MODE
DETAILS (Continued)
Chick-fil-A Controls
The number of “Stopped Too Soon” cycles for this batch of peanut oil
is reported next. Note that this value does not yet include the cook
cycles from today.
“D7: BEFORE TODAY “
“D7: 3% OF LOADS”
“D7: WERE STOPPED”
“D7: TOO SOON”
“D7: ON THIS OIL”
(Press
)
Finally, the controller identifies percentage of “Stopped Too Soon”
cook cycles for the previous batch of peanut oil:
“D7: LAST OIL”
“D7: 5% OF LOADS”
“D7: WERE STOPPED”
“D7: TOO SOON”
D 8: “Beeped *DONE* Too Long” Report
Diagnostic Report section 8 reveals how many cook cycles beeped
“*DONE*” for more than 20 seconds before the user pressed the
Timer button to stop the cycle. This is strictly a user error.
The controller cannot detect when the product is actually removed from
the fryer. It only identifies how long the controller beeped “*DONE*”
before the user pressed
to stop the alarm.
The first item displays the percent of today’s cook cycles that beeped
“*DONE*” for more than 20 seconds before the user pressed
to stop it. All products are grouped into one count.
“D8: 10% OF LOADS”
“D8: BEEPED ‘DONE’”
“D8: TOO LONG”
“D8: TODAY”
(Press
602
)
3-21
Henny Penny
3-3. DIAGNOSTIC MODE
DETAILS (Continued)
Chick-fil-A Controls
The number of “Beeped ‘DONE’ Too Long” cycles for this batch of
peanut oil is reported next. Note that this value does not yet include the
cook cycles from today.
“D8: BEFORE TODAY “
“D8: 7% OF LOADS”
“D8: BEEPED ‘DONE’”
“D8: TOO LONG”
“D8: ON THIS OIL”
(Press the DOWN button...)
Finally, the controller identifies percentage of “Beeped ‘DONE’ Too
Long” cook cycles for the previous batch of peanut oil:
“D8: LAST OIL”
“D8: 6% OF LOADS”
“D8: BEEPED ‘DONE”
“D8: TOO LONG”
D 9: Irregular Loading Report
For most cook cycles, the controller determines when the product was
placed into the peanut oil. This report identifies the percentage of
cycles for which this determination was not successful.
The controller continually monitors the temperature and notes sudden
changes. When the user presses the button to start a cook cycle, the
controller checks to see if any sudden change was observed prior to the
start of the cycle. If a sudden temperature drop was noted in the [90]
second period before the start of the cook timer, the controller
interprets this to be the moment when the product was placed into the
peanut oil. The cooking timer then adjusts accordingly.
This “drop detection” detects most loads, but can fail for several
reasons. Anytime the detection routine fails to find the true drop point,
the controller logs an “Irregular Loading” count.
Examples of failed “drop detection” might be: the Operator takes more
than [90] seconds from the time he starts loading the product to the time
he presses the start button, or the Operator cooks a very light product
load, one or two filets, for example.
In these instances, no drop point will be found and that cook cycle
counts as an “Irregular Loading” cycle. Only products that have more
than 5% of loads with missed detection’s are reported.
3-22
602
Henny Penny
3-3. DIAGNOSTIC MODE
DETAILS (Continued)
Chick-fil-A Controls
Loading Report for Today
If no products have a “failed to detect” rate of more than 5%, the
controller shows:
“D9: LOADING”
“D9: LOOKS OK”
“D9: TODAY”
Otherwise, for each product that has more than 5% of loads in which
the controller failed to detect the drop point, the following message is
displayed:
“D9: IRREGULAR”
“D9: LOADING”
“D9: FOR 8% OF”
“D9: “FILET”
“D9: TODAY”
( <— Product Name )
Loading Report for Present Batch of Peanut oil
The data for this batch of peanut oil does not yet include cook cycles
from today.
If no products have a “failed to detect” rate of more than 5%, the
controller shows:
“D9: LOADING “
“D9: LOOKS OK “
“D9: THIS OIL “
Otherwise, for each product that has more than 5% of loads in which
the controller failed to detect the drop point, the following message is
displayed:
“D9: FOR THIS OIL,”
“D9: IRREGULAR “
“D9: LOADING “
“D9: FOR 12% OF “
“D9: “NUG-STRP” “
602
( <— Product Name )
3-23
Henny Penny
3-3. DIAGNOSTIC MODE
DETAILS (Continued)
Chick-fil-A Controls
Loading Report for Previous Batch of Peanut oil
If no products have a “failed to detect” rate of more than 5%, the
controller shows:
“D9: LOADING”
“D9: LOOKED OK”
“D9: PREVIOUS OIL”
Otherwise, for each product that has more than 5% of loads in which
the controller failed to detect the drop point, the following message is
displayed:
“D9: PREVIOUS OIL,”
“D9: IRREGULAR”
“D9: LOADING”
“D9: FOR 6% OF”
“D9: “BRK-FIL”
( <— Product Name )
D 10: Non-Standard Program Items Report
The last section in the Diagnostic Report identifies how many
programmable settings have been altered from their original, factory
default settings.
For each of the various program modes, the controller either reports
that “all settings match original values” or reports “N items do not match
original values”. This report makes it easy to see if any cook
parameters or other settings have been changed from Chick-fil-A’s
settings.
Some programming items may have been changed from original values
under the direction of Chick-fil-A’s corporate headquarters. In some
cases, a controller should have values that don’t match original values.
A report that “all items match original values” could actually be an
indication that something isn’t set right.
Keep in mind also that the number of such “approved” alterations might
be different for different versions of software.
If all product cook settings match the original, factory default values, the
controller displays the following message:
“10: ALL PROD’S”
“10: MATCH”
“10: ORIG. VALUES”
3-24
602
Henny Penny
3-3. DIAGNOSTIC MODE
DETAILS (Continued)
Chick-fil-A Controls
If any of the product settings do not match original values, the following
message is displayed (with one or more of the product numbers
blinking):
“10: PROD’S 123456”
“10: DO NOT MATCH”
“10: ORIG. VALUES”
In this case, the blinking numbers indicate which products do not match
original settings. If the numbers 3 and 5 are the only numbers blinking,
then product #3 and product #5 each have at least one setting changed
from their factory preset values. Products 1, 2, 4, and 6 are confirmed
to exactly match their original settings.
The second item in section 10 identifies how many items in CFA
Programming Mode have been changed from their original values.
These Chick-fil-A settings mainly deal with special Chick-fil-A
controller features like Oil Wear, Heat-up Monitoring, New Oil
Compensation, Oil Idle Compensation, Drop Detection, Clean-out
Mode, and Amps and Voltage alarms.
If all items in CFA Prog Mode match their original, factory preset
values, the following report is made:
“10: ALL CFA ITEMS”
“10: MATCH”
“10: ORIG. VALUES”
If any of the items in CFA Prog Mode do not match their original
values, the following message is displayed (with the actual number of
changed items):
“10: 2 CFA ITEMS”
“10: DO NOT MATCH”
“10: ORIG. VALUES’
A similar report is made for Special Program Mode. Special Program
(SP) Mode settings deal with °F/°C display, speaker tone and volume,
Melt and Idle Modes, and how the product buttons function (start cook
or merely select product).
“10: ALL SP ITEMS”
“10: MATCH
“
“10: ORIG. VALUES “
602
“10: 1 SP ITEMS “
“10: DO NOT MATCH “
“10: ORIG. VALUES “
3-25
Henny Penny
3-3. DIAGNOSTIC MODE
DETAILS (Continued)
Chick-fil-A Controls
The final item in section 10 identifies if any changes have been made to
the Heat Control settings. These settings affect the fryer’s heating
algorithms, and include the PC factors, rate-of-rise compensations, and
heat pulse cycle time, etc.
“10: ALL HC ITEMS”
“10: MATCH”
“10: ORIG. VALUES”
3-4. INFORMATION MODE
DETAILS
“10: 3 HC ITEMS”
“10: DO NOT MATCH”
“10: ORIG. VALUES”
This historic information in this mode can be recorded and used for
operational and technical help.
Press
and
at the same time and “*INFO MODE*”
shows in the display, followed by “1. E-LOG”.
Press and hold
to exit Information Mode at any time, or
after 2 minutes, controls automatically exit back to normal
operation.
1. E-LOG (error code log)
Press
and “1A. (date & time) *NOW* shows in display. This
is the present date and time.
Press
and if a error was recorded, “1B. (date, time, and error
code infromation)” shows in display. This is the latest error code that
the controls recorded.
Press
and the next latest error code information can be seen. Up
to 10 error codes (1B to 1K) can be stored in the E-LOG section.
Press
to continue to P-LOG.
2. P-LOG (power-up log)
Press
and “2A. (date & time) *NOW* shows in display. This
is the present date and time.
Press
and the latest power-up is shown, “2B. (date, time,)
PWR-UP”.
3-26
3-26
Henny Penny
3-4. INFORMATION MODE
DETAILS
Chick-fil-A Controls
Press
and the next latest power-up date is shown. Up
to 10 power-ups (2B to 2K) can be stored in the P-LOG section.
Press
to continue onto the heat-up log.
3. HEAT-UP’S
Press
and “3A. (date & time) *NOW* shows in display. This
is the present date and time.
Press
and the latest heat-up is shown, along with the heat-up rate,
ex: “3B. MAY-22, 8:37A 1.25”. The heat rate is the maximum rate
(degrees/second) the controller recorded during the shown time frame.
Press
and the next latest heat-up is shown. Up to 10 heat-ups
(3B to 3K) can be stored in the HEAT-UP log.
Press
to continue onto the COOK DATA.
4. COOK DATA
Press
to step through the following data:
FUNCTION
Time of day the last cook cycle was started
Product (Last product cooked)
Ready? (Was fryer Ready before start?)
Drop Detect Status
Drop Adjust (real time seconds)
Cook Time Adj (clock adjust)
Actual Elapsed Cook Time (real seconds)
Stopped: Time remaining, or secs past Done
“Slow Cook” for this cycle?
Frozen or Overload? (Bad batch)
Avg Temp during cook cycle
Max Voltage during cook cycle
Min Voltage during cook cycle
Max Amps during cook cycle
Min Amps during cook cycle
Press
602
DISPLAY EXAMPLE
4A. STARTED 10.25A
4B. PRODUCT -14C. READY? YES
4D. DETECT \/ T-14
4E. DROP ADJ T-14
4F. CK TM ADJ -13
4G. ACT TIME 4:50
4H. STOP DONE+2
4I. SLOW?
NO
4J. FRZ/OVL? NO
4K. AVG TMP 317°F
4L. MAX VOLT 99%
4M. MIN VOLT 97%
4N. MAX AMPS 35
4O. MIN AMPS 34
to continue onto TODAY’S DATA.
3-27
Henny Penny
3-4. INFORMATION MODE
DETAILS
Chick-fil-A Controls
5. TODAY’S DATA (automatically resets each day)
Press
to step through the following data:
FUNCTION
Today’s Date
Time of day last heat-up was completed
Peak heat-up rate (°F/Sec) for last heat-up
Was last heat-up acceptable?
Heat Cap. status (based on last 4 ht-ups)
Number of monitored heat-ups today
Number of slow heat-ups
Max time to heat 270°F to 310°F today
Lowest “peak rate” for today’s heat-ups
Maximum voltage today (when fryer on)
Minimum voltage today (when fryer on)
No. of “Low Voltage” warnings generated
Maximum Amp Draw today
Minimum Amp Draw today
Number of “Low Amps” warnings today
Non-cooking time (hh:mm) while fryer was on
Oil Wear accumulated so far today
Total number of cook cycles today
No. of cycles started before Ready
No. cycles quit early, (0:11 or more remaining)
No. cycles beeped *DONE* 21 sec or more
Individual product cook counts
Individual product “not detected” counts
Individual product “slow cook” counts
Individual product “frozen or overloaded”
DISPLAY EX:
5A. DATE APR-12
5B. LAST HEAT 9:45A
5C. LAST RATE 0.82
5D. LAST OK? YES
5E. HEAT CAP GOOD
5F. HEAT-UPS
2
5G. SLOW HT’S 0
5H. MAX HT TM 1:17
5I. MIN RATE 0.82
5J. MAX VOLT 99%
5K. MIN VOLT 95%
5L. LO VOLT’S 0
5M. MAX AMPS 35
5N. MIN AMPS 33
5O. LO AMP’S
0
5P. IDLE HRS 1:23
5Q. OIL WEAR
3
5R. TOT CK’S 11
5S. NOT RDY’S 2
5T. QUIT 11+
0
5U. DONE 21+
1
5V. Px CK CT
2
5W. Px NO DET 0
5X. Px SLO CT 0
5Y. Px FRZ/OV 0
During steps 5V through 5Y, press the product buttons (or
Manual Prog) to see data on individual product items.
Press
3-28
to continue onto PREV-DAY-SUN log.
602
Henny Penny
3-4. INFORMATION MODE
DETAILS
Chick-fil-A Controls
6. PREV DAY - SUN
Press
to step through the following data. During each step, press
to choose the day of the week, of the past 7 days.
FUNCTION
Day this data was recorded for
Time of day last heat-up was completed
Peak heat-up rate (°F/Sec) for last heat-up
Was that day’s last heat-up acceptable?
Heat Cap. status (based on last 4 ht-ups)
Number of monitored heat-ups that day
Number of slow heat-ups
Max time to heat 270°F to 310°F that day
Lowest “peak rate” for that day’s heat-ups
Maximum voltage that day (when fryer on)
Minimum voltage that day (when fryer on)
No. of “Low Voltage” warnings generated
Maximum Amp Draw that day
Minimum Amp Draw that day
No. of “Low Amps” warnings that day
Non-cooking time (hh:mm) while fryer was on
Oil Wear accumulated that day
Total number of cook cycles that day
Number of cycles started before Ready
No. cycles quit early, (0:11 or more remaining)
No. cycles beeped *DONE* 21 sec or more
Individual product cook counts
Individual product “not detected” counts
Individual product “slow cook” counts
Individual product “frozen or overloaded”
DISPLAY EX:
6A. DATE
APR-8
6B. LAST HEAT 8:15P
6C. LAST RATE 0.88
6D. LAST OK? YES
6E. HEAT CAP GOOD
6F. HEAT-UPS
7
6G. SLOW HT’S 0
6H. MAX HT TM 1:11
6I. MIN RATE 0.67
6J. MAX VOLT 102%
6K. MIN VOLT 98%
6L. LO VOLT’S 0
6M. MAX AMPS 35
6N. MIN AMPS 34
6O. LO AMP’S
0
6P. IDLE HRS 7:09
6Q. OIL WEAR 39
6R. TOT CK’S 18
6S. NOT RDY’S 2
6T. QUIT 11+
1
6U. DONE 21+
3
6V. Px CK CT 12
6W. Px NO DET 1
6X. Px SLO CT 0
6Y. Px FRZ/OV 1
During steps 6V through 6Y, press the product buttons (or
Manual Prog) to see data on individual product items.
Press
602
to continue onto 7-DAY TOTALS log.
3-29
Henny Penny
3-4. INFORMATION MODE
DETAILS
Chick-fil-A Controls
7. 7-DAY TOTALS
Press
to step through the following data:
FUNCTION
Oldest day in the “previous days” history
Number of days with data included in totals
Number of monitored heat-ups
Number of slow heat-ups
Max time to heat 270°F to 310°F
Lowest “peak rate” of all heat-ups
Maximum voltage
Minimum voltage
No. of “Low Voltage” warnings generated
Maximum Amp Draw
Minimum Amp Draw
Number of “Low Amps” warnings
Non-cooking time (hrs) while fryer was on
Total Oil Wear accumulated
Total number of cook cycles
Number of cycles started before Ready
No. cycles quit early, (0:11 or more remaining)
No. cycles beeped *DONE* 21 sec or more
Individual product cook counts
Individual product “not detected” counts
Individual product “slow cook” counts
Individual product “frozen or overloaded”
DISPLAY EX:
7A. SINCE APR-5
7B. DAYS CNT
6
7C. HEAT-UPS 30
7D. SLOW HT’S 1
7E. MAX HT TM 3:25
7F. MIN RATE 0.47
7G. MAX VOLT 102%
7H. MIN VOLT 91%
7I. LO VOLT’S 0
7J. MAX AMPS 35
7K. MIN AMPS 32
7L. LO AMP’S
0
7M. IDLE HRS 43
7N. TOT WEAR 278
7O. TOT CK’S 125
7P. NOT RDY’S
7
7Q. QUIT 11+
1
7R. DONE 21+
3
7S. Px CK CT 77
7T. Px NO DET 3
7U. Px SLO CT 0
7V. Px FRZ/OV 1
During steps 7S through 7V, press the product buttons (or
Manual Prog) to see data on individual product items.
Press
3-30
to continue onto OIL DATA log.
602
Henny Penny
3-4. INFORMATION MODE
DETAILS
Chick-fil-A Controls
8. OIL DATA (current batch; resets by Clean-out Mode)
Press
to step through the following data:
FUNCTION
The day current batch of oil was started
Number of days with data included in totals
Number of monitored heat-ups
Number of slow heat-ups
Max time to heat 270°F to 310°F
Lowest “peak rate” of all heat-ups
Maximum voltage
Minimum voltage
No. of “Low Voltage” warnings generated
Maximum Amp Draw
Minimum Amp Draw
No. of “Low Amps” warnings
Non-cooking time (hrs) while fryer was on
Total Oil Wear accumulated
Total number of cook cycles
Number of cycles started before Ready
No. cycles quit early, (0:11 or more remaining)
No. cycles beeped *DONE* 21 sec or more
Individual product cook counts
Individual product “not detected” counts
Individual product “slow cook” counts
Individual product “frozen or overloaded”
DISPLAY EX:
8A. SINCE APR-1
8B. DAYS CNT 10
8C. HEAT-UPS 75
8D. SLOW HT’S 2
8E. MAX HT TM 3:25
8F. MIN RATE 0.43
8G. MAX VOLT 102%
8H. MIN VOLT 91%
8I. LO VOLT’S 0
8J. MAX AMPS 35
8K. MIN AMPS 32
8L. LO AMP’S
0
8M. IDLE HRS 43
8N. TOT WEAR 278
8O. TOT CK’S 125
8P. NOT RDY’S
7
8Q. QUIT 11+
1
8R. DONE 21+
3
8S. Px CK CT 77
8T. Px NO DET 3
8U. Px SLO CT 0
8V. Px FRZ/OV 1
During steps 8S through 8V, press the product buttons (or
Manual Prog) to see data on individual product items.
Press
602
to continue onto PREV OIL DATA log.
3-31
Henny Penny
3-4. INFORMATION MODE
DETAILS
Chick-fil-A Controls
9. PREV OIL DATA (moved here from Oil Data log; assumes new
peanut oil)
Press
to step through the following data:
FUNCTION
The day previous batch of oil was started
Number of days with data included in totals
Number of monitored heat-ups
Number of slow heat-ups
Max time to heat 270°F to 310°F
Lowest “peak rate” of all heat-ups
Maximum voltage
Minimum voltage
Number of “Low Voltage” warnings generated
Maximum Amp Draw
Minimum Amp Draw
Number of “Low Amps” warnings
Non-cooking time (hours) while fryer was on
Total Oil Wear accumulated
Total number of cook cycles
Number of cycles started before Ready
Num. cycles quit early, with 0:11 or more rem
Num. cycles beeped *DONE* 21 sec or more
Individual product cook counts
Individual product “not detected” counts
Individual product “slow cook” counts
Individual product “frozen or overloaded”
DISPLAY EX:
9A. BEGAN MAR-9
9B. DAYS CNT 18
9C. HEAT-UPS 98
9D. SLOW HT’S 0
9E. MAX HT TM 1:31
9F. MIN RATE 0.57
9G. MAX VOLT 101%
9H. MIN VOLT 96%
9I. LO VOLT’S 0
9J. MAX AMPS 35
9K. MIN AMPS 33
9L. LO AMP’S
0
9M. IDLE HRS 62
9N. TOT WEAR 1523
9O. TOT CK’S 653
9P. NOT RDY’S 25
9Q. QUIT 11+
3
9R. DONE 21+ 13
9S. Px CK CT 466
9T. Px NO DET 31
9U. Px SLO CT 0
9V. Px FRZ/OV 5
During steps 9S through 9V, press the product buttons (or
Manual Prog) to see data on individual product items.
Press
3-32
to continue onto INP A_VHDSF_M check.
602
Henny Penny
3-4. INFORMATION MODE
DETAILS
Chick-fil-A Controls
10. INP A_VHDSF_M
This mode displays the status of components and inputs. If the input
signal is detected, an identifying letter is displayed (see below). If the
signal is not detected, “_” is displayed.
With the Cook/Pump switch turned to COOK, and all inputs detected,
“H_ P_ A_VHDSF_M” shows in the diplay, for electric fryers; “H_ P_
A_VHDSFP_” for gas fryers. See below for “definition” of codes.
A = Cook/Pump Switch turned to COOK.
B = Cook/Pump Switch in COOK position
V = Volts - 24 VAC detected
H = High Limit - If “H” is present, the high limit is good.
If “H” is missing, the high limit is tripped (overheated) or faulty.
D = DRAIN SWITCH - If “D” is present, the drain handle is closed.
If “D” is missing, the drain is open or faulty.
S = Cook/Pump switch “on” interlock circuit: If “S” is present, the
Cook/Pump switch is in the COOK position. If the “S” is missing,
the power switch is either off, failed, or wired incorrectly.
F = FAN
P = PV - Detects 24 V jumper to PV terminal - Gas fryers only
M = MV - Detects 24 V jumper to MV terminal - Electric fryers only
Press
to view the specific status of each input. An underscore
(“_”) indicates the input is not presently detected. A Checkmark (“\/” )
indicates the signal is detecting a normal input. A blinking (“X”)
indicates the signal is presently detected, but is detected as a half-wave
(partially failed) input.
The V, H, D, S, F, P, and M signals below are wired in series.
The first signal missing out of this sequence will generally
cause all signals to the right of it to be missing as well.
Press
602
to continue onto OUTP H* P_ check.
3-33
Henny Penny
3-4. INFORMATION MODE
DETAILS
Chick-fil-A Controls
11. INP A_VHDSF_M
This mode displays the status of components and outputs. If the output
signal is detected, an identifying letter is displayed (see below), followed
by an “*”. If the output is off, “_” is displayed.
H = Heat output
P = Pressure output
If heat is on, “H*” shows in display. If heat is off, “H_” shows in
display. If controls senses a problem with the heat output, “H*” shows
in display, with the “*” flashing.
If pressure is on, “P*” shows in display. If pressure is off, “H_” shows
in display. If controls senses a problem with the pressure output, “H*”
shows in display, with the “*” flashing.
Press
to view the “amps” status of each output.
“H\/” and “P\/” in the display means the amps are good. A flashing “X”
behind the H or P means a problem exists.
Press
to view the No Connect/Ground (“NC/GD”) status of each
output. This monitors a possible problem with the relays on the output
PC board.
“H\/” and “P\/” in the display means everything on the output PC board
is good. A flashing “X” behind the H or P means a problem exists.
Press
Press
to view the outputs and inputs (see step 10) together.
to continue onto the POT TMP reading.
12. POT TMP
This step shows the present peanut oil temperature. The display shows
“12. POT TMP (temp.)”.
Press
to continue onto the CPU TMP reading.
13. CPU TMP
This step shows the present PC board temperature.
Press
3-34
to continue onto the ANALOG reading.
602
Henny Penny
3-4. INFORMATION MODE
DETAILS
Chick-fil-A Controls
14. ANALOG <1> 2344
This step displays the present status of any channel of the controller’s a
to d converter. This feature may be useful to a technician
troubleshooting a problem with the fryer or controller.
The displayed value can be toggled between Volts and Bits by pressing
. If the displayed value has a decimal point, it is voltage
(0 to 5 VDC). If no decimal point is shown, the value is a-to-d bits
(0 - 4095).
Press
to continue onto AC VOLTS reading.
15. AC VOLTS 98%
This item displays the present status of the line voltage supply to the
fryer. The displayed value is averaged over a 10-second period, so
brief dips or fluctuations in the voltage might not show up in this display.
The voltage is normally displayed as a “percent of nominal” value,
where 100% would indicate that voltage is right on the nominal value
(i.e. 208 volts for a 208v fryer). The display can be toggled to an
actual Voltage value by pressing
.
Press
to continue onto AMPS reading.
16. AMPS 33 33 33
For Electric Fryers, this display shows the present readings from the
fryer’s amps sensors, which monitor the electrical current supplied to
the heaters. (These sensors are not present on Gas fryers.)
On Pressure Fryers, these values indicate the current through each
supply leg to the heaters. These values do not correspond directly to
the current through an individual heater coil.
The “Amps” values should normally cycle on and off with the Heat light,
and all three values should be about the same.
Press and hold
to exit Information Mode at any time, or
after 2 minutes, controls automatically exit back to normal
operation.
602
3-35
Henny Penny
Chick-fil-A Controls
LIMITED WARRANTY FOR HENNY PENNY APPLIANCES
Subject to the following conditions, Henny Penny Corporation makes the following limited warranties to the
original purchaser only for Henny Penny appliances and replacement parts:
NEW EQUIPMENT: Any part of a new appliance, except lamps and fuses, which proves to be defective
in material or workmanship within two (2) years from date of original installation, will be repaired or replaced
without charge F.O.B. factory, Eaton, Ohio, or F.O.B. authorized distributor. To validate this warranty, the
registration card for the appliance must be mailed to Henny Penny within ten (10) days after installation.
REPLACEMENT PARTS: Any appliance replacement part, except lamps and fuses, which proves to be
defective in material or workmanship within ninety (90) days from date of original installation will be repaired
or replaced without charge F.O.B. factory, Eaton, Ohio, or F.O.B. authorized distributor.
The warranty for new equipment and replacement parts covers only the repair or replacement of the defective
part and does not include any labor charges for the removal and installation of any parts, travel or other expenses
incidental to the repair or replacement of a part.
EXTENDED FRYPOT WARRANTY: Henny Penny will replace any frypot that fails due to manufacturing or
workmanship issues for a period of up to seven (7) years from date of manufacture. This warranty shall not cover
any frypot that fails due to any misuse or abuse, such as heating of the frypot without shortening.
0 TO 3 YEARS: During this time, any frypot that fails due to manufacturing or workmanship issues will be replaced at no charge for parts, labor, or freight. Henny Penny will either install a new
frypot at no cost or provide a new or reconditioned replacement fryer at no cost.
3 TO 7 YEARS: During this time, any frypot that fails due to manufacturing or workmanship issues will be replaced at no charge for the frypot only. Any freight charges and labor costs to install
the new frypot as well as the cost of any other parts replaced, such as insulation, thermal sensors,
high limits, fittings, and hardware, will be the responsibility of the owner.
Any claim must be represented to either Henny Penny or the distributor from whom the appliance was purchased. No allowance will be granted for repairs made by anyone else without Henny Penny’s written consent. If
damage occurs during shipping, notify the sender at once so that a claim may be filed.
THE ABOVE LIMITED WARRANTY SETS FORTH THE SOLE REMEDY AGAINST HENNY PENNY
FOR ANY BREACH OF WARRANTY OR OTHER TERM. BUYER AGREES THAT NO OTHER REMEDY
(INCLUDING CLAIMS FOR ANY INCIDENTAL OR CONSEQUENTIAL DAMAGES) SHALL BE AVAILABLE.
The above limited warranty does not apply (a) to damage resulting from accident, alteration, misuse, or abuse;
(b) if the equipment’s serial number is removed or defaced; or (c) for lamps and fuses. THE ABOVE LIMITED
WARRANTY IS EXPRESSLY IN LIEU OF ALL OTHER WARRANTIES, EXPRESS OR IMPLIED, INCLUDING MERCHANTABILITY AND FITNESS, AND ALL OTHER WARRANTIES ARE EXCLUDED.
HENNY PENNY NEITHER ASSUMES NOR AUTHORIZES ANY PERSON TO ASSUME FOR IT ANY
OTHER OBLIGATION OR LIABILITY.