1
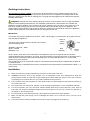
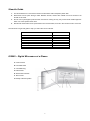
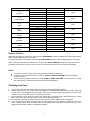
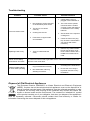
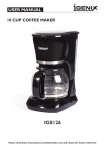
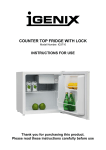
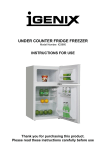
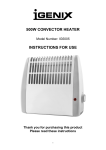
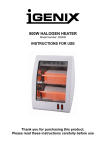
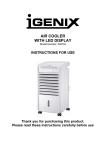
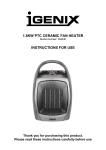
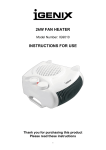
20L DIGITAL MICROWAVE 800W
Model Number: IG2095
INSTRUCTIONS FOR USE
Thank you for purchasing this product
Please read these instructions carefully before use
Trouble with your
microwave? …
Try our troubleshooting
guide on page 9.
If that does not solve the
issue contact us …
Tel: 01473 271 272
Email: [email protected]
Fax: 01473 270 733
Website: www.igenix.co.uk
Postal Address:
Customer Service Department
Pik-a-Pak Electrical Distributors
38 Bluestem Road,
Ransomes Europark,
Ipswich, IP3 9RR
When writing to or emailing us to report a fault please ensure you attach a copy of your proof of
purchase. Please retain your original
2
SAFETY INSTRUCTIONS
Important: This appliance is not intended for use by persons including children with reduced physical,
sensory or mental capabilities, or lack of experience and knowledge, unless they have been given
supervision or instruction concerning use of the appliances by a person responsible for their safety.
WARNING: To reduce the risk of burns, electric shock, fire, injury to persons or exposure to excessive
microwave energy:
1.
2.
3.
4.
5.
6.
7.
8.
1.
2.
3.
4.
9.
10.
11.
12.
13.
14.
15.
16.
17.
18.
Read all instructions before using the appliance.
This appliance is for domestic use only.
This appliance is for indoor use only. Do not use outdoors.
Use this appliance only for its intended use as described in this manual. Do not use corrosive chemicals
or vapors in this appliance. This type of oven is specifically designed to heat, cook or dry food. It is not
designed for industrial or laboratory use.
Do not operate the oven when empty.
Do not operate this appliance if it has a damaged cord or plug, if it is not working properly or if it has
been damaged or dropped. If the supply cord is damaged, it must be replaced by the manufacturer or its
service agent or a similarly qualified person in order to avoid a hazard
WARNING: Children should be supervised to ensure that they do not play with the appliance.
To reduce the risk of fire in the oven cavity:
When heating food in plastic or paper container, check the oven frequently to the possibility of ignition.
Remove wire twist-ties from paper or plastic bags before placing bag in oven.
If smoke is observed, switch off or unplug the appliance and keep the door closed in order to stifle any
flames.
Do not use the cavity for storage purposes. Do not leave paper products, cooking utensils or food in the
cavity when not in use.
WARNING: Liquid or other food must not be heated in sealed containers since they are liable to
explode.
Microwave heating of beverage can result in delayed eruptive boiling, therefore care has to be taken
when handle the container.
Do not fry food in the oven. Hot oil can damage oven parts and utensils and even result in skin burns.
Eggs in their shell and whole hard-boiled eggs should not be heated in microwave ovens since they may
explode even after microwave heating has ended.
Pierce foods with heavy skins such as potatoes, whole squashes, apples and chestnuts before cooking.
The contents of feeding bottles and baby jars should be stirred or shaken and the temperature should
be checked before serving in order to avoid burns.
Cooking utensils may become hot because of heat transferred from the heated food. Potholders may be
needed to handle the utensil.
Utensils should be checked to ensure that they are suitable for use in microwave oven.
WARNING: It is hazardous for anyone other than a trained person to carry out any service or repair
operation which involves the removal of any cover which gives protection against exposure to
microwave energy.
This product is a Group 2 Class B ISM equipment. The definition of Group 2 which contains all ISM
(Industrial, Scientific and Medical) equipment in which radio-frequency energy is intentionally generated
and/or used in the form of electromagnetic radiation for the treatment of material, and spark erosion
equipment. For Class B equipment is equipment suitable for use in domestic establishments and in
establishments directly connected to a low voltage power supply network which supplies buildings used
for domestic purpose.
SPECIFICATIONS
Power Consumption:
Output:
Operation Frequency:
Outside Dimensions:
Oven Cavity
Dimensions:
Oven Capacity:
Net Weight:
220 - 240V, 50Hz, 1200-1270W(Microwave)
750 - 800W
2450MHz
258mm(H)×439mm(W)×355mm(D)
208mm(H)×306mm(W)×307mm(D)
20Litres
Approx.10.7 kg
3
Earthing Instructions
This appliance must be earthed. In the event of an electrical short circuit, earthing reduces the risk of
electric shock by providing an escape wire for the electric current. This appliance is equipped with a cord
having an earthing wire and with an earthing plug. The plug must be plugged into an outlet that is properly
installed and earthed.
WARNING: Improper use of the earthing plug can result in a risk of electric shock. Consult a qualified
electrician if the earthing instructions are not completely understood or if doubt exists as to whether the
appliance is properly earthed. If it is necessary to use an extension cord, use only a 3 wire extension cord
that has a 3 blade earthing plug and a 3 slot receptacle that will accept the plug on the appliance. The
marked rating of the extension cord should be equal to or greater than the electrical rating of the appliance.
Ensure that the extension cord cable does not over hang the counter top.
IMPORTANT
You should only plug the appliance into a 230V – 240V ~50Hz supply. Connecting it to other power sources
may damage the appliance.
Green &
Yellow
The wires in this mains lead are coloured in accordance
Fuse
(Earth)
with the following code
GREEN & YELLOW – Earth
BLUE – Neutral
BROWN - Live
Blue
(Neutral)
Brown
(Live)
As the colours of the wires in the mains lead of this appliance may not correspond with the coloured
markings identifying the terminals in your plug, proceed as follows: The earth wire which is coloured green &
yellow must be connected to the terminal in the plug which is marked with the letter ‘E’ or by the earth
symbol or by green & yellow.
The neutral wire which is coloured blue must be connected to the terminal which is marked with the letter ‘N’
or coloured black.
The live wire which is coloured brown must be connected to the terminal which is marked with the letter ‘L’ or
coloured red.
Installation
1.
2.
3.
4.
5.
6.
7.
8.
Make sure that all the packing materials are removed from the inside of the door.
WARNING: Check the oven for any damage, such as misaligned or bent door, damaged door seals and
sealing surface, broken or loose door hinges and latches and dents inside the cavity or on the door. If there is
any damage, do not operate the oven and contact qualified service personnel.
This microwave oven must be placed on a flat, stable surface to hold its weight and the heaviest food likely to
be cooked in the oven.
Do not place the oven where heat, moisture, or high humidity are generated, or near combustible materials.
For correct operation, the oven must have sufficient airflow. Allow 30cm of space above the oven, 20cm at
both sides. The minimum installation height is 85cm from the ground. Do not cover or block any openings on
the appliance. Do not remove feet.
Do not operate the oven without glass tray, roller support, and shaft in their proper positions.
Make sure that the power supply cord is undamaged and does not run under the oven or over any hot or
sharp surface.
The socket must be readily accessible so that it can be easily unplugged in an emergency.
4
Utensils Guide
1.
2.
3.
4.
The ideal material for a microwave utensil is a Microwave safe transparent plastic dish.
Microwaves cannot pass through metal. Metallic utensils, dishes with metallic trim and aluminum foil
should not be used.
Do not use recycled paper products when microwave cooking as they may contain small metal fragments
which can cause sparks and/or fires.
Round/oval dishes rather than square dishes are recommended, as food in the corners tends to overcook.
The list below is a general guide to help you select the correct utensils.
COOKWARE
MICROWAVE SAFE?
Heat–Resistant Glass
Non Heat–Resistant Glass
Heat–Resistant Ceramics
Microwave–Safe Plastic Dish
Kitchen Paper
Metal Tray
Metal Rack
Aluminium Foil & Foil Containers
Yes
No
Yes
Yes
Yes
No
No
No
IG2085 – Digital Microwave at a Glance
A. Control Panel
B. Turntable Shaft
C. Turntable Ring
D. Glass Plate
E. Observation Window
F. Door Frame
G. Safety Interlock System
5
Control Panel
Operation Instructions
Each time you press a button a beep will sound.
Setting the Digital Clock
Before the first use, the digital clock will need to be set with the correct time,
otherwise the microwave will not function. To start with the display will show
‘0:00’
1. Press ‘CLOCK/ PRESET’ button once. The hour figure will flash
2. Turn the control dial to adjust the hour figure. The time options will be
between 0-23.
3. Press ‘CLOCK/ PRESET’ button again. The minute figure will flash.
4. Turn the control dial to adjust the minute figure. The time options will be
between 0-59.
5. Press ‘CLOCK/ PRESET’ to confirm the setting.’ : ‘ will flash.
Microwave Cooking
The Microwave has 5 different output settings that can be selected before
cooking.
1. Press the ‘MICROWAVE’ button once and ‘P100’ will display
2. Turn the control dial to select the desired microwave power. Please see
table below.
3. Press ‘START/+30SEC./CONFIRM’ to confirm your choice
4. Turn the control dial to adjust the cooking time. The time can be adjusted
from 0:05 to 95:00.
5. Press ‘START/+30SEC./CONFRIM’ to start the cooking.
Microwave Power
100%
80%
50%
30%
10%
Display
P100
P80
P50
P30
P10
Speedy Cooking
1.
2.
Press ‘START/+30SEC./CONFIRM’ button to cook with 100% power level for 30 seconds. Each press of
the same key will increase the cooking time by 30 seconds. The maximum cooking time is 95 minutes.
When you are using the microwave in a setting from the auto menu or weight defrost cooking time
cannot be increased by pressing the ‘START/+30SEC./CONFIRM’ button.
Auto Defrost
The oven allows the defrosting of meat, poultry, and seafood. The time and the defrosting power are
adjusted automatically once the weight is programmed.
1.
2.
3.
1.
2.
3.
Defrost by Weight
Press ‘W.T./TIME DEFROST’ button once. The screen will display ‘dEF1’
Turn the control dial to select the food weight. The range of weight is between 100-2000g.
Press ‘START/+30SEC/CONFIRM’ button to start defrosting.
Defrost by Time
Press ‘W.T./TIME DEFROST’ button twice. The screen will display ‘dEF2’
Turn the control dial to select the defrosting time. The maximum defrosting time is 95 minutes.
Press ‘START/+30SEC/CONFIRM’ button to start defrosting.
6
Multi Stage Cooking
Some recipes may require setting a multi-stage program involving defrosting, and different power levels. The
following example shows the steps in setting up such a program:
Example: If you want to defrost the food for 5 minutes, then to cook with 80% microwave power for 7
minutes. The steps are as follows;
1.
2.
3.
4.
5.
6.
7.
Press ‘W.T./TIME DEFROST’ twice, the screen will display ‘dEF2’
Turn the control dial to adjust defrost time of 5 minutes
Press ‘MICROWAVE’ once
Turn the control dial to choose 80% microwave power ‘P80’ will be displayed
Press ‘START/+30SEC./CONFIRM’ to confirm
Turn the control dial to adjust the cooking time to 7 minutes
Press ‘START/+30SEC./CONFIRM’
NOTE:
The buzzer will ring after each stage and the next stage will begin
Pre-set Function
The Pre-set function allows you to programme in a desired cooking program and set it to start at a delayed
time.
1. Make sure that the clock has already been set. Please see ‘Setting the Digital Clock’ instructions.
2. Input the desired cooking program. Two stages can be set at the most. Defrost should not be set in a
preset function.
Example: If you want to cook with 80% microwave power for 7 minutes.
1. Press ‘MICROWAVE’ once
2. Turn the control dial to choose 80% microwave power until ‘P80’ is displayed
3. Press ‘START/+30SEC./CONFIRM’ to confirm
4. Turn the control dial to adjust the cooking time to 7 minutes
5. After the above steps please DO NOT press ‘START/+30SEC./CONFIRM’ but do as follows
6. Press ‘CLOCK/PRE-SET’ the minute figure will flash
7. Turn the control dial to adjust the minute figure the input time will be between 0-59 minutes
8. Press ‘START/+30SEC/CONFIRM’ to finish setting ‘:’ will light, the buzzer will ring twice when the time
arrives, then cooking will start automatically.
Child Lock
To set the lock press ‘STOP/CLEAR’ for 3 seconds, there will be a long ‘beep’ denoting entering the childlock state. The screen will display the locked indicator.
To release the lock press ‘STOP/CLEAR’ for 3 seconds, there will be a long ‘beep’ denoting the lock is
released.
Auto Menu
1.
2.
3.
4.
5.
With no other setting applied, turn the control dial to the right to choose a menu between A-1 and A-8
(Please see table below of menu functions)
Press ‘START/+30SEC./CONFIRM’ to confirm the menu you choose
Turn the control dial to choose the food weight
Press ‘START/+30SEC./CONFIRM’ to start cooking
After cooking has finished, the buzzer will sound 5 times.
7
MENU
A -1
REHEAT
A -2
VEGETABLE
A– 3
FISH
A– 4
MEAT
A– 5
PASTA
A– 6
POTATO
A– 7
PIZZA
A– 8
SOUP
WEIGHT (G)
200
400
600
200
300
400
250
350
450
250
350
450
50 (With water 450ml)
100 (With water 800ml)
200
400
600
200
400
200
400
DISPLAY
200
400
600
200
300
400
250
350
450
250
350
450
50
100
200
400
600
200
400
200
400
POWER
100%
100%
80%
100%
80%
100%
100%
80%
Enquire Function
Whilst the microwave is cooking you can press the ‘MICROWAVE’ button to display the current power being
used. It will be displayed for 2-3 seconds.
If you wish check the current time, press the ‘CLOCK/PRESET’ button. It will be displayed for 2-3 seconds
When a pre-set mode has been chosen you can press the ‘CLOCK/PRE-SET’ button to check the time for
the delayed start cooking. This will show for 2-3 seconds then it will return to the normal clock display.
Notes
The buzzer will sound once when turning the control dial at the beginning
If cooking is interrupted and the door opened. ‘START/+30SEC./CONFIRM’ must be pressed to
continue cooking.
Once a cooking program has been set if the ‘START/+30SEC./CONFIRM’ is not pressed in 1 minute
the setting will be cancelled and the current time will be displayed.
Cleaning and Care
1.
2.
3.
4.
5.
Turn off the oven and remove the power plug from the wall socket before cleaning.
Keep the inside of the oven clean. When food splatters or spilled liquids adhere to oven walls, wipe with
a damp cloth. Mild detergent may be used if oven gets very dirty. Avoid using spray and other harsh
cleaners as they may stain, streak or dull the door surface.
Do not allow the control panel to become wet. Clean with a soft, damp cloth. When cleaning the control
panel, leave oven door open to prevent oven from accidentally turning on.
If it becomes necessary to replace the oven light, please consult a dealer to have it replaced.
The oven should be cleaned regularly and any food deposits removed. Failure to maintain the oven in a
clean condition could lead to deterioration of the surface that could adversely affect the life of the
appliance and possibly result in a hazardous situation.
8
Troubleshooting
Problem
Possible Cause
Possible Solution
1. Check that the oven is
plugged in and switched on
1. Not plugged in and/or switched
on at the mains power outlet.
2. The door is not closed
correctly.
The oven doesn’t work
3. Cooking time not set.
4. Fuse blown or tripped main
circuit breaker.
Sparking inside cavity
Steam accumulating
around door and vents
Glass turntable making
a noise whilst operating
1. There is metal inside the
cavity.
2. The oven will not operate
unless the door is sealed
correctly. Check that there is
no obstruction to the safety
interlock.
3. Set the timer to the required
cooking time.
4. Check the fuse in the plug
top. Check the fuse board in
your house and reset if
necessary.
1. Remove any metal utensils.
Do not use tin foil to cover
food. Ceramic dishes with a
metallic trim should not be
used.
It is normal for some foods to generate steam. This is not a fault and will clear
when the oven cools down.
1. The turntable shaft and roller
ring not assembled correctly.
2. Dirt underneath roller ring
affecting movement.
1. Assemble correctly
according to the instructions.
2. Ensure the oven cavity is
kept clean and free of any
food debris.
Disposal of Old Electrical Appliances
The European Directive 2002/96/EC on Waste Electrical and Electronic Equipment
(WEEE), requires that old household electrical appliances must not be disposed of in
normal unsorted municipal waste. Old appliances must be collected separately in order
to optimise the recovery and recycling of the materials they contain and reduce the
impact on human health and the environment. The crossed out “wheeled bin” symbol
on the product reminds you of your obligation, that when you dispose of the appliance it
must be separately collected. Consumers should contact their local authority or retailer for
information concerning the correct disposal of their old appliance.
9
Guarantee Information
This product is guaranteed for a period of 12 months from the date of purchase against mechanical and
electrical defects.
You can extend your warranty for a further 12 months by registering your product online. Visit
www.igenix.co.uk to register your extended warranty. Alternatively you can complete the warranty
card enclosed with this manual and return to us by post. Product must be registered within 30 days of purchase.
The warranty does not cover consumable parts that require replacement under normal use or accessories.
This includes the glass plate and control dials.
If your microwave oven becomes faulty within the guarantee period please contact our Customer Service
department on 01473 271 272 or write to us at the address detailed below.
Please quote the model number which begins IG, the ‘Batch Number’ beginning ‘5’ and give details of the
exact fault.
We will then decide whether to repair or replace the item.
You will be required to return a copy of your proof of purchase. Please retain your original.
If an item is replaced within the guarantee period, the guarantee for the replacement item will be calculated
from the purchase date of the original.
Before calling the Customer Service number please ensure you have checked the Troubleshooting
guide on Page 9.
This product is for domestic household use only. To qualify for the guarantee the product must have
been used according to the instructions in this User Manual. Any misuse of the product will result in
the warranty being void.
View the range online at www.igenix.co.uk
Follow us on Twitter
@Igenix_Products
Tel: 01473 271 272
Email: [email protected]
Fax: 01473 270 733
Website: www.igenix.co.uk
Postal Address:
Customer Service Department
Pik-a-Pak Electrical Distributors
38 Bluestem Road,
Ransomes Europark,
Ipswich, IP3 9RR
When writing or emailing us to report a fault please ensure you attach a copy of your proof of purchase.
Please retain your original
10