1
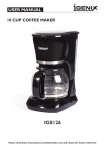
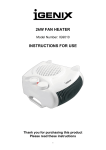
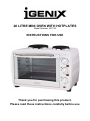
26 LITRE MINI OVEN WITH HOTPLATES
Model Number: IG7126
INSTRUCTIONS FOR USE
Thank you for purchasing this product.
Please read these instructions carefully before use
SAFETY INSTRUCTIONS
Important: This appliance is not intended for use by persons including children with reduced physical, sensory or
mental capabilities, or lack of experience and knowledge, unless they have been given supervision or instruction
concerning use of the appliances by a person responsible for their safety.
1.
Read all instructions before using the appliance.
2.
This appliance is for domestic use only. This appliance is for indoor use only. Do not use outdoors.
3.
WARNING: Children should be supervised to ensure that they do not play with the appliance.
4.
Never leave this mini oven unattended when in use.
5.
Make sure the voltage in your home corresponds to the one shown on the rating label of the appliance.
6.
Use this appliance only for its intended use as described in this manual. Do not use corrosive chemicals or vapors in this
appliance.
7.
Never touch hot surfaces with your bare hands. Always use insulated oven gloves when removing hot items from the
oven. Always use the appropriate handles and dials.
8.
Do not operate this appliance if it has a damaged cord or plug, if it is not working properly or if it has been damaged or
dropped. If the supply cord is damaged, it must be replaced by the manufacturer or its service agent or a similarly
qualified person in order to avoid a hazard.
9.
To protect against electric shock, do not immerse cord, plug or any parts of the oven in water or any other liquid.
10. Do not let cord hang over edge of table or counter, or touch hot surfaces.
11. Use only the accessories provided with the mini oven.
12. Do not place on or near an electric or gas hob.
13. Allow at least four inches of spaces around each side of the mini oven for adequate air circulation.
14. To disconnect, turn all controls and switched to the „OFF‟ position. Remove the plug from the power socket. Do not pull
the plug by its cord.
15. Unplug from the socket when not in use or before cleaning.
16. Allow the oven and the hob to cool down before removing parts or cleaning. Do not clean with metal scouring pads as this
may create a risk of electric shock.
17. To disconnect, turn the timer control dial to the „OFF‟ position and then remove the plug. Always hold the plug and never
pull the cord.
18. Do not insert any oversized foods, containers or metal utensils inside the cavity as this may create a risk of fire.
19. A fire may be caused if the mini oven is covered by or touching flammable materials such as curtains, tea towels, paper
towels or oven gloves etc. Do not store any flammable items on or near the mini oven.
20. Only use oven safe utensils and bake ware on or inside the oven.
21. Extreme caution must be taken when removing any containers with hot oils or liquids.
22. Do not cover any parts of the mini oven or baking trays with metal foil as this may cause the oven to overheat.
23. Do not use the cavity for storage purposes. Do not leave cooking utensils or food in the cavity when not in use.
24. Do not place any of the following materials in the oven: cardboard, plastic, paper or anything similar.
25. Extreme caution should be exercised when using cooking or baking containers constructed of anything other than metal
or ovenproof glass.
26. Be sure that nothing touches the top or bottom elements of the oven.
27. Cooking utensils may become hot because of heat transferred from the food. Pot holders may be needed to handle the
utensil.
28. WARNING: It is hazardous for anyone other than a trained person to carry out any service or repair.
29. This appliance is fitted with a tempered safety glass door. Tempered glass can still break around the edges. Avoid
scratching glass surface or edges.
SPECIFICATIONS
Supply Voltage:
Max Output:
Hot Plate Output Left / Right
Oven Capacity:
220-240V, 50-60Hz
3100W
1000W / 600W
26 Litres
2
IG7126 – 26L Mini Oven at a Glance
A: Housing
B: Front frame
C: Oven temperature dial
D: Upper element switch
E: Left hotplate control dial
F: Lower element switch
G:Right hotplate control dial
H: Power indicator light
I: Oven foot
J: Upper door frame
K: Door handle
L: Lower door frame
M: Baking tray
N: Tray Handle
O: Wire Rack
P: Left hotplate
Q: Right hotplate
Operating Instructions
This product is intended for domestic household use only
When using the oven for the first time, be sure to:
Read all the instructions included in this manual.
Checked that the oven is unplugged and all the switches and control dials are turned to the „OFF‟ position.
Remove all wire racks, baking trays and accessories and wash thoroughly in hot soapy water or in the dishwasher. Dry
and re-assemble in the oven.
Plug the oven into the socket making sure the voltage in your home matches that of the mini oven.
Turn the oven on at full heat for 15-20 minutes to eliminate any liquids that may have remained after cleaning.
A small amount of smoke may be emitted during first use. This should disappear within 15-20 minutes.
o
o
Oven Temperature Control (Dial C): Temperature variable from 100 C to 230 C.
Left Hotplate Control (Dial E): Choice of 3 power settings, level 1, 2 or Max.
Right Hotplate Control (Dial G): Choice of 3 power settings, level 1, 2 or Max.
Main Function Control: There are upper and lower buttons to control the main functions listed below
Grill
Bake
Only upper heating elements work. Suitable for grilling. (Switch D)
Only lower heating elements work. Suitable for baking. (Switch F)
Roast
Both the upper & lower heating elements work together. Suitable for roasting. (Both Switches D & F)
3
Power Indicator Light (Fig. H): This will be illuminated whenever the oven is switched on.
Baking Tray: For use in grilling and roasting. This can also be used as a drip pan.
Wire Rack: For toasting, baking, and general cooking.
Tray Handle: Allows you to pick up the wire rack, and bake tray when they are hot.
WARNING: TO AVOID RISK OF INJURY OR BURNS, DO NOT TOUCH HOT SURFACES WHEN OVEN IS
IN USE. ALWAYS USE INSULATED OVEN GLOVES WHEN REMOVING HOT ITEMS FROM THE OVEN.
Using Your Mini Oven to Grill
Please note that the grill function uses only the upper heating elements. For best results, it is recommended that
o
you preheat the oven for 15 minutes on 230 C.
1.
2.
3.
4.
5.
6.
Food should be placed as close as possible to the top heating element without touching it.
Set temperature control (C) to desired temperature.
Turn on upper element switch (D) to grill
It is advised to leave the door slightly ajar.
Turn food over midway through prescribed cooking time.
When grilling is complete turn the switch off
Using Your Mini Oven to Bake
Please note that the baking function uses only the bottom heating elements. For best results, it is recommended
o
that you preheat the oven for 15minutes on 230 C.
1.
2.
3.
4.
5.
6.
Set temperature control to appropriate temperature.
Turn on lower element switch (F) to bake
Place the wire rack on the lowest or middle support.
Place food on the wire rack.
Food should be placed as close as possible to the lower heating element without touching it
When baking is complete turn the button off.
Using Your Mini Oven to Roast
This oven can cook up to a 3.6kgs chicken/ roasting joint.
For best results we recommend that you preheat the oven for 15 minutes on 230°C.We do not recommend the
use of oven roasting bags or glass containers in the oven. Never use plastic, cardboard, paper or anything similar
in the oven.
1. Place the wire rack in the oven at the lowest position
2. Place food to be cooked in a suitable roasting pan. If you wish to use the baking tray, then you do not
need to insert the wire rack because the bake tray supports itself on the oven support guides.
3. Set temperature control to appropriate temperature.
4. Turn on upper and lower element switches (D & F)
5. When cooking is complete, turn the button off
4
Using Your Hotplates
Power Level Guide
Power level 1: For simmering or slow cooking.
Power level 2: For shallow frying of meat and pan dishes.
Max: For rapid heat or boiling water.
Left Hotplate
1. Place pan onto the hotplate. It should have a solid base which is as even as possible and the diameter should
be same or bigger than the hot plate.
2. Turn the left hotplate dial to desired power level (1, 2 or MAX)
3. When cooking is completed, turn the left hotplate dial to the “OFF” position.
Right Hotplate
1. Place pan onto the hotplate. It should have a solid base which is as even as possible and the diameter should
be same or bigger than the hot plate.
2. Turn the right hotplate dial to desired power level (1, 2 or MAX).
3. When cooking is completed, turn the right hotplate knob to the “OFF” position.
The oven can be operated simultaneously with the left 1000W hotplate only. Do not operate both
hotplates simultaneously with the oven as this could cause an overload on your home’s circuit breaker.
Do not leave the hotplates switched on without any cooking pans in place. This will damage the
appliance and cause excessive heat build-up.
Cleaning and Care
The oven should be cleaned regularly and any food deposits removed to prevent an accumulation of grease and
to avoid unpleasant odours. Failure to maintain the oven in a clean condition could lead to deterioration of the
surface that could adversely affect the life of the appliance and possibly result in a hazardous situation.
1.
2.
3.
4.
5.
Turn off the mini oven and remove the power plug from the wall socket before cleaning. Allow to cool.
Do not immerse the mini oven or power supply in water or wash under the tap.
Remove the wire shelf and baking tray and wash in hot soapy water.
Clean the outside of the mini oven with a damp cloth or sponge.
Do not use any abrasive cleaners or sharp utensils to clean the mini oven as these may scratch the
surface and weaken it.
6. Dry all parts thoroughly before replacing inside the oven.
Your oven features a continuous clean coating that automatically cleans itself during normal operation. Any
spattering that occurs while cooking and comes into contact with the continuous coating is oxidized while the oven
is in operation. If desired, wipe the walls with a damp sponge, cloth or nylon scouring pad and mild detergent.
Do not use steel wool scouring pads, abrasive cleaner or scratch the oven surface with a metal
utensil.
5
Disclaimer
Updates to hardware components are made regularly. Therefore some of the instructions, specifications and
pictures in this documentation may differ slightly from your particular situation. All items described in this guide are
for illustration purposes only and may not apply to your particular situation. No legal right or entitlements may be
obtained from the description made in this manual.
Re-wiring the Plug
The mini oven must be earthed. Fit a 13A BS1362 fuse in a 13A BS1363 plug. Fit the
green/yellow wire to E, the blue wire to N and the brown wire to L. Fit the cord grip. If in doubt,
call an electrician. Do not use a non-rewireable plug unless the fuse cover is fitted. If you remove
the plug, dispose of it.
Guarantee Information
This product is guaranteed for a period of 12 months from the date of purchase against mechanical and electrical
defects.
You can extend your warranty for a further 12 months by registering your product online. Visit
www.igenix.co.uk to register your extended warranty. (Product must be registered within 30 days of purchase)
The warranty does not cover consumable parts that require replacement under normal use or accessories. This
includes shelving, drawers and ice cube trays.
If your refrigerator becomes faulty within the guarantee period please contact our customer service department on
01473 271 272 or write to us at the address detailed on page 2.
Please quote the model number which begins IG, the „Batch Number‟ beginning ‘5’ and give details of the exact
fault.
We will then decide whether to repair or replace the item.
You will be required to return a copy of your proof of purchase. Please retain your original.
If an item is replaced within the guarantee period, the guarantee for the replacement item will be calculated from
the purchase date of the original.
Before calling the Customer Service number please ensure you have checked the Troubleshooting guide
on Page 9.
This product is for domestic household use only. To qualify for the guarantee the product must have been
used according to the instructions in the User Manual. Any misuse of the product will result in the
warranty being void.
Tel: 01473 271 272
Email: [email protected]
Fax: 01473 270 733
Website: www.igenix.co.uk
Postal Address:
Customer Service Department
Pik-a-Pak Electrical Distributors
38 Bluestem Road,
Ransomes Europark,
Ipswich, IP3 9RR
When writing or emailing us to report a fault please ensure you attach a copy of your proof of purchase.
Please retain your original
6
Before calling the Customer Service number please
ensure you have checked the Troubleshooting guide.
This product is for domestic household use only. To qualify for the guarantee the product must have been
used according to the instructions in the User Manual. Any misuse of the product will result in the
warranty being void.
Troubleshooting
Problem
Possible Cause
1.
The mini oven does not work.
Smoke and a slight odour
coming from the mini oven.
Grill is not working.
2.
Not properly plugged into the
mains wall socket.
No electricity in the mains
wall socket.
1.
Excess lubricants used in the
manufacturing process.
1.
Top elements are not turned
on.
Water evaporating from
foods with a high water
content e.g. frozen chips,
roast chicken etc.
1.
Condensation on the wall at the
rear of the mini oven.
Solution
1.
2.
3.
1.
1.
1.
1.
Cooking fat is splattering.
1.
2.
Grill is set too high.
Shelf is too close to the grill.
2.
Plug in firmly
Check fuse or breaker.
Check all settings according
to this manual.
This is normal and the smoke
and smell will cease after a
short period of time.
Turn the upper heater switch
on
It is completely normal for this
to happen and when the oven
has cooled the excess
moisture can be wiped off.
Reduce the temperature of
the grill.
Position the shelf lower in the
oven.
Disposal Information
Disposal of old electrical appliances The European Directive 2002/96/EC on Waste Electrical and Electronic
Equipment (WEEE), requires that old household electrical appliances must not be disposed of in normal unsorted
municipal waste. Old appliances must be collected separately in order to optimise the recovery and recycling of
the materials they contain and reduce the impact on human health and the environment. The crossed out
“wheeled bin” symbol on the product reminds you of your obligation, that when you dispose of the
appliance it must be separately collected. Consumers should contact their local authority or retailer for
information concerning the correct disposal of their old appliance.
7
View the range online at www.igenix.co.uk
Follow us on Twitter
@Igenix_Products
8