1
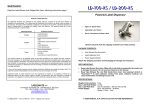
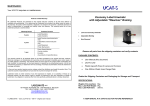
MAINTENANCE:
LD-100-RS / LD-200-RS
Keep the Label Sensor and Stripper Bar clean, following instructions page 1.
Powered Label Dispenser
Product Limited Warranty
All Labelmate Products are warranted to the original end-user customer to be free from defects in
materials and workmanship. If it is determined by Labelmate that a product has failed under the terms of
this warranty, the product will be repaired or replaced at no charge to the customer. Labelmate reserves all
rights to determination of coverage and liability under this warranty. The warranty period for all new
Labelmate products is outlined below:
Warranty Period
Products Covered
5 years
Label Rewinders
Label Unwinders
3 years
Label Counters (mechanical parts
only)
Label Slitters (mechanical parts
only)
Label Dispensers
Printer Mechanisms
1 year
Power Supply Modules
Counter modules
Encoders
Any products not specified above.
The warranty period for all products starts on the date purchased by the original end-user customer.
Warranty coverage is not transferable with ownership and will terminate immediately upon rental, resale or
any other change in ownership. This warranty does not cover repair to any product which is damaged, has
been modified, is missing parts, or has been opened or repaired by any unauthorised person. Use of any
unauthorised accessory or attachment will void coverage. Purchase documentation should be retained for
coverage verification.
In the event your product requires service, please contact the distributor you bought the product from. The
customer assumes responsibility for all cost and risk incurred in transport for service.
Labelmate makes no other warranty of any kind expressed or implied, or to suitability or fitness for a
particular purpose. No other person, agent or reseller is authorised to give any warranties on behalf of
Labelmate. Any obligation to warranty other than that specifically addressed above is hereby disclaimed.
LABELMATE LLC
69 AVENUE ALPHONSE XIII, 1180 BRUSSELS, BELGIUM
TEL: +322.375.69.60 – FAX: +322.375.38.96
[email protected]
www.labelmateeurope.com
© LABELMATE – User_LD-RS-CE – 01/13 – Original user manual.
•
High-Low Speed Select
•
Adjustable Label Sensor
•
Not for Transparent or Black Labels
Remove all parts from the shipping container and verify contents.
PACKAGE CONTENTS:
•
User Manual (this document)
•
Label Dispenser Unit
•
Power Supply Module
Retain the Shipping Container and Packaging for Storage and Transport.
VERY IMPORTANT:
•
•
Keep Label Sensor Eye clean. Wipe with a soft cloth occasionally. Be careful not
to damage the sensor. Do not use any chemical on the Sensor.
Keep Tape Stripper Bar and Web Guide Bars clean. Use isopropyl alcohol or
"Goo-Gone"™ to clean adhesive residue from parts. Adhesive build-up can
cause malfunction and damage to your unit.
SPECIFICATIONS:
Weight of the machine:
Max. Label Roll Weight:
Max. Label Roll Size:
Power Supply:
5 Kg.
4.5 Kg.
220 mm diameter – 300 mm with LD-DE.
Input: 220-240VAC – 50-60Hz.
Output: 11VAC – 2.5A
● KEEP MANUAL IN A SAFE PLACE FOR FUTURE REFERENCE ●
WARNING!
This Product is for indoor use only.
Not for use in wet locations.
Point the sensor up so it is pointing at the bottom of the Stripper Bar. Place the
Power Switch in the “LOW” position. Slowly rotate the Sensor down until the label
begins to advance. Continue to rotate the Sensor slowly until the desired label
length is protruding. Retighten the Lock Knob securely.
9. Use “HIGH” or “LOW” Switch setting to select the desired speed.
10. IMPORTANT – Pull labels UP when removing them. If excess dust or dirt
IMPORTANT INFORMATION:
•
•
•
•
•
•
•
•
•
This product is a label dispenser. It is only to be used to dispense labels of the
recommended dimensions and weight in an indoor, dry environment.
The machine has to be unplugged before any manipulation.
The machine is to be used on a flat surface, if the surface is not flat, it is to be fixed
using the holes in the base plate.
Do not leave the power cable in a passageway.
The ambient light of the working area needs to be sufficient to avoid any risk.
The dispenser can be used in ambient temperatures of +2°C to 40°C.
For operators working long hours on the machine, it is recommended to wear glasses
protecting from the light (e.g. light sunglasses).
All measures have been taken to minimise risks of injuries with the take-up shaft but
the operator has to be careful when manipulating the bail.
Connection of the machine to the power source must respect local and European
legislations.
SET-UP AND USE:
accumulates on the Label Sensor Eye the
Dispenser may not sense labels correctly. Use a
cloth or paper towel dampened with water to gently
clean the Label Sensor.
11. Do not use any chemicals on the sensor.
12. Optional Flanges for the inside and outside of the
label roll are available (Order LD-FLANGES. Set of
two Flanges). These Flanges are recommended for
narrow or loosely wound labels that may have a
tendency to fall off the roll.
Label Threading Path
1. Make sure the Power Switch is in the “OFF” position.
2. Set your LD-100-RS or LD-200-RS in place and plug the cord from the Power
Supply Module into the Power Input Jack on the rear of the Unit.
3. Connect the Power Supply Module to a suitable power source.
4. Place your roll of labels on the Label Roll Holder & slide the Roll Edge Guide(s) to
the width of your label web. The Label Web can be positioned from side to side as
required to ensure that the label lines up with the reflective Sensor.
5. Thread the label web between the Stripper Bar and the round Guide Rod directly
above it. See the Label Threading Path illustration.
6. Pull the label web under (or over) the round Web Guide and slide the width
adjusters to the width of the web.
7. Loop the web UNDER the Wire Bail on the Take-Up Shaft as shown in the
illustration.
8. Slightly loosen the Label Sensor Lock Knob, until you can just rotate the Sensor.
OPTIONAL LABEL COUNTER:
The optional Label Counter will
add one count to the displayed
number for each label that is
dispensed. This Option is
available only factory installed in
new Units.
When the LD-100-RS/LD-200-RS
is first turned on, it will display a
count of “1” or it will display the
number from the previous count.
You can reset the Label Counter
to zero (“0”) by pressing the “R”
Reset Button.
FOR YOUR SAFETY:
Switch off device before removing the bail.