1
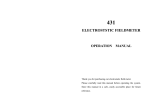
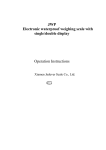
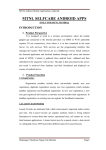
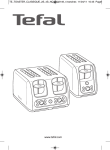
USER MANUAL 14-0623 REV. D Tempod® MP Tempod® MP-X Tempod® MP-1 Tempod® M1 ©2014, TEMPSEN ELECTRONICS COMPANY WWW.TEMPSEN.COM Contents Product Overview .............................................................................................................................................. 3 TempCentre Software ........................................................................................................................................ 4 How to download TempCentre software?................................................................................................... 4 Configure Data Logger ...................................................................................................................................... 4 Trip Description........................................................................................................................................... 4 Start Mode .................................................................................................................................................. 4 Manual Start ............................................................................................................................ 4 Auto Start ................................................................................................................................ 5 Alarm Settings ............................................................................................................................................ 5 Alarm Mode ............................................................................................................................. 5 Alarm Type .............................................................................................................................. 5 Advanced Settings...................................................................................................................................... 6 PDF Report Configuration ....................................................................................................... 6 Start Recording .................................................................................................................................................. 6 Tempod MP/MP-X/MP-1 ......................................................................................................... 6 Tempod M1 ............................................................................................................................. 7 In Recording ...................................................................................................................................................... 7 Mark Important Events....................................................................................................................................... 7 Tempod MP/MP-X/MP-1 ......................................................................................................... 7 Tempod M1 ............................................................................................................................. 8 Trim Data using Mark points....................................................................................................................... 8 Alarm Condition ................................................................................................................................................. 8 Review Temperature Statistics .......................................................................................................................... 9 Tempod MP/MP-X/MP-1 ......................................................................................................... 9 Stop Recording ................................................................................................................................................ 10 Download Data ................................................................................................................................................ 10 Download data via TempCentre ............................................................................................ 10 Get data by copying PDF report ........................................................................................... 10 Battery .............................................................................................................................................................. 11 How to install or change battery? .............................................................................................................. 11 Low Battery Indicator ................................................................................................................................. 11 Tempod MP/MP-X/MP-1 ........................................................................................................ 11 Additional Information ...................................................................................................................................... 12 Warranty .......................................................................................................................................................... 12 USER MANUAL TEMPOD-M/14-0623 PAGE2 / 13 Product Overview Device Front Device Front Tempod MP/MP-X/MP-1 Tempod M1 Device Rare 1. USB plug 2. Start and Stop button 3. Select and Mark button* 4. LCD 5. LED* 6. Battery cover * Tempod M1 is equipped with LED and without Select button. NOTE Only Tempod MP-X is equipped with fixed external NTC probe (1 meter) USER MANUAL TEMPOD-M/14-0623 PAGE3 / 13 TempCentre Software Please download and install the latest version of TempCentre software from www.tempsen.com. How to download TempCentre software? If it’s your first time to download software from www.tempsen.com, please sign up with the information required at first, then an email containing download link would be sent to the mail address you left in couple of minutes. If you want to download the software from www.tempsen.com again after your successful registration last time, please click “I already signed up, download now”button in dialogue, then software would begin to download via your internet browser in couple of minutes. Configure Data Logger Connect logger to USB port of PC, open TempCentre software, click Connect to establish connection with PC, then move to Configure Device to start configuration. Connecting to PC Tempod MP/MP-X/MP-1 Tempod M1 Both OK and ALARM LED light up. Trip Description A brief remark for describing recording task and shows in data report. Start Mode Manual Start If selected manual start, device needs to be started by pressing Start/Stop button, and 2 additional options available in this mode. Start Delay After started manually, the time span device needs to wait to start recording. USER MANUAL TEMPOD-M/14-0623 PAGE4 / 13 Temperature Start After started manually, the temperature condition device needs to meet to start recording, there are 3 temperature start types available for users to choose. 1. Over, device would start recording when temperature over the temperature value preset. 2. Under, device would start recording when temperature under the temperature value preset. 3. Between, device would start recording when temperature falls between the temperature range preset. Auto Start Allows device to start recording on the specific date/time configured by user, logger would start recording automatically when time is up, no need to press Start/Stop button after configuration. Alarm Settings Alarm Mode No alarm setting High & Low alarm Multiple Alarm ranges, 5 alarm ranges available.* *Tempod M1 does not support multiple alarm ranges. Alarm Type Single Event Single event is that alarm could only be triggered when temperature over/blow alarm limit for a continuous period of time is not less than alarm delay. Cumulative Alarm Cumulative alarm means alarm could be triggered once the cumulative total time temperature over or under alarm limit is not less than alarm delay. NOTE Only Tempod MP, Tempod MP-X of firmware version number not less than X1.6 support temperature start capability. Click Write Configuration button in down right corner of program to write in configuration parameters. USER MANUAL TEMPOD-M/14-0623 PAGE5 / 13 Advanced Settings PDF Report Configuration Set up time zone and daylight saving time for PDF report created by loggers. NOTE This function only applies to models able to generate PDF report automatically. Start Recording Tempod MP/MP-X/MP-1 LCD Status after configuration Standby for manual start.(press button to start) Standby for manual start (press button to start) if configured with Temperature Start. Standby for timer start (auto start) If device is set as Manual Start, please press and hold Start/Stop button for 5 seconds to start device, under manual start, LCD status would vary depending on different start options you selected. Start Delay, LCD displays countdown on basis of minutes. (In this example, there are 60 minutes from starting recording.) Temperature Start, LCD displays , or (depending on the type of temperature start triggering mechanisms you selected) and current temperature readings. USER MANUAL TEMPOD-M/14-0623 PAGE6 / 13 (In this example, logger configured as temperature start shows current temperature reading after manual start.) If device is set as Auto Start, no further action is required to start device, logger would start recording automatically when time is up. TempodM1 Please press and hold Start/Stop button for 5 seconds to start device, OK and ALARM LEDs flash in turn for 3 times indicating start success. IMPORTANT To avoid unnecessary loss to your goods, please do not use the temperature logger while the LEDs do not flash after being started. In Recording Recording Tempod MP/MP-X/MP-1 Tempod M1 Ambient temperature>0°C -20°C<=Ambient temperature<=0°C A diamond flashing in left display Indicates currently recording. Ambient temperature<-20°C OK or Alarm LED flashes every 10 seconds OK or Alarm LED flashes every 20 seconds OK or Alarm LED flashes every 30 seconds Mark Important Events Tempod MP/MP-X/MP-1 During recording, press and hold Select/Mark button for several seconds, display will change to Mark mode, and a “MARK” flashes in upper display indicating a mark is about to be placed. To successfully add a mark, please hold the Select/Mark button throughout the whole process. A maximum of 9 marks are available for adding. USER MANUAL TEMPOD-M/14-0623 PAGE7 / 13 Before After A timestamp would be written in logger every time you add a mark, all marks added would be plotted in graph and data list in report. Tempod M1 During recording, press and hold Mark button for 3 seconds, both OK and ALARM LEDs lighting up and off indicates mark success. A timestamp would be written in logger every time you add a mark, marks would be plotted in graph and data list area in report. Trim Data using Mark points TempCentre software allows user to trim each data record using mark points placed during recording, that means by taking advantage of placing mark points in transit, user could obtain a data record that makes sense for stakeholders. NOTE Only TempCentre not lower than version 1.3.3 supports Data Trim. Alarm Condition Alarm in recording Tempod MP/MP-X/MP-1 No Alarm Triggered Tempod M1 OK LED flashes A tick appears in left display with the middle diamond flashing during recording USER MANUAL TEMPOD-M/14-0623 PAGE8 / 13 Alarm Triggered ALARM LED flashes instead of OK LED A cross appears in left display with the middle diamond flashing during recording There will be no alarm status icon (tick or cross) if logger was set without alarm thresholds. Review Temperature Statistics Tempod MP/MP-X/MP-1 Single click Select/Mark button to review logging statistics step by step. Highest Temperature Lowest Temperature Average Temperature Mark History (In this case, 6 marks have been placed) USER MANUAL TEMPOD-M/14-0623 PAGE9 / 13 Stop Recording After arriving at destination, press Start/Stop button and hold for 5 seconds to stop recording. Recording Stopped Tempod MP/MP-X/MP-1 Tempod M1 Both OK and ALARM LEDs repeat lighting up and off for 3 times when manually stopped. A stop shows in LCD OK or ALARM LED flashes 2 times every 10 seconds after stopped. Download Data Download data via TempCentre Connect logger to PC, open TempCentre software, and click Connect to establish data connection between logger and PC, after successful connection, all raw data in data logger would be loaded to TempCentre for viewing and analysis. Please remember to save data to data base of TempCentre by clicking Save button in down right corner of program. Get data by copying PDF report For models supporting automatic PDF report generation, there is an easier way to achieve data, connect logger to USB port of PC, data logger will start generating PDF report and it may take couple of seconds for the process to complete. LCD displays as below while creating PDF report. Open a storage device named TempSenDisk in Computer, copy the PDF report inside to your PC, and then open and view it with Adobe PDF reader. NOTE Logger would be ready for communication with TempCentre software only after PDF report is completely created. USER MANUAL TEMPOD-M/14-0623 PAGE10 / 13 Battery How to install or change battery? Insert a coin in the groove on battery cover to spin it in the direction of OPEN to open the cover, place a new CR2450 lithium battery in battery compartment with positive electrode toward outside, after changing battery, put the cover back on the battery compartment and make sure the 2 triangles are directed at each other, then spin it back in the direction of CLOSE to lock the battery cover. IMPORTANT To make sure logger functions as expected, please contact us for CR2450 battery used for Tempod M series. Low Battery Indicator Tempod MP/MP-X/MP-1 A Battery Low icon appears in the upper left corner of display indicates current battery is going to run out soon. Please replace the battery as soon as possible. IMPORTANT If you take battery out of logger after configuring logger, please do remember to re-configure data logger when you want to start recording, or the date/time recorded will be incorrect. NOTE We suggest you put the battery out of logger to decrease power consumption when the logger will be idle for a long period of time. Time Error Time recording deviation of Tempod logger is 2 minutes every month. USER MANUAL TEMPOD-M/14-0623 PAGE11 / 13 Additional Information To avoid damaging your Tempod logger, please do not disconnect it from USB port while it is communicating with the computer. Data stored in Tempod logger is retrievable even battery runs out. Tempod logger uses CR2450 lithium battery, please do not heat, microwave or recharge it. Please contact your retailer for replacement. Please follow local regulations when recycling or disposing of Tempod logger. Warranty TempSen warrants this TempSen-branded hardware product against defects in materials and workmanship under normal use for a period of ONE (1) YEAR from the date of retail purchase by the original end-user purchaser (“Warranty Period”). If a hardware defect arises and a valid claim within the Warranty Period, as its option and to the extent permitted by law, TempSen will either (1) repair the hardware defect at no charge, using new parts or parts equivalent to new in performance and reliability, (2) exchange the new product with a product is new or equivalent to new in performance and reliability and is at least functionally equivalent to the original product, or (3) refund the purchase price of this product. TempSen may request that you replace defective parts with new or refurbished user-installable parts that TempSen provides in fulfillment of its warranty obligation. A replacement product or parts, including a user-installable part that has been installed in accordance with instructions provided by TempSen, assumes the remaining warranty of the original product or ninety (90) days from the date of replacement or repair, whichever provides longer coverage for you. When a product or part is exchanged, any replacement item becomes your property and the replaced item becomes TempSen’s property. Parts provided by TempSen in fulfillment it’s warranty obligation must be used in products for which warranty service is claimed. When a refund is given, the product for which the refund is provided must be returned to TempSen and becomes TempSen’s property. EXCLUSIONS AND LIMITATIONS This Limited Warranty applies only to the hardware product manufactured by or for TempSen that can be identified by the “TempSen” trademark, trade name, or logo affixed to it. The Limited Warranty does not apply to any non-TempSen hardware product or any software, even if packaged or sold with the TempSen hardware. Manufacturers, suppliers, publishers, other than TempSen, may provide their own warranties to the end user purchaser, but TempSen, in so far as permitted by law, provides their products “as is”. Software distributed by TempSen with or without the TempSen brand name (including, but not limited to system software) is not covered under this Limited Warranty. Refer to the licensing agreement accompanying the software for details of your rights with respect to its use. TempSen does not warrant that the operation of product will be uninterrupted or error-free. TempSen is not responsible for the damage arising from failure to follow instructions relating to the product’s use. This warranty does not apply: (a) to consumable parts, such as batteries, unless damage has occurred due to a defect in materials or workmanship; (b) to cosmetic damage, including but not limited to scratches, dents, and broken plastic on ports; (c) to damage caused USER MANUAL TEMPOD-M/14-0623 PAGE12 / 13 with non-TempSen products; (d) to damage caused by accident, abuse, misuse, flood, fire, earthquake, or other external causes; (e) to damage caused by operating the product outside the permitted or intended uses described by TempSen; (f) to damage caused by service (including upgrades and expansions) performed by anyone who is not a representative of TempSen or TempSen Authorized Service Provider; (g) to a product or part that has been modified to alter functionality or capability without the written permission of TempSen; or (h) if any TempSen serial number has been removed or defaced. IMPORTANT: DO NOT OPEN THE HARDWARE PRODUCT. OPENING THE HARDWARE PRODUCT MAY CAUSE DAMAGE THAT IS NOT COVERED BY THIS WARRANTY. ONLY TEMPSEN OR AN AUTHORIZED SERVICE PROVIDER SHOULD PERFORM SERVICE ON THIS HARDWARE PRODUCT. TempSen Electronics Company T: +86 21 6768 5210 F: +86 21 6768 5232 E: [email protected] www.tempsen.com Technical Support [email protected] USER MANUAL TEMPOD-M/14-0623 PAGE13 / 13