1
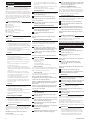
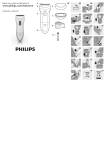
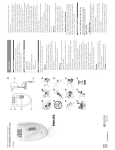
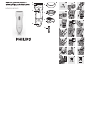
1 A B 2 3 4 5 6 7 E HP6342, HP6341 C F 2 1 1 8 9 10 11 12 13 14 15 16 17 18 19 20 21 22 G D H OIL ENGLISH Introduction Congratulations on your purchase and welcome to 3KLOLSV7RIXOO\EHQHÀWIURPWKHVXSSRUWWKDW3KLOLSVRIIHUV register your product at www.philips.com/welcome. With your new Philips Ladyshave you can quickly, easily and comfortably remove unwanted body hair. You can use the Ladyshave either dry or wet. If you shave while taking a bath or shower, we advise you to use soap or shaving foam for the most comfortable shave. After use, you can clean the Ladyshave under the tap or with the cleaning brush for extra hygiene. General description (Fig. 1) A Shaving unit with shaving foil and pre-trimmer B Shaving head C On/off slide D Battery compartment cover E Protection cap F (IÀFLHQF\FDS+3RQO\ G PPWULPPLQJFRPE+3RQO\ H Cleaning brush 1RWVKRZQ3RXFK+3RQO\ Important Read this user manual carefully before you use the appliance and save it for future reference. Warning - - This appliance is not intended for use by persons LQFOXGLQJFKLOGUHQZLWKUHGXFHGSK\VLFDOVHQVRU\ or mental capabilities, or lack of experience and knowledge, unless they have been given supervision or instruction concerning use of the appliance by a person responsible for their safety. Children should be supervised to ensure that they do not play with the appliance. Caution - - - Make sure your hands and the appliance are dry when you insert the batteries. Do not clean the Ladyshave with water above VKRZHUWHPSHUDWXUHPD[& Be careful with hot water. Always check if the water is not too hot, to prevent your hands from getting burnt. Use and store the appliance at a temperature EHWZHHQ&DQG& Do not use the appliance, the shaving unit, the HIÀFLHQF\FDS+3RQO\RUWKHWULPPLQJFRPE +3RQO\LILWLVGDPDJHGRUEURNHQDVWKLVPD\ cause injury. Never use any accessories or parts from other PDQXIDFWXUHUVRUWKDW3KLOLSVGRHVQRWVSHFLÀFDOO\ recommend. If you use such accessories or parts, your guarantee becomes invalid. Do not expose the Ladyshave to direct sunlight. This appliance is only intended to be used by women to shave and trim their body hair. It is not intended for shaving or trimming scalp hair or for any other purpose. General 1 2 The appliance can be safely used in the bath or VKRZHUDQGFOHDQHGXQGHUWKHWDS)LJ To keep the Ladyshave watertight: Make sure that the rubber sealing ring of the battery holder stays clean and undamaged. Apply some vaseline to the rubber sealing ring from time to time. (OHFWURPDJQHWLFÀHOG(0) - This Philips appliance complies with all standards UHJDUGLQJHOHFWURPDJQHWLFÀHOGV(0),IKDQGOHG properly and according to the instructions in this user manual, the appliance is safe to use based on VFLHQWLÀFHYLGHQFHDYDLODEOHWRGD\ Preparing for use 7KH/DG\VKDYHUXQVRQWZR$$YROWDONDOLQHEDWWHULHV We advise you to use Philips LR6 PowerLife batteries. 7KH\VXSSO\VXIÀFLHQWHQHUJ\IRUDSSUR[PLQXWHVRI shaving. Note: Make sure that your hands are dry when you insert the batteries. To avoid damage due to battery leakage: 2 - Do not expose the appliance to direct sunlight. Do not expose the appliance to temperatures higher WKDQ& Remove the batteries if you are not going to use the appliance for a month or more. Do not leave empty batteries in the appliance. Inserting batteries 1 To remove the battery compartment cover, pull it off the appliance (Fig. 3). 2 Put the batteries in the battery holder (Fig. 4). Note: Make sure that the + and - poles of the batteries point in the right direction. 2 Move the Ladyshave gently over the skin. To achieve the best result, move the Ladyshave up and down and from left to right (Fig. 13). (IÀFLHQF\FDS+3RQO\ ,I\RXDUHQHZWRVKDYLQJ\RXFDQXVHWKHHIÀFLHQF\ cap to help you place the Ladyshave on the skin at the RSWLPXPDQJOH:KHQWKHHIÀFLHQF\FDSLVSODFHGÁDWRQ the skin, the shaving foil and trimmer are fully in contact with the skin. This helps to get perfect results. 7ULPPLQJ+3RQO\ ,IWKHKDLU\RXZDQWWRVKDYHLVORQJHUWKDQPPSUH trim the hair with the trimming comb to a length of 3mm for an optimal shaving performance. 1 Attach the trimming comb onto the appliance. 3 Push the battery compartment cover back onto the appliance (‘click’) (Fig. 5). 2 Press the on/off slide upwards to switch on the appliance (Fig. 9). Attaching/detaching the shaving head 3 Move the appliance against the direction of hair growth. Make sure that the surface of the comb is in full contact with the skin at all times (Fig. 14). 1 To detach the shaving head, press the release buttons on both sides of the appliance (1) and pull the shaving head (2) (Fig. 6). 2 To attach the shaving head push it onto the appliance. Note: Do not exert pressure on the shaving foil to avoid damage. Attaching/detaching attachments +3FRPHVZLWKWKHSURWHFWLRQFDSWKHHIÀFLHQF\ FDSDQGWKHWULPPLQJFRPE+3FRPHVZLWKWKH protection cap. All attachments can be attached and detached in the same way. 1 To attach a cap or comb, carefully push it onto the appliance. Make sure the recess of the comb is aligned with the front of the appliance (Fig. 7). Note:You will achieve the best result if you trim under dry conditions. Cleaning and maintenance Regular cleaning and proper maintenance ensure optimal results and guarantee a long life for the appliance. Clean the Ladyshave after each use. Do not clean, rinse or immerse the Ladyshave in water if the cover of the battery holder is not closed properly. Never use scouring pads, abrasive cleaning agents or aggressive liquids such as petrol or acetone to clean the appliance. 1 Switch off the appliance (Fig. 15). 2 Detach the shaving head from the appliance (see chapter ‘preparing for use’). 2 To detach a cap or comb, carefully pull it off the appliance (Fig. 8). 3 Remove the shaving unit from the shaving head (Fig. 16). Note: Do not hold the comb by its teeth when you pull it. Using the appliance The Ladyshave is suitable for: - Shaving the underarms - Shaving the legs - Shaving the bikini line - 7ULPPLQJWKHELNLQLOLQH+3RQO\ Note: Do not exert too much pressure on the shaving foil to avoid damage. Use on wet skin You can use the Ladyshave on wet skin, while you have a bath or shower. To achieve the best result, lather your skin with soap or shaving cream beforehand. Note: Do not clean the appliance with water above shower temperature. 4 To clean the shaving head and shaving unit, rinse them under the tap or use the cleaning brush (Fig. 17). 5 Rinse the hairs off the appliance (Fig. 18). 6 Use on dry skin If you prefer to use the Ladyshave dry, make sure that your skin is clean and completely dry. 0DLQWHQDQFH Note: in principle, there is no difference in using the appliance on wet skin and using it on dry skin.You can simply choose which method you like best. 1 Lubricate the shaving foil with a drop of sewing machine oil twice a year (Fig. 20). 2 Apply some vaseline to the rubber sealing ring from time to time to keep the Ladyshave watertight. Note: Do not apply alcohol based-lotions to the skin directly before or after shaving. If you want, you can apply some talcum powder. Note: Do not press the shaving head too hard onto the skin, as this has a negative effect on shaving performance and may cause some skin irritation. Shaving Storage 1 Put the protection cap on the appliance. Note:The protection cap prevents the shaving head from becoming damaged. 2 HP6342 only: Store the appliance and accessories in the pouch supplied. Legs and bikini line 1 Press the on/off slide upwards to switch on the appliance (Fig. 9). 2 Hold the appliance at an angle of approximately 70°. Make sure that the shaving foil and pre-trimmer are fully in contact with your skin (Fig. 10). 3 Stretch the skin with your free hand to make the hairs stand upright. Replacement If you use the Ladyshave more than once a week, we advise you to replace the shaving unit after one or two years or when it is damaged. The shaving unit, the cover of the battery compartment, the cleaning brush, the caps and the comb can be replaced. If you need to replace one or more parts, go to your Philips dealer or an authorised Philips service centre. 4 Move the appliance gently over the skin against the direction of hair growth (Fig. 11). Underarms 1 When you shave the underarm area, place one arm behind your head to stretch the skin (Fig. 12). Make sure the appliance is completely dry before you reattach the shaving unit (Fig. 19). - Environment Non-rechargeable batteries contain substances that may pollute the environment. Do not throw away non-rechargeable batteries with the normal KRXVHKROGZDVWHEXWGLVSRVHRIWKHPDWDQRIÀFLDO collection point for batteries. Always remove the non-rechargeable batteries before you discard 4203.000.6698.1 - DQGKDQGLQWKHDSSOLDQFHDWDQRIÀFLDOFROOHFWLRQ SRLQW)LJ Do not throw away the appliance with the normal household waste at the end of its life, but hand it in DWDQRIÀFLDOFROOHFWLRQSRLQWIRUUHF\FOLQJ%\GRLQJ WKLV\RXKHOSWRSUHVHUYHWKHHQYLURQPHQW)LJ Guarantee and service If you need service or information or if you have a problem, please visit the Philips website at www.philips. com or contact the Philips Consumer Care Centre LQ\RXUFRXQWU\\RXÀQGLWVSKRQHQXPEHULQWKH ZRUOGZLGHJXDUDQWHHOHDÁHW,IWKHUHLVQR&RQVXPHU Care Centre in your country, go to your local Philips dealer. Problem The appliance fell into the water while the battery compartment was open. Cause Solution Let the appliance dry. Do not reattach the battery comportment cover until the inside of the appliance is completely dry. Troubleshooting This chapter summarises the most common problems you could encounter with the appliance. If you are unable to solve the problem with the information below, contact the Consumer Care Centre in your country. Problem Cause Solution The appliance is not performing as well as it should. The shaving unit is dirty. Remove the shaving unit and clean it under the tap or with the cleaning brush. Remove any hairs that might be stuck under the trimmer. You put the appliance on the skin at a wrong angle. Make sure that you put the appliance on the skin at an angle RIVHH chapter ‘Using the appliance’, section ¶6KDYLQJ· The batteries are nearly empty. Replace the batteries. The shaving unit is dirty. Clean the shaving unit. The shaving unit needs to be lubricated. Lubricate the shaving unit with a few drops of sewing machine oil. More skin irritation than usual. The shaving foil is damaged or worn. Replace the shaving unit. The appliance does not work. The batteries are empty. Replace the batteries. You have not placed the batteries in the battery compartment correctly. Put the batteries in the compartment in accordance with the + and - indications in the compartment. You have not attached the battery compartment cover properly. Push the battery compartment cover onto the appliance ¶FOLFN· The appliance runs too slowly DQGSURGXFHV DQRGGVRXQG 3 4203.000.6698.1