1
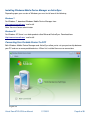
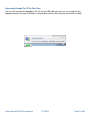
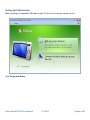
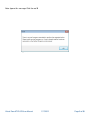
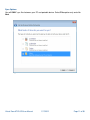
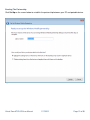
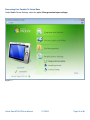
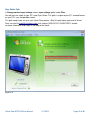
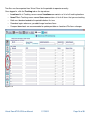
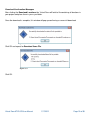
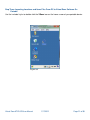
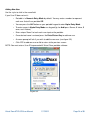
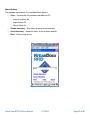
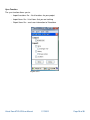
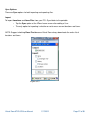
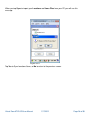
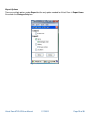
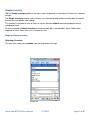
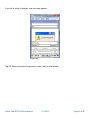
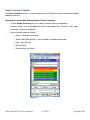
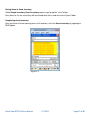
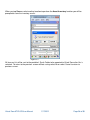
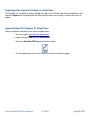
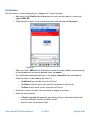
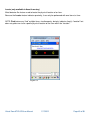
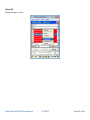
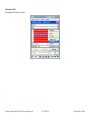
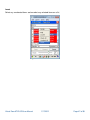
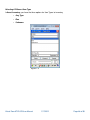
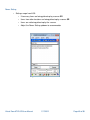
ATID 870 USERS
MANUAL
01/28/2012
Copyright © 2012 Virtual Doxx Corporation
All Rights Reserved
Virtual Doxx ATID 870 User Manual
1/17/2012
Page 2 of 50
Table of Contents
ATID 870 USERS MANUAL...................................................................................................................1
Revision Log......................................................................................................................................5
Installing Windows Mobile Device Manager or ActiveSync...............................................................6
Windows 7......................................................................................................................................................6
Windows XP...................................................................................................................................................6
Connecting Your Portable Device To A PC........................................................................................6
Connecting Portable To PC The First Time....................................................................................................7
Setting Up A Partnership...................................................................................................................8
Sync Options.................................................................................................................................................11
Creating The Partnership..............................................................................................................................12
Messages Displayed When Connecting And Syncing ................................................................................13
Connecting Your Portable To Virtual Doxx..................................................................................................14
Sync Folder Path...........................................................................................................................................15
3 Steps To Downloading Files To Portable From Virtual Doxx.........................................................16
Step One.......................................................................................................................................................16
Step Two.......................................................................................................................................................16
Step Three.....................................................................................................................................................16
Step One: Downloading Locations and Items Files To Your PC's Sync Folder...........................................17
Download Confirmation Messages..........................................................................................................19
Step Two: Synchronizing Locations and Items Files to Portable.................................................................20
Step Three: Importing Locations and Items Files From PC to Virtual Doxx Software On Portable...........21
Using Virtual Doxx Portable Software....................................................................................................22
Entering User ID......................................................................................................................................23
Adding New User....................................................................................................................................24
Menu Options..........................................................................................................................................25
Sync Function..........................................................................................................................................26
Sync Options............................................................................................................................................27
Import......................................................................................................................................................27
Export Options.........................................................................................................................................29
Completing Sync.....................................................................................................................................30
Simple Inventory..............................................................................................................................31
Steps for Simple Inventory ..........................................................................................................................31
Selecting A Location................................................................................................................................31
Scanning Items During Simple Inventory...............................................................................................33
Changing Location During Simple Inventory.........................................................................................34
Clearing or Resetting Simple Inventory..................................................................................................35
Completing Simple Inventory..................................................................................................................35
Asset Inventory Function.................................................................................................................36
Selecting A Location And Scanning Items In Asset Inventory................................................................36
Saving Items in Asset Inventory..............................................................................................................37
Completing Asset Inventory....................................................................................................................37
Exporting Files From the Portable to Virtual Doxx...........................................................................39
Importing New File Changes To Virtual Doxx..................................................................................39
Find Feature....................................................................................................................................40
Additional Features..............................................................................................................................41
Virtual Doxx ATID 870 User Manual
1/17/2012
Page 3 of 50
Asset Inventory................................................................................................................................41
Right Click Options......................................................................................................................................41
Details......................................................................................................................................................42
Locate (only available in Asset Inventory)..............................................................................................43
Locating A Specific Item.........................................................................................................................44
Check All.................................................................................................................................................45
Uncheck All.............................................................................................................................................46
Invert........................................................................................................................................................47
Selecting A Different Item Type..............................................................................................................48
Power Setting................................................................................................................................................49
Virtual Doxx ATID 870 User Manual
1/17/2012
Page 4 of 50
Revision Log
Revision #
Date
Notes
1
01/28/12
Initial Version
Virtual Doxx ATID 870 User Manual
1/17/2012
Page 5 of 50
Installing Windows Mobile Device Manager or ActiveSync
Depending upon your version of Windows you must install one of the following
Windows 7
For Windows 7, download Windows Mobile Device Manager from
http://www.microsoft.com/ and install
Note: You must be an administrator
Windows XP
For Windows XP, there is an older product called Microsoft ActiveSync. Download from
http://www.microsoft.com/ and install.
Connecting Your Portable Device To A PC
Both Windows Mobile Device Manager and ActiveSync allow you to set up a partnership between
your PC and one or more portable devices. When first installed there are no connections
Figure 1.1
Virtual Doxx ATID 870 User Manual
1/17/2012
Page 6 of 50
Connecting Portable To PC The First Time
The first time you plug the portable to the PC via the USB cable you may see a message like this,
depending on your version of Windows, notifying device drivers for the device have been installed.
Figure 1.2
Virtual Doxx ATID 870 User Manual
1/17/2012
Page 7 of 50
Setting Up A Partnership
When you plug in the portable USB cable to your PC for the first time you should see this
Figure 2.1
Click Set up your device
Virtual Doxx ATID 870 User Manual
1/17/2012
Page 8 of 50
Note: Ignore this message-Click the red X
Figure 2.2
Virtual Doxx ATID 870 User Manual
1/17/2012
Page 9 of 50
You can connect to a single computer or two computers, normally one computer is sufficient. Select
desired option and click Next
Figure 2.3
Virtual Doxx ATID 870 User Manual
1/17/2012
Page 10 of 50
Sync Options
You will ONLY sync files between your PC and portable device. Select Files option only and click
Next
Figure 2.4
Virtual Doxx ATID 870 User Manual
1/17/2012
Page 11 of 50
Creating The Partnership
Click Set Up on the screen below to establish the partnership between your PC and portable device.
Figure 2.5
Virtual Doxx ATID 870 User Manual
1/17/2012
Page 12 of 50
Messages Displayed When Connecting And Syncing
When you connect your USB to the PC you will see this message notifying connection is being
established.
Note: You may also see a message “syncing” when sync is in progress.
Figure 2.6
Virtual Doxx ATID 870 User Manual
1/17/2012
Page 13 of 50
Connecting Your Portable To Virtual Doxx
Under Mobile Device Settings select the option Change content sync settings.
Figure 2.7
Virtual Doxx ATID 870 User Manual
1/17/2012
Page 14 of 50
Sync Folder Path
In Change content sync settings choose sync settings option under Files
You will now see a path to your PC's new Sync Folder. This path is unique to your PC, selected based
on your PC's user and portable names.
This path needs to be set up in your Virtual Doxx project. Write this path down and send to Virtual
Doxx via email to [email protected] with subject: NEW SYCH FOLDER PATH. Include
customer information and Logon in the body of the email.
Figure 2.8
Virtual Doxx ATID 870 User Manual
1/17/2012
Page 15 of 50
3 Steps To Downloading Files To Portable From Virtual Doxx
You must complete these steps before using the portable for the first time so that there are Locations
for inventory and Items to find/inventory.
Step One
Download Locations and Items Files from Virtual Doxx tracking screen (See page 15).
Step Two
Reconnect portable via USB to PC to sync all newly downloaded Locations and Items. This sync will
occur automatically any time portable is connected to PC after partnership is established (See page
18).
Step Three
Opening and importing Locations/Items Files to Portable in Virtual Doxx portable software (See pages
19-27).
NOTE: Disconnect the portable's USB cable from your PC before downloading Locations and Items
files from Virtual Doxx Tracking Screen.
Virtual Doxx ATID 870 User Manual
1/17/2012
Page 16 of 50
Step One: Downloading Locations and Items Files To Your PC's Sync Folder
Go to dev.virtualdoxx.com and select the Download option at the top right of the screen.
•
Logon with your User ID and Password
Figure 3.1
Virtual Doxx ATID 870 User Manual
1/17/2012
Page 17 of 50
Two files must be exported from Virtual Doxx for the portable to operate correctly:
Once logged in, click the Tracking tab on the top column
•
Locations file in Tracking screen named Locations.csv contains a list of all tracking locations
•
Items File in Tracking screen named Items.csv contains a list of all items that you are tracking
•
Both must be downloaded to the portable before first use
•
Download again whenever you add/change locations/items
•
Frequent downloads are recommended to update portable on Locations/File Items changes
Figure 3.2
Virtual Doxx ATID 870 User Manual
1/17/2012
Page 18 of 50
Download Confirmation Messages
After clicking the Download Locations tab, Virtual Doxx will build a file containing all locations in
your project and place them in your sync folder.
Once the download is complete, this window will pop up confirming a successful download.
Figure 3.3
Click OK and repeat for Download Items File.
Figure 3.4
Click OK.
Virtual Doxx ATID 870 User Manual
1/17/2012
Page 19 of 50
Step Two: Synchronizing Locations and Items Files to Portable
Reconnect the portable to your PC via USB and portable will automatically synchronize with PC with
all updated Locations and Items Files.
Figure 3.5
Virtual Doxx ATID 870 User Manual
1/17/2012
Page 20 of 50
Step Three: Importing Locations and Items Files From PC to Virtual Doxx Software On
Portable
Use the included stylus to double-click the VDoxx icon on the home screen of your portable device
Figure 3.6
Virtual Doxx ATID 870 User Manual
1/17/2012
Page 21 of 50
Using Virtual Doxx Portable Software
Once required Locations and Items Files are exported and Virtual Doxx program is launched you
will see the VDoxx home screen
Figure 3.7
Virtual Doxx ATID 870 User Manual
1/17/2012
Page 22 of 50
Entering User ID
Enter your User Id so that each scan can be linked to you.
Figure 3.8
Virtual Doxx ATID 870 User Manual
1/17/2012
Page 23 of 50
Adding New User
Use the stylus to click in the name field.
If your User ID does not exist:
•
Portable is in Numeric Entry Mode by default. You may enter a number to represent
each user that will use portable OR
•
You can press the ALP button on your portable keypad to enter Alpha Entry Mode
•
To enter names in Alpha Entry Mode use keypad (Ig: for Andi press 2 once, 6 twice, 3
once, and 4 twice).
•
Enter unique “Name” to track each user input on the portable
•
Once desired name is entered press the Enter/Return Key to add new user
•
A screen prompt will ask if you wish to add the new user (see figure 3.9)
•
Click YES to add new user or No to return to the previous screen
NOTE: You must enter a User ID to proceed with Virtual Doxx portable software.
Figure 3.9
Virtual Doxx ATID 870 User Manual
1/17/2012
Page 24 of 50
Menu Options
The portable now displays the available Menu Options:
•
Sync – Synchronize files between portable and PC
◦ Import Locations file
◦ Import Items file
◦ Export Items file
•
Simple Inventory – Scan items at one or more locations
•
Asset Inventory – Reconcile items at one or more location
•
Find – Find missing item(s)
Figure 3.1.1
Virtual Doxx ATID 870 User Manual
1/17/2012
Page 25 of 50
Sync Function
The sync function allows you to:
◦ Import Locations file – list of locations for your project
◦ Import Items file – list of items that you are tracking
◦ Export Items file – send scan information to Virtualdoxx
Figure 3.1.2
Virtual Doxx ATID 870 User Manual
1/17/2012
Page 26 of 50
Sync Options
There are Sync options for both importing and exporting files.
Import
To import Locations and Items Files from your PC's Sync folder to the portable
•
Tap the Sync option at the VDoxx home screen after adding a User
•
The only option for importing is whether or not to erase current locations and items.
NOTE: Suggest checking Erase First because Virtual Doxx always downloads the entire list of
locations and items.
Figure 3.1.3
Virtual Doxx ATID 870 User Manual
1/17/2012
Page 27 of 50
When you tap Sync to import your Locations and Items Files from your PC you will see this
message.
Figure 3.1.4
Tap Yes to Sync Locations/Items, or No to return to the previous screen.
Virtual Doxx ATID 870 User Manual
1/17/2012
Page 28 of 50
Export Options
There are multiple options under Export but the only option needed for Virtual Doxx is Export Items.
Also check the Changes Only box.
Figure 3.1.5
Virtual Doxx ATID 870 User Manual
1/17/2012
Page 29 of 50
Completing Sync
Once you have selected your sync options tap Sync button.
Figure 3.1.6
Tap OK, you will then be returned to the Sync screen.
To exit the Sync function tap Done.
Virtual Doxx ATID 870 User Manual
1/17/2012
Page 30 of 50
Simple Inventory
Tap the Simple Inventory option on the main screen to perform an inventory of all items at a selected
location.
The Simple Inventory function scans all items at a selected location without echoing back the details
of each item and without color coding.
This function is intended to scan all items at a given location without reconciling expected versus
unexpected items.
All items scanned in Simple Inventory are automatically put in the portable's Synch Folder to be
exported to Virtual Doxx unless list is cleared or reset.
Steps for Simple Inventory
Selecting A Location
First you must select your Location from the drop-down at the top.
Figure 4.1
Virtual Doxx ATID 870 User Manual
1/17/2012
Page 31 of 50
If you fail to select a Location, error message appears
Figure 4.2
Tap OK. When returned to the previous screen select a valid location
Virtual Doxx ATID 870 User Manual
1/17/2012
Page 32 of 50
Scanning Items During Simple Inventory
Once you have selected a location, you can scan items using either barcode or RFID.
•
Scan RFID tagged items by pressing F8 (upper right side of the ATID 870) or by pulling the
trigger if you have a pistol grip handle.
•
Scan barcodes by pressing the “up arrow” button on the top left side of the ATID 870.
***IMPORTANT: These buttons operate as toggles.
•
First button push turns scanner on.
•
Second button push turns scanner off.
•
With the pistol grip, scanner turns on when trigger is pulled and turns off when released.
Figure 4.3
Each item scanned will be displayed without a description.
Virtual Doxx ATID 870 User Manual
1/17/2012
Page 33 of 50
Changing Location During Simple Inventory
After you have scanned the items from the first location you may select a new location from the dropdown and repeat the scanning operation at the new location.
Figure 4.4
Virtual Doxx ATID 870 User Manual
1/17/2012
Page 34 of 50
Clearing or Resetting Simple Inventory
You may clear items on the screen by tapping Clear.
You may abandon Simple Inventory by tapping Reset.
Completing Simple Inventory
Once you have finished scanning items at all locations, finish the Simple Inventory by tapping the
red X. All items on list will be sent to the portable's Synch Folder to be exported to Virtual Doxx when
the X is tapped.
Virtual Doxx ATID 870 User Manual
1/17/2012
Page 35 of 50
Asset Inventory Function
The Asset Inventory function is more complex than the Simple Inventory function but provides
additional features:
Selecting A Location And Scanning Items In Asset Inventory
•
As with Simple Inventory you must select a location from the drop-down
•
However there is also a new option to select a new type of item. (Default is “Any” type)
•
Each item scanned is displayed
•
Items are color coded as follows
•
Green – New item to location
•
Yellow (With Red Writing) – Item scanned at unexpected location
•
Red – Item Missing
•
White-Found
•
Selected item turns blue
Figure 5.1
Virtual Doxx ATID 870 User Manual
1/17/2012
Page 36 of 50
Saving Items in Asset Inventory
Unlike Simple Inventory, Asset Inventory requires you to tap the “save” button.
Once items on list are saved they will be cleared from the list and sent to the Synch Folder.
Completing Asset Inventory
Once you have finished scanning items at all locations, finish the Asset Inventory by tapping the
SAVE option.
Figure 5.2
Virtual Doxx ATID 870 User Manual
1/17/2012
Page 37 of 50
When you tap Save or select another location to perform the Asset Inventory function you will be
prompted to save the inventory results.
Figure 5.3
All items on list will be sent to the portable's Synch Folder to be exported to Virtual Doxx after Yes is
selected. To return to the previous screen without saving select No or select Cancel to return to
previous screen.
Virtual Doxx ATID 870 User Manual
1/17/2012
Page 38 of 50
Exporting Files From the Portable to Virtual Doxx
The portable has the ability to export multiple file types, but for Virtual Doxx only changed items are
required. Exports are not performed until after you have done an inventory, so there are scans to
export.
Importing New File Changes To Virtual Doxx
When you update a location for an item or multiple items:
•
You must log on http://dev.virtualdoxx.com/
•
Logon with your USER ID and PASSWORD
•
Select the Portable RFID option on the left column
•
This will update your Items' new locations to your Virtual Doxx project
Virtual Doxx ATID 870 User Manual
1/17/2012
Page 39 of 50
Find Feature
The find feature is similar to generating a “shopping list” of items to locate.
•
Add item(s) to the Find List by holding down the stylus on the empty list screen and
tapping ADD, OR
•
“Right clicking” on items in the inventory functions and selecting the Find option
Figure 6.1
•
When you select ADD from the Find feature search for the desired/lost item by entering
in the barcode value or a partial barcode value, tap search
•
A list will be generated based on items in the project's Items File from the database.
Check the item(s) to be added to the Find List
•
Tap Add and items will be sent to the Find List
•
Tap Clear to clear all items from search list to perform a new search
•
Tap Done to exit search results and return to Find List
•
Once items are on a list press the scan button or trigger to find items.
•
Unlike the locate feature•
In Find the portable will beep only once when an item is found and red item will
turn white indication the item has been “found”.
•
You must clear list to remove items
Virtual Doxx ATID 870 User Manual
1/17/2012
Page 40 of 50
Additional Features
Asset Inventory
Right Click Options
Right Click by holding down the stylus on any desired item in the list to access the following features.
Figure 7.1
Virtual Doxx ATID 870 User Manual
1/17/2012
Page 41 of 50
Details
View detailed description a specific item
Figure 7.2
Virtual Doxx ATID 870 User Manual
1/17/2012
Page 42 of 50
Locate (only available in Asset Inventory)
Metal detector-like feature used to locate the physical location of an item.
Because the Locate feature indicates proximity, it can only be performed with one item at a time.
NOTE: Find feature can “find” multiple items simultaneously, but only indicates item(s) “location” but
does not guide user to the specific physical location of the item within the “location”.
Figure 7.3
Virtual Doxx ATID 870 User Manual
1/17/2012
Page 43 of 50
Locating A Specific Item
•
Portable will beep louder and faster as you approach the specific item
•
The meter visually indicates proximity
•
If item is not in range the meter will be blank (See figure figure 7.3)
•
Once the specific item is in range the meter begins to beep
•
As you get approach the item the meter will shift from left/green to right/red.
Figure 7.4
Virtual Doxx ATID 870 User Manual
1/17/2012
Page 44 of 50
Check All
Select all items in a list.
Figure 7.5
Virtual Doxx ATID 870 User Manual
1/17/2012
Page 45 of 50
Uncheck All
Unselect all items in a list
Figure 7.6
Virtual Doxx ATID 870 User Manual
1/17/2012
Page 46 of 50
Invert
Select any unselected items and unselect any selected items on a list
Figure 7.7
Virtual Doxx ATID 870 User Manual
1/17/2012
Page 47 of 50
Selecting A Different Item Type
In Asset Inventory you have the three options for Item Types to inventory
•
Any Type
•
Box
•
Unknown
Figure 7.8
Virtual Doxx ATID 870 User Manual
1/17/2012
Page 48 of 50
Power Setting
•
Settings range from 0-30
•
If too many items are being picked up by scanner OR
•
Items from other locations are being picked up by scanner OR
•
Items are not being picked up by the scanner
•
Adjust the Power Setting up/down to accommodate
Figure 7.9
Virtual Doxx ATID 870 User Manual
1/17/2012
Page 49 of 50
Virtual Doxx Helpdesk
[email protected]
800-974-7343 ext 25
Virtual Doxx ATID 870 User Manual
1/17/2012
Page 50 of 50