1
User's manual
1
fr
:
:
I
I
I
I
I
I
t
HD/SD
DVB.T DIGITAL TY RECEIVER
CONTENTS
l.2Main
function
l.3.llayout ofthe main unit--------l.3.2layout ofthe
remotecontrol---
-----------2
----------2
-----3
2. Installat
2.1
Connections--
2.2 Replacing the Remote
2.3 Accessori€s
3.
Control
Battery--------------
-----------4
----------4
Included-
Installation
4.1Switch Channel4.2Volume Control4.3Program Info
4.4Channel Lisl
T.Channel management-------------7.1 Edit TV chann€l
Automatic Search---------------8.2Manual Search
S.SDefault setting
----------7
---8
E. I
---------10
-__-___10
ll
9.5 View Picl
I
l.Techtrical specificatiotr-----------
l5
1.
Introduction
1.2
1.1 Precautions
Install correctly, your new equipment will provide you with years of enjoyable and safe
usage.
Installing this unit requires technical expertise. This unit should be instailed by a quatified
technician or senice personne[. If you try to install this unit by yourself, do it property,
referring to the installation and wiring diagram ms in this operating manual. Improper
installation may result in fire or electric shock.
1.Do not operate this equipment while driving-safe driving should always be your highest
priority.
2.Do not install components in areas which are susceptible to rain, moisture direct
sunlight, extremely heat or cold, excessive dust, dirt or humidity.
3. Immediately unplug the power cord and send the monitor to your local dealer or seryice
center as soon as possible:
a) If there is sm ENTER or any peculiar odor present during used
b) If there is damage to any of the internal components
4. To avoid damage to the unit and risk of electronic shock, do not permit any of this
equipment to become damp or wet from water or liquid. If this does occur, immediately
unplug the power cord and send the unit to your local dealer or service center as sooir
as
possible.
5. Do not attempt to repair, open or disassemble any ofthe components. Dangerous high
voltages are present which may result in electric shock.
6. Use only a power source with D C 1 0- I 5 volts car battery (negative ground).
7. Do not place or suspend objects on the power cord, as this may damage the cord.
8. Do not twist or place the power cord near any source of heat in the vehicle.
9. Avoid dropping any metal objects or inflammable items into the unit yentilation slots.
I 0. After the unit is installed, do not arbitrarily pull it down or strike it. This may loose
the mounting screws and cause it fall down.
I 1. Do not install your monitor where:
a) it will obstruct the driver's view.
b) it \;ill obstruct the operation of the air bag system.
c) it will obstruct the operation of the vehicle, especially the steering wheel, shift lever, or
brake pedal.
d) a diver or passengers may injure themselves when getting into or out of the car.
12. Do not damage any pipes, tubes, the fuel tank or electric wiring when installing this
unit. this can cause a fire. if you drill a hole in car panels, make sure that any hidden car
parts will not be damaged.
1 3. do not use any nuts or bolts for safety deyices such as steering linkage, fuel supply or
braking systems. this can cause a fire or an accident .take care to prevent cords and
wires from getting tangled or crimped in the moving portion of a seat rail.
'
'
'
'
'
'
'
'
'
'
'
'
'
'
o
o
'
'
'
Main function
Twin tuners with diversity structure TV box for high speed driving
Special design for car using. supporthigh speed above 230km/hours
Video decoder H.264l MPEG-4/Reat Video
.A.udio decoder MPEG/AAC/WMA
Support multi-media format : MPG, MKV, AVI, MOY RMVB
Super fast hardware decoding ofJPEG picture
Support SM,MS,SD/SDHC memory card formats
DVB subtitling ETSI 300473 compliant and OSD teletext
Support logic channel number
Easy first installation
Supports multiple OSD languages menu
EPG (Electronic Program Guide) with now and next and 7 days events
Channel search with automatic/manuaI scan
Various channel editing function
SoftwareupgradethroughUSB
USB 2.0 support PVRReady
Standby consumption < 1W
RCA audio and video input with all the way ,Three ot the RCA audio and Video outpul
With HDMI output connector
l.3Introduction
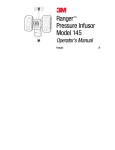
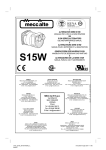
1.3,1 Layout Of The Main
Unit
o fi
oo:ooo
lrf,rx arxrf,
'\-------l'
-v-
:^..-
.,.-=^
193
l.Twin Antenna Input (SMA connector)
2. Ext, Remote Sensor
3. AV Output
a) Video Output (Yellow RCA)
b) RightAudio Output (Red RCA)
c) Left Audio Output (Vr'hite RCA)
4. Power Input DC 10-15 Votts
5. PowerLED
6. Remote Sensor
AV Output/IN
8.USB Connector
7.
9.HDMI OUT(This function is subject to actual models
lnstallation
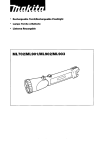
1.3.2 Layout of The Remote Control
ffi
ffi
w
w
ffiw
tm
Power
Press to
Mute
Select soud or remove
Enter
Conlm
Display
Displays cment chameVprogrm infomation
TV/RADIO
Switch between TV md Radio modes
0-9
Input chamel number
SI]B
Chmge the subtitle language
EPG
Display the Electronic Program Guide
AUDIO
To chmge audio language
TTX
Display teletext featues
FAV
add or remoye TV chmels from one of the
fou favorite chmel lists
Exit
Menu exit and C)Sf) clear
voL+/-
Volwe
Menu
Display the main Menu
CH+/-
Chmge the chamel one by one md up/dom in
oDloff the DTV
soud
the selection
adjust md left/right in the menu
2.
progrm
Search
Scan
Play/Pause
Press to
tm
on/offthe Time shifl
To select HDMI and CVBS output
(This function is sudject to actual models)
YELLOW
KEY
The red power wire connect to the ACC line which can control the auto, don,t connect to
the storage battery directly from the auto, to guard against long term operation can,t
stop. The ACC line and the GND line should install firmly, avoid some unnecessary
the menu
Menu selecl
Fomat
l
Press to
tum on/offthe recording
3.
machine issues.
If the machine don't use the AV input terminal, pls connect the "CAR BACK" yeltow
line to the ground line, and use the AV input terminal. Pls connect the "CAR BACK"
yellow line to the positive pole ofthe visual light after.
The two antennas should be parallel installation near the car roof, the input voltage is
DCt2y.
2.2 Replacing the Remote
Control Battery
1)Always use new battery when replace the old set
2)Donotattempttocharge,short-circuit,disassemble,
heatorburnusedbatteries,
battery may be explode ifmistreated.
3)Battery replacement is necessary when remote control acts sporadically or stops
operating.
4)Do not drop, apply shock or step on the remote control.
5)Do not spill water on the remote control.
6)Do not place objeats between the remote control and remote sensor.
7)Do notuseremote control forthe otherequipments atthe same time.
-4-
8)Do not leave the remote near any heat sources, or in a place subject to direct
sunlight(especially on the dashboard).
9) Keep the tithium battery out ofthe reach ofchildren. Should the battery be swallowed,
immediately consult a doctor.
I 0)Ifthe REMOTE does not operate even when you operate the remote control ftom a
close range, it is time to replace the battery refer irg to the label on the back ofthe
basic control. Use any ofothermaybe arisk offire orexplosion.
I 1)Do not hold the battery with metallic tweezers, otherwise a short-circuit may occur.
12)Wipe the battery with dry cloth to assure a good contact.
13)Undernormal conditions, batteries will last approximately I year. The service life
may be shorter,depending on the conditions ofuse.
tffit
ry
Power Cable
3.
This chapter describes the basic functions such as switching channel, volume control when
watching
T'fi
4.1 Switch Channel
The channel can be chansed throush one of the follow inp methods.
( I ) Press thelJV keys tohove to tEe numerical prior or ffext channel.
(2) Input the desired channel number using the numerical keys (0-9) to move to the channel
directly.
(3) Press the "TV/Radio" key to switch between TV channel and Radio channel.
(4) You can also switch channel using Electronic Program Guide or Channel List
4.2 Volume
(l)
Control
Press the<Dkeys to decrease/increase the audio volume.
(2) Press the "MUTE" key to pause the sound olyour program temporarily, and then you can
set the program to formal status by press "MUTE" key again or press the keys.
2.3 Accessories Included
lEffil
4. Basic Operation
#
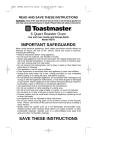
4.3 Program
Information
Program information is always displayed for a specific period of time whenever you switch
channels. You can view the detail program information by pressing the "INFO" key while
watching a program, and then press the "EXIT" key to hide it.
(1) General Information
General Information is displayed as follows on the screen.
:s
Installation Wizard
When powering on your receiver for the first time,the installation wizard is automatically
started (You can enable the Installation Wizard in IDefault Setting])
<<
1)
Channel number and channel name
<<2>>
Progress bar.
<(3 D
Icons lt.&
r
lE[r
IIT
Eil
(4))
(5)
(6)
It recommends you to finish the lnstallation Wizard. Ifyou exit the Installation Wizard without
fully completing the setting procedures, you maybe can't watch all TV or radio programs. In
this case, you can use the Installation Menu to configure your receiver as you like.
Displayed only when the channel is locked.
Displayed only when the channel is in one ofthe FAV list.
Displayed when multi audio languages is available in this program
Displayed only when there is teletext in this program
Displayed only when subtitle information is available.
Now: Cu[ent program name, program begin time and end time.
Next: Nextprogramname, programbegintime and endtime.
Currenttime.
(2) Detail Program Information
You can see detail information about the current channel by pressing the
Note:
Press the
"EXIT"
key to hide the information box.
-6-
"INFO"
key,
4.4 Channel
List
6. System
Three types of channel lists are provided lor easy and quick channel switch. TV list and
RADIO list are list ofTV and radio channels.
(1) Press "OK" key to display the TV list, and then you can press <D keys to switch to
RADIO list and FAV lists, or you can press "FAV" key to display FAV lists directly.
(2) Select your desired channet using the rv keys and press the "OK,, key to change the
channel
6.1 Parent Control
If
password
F
F
Password Enable: Use <Dkeys to select between Enabte and Disable.
Old Password: Ifyou want to change the password, you have to enter the old password
first. Pressrvkeys to set the focus on [Old Password], then input four number using
numeric keys (0-9) on the remote control. If this is finished, the focus will switch to
[New Password] automatically.
New Password: Enter a four-number new password.
is enabled, [Parent Controll can prevent children from watching
some
channels which are locked. Of course it will restrict them to acaess some system setting
menus only ifthey know the right password.
)
i
4.5 Text service
If your chosen channel has teletext feature, you can access it. Teletext service often
is
loaded automatically shortly after the Digital Teletext window is displayed.
( 1 ) Press TEXT key to access teletext features.
(2) Press EXIT key again to return to normal viewing.
5. EPG
The Electronic Program Guide (EPG) displays program information about each channel,
based on the date and time. You can also schedule your watching using the information
given. There are three elements on the screen.
> Video window: Display current channel program.
! Channel list: Press !V keys to switch to prior/next channel. Press "TV / RADIO" key
to switch between ITV Listl and IRadio List].
> Program list: A list ofprogram information ofcurrent channel.
F
F
Verify Password: Input the new password again for confirmation
6.2 System Information
Prom here, you can get information about the receiver, such as hardware version,
software version, release date, loader version and driver version.
7. Channel Management
7.1 Edit TV Channels
From here, you can lock channels, delete channels and move channels.
5.1 Browse Program
Information
ts Ifthe focusarenotonthechannellist,press "EPG "key;
F Press{l}keystoselectadayfromMondaytoSunday.Itwillbedisplayedatthetopof
>
the program list.
Press " EPG " key to set the focus on program list, and then pressl/v keys browse the
program information.
7-
F
Lock
Select the channel that you want to lock and then press "Red,,key. The selected channel will
be marked with a lock symbo[. Ilyou want to unlock the channel, press ,,Red,,key again.
F
Note:
To yiew a locked channel, you have to input the password. The default password is 0000.
More information about password, please refer to section 7.2.
F
Delete
This operation allows you to delete one or more unwanted programs. press
^/v/PAGE/PAGE+ keys to select a program. Press "Green" key to delete it.
8.2 Manual Search
You can se3rch single channel manually by searching parameters,
information.
>
>
if you know the channel
ChannelNumber
Press.l|key to move to your desired channel, and the corresponding channel frequency,
signal strength and signal quality will be change automatically.
Frequency
You can also enter the frequency that you want to search by pressing numeric keys (0-9) on
the remote control when the focus is on frequency.
) R"o"-e
Select the channel that you want to lock and then press ,,Blue,, key, you can rename the
channel name.
7.2
Edit Radio Channels
Please refer to section 8. 1 Edit TV Channel s.
7.3 Add TV Favorites
From here, you can add TV channels to or remove TV channels from one of the four favorite
channel lists labeled with FAV l, FAV2, FAV3 and FAV4.
If you think all the aboye
parameters are ready, press
procedure. When finished, the result will be displayed.
(1 )
(2)
Pressa/vkeys to select the channel.
Press "Red/Green/Yellow/Blue" keys to add to or remove from list FAv 1, FAv2, FAV3
and FAV4 respectively. For itrstance, ifa channel is added to tist FAVl, it will be marked
with the symbol E It is similarto other FAv list.
Installation
This chapter describes how to search for channels and a series ofprocedures.
S.l Automatic Search
Press "MENU" key, and then select Unstallatiotrl, [Automatic Search], you will see
Automatic Search interface as follows. Here, you don,t need to enter any other information
than press "OK" key, and then it will automatically search all the channels.
)
(2)
(
1
the manual search
8.3 Default Setting
Default Setting restores the receiver to the factory default settings. After Default Setting is
caried out and exit the main menu, the Instaltation Wizard will be automatically run..
Warning: Please note that once you perform Default Setting, all data such as Channel
information and user configured data are deleted.
Note:
' Onechannelcanbeaddedtoseverallists.
' The FAV list can be displayed by pressing the "Red" key when you are watching TV.
8.
"OK" key to begin
Press "OK" key to begin the auto search procedure. If there are already some channels,
the receiver will ask ifor not to carry out the procedure.
Press "OK" key to stop the procedure at any time ifyou want to_
-1 0-
9. USB
9.1 Time Shifting
Press the key of
"Yellow" on the Remote Controller , the receiver will give you following
option.
You can set record time according your needs, and Press IRecord by timel button.
When you choose [Record freelyl button, the record process will stop until the disk is ful1.
Press the key of "PLAY/PAUSE"on the Remote Cotrtroller, the video picture is paused.
the receiver will start record process.
Ifthe hard disk works correctly,
Press the key of"PLAY/PAUSE"on
the Remote Controller again, the program will restart
at the stop point before, you can select "<<" and ">>"button to back forward or fast
forward program.
Press thc Exit key, the receiver
will exit
the time shift function.
F
9.2 Program Record
F
Before start recording program, make sure the hard disk is connected to the receiver
correctly.
Enter the "RECORD SET" menu, it will display the detail info about hard disk.
!
F InthemenuoptionfTimeshiftduringPausing],ifyouchoose<ON>,itwillstarttime
shift function when you press the key of "PLAY/PAUSE" on the Remote Controller.
When you choose <OFF>, it just pause the video picture. Press the key of
"PLAY/PAUSE" on the Remote Controller again, the video picture will resume
Enter "PVR Playback" menu, it will show the record files in the hard disk. You can
seleat the file and play"
In the file list menu, you oan press "Red" buttonto delete the record file
9.5 View
9.3 Play Music
Picture
10. Trouble Shooting
Before contacting your local service, please make sure following instructions. Ifthe product
does not work normally after completing the following trouble shooting, please contact your
local product distributor or service center.
( I ) No messagc is displayed on the front panel or product has no power
- Check the main power cable and check that it is plugged into a suitable power outlet.
- Check whether Power Switch is On.
(2) No picture
- Make sure that the product is in Operation Mode.
- Make sure that the AV Cable is firmly connected to the TV.
- Make sure that aerial line is correctly connected to the equipment.
- Check the brightness level ofTV.
- Check thc channel is on air.
(3) Poor picture & sound quality
- Install aerial where there is not obstacle ahead.
- Make sure to avoid putting mobile phone or microwave oven near around the equipment.
(4) No or poor sound
- Check the volume level ofthe TV and the remote control.
- Check the Mute status ofthe TV and product.
- Press the Audio button to change the Sound Track type.
(5) Remote control does not operate
- To manipulate the equipment with remote control, the remote control's emitting part should
directly point towards the receiving part ofreceiver's remote control.
- Check the battery ofRemote control.
9.4 Play Video
-13
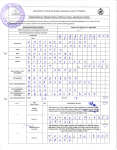
11 Technical Specification
TUNER
Frequency Range: l7 4 MHz -862 MHz
Bardz 6/7l8MHz
Input impedancer 75
C)
CHANNELDECODING
Standard: DVB-T
Demodulation: COFDM
FEC, t/2, 2/3,3/4,
4/5, 5/6,7 /8
solomon, 204,
Reed
I 88,
t:
8
DEMULTIPLEXER
Standard: ISO/IEC 13818-1
VIDEODECODING
Standard, H.264 HP@Level
4.
l, MPEG2 HP@HL, MPEG-4, RealVideo
Aspectratio:16:9/4:3
AUDIODECODING
Decoding: MPEGaudiolayerI.
II&IIL
DoblyAC3,WMA,AAC,FLAC
MEMORY
FLASH:8MByte
DDR
:
256MByte
AVOUTPUT
Video: CVBS
Audio: L/R
Power Source
DCl0-15 Volts
Negative Earth
Powef Consumption
<5W (Power on)
Less than 300 MW (Power off)
Operating Condition
-20"c- 60'c
Board Dimensions
140 mm x 125 mm x 25 mm
Weight
380 g
NOTE
Designs and specifications are subject to change without prompt notice
Weight and dimensions shown are approximate.
-1
5-