1
Installation and Administration Manual
Oracle AutoVue 20.0.0, Client/Server Deployment
Copyright © 1999, 2010, Oracle and/or its affiliates. All rights reserved.
Portions of this software Copyright 1996-2007 Glyph & Cog, LLC.
Portions of this software Copyright Unisearch Ltd, Australia.
Portions of this software are owned by Siemens PLM © 1986-2008. All rights reserved.
This software uses ACIS® software by Spatial Technology Inc. ACIS® Copyright © 1994-1999 Spatial Technology Inc. All rights
reserved.
Oracle is a registered trademark of Oracle Corporation and/or its affiliates. Other names may be trademarks of their respective
owners.
This software and related documentation are provided under a license agreement containing restrictions on use and disclosure and
are protected by intellectual property laws. Except as expressly permitted in your license agreement or allowed by law, you may
not use, copy, reproduce, translate, broadcast, modify, license, transmit, distribute, exhibit, perform, publish or display any part, in
any form, or by any means. Reverse engineering, disassembly, or decompilation of this software, unless required by law for
interoperability, is prohibited.
The information contained herein is subject to change without notice and is not warranted to be error-free. If you find any errors,
please report them to us in writing.
If this software or related documentation is delivered to the U.S. Government or anyone licensing it on behalf of the U.S. Government, the following notice is applicable:
U.S. GOVERNMENT RIGHTS
Programs, software, databases, and related documentation and technical data delivered to U.S. Government customers are "commercial computer software" or "commercial technical data" pursuant to the applicable Federal Acquisition Regulation and agencyspecific supplemental regulations. As such, the use, duplication, disclosure, modification, and adaptation shall be subject to the
restrictions and license terms set forth in the applicable Government contract, and, to the extent applicable by the terms of the Government contract, the additional rights set forth in FAR 52.227-19, Commercial Computer Software License (December 2007).
Oracle USA, Inc., 500 Oracle Parkway, Redwood City, CA 94065.
This software is developed for general use in a variety of information management applications. It is not developed or intended for
use in any inherently dangerous applications, including applications which may create a risk of personal injury. If you use this software in dangerous applications, then you shall be responsible to take all appropriate fail-safe, backup, redundancy and other measures to ensure the safe use of this software. Oracle Corporation and its affiliates disclaim any liability for any damages caused by
use of this software in dangerous applications.
This software and documentation may provide access to or information on content, products and services from third parties. Oracle
Corporation and its affiliates are not responsible for and expressly disclaim all warranties of any kind with respect to third party
content, products and services. Oracle Corporation and its affiliates will not be responsible for any loss, costs, or damages incurred
due to your access to or use of third party content, products or services.
AutoVue
3
Contents
PREFACE.......................................................................................................................................7
Audience .................................................................................................................................................. 7
Documentation Accessibility ................................................................................................................. 7
Accessibility of Code Examples in Documentation ......................................................................... 7
Accessibility of Links to External Web Sites in Documentation ..................................................... 7
TTY Access to Oracle Support Services .......................................................................................... 7
Related Documents................................................................................................................................. 7
Conventions............................................................................................................................................. 8
INTRODUCTION .........................................................................................................................9
Main Features ......................................................................................................................................... 9
Server Scalability and Clustering ..................................................................................................... 9
Accurate and Streamed Rendering ................................................................................................... 9
Server-based Client Configuration ................................................................................................... 9
AutoVue Key Features and Capabilities ........................................................................................ 10
Integrations and OEM Needs ......................................................................................................... 10
Why Oracle for OEM Implementation .............................................................................................. 10
Product Architecture ........................................................................................................................... 11
SYSTEM REQUIREMENTS .....................................................................................................12
Server..................................................................................................................................................... 12
Windows......................................................................................................................................... 12
Linux............................................................................................................................................... 12
Client...................................................................................................................................................... 12
Application Servers .............................................................................................................................. 13
Web Server............................................................................................................................................ 13
SECURITY RECOMMENDATIONS .......................................................................................14
Installation ............................................................................................................................................ 14
Running AutoVue as a Service............................................................................................................ 14
File Permissions .................................................................................................................................... 14
Deployments.......................................................................................................................................... 14
Integrations with AutoVue .................................................................................................................. 14
Secure Communication ........................................................................................................................ 14
VueServlet ............................................................................................................................................. 15
INSTALLATION PREREQUISITES .......................................................................................16
Upgrading AutoVue ............................................................................................................................. 16
Prerequisites for Installing on Linux OS ........................................................................................... 16
AUTOVUE INSTALLATION....................................................................................................18
Installing AutoVue Server ................................................................................................................... 18
Deploying the VueServlet .................................................................................................................... 20
Deploying in an Integrated Environment ....................................................................................... 21
Deploying in a Non-Integrated Environment ................................................................................. 21
VueServlet Parameters ................................................................................................................... 23
Configuring AutoVue startup script to start Jetty........................................................................... 23
Configuring AutoVue Server .............................................................................................................. 24
Configuration Options in jvueserver.properties ............................................................................. 24
Configuration Options in VueServer.ini......................................................................................... 28
Configuring the File Open Dialog .................................................................................................. 30
Oracle Corp.
AutoVue
4
Installing AutoVue Client Components ............................................................................................. 31
Installing in an Integrated Environment ......................................................................................... 31
Installing in a non-Integrated Environment.................................................................................... 31
Configuring the AutoVue Client ......................................................................................................... 33
AutoVue Applet Parameters........................................................................................................... 34
Scripting the Applet........................................................................................................................ 38
Verifying Your AutoVue Installation ................................................................................................. 43
Client-Side Installation ........................................................................................................................ 44
STARTING AUTOVUE SERVER ............................................................................................45
Starting AutoVue on Windows OSes.................................................................................................. 45
Starting AutoVue on Linux OSes........................................................................................................ 45
Shutting Down AutoVue Server.......................................................................................................... 46
Running the AutoVue Server as a Service ......................................................................................... 46
On Windows OSes.......................................................................................................................... 46
On Linux OSes ............................................................................................................................... 47
THE AUTOVUE SERVER CONSOLE ....................................................................................49
Diagnostics Button................................................................................................................................ 50
Process Pool........................................................................................................................................... 50
AUTOVUE DEPLOYMENT OPTIONS AND SCENARIOS.................................................51
AutoVue in Online/Offline Mode ........................................................................................................ 51
Adding Multiple AutoVue Servers in a Cluster ................................................................................ 51
Adding an Additional Server.......................................................................................................... 52
Configuring Multiple Servers in a Cluster ..................................................................................... 52
Configuring for Failover...................................................................................................................... 53
DEBUGGING AUTOVUE..........................................................................................................54
Logging for the AutoVue Server ......................................................................................................... 54
Debugging the Servlet .......................................................................................................................... 54
Debugging the Client............................................................................................................................ 56
APPENDIX A: NON-INTERACTIVE INSTALLATIONS ....................................................57
Installation ............................................................................................................................................ 57
Uninstallation........................................................................................................................................ 59
APPENDIX B: VUESERVLET DEPLOYMENT ....................................................................60
Tunneling through J2EE-enabled Application Servers.................................................................... 60
Deploying the WAR File................................................................................................................ 60
Tunneling with non-J2EE Application Servers ................................................................................. 62
Setting up VueServlet..................................................................................................................... 62
Tunneling using Jetty...................................................................................................................... 63
Tunneling using Microsoft IIS ............................................................................................................ 64
APPENDIX C: CUSTOMIZING THE GUI .............................................................................65
Choosing the GUI File.......................................................................................................................... 65
Modifying the GUI File ........................................................................................................................ 65
Structure and Syntax of GUI Files ................................................................................................. 65
GUI Configuration Syntax.............................................................................................................. 66
UNC File Names ................................................................................................................................... 71
APPENDIX D: CONFIGURING A DIRECTORY-BROWSING
SERVLET FOR THE AUTOVUE CLIENT.............................................................................72
APPENDIX E: IDENTITY MANAGEMENT SYSTEM ........................................................73
APPENDIX F: USAGE MONITORING...................................................................................74
APPENDIX G: AUTOVUE MOBILE .......................................................................................75
Oracle Corp.
AutoVue
5
APPENDIX H: LOGGING FOR THE AUTOVUE SERVER................................................78
Appenders....................................................................................................................................... 78
Logger Information......................................................................................................................... 80
APPENDIX I: LIST OF INI OPTIONS ....................................................................................82
allusers.ini and default.ini Options ..................................................................................................... 82
Acrobat PDF Options........................................................................................................................... 82
Allegro Options..................................................................................................................................... 83
AutoCAD Options ................................................................................................................................ 83
Autodesk DWF Options ....................................................................................................................... 84
Autodesk Inventor Options ................................................................................................................. 85
Cadence Options................................................................................................................................... 85
Cadkey Options .................................................................................................................................... 86
CATIA Options..................................................................................................................................... 86
CATIA 4 Options.................................................................................................................................. 86
CATIA 5 Options.................................................................................................................................. 87
CGM Options........................................................................................................................................ 87
DirectModel (JT) Options.................................................................................................................... 88
Excel Options ........................................................................................................................................ 88
Gerber Options ..................................................................................................................................... 88
HPGL/HPGL2 Options........................................................................................................................ 90
IFC Options........................................................................................................................................... 91
JPEG Options ....................................................................................................................................... 92
JPEG 2000 Options .............................................................................................................................. 92
ME10/OneSpace Designer Drafting Options ..................................................................................... 92
Microsoft Outlook Options.................................................................................................................. 93
MicroStation Options........................................................................................................................... 94
NC-Drill Options .................................................................................................................................. 96
OrCAD Layout Options....................................................................................................................... 96
Pro/ENGINEER Options..................................................................................................................... 97
SolidWorks Options ............................................................................................................................. 98
STEP Options ....................................................................................................................................... 98
Text Options.......................................................................................................................................... 98
TIFF Options ........................................................................................................................................ 99
Visio Options......................................................................................................................................... 99
Word Options ....................................................................................................................................... 99
General Options.................................................................................................................................. 100
Base Font ...................................................................................................................................... 105
UI Color Options .......................................................................................................................... 105
AutoVue Mobile Options ................................................................................................................... 106
Company Wide Policy.................................................................................................................. 107
3D Options........................................................................................................................................... 107
3D PMI Options............................................................................................................................ 109
3D Export Options........................................................................................................................ 111
3D Color Options.......................................................................................................................... 111
ECAD Options .................................................................................................................................... 112
Markups .............................................................................................................................................. 114
Markup Options............................................................................................................................ 114
Markup Font Options.................................................................................................................... 116
Overlay Options.................................................................................................................................. 116
Oracle Corp.
AutoVue
6
Disable Options................................................................................................................................... 117
Printing Options ................................................................................................................................. 117
General Options............................................................................................................................ 117
EMF Generation Options.............................................................................................................. 123
Watermark Options....................................................................................................................... 123
Headers/Footers Options .............................................................................................................. 124
Margins Options ........................................................................................................................... 125
Pen Settings Options..................................................................................................................... 125
Watermark in View Mode ................................................................................................................. 126
CSI Shapefile Project Files ................................................................................................................ 126
APPENDIX J: FAQ ...................................................................................................................130
General ................................................................................................................................................ 130
Security................................................................................................................................................ 133
Integrating with Other Systems ........................................................................................................ 135
Troubleshooting.................................................................................................................................. 137
INDEX.........................................................................................................................................141
FEEDBACK ...............................................................................................................................144
General Inquiries................................................................................................................................ 144
Sales Inquiries..................................................................................................................................... 144
Customer Support .............................................................................................................................. 144
Oracle Corp.
AutoVue
7
Preface
The Oracle AutoVue Installation and Administration Manual describes how to install and configure Oracle AutoVue.
Audience
The Oracle AutoVue Installation and Administration Manual is directed at any user whose task is the installation,
configuration, administration, and maintenance of Oracle AutoVue.
Documentation Accessibility
Our goal is to make Oracle products, services, and supporting documentation accessible to all users, including users
that are disabled. To that end, our documentation includes features that make information available to users of
assistive technology. This documentation is available in HTML format, and contains markup to facilitate access by
the disabled community. Accessibility standards will continue to evolve over time, and Oracle is actively engaged
with other market-leading technology vendors to address technical obstacles so that our documentation can be
accessible to all of our customers. For more information, visit the Oracle Accessibility Program Web site at http:/
/www.oracle.com/accessibility/.
Accessibility of Code Examples in Documentation
Screen readers may not always correctly read the code examples in this document. The conventions for writing code
require that closing braces should appear on an otherwise empty line; however, some screen readers may not always
read a line of text that consists solely of a bracket or brace.
Accessibility of Links to External Web Sites in Documentation
This documentation may contain links to Web sites of other companies or organizations that Oracle does not own or
control. Oracle neither evaluates nor makes any representations regarding the accessibility of these Web sites.
TTY Access to Oracle Support Services
Oracle provides dedicated Text Telephone (TTY) access to Oracle Support Services within the United States of
America 24 hours a day, 7 days a week. For TTY support, call 800.446.2398. Outside the United States, call
+1.407.458.2479.
Related Documents
For more information, see the following documents in the Oracle AutoVue documentation library:
•
•
•
•
•
•
•
•
User’s Manual
Release Notes
Acknowledgments
Supported Formats List
Product Limitations
Product Variations - Feature Matrix
Performance Related INI Options
DMAPI Manual
Oracle Corp.
AutoVue
8
Conventions
The following text conventions are used in this document:
Convention
Meaning
boldface
Boldface type indicates graphical user interface elements associated with an action, or
terms defined in the text.
italic
Italic type indicates book titles, emphasis, or placeholder variables for which you
supply particular values.
monospace
Monospace type indicates commands within a paragraph, URLs, code in examples,
text that appears on the screen, or text that you enter.
[root directory]\[sub
directory]
In Windows and Linux OSes, directory hierarchy is written with backward slashes (\)
and forward slashes (/), respectively. In this document, unless mentioned otherwise,
directory hierarchy for Windows and Linux OSes are written with the backward slash.
<angular brackets>
Indicates required entries but are not to be included in the entered information.
{curly braces}
Indicates mandatory information.
[square brackets]
Indicates optional syntactical elements.
|
Indicates an either-or type of choice.
...
Indicates that information may be repeated.
Oracle Corp.
AutoVue
9
Introduction
Oracle’s AutoVue Enterprise Visualization is the industry leading solution for viewing, reviewing, and collaborating
on technical documents and information across the enterprise. AutoVue delivers industrial-strength, Web-based
viewing, markup, real-time collaboration and back office integration capabilities; connecting people, information and
processes in a secure, efficient and flexible manner. Organizations can extend the reach of technical information to a
broader set of enterprise users and optimize internal business processes, driving innovation, operational efficiency
and business excellence.
Main Features
Server Scalability and Clustering
AutoVue is designed to provide server scalability to support a growing number of users. If there is an increase in the
numbers of users, additional servers can simply be added. This can be done online without interrupting service.
Accommodating additional users is simply a matter of monitoring AutoVue server load and adding more servers, if
necessary. The load is efficiently balanced across the AutoVue server cluster. Increasing the capacity may be as
simple as adding one more machine, making it a cost and resource efficient way to accommodate growth.
Accurate and Streamed Rendering
During the viewing process, documents available for viewing are rendered on the server or servers and an intelligent
and displayable data stream is delivered to the client. In this manner, AutoVue eliminates any concerns about security
since the original document with its proprietary data is not transferred to the client machine. During the transmission
of the viewable data, AutoVue utilizes different compression and streaming algorithms in order to achieve a quick
and responsive feedback to the client side for large and multi-page documents.
AutoVue embeds several different rendering schemes in order to accommodate environments. These schemes allow
the server to take into account issues such as: network bandwidth, load balancing between server and client, server
configuration and performance, Intranet/Extranet/Internet use and file size and format to be viewed. However, in all
rendering options, AutoVue keeps all necessary information for querying purposes (in other words, the “intelligence”
of drawings is preserved). For example, users can perform text searches on text and CAD files or perform queries
based on drawing attributes in a CAD file.
Server-based Client Configuration
The server defines the user interface capabilities and the feature set provided to the client. The server has complete
control over what functions and user interface are made available to the client. For example, users may be granted or
denied rights to perform printing, marking up, or any other functionality available in AutoVue depending on their
access permissions. Moreover, multiple language support is provided “out-of-the-box” within AutoVue, and users
using different languages will be served with a localized user interface from the same applet.
Oracle Corp.
AutoVue
10
AutoVue Key Features and Capabilities
•
•
•
•
View hundreds of document types:
a. View and markup a wide array of document types—including 3D and 2D CAD, EDA, Office, PDF, and
graphics files—all without the authoring application.
Accelerate viewing of complex CAD files:
a. Begin viewing and working on complex 3D assemblies and multi-page 2D CAD documents when only a
fraction of the data has been streamed.
Add markups and comments:
a. Manage and track comments from all reviewers.
Collaborate in real-time:
a.
b.
c.
d.
•
•
•
Initiate real-time collaboration sessions with team members across the globe.
Enable team members to create simultaneous markups.
Identify all team members and controller’s markups with color-coded markups and chat.
Create an audit trail and capture session information such as meeting, subject, date and time, participants,
transcript of session events, and a complete chat record.
Enforce server-based privileges and permissions:
a. Manage and control users’ access permission level, and define the user-interface capabilities and feature set
from the server.
Scale to meet the needs of an extended enterprise:
a. Add servers to accommodate additional users.
View and markup files in offline mode:
a. The offline mode option in AutoVue provides you with the ability to view and markup files when you do not
have access to the AutoVue server or backend Document Management System (DMS).
Integrations and OEM Needs
AutoVue is customizable and has been designed to provide an extensive set of APIs for integration with Document
Management Systems (DMS), Product Lifecycle Management (PLM), Knowledge Management, Product Data
Management (PDM), Product Portfolio Management (PPM), Portals, Enterprise Resource Planning (ERP), supply
chain, and project management Web-centric solutions.
AutoVue can be closely integrated into various backend systems using a complete and flexible integration
development kit (ISDK). ISDK has been designed to provide a transparent integration scheme, where a client is able
to review a DMS document or a remote file with no knowledge of the underlying technology. In certain cases where
the integrator might want to have complete control of user interface and functionality, we offer the View and Markup
beans.
Detailed information about AutoVue integration possibilities can be obtained from Oracle Corp.
Why Oracle for OEM Implementation
Oracle develops the AutoVue product. Several articles and reviews have described AutoVue as the “best” engineering
viewing solution available on the market today. Please connect to http://www.oracle.com/autovue/index.html for
more information. The AutoVue family of products provides for the most accurate and complete viewing and markup
needs.
Oracle owns the technology embedded within AutoVue. Therefore, Oracle can provide timely and knowledgeable
customer support.
Oracle Corp.
AutoVue
11
Product Architecture
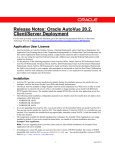
Oracle’s Web viewing technology is based on a multi-tiered client-server architecture. Communication between the
different levels is through standard communication mechanisms.
At the highest level this structure is as follows:
More than one server can be used to perform intelligent load-balancing — the servers automatically divide the load in
a peer-to-peer fashion to avoid any bottlenecks.
AutoVue uses JAVA’s applet technology for the client. Clients can be a standard Web or ASP page that embeds the
applet, or they can be standalone applications.
Oracle Corp.
AutoVue
System Requirements
The following are certified by Oracle Corp.
Server
Windows
•
•
•
•
•
Windows Server 2003 32-bit
Windows Server 2003 64-bit (AutoVue running in 32-bit mode)
Windows Server 2008 32-bit
Windows Server 2008 64-bit (AutoVue running in 32-bit mode).
The installation requires about 400MB of free space.
Linux
•
•
•
•
•
Red Hat Enterprise Linux 5.4 (x86)—32-bit only
Red Hat Enterprise Linux 5.4 (x86)—64-bit (AutoVue running in 32-bit mode)
Oracle Enterprise Linux 5.4 (x86)—32-bit only
Oracle Enterprise Linux 5.4 (x86)—64-bit (AutoVue running in 32-bit mode)
The installation requires about 400MB of free space.
Client
Clients running the following Java Virtual Machines:
•
•
•
J2SE 5.0 update 19
J2SE 6.0 update 14
JRE 1.4.2 update 19
The following OSes and browsers:
•
•
•
•
•
Microsoft Internet Explorer (6.0, 7.0, and 8.0)—32-bit only, and FireFox 3.0—32-bit only) on Windows OS
Safari 4.0, Firefox 3.0 on Apple MAC OS X 10.5
Firefox 3.0 on RedHat Enterprise Linux 5
Firefox 3.0 on Ubuntu 8.04
Firefox 3.0 on Solaris 10 Sparc
Oracle Corp.
12
AutoVue
13
Application Servers
The VueServlet has been certified on the following application servers:
Refer to "Appendix B: VueServlet Deployment" for more information on application servers.
•
•
•
•
•
Tomcat 5.x and up
WebSphere 6.1 and up
WebLogic 8.x and up
Oracle Application Server 10g R3 and up
Jetty 6.0 and up
Web Server
AutoVue generally works with any Web server. The following Web servers are certified:
•
•
•
Windows IIS
Apache v2 on Windows and Linux OSes
Oracle HTTP Server on Windows and Linux OSes
The AutoVue installer detects whether a Web server is installed on the AutoVue Server machine. If one of the
certified Web servers are found, the required AutoVue client components are installed. However, if you want install
AutoVue client components manually, or are using an integration with AutoVue, refer to the "Installing AutoVue
Client Components" section for information on installing the client components.
Oracle Corp.
AutoVue
14
Security Recommendations
This section provides security recommendations for installing or configuring AutoVue.
Installation
It is recommended that you install and run AutoVue Server as a secure user to ensure that direct access to the server
and files on the server is restricted. Users connecting to AutoVue Server via the client can still view files and generate
streaming files.
Running AutoVue as a Service
When running AutoVue Server as a service we recommend that it is run as a named user and not run as Local System
Account, as the local system account has more privileges than a named account.
File Permissions
If configuring a server:// directory to use with AutoVue, it is important to note that any user connecting to AutoVue
has access to the files contained in the server:// directory. Do not use the server:// protocol if you need to restrict
access to files located at the server:// directory.
Deployments
The DMS_PRESERVE_COOKIES applet parameter is used when AutoVue is deployed in a cluster environment or
when an integration with AutoVue relies on setting cookies and having the client pass them back as part of the
request.
As of AutoVue version 20.0.0, the DMS_PRESERVE_COOKIES applet parameter has been updated to allow
integrators to specify the exact list of cookies that the AutoVue client should pass on to the AutoVue Server and/or the
integration/VueLink servlet. We recommend that you update your deployment to leverage this enhancement to
DMS_PRESERVE_COOKIE and specify only those cookies that are necessary for your deployment/integration to
work.
Integrations with AutoVue
•
•
•
Ensure that the Original URL to a file does not contain sensitive information such as user information, server
information. Use the DMSARGS applet parameter to set this sensitive information.
Ensure that the HTML pages that invoke the applet parameter do not include the USERNAME applet parameter.
AutoVue Server queries the CSI_UserName property at the beginning of a session. Ensure that your integration
returns this property to AutoVue Server.
AutoVue version 20.0.0 has security enhancements. The ISDK for AutoVue 20.0.0 leverages these security
enhancements. We encourage integrators to upgrade their integrations to use the new ISDK to benefit from these
security enhancements.
Secure Communication
You can “tunnel” all communications between the AutoVue Server and client through HTTPS which uses SSL. This
ensures a secure connection. To implement this, the applet should communicate with the server through a servlet
which should be referenced through HTTPS.
Oracle Corp.
AutoVue
15
VueServlet
We recommend that you set the ServerInfo parameter of the VueServlet to False. When set to True, if a user accesses
the VueServlet page, the server IP address is displayed.
Oracle Corp.
AutoVue
16
Installation Prerequisites
Upgrading AutoVue
If you are upgrading your AutoVue installation from either an older version or a different product variation, you must
uninstall it before proceeding with the new installation. Before uninstalling, make sure to save a backup copy of any
specific settings and content that you would like to push forward into your new installation. This can include the
following:
•
•
•
•
•
•
•
•
AutoVue Server settings from the jvueserver.properties file and VueServer.ini file (located in the \bin
directory of your AutoVue Server installation)
AutoVue user profiles and customized GUI files (located in the \bin\Profiles directory of your AutoVue
Server installation)
Global user settings from the allusers.ini file and default user settings from the default.ini file (located in
the \bin directory of your AutoVue Server installation)
Intellistamp attributes and settings from the dmstamps.ini file (located in the \bin directory of your AutoVue
Server installation)
Custom logging settings from the log4j.properties file (located in the \bin directory of your AutoVue Server
installation)
Markup files, if markups are being managed by AutoVue server (located in the \bin\Markups directory of your
AutoVue Server installation)
Custom markup symbol libraries (located in the \bin\Symbols directory of your AutoVue Server installation)
On Linux installations of AutoVue backup the jvuew_config file located in the <AutoVue Server installation>/
config directory.
If you decide to move these settings/contents forward to your new installation of AutoVue, they can be copied to the
same relative locations in your new installation. However, for the AutoVue Server settings in
jvueserver.properties (the global user settings in allusers.ini and default user settings in default.ini) and the
customized GUI settings, it is best to manually copy the specific settings that you would like to keep as the new
installation of AutoVue may have important new settings.
Prerequisites for Installing on Linux OS
To correctly install AutoVue on a Linux OS, it is recommended that you have basic knowledge of Linux and its
administration.
1
Run the update agent, up2date, to download the latest Xvfb and Mesa files.
Note: The AutoVue Server installer does not detect whether Xvfb or Mesa are installed.
2
Install Xvfb version 6.8.2 or later.
Make sure you install the Xvfb with XRender and GLX extensions.
3
Install the latest Mesa package (recommended version is 6.5.1 or later).
Note: In the event you want to use an earlier version of Mesa, it is acceptable to use the version that is included
in the repository of the supported Linux distribution.
4
Install the Wine RPM package wine-av-20040914-20.i386.rpm from http://oss.oracle.com/
AutoVue.
• If you have an older version of Wine, you need to uninstall it and then install the package that is certified with
this release of Oracle AutoVue.
Oracle Corp.
AutoVue
• Install Wine as a root user by running the following:
#rpm -i wine-av-20040914-20.i386.rpm
Note: This version of Wine is installed in the /usr/av directory.
Oracle Corp.
17
AutoVue
18
AutoVue Installation
Note: We recommend that you review "Security Recommendations" and "AutoVue Deployment Options and
Scenarios" before proceeding with the AutoVue installation.
This chapter describes how to install AutoVue on Windows and Linux OSes.
The AutoVue installation consists of the following steps:
1
"Installing AutoVue Server"
2
"Deploying the VueServlet"
3
"Configuring AutoVue Server"
4
"Installing AutoVue Client Components"
5
"Configuring the AutoVue Client"
6
"Verifying Your AutoVue Installation"
7
"Client-Side Installation"
Note: If you want to install AutoVue in non-interactive mode, refer to "Appendix A: Non-Interactive Installations".
Installing AutoVue Server
To install AutoVue Server, do the following:
1
Download the Oracle AutoVue Media Pack and extract its contents.
2
Run the AutoVue installer executable:
• On Windows OSes, the installer is deploy_server.bat
• On Linux OSes, the installer is jInstall_lin.bin.
Note: You might need to grant execute permissions for the installer on Linux. To do so, run chmod +x
jInstall_lin.bin.
3
Select a language from the installation dialog and then click OK.
4
Click Next to begin installation.
5
Specify the installation directory and then click Next.
Windows OS Example: C:\Program Files\jVue
Linux OS Example: /home/apps/jvue
6
Click an installation set icon and then click Next:
Installation Set
Description
Standard
Installs the most common AutoVue features. Note that this set does not install the sample drawing
files or API examples.
Custom
You can select the features to install. Select this installation set to install the sample drawing files
and API examples.
If you selected the Custom install set continue to step 7, otherwise proceed to step 8.
Oracle Corp.
AutoVue
7
19
Select which of the following features to install and then click Next:
8
Option
Description
Program Files
Installs Oracle AutoVue. The option is selected by default.
Administration Documentation
Installs Oracle AutoVue system administration documentation. The option is
selected by default.
User Documentation
Installs AutoVue end-user documentation. The option is selected by default.
Example Client Application
Installs a sample AutoVue client application. The option is selected by default.
Sample Files
Installs drawing sample files.
API Examples
Installs examples of how Oracle AutoVue features can be added to third-party
applications using APIs.
For Windows OS installations, select one of the following locations to create shortcuts and then click Next.
Options
Description
In a new Program Group
Creates a shortcut in the Program group of the Start menu. For example, Oracle
AutoVue. This is the default option.
In an existing Program Group
Adds a shortcut to an existing Program group. For example, Accessories.
In the Start Menu
Adds a shortcut in the Start menu.
On the Desktop
Adds a shortcut on the Desktop.
In the Quick Launch Bar
Adds a shortcut to the Quick Launch bar.
Other
Adds a shortcut to the specified location.
Don’t create icons
Shortcuts are not created.
To create icons for all users of AutoVue, select Create Icons for All Users.
9
Specify a host name or IP address for the AutoVue Server and then click Next.
Example: hostname1.domain.com
10 Specify the hostname and port of the Web server and then click Next.
Example: hostname1.domain.com:80
11 Specify the document root of the Web server. If IIS or Oracle HTTP Server or Apache Web Server is installed,
the installer detects the installation and auto-populates the document root. If you are using a web server that is
not one of these, you can choose the Custom radio button and enter the document root of this web server in the
text area.Click Next when done.
Web Server Options
Description
Oracle HTTP Server
Document root example: C:\product\10.1.3.2\companionCDHome_1\ohs\htdocs
Apache Web Server
Document root example: /var/apache/htdocs
Microsoft IIS
Document root example: C:\inetpub\wwwroot
Custom
If you are using another Web server, you can specify the document root for this Web server.
Oracle Corp.
AutoVue
20
12 Specify the path to the sample HTML and client Jar files relative to the document root of the Web server.
Default value: jVue
Note: Sample HTML pages and client Jar files are installed in this directory in the root of the Web server’s tree.
For example, http://hostname1/jVue/…
13 Review the pre-installation summary and then click Install.
14 Once the installation program is finished on a Windows OS, the installer prompts if you wish to register AutoVue
as a Windows service. If you wish to register AutoVue Server as a Windows service, select Yes and click Next to
continue.
Note: If you wish to setup AutoVue Server as a service on a Linux OS, you must do so manually after the
installation is complete.
Note: If you choose to skip this step on a Windows OS, you can manually register AutoVue as a service later.
Refer to the Installation and Administration manual for instructions.
15 If you chose to register AutoVue as a Windows service, the installer prompts for an account name and password.
This is the account that will be used to startup AutoVue Server as a service. Enter the account name and
password and click Next to Continue.
16 Click Done to quit the installer.
AutoVue Server is installed in the specified directory.
Note: If there are any warnings or errors, refer to the installation log file, install.log, located in the <AutoVue
Installation Folder>\bin directory.
Deploying the VueServlet
The Oracle-developed VueServlet allows the AutoVue client to communicate with the AutoVue Server using the
standard HTTP protocol. This has two advantages:
•
•
The client and AutoVue Server can generally communicate across firewalls since the standard HTTP ports (for
example, 80) are used.
The client can be configured to use the HTTPS protocol to communicate with the VueServlet. This ensures that
all communications are secure.
When tunneling is configured, the AutoVue client encodes requests from the HTTP/HTTPS protocol and attempts to
invoke the servlet on the specified server. The servlet decodes the parameters included in the request and forwards the
request to the AutoVue Server using a socket connection. The servlet also replies to the client machine using the same
HTTP/HTTPS protocol. You can deploy the VueServlet with any application server you choose. For a list of
application servers that are certified by Oracle, refer to "System Requirements".
Note: The VueServlet is pre-configured with the Jetty that is shipped with AutoVue Server.
When deploying the VueServlet, your deployment steps depend on whether you have integrated AutoVue into a DMS
or whether you are using it in a non-integrated environment.
Oracle Corp.
AutoVue
21
Deploying in an Integrated Environment
In most cases, when AutoVue is integrated with a DMS, the VueServlet is deployed on the application server that
hosts the integration servlet and/or the DMS.
In order to deploy the VueServlet in these environments, follow these steps:
1
Identify where the VueServlet.jar is located in your integration/VueLink deployment.
2
Shut down the application server where the integration/VueLink is deployed.
3
If the VueServlet is deployed in a WAR file, extract the contents of the WAR file.
4
Replace VueServlet.jar from the extract with the VueServlet.jar file from the current release.
5
Modify any of the configuration parameters for the VueServlet as needed. Refer to section "VueServlet
Parameters" for more information.
6
Re-create the WAR file (if you had to extract it in step 3).
7
Restart the application server.
8
Redeploy the WAR file.
Deploying in a Non-Integrated Environment
To deploy the VueServlet with your J2EE-enabled application server, you must first create and then deploy a war file.
The following steps explain how to do this:
1
Create a directory.
For Example: C:\csiwar
2
In the folder C:\csiwar, create a sub-directory WEB-INF.
3
In WEB-INF, create a directory lib: C:\csiwar\WEB-INF\lib
4
Copy vueservlet.jar to C:\csiwar\WEB-INF\lib.
5
Create a deployment descriptor. The deployment descriptor should be stored as a file named web.xml in the
WEB-INF directory.
• The following is the mandatory header for the web.xml document. It defines the document as an XML file and
relates the file syntax to the DOCTYPE resource specified.
<?xml version="1.0" encoding="ISO-8859-1"?>
<!DOCTYPE web-app PUBLIC "-//Sun Microsystems, Inc.//DTD Web Application
2.2//EN" "http://java.sun.com/j2ee/dtds/web-app_2_2.dtd">
Oracle Corp.
AutoVue
22
• Use the following code to specify the deployment descriptor needed to deploy the VueServlet.
<web-app>
<servlet>
<servlet-name>com.cimmetry.servlet.VueServlet
</servlet-name>
<servlet-class>com.cimmetry.servlet.VueServlet
</servlet-class>
<init-param>
<param-name>JVueServer
</param-name>
<param-value>hostname:5099
</param-value>
</init-param>
<init-param>
<param-name>Verbose
</param-name>
<param-value>0
</param-value>
</init-param>
</servlet>
<servlet-mapping>
<servlet-name>com.cimmetry.servlet.VueServlet
</servlet-name>
<url-pattern>/servlet/VueServlet
</url-pattern>
</servlet-mapping>
</web-app>
The <servlet-name> parameter is how the servlet is known within the XML file.
The <servlet-class> parameter is the fully qualified Java programming language class name of the
Servlet.
The <url-pattern> parameter is how the servlet is referenced from a Universal Resource Indicator (URI).
Note: The parameter structure must follow the order in the DTD definition. For example, all <servlet>s must be
defined before any <servlet-mapping>s can be specified.
6
Update hostname in web.xml with the name of the AutoVue Server machine.
7
Specify additional configuration parameters for the VueServlet at this point. Refer to section "VueServlet
Parameters".
8
To create the WAR file, use the "jar" utility from the JavaTM Development Kit distribution. If you are in the root
directory you created for the WAR contents (C:\csiwar), use the following command:
jar cvf VueServlet.war WEB-INF
9
Deploy VueServlet.war using any J2EE compliant application server.
10 After the VueServlet is deployed, to access the content, enter the following into your Web browser address field:
http://host:port/<context>/servlet/VueServlet
The <context> parameter can be set in the deployment phase or set automatically by the application server. Some
application servers allow you to specify the context name, but generally the WAR file name is used as the
context.
11 Update the JVUESERVER applet parameter in the Web pages that embed the AutoVue applet to include the full
URL of the servlet (something like http://servername/servlet/VueServlet).
Oracle Corp.
AutoVue
23
The exact steps to set up the VueServlet on your application server depend on the software you are using. Refer to
"Appendix B: VueServlet Deployment" for information on setting up the VueServlet for common servlet engines.
VueServlet Parameters
The following table describes VueServlet initialization parameters:
Parameter
Description
Default
DebugLevel=[0-100]
Set the debug output category.
0
EnableSSL=[True|False]
Set to True to enable secure socket connection to AutoVue servers.
False
JVueServer={server host
names}
A semicolon separated list of AutoVue server host names. This parameter is
used by the VueServlet to connect to AutoVue servers through socket
connection.
The JVUESERVER parameter needs to be set to the hostname:port value used
when starting the AutoVue Server. You can specify more than one
hostname:port separated by semi-colons (;) for fail-over. In other words,
if one machine is down the servlet will try the next machine.
If JVueServer is not specified, it defaults to localhost:5099. The servlet
assumes that AutoVue server is running on the same machine as the Web
server and communicates through port 5099.
local host
name:5099
InvokerCount=value
Set number of simultaneous connects to AutoVue server per channel per
server (2 channels per server).
100
ServerInfo=[True|False]
Set to True to include AutoVue server info on VueServlet status page.
True
Verbose=[TRUE|FALSE]
Set to TRUE to enable debug output.
Set to FALSE to disable debug output.
FALSE
Configuring AutoVue startup script to start Jetty
As of AutoVue version 20.0.0, Jetty does not startup automatically when AutoVue starts up. If you wish to use Jetty
that ships with AutoVue, you can start up Jetty manually by:
•
•
•
running “startJetty.bat” located at <AutoVue Installation Folder>\bin\jetty\bin on Windows installations of
AutoVue
running “startJetty” located at <AutoVue Installation Folder>\bin\jetty\bin on Linux installations of AutoVue
selecting the “Start VueServlet on Jetty” shortcut from the AutoVue programs group on Windows installations of
AutoVue
If you wish to automatically startup Jetty when AutoVue Server starts up, you can do so by editing
jvueserver.properties and uncommenting the lines beginning with:
#servlet-engine.classpath=
#servlet-engine.jre=
#servlet-engine.cmdline=
The next time you start up AutoVue Server, Jetty will startup along with AutoVue.
Oracle Corp.
AutoVue
24
Configuring AutoVue Server
This section describes how to configure AutoVue Server. If you wish to modify the ports that AutoVue Server is
running on, or if you wish to set up a server farm or perform any other server configuration, refer to the following
sections. AutoVue’s server configuration parameters are located primarily in two configuration files:
jvueserver.properties and VueServer.ini. They are both located in the <AutoVue Installation Folder>\bin directory.
Note: You must stop the AutoVue Server before modifying jvueserver.properties and VueServer.ini.
Configuration Options in jvueserver.properties
The jueserver.properties file contains the configuration settings for the startup and operation of the AutoVue Server.
Modifying RMI and Socket Ports
By default, AutoVue Server opens a socket connection to clients on port 5099 and an RMI registry port on 1099. The
RMI port is also used to for communication with other servers when AutoVue is set up in a server farm.
You can use different ports for RMI and socket. To change these ports, you need to modify the
jvueserver.properties file located in the \bin subdirectory of the AutoVue Server installation directory.
Edit the following lines in jvueserver.properties:
jvueserver.rmi.port=1099
jvueserver.socket.port=5099
This new socket port needs to be properly reflected in the JVUESERVER parameter specified in the VueServlet
descriptors that point to this server.
Note: These port numbers are not related to the HTTP port used by the Web server.
AutoVue uses n+1 consecutive ports starting from the base RMI and socket ports, where n is the processPoolSize
value specified in jvueserver.properties. You should verify that the required ports are open and not in use by any other
process. The netstat –a program displays which ports are in use.
Configuring for a Proxy Connection
If your AutoVue Server uses a proxy server to connect to the Internet, then the proxy server name must be specified in
jvueserver.properties.
Example:
jvueserver.http.proxyhost=my.proxyserver.com:80
jvueserver.ftp.proxyhost= my.proxyserver.com:80
Replace my.proxyserver.com with the name of the proxy server running on the server and the port with the
appropriate port number. It is recommended that, except for the proxy settings, you do not change the default settings.
Setting Backward Compatibility Options
Release 20.0.0 contains enhanced encryption of the authorization block. To allow for backward compatibility for 19.3
VueLinks/integrations, AutoVue provides the following parameter in jvueserver.properties:
dms.vuelink.version = [19.3]
Oracle Corp.
AutoVue
25
This parameter allows you to continue using your existing integrations with release 19.3. In the next release of
AutoVue, this backward compatibility option will be turned off. It is important that you update your integrations to
implement the enhanced encryption of the authorization block.
Configuring AutoVue Host Name
If you rename your server machine name after you install AutoVue, you must modify jvueserver.properties and
update this parameter:
jvueserver.hostname = [host name]
Note: This new server hostname must be properly reflected in the JVUESERVER parameter specified in the
VueServlet descriptors that point to this server.
Enabling NTLM Authentication
To support NTLM authentication, set the following parameter in jvueserver.properties to TRUE:
jvueserver.ntlm.enable = [TRUE | FALSE]
Note: The default value is FALSE.
Configuring Process Pool Size
In jvueserver.properties, you can set the process pool size with the following parameter:
jvueserverx.nt.processPoolSize = [integer]
This specifies the number of secondaries (or DocServers) to startup when AutoVue Server starts up. The default value
is 4.
Configuring Streaming Files
This section provides streaming files parameters that can be configured.
Property
Description
Default
jvueserver.metacache.enable =
[TRUE | FALSE]
Set to false to disable creation of streaming files on the server. When
set to false, dedicated streaming file process will not start.
Default: True
TRUE
dms.save.metafile = [TRUE |
FALSE]
Specify whether or not streaming files are saved in the DMS.
Set to TRUE to save streaming files in DMS.
Set to FALSE so that streaming files will not be saved in DMS.
TRUE
jvueserver.metacache.process =
[TRUE | FALSE]
Flag for using separate process for streaming file generation.
If false, DocServers themselves handle streaming file generation.
TRUE
jvueserver.metacache.threshold =
[non-negative integer]
DocServer load that forces streaming file creation in a designated
process.
0
Oracle Corp.
AutoVue
jvueserver.metacache.pdf.enable
= [TRUE | FALSE]
26
Set to TRUE: Streaming file is not generated for PDF.
Set to FALSE: Streaming file is generated for PDF and Word PDF
files.
This configuration parameter should be set manually.
FALSE
For additional streaming file configuration, see section "Configuring Streaming File Storage Options".
Configuring for Collaboration
When using the Collaboration feature in AutoVue, you can configure the following parameters in the
jvueserver.properties file. For example, you can choose to enable the Collaboration feature on the server, and/or
you can specify the protocol to use for collaboration.
Parameter
Description
Default
jvueserver.collaboration.enable =
[TRUE | FALSE]
True enables collaboration mode on the server.
False disables the mode.
True
jvueserver.collaboration.protocol=[rmi |
jxta]
Specify the protocol to use for collaboration.
rmi
jvueserver.collaboration.tcp.port=[integ
er]
BaseTCP port to be used.
Note: The configuration parameters below need to be
changed when using more than one server cluster in a server
farm.
9700
jvueserver.collaboration.id.min=[integer
]
Minimum ID given to users and collaboration sessions by this
server. Change this ID when you are running many AutoVue
servers that must communicate together for collaboration. The
second server must have a minimum ID of at least
jvueserver.collaboration.id.min +
jvueserver.collaboration.id.range of the first server. Otherwise,
an ID overlap may occur.
0
jvueserver.collaboration.id.range=[integ
er]
Range of ids given to users and collaboration sessions by this
server. This will limit the number of simultaneous connections.
100000
Configuring Across Firewalls and Multiple AutoVue Servers
When using the Collaboration feature in AutoVue when behind a firewall or multiple AutoVue servers, you must
configure the following parameters. For example, you can set a parameter to allow communication with servers that
are not part of the server farm, or specify the external address and port for HTTP connections when behind a firewall.
Parameter
Description
jvueserver.collaboration.protocol=[jxta]
Protocol should be set to JXTA.
jvueserver.collaboration.rendezvous.enable=[true | false]
Set to true to enable communication with other servers that are
not part of the server farm. When you have multiple server
farms, set to true for at least one server in each farm to enable
this server to communicate with other server farms across
firewalls.
jvueserver.collaboration.rendezvous=[protocol://
IP_of_server_to_communicate_with:port]
Specify the protocol, the IP address of other servers to
communicate with, and the port for communication.
For example: jvueserver.collaboration.rendezvous=tcp://
ip1:port1;http://ip2:port2
Oracle Corp.
AutoVue
27
Parameter
Description
jvueserver.collaboration.jxta.allowExternal=[true | false]
Set to true to allow other servers that are not part of the server
farm to communicate with this server.
Specify one of the following parameters when using network address translators in a firewall setup.
Parameter
Description
jvueserver.collaboration.http.server=[external_IP:port]
When using firewalls and Network Address Translators, specify
the external address and port for http connections.
jvueserver.collaboration.tcp.server=[external_IP:port]
When using firewalls and Network Address Translators, specify
the external address and port for TCP connections.
Other Parameters in jvueserver.properties
The following table describes the additional parameters in jvueserver.properties.
Property
Description
Default
jvueserver.inifile = file name
Specify the name of the Server startup INI file. Default is VueServer.ini
in the bin directory in AutoVue Server’s installation directory.
VueServer.ini
jvueserver.markup.nativegui.type
Add Author, Date, and Markup Info columns to the Markup Files
dialog box.
0: Name column displays
1: Enable Author
2: Enable Date
4: Enable Markup Info
Note: These are ORed flags. For example: Enter 7 to enable all three
columns.
0
jvueserver.preload =[string]
Pre-loader class name.
Enable loading of specified java class prior to jvueserver startup.
jvueserver.rmi.objectPorts =
[2020-2029]
Specify a range of ports to use, or leave commented for automatic
allocation.
jvueserver.socket.timeout=<integ
er>
Specify the inactive time in seconds after which socket times out.
When 0, there is no timeout.
0
Configuring log4j Parameters
This section provides log4j parameters that can be configured.
Property
Description
Default
jvueserver.log4j.configureandwat
ch = [TRUE | FALSE]
Set this to TRUE to be able to dynamically change log4j logging
level.
FALSE
jvueserver.log4j.configureandwat
ch.delay = integer
Time interval for waking up and detecting log4j configuration change.
60
Oracle Corp.
AutoVue
28
Configuration Options in VueServer.ini
VueServer.ini contains directory configuration settings, server farm settings, and other settings for the AutoVue
Server. It is located in the \bin subdirectory of the AutoVue Server installation directory
Windows OS Example: C:\Program Files\jVue\bin
Linux OS Example: /home/apps/jvue/bin
Configuring Global User Settings
The following global user settings can be configured in VueServer.ini.
[Users]
Option
Description
Directory
ContainsS the directory in which user information is stored (users’ initialization files, users’ GUI
files).
DefaultINI
Name of the default INI file
AllUsersIni
Name of the allusers INI file
The INI files allusers.ini and default.ini are stored in the directory specified under [Users]/Directory in
VueServer.ini (the default is the directory of the VueServer.dll). The file default.ini is the default INI file for
all users at the start. When you first log on, the contents of default.ini is copied to your own INI file
("username".ini). The contents of allusers.ini is then transferred to "username".ini when you connect to AutoVue.
For a complete list of options, see "Appendix I: List of INI Options".
Configuring Markup Options
The following Markup options can be configured in VueServer.ini.
[Markups]
Option
Description
Directory
Specifies in which directory the Markups files should be saved. Markups are saved with random
names in this directory, and the mapping between Markup files and their base file is held in a
central map file named markups.map, stored in the same directory. By default, the directory is
the Markups subdirectory of the AutoVue server program directory.
Note: This option is for server-managed Markups.
Permissions
By default, all users can see the Markups of a file but only the owner of a Markup can modify it.
The Permissions key can be used to change that behavior: setting it to 0 allows all users to see
and change Markup files.
SymbolDir
Specifies in which directory the Markups symbol libraries are stored. By default, the directory is
the symbols subdirectory of the AutoVue server program directory.
Configuring Streaming File Storage Options
The following streaming file options can be configured in VueServer.ini.
Oracle Corp.
AutoVue
29
[Cache]
Option
Description
Directory
Specifies in which directory the cached files should be saved. A central cache information file
named cache.map is stored in the same directory. By default, the directory is the Cache
subdirectory of the AutoVue server program directory.
ForceAscii=[0|1]
Forces using ASCII characters in cached files names.
Size
Specifies, in Megabytes, the maximum size of the file cache.
If not specified, or if value specified is less than 50 MB, a default of 51200 MB will be used.
MaxLifeTime = [number
of days]
Specifies the maximum number of days a file is kept in the AutoVue cache directory. When the
maximum life time is reached, the file is deleted from the cache directory.
Note: The minimum value is 1.
MaxNumFiles = [val]
Specifies the maximum number of files allowed in the AutoVue cache directory. When the
threshold is reached, the least recently used files are deleted.
Note: The minimum value is 1000.
Default: 64000
Configuring Server Viewable Local Files Options
The following server options can be configured in VueServer.ini.
[Server]
Option
Description
Directory
Specifies in which directory to search for the local files. This key has to be set to allow client to
see server local files through the ‘server://’ pseudo-protocol.
Refer to the FILENAME description in "Configuring the AutoVue Client".
By default no server files can be viewed. Setting this key allows users to see ANY local file in the
specified directory and subdirectories. However, the server takes care of parent references in
paths (the “..” directory) to avoid security breaches.
Directory1
Directory2
...
Directoryn
To specify multiple directories, specify Directoryn=[Path]. To access files at these locations,
specify "server://@n/..."
Oracle Corp.
AutoVue
30
Configuring Online Help Options
The following online help options can be configured in VueServer.ini.
[HELP]
Option
Description
File_en
Entry specifies the URL to the English Help file.
File_xx
Entry specifies the URL to the Help file for the language “xx.”
File
Entry specifies the URL to the default Help file.
Configuring the File Open Dialog
The File Open dialog lets you browse and search backend systems. The dialog lets you browse multiple backend
systems if AutoVue is integrated with multiple backend systems. You can search and browse backend systems even if
your client has not already established a connection to the backend system, .i.e., you can just launch the AutoVue
applet and browse/search through your backend to locate a file to open in AutoVue. To enable this feature (browse/
search when you have not yet established a connection with the backend system), you must create a file named
vuelinks.xml with the following format:
<DMSList>
<vuelink url="vuelink_url">
<name>your_DMS_name</name>
<DMSArgs>
<DMSArg name="your_argument" value="your_value" />
</DMSArgs>
<seed>seed_url</seed>
</vuelink>
</DMSList>
•
•
•
•
The <vuelink> tag defines the URL location of the backend DMS system. Replace vuelink_url with the URL
to your VueLink/integration servlet.
The <name> tag defines the backend system button name to appear in the File Open dialog. Replace
your_DMS_name with the name of your backend system.
The <DMSArgs> tag defines arguments for the specified integration. Replace your_argument and your_value
with any DMSArgs you may used with DMS integration.
The <seed> tag defines the defines the URL format for retrieving a file from the backend system. Replace
seed_url with a URL to a file from your backend system. This is generally the FILENAME URL that is passed
to the AutoVue client when you view your DMS file in AutoVue.
Note: In your seed URL, you must replace any special characters with it’s character entity reference.
For example: Replace & with &
For more information on the File Open dialog, refer to the User’s Manual.
Note: If you wish to use this feature (browse/search backend systems when you have not yet established a
connection with the backend system) with VueLink for Documentum 19.2.x or 19.3.x, you will need a hot fix for the
VueLink. Contact a Customer Support representative for a hotfix for your VueLink.
Oracle Corp.
AutoVue
31
Installing AutoVue Client Components
When installing AutoVue client components, there are two things you must consider:
•
•
Are you using AutoVue in an integrated environment?
Are you using a Web server for AutoVue client components?
The following sections explain each scenario for installing AutoVue client components.
Installing in an Integrated Environment
In most cases, when AutoVue is integrated with a DMS, AutoVue client components are deployed with an application
server that hosts the integration components and/or the DMS.
In order to deploy the current AutoVue client components in these environments, follow these steps:
1
Identify where the AutoVue client components are located in your integration/VueLink deployment.
2
Shut down the application server where the AutoVue client components are deployed.
3
If the AutoVue client components are deployed in a WAR file, extract the contents of the file.
4
Replace the following files in your integration environment (or extracted files) with files from the <AutoVue
Installation Folder>\html directory:
• jvue.jar
• jogl.jar
• gluegen-rt.jar
5
If you want to support an offline deployment of AutoVue, you must copy jInstall.exe (the installer for the
Desktop Deployment) from your extracted Media Pack and AutoVueupdate.xml from the <AutoVue Installation
Folder>\html directory to the same location as the AutoVue client components.
6
Update AutoVueupdate.xml and specify the full URL to jInstall.exe.
7
Re-create the WAR file (if you had extracted it in step 3).
8
Restart the application server.
9
Redeploy the WAR file.
Installing in a non-Integrated Environment
If you need to setup AutoVue client components manually perform the following steps:
1
Create a folder (for example, named jVue) on your Web server docroot.
2
Copy all files from the <AutoVue Installation Folder>\html directory to the directory you created on your Web
server docroot.
3
Edit the files that embed the AutoVue applet and replace the following parameters with appropriate values. To
use the sample HTML pages provided with AutoVue, you must update frmApplet.html and batchPrint.html
and update the following parameters.
Parameter
Description
CODEBASE
Specify the URL to the AutoVue client files on your Web Server (the folder
created above).
For example:
http://AutoVueClient:8080/jVue
Oracle Corp.
AutoVue
32
Parameter
Description
JVUESERVER
Specify the servlet connection to the AutoVue Server. Separate multiple values
with a semi-colon.
For example:
http://AutoVueServer:5098/servlet/VueServlet
Refer to "VueServlet Parameters" for more information on available parameters.
4
If are using the sample HTML pages that ship with AutoVue and you would like to access the sample files that
ship with AutoVue, edit frmFiles.html and replace the values for the variable identified in table below with the
appropriate value:
Variable
Description
jVueSamples
Note: This feature is optional. During AutoVue installation, you must
select the Sample Files check box to include the sample files.
Specify the URL to the AutoVue sample files on your Web Server.
For example:
http://AutoVueClient:8080/jVue/samples
Oracle Corp.
AutoVue
33
Configuring the AutoVue Client
This section provides information on how the AutoVue client can be configured.
If you selected Example Client Application during AutoVue installation, you can view the test HTML page
jVue.html. The test HTML page is strictly a sample Web page and is not a required component for your deployment.
This sample Web page does, however, provide a good example of how to configure the AutoVue applet. The page
consists of three frames: frmHeading.html, frmApplet.html and frmFiles.html.
Note: The frmFiles.html page only appears if you choose to install the sample files during AutoVue installation.
frmHeading.html
frmFiles.html
frmApplet.html
The HTML code responsible for the applet generation is held in frmApplet.html. The code in frmApplet.html
holds the <APPLET> tag with the customizable parameters and provides a JavaScript method called setFile to allow
frmFiles.html to dynamically change the file displayed in the applet, see "Scripting the Applet".
The connection scheme used in these examples is by default, servlet tunneling.
Oracle Corp.
AutoVue
34
AutoVue Applet Parameters
AutoVue allows you to customize the client applet. For example, with the EMBEDDED parameter you can embed the
applet into a Web page, or with the DMS parameter you can specify the DMS servlet that AutoVue Server uses to
interface with a DMS.
The following table describes the customizable parameters in the AutoVue applet.
Syntax:
<PARAM NAME=<name>
VALUE=<type> >
Refer to "Basic Applet" for a sample applet definition.
Name
Type
Value
CACHEUI
[TRUE|FALSE]
Set to TRUE to cache UI components for later use
during the same Java Virtual Machine session.
Default: FALSE
COLLABORATION
DMS
Oracle Corp.
INIT:CSI_ClbSessionID=987654321;
CSI_ClbDMS=dmsIndex;
CSI_ClbSessionData= 123456789;
CSI_ClbSessionSubject= Subject;
CSI_ClbSessionType= public|private;
CSI_ClbUsers=user1, user2,…
Initiate collaboration session.
CSI_ClbSessionID= 987654321
DMS collaboration session ID.
CSI_ClbDMS=dmsIndex
DMS index.
CSI_ClbSessionData=
123456789
DMS collaboration session data.
CSI_ClbSessionSubject= Subject
Collaboration session subject.
CSI_ClbSessionType= public|private
Collaboration session type.
CSI_ClbUsers=user1, user2,…
Invited users.
JOIN:CSI_ClbSessionID=987654321;
CSI_ClbDMS=
dmsIndex;CSI_ClbSession
Data=123456789;
Join collaboration session in progress.
CSI_ClbSessionID= 987654321
DMS collaboration session ID.
CSI_ClbDMS=dmsIndex
DMS index.
CSI_ClbSessionData= 123456789
DMS collaboration session data.
http://name:port/dmsServlet
Specifies the DMS servlet that the AutoVue server uses
to interface with a DMS.
This has precedence over any DMS entries specified in
the Server’s VueServer.ini file.
AutoVue
35
Name
Type
Value
DMSARGS
String
List of DMS arguments passed in as Applet parameters.
Specify semicolon separated list of applet parameters.
The value will be sent with every request to the DMS.
Example:
<PARAM NAME="DMSARGS" VALUE="ARG1;ARG2>
<PARAM NAME="ARG1" VALUE="value1">
<PARAM NAME="ARG2" VALUE="value2">
DMS_PRESERVE_
COOKIES
[TRUE | FALSE|semi-colon separated
list of cookies]
Set this parameter to TRUE if you want AutoVue client
to pass on all cookies to the AutoVue Server and
integration components. Set to FALSE if you do not
want AutoVue client to pass on any cookies.
Specify a semi-colon separated list of cookies that the
AutoVue client should pass on to the AutoVue Server
and integration components.
Default: FALSE
Example:
<PARAM NAME="DMSARGS"
VALUE="DMS_PRESERVE_COOKIES">
<PARAM NAME="DMS_PRESERVE_COOKIES"
VALUE="TRUE">
EMBEDDED
[TRUE | FALSE]
Set to TRUE to embed the Applet in the web page.
Default value: TRUE
ENABLEEMF
[TRUE | FALSE]
When set the to TRUE, document files are converted to
EMF and sent to the client. The client then uses native
code for rendering that EMF to the output.
Default: FALSE
FILENAME
URL
Set it to the file to be opened at Applet’s start-up.
upload://dir/…/file
Will be understood as a client local file to be uploaded
on the server to be viewed.
http://host/file
Specify a HTTP URL for file open.
ftp://host/file
or...
ftp://<user>:<password>@
<ftpserver>/file
Specify a FTP URL for file open.
server://dir/../file
Will be understood as a server local file to be viewed.
Server local files have to be located under subdirectories
of the root directory specified in the VueServer.ini file
under the [Server]/Directory key. If that key is not set,
no file will be accessible.
Oracle Corp.
AutoVue
36
Name
Type
Value
FORMAT
[AUTO | TILED | METAFILE]
Set the rendering format.
TILED uses a tiled-raster representation of documents
to display file.
AUTO uses adapted representations depending on the
type of file viewed.
When set to METAFILE, data is streamed to the client
as a compressed metafile (CMF). Display lists are sent
to the client and the client interprets and renders these
display lists.
Generally, Office documents are rendered in TILED
mode, while 2D and Raster documents are rendered in
METAFILE mode.
Default: AUTO
GUIFILE
String
The Graphical User Interface (GUI) definition file used.
Using this parameter, Web servers can customize the
GUI of the applet according to client credentials. GUI
files are stored in subdirectories of the root directory
specified in the [Users]\Directory key of the
VueServer.ini file. The specification can also specify a
local file using the “file://” convention.
Default for the [Users]\Directory key is <bin
dir>\Profiles.
HEAVYWEIGHT
[TRUE|FALSE|AUTO]
Specify if you would like to use JOGL’s heavyweight or
lightweight widget to render 3D Models. When
heavyweight is on, AutoVue uses hardware acceleration
to render 3D.
Default is AUTO and AutoVue uses heavyweight
rendering on all clients except MAC clients.
JVUESERVER
Semicolon-separated list.
Specify the servlet connection to the AutoVue Server.
Separate multiple values with a semi-colon.
Example:
http://AutoVueServer:5098/servlet/VueServlet
LISTUSERS
[TRUE|FALSE]
Show list of users connected to AutoVue Server when
initiating a collaboration session or when inviting users
to a collaboration session.
Default: TRUE
LOCALE
Oracle Corp.
[DE|EN|FR|JA|KO|TW|ZH]
The Locale to be used in the user interface, specified as
an ISO639 two-letter code.
Using this parameter, Web servers can force the applet
GUI to be displayed in one of the supported languages.
If not set, the Locale is determined using the client
system properties.
AutoVue
37
Name
Type
Value
LOGFILE
String
Specify full path to the log file for messages. null is for
standard output.
Example: C:\temp\clientlog.txt
Default: null
ONINIT
“myFunction();”
If the ONINIT parameter function is supplied, then the
AutoVue client will call the specified JavaScript
function on the originating HTML page as soon as the
applet has loaded and initialized. This allows for an
extremely high level of control and interaction between
the HTML page and the Applet.
Refer to "Advanced Scripting Functionality" for more
information.
SESSIONXFONTPA
TH
[font path]
Specify the font path to use to resolve fonts needed by
the base file.
SESSIONXREFPATH
S
[xref folder path]
Specify the XRefs path to use to resolve external
resources needed by the base file.
SWINGLAF
String
Specify a look and feel for Swing. For example,
com.java. swing.plaf.motif. MotifLookAndFeel.
If null, platform’s default look and feel will be used,
obtained by UIManager. getSystem LookAnd
FeelClassName().
Default: null
USERNAME
String
Set it to the user name to be used for opening sessions
on the AutoVue Server.
If not set, the applet either gets the user name from the
DMS if in an integrated environment or from system
properties when not integrated.
VERBOSE
OFF | ERROR | INFO | DEBUG | ALL
Set to ERROR to output all error messages.
Set to INFO to display all informative messages.
Set to DEBUG to display all debug messages.
Set to ALL to display all messages.
Set to OFF or FALSE to turn off verbosity.
Default: OFF
Oracle Corp.
AutoVue
38
Scripting the Applet
Basic Applet
The basic definition needed for the applet is:
<!-- BEGIN AutoVue Applet -->
<APPLET
<!-- NAME is optional but useful to identify the object in JavaScript -->
NAME="JVue"
<!-- The name of the Applet Class (not to be changed)-->
CODE="com.cimmetry.jvue.JVue"
<!-- This specifies the location of jvue.jar, jogl.jar, and gluegen-rt.jar. The WEB Browser
will download these files from this location -->
CODEBASE="http://www.webserver.com/jVue"
<!-- Name of the JAR Archive containing the Applet.Used by Netscape (not to be changed) -->
ARCHIVE="jvue.jar, jogl.jar,gluegen-rt.jar"
<!-- Optional Sizing Parameters -->
HSPACE="0" VSPACE="0" WIDTH="100%" HEIGHT="100%"
<!-- MAYSCRIPT is required. This allows the Applet to read and write a cookie identifying
sessions on the Web Browser -->MAYSCRIPT>
<!-- Set EMBEDDED to “true” for the Applet to appear within the WEB page. The default value is
“false” which causes the Applet to appear in a separate Window -->
<PARAM NAME="EMBEDDED" VALUE="false">
<!-- The VERBOSE parameter is optional. If set to “true” then diagnostic output appears in the
Browser’s Java Console -->
<PARAM NAME="VERBOSE" VALUE="false">
<!-- Set FILENAME to specify the URL to load in the Applet. If not
specified then the Applet
shows up with no file set initially -->
<PARAM NAME="FILENAME"VALUE="http://www.webserver.com/jVue/samples/acad12.dwg">
<!-- The JVUESERVER parameter specifies a semi-colon separated list of connection methods to
use to communicate with the AutoVue Server.Below: the client tunnels through the Servlet
installed under http://www.webserver.com/Servlet/VueServlet-->
<PARAM NAME="JVUESERVER" VALUE="http://www.webserver.com/servlet/VueServlet">
<!-- Name of the JAR Archive containing the Applet. Used by Internet Explorer -->
<!—Message for Browser that do not support Java -->
<p><b>Requires a browser that supports Java.</b></p>
</APPLET>
<!-- END AutoVue Applet -->
Oracle Corp.
AutoVue
39
Advanced Scripting Functionality
When integrating the AutoVue applet in dynamic Web pages all public API methods in the jVue class can be accessed
through JavaScript.
Commonly used methods include:
Method
Description
createMobilePack(MobilePackOptions opts)
Generates the Mobile Pack according to specified options.
setFile(String url)
Set the file to be viewed in the applet.
setCompareFile(String url)
Switch to compare mode and compare the current file with a given one.
setDMSArg(String name, String value)
Set to add, modify, or remove parameters in the DMSARGS parameter list.
addOverlay(String url)
Add a given file as an overlay on the current file.
printFile(PrintProperties pProps)
Print the current file using options specified.
printFile(PrintProperties pProps, boolean
UseDefaultPrinter)
Print the current file using the options specified, but do not prompt for the
printer to use.
Note: Control the prompting for the printer with the useDefaultPrinter
parameter.
setMarkupMode(boolean enterMarkupMode)
Enter or exit Markup mode.
openMarkup(String markupID)
Open the specified Markup.
If MarkupID ==”*” then all Markups associated with the document are
loaded.
To open a local Markup specify the MarkupID as
“CSI_DocName=markupName”.
To open a DMAPI integrated Markup specify the MarkupID document ID as
“CSI_DocID=markupID”.
collaborationInit(String sessionProperties)
Initiate collaboration session.
sessionProperties - Property string describing collaboration session (has
same format as applet’s COLLABORATION parameter’s INIT: format).
See INIT in Applet Parameters for Collaboration.
collaborationJoin(String sessionProperties)
Join collaboration session in progress.
sessionProperties - Property string describing collaboration session (has
same format as applet’s COLLABORATION parameter’s JOIN: format).
See JOIN in Applet Parameters for Collaboration.
collaborationEnd()
End current collaboration session.
crossProbe(String fileName)
Add a given file to the list of cross-probed files.
closeDocument():
Close current document.
Oracle Corp.
AutoVue
40
Method
Description
import3DFile(String fileName, HMatrix
transform)
Import a 3D file. Specify file name and the transformation to apply to the
imported entity.
Following is the mapping of a 4X4 transformation matrix:
X11
X21
X31
X41
X12
X22
X32
X42
X13
X23
X33
X43
X14
X24
X34
X44
XX
YX
ZX
0.0
XY
YY
ZY
0.0
XZ
YZ
ZZ
0.0
X
Y
Z
1.0
where (X, Y, Z) is the translation vector and the
XX
XY
XZ
YX
YY
YZ
ZX
ZY
ZZ
represents the 3X3 rotation and scaling matrix.
The last row of the 4X4 transformation matrix should always be set to (0.0,
0.0, 0.0, 1.0).
setGUI(String guiFile)
Set GUI definition file.
Specify the name of the GUI definition file.
setPage(int page)
Sets the page on the currently opened document. Specify the page number to
set.
syncMobilePack(MobilePackOptions opts)
Synchronizes the Mobile Pack. The markups and intellistamp properties that
were created/modified while disconnected are specified, and then checked
into the backend system.
waitForLastMethod()
Pauses current thread until last invoked method finishes execution.
invokeAction(String actionClassStr)
Directly invokes an action that has no sub-actions (child actions).
invokeAction(String actionClassStr, String
subActionStr)
Directly invokes a sub-action (child action) of the specified action.
Refer to the “JavaDocs” on the AutoVue applet and the VueBean for complete information on the public methods that
are available.
Oracle Corp.
AutoVue
41
Example 1:
Use the ONINIT applet parameter to automatically load a document to view, load all associated Markups and print
the results.
<script>
<!-- Hide script from old browsers
function myFunction() {
// The main Applet object.
var myApp = window.document.applets["JVue"];
// Open the specified document
myApp.setFile(‘http://www.machine.com/jVue/samples/acad12.dwg’);
// Load all markups
myApp.openMarkup('*’);
// Create a PrintProperties class
var pPropsClass =
myApp.getClass("com.cimmetry.common.PrintProperties");
// Instantiate the object
var pProps = pPropsClass.newInstance();
// Load default properties from the user’s preferences
pProps.setProfile(myApp.getActiveVueBean().getProfile());
// Specify the Top Center Header text: To specify a DMAPI
//
attribute use the syntax “%X<attribute_name>”
pProps.getHeaders().setTopCenterText("My Header");
// Specify scaling Fit-To-Page (PrintOptions.SCALING_FIT==0)
pProps.getOptions().setScaling(0);
// Print the extents of the drawing (PrintOptions.AREA_EXTENTS==0)
pProps.getOptions().setArea(0);
// Print the document using the default printer.
myApp.printFile(pProps, true);
// etc…
}
-->
</script>
Oracle Corp.
AutoVue
42
<!-- BEGIN AutoVue Applet -->
<APPLET
NAME="JVue"
CODE="com.cimmetry.jvue.JVue.class"
CODEBASE="http://www.webserver.com/jVue"
ARCHIVE="jvue.jar,jogl.jar,gluegen-rt.jar"
HSPACE="0" VSPACE="0" WIDTH="100%" HEIGHT="100%"
MAYSCRIPT>
<PARAM NAME="EMBEDDED" VALUE="false">
<PARAM NAME="VERBOSE" VALUE="false">
<PARAM NAME="ONINIT"
VALUE="myFunction();">
<PARAM NAME="JVUESERVER" VALUE="http://www.webserver.com/servlet/
VueServlet">
<p><b>Requires a browser that supports Java.
</b>
</p>
</APPLET>
<!-- END AutoVue Applet -->
Example 2:
The frmFiles.html sample page that ships with the product makes use of the setFile() method to dynamically change
the file in the applet.
This is easily extendible. Assuming that the HTML frame of the applet is named AppletFrame and that your CAD
drawings are located at the URL http://myserver/CAD, creating four HRefs in a separate frame to dynamically
call those methods will be done by adding the following lines to your HTML code:
<a href="JavaScript:parent.AppletFrame.JVue.setFile('http://myserver/CAD/cad.dwg')"> View
cad.dwg
</a>
<a href="JavaScript:parent.AppletFrame.JVue.setCompareFile('http://myserver/CAD/oldcad.dwg')">
Compare to old version
</a>
<a href="JavaScript:parent.AppletFrame.JVue.addOverlay('http://myserver/CAD/ovrl.dwg')"> Add
overlay ovrl.dwg
</a>
<a href="JavaScript:parent.AppletFrame.JVue.printFile(true)"> Print file
</a>
Oracle Corp.
AutoVue
43
Verifying Your AutoVue Installation
To verify your AutoVue Server installation:
1
Start AutoVue Server.
Refer to "Starting AutoVue Server" for instructions.
The AutoVue Server starts successfully if all processes appear as green (except for the Servlet process) in the
AutoVue Server Console. Refer to "Configuring AutoVue Server" for more information.
2
Make sure your application server that hosts the VueServlet is configured correctly and starts up.
If you are using Jetty that ships with AutoVue, you can start it up by running:
• “Start VueServlet on Jetty” from the “AutoVue” programs shortcut on Windows OS
• <AutoVue Installation Folder>/bin/Jetty/bin/startJetty on Linux OS
3
Verify that the VueServlet is working correctly by opening a URL to the VueServlet in your Web browser.
Example: http://AutoVueServer:5098/servlet/VueServlet. As displayed in the following Oracle AutoVue
Servlet tunneling page, “Connection State: OK” states that the VueServlet is configured correctly.
4
Once AutoVue Server and your application server start up, launch the example AutoVue client application by
running:
• <AutoVue Installation Folder>\bin\jvue.bat on Windows OS
• <AutoVue Installation Folder>/bin/jvue on Linux OS
Note: You must first update jvue.bat on Windows OS and jvue on Linux OS to point to the correct URL to the
VueServlet. Edit the file in a text editor and set -param JVUESERVER=”<URL to the VueServlet>”
Oracle Corp.
AutoVue
44
The AutoVue applet should load successfully.
If your server does not start up, or if the AutoVue applet does not load, refer to "Debugging AutoVue" for information
on troubleshooting your installation.
Client-Side Installation
There is no special configuration required on the client-side installation. The only requirement is a Java-compatible
Web browser for a Web client. Generally, the software is installed on a Web/application server. It is automatically
deployed onto the client machines when the applet is first loaded.
Oracle Corp.
AutoVue
45
Starting AutoVue Server
This chapter discusses how to start and stop AutoVue Server on Windows and Linux OSes.
Starting AutoVue on Windows OSes
1
Start AutoVue Server by clicking Start AutoVue Server
in the Oracle AutoVue, Web Version Program
Manager group.
By default, when the server is started, the console is displayed and the server appears in the system tray. To
disable the console and to start up AutoVue Server only in the system tray, start the server with the following:
jVueServerX -noconsole
2
Start the application server with which VueServlet is deployed.
Note: If you are using Jetty, you must start it up by running the Start VueServlet on Jetty shortcut in the
AutoVue programs group.
3
Make sure to start the Web server if you are using it for AutoVue client components.
Starting AutoVue on Linux OSes
1
Start AutoVue Server by entering the following:
./jvueserver
This starts up the server console as long as the DISPLAY environment variable is properly set.
Note: Run jvueserver_debug -u& if you need to start up the server console separately.
Note: AutoVue Server starts up with a default ProcessPoolSize of 4. To modify the ProcessPoolSize, edit
jvueserver.properties and set your ProcessPoolSize. Refer to "Configuring AutoVue Server" for more
information.
2
Start the application server with which VueServlet is deployed.
Note: If you are using Jetty, you must start it up by running startJetty from the <AutoVue Installation
Folder>\jVue\bin\jetty\bin directory.
3
Make sure to start the Web server if you are using it for AutoVue client components.
The startup script for AutoVue Server on Linux OSes also starts up the Xvfb server. Xvfb is an X11 virtual
framebuffer that helps AutoVue Server render files. The Xvfb server runs on port 909 by default. To modify this port
and configuring other Xvfb properties, open the jvueserver.properties file (located in the \bin subdirectory of the
AutoVue Server installation directory) and locate property names containing “xvfb”.
Note: If you want the AutoVue Server to continue running after you close the terminal window, or after you log out
of the Linux machine, you must exit the shell (console window) used to start AutoVue Server before logging out of
Linux. As a result, the server continues running even after you log off. To exit the shell, you must enter Exit (do not
exit by clicking the Close button).
Oracle Corp.
AutoVue
46
Shutting Down AutoVue Server
To shut down AutoVue Server, click Shutdown on the AutoVue Server console.
Running the AutoVue Server as a Service
On Windows OSes
AutoVue server can be run as a Windows Service. The advantage of this is that it will continue to run even after you
log off of Windows. The AutoVue service is automatically registered with the Windows Service Control Manager if
when installing AutoVue, you selected the option to install as a service. Before running the AutoVue service, first
verify that it runs properly in “non-service” mode (for example., run by clicking the Start AutoVue Server button in
the Start menu).
To install the service manually, go to the \bin directory of the directory where you had installed AutoVue server and
type: jvueserver -install <user information>
where <user information> is in the form “domain\username password”. This ensures that the AutoVue Server service
runs as a named user instead of the local system account.
The service will be automatically unregistered and removed if you uninstall the product.
To manually remove the service, go to the \bin directory of the directory where you installed AutoVue Server and
enter the following:
jvueserver -remove
Starting and Stopping the Service
1
In the Control Panel start the Services Control Panel applet.
2
Select the AutoVue Server service.
3
Click the Startup.
4
Select whether you want the service started automatically on re-boot or manually. The default is Manual.
5
If you select Manual, you can start the service by one of the following:
• Click Start in the Services dialog
or
• Use the sc.exe utility.
For example: SC start “AutoVue Server”
or
Oracle Corp.
AutoVue
• Use the NET program.
For example: NET start “AutoVue Server”
Once the Service has been started, it behaves exactly as if run in “non-service” mode. The AutoVue server icon
appears in the System Tray. To stop the service click Shutdown.
On Linux OSes
Oracle provides an “rc” script to manage AutoVue Server on Linux. AutoVue Server can be configured to startup
automatically when the machine is restarted by following instructions below:
• Edit file <AutoVue Installation Directory>/etc/jvueserver_rc and locate the following lines:
•
AUTOVUEDIR=$USER_INSTALL_DIR$
•
AUTOVUEUSER=__JVUEUSER__
Replace $USER_INSTALL_DIR$ with the path to AutoVue installation and
__JVUEUSER__ with the name of the user that will be running AutoVue Server.
• Rename jvueserver_rc to autovue.
• Login as a root and copy autovue to /etc/init.d folder.
• As root, go to the /etc/init.d folder and add AutoVue as a service:
chkconfig --add autovue
• Configure autovue to startup automatically:
chkconfig autovue on
AutoVue will now start up automatically when the machine starts up.
Oracle Corp.
47
AutoVue
To startup the AutoVue service, manually, run
service autovue start
To stop the AutoVue service manually, run
service autovue stop
To remove the AutoVue service, run
chkconfig -del AutoVue
Oracle Corp.
48
AutoVue
49
The AutoVue Server Console
The AutoVue Server console displays the user connection state (process, username, client IP and number of open
documents) and the process pool state. On starting the server, the console is launched and the connection and process
pool states are queried.
Pool State
Description
Red
Process is not running.
Green
Process is running.
Yellow
Process is initializing.
Grey
Process is disabled by the user (applies only to servlet process).
Black
Process is not responding.
Click Refresh to update the console display to regenerate cached server information.
To stop running the AutoVue server and all attached processes, click Shutdown.
Any errors that occur during initialization are listed under Output.
Under Processes, P indicates the primary process; S indicates the servlet engine; 1, 2, 3… represent secondary servers
(also called Document Servers or DocServers), and M represents the process for generating streaming files (only
visible when jvueserver.metacache.process is set to true - the default value in jvueserver.properties). The
number of secondary servers is set in the processPoolSize parameter in jvueserver.properties.
Oracle Corp.
AutoVue
50
Double-click on the session listed in the Console to see more information regarding the session. Information such as
what document is opened by the user, which DocServer is processing the request is displayed.
Diagnostics Button
The diagostics feature of the AutoVue Server console generates a report, JVueServerDiagnostics.out, to the
<AutoVue Install Root>\bin directory and contains pertinent troubleshooting information. An Oracle Global
Customer Support representative may require you to generate the report to identify problems you may have with your
deployment of AutoVue.
Process Pool
The AutoVue Server can run in a process pool on a single machine. The default process pool size is 4 and is set in the
jvueserver.properties file.
Example: jvueserverx.nt.processPoolSize=4
Creating a process pool helps improve the responsiveness when handling simultaneous connections and also helps
balance the load across processors in a multi-CPU machine. As a rule of thumb, you should allow for approximately
50MB for each process in a pool. As a result, a process pool size of 4 requires approximately 200MB of RAM on the
machine to run comfortably. The load is balanced across the pool on the single machine.
Oracle Corp.
AutoVue
51
AutoVue Deployment Options and
Scenarios
AutoVue in Online/Offline Mode
The offline mode option in AutoVue provides you with the ability to view and markup files when you do not have
access to the AutoVue Server or backend DMS. Many AutoVue users require access to their files when they are not
connected to their backend systems. For example, having offline access to files is essential when you need to review
and add markups to a document during your regular commute or when bringing all your files when on a business trip.
Note: Going offline is supported from Windows-based clients only.
When you select the Work Offline option from the Server deployment of AutoVue, a predefined list of files and
associated resources and markups are copied to your local system as offline files and a local installation of AutoVue
is deployed. Once installation is complete you can continue working on your files with AutoVue in offline mode. For
more information refer to the Oracle AutoVue User’s Manual.
When your AutoVue Server is running on a Linux environment, you will need to perform some additional
configuration in order to support working offline from windows clients:
1
Copy autovueupdate.xml from <AutoVue Installation Folder>/html to the web server or the application server
that you are using for AutoVue client components.
2
Download the AutoVue media pack for windows and extract the jInstall.exe for the Desktop deployment
installation of AutoVue.
3
Copy this executable to the web server or the application server location where AutoVue client files are
deployed.
4
Edit autovueupdate.xml and specify the URL to the AutoVue executable.
Example: url=’http://autovueserver1:80/AutoVue/jInstall.exe’
Adding Multiple AutoVue Servers in a Cluster
AutoVue Server is designed to be easily scalable. As the demand for viewing and marking up increases in an
organization, AutoVue can easily accommodate the additional load by adding new servers. Each time a client
connects to the cluster entry point (for example, the host specified in the JVUESERVER parameter of the APPLET) the
overall load is calculated and the server with the least load in the cluster is selected for the client to use. You do not
need to modify your HTML pages or stop your running servers to add a new server to the cluster.
You can add more machines to the “server farm” and the load balances across all machines. Scaling to support more
concurrent users can be easily achieved by adding more hardware while keeping the software configuration identical.
Oracle Corp.
AutoVue
52
Adding an Additional Server
1
Add a new machine to the same network as the original AutoVue Server.
2
Install and configure the AutoVue Server software on the new server, going through the same steps as in the
original installation.
Note: All the AutoVue Servers in the cluster must be the same versions. If you install a patch or a service pack
on one of the servers, you must do same for all the other servers.
3
Once installed, edit the VueServer.ini file located in the \bin directory on the cluster entry point machine and
add the following entries in the [RMI] section:
[RMI]
MaximumLoad=100
RMIHost1=jvueserver1.company.com:1099
RMIHost2=jvueserver2.company.com:1099
Etc.
Where
RMIHost1 is set to the name of the primary AutoVue server in the farm.
RMIHost2 is the name of the second AutoVue server in the farm and so on.
The entry MaximumLoad (default 100) is used by the load-balancing algorithm — it gives a rough estimate of the
server capacity. On a powerful machine you may want to set it higher than on a lower-end server. This setting can
vary from server to server and you may wish to set it in the VueServer.ini of the new server.
Example: If you are running on a cluster of two machines with different performances, you can set
MaximumLoad=100 for the faster machine and MaximumLoad=50 for the slower machine. This setting
determines that the AutoVue Server on the faster machine can handle twice as many requests as the server on the
slower machine. Note that this is not an indication of the number of connections that can be handled by a server.
The following entries list all the servers in the server-cluster. Their IP address:RMI port identifies them. The
RMI port is optional — if not specified it defaults to 1099:
RMIHost1=machine1:rmiport1
RMIHost2=machine2:rmiport2
RMIHost3=machine3:rmiport3,
and so on...
Note: These modifications are needed only on the primary AutoVue Server machine. For fail-safe installation,
repeat the customizations on all machines in the cluster.
Note: If firewall is enabled on the machines where AutoVue Server is running, you might need to add java.exe and
javaw.exe to the firewall exceptions.
If you plan to use AutoVue’s Collaboration feature, see "Configuring for Collaboration".
Configuring Multiple Servers in a Cluster
When you have multiple servers in cluster, you can configure a network drive as shared storage for markups,
symbols, and server directories. By doing so, you can centralize the configuration for the servers in the cluster.
These configuration are done in VueServer.ini. Refer to "Configuration Options in VueServer.ini"for information on
the available options.
Oracle Corp.
AutoVue
53
Configuring for Failover
In the event of a failure of an AutoVue Server, either when using a cluster or when using a standalone server, you can
configure the VueServlet so that it directs requests to another AutoVue Server. When using a cluster, the failover
server can be another server in the cluster. When using standalone installation, you must install another instance of
AutoVue Server.
To configure VueServlet for failover, update the JVUESERVER parameter of the VueServlet and add the following:
;[secondary server hostname]:[secondary server socket port number]
Example:
<param-value>
hostname1:5099;hostname2:5099
</param-value>
Note: Failover can also can occur at the application server layer. For more information refer to the My Oracle
Support Knowledge Base at https://support.oracle.com.
Oracle Corp.
AutoVue
54
Debugging AutoVue
Logging for the AutoVue Server
The configuration file log4j.xml (located in the <AutoVue Install Root>\bin directory) makes it possible to display
class-level debugging information for AutoVue Server. The configuration file defines several appenders and output
layouts, and can be configured for license usage logging. If you experiences issues with AutoVue Server, you can
provide logging information from log4j.xml to an Oracle Global Customer Support representative.
Refer to "Appendix H: Logging for the AutoVue Server" for information on the available appenders, output layouts,
and logger information.
Debugging the Servlet
If the servlet URL is incorrect, you will see the usual HTTP error 404 (File not found) screen:
There are many reasons why you might get the above 404 error message. One common reason is that there is a typo
in the VueServlet URL (as is the case with this example). Typos are also common in the case where the application
server is case sensitive (for example, Tomcat).
Another possibly root of the error is that the VueServlet was not properly installed on your application server. For
details on setting up VueServlet, see "Deploying the VueServlet".
Oracle Corp.
AutoVue
55
If the URL was found but the AutoVue Server could not be accessed, you will see the following HTML page:
Exceptions and errors may vary depending on the failure reason. If you see an error message similar to the screen
above, it means that the VueServlet was installed properly but could not contact the AutoVue server.
This is generally caused by one of two reasons:
•
The AutoVue server is not running.
or
•
The hostname and/or socket port specified in the JVUESERVER init parameter of the VueServlet are not correct.
Oracle Corp.
AutoVue
56
To enable debugging for the VueServlet, you must set the VERBOSE parameter to TRUE in the descriptor for the
VueServlet.
Parameter
Description
Default
Verbose=[TRUE|FALSE]
Set to TRUE to enable debug output.
Set to FALSE to disable debug output.
FALSE
To define the debug output category, you must set DEBUGLEVEL in webdefault.xml:
Parameter
Description
Default
DebugLevel=[0-100]
Set the debug output category.
0
For a list of additional customizable parameters for VueServlet, refer to "VueServlet Parameters".
Debugging the Client
In the event the applet fails to load, perform the following troubleshooting:
•
•
•
Check that the application server hosting the VueServlet is running.
Verify that AutoVue Server is running.
Open the URL to the VueServlet in a Web browser to verify the connection.
For enabling debug information, refer to the following table:
Note: When the client applet is deployed on a Web page, the standard output is typically the Java console. You can
direct the output to a text file by setting the LOGFILE parameter to the full path of an output file.
Parameter
Description
Default
LOGFILE=string
Specify the full path to the log file for messages. null is for standard output.
null
VERBOSE=[OFF |
ERROR | INFO | DEBUG
| ALL]
Set to ERROR to output all error messages.
Set to INFO to display all informative messages.
Set to DEBUG to display all debug messages.
Set to ALL to display all messages.
Set to OFF or FALSE to turn off verbosity.
OFF
For a list of additional customizable parameters for frmApplet.html, refer to "AutoVue Applet Parameters".
Oracle Corp.
AutoVue
57
Appendix A: Non-Interactive Installations
Installation
To install AutoVue in non-interactive mode, you need to specify a configuration file that contains the required
installation parameters. To do so, you must generate the configuration file manually following below syntax.
For Windows OSes:
#Specify Installation Directory
#-----------------------------USER_INSTALL_DIR=C:\\Program Files\\AVServer
#Select Shortcut Folder
#---------------------USER_SHORTCUTS=C:\\Documents and Settings\Administrator\Start Menu\Programs\Oracle
AutoVue
#Select Features (Available: ProgFiles,AdminDocs,UserDocs,Website,SampleFiles,APIEx)
#----------------------------------------------------------------------------CHOSEN_INSTALL_FEATURE_LIST=ProgFiles,AdminDocs,UserDocs,Website,SampleFiles,APIEx
#Specify host name for WV Server
#------------------------------JVUESERVER_HOST=avserver1
#Specify settings for Web Server
#------------------------------WEBSERVER_HOST=avserver1:80
WEBSERVER_DOCROOT=C:\\inetpub\\wwwroot
WEBSERVER_PATH=AutoVue
#Install AutoVue Server as Windows service
#----------------------------------------INSTALL_WIN_SERVICE=Yes
WIN_SERVICE_ACCOUNT=domain\\username
WIN_SERVICE_PASSWORD=password
Oracle Corp.
AutoVue
58
For Linux OSes:
#Specify Installation Directory
#-----------------------------USER_INSTALL_DIR=/home/qa/AutoVue
#Select Features (Available: ProgFiles,AdminDocs,UserDocs,Website,SampleFiles,APIEx)
#----------------------------------------------------------------------------CHOSEN_INSTALL_FEATURE_LIST=ProgFiles,AdminDocs,UserDocs,Website,SampleFiles,APIEx
#Specify host name for WV Server
#------------------------------JVUESERVER_HOST=avserver
#Specify settings for Web Server
#------------------------------WEBSERVER_HOST=avserver
WEBSERVER_DOCROOT=/var/www/html
WEBSERVER_PATH=AVclient
Following are the installation parameters that you can specify in the configuration file:
Parameter
Description
USER_INSTALL_DIR={file path}
Specify the path where you want to install AutoVue Server.
USER_SHORTCUTS={file path}
Specify the shortcut path.
Note: This parameter is only for Windows OS installations.
CHOSEN_INSTALL_FEATURES=
ProgFile, AdminDocs,
UserDocs,Website,SampleFiles,A
PIEx
Specify the features to install.
The comma-separated list can contain the following features:
ProgFile: Installs Oracle AutoVue.
AdminDocs Installs Oracle AutoVue system administration
documentation.
UserDocs: Installs AutoVue end-user documentation.
Website: Installs AutoVue client components onto a web server.
SampleFiles: Installs sample files.
APIEx: Installs examples of how Oracle AutoVue features can be
added to third-party applications using APIs.
JVUESERVER_HOST={AutoVue
Server host name}
Specify the AutoVue Server host name.
WEBSERVER_HOST={Web server
host name and port}
Specify the Web server host name.
WEBSERVER_DOCROOT={Web
server document root}
Specify the document root of the Web Server
WEBSERVER_PATH={Path to
AutoVue client files relative to
DOCROOT}
Specify the path to the AutoVue client files relative to the document
root.
INSTALL_WIN_SERVICE={Yes|
No}
Specify if you want to register AutoVue as a windows service.
Note: This parameter is only for Windows OS installations.
Oracle Corp.
Default
Value
ProgFile,
AdminDocs
,
UserDocs,
Website
AutoVue
59
Parameter
Description
WIN_SERVICE_ACCOUNT={dom
ain\username}
This is required to run the service as a named user. Specify the domain
and the user name of the user account that will be used to run the
AutoVue Server service.
Note: This parameter is only for Windows OS installations.
WIN_SERVICE_PASSWORD={pa
ssword}
Specify the password for the user specified in
WIN_SERVICE_ACCOUNT,
Note: This parameter is only for Windows OS installations.
Default
Value
After you specify the parameters for the configuration file, you can run the installation in non-interactive mode. Enter
the following command lines:
For Windows OSes:
jInstall.exe -DSERVER=1 -i silent -f <full path to configuration file>
For Linux OSes:
jInstall_lin_bin -DSERVER=1 -i silent -f <full path to configuration file>
Uninstallation
If AutoVue is installed in non-interactive mode, the uninstallation is automatically in non-interactive mode. Simply
invoke the uninstaller for AutoVue:
For Windows OSes:
<AutoVue Installation Folder>\uninstall\uninstall.exe
For Linux OSes:
<AutoVue Installation Folder>/uninstall/uninstall
Oracle Corp.
AutoVue
60
Appendix B: VueServlet Deployment
This section describes the steps to setup the VueServlet for several popular Application Servers/Servlet Engines.
Generally, you can follow similar steps to deploy with any application server. Refer to your application server
documentation for specific instructions.
Tunneling through J2EE-enabled Application
Servers
This section provides instructions for deploying VueServlet for J2EE application servers.
Deploying the WAR File
This section provides generic instructions for deploying a WAR file, followed by instructions for deploying the WAR
file with a specific application server.
Generic Steps to Deploy the WAR File
1
Launch the administrative console of your application server.
2
Select Install a new Web application.
3
Browse and select VueServlet.war.
4
Specify VueServlet for the context name.
5
Deploy VueServlet.war.
We provide you with instructions for deploying VueServlet.war with some application servers in the following
section.
Deploying the WAR File with WebSphere 6.1 and up
1
Launch the administrative console and log on to the application server.
2
Select Applications and then Install new application.
3
Browse and select VueServlet.war.
Oracle Corp.
AutoVue
4
Specify VueServlet for the context name and click Next.
5
Accept the default values in the screen that appears.
6
In the Install New Application screen, enter VueServlet for the Application Name and click Next.
7
Accept the default values in the remaining screens. Then click Finish.
8
To start the VueServlet application, go to Applications and then Enterprise Applications.
9
Select VueServlet and click Start.
61
To test the VueServlet, connect to:
http://<host name>:<port>/VueServlet/servlet/VueServlet
where <host name> is the name of your application server host machine and <port> is the port your application
server is running on.
Deploying the WAR File with WebLogic 8.x and up
1
Logon to the Administrative Console for WebLogic.
2
Select Deployments from the tree.
3
Click on Install.
4
Browse to the folder containing VueServlet.war and select VueServlet.war.
5
Enter VueServlet for the Application Name.
Oracle Corp.
AutoVue
6
62
Select the Server to which you wish to deploy VueServlet.
Example: myserver
7
Click Activate Changes.
8
Select Deployments again and select the VueServlet application.
9
Click Start and select Servicing all requests.
The application starts.
Once the deployment is successful, verify the deployment. To do so, connect to:
http://<host name>:<port>/VueServlet/servlet/VueServlet
where <host name> is the name of your Application Server host machine and <port> is the port your application
server is running on.
Deploying the WAR File with Oracle Application Server 10g R3
1
Logon to Oracle Application Server Control.
2
From the Application tree, select Home.
3
Select the Application tab and then click Deploy.
The Select Archive page appears.
4
From the Application Location field, click Browse to select vueservlet.war.
5
Click Next.
The Application Attributes page appears.
6
Enter VueServlet for the Application Name.
7
Enter VueServlet for the Context Root.
8
Click Next.
The Deployment Settings page appears.
9
Click Deploy.
Deploying the VueServlet with Tomcat 5.x and up
1
Copy vueservlet.war to your Tomcat webapps directory.
2
Restart Tomcat.
The VueServlet is deployed automatically.
Tunneling with non-J2EE Application Servers
Setting up VueServlet
Below are generic instructions for deploying the VueServlet with a non-J2EE application server.
1
Copy the file vueservlet.jar to your Servlet Engine’s servlet directory.
2
Add vueservlet.jar to your Servlet Engine’s CLASSPATH.
3
Create an alias for VueServlet to com.cimmetry.servlet.VueServlet.
Oracle Corp.
AutoVue
63
4
If your AutoVue server is running on a different machine, specify the init parameter JVueServer to be
my.jvueserver.com:5099 where my.jvueserver.com specifies the machine on which AutoVue
server is running. 5099 is the default port that the server runs on. If you change the default, this should also be
correspondingly changed.
5
For the changes to take effect, restart the servlet engine.
Note: The default socket port is 5099 (not 1099, that is used by RMI).
Tunneling using Jetty
1
Add VueServlet.jar to Jetty's class path.
2
Edit startjetty.bat and add the full path to VueServlet.jar to the CLASSPATH variable.
3
Edit webdefault.xml and add the following:
<servlet id="VueServlet">
<servlet-name>VueServlet
</servlet-name>
<servlet-class>com.cimmetry.servlet.VueServlet
</servlet-class>
<init-param>
<param-name>JVueServer
</param-name>
<param-value>www.jvueserver.com:5099
</param-value>
</init-param>
<init-param>
<param-name>Verbose
</param-name>
<param-value>false
</param-value>
</init-param>
<init-param>
<param-name>DebugLevel
</param-name>
<param-value>0
</param-value>
</init-param>
<load-on-startup>0
</load-on-startup>
</servlet>
4
Replace www.jvueserver.com with the name of the machine on which AutoVue Server is running. 5099
specifies the socket port that the AutoVue Server uses. If the server is using a different socket port, specify the
correct socket port.
5
Start Jetty and AutoVue Server.
6
Test that the VueServlet is installed properly; Open a Web browser and enter the URL to the VueServlet:
http://<machine name>:5098/servlet/VueServlet
Oracle Corp.
AutoVue
Tunneling using Microsoft IIS
Microsoft’s IIS normally cannot execute servlets. Configuring IIS to use ISAPI redirector will let IIS send servlet
requests to the application server. Follow the instructions for the third party J2EE/servlet engine to setup ISAPI
redirection.
Oracle Corp.
64
AutoVue
65
Appendix C: Customizing the GUI
Choosing the GUI File
By default, if the applet parameter GUIFILE is not set, the applet will use a default GUI specification for the menus
and toolbars. However, this default GUI is the same as the one that would be generated with the configuration
specified in the file default.gui. The location of this file is specified by the entry Directory in the [Users] section of
the ini file (VueServer.ini).
To customize the default GUI configuration, modify default.gui and set the GUIFILE to this customized file. This
way, you can even create several GUI files with specific functionalities (like “no compare mode”, “no printing”, and
so on) and allow different clients to have different GUIs. A sample GUI file that allows viewing only (disabling
Markup mode) is provided as viewonly.gui.
Modifying the GUI File
The GUI definition file structure is simple. It mainly describes which controls (corresponding to available actions in
the applet, like Rotate, Open, and so on) are to be added to which context (like MenuBar, ToolBar, and so on), thus
allowing users to have complete control over the functionality and the look of the applet interface.
The GUI to use on the AutoVue client can be specified in the GUIFILE applet parameters. Refer to "Configuring the
AutoVue Client" for more information.
Structure and Syntax of GUI Files
AutoVue supports five modes: View, Compare, Markup, Collaboration, and Print Preview. A GUI file defines the
graphical interface for each mode. Menu bars, toolbars, status bar and Right Mouse Button (RMB) menus are defined
in this file. For some of these objects, location (north, south, west, east) may be specified. Toolbars are located in
north, west or east. The status bar is always located at the bottom of the component (south).
Note: Popup menus may be added to menu bars. Menu items, popup menus or separators may be added to popup
menus. Toolbars only accept buttons. Buttons or panes may be defined for the status bar. The RMB popup is
processed as any other popup menu.
The following table lists each GUI file for each mode:
2D
EDA
3D
View
VIEW
ECADMARKUP
SMVIEW
Markup
MARKUP
ECADMARKUP
MARKUP3D
Collaboration
COLLABORATION
ECADCOLLABORAT
ION
COLLABORATION3
D
Compare
COMPARE
COMPARE
COMPARE3D
Print Preview
PRINTPREVIEW
PRINTPREVIEW
PRINTPREVIEW
Oracle Corp.
AutoVue
66
GUI Configuration Syntax
The most generic definition of a GUI file can be described through the symbols below:
•
•
•
•
Words with CAPITAL LETTERS should be entered literally.
The character ‘|’ is used as “or” (for example, a|b means a or b)
The character ‘*’ means “zero or more occurrences of.”
A GUI file can contain one or more “GUI configuration” blocks as shown in the following table:
GUI Configuration Blocks
GUI_configuration =
BEGIN UI VIEW UI_mode_configuration END
{BEGIN UI COMPARE | MARKUP UI_mode_configuration
END}
*UI_mode_configuration =
{menu_bar_configuration | {toolbar_configuration}* | status_bar_configuration |
RMB_popup_menu_configuration}
menu_bar_configuration =
MENUBAR BEGIN {popup_menu_configuration}* END
toolbar_configuration =
TOOLBAR NORTH|WEST|EAST BEGIN {button_control }* END
status_bar_configuration =
STATUSBAR SOUTH BEGIN {button_control | pane_control } * END
RMB_popup_menu_configuration =
RMB BEGIN {popup_menu_configuration | menu_item_control }* END
popup_menu_configuration =
POPUP IDS_{FILE|EDIT |VIEW |OPTIONS |HELP | VIEW_IMAGE |TOOLS |ENTITIES |MODIFY |HYPERLINK}
BEGIN {popup_menu_configuration | menu_item_control | SEPARATOR }* END
button_control =
BUTTON action_control`
menu_item_control =
MENUITEM action_control
pane_control =
PANE action_control
action_control =
control_name, control_key_list, permissions
control_name: For list of available control names refer to "Control Names".
control_key_list: For the control key list for different controls refer to "Control Names".
Oracle Corp.
AutoVue
67
GUI Configuration Blocks
permissions: All action names need “PERM_READ”.
These are the exceptions to this rule:
VueActionFilePrint needs: PERM_READ|PERM_HEADERS|PERM_WATERMARK
VueActionOptionsBars needs: PERM_NONE
VueActionHelp needs: PERM_NONE
Example:
To define a very basic user interface that only allows users, through menu items, to open or print a file and get the file
information without changing watermark/headers/footers:
BEGIN UI VIEW
MENUBAR BEGIN
POPUP IDS_FILE BEGIN
MENUITEM VueActionFileOpen, , PERM_READ
MENUITEM VueActionFileProperties, , PERM_READ
MENUITEM VueActionFilePrint, , PERM_READ
END
END
END
For a list of available Control Names and their functionality, refer to "Control Names".
Control Names
The following table lists available Control Names and their functionality.
Control
Key List
VueAction
FileOpen
VC
When INI option EnableUniversalFileChooser is
set to 0, invokes open URL dialog. When option is
set to 1, the universal file chooser dialog (that
supports URLs, local files, server:// protocol and
DMS files) appears. Default for
EnableUniversalFileChooser is 1.
r
VueAction
FileUpload
VC
Upload local file when
EnableUniversalFileChooser=0. Not available
when EnableUniversalFileChooser=1.
r
VueAction
FileOpenUNC
VC
Open files using UNC names
r
VueAction
FileMarkup
V
Switch to Markup mode
r
VueAction
FileCompare
V
Switch to compare mode
r
Oracle Corp.
RMB
Contexts
Status Bar
Functionality
Toolbar
UI*
Modes
Popup Menu
Control
Name
r
r
r
r
AutoVue
Control
Name
68
Control
Key List
UI*
Modes
Functionality
VueAction
FileOverlays
V
Select and modify overlays
r
VueAction
FileProperties
VCM
(M:
status
bar only)
Show file properties
r
VueAction
FilePrint
VCM
Modify print options and print a file
r
VueAction
FileMRU
V
List most recently used documents
r
VueAction
EditSearch
VM
Do search or repeat search
r
r
VueAction
ViewZoom
VCM
Apply zoom
In/
Out/
Previous/
FullRes/
FitBoth/
r
r
VueAction
ViewFlip
VCM
Apply flip
Vertical/
Horizontal/Both
r
r
VueAction
ViewRotate
VCM
Apply rotation
0/
90/
180/
270
r
r
VueAction
ViewContrast
VCM
Apply contrast
r
VueAction
ViewAntiAlias
VCM
Apply anti alias
r
VueAction
ViewInvert
VCM
Apply invert
r
VueAction
ViewPage
VCM
Go to next page, previouse page or select page
number.
r
VueAction
ViewViewPoint
VC
Select view point
r
VueAction
ViewXrefs
VCM
Select Xrefs
r
r
VueAction
ViewLayers
VCM
Select layers
r
r
VueAction
ViewBlocks
VCM
Select blocks
r
r
VueAction
ViewViews
VCM
Select views
r
r
Oracle Corp.
Contexts
r
r
r
r
AutoVue
Control
Name
69
Control
Key List
UI*
Modes
Functionality
VueAction
ViewDrawing
Info
VCM
Get entity’s drawing information
r
VueAction
ViewMeasure
VCM
Measure distance, cumulative distance, area, or
calibrate
r
VueAction
ViewSpecialVi
ewModes
VCM
Show special view modes
VueAction
ToolsDrawing
Info
VCM
Get drawing information for one entity, some
entities or a block
r
VueAction
OptionsBars
VCM
Hide or show toolbars or status bar
r
VueAction
ViewDrawing
Info
VCM
Get entity’s drawing information
r
VueAction
CreateMobile
Pack
VM
Create a Mobile Pack
r
VueAction
ReplyMobile
Pack
VM
Send Mobile pack with your default e-mail client
r
VueAction
SyncMobile
Pack
VM
Synchronize changes to Mobile Pack to backend
system
r
VueAction
ShowRendition
VM
Show renditions in the Mobile Pack
r
VueActionFile
Browse
VM
Opens the File Browse dialog when browsing
documents from different sources (local, DMS,
server, URL). The document is open as soon as it
is single clicked. Available only when
EnableUniversalFileChooser=1 (default).
r
VueActionFile
Convert
VM
Converts file to different formats using convert
options.
r
VueActionFile
OpenNew
Window
VM
Same as VueActionFileOpen, but opens file in
new window.
r
VueAction
ManageOffline
Files
VM
Opens a dialog for managing offline files (adding,
removing, and so on).
r
VueAction
WorkOffline
VM
Switches between offline/online modes.
r
Oracle Corp.
Pan and Zoom
Window/
MagnifyWindow
/
MagnifyGlass
Contexts
r
r
r
AutoVue
70
Note: The letters in the UI* Modes column indicate:
V
- View
C
- Compare
M
- Markup
The columns indicate:
•
•
Control Name: Column shows the list of available control names.
UI modes(s): Column specify in which modes can be used that control safely.
Example: VueActionFileOpen can be added to View and Compare Modes, except for Markup mode.
•
Functionality: Column specifies which functionalities are provided when this control is added to a context.
Example: Adding VueActionFileMarkup to any context enables you to switch to Markup mode.
•
Control key list: Column provides the optional functionalities that can be added to a context.
• If for a control name there is no entry in this list, this means that by default all the controls providing the
functionality listed in the functionality column are provided. For example, for VueActionFileOverlays,
there is no entry in the control key list and adding it to a popup menu will provide both select and modify
functionalities for overlays. The entry will look like this:
MENUITEM VueActionFileOverlays, , PERM_READ
•
If there is a list of strings separated by ‘/’, you can specify which functionalities you want added. If you
don’t specify any of them, by default all functionalities will be added. For example the following entry adds
two buttons to the toolbar: one for Zoom In and one for Zoom Out.:
BUTTON VueActionViewZoom, In/Out, PERM_READ
Whereas the following entry:
BUTTON VueActionViewZoom, , PERM_READ
is interpreted as:
BUTTON VueActionViewZoom, In/Out/Previous/
FullRes/FitBoth, PERM_READ
•
Contexts: Column provides the contexts to which you can add the control to.
Example: You can have the entry in a popup menu of the menu bar, but not in an RMB configuration. (If
have such an entry, it will be ignored.):
MENUITEM VueActionFileOpen, , PERM_READ
Oracle Corp.
you
AutoVue
71
UNC File Names
When AutoVue is used in a Microsoft-based network environment, a special VueAction is available to support the
viewing of files through their UNC filenames. This VueAction allows the server to directly access files on the
network, as well as XRef files if they exist in the same directory as the base file. File names are specified through a
specialization of the server:// URL mechanism, where the UNC name is prefixed with the following string:
server://@0
The control name is VueActionFileOpenUNC. The GUI file has to be modified to use VueActionFileOpenUNC. For
more information on the GUI file, see "Structure and Syntax of GUI Files".
Following are a few examples of how this VueAction works. First you will have to modify the GUI file to use
VueActionFileOpenUNC.
Example 1
Assuming that you have files on a shared network drive \\machine1\share1. You wish to open files that are in
subdirectory dir1 on the shared drive.
Select Open from the File menu and browse to \\machine1\share1\dir1. Then select a file file1 to open. AutoVue
translates this upload request to: server://@0/\\machine1\share1\dir1\file1
Example 2
Assuming that you have files on a shared network drive \\machine2\share2 mapped as 'W:'. You wish to open
files that are in subdirectory dir2 on W:.
When you open a file file2 using Open from the File menu, AutoVue translates this upload request to server://
@0/\\machine2\share2\dir2\file2.
Example 3
Assuming that you have files on a shared network drive \\machine3\share3. You wish to open files that are in
subdirectory dir3 on this shared drive. You wish to open file file3 that exists in directory dir3. All the XRefs for
this file exist in the same directory.
When you open file file3, using Open from the File menu, AutoVue translates this upload request to server://@0/
\\machine3\share3\dir3\file3. AutoVue also locates all the XRefs for this file that exist in the same directory.
Oracle Corp.
AutoVue
72
Appendix D: Configuring a DirectoryBrowsing Servlet for the AutoVue Client
The basic setFile functionality described in "Configuring the AutoVue Client" allows for easy browsing of files on
the server side, using the small servlet ListDirServlet provided with the installation. This servlet generates a list of the
accessible server files in HTML format and sends it back to the client. The client can then select a file in the list and
display it in the AutoVue client.
The ListDirServlet accepts three initialization parameters:
•
•
RootDir: This is the root directory of all the directories that a user can browse on the server side.
RootURL: This is the URL of the RootDir. Subdirectory URLs are assumed to be RootURL + relative path to the
•
HREFFormat: This is the format of the HRef generated for every file listed. In this format, the URL of the file
directory.
listed replaces the %URL token. For example, the following default format generates a hyperlink that will trigger
a setFile in the applet located in the frame named AppletFrame, for each file listed:
HREFFormat= JavaScript:parent.AppletFrame.setFile('%URL')
Because the client only receives a URL list, basic security of URL browsing still applies to the file access. However,
you can also specify URLs using the pseudo-protocol ‘server:’ and directly browse the server file system (thus
eliminating the download overhead). In order to use this protocol, you just have to ensure that the RootDir directory
is also the one specified in the [Server]/Directory key of the vueserver.ini file.
Refer to "Configuration Options in VueServer.ini" for more information.
Installing the ListDirServlet depends on the servlet engine your Web server is using, see "Appendix B: VueServlet
Deployment". Once the servlet is properly installed (you can test the installation by accessing the servlet URL in your
favorite Web browser), modifying the sample HTML code so that it displays the list of available files in the left frame
is very easy. To do so, use the following servlet URL to access the VueServlet:
http://myserver/servlet/ListDirServlet
Note: You can set this URL as a frame in an HTML framset.
Oracle Corp.
AutoVue
73
Appendix E: Identity Management
System
Added an authentication plug-in scheme between the client and server to enable integrators to hook AutoVue to
Identity Management Systems. Under this scheme, there is a plug-in for the AutoVue client and another for the
server. The client uses its plug-in to obtain user credentials as part of the process of connecting to the server. The
client encrypts the credentials and sends them to the server which uses its plug-in to authenticate the user who is
trying to connect. If the server does not recognize the credentials, it refuses the connection.
A pair of default plug-ins are now supplied with AutoVue. The UsernamePasswordObtainer class is supplied so that
the client can prompt the user for login information (username and password). The JAASAuthenticator class is
supplied so that the server can use the Java Authentication and Authorization Service to authenticate using the
authentication mechanisms specified in the configuration text file, jaas_authen.conf. The default version of this file is
configured to authenticate using the Kerberos protocol which is supported by Windows Active Directory and many
other popular identity repository solutions.
To configure the server to use the default authentication plug-in supplied with the product, perform the following:
1
Edit jvueserver.properties to specify the plug-in by uncommenting the following line:
jvueserver.authenticator=com.cimmetry.jvueserver.JAASAuthenticator
2
Create a text file called jaas_authen.conf in <AutoVue Install Folder>\bin directory. Add the following text in
jaas_authen.conf:
/**
** Example JAAS Login Configuration for AutoVue Server
**/
AVServer {
com.sun.security.auth.module.Krb5LoginModule requiredstoreKey=true;
};
Edit jvueserver.properties and add the following highlighted lines after the -Djava.security.policy
parameter of jvueserver.cmdline:
jvueserver.cmdline=-Xmx128M -Djava.security.policy="C:\Program
Files\jVue\bin\policy"
-Djava.security.krb5.realm=<realm> -Djava.security.krb5.kdc=<kdc>
-Djava.security.auth.login.config=<full path to jaas_authen.conf>
Replace <realm> with your security realm.
Replace <kdc> with your key distribution center
3
Update the client Web pages that embed the AutoVue applet to add a new applet parameter:
<PARAM NAME=”CREDENTIALOBTAINER”
VALUE=”com.cimmetry.vueframe.UsernamePasswordObtainer”>
4
Startup AutoVue Server.
5
Launch AutoVue client.
An authentication dialog appears and prompts you for login information. On successful login, AutoVue client
should launch.
Oracle Corp.
AutoVue
74
Appendix F: Usage Monitoring
AutoVue has usage monitoring to enable system administrators to track how many files of a format group are opened
at any given time. For example, you can use this feature to track the number of licenses for the different product
variations of a single deployment of AutoVue. Usage data is written to licusage.out file in the <AutoVue Install
Folder>\bin directory.
AutoVue ships a utility to parse the usage log and present meaningful information to the system administrator.
The following is the format of the command line to run this utility:
usagestat
[-c]
<path to the input file>
where usagestat is the command to run this utility.
[-c] is an optional parameter and indicates that the utility should run in continuous mode.
<path to the input file> specifies the full path to the input file, i.e. the log file on which the statistics is based. This
argument is mandatory.
The following is an example command line that runs the utility in a standard or regular mode.
usagestat
Oracle Corp.
c:\AutoVue\bin\LicUsage.out
AutoVue
75
Appendix G: AutoVue Mobile
AutoVue Mobile provides the ability to view and add markups to files in a disconnected environment. Using the
AutoVue Mobile feature in AutoVue, you can create a Mobile Pack (a "packaged" file that contains the base file, all
the external resources—fonts, XRefs—needed to fully display the file, and existing markups for the file).
In a disconnected environment, depending on the markup policy defined during Mobile Pack creation, you can add
markups using the Desktop deployment of AutoVue. Markup policy defines a set of rules to determine certain
restrictions and privileges for users of the Mobile Pack. If no markup policy is defined in the Mobile Pack, a default
set of values are used.
The default markup policy file, MarkupPolicy.xml, can be found in the <AutoVue installation>\bin folder.
Note: For more information on Mobile Pack, refer to the User’s Manual.
The following table explains the actions included in the markup policy, their default values, and which values can be
modified.
All the following actions can be combined with certain exceptions.
Action
Description
Default
SaveNewMarkup=
<TRUE|FALSE>
If TRUE, new Markup file creation inside the Mobile Pack is allowed.
If FALSE, new Markup file creation inside the Mobile Pack is not allowed:
For new/imported (local file) Markup file, Markup Save and Markup Save As
are disabled.
For an existing Markup file, Markup Save As is disabled.
TRUE
SaveExistingMarkup=
<TRUE|FALSE>
If TRUE, resave of existing Markup file is allowed.
If FALSE, the Markup file from the Mobile Pack cannot be re-saved. The
Markup Save command will be disabled for the existing Markup file.
TRUE
EditMarkup=
<TRUE|FALSE>
If TRUE, the Markup file can be edited.
If FALSE, the Markup file is opened as read-only. All manipulation
commands at all levels—Markup file, markup layers, and markup entities—
are disabled.
Setting EditMarkup=False is equivalent to the Hide Icon menu option.
TRUE
DeleteMarkup=
<TRUE|FALSE>
Note: Only available for a Mobile Pack created with DMS files.
If TRUE, the Delete Markup menu option is enabled in the Markup File Open
dialog.
If FALSE, the Delete Markup menu option is disabled in the Markup File
Open dialog.
TRUE
OpenMarkup=
<TRUE|FALSE>
If TRUE, the Markup file is listed in the Markup File Open dialog.
If FALSE, the Markup files is not listed in the Markup File Open dialog.
TRUE
AutoOpenMarkup=
<TRUE|FALSE>
If TRUE, the Markup file opens automatically when opening the Mobile Pack.
If FALSE, the Markup file does not open automatically when opening the
Mobile Pack.
FALSE
Oracle Corp.
AutoVue
76
Action
Description
Default
FilterAttrFromGUI.<GU
I>.<Prop>.<Value>=<T
RUE|FALSE>
If TRUE, the given property value is removed from the GUI definition.
If FALSE, the given property value is not removed from the GUI definition.
This action takes three parameters:
GUI: GUI definition to be modified
Prop: Property to be removed
Value: Property value to be removed
If no Value is specified, then the UI element that represents the given property
in the GUI definition is removed.
For example:
<Action name="FilterAttrFromGUI.Edit.CSI_MarkupType.master"
default="false">
FALSE
Oracle Corp.
AutoVue
The following is an example of how to define a markup policy in XML.
<MarkupPolicy>
<Action name="SaveExistingMarkup" default="true">
<ExConditions>
<OrOperator>
<AndOperator>
<AnyMarkupFileCondition Name="CSI_MarkupType" Value="master"/>
<MarkupFileCondition name="CSI_MarkupType" value="consolidated"/>
<MarkupFileCondition name="CSI_DocAuthor" value="$CURRENT_USER"/>
</AndOperator>
<NotOperator>
<MarkupFileCondition name="CSI_DocAuthor" value="$CURRENT_USER"/>
</NotOperator>
</OrOperator>
</ExConditions>
</Action>
<Action name="EditMarkup" default="true">
<ExConditions>
MarkupFileCondition name="Original" value="true"/>
</ExConditions>
</Action>
<Action name="DeleteMarkup" default="true">
<ExConditions>
<OrOperator>
<AndOperator>
<AnyMarkupFileCondition name="CSI_MarkupType" value="master"/>
<MarkupFileCondition name="CSI_MarkupType" value="consolidated"/>
<MarkupFileCondition name="CSI_DocAuthor" value="$CURRENT_USER"/>
</AndOperator>
<NotOperator>
<MarkupFileCondition name="CSI_DocAuthor" value="$CURRENT_USER"/>
</NotOperator>
</OrOperator>
</ExConditions>
</Action>
<Action name="FilterAttrFromGUI.Edit.CSI_MarkupType.master"
default="false">
<ExConditions>
<AnyMarkupFileCondition name="CSI_MarkupType" value="master"/>
</ExConditions>
</Action> </MarkupPolicy>
Oracle Corp.
77
AutoVue
78
Appendix H: Logging for the AutoVue
Server
Appenders
The following table lists the appenders that are defined in log4j.xml.
Appender
Description
Parameters
File Appender
(org.apache.log4j.FileAppender)
Appender for logging to file.
File: The name of the log file.
Rolling File Appender
(org.apache.log4j.RollingFileAppen
der)
Backs up (rolls) previous files
when the maximum files size is
reached.
Note: This appender is enabled
by default.
Append: If set to TRUE, logs are appended to
file after process restarts. If set to FALSE, the old
files is discarded after the process restarts.
MaxFileSize: The maximum size that the
output file is allowed to reach before being
rolled over to backup files.
MaxBackupIndex: The maximum number of
backup files to keep.
${jvueserver.processIndex}: AutoVue Server-specific parameter used to log AutoVue’s processes into a separate file.
Daily Rolling File Appender
(org.apache.log4j.DailyRollingFileA
ppender)
Defines the frequency for rolling
over a file.
Console Appender
(org.apache.log4j.ConsoleAppender)
Used for logging the program
console window.
SMTP Appender
(org.apache.log4j.SMTPAppender)
Send an e-mail when a specfic
logging event occurs (such as
errors or fatal errors).
DatePattern: Determines the roll-over
schedule. For format details refer to log4j documentation.
BufferSize: The maximym number of logging events to collect in a cyclic buffer.
SMTPHost: The host name of the SMTP server
that sends the e-mail.
From: E-mail address of the sender.
To: A comma-separated list of the recipients’ email addresses.
Subject: The subject of the e-mail.
NT Event Log Appender
(org.apache.log4j.NTEventLogAppe
nder)
Oracle Corp.
Appends to the NT event log system.
Note: The is appender is only for
Windows OSes.
Source: The source of the events.
AutoVue
79
Output Layout
The following table defines the available output layouts in the log4j.xml configuration file.
Note: The output XML file can be viewed in a GUI-based log viewer such as Apache Chainsaw.
Output Layout
Description
Parameters
XML Layout
(org.apache.log4j.xml.XMLLayo
ut)
When this layout is enabled, log4j outputs the logs in XML format.
Properties: Set this value to TRUE to
force log4j to record Mapped Diagnostic
Complex (MDC) values.
AutoVue-specific MDC values:
User: Outputs source username with logging event.
Document: Outputs current document
name with logging event.
Pattern Layout
(com.cimmetry.jvueserver.logger.
JVuePatternLayout)
When this layout is enabled, log4j outputs the logs in textual format allowing
for flexible string format configuration.
ConversionPattern: The string that
controls formatting. For the list of formatting characters, refer to log4j documentation.
AutoVue-specific formatting characters
in conversion pattern:
%s: Outputs current document server index
or “0” in the case of a session server.
The following is an excerpt from a sample log4j.xml configuration file for the SMTP appender.
<!-- SMTPAppender -->
<appender name="JVUE-SMTP" class="org.apache.log4j.net.SMTPAppender">
<param name="Threshold" value="ERROR"/>
<param name="BufferSize" value="512"/>
<param name="SMTPHost" value="mycompany.com"/>
<param name="From" value="[email protected]"/>
<param name="To" value="[email protected]"/>
<param name="Subject" value="[SMTPAppender] AutoVue Server Admin
notification"/>
<layout class="com.cimmetry.jvueserver.logger.JVuePatternLayout">
<param name="ConversionPattern" value="%d %-5p JVueServer%s:
%m%n"/>
</layout>
</appender>
Oracle Corp.
AutoVue
80
Note: To enable logging output to the console, you must uncomment the JVUE-CONS line in the log4j.xml
configuration file as shown in the following figure:
<!-- Root logger -->
<!-- Uncomment additional appender-ref to output to different/multiple
outputs -->
<root>
<level value="debug"/>
<appender-ref ref="JVUE-ROLL"/>
<!-- <appender-ref ref="JVUE-FILE"/> -->
<!-- <appender-ref ref="JVUE-DAILY"/> -->
<appender-ref ref="JVUE-CONS"/>
<!-- <appender-ref ref="JVUE-SMTP"/> -->
<!-- <appender-ref ref="JVUE-EVENT"/> -->
</root>
Logger Information
The following descriptions explain what kind of logger information will be seen for each class specified:
Class
Description
com.cimmetry.jvueserver.man
agement
Displays information relating the start-up of the AutoVue Server, communications
between AutoVue Server clusters and connections from the console, and other
server management-related reports.
com.cimmetry.jvueserver.lic
usage
Displays information related to the usage of AutoVue Server (opening and closing
sessions and documents).
com.cimmetry.jvueserver.con
figuration
Displays reports on loading errors of the server's configuration.
com.cimmetry.jvueserver.eve
nt
Displays information concerning posting and handling of different server events
(opened and closed sessions, opened and closed documents, and so on).
com.cimmetry.jvueserver.cac
he
Displays information concerning the server's cache. Reports messages and errors
related to loading the cache, locking, saving, deleting cached files as well as
searching for archive and XRef files.
log4j.category.com.cimmetry
.connection
Displays information concerning downloading files from the network.
com.cimmetry.jvueserver.ses
sion
Displays reports on sessions opening, closing and being restored, and the loading
and saving of session profiles.
com.cimmetry.jvueserver.doc
ument
Displays document-related information (open, information, properties, and so
on).
com.cimmetry.jvueserver.doc
ument.native
Displays messages and error reporting for document related native code
execution..
com.cimmetry.jvueserver.dms
Displays DMS-related operations (open, download, save, properties, and so on).
com.cimmetry.jvueserver.mob
ilepack
Displays information concerning generation and usage of mobile packs.
Oracle Corp.
AutoVue
81
com.cimmetry.jvueserver.str
eamingfile
Displays information concerning generation and usage of streaming files.
com.cimmetry.jvueserver.col
laboration
Displays all server-side collaboration activity.
com.cimmetry.jvueserver.col
laboration.jxta
Displays all messages regarding JXTA connection handling for real-time
collaboration.
com.cimmetry.jvueserver.col
laboration.rmi
Displays all messages regarding RMI connection handling for real-time
collaboration.
com.cimmetry.jvueserver.con
sole
Displays messages on server console loading, connecting information and Server
Console Frame errors.
com.cimmetry.frontend
Displays all messages and errorr reported from the AutoVue client.
You can specify what kind of information to output by setting the classes to one of the following information levels:
Information Level
Description
INFO
Displays informative messages such as session information, document open requests.
WARN
Displays error messages that are caused by factors external to AutoVue server such as RMI ports
already in use.
ERROR
Displays errors or exceptions that are related to server startup.
OFF
Turn logging off. This is the default value.
Note: If you need more specific error messages, you can turn on verbosity for specific classes.
For Example:
com.cimmetry.jvueserver.management=INFO
com.cimmetry.jvueserver.session=WARN
com.cimmetry.jvueserver.document=ERROR
com.cimmetry.jvueserver.dms=ALL
These four lines mean that session information will be displayed for the management class, warning messages will
display for the session class, error messages pertaining to document requests will display for the document class. For
the com.cimmetry.jvueserver.dms package, all messages be reported.
Refer to the Apache Web site and log4j documentation for more information.
Oracle Corp.
AutoVue
82
Appendix I: List of INI Options
In the following sections, option section headers are indicated in brackets []. Section headers in the INI file must be
specified in brackets. The options for the section are discussed in the table below the section header.
Note: When you add multibyte paths or INI option values to INI files, make sure to save the files with Unicode
encoding.
allusers.ini and default.ini Options
When users connect to the AutoVue server for the first time (for example, when profiles are created for the first time),
the contents of default.ini are copied to the users’ own INI file (“username”.ini).
If you want all users that connect to AutoVue to have the same initial default options, specify these options in
default.ini. When users connect to the AutoVue server, options set in allusers.ini are transferred to the user profile.
If you want set options for specific users only, you can do so by adding required options to their “username”.ini files.
The options set in allusers.ini always override user profile settings.
All INI options described in this appendix can be set in allusers.ini or default.ini or user-specific INI files.
Acrobat PDF Options
Configure options for Adobe PDF files.
[Options]
Parameter
Description
Default
PDFCUSTOMRESOLUTION=<val
>
When viewing PDF documents, specify a resolution at which to display
the documents. This corresponds to Adobe’s resolution setting
(Preferences > Page Display > Resolution). This resolution setting
determines the zoom level at which AutoVue displays PDF documents
(same behaviour as Adobe).
val can be any value between 10 nd 4800.
When val is <=0, use system screen resolution.
110
PDFENHANCELINES=[0|1]
If set to 1, this option results in enhanced line display similar to the
Adobe Acrobat option Enhance Thick Lines. This option is useful for
cases when lines start to disappear in the AutoVue display when
zooming out.
If set to 0, this option is disabled and the line display is not enhanced.
0
PDFMAXIMAGESIZEMB = [val]
Allows users to set the maximum image size (in Mbytes) of large
bitmaps in PDF files after which the PDF decoder starts reducing
resolution to reduce memory use.
150
Oracle Corp.
AutoVue
83
Allegro Options
Configure options for Allegro files.
[ECAD]
Parameter
Description
Default
ALLEGRO_USETRUETYPEFON
TS = [0|1]
Set to 0 to use stroke font.
Set to 1 to use true type to use true type font instead (increases
performance).
0
ECAD_3D_SHOWHOLES = [0|1]
Set to 1 if you want holes to be drawn in the 3D model.
Set to 0 if you do not want holes to be drawn in the 3D model (increases
performance). Currently only affects Allegro files.
0
AutoCAD Options
Configure options for AutoCAD drawings.
[Options]
Parameter
Description
Default
ACAD_FAST3D=[0|1]
Set to 1 to improve rendering speed of AutoCAD 3D.
Note: Setting this option to 1 means that layers will not be listed and
AutoVue streams all meshes and extrusions in one body.
Set to 0 will mean slower rendering of AutoCAD 3D. However, layer
information is listed and each mesh is streamed in its own entity.
0
ACAD_MAXNUMLINETYPECY
CLES = [0-1000]
Specifies the maximum number of times a line type pattern can be
repeated for a particular entity segment.
Note: Any entity segment that has more cycles than then specified line
type is drawn with a solid line type.
256
ACAD_PENSETTINGSAFFECTLI
NEWIDTH=[0|1]
Option is for AutoCAD drawings.
When set to 0, pen settings do not affect non-zero constant width
polylines.
When set to 1, pen settings affect non-zero constant width polylines.
0
ACAD2004RGBCOLOR=[1|0]
Set to 1 to use RGB color.
Set to 0 to use AIC (AutoCAD Indexed Color).
Note: Should be set to 0 to be able to use pen settings for printing.
Note: This is for AutoCAD files, version 2004 and later.
1
ACADDEFAULTFONT=[fontname
]
This font is substituted if an 8-bit font is not located for AutoCAD
drawings.
ACADDEFAULTBIGFONT=
[bigfontname]
This font is substituted if a 16-bit font is not located.
ACADDEFAULTSHAPEFONT=[fi
lename]
Specifies the default shape font filename that should be used if the
desired shape font file and an equivalent AutoVue font cannot be found.
You can specify a full file path or just the file name. The decoder
searches for the font file name in the file path (if provided), the base file
folder, XFONTPATHS, and the fonts directory of the installation.
Oracle Corp.
AutoVue
84
Parameter
Description
Default
DRAWORDER=[0|1]
Set to 1 to draw sorted (ordered) entities from the last save of the DWG
file.
Set to 0 to draw entities in the order they were first created.
1
FIELDDISPLAY = [0|1]
Specify whether or not field backgrounds display.
Set to 1 to display field background.
Set to 0 to hide field background.
Note: For AutoCAD 2005 and later.
1
LWDEFAULT = [1-100]
Set the default line weight.
Specify a value between 1 (which corresponds to 0.01mm) and 100
(which corresponds to 1mm).
Default value is 25 (which corresponds to 0.25mm).
25
LWDISPLAYSCALE=[0-100]
This option controls the display scale of line weights in the modelspace
page for AutoCAD files version 14 and above.
Set this option to [0-100].
For no line weight scaling, set this option to 25.
For thicker lines, set this option above 25.
For thinner lines, set this option below 25.
25
SHOWALLLAYERS=[0|1]
Set to 1 to turn on all the layers in the base and XRef files.
0
SHOWNONRECTVIEWPORTS =
<0|1>
In AutoCAD it is possible to create non-rectangular viewports. When a
file has non-rectangular viewports, it may take AutoVue longer to
display the drawing.
Set to 1 to display non-rectangular viewports.
Set to 0 to disable display of non-rectangular viewports and improve
performance. Note that the accuracy of the display will be
compromised.
Note: This options applies to AutoCAD 2000 and up files.
1
Autodesk DWF Options
Configure options for Autodesk DWF files.
[Options]
Parameter
Description
Default
DWFRGBCOLOR=[0|1]
Set to 1 to use RGB color.
Set to 0 to use AIC (AutoVue Indexed Color).
Note: Should be set to 0 to be able to use pen settings for printing.
1
Oracle Corp.
AutoVue
85
Parameter
Description
DWFCOLORTBL=[file path]
Option is applicable only when DWFRGBCOLOR=0.
Specify the path and the name to a color table. Specified color table
overrides the palette stored in the DWF file.
If no external palette is specified, the default palette stored in the DWF file
will be used.
Here are some of the common colors and their corresponding pen numbers:
0,0,0
/* 0, Black */
128,128,128 /* 248, Gray */
255,0,0
/* 190, Red */
0,255,0
/* 40 Green */
255,255,0
/* 251, Yellow */
0,0,255
/* 15, Blue */
255,0,255
/* 195, Violet */
0,255,255
/* 45, Cyan */
255,255,255 /* 225, White */
Default
Autodesk Inventor Options
Configure options for Autodesk Inventor file.
[Options]
Parameter
Description
Default
AIBACKGROUND=
[0|1]
Set to 1 to draw background sheet.
Set to 0 to draw the outline only.
Note: Option applicable to AutoDesk Inventor 2D versions 6 and later.
1
AILOADNATIVE2D=
[0|1]
Set to 1 to Read native data for Inventor 2D.
Set to 0 to read embedded DWF information. If DWF information is not stored in
the Inventor 2D file, then native support will be activated automatically.
Note: Option applicable to Inventor 2D versions 6 and later.
1
Cadence Options
Configure options for Candence Concept HDL file.
[ECAD]
Parameter
Description
CADENCE_CALLOUTS
FILE = [file path]
Specifies the full path to a callouts file. The callouts file is used to create abstract
mechanical part entities for the design
CADENCE_CONCEPT
HDLONLY=[0|1]
Set to 1 so that PCB boards should not be displayed.
0
CADENCE_CPMONLY=
[0|1]
Set to 1 to only display files listed in the CPM file.
1
Oracle Corp.
Default
AutoVue
86
Cadkey Options
Configure options for Cadkey files.
[Options]
Parameter
Description
Default
PRTFONTMAP=
[fullpath to prtfont.map]
Specifies the full path to the Cadkey/PRT font map file. This file
maps Cadkey/PRT fonts to TrueType fonts.
The file Prtfont.map in the
program directory
CATIA Options
Configure options for CATIA 4 and 5 files.
Note: For CATIA 4-specific files see "CATIA 4 Options" and for CATIA 5-specific options see "CATIA 5 Options".
[Options]
Parameter
Description
Default
CATIALOADPMI = [0|1]
Set to 1 to enable displaying of PMIs.
Set to 0 to disable displaying of PMIs.
1
CATIA 4 Options
Configure options for CATIA 4-specific files.
[Options]
Parameter
Description
Default
CATIA4SPLINEGEOMETRY
= [0|1|2]
Specify the geometry representation in the loaded model. There are two
representations for geometry: analytical and spline geometry. Set the value
for the preferred representation:
0: Analytical representation is preferred.
1: In some cases spline geometry will be selected.
2: Spline geometry is preferred.
0
CATIAPROJECTFILE=[file
path]
Specify the full path to the CATIA 4 project file.
LOADCATIAWIRES=[0|1]
Set to 0 to disable display of 3D wires for CATIA 4 3D.
CATIADEFAULTFONT
Specify the default Catia 4 native font to use if a font is not found.
CATIAFILTERNONROOT=
[0|1]
Set to 0 to display root entities for CATIA 4 3D.
1
CATIAFILTERNOSHOWS=
[0|1]
Set to 0 so that no show entities are displayed for CATIA 4 3D.
1
CATIAIGNOREPROJECTIO
NLAYER=[0|1]
Set to 1 to support projected view visibility through draft view layer settings
for CATIA 4 drawings
0
Oracle Corp.
1
AutoVue
87
Parameter
Description
CATIAPROJECTFILEPATH =
[file path]
Specify the directory path for the location of project files. If the option is set,
it will override the existing INI option CATIAProjectFile. Otherwise if the
option is not set or project file(s) cannot be found in the specified directory,
the old option (CATIAProjectFile) will be used.
Default
Note: Mapping for CATIA 4 fonts is specified in file CATIAv4.fontmap located in the <install directory>\bin\fonts.
This font map is used to map font name to corresponding font resources so that text strings will be displayed properly
with correct characters. A requirement for this font map to work properly is the existence of the CATIA 4 project file.
CATIA 5 Options
Configure options for CATIA 5-specific files.
[Options]
Parameter
Description
Default
CATIA5BUILDCGMSETS = [0|1]
Controls the display of Geometrical sets.
Set to 1 to show geometrical sets structure in the Model Tree.
1
CATIA5BUILDIINVISIBLECGMB
ODIES = [0|1]
Set to 1 to process and display invisible BREP bodies for CATIA 5 files.
0
Parameter
Description
Default
CGMNOCLIP = [0|1]
Set to 0 to enable clipping in CGM files. Some files may display as
empty when the value is 0.
Set to 1 to disable clipping.
0
SHOWBACKGROUND=[0|1]
Set to 1 to display the background of CGM files with color.
Set to 0 if you have problems printing CGM files that contain large
black or dark backgrounds.
0
CGM Options
Configure options for CGM files.
[Options]
Oracle Corp.
AutoVue
88
DirectModel (JT) Options
Configure options for DirectModel (JT) files.
[Options]
Parameter
JTRESOLUTION = [HI |
MED | LO]
Description
When available, enables users to load the model’s high, medium, and low
resolution meshes.
Note: It is recommended to reduce the model’s resolution mesh to LO if
loading large complex assemblies degrades performance or utilizes
significantly high memory resources.
Default
HI
Excel Options
Configure options for Excel files.
[Options]
Parameter
Description
Default
DOCVIEW = [0|1]
Set to 1 to display an Excel file in Print Preview mode
Set to 0 to display as a regular spreadsheet.
0
DOCVIEWSHOWHEADERS =
[0|1]
Set to 1 to display headers when DOCVIEW = 1.
0
USESMALLFONTSFOREXCELS
MALLTEXT = [0|1]
Set to 1 so that the Excel Small Fonts font is used to display text at
small fonts sizes of 7 points or less (matching Excel behavior).
Set to 0 so that the Small Fonts font is not used.
Note: This parameter has effect only if the Small Fonts font is installed
on the system (it usually comes with Excel).
0
Gerber Options
Configure options for Gerber files.
[Gerber Format]
Parameter
Description
APERTURE_FORMAT_FILEPATH
=[file path]
Specifies the file path for the aperture format file.
ENDOFCOMMAND =
[ASTERISK | DOLLAR |
ENDOFLINE | AUTODETECT]
Specifies the end of command character if known. If end of command
character is not known, ENDOFCOMMAND can be set to
AUTODETECT mode.
Available values:
ASTERISK: End of command is *
DOLLAR: End of command is $
ENDOFLINE: End of command is the end of the line.
AUTODETECT: AutoVue automatically detects the end of command
character.
Oracle Corp.
Default
AUTODE
TECT
AutoVue
89
Parameter
Description
Default
INCREMENTALMODE = [0|1]
Set to 1 if data is in incremental mode.
0
MULTIQUADRANT_ARCS_BY_
DEFAULT = [0|1]
Specifies whether the default circular interpolation is multi-quadrant or
single-quadrant.
Set to 0 so that the circular interpolation is single-quadrant.
Set to 1 so that the circular interpolation is multi-quadrant.
0
NUMDECIMALS = [num]
Enter the number of decimals. Specify a value between 1 and 6.
3
NUMDIGITS = [num]
Enter the number of digits. Specify a value between 1 and 6.
2
TOOLFILEPATH =
[<filepath>\default.too]
Specifies the path to the aperture list file.
Web
Version:
<install
directory>\
jVue\bin\de
fault.too
Desktop
Version:
<install
directory>\
av\avwin\d
efault.too
TOOLFILETYPE=[0|1|2|3|4|5|6|7]
Specifies the type of aperture list file.
0 = CSI
1 = Orcad
2 = ECAM
3 = Protel
4 = Artwork
5 = Allegro
6 = Visula
7 = Autotrax
0
TRAILINGZEROS= [0|1]
Set to 1 if coordinate data is in trailing zeros format.
0
TOOL_UNIT=[-1|1|2|12]
Specify the unit for the tool and aperture file if unit is different from the
Gerber file.
-1 = Unspecified file unit. Aperture file will adopt the same unit as the
Gerber file.
1 = inches
2 = millimeters
12 = mil
-1
UNITS = [1|2]
Specifies the unit.
Set to 1 for inches (in).
Set to 2 for millimeters (mm).
1
Oracle Corp.
AutoVue
90
HPGL/HPGL2 Options
Configure options for HPGL/HPGL2 file.
[Options]
Parameter
Description
Default
CODEPAGE = [num]
Forces text display of a specific language. Specify the codepage to use for
hpgl files.
For example, set CODEPAGE = 932 to display Japanese text in HPGL
files.
For a full list of value, refer to the following Web sites:
http://www.microsoft.com/globaldev/reference/cphome.mspx
http://en.wikipedia.org/wiki/Code_page
HPBACKGROUND =
[0|1]
Set to 0 so that the page background is not drawn.
Set to 1 to draw page background.
Note: Applies to HPGL/HPGL2 files.
0
HPGLCOLORTBL =
[<file path>\hpglcol.tbl]
Specifies the color table for HPGL/HPGL2 files. The color table file
specifies the mapping between a pen number and a color.
Note: This option is used only if the file does not explicitly specify pen
colors with the HPGL PC command.
Web Version:
<install
directory>\jVue\
bin\hpglcol.tb
Desktop
Version: <install
directory>\av\av
win\hpglcol.tb
Oracle Corp.
AutoVue
91
IFC Options
Configure options for IFC 3D files.
[Options]
Parameter
Description
Default
IFCCOLORS
Specify group element colors for IFC files.
Syntax:
[Options]
IFCCOLORS=GROUP_ELEMENT_NAME(r,g,b)
or IFCCOLORS=GROUP_ELEMENT_NAME(color_name)
where GROUP_ELEMENT_NAME is the name of the group element. For
example DOORS, WINDOWS, WALLS
IFCCOLORS=
WALLSTANDARDC
ASES(255,255,255)
CURTAINWALLS(25
5,255,255)
DOORS(255,219,153)
OTHERS(0,255,255)
SLABS(205,91,69)
WALLS(255,255,255)
WINDOWS(122,197,
205)
(r,g,b) is the RGB value for the color
color_name is the string representing the color
All color definitions should be on the same line and should be separated by
spaces.
For example:
IFCCOLORS= WALLS(WHITE) DOORS(GREEN) WINDOWS(BROWN)
Special element name OTHERS is used for all elements that are not in the
color definition.
Special color NONE is used when you want to use the 3d default element
color for a group element.
IFC pre-defined color extension is defined as below:
Color Name
(R,G,B)
LIGHTCYAN
(188,255,255)
BROWN
(205,91,69)
LIGHTYELLOW
(255,219,153)
CADETBLUE
(122,197,205)
IFCCOLORS_MO
DE=[0|1|2|3]
Specify the mode of using default element colors.
Set to 0 to turn off default element colors.
Set to 1 to use default colors. File-defined colors are ignored.
Set to 2 to use default colors for elements without file-defined colors.
Set to 3 to use default colors for elements without file-defined colors, and to
replace elements defined as black.
3
IFCREADPROPE
RTIES=[0|1]
Enable or disable loading of attributes for IFC files.
Set to 1 to display all supported entity properties for an IFC file.
Set to 0 to display only the default entity properties which are Display Mode,
Name and Visibility.
1
IFCLOADINVISI
BLESPACES
=[0|1]
Enable or disable loading of internal spaces boundary geometry.
Set to 1 to enable loading of internal spaces boundary geometry.
Set to 0 to disable loading of internal spaces boundary geometry.
1
IFCWINDOW_TR
ANSPARENCY=[i
nt value]
Specify the transparency level for windows in IFC files.
Value is an integer between 0 (no transparency) and 100 (full transparency).
55
Oracle Corp.
AutoVue
92
JPEG Options
Configure options for JPEG files.
[Options]
Parameter
JPGQUANTIZE = [0|1]
Description
Default
Quantizes JPEG images to 256 colors for quicker display. Quantizing images
affects quality of the color display.
1
Set to 1 to quantize images.
Set to 0 to use true colors.
JPEG 2000 Options
Configure options for JPEG 2000 files.
[Options]
Parameter
Description
J2KRESOLUTION=
[DYNAMIC | HIGH |
MEDIUM | LOW | +num |
-num]
Set to HIGH to display with a high resolution. This could cause a decrease in
performance.
Other values: LOW, MEDIUM, and DYNAMIC.
You can also set J2KRESOLUTION values to +num or -num, where num is
a number between 1 and 100.
Setting the value to +num gives the same result as DYNAMIC but increases
the resolution by a factor of num where num is a value from 1 to 100 (up to
the maximum possible resolution of the image). Note that this will decrease
performance.
Setting to -num gives the same result as DYNAMIC but decreases the
resolution by a factor of num where num is a value from 1 to 100 (down to
the lowest possible resolution of the image). Note that this will increase
performance.
Default
DYNAMIC
ME10/OneSpace Designer Drafting Options
Configure options for ME10/OneSpace Designer Drafting files.
[Options]
Parameter
Description
Default
ME10CONSTRUCTION
GEOM = [0|1]
Set to 1 to draw construction entities for ME10 files.
1
ME10MULTIBYTE = [0|1]
This option sets the priority for glyph search in Multibyte/Singlebyte fonts.
Set to 0 if the file does not contain any Multibyte fonts (Far Eastern
Languages).
Set to 1 if the file contains a mixture of Singlebyte/Multibyte fonts.
0
Oracle Corp.
AutoVue
93
Parameter
Description
Default
ME10RGBCOLOR = [0|1]
Determine the mode of colors for ME10 files.
Set to 1 to use RGB colors.
Set to 0 to use AIC (AutoVue Indexed Color).
Note: When set to 0, you can customize file me10col.tbl to get desired pen
settings.
1
ME10SHOWVERTEX = [0|1]
Set to 1 to draw vertices for ME10 files.
0
MEFONTMAP = [<file
path>\mefont.map]
Specifies the full path to the ME10/OneSpace Designer Drafting (ME10)
font map file. This file maps ME10 fonts to the appropriate native ME10 font
files or TrueType fonts.
To use native ME10 fonts, you need to provide the appropriate font files.
This can be done:
•
By specifying the path to them using the INI option XFONTPATH.
Web
Version:
<install
directory>\
jVue\bin\m
efont.map
Desktop
Version:
<install
directory>\
av\avwin\
mefont.ma
p
Microsoft Outlook Options
Configure options for Microsoft Outlook MSG files.
[Options]
Parameter
Description
Default
OUTLOOKLINKFLAG=[0|1|2
|3]
Enable or disable hyperlinks or attachments in Outlook MSG files.
0 – Hyperlink on, Attachment on
1 – Hyperlink on, Attachment off
2 – Hyperlink off, Attachment on
3 – Hyperlink off, Attachment off
0
DOWNLOADWEBRESOUR
CES=[0|1]
Specifies whether external (files other than .msg files) resources are
downloaded and displayed.
Set to 1 to enable download and displaying of external resources.
Set to 0 to disable download.
Note: This option is not supported with AutoVue on Linux.
0
Oracle Corp.
AutoVue
94
MicroStation Options
Configure options for MicroStation files.
[Options]
Parameter
Description
Default
DGN_FAST3D = [0|1]
Set to 1 to improve rendering speed of MicroStation 7 and 8 files.
Note: Setting this option to 1 means that layer visibility will not be
supported and AutoVue streams all meshes and extrusions in one body.
Set to 0 will mean slower rendering of MicroStation 7 and 8 files.
However, layer visibility is supported and each mesh is streamed in its
own entity.
1
DGN8LWDISPLAYSCALE =
[0.0-1000.0]
Set to a floating point value, greater than or equal to 0.0, representing
the scaling factor which is applied to all lineweights in the drawing.
Example:
Set to 0.0: Reduces all lineweights to 0 (1 pixel width).
Set to 1.0: Lineweights remain at their default value.
Set to 0.5: Reduces all lineweights by half.
Set to 2.0: Multiplies all lineweights by 2.
1.0
DGN8XREFUNITS=[unit]
Specifies the unit to use for AutoCAD XRefs when units information
for the XRefs is not stored in the MicroStation drawing. The selected
unit should be the same as the unit chosen for the DWG in
MicroStation. Consult the MicroStation help for a complete list of units.
If the unit is not specified or an invalid value is entered, AutoVue reads
the units from the AutoCAD XRef and hence, XRefs may not be scaled
properly.
Example:
DGN8XREFUNITS = meters
Note: Option applies to MicroStation version 8 files with AutoCAD
XRefs.
DGNARABICFONTS = [0|1]
Support for Arabic fonts for MicroStation.
Set to 1 to specify right-to-left drawing.
DGNCOLORTBL = [<file
path>\color.tbl]
Specifies the full path to a MicroStation DGN color table file. This
option is used only if the MicroStation file does not have a color-table
element in it.
If a color-table element exists in the file, it will supersede this option.
Note: Option applies to MicroStation version 7 files.
DGNDEACTIVATELEVSYM
B = [0|1]
When MicroStation’s Settings\View Settings\Level Symbology flag is
set, all graphic entities are displayed using the level (the one the entity
belongs to) settings for color, line style and line width (the entity’s
symbology). This option is implemented to overwrite the Settings\View
Settings\Level Symbology flag and display a file using the individual
entity’s symbology.
Note: Option applies to MicroStation 7 and 8 files.
Oracle Corp.
0
0
AutoVue
95
Parameter
Description
Default
DGNDISABLEZCLIP = <0|1>
Specifies whether to take the z-axis into consideration when applying a
clip region (a cut-out region) to a 2D drawing.
Set to 1 if the contents of the clipped image should not be restricted
based on the z-coordinate of individual objects.
Set to 0 if the contents of the clipped image should be restricted based
on the z-coordinate of individual objects.
Note: This option only applies to 2D drawings; it is not considered
when loading a 3D model.
Note: Option applies to Microstation 7 files.
0
DGNFONTRSC = [<file
path>\font.rsc;full 2. . .]
Specifies a semi-colon separated list of the full paths to fonts for the
MicroStation font RSC files.
DGNIRASB = [0|1]
Set to 0 so that MicroStation raster hybrid files follow the I/RASB
conventions for raster extents.
Set to 1 if you find that the raster components of MicroStation files
appear stretched.
DGNLSTYLERSC =[<file
path>\style.rsc]
Specifies the full path to a MicroStation linestyle resource file that will
be used to render linestyles and multi-line patterns.
Note: Option applies to MicroStation 7 and 8 files.
DGNREFCYCLECHECK =
[0|1]
When set to 1, the decoder will check for circular references in
reference paths. Circular references will not be displayed, except for the
case where a given model references itself.
When set to 0, all references will be displayed, as long as nesting depth
permits.
Note: Option applies to MicroStation 8 files and corresponds to
MicroStation v8.5 environment variable MS_REF_CYCLECHECK.
1
DGNSHOWZEROLENGTHLI
NES = [0|1]
Set to 1 to display zero-length lines as fixed-sized filled squares.
Set to 0 to ignore zero-length lines.
Note: Option applies to Microstation 7 files.
0
DGNLSTYLEDASHDOT =[
description, number of
patterns, pattern1, pattern2,... ,
pattern6]
Defines up to seven line styles (indexed from 1 to 7). Each line style,
separated by a comma, can include up to six patterns. Each line style
must be preceded by a description and a number specifying the number
of patterns for the style.
Example:
DGNLSTYLEDASHDOT = style1,5,-1,1,0,-1,2,style2,3,2,-2,-2
In this example, two line styles (index 1 and index 2) are defined. the
line styles provided by this parameter replaces the default seven
standard styles. A line that uses style index that has not been provided is
displayed as a solid line (for example, a line with style3 when only two
styles have been defined).
Oracle Corp.
0
AutoVue
96
NC-Drill Options
Configure options for NC-Drill files.
[ECAD]
Parameter
Description
Default
NCD_UNITS=[1|2]
Specifies units for NC-Drill files.
1 = inches
2 = millimeters
1
NCD_TRAILINGZEROSOMIT
TED=[0|1|2|3]
0 = Coordinate data is trailing zero omitted
1 = Coordinate data is leading zero omitted
2 = Coordinate data is all digits present
3 = Coordinate data is explicit decimal point
0
NCD_COMMENTSYMBOL=[s
ymbol]
Specifies the comment symbol.
;
NCD_INCREMENTALMODE=
[0|1]
Set to 1 if data is in incremental mode.
0 = absolute mode
1 = incremental mode
0
NCD_NUMDIGIT=[0-6]
Specifies the number of digits. Enter a value between 0 and 6.
Note: Changing this value will affect the x, y coordinate.
2
NCD_NUMDECIMALS=[0-6]
Specifies the number of decimals. Enter a value between 0 and 6.
Note: Changing this value will affect the x, y coordinate.
4
NCD_APERTURE_FORMAT_
FILEPATH=[file path]
Complete path for Aperture format file. This file provides information on
how to read the tool file
NCD_TOOLFILEPATH=[file
path]
Complete path for Tool file.
OrCAD Layout Options
Configure options for OrCAD Layout files.
[ECAD]
Parameter
Description
Default
ORCAD_CUTOUT_COPPER
_POUR = [0|1]
Controls whether or not to display the copper pour cutouts for OrCAD
Layout files.
Set to 1 to display the copper pour cutouts.
Set to 0 to disable the display.
0
Oracle Corp.
AutoVue
97
Pro/ENGINEER Options
Configure options for Pro/ENGINEER files.
[Options]
Parameter
Description
Default
PROE2DLOADPICTURE = [0|1]
Set to 1 to load the preview data for Pro/ENGINEER 2D Drawings. If
preview does not exist, the 2D drawing will be generated from the 3D
Model.
0
PROE2DLOADSAVEDDISIPLAY
LISTS = [0|1]
Set to 1 to load the display list instead of generating the 2D drawing
from the 3D Model. Option applies to Pro/ENGINEER 2D files. If the
display list does not exist, the 2D drawing will be generated from the
3D Model.
1
PROE2DTANEEDGEDEFAULTST
YLE = [0-4]
Specifies the default line style for tangent edges if it is not saved in
the native file. The styles are:
0 - Solid
1 - Disabled
2 - Control
3 - Phantom
4 - Dimmed
0
PROE2DVIEWDEFAULTSTYLE =
[HIDDEN | WIREFRAME |
SHADING | NO HIDDEN]
Specifies a default style to display 3D projected views:
•
HIDDEN
•
WIREFRAME
•
SHADING
•
NO HIDDEN
NO HIDDEN
PROELANG=[native font]
Specifies the native font to use for Pro/ENGINEER 2D drawings.
Possible values are:
Korean/Japanese/Chinese_cn/Chinese_tw/Hebrew/Russian
Example:
ProELang = Chinese_cn
Font files to use should be defined in the proefont.map file located in
the jvue\bin\font subdirectory in the AutoVue installation directory.
Refer to proefont.map for more instructions regarding font mapping.
PROELOADCOSMETICS = [0|1]
Set to 0 to turn off display of datum cosmetics (coordinate system,
datum planes and datum axes and datum points).
1
PROELOADCOSMETICWIRES=[
0|1]
Set to 0 to turn off display of cosmetic wires.
1
PROELOADPMIDATA = [0|1]
Set to 0 to disable display of PMI entities.
1
PROEMASSPROPUSEMESH =
[0|1]
Set to 1 to compute mass properties (volume, surface area, mass,...)
using the mesh model.
Set to 0 to compute mass properties using the BRep model.
0
PROEPMIDIMTOLDISPLAY =
[0|1]
Set to 1 to display tolerance for dimension entities for Pro/
ENGINEER 3D files.
1
PROESHOWHIDDENLINEDASH
ED=[0|1]
This option controls the display and printing of hidden lines contained
in Pro/ENGINEER drawings.
Set to 1 to display and print hidden lines as dashed lines.
Set to 0 to display and print hidden lines as solid lines.
0
Oracle Corp.
AutoVue
98
SolidWorks Options
Configure the option for SolidWorks files.
[Options]
Parameter
Description
Default
SWWIRECOLORVISIBLE=[int
value]
Specifies the color to use for drawing Solidworks wireframe models for
Solidworks drawings. Value should be an integer value specifying the
RGB color.
0 (Black)
SWSHOWVIEWPORTBORDER =
[0|1]
Set to 1 to display the border (bounding box) of 2D views in a
SolidWorks drawing.
Set to 0 so that no border is drawn.
0
STEP Options
Configure options for STEP file.
[Options]
Parameter
Description
Default
STEPDETAILEDTREE = [0|1]
Set to 1 to show detailed tree for STEP 3D files.
0
STEPFACEPOSITIVECOLOR
=[0|1]
Option applies to STEP files.
Set to 1 so that AutoVue uses either the color for “.BOTH” sides of the face
if it is set or the color of the “positive” face side if it is set.
Set to 0 so that AutoVue uses either the color for “.BOTH” sides of the face
if it is set or selects the “positive” or “negative” face side color depending on
the face sense.
0
Text Options
Configure options for text files.
[Options]
Parameter
Description
CODEPAGE =[
num]
Forces text display of a specific language. Specifies the codepage to use for TXT files.
For example, set CODEPAGE = 932 to display Japanese text in TXT files.
For a full lists of value, refer to the following Web sites:
http://www.microsoft.com/globaldev/reference/cphome.mspx
http://en.wikipedia.org/wiki/Code_page
MAXPLAINTEXTP
AGES = [num]
Sets the maximum number of plain pages to be loaded to help improve performance.
The option only affects unformatted text; other types of documents (Word, RTF, and so
on) are not affected.
Note: Setting the option value to 0 or less results in the entire file loading.
Oracle Corp.
Default
1000
AutoVue
99
TIFF Options
Configure options for TIFF files.
[Options]
Parameter
Description
Default
TIFF_ZERO_PIXEL
= [BLACK | WHITE
| FILE]
Specifies how pixel values are interpreted in black and white TIFF files.
Set to BLACK to force zero pixels to display black.
Set to WHITE to force zero pixels to display white.
Set to FILE to force zero pixels to display as the pixel color specified in the file.
Note: This only applies to black and white TIFF images.
FILE
Visio Options
Configure options for Visio files.
[Options]
Parameter
Description
Default
VISIODRAWINGPAGE = [0|1]
Specify if you want to display Visio files in drawing mode or in print mode.
Set to 1 to display in print mode.
0
VISIOPAGE = [0|1]
0: Off
1: On. Displays the page outline and background.
0
VISIOPAGEBKCOLOR =
[num]
Used to turn ON/OFF the page background fill color for Visio files.
If set to the default -1, there will be no background.
You can specify an integer that represents an RGB color (Red + 256*Green
+ 65536*Blue). The values for Red, Green, and Blue range from 0 to 255.
Only the outline will be displayed if VISIOPAGE is on (=1).
-1
Word Options
Configure options for Microsoft Word files.
[Options]
Parameter
Description
Default
CUSTOMDOCFONTSUBSTITUTI
ON=[file path]
Specifies the path of the custom font mapping file (docfont.map) to
use for word documents.
The docfont.map contains font mapping information that identifies
what font to use if a font is missing. If you wish to modify font
mappings, update docfont.map
C:/<AutoVue
installation
directory>bin/
fonts
DOC_SHOWTABLEGRIDLINES
= [0|1]
Turn table grid lines on and off.
Set to 1 to display the table gridlines.
Set to 0 to hide the table gridlines.
Unlike cell borders, gridlines never print.
0
Oracle Corp.
AutoVue
100
General Options
Configure options that apply to parameters such as fonts, performance, and color
[Options]
Parameter
Description
Default
ANTIALIAS = [0|1]
Aliasing is the distortion of a continuous line due to the nature of screen
display, which relies on a matrix of pixels. Anti-aliasing visually
corrects this by introducing additional colored pixels to give the
impression of a continuous line or curve.
1
If set to 1, anti-aliasing is enabled.
If set to 0, anti-aliasing is disabled and degrades the quality of the
display.
ARCRESOLUTION = [num]
Indicates the degree increment used in rendering arcs. Value can be a
number from 0 to 10.
10
BRIGHTNESS = [value]
Specify the brightness value for the current control (this only affects
colored raster formats and vectors overlaying them).
Value can be an integer between -100 (black display) and 100 (white
display).
0
CLIPLIMIT = [num]
Reduce file loading time.
Set num to more than 1500: the clipping is performed on the server (in
"TILED" rendering format).
Set num to less than 1500: the clipping is performed on the client (in
“METAFILE(CMF)” rendering format).
1500
CONTRAST = [value]
Applies contrast to raster images. The value can range from 0 (low
contrast) to100 (high contrast).
0
CONVERTPDFTHROUGHPRINTI
NG = <0|1>
Specifies whether markups should be included as graphical
elements in the PDF or added as annotations to the PDF.
Set to 1 to add as graphical elements.
Set to 0 to convert to PDF annotations.
1
DEFAULTDOCPAGESIZE=[height
, width]
Specifies the page size in inches that AutoVue should use in order to
properly display text files.
Example:
DefaultDocPageSize = 11.0,8.5
will force AutoVue to display text files at a page size of 11x8.5 inches.
Note: This option is only for Text files and Microsoft Outlook
Messenger files.
DEFAULTFILEUNITS=[1|2|5|7|8|9|
10|11|12|14|15]
Specifies the unit to use if native file does not contain units information.
1 - inches
2 - millimeters
5 - centimeters
7 - meters
8 - kilometers
9 - feet
10 - yards
11 - miles
12 - mils
14 - microns
15 - microinches
Oracle Corp.
1
AutoVue
101
Parameter
Description
Default
DIBTRUECOLOR = [0|1]
Set to 1 to force rendering of 4-bit and 8-bit raster images on a 24-bit
pixmap.
0
DIGITSNUMBER
Specifies the number of decimals to display when measuring in
AutoVue.
6
DMSBROWSEUICOLUMNS=
[-1|0|numcolumns]
Option controls the number of custom columns to display in the file
open dialog when doing a DMS Browse.
Set to -1 to use the number of columns specified in the DMS GUI
definition
Set to 0 to not display custom columns
Set numcolumns to the number of columns you want to display.
Note: Option works only when
ENABLEUNIVESALFILECHOOSER=1.
-1
ENABLEIDENTICALPARTDETE
CTION=[0|1]
Optimizes the performance of loading 3D files.
Set to 1 to detect identical parts in a native file before streaming begins.
The detection helps to share more parts in the model and, as a result,
reduce the amount of streaming data. In some cases, this procedure may
become very slow and cause a critical slowdown in the loading of
native files in AutoVue.
Set to 0 to disable the procedure. By doing so, a memory increase on
client side is apparent, as is a slowdown in the loading time for native
files. As a result, performance is degraded except for files where this
procedure suffers from a critical slowdown(as mentioned above).
1
ENABLEUFCAUTOCOMPLETE=
[0|1]
Specifies whether to enable the filename auto-completion option for the
File Open dialog.
Set to 1 to enable filename auto-completion option.
Set to 0 to disable filename auto-completion option.
1
ENABLEUNIVERSALFILECHOO
SE=[0|1]
Set to 1 to display the dialog with “universal file opening” ability. This
dialog lets you browse server:// directories, local files, DMS systems.
Set to 0 to display the 19.3 and earlier file open dialog.
1
FASTDISPLAY = [0|1]
AutoVue renders the drawing ignoring some details in order to speedup
the rendering.
Set to 0 so that AutoVue performs a full rendering without any
optimization of the drawing of the primitives.
Set to 1 so that AutoVue performs the following optimizations when the
file is rendered in TILED mode:
•
Draw small text as boxes.
•
Ignore the line-style for small primitives and draw them with plain
style.
•
Ignore the point style for points and draw them in dot style.
0
FLIP = [0|1|2|3]
Specifies:
0 - none
1 - horizontal
2 - vertical
3 - both
0
FOLDERPERMISSIONS = [0|1]
Switch off the verification of client permissions for accessing the UNC
path.
Set to 1 to follow the standard folder permissions.
Set to 0 to allow the client to access file locations for which the client
does not have permissions.
1
Oracle Corp.
AutoVue
102
Parameter
Description
Default
FORCETOBLACK = [0|1]
Set to 1 to force all colors to black when displaying vector documents.
0
FULLCOLORPRINTERSUPPOAR
T = [0|1]
Enable color printing for some monochrome images.
Set to 0: Default AutoVue behavior; where some transparent
monochrome images are not printed in color due to some printers that
do not fully support transparency.
Set to 1: Enables certain monochrome images to be printed in color
with color printers. This flag should not be set by default because it has
some drawbacks and may cause some problems on some printers.
Enabling option 1 could cause a decrease in performance:
•
The spool size is much larger because there is 8 to 24 times more
information sent to the printer.
•
Not all printers support image transparency and using them with
this option may yield incorrect results.
0
INVERT = [0|1]
If 1, monochrome raster images are displayed inverted.
0
KEEPORIGINALCOLORS = [0|1]
Set to 1 to keep original colors - white graphics and black graphics will
always be drawn white and black respectively, even if the background is
white or black.
Set to 0 to invert colors for white and black graphics on white and black
background.
0
LOOKAHEAD = [1|0]
Enable look ahead rendering a Tiled mode.
0
NOSYMBOLTTF = [0|1]
Set to 1 to override the Charset of Symbol fonts. It will be replaced by
the default Charset. This option applies to DWF and DWG files only.
0
NOWINARCS = [0|1]
Set to 1 so that Windows GDI functions are not used to draw arcs.
Set to 0 so that Windows renders the arcs. This option is used for some
HP print drivers that do not properly render arcs and circles.
0
OVERLAYALPHAVALUE = [0|1]
Controls transparency of two overlaid tiff files.
Set to 1 so that the overlay is opaque.
Set to 0 so that the overlay is transparent.
Note: Use only for Autovue client on Java2.
0.5
PMITEXTRENDERINGSTYLE =
[0|1|2]
Specifies the text rendering style for PMI entities.
0 - Native Setting
1 - 3D
2 - Flat-to-screen
0
RASTERFIT = [0|1]
Set to 1 to fit the initial display of raster images to the screen.
Set to 0 so that the full resolution is shown.
1
RASTERMEMLIMIT = [n_kbytes]
Swaps raster data to disk when the Windows global memory heap falls
below n_kbytes.
6000
RASNOFORCETOBLACK = [0|1]
Set to 1 to disable Force to Black for raster overlays and raster files.
Note: Option is applicable only when FORCETOBLACK = 1.
0
REPLACEMENTFONTS=font1;fon
t2;...;fontn
Specifies a list of replacement TrueType fonts to use when required
TrueType fonts do not have the required glyphs.
This option applies to all 2D vector formats containg non-English
TrueType text.
Specify a semicolon (;) separated list of font face names.
REQUESTTIMEOUT = [timeout
value in milliseconds]
Partial results polling timeout in milliseconds.
Oracle Corp.
500
AutoVue
103
Parameter
Description
Default
RESETROTATEAANDFLIP=[0|1]
This option allows the user to choose rotation and flip settings when
viewing files.
Set to 1 to render the file with no rotation and no flipping. If native file
itself is rotated or flipped, native file settings take precedence and file is
rendered with saved rotation/flip.
Set to 0 to render the file with the rotation and flip settings defined in
AutoVue GUI or in AutoVue INI file.
1
RESOLUTION = [1|2|3|4]
If 3DPOLICYMANAGER = 1, set load resolution.
1 = Low
2 = Medium
3 = High
4 = Very High
2
RESOLVERESOURCES = [0|1]
Enable/disable resource file lookup by the client.
Set to 1 so that the client will try to locate resource files,
Set to 0 so that the client will never receive a request to
resolve resources.
1
RESOURCERESOLVINGTIMEOU
T=[time in seconds]
Specifies the timeout for resource resolving callback. After the timeout
has elapsed, resource resolving callback will not wait for a response
from the client, it will continue execution without attempting to resolve
any more resources on the client.
60
ROTATE = [degrees]
Specifies the degrees of rotation as 0, 90, 180 or 270.
0
SELECTIONHIGHLIGHT = [0|1]
Specifies selection highlight mode.
0: Bounding box
1: Entity default color
SHOWDIMENSION = [0|1]
Set to 1 to show dimension entities. Otherwise, they are not shown.
1
SHOWFILL = [0|1]
Set to 0 to display only the outlines of filled entities (solids, fat
polylines, and so on).
Set to 1 so that the entities are shown as filled.
1
SHOWHATCHING = [0|1]
Set to 0 so that the FILLMODE system variable (AutoCad) and the
Hatch display are turned off.
Set to 1 so that the Hatch entities are displayed.
1
SHOWLINESTYLE = [0|1]
Set to 1 to show linestyle patterns.
Set to 0 so that linestyles are displayed as solid lines.
1
SHOWLINEWEIGHT = [0|1]
Set to 1 to display varying line thicknesses.
Set to 0 so that no line weights are displayed for any lines (all lines
appear equal).
1
SHOWTEXT = [0|1]
Set to 1 so that text entities are shown.
1
SHOWTREE = [0|1]
Set to 1 to display tree.
Set to 0 to switch off the tree display.
1
SHOWXREFS = [0|1]
Set to 1 so that external reference files are shown.
1
SHOW_POINTOPOINT_PAGE =
[0|1]
Set to 1 to hide the Point to Point distance tab.
Set to 0 to display the Point to Point distance tab.
Note: When snapping to an edge with the Point to Point distance tab
enabled, the distance is measured from the exact point you click on the
drawing (rather then the midpoint).
0
Oracle Corp.
AutoVue
104
Parameter
Description
Default
SMOOTHSHADING = [0|1]
Set to 1 to enable smooth shading of 3D display.
1
STATUSBARPATHPREFERREDW
IDTH = [numeric value]
Specifies the character width of the file name field in the status bar.
When you specify a value for StatusBarPathPreferredWidth, it controls
the proportion of the file name field with respect to the other fields
displayed in the status bar. The file name field width will vary when
loading different types of formats or if the applet size changes. This is
because the value specified controls the proportion and does not set it to
a fixed width.
Note: To be able to display 56 characters in the file name field
(STATUSBARPATHPREFERREDWIDTH=56), the client applet width
must be greater than 800 pixels when all the default fields are displayed
in the status bar.
12
TEXTBITMAPRENDERING=[0|1]
Set to 1 to render small text glyphs using bitmaps.
Set to 0 so that text is not rendered using bitmaps.
Note This option may affect most text in PDF, TrueType text in ME10,
and PostScript text in CATIA5.
1
TILEMODE = [-1|0|1]
1: Specifies model space
0: Specifies paper space
-1: Specifies automatic
-1
USESERVERBANDING = [0|1]
Banding during native printing is done on the client.
Set to 1 to force banding on the server.
0
USERXFONTPATHS = [semicolon
separated list of paths]
Specifies the paths for external font lookup on the client side. The path
appears in the Configuration dialog in General > Font Paths.
USERXREFPATHS = [semicolon
separated list of paths]
Specifies the paths for XRef lookup on the client side. The path appears
in the Configuration dialog in General > XRef Paths.
VECTORFIT = [0 |1]
Set to 1 so that Vector files are "Auto-Fit" once they are loaded.
0
VECTORMEMLIMIT = [n_kbytes]
Swaps vector data to disk when the Windows global memory heap falls
below n_kbytes.
4096
XFONTPATHS = [paths]
Specifies a semicolon-delimited list of directories to search for external
fonts.
XREFPATHS = [paths]
Specifies a semicolon-delimited list of directories to search for external
references.
ZOOMBOXENABLED=<0|1>
When a file is opened, this parameter sets the default mode of the
mouse pointer to a zoom box.
Note: This parameter only works with non-3D designs.
Set to 1 to set the default mode of the mouse pointer to a zoom box.
Set to 0 to disable option.
Oracle Corp.
1
AutoVue
105
Base Font
Specify base font to be used for ASCII files.
[BASEFONT]
Parameter
Description
FACE=[font style]
Specifies font style.
ISITALIC=[0|1]
Specifies if font is italic.
SIZE = [num]
Specifies font height.
WEIGHT = [num]
Specifies font weight.
FROMPAGE = [num]
Indicates the starting page number of the print range.
Default
UI Color Options
Specify background color to be used for different file formats.
Note: For parameters in the following table, specify an integer that represents an RGB color (Red + 256 * Green +
65536*Blue). The values for Red, Green, and Blue range from 0 to 255.
[UI Colors]
Parameter
Description
BKCOLORARCHIVE
Specifies background color for archive files.
BKCOLORDATABASE
Specifies background color for database files.
BKCOLORDOCUMENT
Specifies background color for PDF format.
BKCOLOREDA
Specifies background color for EDA files.
BKCOLORCOLORRASTER
Specifies background color for raster formats.
BKCOLORMONORASTER
Specifies background color for monochrome raster formats.
BKCOLORNOFILESET
Specifies background color when no file is open in AutoVue.
BKCOLORSPREADSHEET
Specifies background color for spreadsheets.
BKCOLORTHUMBNAILS
Specifies background color for thumbnails.
BKCOLORVECTOR
Specifies background color for vector formats.
Oracle Corp.
Default
0
AutoVue
106
AutoVue Mobile Options
Configure the parameters for AutoVue Mobile.
[AutoVueMobile]
Parameter
Description
Default
MRKPOLICYFILE=[<file
path>\markuppolicy.xml]
Specifies the path to the Markup Policy XML file for the
Mobile Pack.
<AutoVue
Installation>\bin\markuppolicy.x
ml
FILESTREAMENCRYPTI
ON=[RC4|3DES]
Specifies encryption algorithm for both Markup and
Mobile Pack password protection.
RC4
Parameter
Description
Default
FILESTREAMENCRIPT
ION=[RC4|3DES]
Specifies encryption algorithm for both Markup and Mobile Pack password
protection.
RC4
[Options]
Parameter
Description
Default
MAILINSEPARATEPRO
CESS=[0|1]
Specifies whether to send mail in a new process or to send mail in the current jvm
process.
Note: This option is available only when MAPI is supported.
Set to 1 to send out mail in a new process or system call.
Set to 0 to send out mail in the current jvm process.
If the current mail client is Lotus Notes, mail will be sent out in a new process
regardless of whether this option is enabled or disabled.
1
MAILERPATH=[file
path]
Specifies the path to the mail client executable. Once the path is entered, it is saved
in the user’s profile.
If no path is specified, a dialog box appears prompting for the file path.
Note: This option is available only when MAPI is not supported.
MAILERTYPE=[auto |
mozilla | thunderbird |
evolution]
Specifies the type of mailer application once the full path of the mail client is
obtained.
•
When the parameter is set to mozilla, thunderbird, or auto, and the mail file
path contains mozilla or thunderbird, the mail client will default to thunderbird.
•
If the mail client is neither mozilla, thunderbird, or evolution, a standard mail
message is constructed.
Note: This option is available only when MAPI is not supported.
Note: Evolution is only for clients on a Linux system.
Oracle Corp.
auto
AutoVue
107
Company Wide Policy
Configure AutoVue Mobile parameter for Company Wide policy.
[AutoVueMobile]
Parameter
Description
EXPIREAFTER=[num]
Set the expiry date for the Mobile Pack.
For example, ExpireAfter=10 results in the Mobile Pack expiring 10 days after
creation.
INCLUDESTREAMING
FILE=[0|1]
Set to 1 to only include the streaming file in Mobile Pack.
Set to 0 to exclude the streaming file from Mobile Pack. Therefore, the native file
is only included in the Mobile Pack.
RENDITION=
[None|PDF|TIFF]
Set to include or exclude rendition for the Mobile Pack.
Set to None to exclude any rendition.
Set to PDF to include PDF rendition.
Set to TIFF to include TIFF rendition.
Default
0
3D Options
The parameters in the following table apply to 3D files.
[Options]
Parameter
Description
Default
3DMASSPROP_MESH_BEH
AVIOR = [0|1|2]
Specifies how to handle mesh when computing mass properties.This option
can have of the following values:
0 - Exclude from mass property computation.
1- Include in mass property computation.
2 - Handle selection: Include in mass property computation only if the
selection is fully made with mesh bodies.
1
3DMASSPROP_SHEET_BEH
AVIOR = [0|1|2]
Specifies how to handle sheet when computing mass properties. This option
can have of the following values:
0 - Exclude from mass property computation.
1- Include in mass property computation.
2 - Handle selection: Include in mass property computation only if the
selection is fully made with sheet bodies.
2
3DPOLICYMANAGER =
[0|1]
Set to 1 to enable dynamic loading of 3D models.
Set to 0 to loads incrementally.
1
AXESSIZE = [value]
Enables you to resize the 3D axes.
Example:
If you set AxesSize=0 the default 3D axes will display. If you assign a value
greater than 0, the size of the 3D axes will change accordingly.
Suggested value=45.
90
Oracle Corp.
AutoVue
108
BKIMAGES=[path1,
position1, stretch1; path2,
postion2, strech2; ...]
Displays a list of images in the 3D background. Can include a semi-colon
separated list of images.
Path values: May be absolute and relative to the start directory of the
application or module directory.
Position values: CENTER, TOP, BOTTOM, LEFT, RIGHT, TOP_LEFT,
TOP_RIGHT, BOTTOM_LEFT, or BOTTOM_RIGHT.
Stretch Values: NONE (no stretching), FILL (fills the screen and does not
respect image ratio), UNIFORM (displays full image and respects image
ratio), and UNIFORM_TO_FILL (fill the screen and respects image ratio).
BKTYPE
Specifies the type of 3D background. Three classes of values: radial
gradient, directional gradient, and plain color (default value).
Radial gradient values: CENTER, TOP, BOTTOM, LEFT, RIGHT,
TOP_LEFT, TOP_RIGHT, BOTTOM_LEFT, or BOTTOM_RIGHT.
Directional gradient values:
An integer value (angle in degrees). Note that 0 is in the “3 o’clock”
direction and that the angles rotate CCW.
PLAIN
DYNAMICRENDERING =
[0|1|2]
Specifies mode for dynamic rendering of 3D.
0 - current render mode
1 - Flat Shading
2 - Wire Polygons
0
FORCEPMISZORDER = [0|1]
Invalidate the PMI_ATTRIB_RENDERABOVEMODEL generic attribute
effect: 3D PMIs are not forced above the model and may be occluded by it,
depending on its orientation.
0
LOADFACETEDDATA = [0|1]
Set to 1 if you wish to read Mesh data for 3D files.
Set to 0 if you wish to read BRep data for 3D files.
0
MESHBUILDTOPOLOGY =
[0|1]
Set to 1 to build the topology in mesh mode.
Set to 0 if you do not want to build the topology in mesh mode. Note that
building topololgy for meshes impacts load and rendering times (especially
for large mesh parrts and complex assemblies).
1
Applies to the following file formats:
•
AutoCAD
•
Catia 4
•
Catia 5
•
DirectModel (JT)
•
DWG
•
DWF3D
•
Microstation
•
ProEngineer
•
SolidWorks
•
Unigraphics
•
STL
•
IFC
Note: This option replaces the following INI options:
SWBUILDMESHTOPOLOGY, Catia5MeshBuildTopology and
BUILDMESHTOPOLOGY.
MESHRESOLUTION = [LOW
| MEDIUM | HIGH |
VERYHIGH]
Oracle Corp.
Specifies the default mesh resolution for 3D files.
Note that the higher the mesh resolution, the more time required to load the
image.
Set to LOW for low mesh resolution.
Set to MEDIUM for medium mesh resolution.
Set to HIGH for high mesh resolution.
Set to VERYHIGH for very high mesh resolution.
LOW
AutoVue
109
NOACCELERATION = [0|1]
Set to 1 to disable OpenGL acceleration.
It is recommended setting to 1 if 3D files are displaying blank or vector files
are not displaying properly or if markup entities are not completely visible.
Note: If you have a poor graphics cards, OpenGL acceleration could slow
down performance for big 3D models.
1
SHOWGLOBALAXES = [0|1]
Set to 1 to display global axes for 3D models.
1
USEMESHCACHE = [0|1]
Set to 1 to enable using hard drive to cache mesh data when loading 3D files.
When memory is insufficient, data is dumped to disk.
Note: Option should be used when loading large 3D models.
0
3D PMI Options
Configure options to control visibility of PMI entities for 3D files.
[PMI]
Parameter
Description
Default
COORDINATE_SYSTEM_
TREE_VIS = [0|1]
Set to 1 to display datum coordinate system entities in the tree.
Set to 0 to hide datum coordinate system entities from the tree.
1
COORDINATE_SYSTEM_
VIEW_VIS = [0|1|2]
Set to 2 to set the visibility of datum coordinate system entities to the last
saved state in the native application.
Set to 1 to display datum coordinate system entities.
Set to 0 to hide datum coordinate system entities from the display.
2
DATUM_FEATURE_
SYMBOL_TREE_VIS = [0|1]
Set to 1 to display datum feature symbol entities in the tree.
Set to 0 to hide datum feature symbol entities from the tree.
1
DATUM_FEATURE_
SYMBOL_VIEW_VIS =
[0|1|2]
Set to 2 to set the visibility of datum feature symbol entities to the last saved
state in the native application.
Set to 1 to display datum feature symbol entities.
Set to 0 to hide datum feature symbol entities from the display.
2
DATUM_TARGET_TREE_
VIS = [0|1]
Set to 1 to display datum target entities in the tree.
Set to 0 to hide datum target entities from the tree.
1
DATUM_TARGET_VIEW_
VIS = [0|1|2]
Set to 2 to set the visibility of datum target entities to the last saved state in
the native application.
Set to 1 to display datum target entities.
Set to 0 to hide datum target entities from the display.
2
DIMENSION_TREE_VIS =
[0|1]
Set to 1 to display dimension entities in the tree.
Set to 0 to hide dimension entities from the tree.
1
DIMENSION_VIEW_VIS =
[0|1|2]
Set to 2 to set the visibility of dimension entities to the last saved state in the
native application.
Set to 1 to display dimension entities.
Set to 0 to hide dimension entities from the display.
2
FEATURE_CONTROL_
FRAME_TREE_VIS = [0|1]
Set to 1 to display datum feature control frame entities in the tree.
Set to 0 to hide datum feature control frame entities from the tree.
1
FEATURE_CONTROL_
FRAME_VIEW_VIS = [0|1|2]
Set to 2 to set the visibility of datum feature control frame entities to the last
saved state in the native application.
Set to 1 to display datum feature control frame entities.
Set to 0 to hide datum feature control frame entities from the display.
2
LINE_WELD_TREE_VIS =
[0|1]
Set to 1 to display lineweld entities in the tree.
Set to 0 to hide lineweld entities from the tree.
1
Oracle Corp.
AutoVue
110
Parameter
Description
Default
LINE_WELD_VIEW_VIS =
[0|1|2]
Set to 2 to set the visibility of lineweld entities to the last saved state in the
native application.
Set to 1 to display lineweld entities.
Set to 0 to hide lineweld entities from the display.
2
LOCATOR_TREE_VIS = [0|1]
Set to 1 to display locator entities in the tree.
Set to 0 to hide locator entities from the tree.
1
LOCATOR_VIEW_VIS =
[0|1|2]
Set to 2 to set the visibility of locator entities to the last saved state in the
native application.
Set to 1 to display locator entities.
Set to 0 to hide locator entities from the display.
2
MEASUREMENT_POINT_
TREE_VIS = [0|1]
Set to 1 to display point measurement entities in the tree.
Set to 0 to hide point measurement entities from the tree.
1
MEASUREMENT_POINT_
VIEW_VIS = [0|1|2]
Set to 2 to set the visibility of point measurement entities to the last saved
state in the native application.
Set to 1 to display point measurement entities.
Set to 0 to hide point measurement entities from the display.
2
NOTE_TREE_VIS = [0|1]
Set to 1 to display note entities in the tree.
Set to 0 to hide note entities from the tree.
1
NOTE_VIEW_VIS = [0|1|2]
Set to 2 to set the visibility of note entities to the last saved state in the native
application.
Set to 1 to display note entities.
Set to 0 to hide note entities from the display.
2
REFERENCE_GEOMETRY_
TREE_VIS = [0|1]
Set to 1 to display reference geometry entities in the tree.
Set to 0 to hide reference geometry entities from the tree.
1
REFERENCE_GEOMETRY_
VIEW_VIS = [0|1|2]
Set to 2 to set the visibility of reference geometry entities to the last saved
state in the native application.
Set to 1 to display reference geometry entities.
Set to 0 to hide reference geometry entities from the display.
2
SPOT_WELD_TREE_VIS =
[0|1]
Set to 1 to display spotweld entities in the tree.
Set to 0 to hide spotweld entities from the tree.
1
SPOT_WELD_VIEW_VIS =
[0|1|2]
Set to 2 to set the visibility of spotweld entities to the last saved state in the
native application.
Set to 1 to display spotweld entities.
Set to 0 to hide spotweld entities from the display.
2
SURFACE_FINISH_TREE_
VIS = [0|1]
Set to 1 to display surface finish entities in the tree.
Set to 0 to hide surface finish entities from the tree.
1
SURFACE_FINISH_VIEW_
VIS = [0|1|2]
Set to 2 to set the visibility of surface finish entities to the last saved state in
the native application.
Set to 1 to display surface finish entities.
Set to 0 to hide surface finish entities from the display.
2
WIRE_TREE_VIS = [0|1]
Set to 1 to display wire entities in the tree.
Set to 0 to hide wire entities from the tree.
1
WIRE_VIEW_VIS = [0|1|2]
Set to 2 to set the visibility of wire entities to the last saved state in the native
application.
Set to 1 to display wire entities.
Set to 0 to hide wire entities from the display.
2
Oracle Corp.
AutoVue
111
3D Export Options
Configure the parameters in the following table for 3D export options
[Export Options]
Parameter
Description
Default
EXPORTTESSELL
ATIONTOL=[val]
Control the mesh density when converting to 3D STL. Meshes are more dense if
tolerance value is smaller.
Note: Val can be 0.01, 0.005, 0.001, 0.0001
0
3D Color Options
Note: For parameters in the following table, specify an integer that represents an RGB color (Red + 256 * Green +
65536*Blue). The values for Red, Green, and Blue range from 0 to 255.
[Options]
Parameter
Description
BACKGROUNDCOLOR
Specifies background color for 3D models.
ENTITYDEFAULTCOLOR
Specifies default color for 3D models.
EDGESHIGHLIGHTCOLOR
Specifies color for highlighting edges.
FACEHIGHLIGHTCOLOR
Specifies color for highlighting faces.
MEASUREMENTCOLOR
Specifies color for measurements.
MINDDISTANCESET1
HIGHLIGHTCOLOR
Specifies color for first set in minimum distance measurement.
MINDDISTANCESET2
HIGHLIGHTCOLOR
Specifies color for second set in minimum distance measurement.
SECTIONEDGESCOLOR
Specifies section edge color.
SECTIONFILLCOLOR
Specifies fill color.
SECTIONFILLHATCHCOLOR
Specifies hatch pattern for fill color.
SELECTIONCOLOR
Specifies color for selecting models or model parts.
VERTEXHIGHLIGHTSCOLOR
Specifies color for highlighting vertices.
Oracle Corp.
Default
AutoVue
112
ECAD Options
Specify configuration options for ECAD.
[ECAD]
Parameter
Description
Default
CROSSPROBE_ACTION = [0|1|2]
Specifies entity selection behavior when cross-probing EDA files. This
option can have one of the following values:
0 - Keep zoom level
1 - Zoom selected
2 - Zoom Fit
1
CROSSPROBE_AUTOMATIC_PA
GETYPE = [0|1]
Specifies whether the Automatic option is enabled or disabled when
cross probing EDA files.
Set to 1 to enable Automatic mode during an EDA cross probe.
Set to 0 to disable Automatic mode during an EDA cross probe.
1
ECAD_3D_BOARDCOLOR
Specifies the color of the PCB board in 3D.
ECAD_3D_COMPONENTCOLOR
Specifies the color of the PCB components in 3D.
ECAD_3D_CUTOUTDRILLHOLE
S = [0|1]
Specifies whether to cut drill holes out of the 3D model of the board.
Set to 1 to cut out drill holes.
Set to 0 to disable drill holes.
Note: Setting this option to 1 increases the amount of memory required
to load the 3D model. Also, for DMU purposes, this option should be
set to 1 to correctly check for interference for parts that go through the
drill holes.
0
ECAD_3D_DEFAULTBOARD
THICKNESS
Specifies default board thickness for EDA.
Note: This option is used when the board thickness is not specified in
the design.
40.0
ECAD_3D_DEFAULTCOMPONE
NT THICKNESS
Specifies default thickness for components for 3D EDA.
Note: This option is used when the component height is not specified
in the design.
40.0
ECAD_3D_DEFAULTTHICKNES
SUNIT
Specifies the unit to be used for the options
ECAD_3D_DEFAULTBOARDTHICKNESS and
ECAD_3D_DEFAULTCOMPONENTTHICKNESS.
12 (mils)
ECAD_DIMLEVEL = [0.0-1.0]
Specifies the dim level. The value corresponds to a percentage. For
example 0.3 is 30%.
Change takes effect whether you change it manually or through the
GUI. Set a value between 0.0 and 1.0.
0.5
ECAD_LAYER_EXPANDCOLLA
PSE_LOGICAL = [0|1]
Expand or collapse the Logical Layers pane in the Layers dialog.
Set to 0 to expand the Logical Layers pane.
Set to 1 to collapse the Logical Layers pane.
1
ECAD_LAYER_EXPANDCOLLA
PSE_PHYSICAL = [0|1]
Expand or collapse the Physical Layers pane in the Layers dialog.
Set to 0 to expand the Physical Layers pane.
Set to 1 to collapse the Physical Layers pane.
0
Oracle Corp.
AutoVue
113
ECAD_LOAD_3D_PAGE=[0|1]
Enable or disable display of 3D models of EDA files.
Set to 0 to disable display of 3D model.
Set to 1 to enable display of 3D model.
Option applies to the following PCB formats:
•
Altium Designer/Protel
•
Cadence Allegro
•
Cadence Projects
•
Cadence Specctra
•
IDF
•
Mentor BoardStation
•
Mentor Expedition
•
ODB++
•
OrCAD Layout
•
Zuken CADIF
•
Zuken CADSTAR
1
ECAD_SEARCH_DESIGN = [0|1]
EDA entity searching scope.
Set to 1: the search scope is the entire design.
Set to 0: the search scope is current page.
0
ECAD_SELECTIONHIGHLIGHT
= [0|1]
Select either Highlight Selected or Dim Unselected as the default
behavior when selecting entities.
Set to 1 when Dim Unselected is selected.
Set to 0 when Highlight Selected is selected.
Option takes effect whether you change it manually or through the GUI.
0
ECAD_SHOW_NATIVE_HIGHLI
GHTS = [0|1]
Specifies whether AutoVue should display a file’s native highlighting.
Set to 0 so that the native highlighting in the file is ignored during
display.
Set to 1 so that the native highlighting in the file is applied during
display.
1
ECAD_SNAPRADIUS
Specifies snap radius for snap box to appear to select entity.
Note: The snap radius is configured in pixels.
5
Oracle Corp.
AutoVue
114
Markups
Markup Options
Configure a variety of Markup options such as symbol for markup dimensions.
[Markup Options]
Parameter
Description
ARROW_SIZE
Set to a positive value (greater than 0.1) to create zoomable
arrow heads when creating leader and measurement markup
entities.
If set to a negative value, arrow head is not zoomable.
between
-7.2 and 0
ATTACHMENT_MAX_SIZE=[val
ue]
Specifies the maximum size for attachment markup entities.
When creating attachment markup entities, if attachment
size exceeds, an error message appears to indicate that
attachment size exceeds the limit.
Note: value is in MegaBytes.
0 (no limit)
CONSOLIDATE_OPENASACTIV
E = [0|1]
Set to 1 to turn on the Open as Active Markup option in the
Markup Consolidation dialog box.
Set to 0 to turn off this option.
1
DEF_COLOR=
Specifies a windows RGB color for default markup entity
color.
Other values:
-1 - Assign layer color to markup entity
-2 - Hide markup entity
-3 - Assign line color (option applies to fill color only)
-1
DEF_LSTYLE
Specifies the default linestyle for markup entities. Possible
values are:
0 - Solid line
1 - Dashed line
2 - Dashed line (smaller
dashes)
3 - Dash Dot
4 - Dash Dot Dot
6 - Cloud linestyle
7 - Triangle linestyle
0
DEF_LWIDTH=
Specifies the default line width in pixels for markup entities.
1
DEF_FILLTYPE=
Specifies the fill type for filled entities.
Possible values are:
0 - No Fill
1 - Solid Fill
2 - Transparent Fill
0
DEF_FILLCOLOR=[-1|-2|-3]
Specifies a windows RGB color for default fill color.
Other values:
-1 - Assign layer color to markup entity
-2 - Hide markup entity
-3 - Assign line color (option applies to fill color only)
-1
LINETHICKNESS_ZOOMABLE
Set to 1 if you want markup entity line thickness to scale
according to zoom level
0
Oracle Corp.
Default
AutoVue
115
Parameter
Description
LINESTYLE_ZOOMABLE
Set to 1 if you want to maintain markup entity line style at
all zoom levels
0
NOTENAME_AUTOGEN
Set to 0 to disable automatic numbering of note entities.
Set to 1 to enable numbering of note entities.
1
RESCALEMARKUP=[0|1]
If view extents of base document have changed since
creating the Markup, set this option to 1 to scale Markups
appropriately.
0
TRUEBACKGROUND=[0|1]
Used when a highlight markup is applied on a colored
background (for example, graphic/filled cell areas in office
document tables).
Set to 1 for a dithered highlight markup.
Set to 0 for a normal highlight markup.
0
TRUECOLOR=[0|1]
Set to 0 so that the Markup entity color is inverted when it
matches the background color.
Set to 1 so that all entities are drawn with their actual color
irrespective of the background color. Entities whose color
matches or is close to the background color become
invisible.
1
SIGNOFFFILE = [<file
path>\name_of_signoffbg]
Specifies the name of the background image for the Sign Off
markup entity. The image file should exist in the bin subdirectory of the AutoVue Installation.
signoffstamp.bmp
in the <AutoVue
installation>\bin
directory
SYMBOLLIST=[alphanum]
Specifies a comma-separated list of symbols (in unicode) for
measurements.
Example:
u0398, u2221, u2248.
ANGLESYMBOLLIST=[aplhanum
]
Specifies a comma-separated list of symbols (in unicode) for
angle measurements. If not specified and SymbolList is
specified, symbols defined in SymbolList are displayed.
Example:
u0398, u2221, u2248.
ARCSSYMBOLLIST=[aplhanum]
Specifies a comma-separated list of symbols (in unicode) for
arc measurements. If not specified and SymbolList is
specified, symbols specified in SymbolList are displayed.
Example:
u0398, u2221, u2248
DISTANCESYMBOLLIST=[aplha
num]
Specifies a comma-separated list of symbols (in unicode) for
distance measurements. If not specified and SymbolList is
specified, symbols specified in SymbolList are displayed.
Example:
u0398, u2221, u2248
AREASYMBOLLIST=[alphanum]
Specifies a comma-separated list of symbols (in unicode) for
area measurements. If not specified and SymbolList is
specified, symbols specified in SymbolList are displayed.
Example:
u0398, u2221, u2248
Oracle Corp.
Default
AutoVue
116
[Options]
Parameter
Description
Default
ALLOWSTAMPLIBRARYEDIT =
[0|1]
Specifies whether you can edit/delete a stamp library.
Set to 1 to enable editing/deleting of a stamp library.
Set to 0 to disable editing/deleting of a stamp library.
0
ENABLEOFFICEMARKUPS=[0|1]
Enable/disable creation of markups for office documents.
Set to 1 to enable markups for office formats.
Set to 0 to disable markups for office formats.
1
Markup Font Options
[MrkFont]
Parameter
Description
Default
FACE
Specifies the text entity font name.
Arial
SIZE
Specifies the text entity font size.
10
ISBOLD
Set to 1 so that the text entity font appears in bold.
0
ISUNDERLINE
Set to 1 so that the text entity is underlined.
0
ISITALIC
Set to 1 so that the text entity appears in italic.
0
Overlay Options
Configure Overlay options that apply to laying files over the current active document.
[Options]
Parameter
Description
Default
CONVERTWMFT
OEMF = [0|1|2]
Specifies if the WMF should be converted to EMF. This is option is useful when
troubleshooting display issues with WMF.
Set to 0 to convert WMF to EMF. Set this value when progressive loading is
desired.
Set to 1 to convert WMF overlays to EMF. Set this value if enhanced functionality such as rotate and mirroring is required.
Set to 2 use default behavior of the format handler.
2
Oracle Corp.
AutoVue
117
Disable Options
Configure the Disable options parameters.
[Disable]
Parameter
Description
Default
ANTIALIASING = [0|1|2|4|8]
Specify whether to disable certain types of antialiasing.
Set to 0 to enable all types of antialiasing.
Set to 1 to disable image antialiasing. This also disables image blurring
(value=8).
Set to 2 to disable text antialiasing.
Set to 4 to disable geometry antialiasing. Geometry includes lines, arcs,
polygons, ellipses and rectangles.
Set to 8 to disable image blurring. Blurring is an interpolation that is performed
when images are magnified to prevent pixelation. Disabling image antialiasing
(value=1) also disables blurring.
0
Note: To use this option, ANTIALIAS must be set to 1.
MARKUPFORCETOBLACK
= [0|1]
0
Specifies whether to force markup color to black for high resolution printing.
Set to 1 so that markup color is not forced to black (even when base file
printing is forced to black).
Set to 0 to use the same logic as for the base file color.
Printing Options
General Options
Specify general print options such as orientation, scale.
[PRINTOPTIONS]
Parameter
Description
AREA = [0|1]
If 0, the extents of the page is printed, otherwise, the region displayed in the
view window is printed.
0
AREA
Indicates if you are printing:
0 - File Extents
1 - Displayed
2 - Selected area
3 - Limits (AutoCAD files only)
0
COPIES
Specifies the number of copies to print.
1
CUSTOMOFFSETX = [num]
If SCALING is set to 1 or 2 then you can specify the offset value (in inches)
along the X-axis.
0
CUSTOMOFFSETY = [num]
If SCALING is set to 1 or 2, then you can specify the offset value (in inches)
along the Y-axis.
0
FACTOR1 = [num]
If SCALING = 1, specifies the number of pixels for the scaling factor.
FACTOR2 = [num]
If SCALING = 1, specifies the number of units to which the specified
number of pixels are scaled.
Oracle Corp.
Default
AutoVue
118
FORCETOBLACK = [0|1]
If 1, the file is printed in black and white; otherwise, in color.
0
FROMPAGE = [num]
Indicates the starting page number of the print range.
HIGHRESOLUTION = [0|1]
If 1, prints high resolution
LIMITTOONEPRINTER
PAGE = [0|1]
If 1, limits output to one printer page when the scaling
options selected causes a single page to span over several pages.
0
OFFSETTYPE = [0-9]
Specifies the location of the drawing with respective to the page boundary
when printing.
0
Possible values:
0: Custom—To set a custom offset type, you must also set the values for
SCALING to 1 or 2, and then assign values for CUSTOMOFFSETX and
CUSTOMOFFSETY. See the respective INI options for more information.
1: Top Left
2: Top Center
3: Top Right
4: Middle Left
5: Center
6: Middle Right
7: Bottom Left
8: Bottom Center
9: Bottom Right
ORIENTATION = [1|0]
If 0, the file is printed as portrait; otherwise, landscape. Currently supported
with Java 2 low resolution printing.
PAGES = [0|1|2]
Indicates if you want to print
0 - All Pages
1 - Current Page
2 - Page Range
PAPER SIZE
Specifies the paper size to print to.
The following table lists the available paper sizes.
Print Option: PAPERSIZE
Name
Description
PAPER_10X11
10 x 11 in.
PAPER_10X14
10x14 in.
PAPER_11X17
11x17 in.
PAPER_12X11
12 x 11 in.
PAPER_15X11
15 x 11 in.
PAPER_9X11
9 x 11 in.
PAPER_A_PLUS
SuperA/SuperA/A4 227 x 356 mm.
PAPER_A2
A2 420 x 594 mm.
PAPER_A3
A3 297 x 420 mm.
PAPER_A3_EXTRA
A3 Extra 322 x 445 mm.
Oracle Corp.
1
AutoVue
119
PAPER_A3_EXTRA_TRANSVERSE
A3 Extra Transverse 322 x 445 mm.
PAPER_A3_ROTATED
A3 Rotated 420 x 297 mm.
PAPER_A3_TRANSVERSE
A3 Transverse 297 x 420 mm.
PAPER_A4
A4 210 x 297 mm.
PAPER_A4_EXTRA
A4 Extra 9.27 x 12.69 in.
PAPER_A4_PLUS
A4 Plus 210 x 330 mm.
PAPER_A4_ROTATED
A4 Rotated 297 x 210 mm.
PAPER_A4_TRANSVERSE
A4 Transverse 210 x 297 mm.
PAPER_A4SMALL
A4 Small 210 x 297 mm.
PAPER_A5
A5 148 x 210 mm.
PAPER_A5_EXTRA
A5 Extra 174 x 235 mm.
PAPER_A5_ROTATED
A5 Rotated 210 x 148 mm.
PAPER_A5_TRANSVERSE
A5 Transverse 148 x 210 mm.
PAPER_A6
A6 105 x 148 mm.
PAPER_A6_ROTATED
A6 Rotated 148 x 105 mm.
PAPER_B_PLUS
SuperB/SuperB/A3 305 x 487 mm
PAPER_B4
B4 (JIS) 250 x 354.
PAPER_B4_JIS_ROTATED
B4 (JIS) Rotated 364 x 257 mm.
PAPER_B5
B5 (JIS) 182 x 257 mm.
PAPER_B5_EXTRA
B5 (ISO) Extra 201 x 276 mm.
PAPER_B5_JIS_ROTATED
B5 (JIS) Rotated 257 x 182 mm.
PAPER_B5_TRANSVERSE
B5 (JIS) Transverse 182 x 257 mm.
PAPER_B6_JIS
B6 (JIS) 128 x 182 mm.
PAPER_B6_JIS_ROTATED
B6 (JIS) Rotated 182 x 128 mm.
PAPER_CSHEET
C size sheet.
PAPER_DBL_JAPANESE_POSTCARD
Japanese Double Postcard 200 x 148 mm.
PAPER_DBL_JAPANESE_POSTCARD_ROTATED
Double Japanese Postcard Rotated 148 x 200 mm.
PAPER_DSHEET
D size sheet.
PAPER_ENV_10
Envelope #10 4 1/8 x 9 1/2.
PAPER_ENV_11
Envelope #11 4 1/2 x 10 3/8.
PAPER_ENV_12
Envelope #12 4 \276 x 11.
PAPER_ENV_14
Envelope #14 5 x 11 1/2.
PAPER_ENV_9
Envelope #9 3 7/8 x 8 7/8.
PAPER_ENV_B4
Envelope B4 250 x 353 mm.
Oracle Corp.
AutoVue
120
PAPER_ENV_B5
Envelope B5 176 x 250 mm.
PAPER_ENV_B6
Envelope B6 176 x 125 mm.
PAPER_ENV_C3
Envelope C3 324 x 458 mm.
PAPER_ENV_C4
Envelope C4 229 x 324 mm.
PAPER_ENV_C5
Envelope C5 162 x 229 mm.
PAPER_ENV_C6
Envelope C6 114 x 162 mm.
PAPER_ENV_C65
Envelope C65 114 x 229 mm.
PAPER_ENV_DL
Envelope DL 110 x 220mm.
PAPER_ENV_INVITE
Envelope Invite 220 x 220 mm.
PAPER_ENV_ITALY
Envelope 110 x 230 mm.
PAPER_ENV_MONARCH
Envelope Monarch 3.875 x 7.5 in.
PAPER_ENV_PERSONAL
6 3/4 Envelope 3 5/8 x 6 1/2 in.
PAPER_ESHEET
E size sheet.
PAPER_EXECUTIVE
Executive 7 1/4 x 10 1/2 in.
PAPER_FANFOLD_LGL_GERMAN
German Legal Fanfold 8 1/2 x 13 in.
PAPER_FANFOLD_STD_GERMAN
German Std Fanfold 8 1/2 x 12 in.
PAPER_FANFOLD_US
US Std Fanfold 14 7/8 x 11 in.
PAPER_FOLIO
Folio 8 1/2 x 13 in.
PAPER_ISO_B4
B4 (ISO) 250 x 353 mm.
PAPER_JAPANESE_POSTCARD
Japanese Postcard 100 x 148 mm.
PAPER_JAPANESE_POSTCARD_ROTATED
Japanese Postcard Rotated 148 x 100 mm.
PAPER_JENV_CHOU3
Japanese Envelope Chou #3.
PAPER_JENV_CHOU3_ROTATED
Japanese Envelope Chou #3 Rotated.
PAPER_JENV_CHOU4
Japanese Envelope Chou #4.
PAPER_JENV_CHOU4_ROTATED
Japanese Envelope Chou #4 Rotated.
PAPER_JENV_KAKU2
Japanese Envelope Kaku #2.
PAPER_JENV_KAKU2_ROTATED
Japanese Envelope Kaku #2 Rotated.
PAPER_JENV_KAKU3
Japanese Envelope Kaku #3.
PAPER_JENV_KAKU3_ROTATED
Japanese Envelope Kaku #3 Rotated.
PAPER_JENV_YOU4
Japanese Envelope You #4.
PAPER_JENV_YOU4_ROTATED
Japanese Envelope You #4 Rotated.
PAPER_LEDGER
Ledger 17 x 11 in.
PAPER_LEGAL
Legal 8 1/2 x 14 in.
PAPER_LEGAL_EXTRA
Legal Extra 9 \275 x 15 in.
Oracle Corp.
AutoVue
121
PAPER_LETTER
Letter 8 1/2 x 11 in.
PAPER_LETTER_EXTRA
Letter Extra 9 \275 x 12 in.
PAPER_LETTER_EXTRA_TRANSVERSE
Letter Extra Transverse 9\275 x 12 in.
PAPER_LETTER_PLUS
Letter Plus 8.5 x 12.69 in.
PAPER_LETTER_ROTATED
Letter Rotated 11 x 8 1/2 11 in.
PAPER_LETTER_TRANSVERSE
Letter Transverse 8 \275 x 11 in.
PAPER_LETTERSMALL
Letter Small 8 1/2 x 11 in.
PAPER_NOTE
Note 8 1/2 x 11 in.
PAPER_P16K
PRC 16K 146 x 215 mm.
PAPER_P16K_ROTATED
PRC 16K Rotated.
PAPER_P32K
PRC 32K 97 x 151 mm.
PAPER_P32K_ROTATED
PRC 32K Rotated.
PAPER_P32KBIG
PRC 32K(Big) 97 x 151 mm.
PAPER_P32KBIG_ROTATED
PRC 32K(Big) Rotated.
PAPER_PENV_1
PRC Envelope #1 102 x 165 mm.
PAPER_PENV_1_ROTATED
PRC Envelope #1 Rotated 165 x 102 mm.
PAPER_PENV_10
PRC Envelope #10 324 x 458 mm.
PAPER_PENV_10_ROTATED
PRC Envelope #10 Rotated 458 x 324 mm.
PAPER_PENV_2
PRC Envelope #2 102 x 176 mm.
PAPER_PENV_2_ROTATED
PRC Envelope #2 Rotated 176 x 102 mm.
PAPER_PENV_3
PRC Envelope #3 125 x 176 mm.
PAPER_PENV_3_ROTATED
PRC Envelope #3 Rotated 176 x 125 mm.
PAPER_PENV_4
PRC Envelope #4 110 x 208 mm.
PAPER_PENV_4_ROTATED
PRC Envelope #4 Rotated 208 x 110 mm.
PAPER_PENV_5
PRC Envelope #5 110 x 220 mm.
PAPER_PENV_5_ROTATED
PRC Envelope #5 Rotated 220 x 110 mm.
PAPER_PENV_6
PRC Envelope #6 120 x 230 mm.
PAPER_PENV_6_ROTATED
PRC Envelope #6 Rotated 230 x 120 mm.
PAPER_PENV_7
PRC Envelope #7 160 x 230 mm.
PAPER_PENV_7_ROTATED
PRC Envelope #7 Rotated 230 x 160 mm.
PAPER_PENV_8
PRC Envelope #8 120 x 309 mm.
PAPER_PENV_8_ROTATED
PRC Envelope #8 Rotated 309 x 120 mm.
PAPER_PENV_9
PRC Envelope #9 229 x 324 mm.
PAPER_PENV_9_ROTATED
PRC Envelope #9 Rotated 324 x 229 mm.
Oracle Corp.
AutoVue
122
PAPER_QUARTO
Quarto 215 x 275 mm.
PAPER_RESERVED_48
RESERVED--DO NOT USE.
PAPER_RESERVED_49
RESERVED--DO NOT USE.
PAPER_STATEMENT
Statement 5 1/2 x 8 1/2 in.
PAPER_TABLOID
Tabloid 11 x 17 in.
PAPER_TABLOID_EXTRA
Tabloid Extra 11.69 x 18 in.
[PRINTOPTIONS]
Parameter
Description
SCALING = [0|1|2]
Specifies the scaling factor:
0 - fit
1 - scaling factor
2 - scaling percentage
SCALE = [percentage]
If scaling = 2, specifies the percentage to which the image is scaled.
SSNOPRINTCOLHEADERS
= [0|1]
If 1, row and column headers are not printed for spreadsheet formats.
ThicknessScale = [thickness1,
thickness2, ..., thicknessN]
Specifies the mapping of MicroStation line weights to line thickness on
paper. You can get this from the MicroStation configuration file, attribute
weight_strokes.
Example:
ThicknessScale = 0.250, 0.375, 0.500, 0.625, 0.750, 0.875, 1.000, 1.125,
1.250, 1.375, 1.500, 1.625, 1.750, 1.875, 2.000, 2.125, 2.250, 2.375, 2.500,
2.625, 2.750, 2.875, 3.000, 3.125, 3.250, 3.375, 3.500, 3.625, 3.750, 3.875,
4.000, 4.125
THICKNESSSCALEUNITS =
[mm|inch|dot]
Specifies the unit to use for the thickness scale.
Option only applies to MicroStation files when ThicknessScale is set.
TOPAGE = [num]
Indicates the ending page number of the print range.
UNITS = [1|0|2]
Specifies the scaling factor units:
0 - pixels
1 - inches
2 - millimeters
Default
0
0
1
[Options]
MAXPRINTERDPI =
[DPI value]
Specifies the maximum printer DPI to use for Enhanced Metafile (EMF)
generation for Java and native printing (used to minimize EMF size if
needed).
600
PRINTBANDSIZE =
[Band size value in MB]
Specifies the size of one printing band for requesting from the server in
megabytes (MB).
If an images sent to the printer is estimated to be too large, then the generated
images are banded.
5.0
PRINTINGDPI = [DPI]
Specifies the DPI for java printing. This value affects the size of the image
that is sent to the printer graphics.
144
Oracle Corp.
AutoVue
PRINTWITHBICUBICIN
TERPOLATION = <0|1>
123
Specifies whether to enable bi-cubic interpolation rendering of the image
when printing 3D models.
Set to 1 to enable bi-cubic interpolation rendering. Print quality is improved
but performance might be reduced.
Set to 0 to disable bi-cubic interpolation rendering.
1
EMF Generation Options
There are two methods to generate Enhanced Metafiles (EMF) on the server: rendering directly to EMF device
context (DC) or rendering using an intermediate banded device-independent bitmap (DIB) images. The following
options control which option is used.
[Options]
Parameter
Description
Default
DOCDIRECTRENDER = [0|1]
Controls whether EMF DC is used directly for document files.
Set to 0 so that banded DIB images are used.
Set to 1 so that EMF DC is used.
1
DIRECTRENDERLIMIT =
[Size in KB]
Specifies the threshold in KB when to use DIB images if the estimated page
size is too large.This option affects vector and spreadsheet formats.
30720KB
TROVLDIRECTRENDER =
[0|1]
Controls whether EMF DC is used directly when a vector file contains
transparent overlays.
Set to 0 to disable this option.
Set to 1 to enable this option.
Note: This option is enabled in order to have a safe fallback after disabling
check for transparent overlays.
1
VECDIRECTRENDER = [0|1]
Controls whether EMF DC is directory for vector files.
Set to 0 so that banded DIB images are used.
Set to 1 so that additional checks are performed to determine which method
to use.
1
Watermark Options
Specify Watermark options such as font style, size, text.
[PRINTWATERMARK]
Parameter
Description
FONTNAME
Specifies the font used for the printed Watermark text
FONTSIZE
Specifies the font size for Watermark text
FONTSTYLE = [2|1|0]
Specifies the font style used for Watermark text.
0 - Regular
1 - Bold
2 - Italic
TEXT
Specifies the text to be printed as a watermark. For carriage returns enter %r.
Oracle Corp.
Default
2
AutoVue
124
ORIENTATION = [0|1|2]
Specifies if the watermark should be:
0 - Diagonal
1 - Horizontal
2 - Vertical
DISABLEWATERMARK=
[0|1]
When set to 1, user will not be able to edit entries for watermark in the print
properties dialog box (for both print and print preview). Option goes under
section
[PRINTOPTIONS] in the INI File.
0
Headers/Footers Options
Configure options for headers and footers.
[PRINTHEADERS]
Parameter
Description
FONTNAME
Specifies the font used for the printed Header/Footer strings.
TOPCENTERTEXT
Specifies the text for the center header. For carriage returns, enter %r.
TOPLEFTTEXT
Specifies the text for the left header. For carriage returns, enter %r.
TOPRIGHTTEXT
Specifies the text for the right header. For carriage returns, enter %r.
BOTTOMCENTERTEXT
Specifies the text for the center footer. For carriage returns, enter %r.
BOTTOMLEFTTEXT
Specifies the text for the left footer. For carriage returns, enter %r.
BOTTOMRIGHTTEXT
Specifies the text for the right footer. For carriage returns, enter %r.
DISABLEHEADERS=[0|1]
When set to 1, user will not be able to edit entries for headers or footers in the
print properties dialog box (for both print and print preview). Option goes
under section [PRINTOPTIONS] in the INI File.
Oracle Corp.
Default
0
AutoVue
125
Margins Options
Configure options for print margins.
[PRINTMARGINS]
Parameter
Description
Default
BOTTOM=
Specifies the bottom margin
0.25
LEFT=
Specifies the left margin
0.25
RIGHT=
Specifies the right margin
0.25
TOP=
Specifies the top margin
0.25
UNITS=
Specifies units for the margin:
0 - pixels
1 - inches
2 - millimeters
0
Pen Settings Options
Configure options for pen settings.
[PENSETTINGS]
Parameter
Description
Default
UNITS=[0|1]
Specifies units for the pen settings:
0 - inches
1 - millimeters
0
SELECTEDPEN=[pen name]
The active pen setting. Pen mappings are defined in INI options
PEN<n>, where n starts from 0.
Note: You can define as many pen settings as you wish.
PEN1=[<penname>, n1=<thickness>,
n2=<thickness>,.....,]
Specifies the pen name and a mapping of pen index and thickness.
Thickness value is in inches.
Note: The pen color mapping is format dependent.
AutoCAD - The pen-color mapping uses the AutoCAD color palette.
You cannot modify the mapping.
HPGL - The pen-color mapping is defined in hpglcol.tbl and can be
modified by the user.
ME10 - The pen-color mapping is defined in me10col.tbl and can be
modified by the user.
DWF - The pen-color mapping is defined in dwfcol.tbl and can be
modified by the user.
Microstation drawings - The pen-color mapping is shipped in a binary
file, color.tbl. This mapping file can be modified using Microstation.
The mapping files are located at <AutoVue Installation Directory>\bin.
PEN0=[<penname>,
n1=<thickness>,
n2=<thickness>,.....,]
Oracle Corp.
AutoVue
126
Watermark in View Mode
With AutoVue it is possible to display watermarks in View mode.
[WATERMARK]
Parameter
Description
TEXT
Specifies watermark text.
Example, TEXT=AutoVue 19.3.
FONTNAME
Specifies font to be used for the watermark.
Example, FONTNAME=Times New Roman.
FONTSTYLE
Specifies the font style for the watermark.
0 – Plain
1 – Bold
2 – Italic
3 – Bold and Italic
Example, FONTSTYLE=3.
FONTSIZE
Specifies font size.
Example, FONTSIZE=24.
XFACTOR
Specifies watermark x position on the applet window. Value should range from 0 to 1.
Example, XFACTOR=0.05.
YFACTOR
Specifies watermark y position on the applet window. Value should range from 0 to 1.
Example, YFACTOR=0.90.
COLOR
Specifies a valid color value.
Example, COLOR=0xFF.
ALPHA
Specifies the transparency level of the text. Value can range from 0x00 (not visible) to
0xFF (opaque).
Example, ALPHA=0x80.
Default
Note: To disable the watermark you must either remove the whole [WATERMARK] section, remove the TEXT
option, or assign an empty string to the TEXT option.
CSI Shapefile Project Files
CSI shapefile project files (CSHP files) are used to overlay multiple ESRI shapefile drawings. Project files specify
the shapefiles that should be overlayed and general information such as units and point options. Project files are
formatted as standard INI configuration settings files. Comments in CSHP files begin with a semi-colon(;).
Note: A CSI shapefile project file must begin with the following line: ;CSI shapefile project file
[PROJECTPROPERTIES]
Parameter
Oracle Corp.
Description
Default
AutoVue
127
UNITS
Specifies the file units.
Possible values:
•
px
•
inches
•
millimeters
•
mm
•
twips
•
centimeters
•
cm
•
decimeters
•
dm
•
meters
•
m
•
kilometers
•
km
•
feet
•
yards
•
miles
•
millimeters
•
micromiles
•
microns
•
microinches
POINTYPE
Specifies what shape to use when drawing a point.
Possible values:
•
Circle
•
Triangle
•
Square
•
Star
•
Dot
•
Plus
•
Cross
•
Diamond
•
Custom
Custom
POINTSIZE=[int]
Specifies what size to use when drawing a point.
You can assign int any integer greater than 0.
7
Oracle Corp.
AutoVue
128
[LAYERS]
Parameter
Description
OUTLINECOLOR=[
int]
Specifies the color to use when drawing outlines for graphics such as points, lines,
polygons, and so on.
Default
-1
Possible integer range: [-1, 255]
Set to OUTLINECOLOR=-1 so that an internal counter is used to determine the color.
The counter is incremented a maximum of two times per layer and only if it is required:
once for the outline color (if it is not provided) and once for the fill color (if it is not
provided).
Example: If a user provides valid outline and fill colors, the counter is not incremented
for the given layer. However, if the user only provides a valid outline color, the counter
increments once for the given layer.
FILLCOLOR=[int]
Specifies the color to use when the drawing fills for graphic (such as polygons).
-1
Possible integer range = [-1, 255]
Set to FILLCOLOR=-1 so that an internal counter is used to determine the color.
The counter is incremented a maximum of two times per layer and only if it is required:
once for the outline color (if it is not provided) and once for the fill color (if it is not
provided).
Example: If a user provides valid outline and fill colors, the counter is not incremented
for the given layer. However, if the user only provides a valid outline color, the counter
increments once for the given layer.
LINEWIDTH=[int]
Specifies the line width to used when drawing graphics.
0
Possible integer range: [0,100]
VISIBLE=[0|1]
Specifies the visibility of the shapefile.
Set to 1 to make the shapefile visible when initially loading the CSI shapefile project.
Set to 0 to make the shapefile invisible when initially loading the CSI shapefile project.
1
POINTTYPE
Specifies what shape to use when drawing a point.
Custom
Note: If a POINTTYPE is not provided for the a given [LAYER] section, then the
POINTTYPE provided in [PROJECTPROPERTIES] section is used.
Possible values:
•
Circle
•
Triangle
•
Square
•
Star
•
Dot
•
Plus
•
Cross
•
Diamond
•
Custom
POINTSIZE
Specifies what size to use when drawing a point.
Note: If a POINTSIZE is not provided for the a given [LAYER] section, then the
POINTSIZE provided in [PROJECTPROPERTIES] section is used.
You can assign num any integer greater than 0.
Oracle Corp.
7
AutoVue
FILENAME= [file
path]
Oracle Corp.
129
Specifies the name of the ESRI shapefile drawing.
AutoVue
130
Appendix J: FAQ
General
Q What is the applet size of AutoVue client?
A
The applet size is about 5.2MB.
Q What is the approximate transfer time of the applet?
A
This depends on your network connection speed. On a Local Area Network, transfer time is a few seconds.
Q Is the applet transmitted every time a document is viewed?
A
No. The applet is usually only transmitted the first time it is used and then is saved by your Web browser in its cache
folder. The applet is transmitted again if:
•
•
You clear up the cache.
A new version of the applet is available on the server, in which case the new applet is transmitted automatically.
Q What languages are supported by AutoVue Client?
A
English(EN), French(FR), German(DE), Japanese(JA), Korean(KO), traditional Chinese(TW), and simplified
Chinese(ZH).
Q How do I set up AutoVue to run in a specific language (English, French, German, Korean, and so on)?
A
It is done automatically; you do not need to set up anything. AutoVue is multilingual. The Client chooses the
appropriate language depending on the client machine’s LOCALE setting. However, you can modify this behavior by
using the LOCALE parameter of the applet.
Q How do I set up AutoVue Server on Linux so as to get full font support for Office and other formats?
A
If your format requires TTF and TTC fonts, follow these steps to configure AutoVue Server on Linux:
1
Shut down AutoVue Server.
2
Back up and remove the fonts from <AutoVue Server Install Directory>/jvuew_c/windows/fonts.
3
Copy all required TTF/TTC fonts from a Windows font directory (from a machine which has all required fonts)
to <AutoVue Installation Folder>/jvuew_c/windows/fonts.
Restart AutoVue server.
Oracle Corp.
AutoVue
131
Q How does AutoVue locate external resources (XRefs, fonts, font maps, and so on)?
A
When AutoVue encounters a base file that requires other resources in order to display fully, AutoVue generally
performs the following series of searches until the resources are found. Note, however, that there are certain
exceptions to the search sequence.
1
If the base file contains a path to the resource, AutoVue looks up the path to locate the resource. If the path is a
relative path, the relative path is taken with respect to the base file path.
2
AutoVue looks for the resources in the base file location.
3
AutoVue looks for the resource in the AutoVue installation folder (in some cases, this folder is used for font
maps, color maps, and font resources).
4
If the client contains a session path setting (for example, SESSIONXFONTPATH or SESSIONXREFPATHS),
AutoVue looks for the resources in this path.
5
AutoVue looks in the path specified by the XREFPATHS and XFONTSPATH ini options specified in the user’s
INI file.
Q What are the rendering schemes used by AutoVue?
A
A number of different rendering schemes are used by AutoVue.
Vector and 2D CAD files are generally streamed as Custom or Compressed Metafile Format.
Other formats are generally rendered using a tiled raster stream.
Q When rendering a file what is the size of the streamed data compared to the original file size?
A
This is highly dependent on the nature of the document being viewed.
Vector and 2D CAD files are streamed as ASF (AutoVue Streaming Format). The ASF is generally smaller than the
original file, but it depends on the complexity of the original document.
Other formats are rendered using a tiled raster stream. The advantage of this is that the size of the tiled data is
generally independent of the size of the document being viewed. The size of each tile is quite small, generally less
than 10Kb. You can check the size of the data being transmitted by setting the “VERBOSE” Applet parameter tag to
TRUE. The results are displayed in the Java console.
Q What is streaming file?
A
When a native document is read, AutoVue Server provides the capability to export the internal representation of the
document. This is, by default, stored in the AutoVue Server’s cache in a format called the streaming file format. The
first time a 2D CAD file or a 3D assembly/part is read, the server will parse the file and load it. A streaming file is
created when the file is closed. The streaming file is then used for all subsequent loads of the same document. Thus
the second and subsequent loads of document are faster than the first load.
When a document is loaded and its streaming file exists, it greatly speeds up the loading time since the original
document does not have to be re-parsed and many of the CPU intensive calculations are skipped since the results are
in the streaming file.
Oracle Corp.
AutoVue
132
Q Is it possible to disable streaming file generation?
A
Yes. It is possible to disable streaming file generation. Set:
jvueserver.metacache.enable=false in jvueserver.properties
Default: true
Q What is a Doc Server? How is it different from the Primary Server?
What is a Streaming File Server?
A
Every AutoVue Server installation has a Primary Server, several Doc Servers and a Streaming File Server.
The Primary Server is responsible for routing document requests to the secondary servers. This server is represented
by P in the AutoVue Server console.
The secondary servers, also called Doc Servers or Document Servers are responsible for processing document
requests and streaming data to the clients.The secondary servers are represented by 1, 2, 3, 4 in the AutoVue Server
console. The number of secondary processes is determined by the jvueserverx.nt.processPoolSize setting in
jvueserver.properties. Default: 4.
The Streaming File Server is dedicated to generating streaming files for all documents. When a document handle is
closed, request is transferred from the Doc Server to the Streaming File Server and this server generates the streaming
file. The Streaming File Server is represented by M in the AutoVue Server console.
The advantage of having a dedicated process for generating streaming files is that clients do not have to wait for the
previous document to be cached to view the next document.
Q How do I configure what servers handle streaming file generation?
A
There are two ways to configure this:
1
You can configure AutoVue Server so that if the load on the Doc Server is high, Streaming File Server can handle
streaming file generation. In jvueserver.properties, set:
jvueserver.metacache.threshold to a non-negative integer.
If the load on the Doc Server reaches this threshold, Streaming File Server will generate streaming files.
2
You can disable the Streaming File Server so that all streaming file creation requests are handled by Document
Servers.
In jvueserver.properties, set jvueserver.metacache.process=false.
Q Does AutoVue work with firewalls and proxy servers?
A
Yes. There are usually two distinct sets of firewalls/proxy servers that come into play:
•
•
•
Firewall/proxy on the server: Most Web servers, ASP’s and document management systems run behind a firewall
and proxy server for security.
If a Proxy Server is being used to connect to the outside Internet, then the name of the Proxy Server must be
specified in jvueserver.properties. See "Configuring AutoVue Server".
Firewall/proxy on the client. Many client browsers run behind a firewall. Generally all ports except the standard
HTTP port (80) are disabled. You must set up the VueServlet on your Web server to tunnel all communications
Oracle Corp.
AutoVue
133
through standard HTTP or HTTPS. If the client is using a proxy server to connect to the Internet, there is
generally no special configuration needed since the AutoVue Client will use the TCP/IP services of the browser.
Note:
•
•
The proxy server uses NTLM authentication; only IE works in this case.
Even if there is no way for the server to know if a client is behind a firewall or not, you still can provide the direct
socket connection just by setting the JVUESERVER parameter properly.
Use something like:
<PARAM NAME=”JVUESERVER”
VALUE=”http://myserver/servlet/VueServlet”>
would allow clients behind firewall to tunnel through the servlet, while other clients can still use the faster socket
connection.
Q How do I setup ISAPI tunneling for the VueServlet or how do I direct requests to the VueServlet through
IIS?
A
The instructions for setting up ISAPI tunneling depends on the application server you are using. Refer to your
application server documentation for instructions on setting up ISAPI tunneling.
Q I want to use AutoVue client as a standalone application without using an Web browser. How do I do this?
A
The best way to minimize deployment effort is to put the necessary files on a locally accessible network directory so
that all users can just fire up the applet from that common location.
Once the server is installed, copy the following files and directories to the chosen location, then run jvue.bat for
Windows and jvue for Linux to launch the applet as a standalone application.
•
•
•
•
•
•
<AutoVue
<AutoVue
<AutoVue
<AutoVue
<AutoVue
<AutoVue
Install
Install
Install
Install
Install
Install
directory>\bin\jvue.bat (Windows OS)
directory>/bin/jvue (Linux OS)
directory>\html\jvue.jar
directory>\html\jogl.jar
directory>\html\gluegen-rt.jar
directory>\jre
Security
Q Does AutoVue Client set cookies?
A
No. As of release 20.0.0, AutoVue client does not set cookies. However, AutoVue client passes on cookies available
to it to AutoVue Server and integration/VueLink servlet.
Q Can I use HTTPS/SSL for secure communications?
A
Yes. You can “tunnel” all communications between the AutoVue Client and server through HTTPS which uses SSL.
This ensures a secure connection. To do this, the applet should communicate with the server through a servlet which
should be referenced through HTTPS.
Example:
Oracle Corp.
AutoVue
134
<PARAM NAME="JVUESERVER" VALUE="https://www.mymachine.com/servlet/VueServlet">
Q Is the data transmitted to the Applet encrypted?
A
If you tunnel all communications through the servlet using HTTPS, all communications are encrypted using SSL.
Q When I load any 3D file for the first time, a security warning dialog box pops up. Can I deny the certificate?
A
No. This certificate belongs to SUN Microsystems Inc. and is necessary for the 3D model to render properly. If not
accepted, the 3D model will load blank.
Oracle Corp.
AutoVue
135
Integrating with Other Systems
Q Can AutoVue be customized to work within our interface?
A
Yes. We provide several kinds of integrations:
•
•
•
•
•
You can script the Applet just by changing the FILENAME parameter in it. This is a simple but convenient way
to generate Applet pages from a backend Document Management System.
You can script the applet with JavaScript to:
• Set the document to View
• Load one or more markups
• Compare to a file
• Add an overlay
• Print the document
You can define the GUI definition of the Applet by specifying the GUIFILE applet parameter. This allows you to
fully control the menu and toolbar items that will appear on the client.
You can integrate the server with a DMS using AutoVue’s Integration SDK. This is aimed at customers who want
to tightly integrate AutoVue with a back-end document database. The SDK provides the interface between the
AutoVue Server and the back-end database and provides all “hooks” to manage Markups, reference files, access
permissions and user permissions.
You can use the VueBean, which is to AutoVue what the VCET controls are to AutoVue Desktop Version. The
VueBean provides the full rendering and Markup capability of AutoVue, but without any GUI. This is aimed at
customers who want full control over the applet interface.
Q Does the AutoVue server have to be on the same server as my drawings or Web server?
A
No. The AutoVue server can be on any machine. In fact, the AutoVue server distinguishes between several types of
documents:
•
•
•
•
When the server is integrated with a DMS then the location of the documents is completely transparent to the
AutoVue server. The downloads/uploads are handled by the DMAPI integration component.
The applet client can upload local files to the AutoVue Server using the “upload:” pseudo-protocol.
If the document to be viewed specifies a URL with the HTTP:, HTTPS: or FTP: protocol, then the AutoVue
server tries to download the document. These documents could be located anywhere, as long as they are
accessible through TCP/IP.
You can view documents that are on the AutoVue server itself using the “server:” pseudo-protocol.
Note: This is disabled by default, see directory in the [Server] section in "Configuring the AutoVue Client" for
more information.
Q Can I access my Oracle/Microsoft SQL database even if it is on a different server?
A
Yes. Refer to the question above. You will probably have to have a DMAPI integration installed for a tight integration
between the Applet, the AutoVue server and the Database.
Oracle Corp.
AutoVue
136
Q Do I need a Web server to be able to run AutoVue?
A
No. Users will access the client applet through a Web browser such as IE or FireFox. However, a WEB server is not
required.
The AutoVue client can also be run as an application (not as an applet). The jvue.bat file in the \bin directory gives
an example on how to invoke the client as an application.
Q Can I integrate AutoVue with my FTP site?
A
Yes. The applet can accept any valid URL including the standard HTTP, HTTPS and FTP protocols.
Q Can users Markup files on my FTP site and save the Markup files there?
A
Yes. By default Markups will be managed and saved by the AutoVue server.
In order to have the Markups saved on the FTP site, you would have to interface with the AutoVue server using the
DMAPI.
Q Can I set security access or restricted access to my drawings through AutoVue?
A
Yes. Through the integration with your backend system, you can enforce any access restrictions that are defined in
your DMS.
Q Has AutoVue been integrated with popular EDM/PDM Systems?
A
Yes. We have "out-of-the-box" solutions for a number of systems including: Agile, Documentum, Oracle UCM, and
SharePoint.
The integration SDK is an open specification that allows AutoVue server to be integrated with other systems.
Q How easy is it to integrate AutoVue into my own EDM/PDM system?
A
It is relatively straightforward. Oracle provides an Integration SDK and sample interface to get you started. The API
is XML-based and can be implemented as a Web server component. We provide a skeleton servlet that can be used as
basis.
Q What is meant by the DMAPI/Vuelink Integration/Interface and what can I do with it?
A
The DMAPI is the XML-based API that is used to interface the AutoVue server with a back-end EDM/PDM system.
VueLink is the product name of the DMAPI interfaces that Oracle itself has developed for a variety of EDM/PDM
systems. The development of a DMAPI integration generally involves several issues:
•
The integration can be developed in any language that supports a CGI-like protocol, including .ASPs, .JSPs, C or
Perl CGI scripts or Java Servlets.
We provide a sample skeleton of an integration as a Java servlet.
Oracle Corp.
AutoVue
•
•
•
•
•
137
The Integration has full control over the document properties.
The Integration has full control over the querying/reading/saving of Markups.
The Integration has full control over the management of reference files/compound documents.
The integration can enforce any access restrictions and workflow rules.
For example when a new Markup is created on a document a workflow can be automatically started.
Query document attributes to add to the headers/footers or watermark of printouts.
In general the DMAPI integration acts as an intermediary layer between the AutoVue server and the EDM/PDM
system.
Q Does AutoVue support real-time collaboration?
A
Yes.
Q Where are Markups saved?
A
When AutoVue is integrated with a DMS using the VueLink DMAPI then Markups are entirely managed by the
DMS.
Without the integration the AutoVue server will manage the Markups itself. The Markups are stored in a specific
directory on the server, with a mapping between the base file and the associated Markup list. By default the Markups
are stored in the \Markups subdirectory of the AutoVue server program directory, but this can be specified in the
VueServer.ini file.
Troubleshooting
Q I’ve installed the AutoVue server. When I open the sample HTML page (http://my.machine.com/jVue/
jVue.html) containing the applet I just get a blank screen. What should I do?
A
Proceed in the following order:
If you are running Internet Explorer
1 Clear the browser cache. Do this by selecting Tools, then Internet-Options.
2
Under Temporary Internet Files, click Delete Files.
3
Click OK.
4
Again under Temporary Internet Files, click Settings.
5
Click View Objects in the Settings dialog.
In the list of objects, you will not see jVue or VueBean.
6
If you see either of these two objects, right-click and select Delete.
(These two objects were created by a very early version of AutoVue and are incompatible with the new version.)
If you are running Firefox
1 Clear the browser cache. Do this by selecting Tools then Clear Private Data.
2
In the Clear Private Data dialog box, select all the entries and click Clear Private Data.
Oracle Corp.
AutoVue
3
138
Restart the browser.
The problem should be solved, but if it is not continue to take the following steps.
4
If you still see a blank screen, there is an installation problem on the server.
Verify that the Jar files are accessible. You can do this from your browser by typing the following URLs:
http://my.machine.com/jVue/jvue.jar
http://my.machine.com/jVue/jogl.jar
http://my.machine.com/jVue/gluegen-rt.jar
If you are prompted for a download, you can ignore it. If you are not prompted for a download then the Jar files
are improperly installed on the server.
5
If you can modify the file frmApplet.html on the server machine, under the \jVue Web directory, then set the
VERBOSE parameter of the applet to TRUE.
6
Restart the browser and re-open the jVue.html page on the Web server.
7
Open the Java Console in the Web browser.
The console indicates the cause of the problem.
Q I get an error message, “An error occurred while connecting to the server. Restart the applet?” What should
I do?
A
To begin, you should start by clearing your browser cache, following the steps from the previously answered
question. If you still get this message it means that the client cannot communicate with the AutoVue server. Verify
that the AutoVue server is running on the server machine.
Next verify that the applet parameter JVUESERVER is properly set to the VueServlet URL. See "Debugging
AutoVue" which provides pointers on troubleshooting the servlet.
Q When I open files from the AutoVue client, files do not display. What should I do?
A
This problem could occur if the AutoVue client and the server are of different versions. When there is a mismatch in
the version or build numbers, files either display blank or a ’File not found’ error message appears.
To begin, launch the AutoVue Client, select ’Help’-’About’. Check that the client and the server version and build
numbers are the same. If they do not match, clear your browser cache and reload the applet. If the numbers still do not
match, check the Web server components installed as part of the AutoVue server installation. Try a manual
installation of the Web server components.
Q When I start up AutoVue server, the processes P, 1, 2, 3, 4, M never turn green.
A
This can occur if the ports needed by AutoVue server are in use. Make sure the following ports are available for the
server:
•
•
RMI port + [n+1] consecutive ports (where RMI port is the port set in jvueserver.properties — the default RMI
port is 1099; and where n is the process pool size in jvueserver.properties)
For example, if the RMI port is 1099: make sure ports 1099, 1100, 1101, 1102 and 1103 are available for a
process pool size of 4.
Socket port + [n+1] (where Socket port is the port used for socket connections — see jvuserver.properties for
the socket port number value — the default Socket port is 5099; and where n is the process pool size set in
jvueserver.properties)
Oracle Corp.
AutoVue
139
Q When I start up AutoVue Server on Linux, I get the following error
messages:“XSERVTransMakeAllCOTSServerListeners: server already runningFatal server error:Cannot
establish any listening sockets - Make sure an X server isn't already runningx11drv: Can't open display:
localhost:909.” What should I do?
A
This error occurs when the port used by the Xvfb server is already in use by another process. Modify the Xvfb port by
editing jvueserver in <AutoVue Install directory>/bin. Set xvfb_display in jvueserver.propertites to
an available port.
Q When I start up AutoVue Server on Linux, the server fails to start and the message in the log is “Could not
create server lock file: /tmp/.X909.lock” or “Cannot establish any listening sockets - Make sure an X server
isn’t already running.
A
Ensure that AutoVue Server is not running already. Next, ensure that there is no other process using port 909. If
another process is using the port, modify the Xvfb port by editing jvueserver in <AutoVue Install directory>/bin. Set
xvfb_display in jvueserver.propertites to an available port. Remove all files in /tmp/..X9* and /tmp/
.X11-unix/X9*. Restart AutoVue.
Q 3D files don’t display when the AutoVue client is on HP-UX / Linux / AIX.
A
Make sure these libraries exist on your Linux machine:
•
•
•
HP-UX - libGL.sl and libGLU.sl
Linux - libGL.so and linGLU.so
AIX - libGL.a and libGLU.a
Make sure the path to these libraries is set in the LD_LIBRARY_PATH.
Q When I print from my Linux client, text is not printed properly.
A
This can happen when printing files containing overlays when the file is rendered in EMF. Since printing on a Linux
client, defaults to JAVA printing, which is client-side printing, you must ensure that Windows TTF fonts (such as
symbol.ttf) are installed on the client-side.
Note: The fonts should be installed in a location where the Java Virtual Machine (JVM) can access them.
The follow steps describe how to install the Windows TTF fonts.
1
Copy symbol.ttf from a the fonts directory of a Windows machine to the JDK fonts directory of the Linux
client machine.
Example: /usr/java/jdk1.6.0_06/jre/lib/fonts
2
From the fonts directory of the Linux machine open fonts.dir with a text editor.
3
Append the following code line to the end of font.dir:
symbol.ttf -urw-symbol-medium-r-normal--0-0-0-0-p-0-adobe-fontspecific
Oracle Corp.
AutoVue
140
Q Why is text not displaying correctly when I view a file?
A
Check to see if the Resource icon
displays in the status bar. If it does appear, click on it to view whether there are
any missing or substituted font resources. In the event there are missing or substituted resources, you must provide
access to AutoVue for these fonts. If a TTF font is missing, install the font in the C:\Windows\fonts directory on the
AutoVue Server machine. If other fonts are missing, specify the font path in the XFONTPATH ini option or through
the Configuration dialog. In some cases, you must update the font map.
Q I have the WV server on Linux. When I open files with XRefs, the XRefs do not load.
A
In release 19.3.1, if you have XRefs defined in your INI file or if you are using the server protocol to load XRefs, you
must do an additional step. You need to modify the Wine configuration file to map the UNIX path to an internal
Windows drive. Open jVue/jvue_w/jvuew_config in a text editor and add the following:
[Drive <letter>]
"Path" = <path>
"Type" = "network"
"Label" = "Root"
"Filesystem" = "unix"
For example:
[Drive T:]
"Path" = /home/admin/jVue/XREFs
"Type" = "network"
"Label" = "Root"
"Filesystem" = "unix"
Q Why do I get a “Running low on memory” message when viewing a file?
A
In the event the allocated memory to the client is lower than what is required to complete a task, you will see a
“Running low on memory” message. To resolve this issue, you must increase Java memory client-side and try again.
To increase Java memory:
1
Open the Control Panel.
2
Double-click Java.
The Java Control Panel appears.
3
Select the Java tab and then click View.
The Java Runtime Environment Settings dialog appears.
4
Select the User tab.
5
Double-click the Runtime Parameters field for your Java platform and set/update the maximum memory.
For example: -Xmx256M
This value sets your maximum Java memory to 256MB.
Oracle Corp.
AutoVue
Index
Numerics
3D Color options 111
3D Options 107
export 111
3D PMI options 109
A
Acrobat PDF options 82
Adding an Additional Server 52
Allegro Options 83
allusers.ini options 82
AutoCAD options 83
Autodesk DWF options 84
Autodesk Inventor options 85
AutoVue Mobile Options 106
Canada wide policy 107
AutoVue Server 24
start
for Windows 45
AutoVue Server Console 24
C
Cadence options 85
Cadkey options 86
CATIA 4 options 86
CATIA 5 options 87
CATIA options 86
CGM options 87
Client-side Installation 44
Collaboration
configuring 26
Configuring for Collaboration 26
Creating a WAR file 60
Customizing the GUI 65
choosing GUI file 65
UNC file names 71
D
default.ini options 82
Deploying the WAR File 60
generic steps 60
Oracle Application Server 10g R3 62
Tomcat 5.5 62
Oracle Corp.
141
WebLogic 9.0 61
WebSphere 5.x 60
DirectModel (JT) options 88
Disable options 117
E
ECAD options 112
EMF generation options 123
Enable Tunneling 60
Excel options 88
G
General options 100
base font 105
Gerber options 88
GUI
customizing 65
GUI Configuration Syntax 66
H
HPGL/HPGL2 options 90
I
IFC options 91
INI File Options
3D color 111
3D Options 107
3D PMI 109
Allegro 83
AutoCAD 83
Autodesk DWF 84
Autodesk Inventor 85
AutoVue Mobile options 106
Cadence 85
Cadkey 86
CATIA 86
CATIA 4 86
CATIA 5 87
CGM 87
DirectModel (JT) 88
ECAD 112
EMF generation 123
Excel 88
General 100
base font 105
Gerber 88
AutoVue
HPGL/HPGL2 90
IFC 91
JPEG 92
JPEG 2000 92
Markup 114
ME10/OneSpace 92
Microsoft Outlook 93
MicroStation 7/8 94
NC-Drill 96
OrCad Layout 96
Printing 117
general 117
headers/footers 124
margins 125
pen settings 125
watermark 123
in view mode 126
Pro/ENGINEER 97
SolidWorks 98
STEP 98
Text 98
TIFF 99
UI Color 105
Visio 99
Word 99
INI Options
Markup
Font 116
Overlay 116
Initialization file
general options
SHOWALLLAYERS 84
Installation
server-side 18
J
J2EE-enabled Application Servers 60
JPEG 2000 options 92
JPEG options 92
M
Markup options 114
font 116
ME10/OneSpace Designer Drafting options 92
Microsoft IIS ISAPI Extension
tunelling 64
Oracle Corp.
142
Microsoft Outlook 93
MicroStation 7/8options 94
Modifying GUI file 65
N
NC-Drill options 96
Non-Interactive Installation 57, 73, 74, 75, 78
Non-J2EE Application Servers
tunelling 62
O
OrCad layout options 96
Overlay options 116
P
Printing
general options 117
headers/footers options 124
margins options 125
pen settings options 125
watermark options 123
Pro/ENGINEER options 97
S
Scripting the Applet
advanced scripting 39
basic 38
Server Configuration 24
adding an additional server 52
adding multiple servers in a cluster 51
Server-side Installation 18
Servlet Configuration 60
SolidWorks options 98
Start AutoVue Server 45
for Windows 45
STEP options 98
Structure and Syntax of GUI Files 65
System Requirements 12
T
Text options 98
TIFF options 99
Tunneling with Microsoft IIS ISAPI Extension
64
Tunneling with non-J2EE Application Servers
62
AutoVue
U
UI Color options 105
V
Visio options 99
W
WebSphere 5.0 60
Word options 99
Oracle Corp.
143
AutoVue
144
Feedback
If you have any questions or require support for AutoVue please contact your system administrator. Some
customization and maintenance must be done on the server and cannot be implemented on the client machine. If the
administrator is unable to resolve the issue, please contact Oracle Corp.
If at any time you have questions or concerns regarding AutoVue, call or e-mail us.
General Inquiries
Telephone:
+1.514.905.8400 or +1.800.363.5805
E-mail:
[email protected]
Web Site:
http://www.oracle.com/autovue/index.html
Sales Inquiries
Telephone:
+1.514.905.8400 or +1.800.363.5805
E-mail:
[email protected]
Customer Support
Web Site:
Oracle Corp.
http://www.oracle.com/support/index.html