1
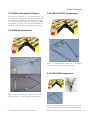
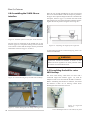
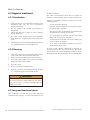
USERS’ MANUAL
SLAM Cot Fastener
July 2014
Pub. N° MU-049-H
Read this manual
carefully and retain1
it for future reference
Slam Cot Fastener
Warning
Rights
This manual contains general information on the use,
operation and maintenance of this product. Instructions
contained in this manual do not cover every single
application and operation.
Safety and proper use of this product depend on the user
acting responsibly.
Safety information is provided for the user and only
ensures the minimum level necessary to avoid injury
to operators and patients. Appropriate training is
recommended for staff who use this product, before each
actual application.
Information contained in this manual is the property of
Ferno Washington Italia s.r.l. - Via Benedetto Zallone, 26
– 40066 Pieve di Cento (BO) - Italy. Ferno Washington
Italia s.r.l. reserves all rights related to images and
illustrations.
This manual may not be reproduced in whole or part
without the express authorization of Ferno Washington
Italia s.r.l.
Keep this manual safe for future reference and pass it on
to new users. Additional free copies are available upon
request from Ferno Washington Italia Customer Relations.
© Copyright Ferno Washington Italia s.r.l. All rights reserved.
Ferno Washington Italia s.r.l.
Via Benedetto Zallone, 26
40066 - Pieve di Cento (BO) - ITALY
Internet www.ferno.it
E-mail [email protected]
Telephone...................................+39 0516860028
Fax .........................................+39 0516861508
2
© Ferno Washington Italia s.r.l. MU-049-H, July 2014
Slam Cot Fastener
TABLE OF CONTENTS
Chapter/Paragraph
Page
Chapter/Paragraph
Page
1. SAFETY INFORMATION_________________ 4
5. USING THE SLAM COT FASTENER_______ 12
1.1 Safety warnings________________________ 4
Non-original spare parts may cause damage.
Only use original Ferno spare parts._____________ 4
5.1 Before use____________________________ 12
1.2 Important_____________________________ 5
6. MAINTENANCE_________________________ 13
1.3 Conformity to current regulations__________ 5
1.4 Information labels______________________ 5
1.5 Symbol Glossary_______________________ 5
1.6 Risks of infection_______________________ 5
2. OPERATOR SKILLS AND TRAINING_________ 6
2.1 Operator ability________________________ 6
2.2 Training______________________________ 6
2.3 Operator skills_________________________ 6
3. DESCRIPTION OF THE SLAM COT
FASTENER______________________________ 6
3.1 General Features_______________________ 6
3.2 SLAM Cot Fastener disclaimer____________ 7
3.3 SLAM-26 components___________________ 7
3.4 SLAM-5026/EFX Components____________ 7
3.5 SLAM-4050 Components________________ 7
5.2 Locking and unlocking the stretcher or
trolley with the SLAM Cot Fastener________ 12
6.1 Routine Maintenance____________________ 13
6.2 Hygienic treatment______________________ 14
6.2.1 Disinfection_______________________ 14
6.2.2 Cleaning__________________________ 14
6.3 Safety and functional check_______________ 14
7. ACCESSORIES AND RELATED PRODUCTS__ 15
8. TECHNICAL SUPPORT AND SERVICE_____ 16
8.1 Technical Support_______________________ 16
8.2 Services and Training____________________ 16
9. WARRANTY_____________________________ 16
9.1 Warranty Conditions____________________ 16
9.2 Disclaimers____________________________ 17
9.3 Warranty Requests______________________ 17
9.4 Complaints____________________________ 17
9.5 Authorization for Returns_________________ 17
4. INSTALLING THE SLAM COT
FASTENER______________________________ 8
10. TRAINING RECORD____________________ 18
4.1 Notes on installation_____________________ 8
11. MAINTENANCE RECORD_______________ 18
4.2 Notes on the vehicle_____________________ 8
4.3 Parts supplied__________________________ 8
4.4 Tools and installation elements needed______ 8
4.5 Anchoring the SLAM Cot Fastener_________ 8
4.6 Anchoring the SLAM-26 fork_____________ 8
4.7 Anchoring the SLAM-4050
and SLAM-5026/EFX forks_______________ 9
4.8 Assembling the SLAM-26 rear interface_______ 10
4.9 Assembling the bolt for series 4050
trolleys_______________________________ 10
4.10 Anchoring the SLAM-CUSTOM PWR forks_11
4.11 Testing phase_________________________ 11
© Ferno Washington Italia s.r.l. MU-049-H, July 2014
3
Slam Cot Fastener
1. SAFETY INFORMATION
Read this User Manual carefully. It is an integral part of
the device and must always be readily available.
For your own personal safety and that of the patient,
please observe the following:
•Before each use, check that the device is working
properly, by following the indications in this manual
(see chapter 6 - paragraph 6.3 “Safety and functionality
checks”).
• In order to avoid infection and/or bacterial contamination,
carefully follow the instructions in chapter 6 - paragraph
6.2 “Hygienic treatment”.
1.1 Safety warnings
Warning notices indicate a potentially hazardous situation
which, if not avoided, could result in injury.
WARNING
Improper use of the SLAM Cot Fastener can cause
damage and /or injury. Use the SLAM Cot Fastener for
its intended purpose as described in this manual.
Untrained operators may injure themselves and/or
cause damage or injury. Only trained personnel should
be allowed to use the SLAM Cot Fastener.
Unauthorized modifications may cause serious
damage, injury or unforeseen operative problems. Do
not modify or alter the SLAM Cot Fastener in any way.
Any damage to the SLAM Cot Fastener may alter its
performance and safety. Inspect the SLAM Cot Fastener
frequently and especially before and after each use. Do
not use the SLAM Cot Fastener if it appears worn or
damaged.
Repairs carried out by technicians or workshops not
authorized by Ferno W. Italia will render any type of
warranty void and may make any operation involving
the SLAM Cot Fastener dangerous.
Improper operation can cause damage and/or injury.
Carry out maintenance as described in this manual.
Non-original spare parts may cause damage. Only use
original Ferno spare parts.
4
© Ferno Washington Italia s.r.l. MU-049-H, July 2014
Slam Cot Fastener
1.2 Important
1.5 Symbol Glossary
Important notices emphasize important usage or
maintenance information.
These symbols are shown on the SLAM Cot Fastener
and in this manual.
Important
This product meets European
Union Standards
Do not use high-pressure water or steam to clean the
SLAM Cot Fastener.
High-pressure water and steam may cause the SLAM
Cot Fastener to corrode.
1.3 Conformity to current
regulations
This product has been designed and built by Ferno
Washington Italia s.r.l. in conformity with safety
regulations contained in Directive 93/42/EEC (class
I) regarding medical devices and with EN 1789 1999+
A1:2003 regulations “Medical vehicles and their
equipment – Road ambulances”.
Shows the red SLAM unlock
button.
1.6 Risks of infection
To reduce the risk of exposure to blood-born infectious
diseases like HIV-1 or hepatitis, scrupulously follow the
instructions in this manual while using the SLAM Cot
Fastener and make sure it undergoes hygienic treatment.
1.4 Information labels
The information and safety labels provide important
information of which the user must be aware. Read and
follow the instructions on the labels. Replace worn or
damaged labels immediately. Contact Ferno Washington
Italy Customer Relations to request new labels (page 2).
Figure 1 - Main label
© Ferno Washington Italia s.r.l. MU-049-H, July 2014
5
Slam Cot Fastener
2. OPERATOR SKILLS AND TRAINING
2.1 Operator ability
•
Operators who use the SLAM Cot Fastener must:
•
•
•
•
•
•
Be familiar with procedures for moving the
patient
Be able to assist the patient
Have understood the procedures described in
this manual
Have taken part in a specific training course on
how to use the device correctly
Be familiar with the device, its features and all
the accessories used
Practice with the SLAM Cot Fastener and its
accessories before using it in real situations
Carefully record the training sessions with the SLAM
Cot Fastener on the form enclosed with this manual
(chapter 10 “Training record”)
WARNING
Untrained personnel may cause serious damage or injury
to themselves and to patients. Only expert, properly
trained staff should be allowed to use the SLAM Cot
Fastener.
2.2 Training
For correct training users must:
•
Read this manual carefully (for additional copies
contact Ferno Washington Italia s.r.l. Customer
Relations)
•
Follow a Training Program to use the SLAM Cot
Fastener correctly and safely
2.3 Operator skills
Operators must be able to ensure their own safety and
the safety of patients while using this product. Operators
must know how to use the device and the various system
components safely.
3. DESCRIPTION OF THE SLAM COT FASTENER
3.1 General Features
The SLAM device is a SLAM Cot Fastener for Ferno
stretchers to be fitted on the ground or on ambulance
loading surfaces. It is supplied in various models in order
to fit several stretchers and loading systems.
The following models are available:
•
SLAM-26 (for 26-S and 26P stretchers);
•
SLAM – 5026/EFX (for 5026 series and
WARNING
Improper use of the SLAM Cot Fastener can cause
damage and/or injury. Use the SLAM Cot Fastener for
its intended purpose and as described in this manual.
If the SLAM Cot Fastener is not assembled according
to the instructions in this manual can it cause serious
damage and/or injury to operators and patients.
CUSTOM-M stretchers);
6
•
SLAM-4050 (for 4051 and 4052 trolleys).
•
SLAM-CUSTOM PWR (for CUSTOM-PWR)
© Ferno Washington Italia s.r.l. MU-049-H, July 2014
Slam Cot Fastener
3.2 SLAM Cot Fastener disclaimer
3.4 SLAM-5026/EFX Components
The SLAM Cot Fastener, in its available models, has
been exclusively designed for use with the stretchers and
trolleys listed in paragraph 3.1 “General Features”. There
is no guarantee that the SLAM Cot Fastener is suitable
for stretchers or trolleys other than those indicated. For
conditions of warranty, please refer to chapter 9 “Warranty ”.
3.3 SLAM-26 components
Figure 3 - SLAM-5026/EFX components. a) SLAM Cot
Fastener. b) Front anchorage with dual hook.
3.5 SLAM-4050 Components
Figure 2 - SLAM-2 components 6. a) SLAM Cot Fastener.
b) Rear interface. c) Front anchorage with dual hook.
Figure 4 - SLAM-4050 components. a) SLAM Cot Fastener.
b) Single bolt interface c) Front anchorage with dual hook.
© Ferno Washington Italia s.r.l. MU-049-H, July 2014
7
Slam Cot Fastener
4. INSTALLING THE SLAM COT FASTENER
4.1 Notes on installation
Installation of the SLAM Cot Fastener requires
professional knowledge of how a road ambulance is built.
WARNING
The SLAM Cot Fastener has been designed to be
installed with steel counterplates placed below the
surface on which the SLAM Cot Fastener is installed
(the floor of an ambulance or loading surface, etc.).
If the vehicle in which the SLAM Cot Fastener is
installed does not have the counterplates, required,
they must be installed by qualified technicians.
4.2 Notes on the vehicle
If the SLAM Cot Fastener is mounted on the ambulance
floor, ensure that it is not installed near oxygen tubes or
fuel lines, and that no holes are made in the structure of
the vehicle during installation.
4.3 Parts supplied
Each model has a SLAM Cot Fastener and front anchoring.
Depending on the type of installation you will need a 26S
stretcher, a 26 P stretcher, a 5026 stretcher, or a 4051 or a
4052 trolley.
Identify where the stretcher (or trolley) will be positioned
in the ambulance and mark the position of the 4 anchorage
points of the SLAM Cot Fastener on the floor.
Remove the SLAM Cot Fastener and make 4 holes (9 mm
in diameter) in correspondence with the points marked.
The SLAM Cot Fastener is fixed to the floor using four M8
countersunk hex head screws, nuts and washers (screws
not included). Use rubber washers, locknuts or medium or
low strength threadlocker.
If the SLAM Cot Fastener is fixed to the floor of the
ambulance or on a loading surface, the lower part of the
floor or the metal sheet of the loading surface must have
a steel counterplate (minimum 3 mm thick and 200 mm x
160 mm in size).
Apply medium or low strength threadlocker to the screw
thread.
For further information contact Ferno Washington Italia
Technical Assistance Service.
Please refer to chapter 3 “Description of the SLAM Cot
Fastener”.
4.6 Anchoring the SLAM-26 fork
4.4 Tools and installation elements
needed
This operation must be performed after the operations
described in paragraphs 4.5 and 4.8. Attach the 26S or
26P stretcher to the SLAM Cot Fastener and ensure that
the attaching mechanism has clicked into place fully and
correctly.
- A drill with 7 mm and 9 mm bits
- A Phillips screwdriver
- An adjustable wrench
- Pliers
- M8 and M6 bolts of various lengths
- Nuts and washers for M8 and M6 screws
- Low strength threadlocker
- 24 diameter wrench
8
4.5 Anchoring the SLAM Cot
Fastener
Bring the fork into contact with the transversal tube of
the stretcher and move it at least 10 mm in the opposite
direction to the SLAM (figure 5). Mark the 5 anchorage
points on the floor.
Remove the fork and make 4 holes with a 9 mm
diameter and one hole with a 7 mm diameter in
correspondence with the points marked (the 4x9 mm
diameter holes in correspondence with the 4 holes of
the 8 mm diameter fork and the 7 mm diameter hole
in correspondence with the 6 mm diameter fork).
© Ferno Washington Italia s.r.l. MU-049-H, July 2014
Slam Cot Fastener
The fork is anchored to the floor using four M8
screws and one M6 screw, their relative nuts and
washers (screws not supplied). Use rubber washers,
locknuts or medium or low strength threadlocker.
Place two steel counterplates with a minimum
thickness of 4 mm, and at least 80 mm x 80 mm in
size, in the lower part of the floor or the metal sheet of
the loading surface, for the screws shown in figure 6.
4.7 Anchoring the SLAM-4050 and
SLAM-5026/EFX forks
This operation should take place after those described in
paragraph 4.5. Attach the series 5026 stretcher or series
4050 trolley to the SLAM Cot Fastener and ensure that
the attaching mechanism has clicked into place fully and
correctly. Bring the fork into contact with the transversal
tube of the stretcher and move it at least 10 mm in the
opposite direction to the SLAM. Mark the 6 anchorage
points on the floor. The fork is anchored to the floor using
six M6 screws, their relative nuts and washers (screws
not supplied). Use rubber washers, locknuts or medium
or low strength threadlocker.
Place four steel counterplates with a minimum thickness
of 4 mm, and at least 80 mm x 80 mm in size in the lower
part of the floor or the metal sheet of the loading surface,
for the screws shown in figure 7.
Figure 5 - Position of the fork in contact with the
transversal tube of series 26 stretcher.
Figure 7 - Fastenings for which the counterplates are
needed.
Warning:
Figure 6 - Fastenings for which the counterplates are
needed.
ensure that there is a distance of
approximately 180 mm between the two end sections of
the anchorage system for series 5126 stretchers as shown
in figure 8.
Figure 8 - Distance of
approx. 180 mm.
© Ferno Washington Italia s.r.l. MU-049-H, July 2014
9
Slam Cot Fastener
4.8 Assembling the SLAM-26 rear
interface
Place the low strength threadlocker on the screw thread.
The screws must be fixed so that the clamps are parallel to
the upper bar. Adjust the height of the bolt to maintain the
interspace, shown in figure 12, between the head of the
bolt and the lower part of the SLAM Cot Fastener plaque.
Tighten the bolt in position using the return ring nut.
Figure 9 - Position of the rear interface on the stretcher.
The bar must be positioned on the middle axis of the
stretcher (figure 9). The plastic bearing must be inserted
in the central crossbar and the clamps must be positioned
and fixed as shown as in figures 10 and 11.
Figure 12 - Adjusting the height of the single bolt.
As the return ring nut has a self-locking ring, there is no
need for threadlocker.
WARNING
Regulate the SLAM Cot Fastener as shown in this
manual. Incorrect regulation can cause problems when
the stretcher is locked and unlocked.
4.9 Assembling the bolt for series
4050 trolleys
Figure 10 - Detail showing the front and central clamps.
The series 4050 trolley, which does not come with a
reinforced single bolt interface (figure 13), must be
adapted in order to be used with the SLAM Cot Fastener.
Before assembling the SLAM Cot Fastener, check that
the interface is there. If it is missing, contact Ferno
Washington Italia Customers Services.
Figure 11 - Detail showing the rear clamp with single bolt
10
Figure 13 - single bolt
interface.
© Ferno Washington Italia s.r.l. MU-049-H, July 2014
Slam Cot Fastener
4.10 Anchoring the SLAM-CUSTOM
PWR forks
This operation should take place after those described
in paragraph 4.5. Attach the CUSTOM-PWR stretcher
to the SLAM Cot Fastener and ensure that the attaching
mechanism has clicked into place fully and correctly.
Bring the fork into contact with the carter and move it at
least 10 mm in the opposite direction to the SLAM. Mark
the 6 anchorage points on the floor. The fork is anchored
to the floor using six M6 screws, their relative nuts and
washers (screws not supplied). Use rubber washers,
locknuts or medium or low strength threadlocker.
4.11 Testing phase
Once the SLAM Cot Fastener has been assembled
(whichever model is used) load the stretcher (26S, 26P
or series 5026) or the trolley (series 4050) onto the
ambulance and carry out loading and unloading tests.
• Load the stretcher (or trolley) and lock it to the
SLAM Cot Fastener. Check that the stretcher or
trolley is locked correctly.
• Unlock the stretcher (or trolley) by pressing the red
unlock button on the SLAM Cot Fastener (figure 15)
and proceed to unload.
• Repeat these operations several times to ensure
everything is working correctly.
Figure 14- Distance 10 mm
WARNING
Always use threadlocker when indicated in this users’
manual.
Follow the installation instructions in the users’ manual
enclosed with the product in order to ensure safety
compliance. The SLAM Cot Fastener conformity
declaration released by Ferno Washington Italia
depends on correct installation of the product according
to instructions; Ferno Washington Italia declines all
responsibility if the SLAM Cot Fastener is incorrectly
installed.
Red unlock button
for stretchers/trolleys
Figure 15 - Red unlock button for stretchers/trolleys on
the SLAM Cot Fastener.
© Ferno Washington Italia s.r.l. MU-049-H, July 2014
11
Slam Cot Fastener
5. USING THE SLAM COT FASTENER
5.1 Before use
The operator must have carefully read and understood
the information contained in this manual and in the user
manual of the stretcher or trolley to be used with the
SLAM Cot Fastener before operation.
The SLAM Cot Fastener must be installed firmly and
correctly by a specialized technician (see chapter 4,
paragraph 4.1 “Notes on installation”).
Ensure that the SLAM Cot Fastener is installed correctly.
Ensure that the anchor bolts are regulated properly.
Follow the instructions in chapter 6, paragraph 6.3
“Safety and Functional Check”.
WARNING
Improper use of the SLAM Cot Fastener may cause
damage and/or injury. Use the SLAM Cot Fastener for
its intended purpose and as described in this manual.
5.2 Locking and unlocking the
stretcher or trolley with the SLAM
Cot Fastener
How to lock the stretcher or trolley to the SLAM
Read the stretcher or trolley user manual on how to load
correctly.
Load the stretcher or trolley into the ambulance and guide
it in the direction of the front anchoring elements (forks in
the case of the SLAM-26 and SLAM-4050). Align the bolt
positioned in the rear part of the stretcher or trolley with
the SLAM guide channel (figure 16). Slide the stretcher
or trolley so that the bolt is inserted into the snaplock of
the guide channel. The bolt will automatically activate
the locking mechanism so that the stretcher or trolley is
locked firmly.
Snaplock
Guide
channel
Figure 16 - Stretcher/trolley lock.
How to unlock the stretcher or trolley from the SLAM
Read the stretcher or trolley user manual on how to unload
correctly.
Red stretcher/
trolley unlock
button
To unlock the stretcher or trolley from the SLAM, press
the red unlock button on the SLAM (figure 17) and
proceed to unload.
Figure 17 - SLAM red stretcher/trolley unlock button.
12
© Ferno Washington Italia s.r.l. MU-049-H, July 2014
Slam Cot Fastener
6. MAINTENANCE
6.1 Routine Maintenance
The SLAM Cot Fastener should be maintained regularly.
Preventative maintenance, inspections and repairs must
be carried out exclusively by Ferno or by personnel
expressly authorized by the manufacturer. The SLAM
Cot Fastener must undergo preventative maintenance at
least once a year by a specialized Ferno technician.
If the device is used heavily the SLAM Cot Fastener
should undergo maintenance more frequently by
authorized Ferno personnel. Repairs must be carried out
by a specialized Ferno technician with original spare parts.
We recommend the user follows the maintenance
schedule below:
Maintenance Schedule
Each Use
●
Disinfection
Cleaning
●
Inspecting
Safety and functional check
Contact Ferno Washington Italia for information on
disinfection and cleaning/disinfecting products.
WARNING
Improper use and improper maintenance may cause
damage, accidents and/or injury. Carry out maintenance
as described in this manual. Only use original spare parts.
Maintenance and repairs must be carried out only by a
Ferno technician.
As Needed
Each Month
●
●
● ●
●
●
●
Table 1 User maintenance schedule.
© Ferno Washington Italia s.r.l. MU-049-H, July 2014
13
Slam Cot Fastener
6.2 Hygienic treatment
6.2.1 Disinfection
1. Clean the surfaces of the SLAM Cot Fastener with
disinfectant after every use. Use a non-abrasive
surface disinfectant.
2. Do not immerse the SLAM Cot Fastener in
disinfectant.
3. Check that there are no signs of wear or damage
during disinfection.
4. Dry with a cloth. Ensure that all the components
of the device are completely dry before using them
again.
5. Suitable gloves are recommended during disinfection
(e.g. disposable gloves or household gloves).
6.2.2 Cleaning
1. Clean the surfaces of the SLAM Cot Fastener with a
cloth, warm water and non-abrasive detergent.
2. Do not immerse the SLAM Cot Fastener in water.
3. Use a soft brush to remove any marks, if necessary,
taking care not to remove labels.
SLAM Cot Fastener.
The safety and functional check must be carried out
monthly or more frequently if the product is used heavily.
Technical maintenance personnel should carry out the
following checks:
•
Are all components present?
•
Does the snaplock mechanism close perfectly when
the locking bolt is inserted?
•
Does the front bar (for SLAM-26, SLAM-4050 and
SLAM 5026) fit perfectly into the fork?
•
Are the SLAM Cot Fastener and the forks fixed
firmly and correctly to the ambulance?
•
Are the forks bent, cracked or are there evident signs
of wear and tear or damage?
•
Is the single bolt interface installed on the series
4050 stretcher (figure 13)?
If signs of wear, damage, malfunction or attrition are
discovered during this test and inspection, the device
must be taken out of use immediately. Contact the Ferno
Washington Italia Technical Support Service immediately.
4. Dry with a cloth.
5. Do not wash with pressurized water.
6. Suitable gloves are recommended during cleaning
(e.g. disposable gloves or household gloves).
WARNING
Steam or high-pressure water penetrates the joints and
may cause corrosion or remove lubricant. Do not use
high pressure water or steam to clean/disinfect the
SLAM Cot Fastener.
6.3 Safety and functional check
This inspection is to look for any problem that may
compromise the integrity or correct functioning of the
14
© Ferno Washington Italia s.r.l. MU-049-H, July 2014
Slam Cot Fastener
7. ACCESSORIES AND RELATED PRODUCTS
Part No
SLAM-26
Description:
COT FASTENER FOR 26-S AND 26P STRETCHERS
WITH FRONT ANCHORING KIT.
SLAM – 5026/EFX
COT FASTENER FOR SERIES 5026 AND CUSTOM-M
STRETCHERS WITH FRONT ANCHORING KIT.
SLAM-4050
COT FASTENER FOR 4051AND 4052 TROLLEYS
WITH FRONT ANCHORING KIT.
SLAM-CUSTOM PWR
COT FASTENER FOR CUSTOM-PWR STRETCHERS
WITH FRONT ANCHORING KIT.
25-0331-001
WEDGE KIT FOR SLAM 5026/EFX RAMP.
SLAM-26+
FASTENER FOR 26-S STRETCHERS WITH FRONT ANCHORING KIT
To assemble the ramp wedge kit (code 25-0331-001), see instructions for correct assembly of the ramp for the
SLAM5026/EFX Cot Fastener.
Figure 18 - Ramp wedge kit.
Figure 19 - Ramp wedge kit installed.
For better hold of the 5126EL stretcher anti-fall system to the SLAM Cot Fastener apply a self-adhesive non-slip strip to
the SLAM (figure 20).
Figure 20 - Self-adhesive non-slip strip.
Instructions for applying the self-adhesive non-slip strip:
•
•
•
•
Clean the surface of the SLAM Cot Fastener to which the strip will be applied carefully with acetone, thinner or
alcohol.
Cut the strip if necessary to obtain a length of around 130 mm.
Apply the strip so that it fits perfectly to the surface and is aligned with the upper edge of the SLAM.
Wait approximately 24 hours before use so that the adhesive sticks perfectly.
© Ferno Washington Italia s.r.l. MU-049-H, July 2014
15
Slam Cot Fastener
8. TECHNICAL SUPPORT AND SERVICE
Check regularly that the strip has no attrition and change
it if it is worn or damaged.
fax. +39 0516861508
Email: [email protected]
8.1 Technical Support
8.2 Services and Training
For technical support, repairs and further information
contact:
For information on the use of the SLAM Cot Fastener and
to plan training courses, contact:
Ferno Washington Italia s.r.l.
Via B. Zallone n. 26
40066 - Pieve di Cento (BO) - Italy
tel. +39 0516860028
Ferno Washington Italia s.r.l.
Via B. Zallone n. 26
40066 - Pieve di Cento (BO) - Italy
tel. +39 0516860028
fax. +39 0516861508
Email: [email protected]
9. WARRANTY
9.1 Warranty Conditions
Ferno products are guaranteed free from manufacturing
defects for 24 months from the date shown on the Ferno
W. Italia s.r.l. delivery note.
Ferno Washington Italia parts have a 12-month warranty.
During the warranty period all parts with properly
ascertained manufacturing defects will be repaired and/or
replaced, not including labor costs or transfer, transport
and packaging costs.
The warranty does not cover consumables or components
subject to wear associated with normal product use, any
parts typically subject to sliding or rolling friction (ball
bearings, brushes, lubricants, tracks and belts, etc.), parts
potentially subject to oxidation or corrosion (copper
or metal alloy elements, electrical and mechanical
apparatus) and batteries.
External finishes (gel coat/resin, paint, powder coating,
decals, ribbons, lettering, etc) are guaranteed for 90 days.
Repairs are carried out by specialized technical staff
at the Ferno Washington Italia s.r.l. headquarters in
Via Zallone 26- 40066 Pieve di Cento (BO) or at the
Customer’s premises if approved by Ferno Washington
Italia Customer Relations.
Technical support carried out at the Customer’s premises
must be approved and will include partial reimbursement
of expenses sustained that will be documented upon
request. For info on the cost of technical support contact
16
Ferno W. Italia s.r.l. Technical Support Department.
Repairs are guaranteed for 6 months from the date of
completion. This warranty applies only if the product is
used according to the user manual supplied. Improper or
careless use will render this warranty void.
The warranty begins on the day on which the product is
sent by Ferno W. Italia s.r.l. and does not cover delivery
costs. Ferno W. Italia s.r.l. is not responsible for damage
in transport or for damage caused by improper use of the
product.
Products that do not have the original Ferno trademark,
sold by Ferno W. Italia s.r.l., are covered by the product
manufacturer’s original warranty. Ferno W. Italia s.r.l. will
not extend a warranty beyond the product manufacturer’s
warranty period; Ferno W. Italia s.r.l. will not be held
responsible for products manufactured by others.
The warranty will not apply in the case of:
– Failure to observe instructions for use
– Wrong usage
– Inappropriate use or handling
– Repairs to the device by unauthorized personnel
– Damage in transport due to improper packaging when
returned by the user
– Lack of maintenance
– Failure to use original parts
In cases not covered by the warranty, Ferno W. Italia will
not be responsible for transport costs for sending and
returning the product.
© Ferno Washington Italia s.r.l. MU-049-H, July 2014
Slam Cot Fastener
9.2 Disclaimers
9.4 Complaints
If a product is defective, Ferno W. Italia s.r.l. will repair or
replace it, or refund the cost price, at its discretion. Ferno
W. Italia s.r.l. will not be responsible for refunding more
than the cost of the product. The buyer accepts these terms
in lieu of all damages. Ferno W. Italia s.r.l. does not make
any other express or implicit guarantees, nor does it make
any guarantee as to the merchantability or suitability for
particular ends of its product or the products of others.
In the case of infraction of the limited warranty, legal
procedures must be archived within a year of the date on
which an infraction was or should have been discovered.
Ferno W. Italia s.r.l. reserves the right to cancel the
warranty on products sold:
- If labels or plates showing the manufacturer’s trademark,
serial number or registration number have been erased
or removed
- If the product has been altered or repaired or if work
has been carried out without authorization by Ferno W.
Italia s.r.l. or its personnel
- If the product has not been used according to the
instructions supplied or for purposes other than that for
which it was designed
- According to paragraph 9.1 “Warranty Conditions”.
Under no circumstances will Ferno W. Italia s.r.l. be held
responsible for direct or indirect damage caused by use
other than that described in the user manual and for which
the product was designed.
Any complaints must be communicated to the vendor
or to Ferno W. Italia s.r.l. Customer Relations within 5
days of receipt of the product or discovery of the alleged
defect. Complaints or controversies regarding a single
product do not exonerate the buyer from the obligation of
receiving and paying for other products in the same order,
unless otherwise agreed with the seller.
9.5 Authorization for Returns
No product will be accepted without prior approval by
Ferno W. Italia s.r.l. Products returned for commercial
reasons, i.e. for reasons that do not derive from defects
of conformity, will only be accepted after they have been
checked by specialized Ferno W. Italia s.r.l. staff.
9.3 Warranty Requests
If you suspect that you have received a defective product,
contact Ferno Customer Relations immediately. A
representative will deal with your complaint. Obtain
authorization from Ferno Customer Relations before
sending products to Ferno W. Italia s.r.l.
© Ferno Washington Italia s.r.l. MU-049-H, July 2014
17
Slam Cot Fastener
10. TRAINING RECORD
Date
Instructor’s name
Type of Training
11. MAINTENANCE RECORD
Date
18
Maintenance
technician
Type of Maintenance
© Ferno Washington Italia s.r.l. MU-049-H, July 2014
Slam Cot Fastener
Product user and maintenance manual, needed for the safe operation, efficiency and reliability of the product and to
render warranty conditions valid.
MU-049-H
July 2014
Ferno Washington Italia s.r.l.
Via Benedetto Zallone, 26
40066 - Pieve di Cento (BO) - ITALY
Internet www.ferno.it
E-mail [email protected]
Telephone...................................+39 0516860028
Fax .........................................+39 0516861508
© Ferno Washington Italia s.r.l. MU-049-H, July 2014
19