1
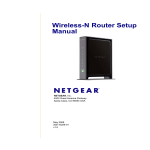
NexPump Ai Network\Notification
Guide
NexPump, Inc.
Phone: 630-365-4NEX (4639)
Fax: 630-365-6919
Email: [email protected]
Web Address: www.nexpump.com
Network\Notification Guide 5.00.0000
NexPump is a Registered Trademark of NexPump, Inc.
Copyright © 2003-2014 NexPump, Inc., All Rights Reserved
Patent Pending
Intentionally Blank
NexPump Ai Network\Notification Guide
TABLE OF CONTENTS
Ai Notification System
....... 12
Appendix
....... 13
Internet Screens
....... 10
LAN
.......
4
LAN Warnings
.......
7
LAN Errors
.......
7
Network Defaults
.......
7
Notification Status
....... 10
Phone Line Info
.......
3
Phone Line Setup
.......
3
Remote Network Setup
....... 10
Surge Protector
....... 14
Wired Network Setup
.......
8
Wireless Network Setup
.......
8
WiFi Config Mode
....... 4,6
2
PHONE-LINE:
Phone Notification Module:
In the event of a Phone Notification Module alert the
display will toggle ‘ANMOD’ in location (E) of the
display
If Notification is Installed:
Notification will NOT occur when a Phone Connection is
no longer detected, however the alarm will sound
Clear Phone Monitor Alerts:
To Clear Phone Monitor Alert, use Function 'C'
Testing:
The Phone Notification Module is tested during Automatic
Self-Tests and Manual Tests. The Phone Line is tested in
Automatic Self-Tests when Phone Monitor is enabled and
during Manual Tests.
Phone Line Setup:
Menu Options for Phone Operations:
Function 'K' Phone Operations:
Menu Item to turn on Phone Monitor:
(Turn on Phone Monitor to Monitor the Phone connection.
Press and hold Function Button at this menu, cursor will
toggle between 'Y' and 'N'. Release at desired position)
The NexPump will only accept an RJ11 Phone Connector
that plugs into the NexPump Unit. It is also required to
install the supplied surge protector before the NexPump
Unit. Please refer to the Surge Protector installation at end
of this document for more information. Once the phone
line is connected, you can test the phone line connection
by running a Manual Test.
Function 'I' Phone Operations:
Manual Test to Check Phone Line:
(Use Function 'T' to run a manual test.)
Info Item for Phone Monitor:
(Displays if Phone Monitor is Off or On)
Phone Line Status:
(Status Returned, 'Connected' or 'No PhLine')
Phone Monitor Operation:
The Phone Monitor when enabled will monitor the Phone
Line connection and alert you if a Phone Line is no longer
detected. The Phone Monitor by default is set to the Off
position. Once a Phone Line Connection is no longer
detected, an alarm will sound, in addition the display will
toggle ‘PHMON’ in location (E) of the display..
Test Phone Line Polarity:
(Verify Phone Polarity)
Test Phone Line Polarity:
(Polarity Returned, 'OK' or Revrsed'. If a reversed polarity
is returned, the tip and ring should be reversed. This is
typically the red and green wires of the phone line.)
3
Menu Item DHCP:
('DHCP' stands for 'Dynamic Host Configuration Protocol'.
By default this is turned on and allows for the Network
Information to Configure Automatically. Press and hold
Function Button at this menu, cursor will toggle between
'Y' and 'N'. Release at desired position)
LAN:
If Notification is Installed:
Notification will NOT occur when a LAN Connection is
no longer detected.
Clear LAN Monitor Alerts:
To Clear LAN Alerts, use Function 'C'
Testing:
LAN is continually monitored.
Menu Item to Reset Web Username and Password:
(Resets Username-'NPAdmin' and Password- Serial #.
Defaults: Username'NPAdmin', Password- Serial #.
(Press and hold Function Button at this menu, cursor will
toggle between 'Y' and 'N'. Release at 'Y')
Menu Options for LAN Operations:
Function 'K' LAN Operations:
Menu Item to Lock IP Configuration:
(Turn on 'Lock IP Config' to prevent changes to the IP
Configuration. Press and hold Function Button at this
menu, cursor will toggle between 'Y' and 'N'. Release at
'Y')
Menu Item to Set HTTP Port:
(Sets HTTP Port. Valves: '80','81','82','83','84','0'. Defaults
to Port '80'. Use if you need the HTTP port to be other than
'80'. '0' disables the HTTP Port.
Press and hold Function Button at this menu, Port will
increment, range 80-84, 0 – Disables HTTP)
Menu Item to Reset IP Configuration:
(Select 'Y' to Reset IP Configuration to defaults.
Defaults: Address-'192.168.1.105', Mask-'255.255.255.0'
Gateway-'192.168.1.51',DNS-'192.168.1.51',DHCP-'On',
HTTP Port-'80'
Press and hold Function Button at this menu, cursor will
toggle between 'Y' and 'N'. Release at 'Y')
Menu Item to turn on LAN Monitor:
(Turn on LAN Monitor to continually Monitor the LAN
connection. Defaults to 'Off'. Press and hold Function
Button at this menu, cursor will toggle between 'Y' and 'N'.
Release at desired position)
Menu Item to Reset WIFI Configuration:
(Wireless Module ONLY)
(Select 'Y' to Reset WIFI Configuration to defaults.
Note: Resetting WIFI Configuration will reset any
programmed User WIFI Configuration and you will need
to reprogram your WIFI Configuration again.
Press and hold Function Button at this menu, cursor will
toggle between 'Y' and 'N'. Release at 'Y')
Menu Item to turn on Update Mode:
(Turn on Update Mode so LAN Firmware can be updated..
Defaults to 'Off'. This should only be turned on to update
firmware and then turned off. Press and hold Function
Button at this menu, cursor will toggle between 'Y' and 'N'.
Release at desired position)
4
Menu Item to turn on WIFI Config Mode:
(Wireless Module ONLY)
(Turn on WIFI Config Mode to setup your own Wireless
Configuration. Defaults to 'Off'.
Press and hold Function Button at this menu, cursor will
toggle between 'Y' and 'N'. Release at desired position)
Menu Item To Send Test Status EMail:
(Used to Send a Test Status EMail. Send Status is also
available on the 'Web Configuration Screen' in the EMail
Status Table under 'Last Send Status'.
Press and hold Function Button at this menu, cursor will
toggle between 'Y' and 'N'. Release at 'Y')
Menu Item to turn on WPS Config Mode:
(Wireless Module ONLY)
(ETH Firmware 5 or greater)
(Turn on WPS Config Mode to setup your own Wireless
Configuration. Defaults to 'Off'.
Press and hold Function Button at this menu, cursor will
toggle between 'Y' and 'N'. Release at desired position)
Menu Item To Clear Intruder Detection:
(ETH Firmware 5 or greater)
(If an Invalid Password is entered more than 10 times in 15
Minutes, the system will automatically prevent access to
the NexPump Web Interface for 15 minutes. If you want to
access the Web Interface before that you can Clear the
Intruder Detection through this menu item.
Press and hold Function Button at this menu, cursor will
toggle between 'Y' and 'N'. Release at 'Y')
WPS Config ON
Are U Sure ? Y N
Clr Intruder?
Are U Sure ? Y N
Menu Item for EMail Status:
(Set this for the interval to receive Status EMails. Each
Number is the number of Self-Tests which occur every 12
Hours. In the Screen below the Recurring Amount is set
for '02', which will send a Status Email after every 2 SelfTests or every 24 Hours.
Press and hold Function Button at this menu, Number will
increment, '0-28', 0 – Disables Status EMail)
Menu Item To Set Status EMail Port:
(Used to Set Port for sending Status EMails
Valid values are 25, 465, 587
Press and hold Function Button at this menu, Number will
loop through 025, 465, 587)
5
Info Item Displays Web HTTP Username :
(Displays configured Web HTTP Username
Default:'NPAdmin' (Case Sensitive))
Function 'I' LAN Operations:
Note: With Firmware Version 5 or greater, Pressing and
Releasing Function Button will allow you to skip
screens.
Info Item for LAN Monitor:
(Displays if LAN Monitor is Off or On)
Info Item Displays Web HTTP Password :
(Displays configured Web HTTP Password
Default:Serial Number (Case Sensitive))
Info Item for SSID Connection:
(Wireless Module ONLY)
(Display Wireless SSID Connection. '0' = No Connection)
Info Item Displays Status EMail To Address :
(Displays configured Status EMail To Address)
Info Item Displays IP Address:
(Displays configured IP Address)
Info Item Displays Status EMail Host Address :
(Displays configured Status EMail Host Address)
Info Item Displays IP Mask Address:
(Displays configured IP Mask)
Info Item Displays Status EMail Login Name :
(Displays configured Status EMail Login Name. Required
if Authentication is needed)
Info Item Displays IP Gateway Address:
(Displays configured IP Gateway)
Info Item Displays Status EMail Login Password :
(Displays configured Status EMail Login Password.
Required if Authentication is needed)
Info Item Displays DNS Address:
(Displays configured DNS)
Info Item Displays Status EMail Recurring Count :
(Displays configured Status EMail Recurring Count)
Info Item Displays HTTP Port :
(Displays configured HTTP Port)
6
Info Item Displays Status EMail Port:
(Displays configured Status EMail Port)
Intentionally Blank
Info Item Displays Status EMail Last Status :
(Displays configured Status EMail Last Status)
7
'03' – Authentication Failure
'04' – Association Failure
'05' – WEP Handshake Failure
'06' – PSK Calculation Failure
'07' – PSK Handshake Failure
'08' – AdHoc Join Failure
'09' – Security Mismatch
'10' – No Suitable AP Found
LAN Monitor Operation:
LAN Monitor when enabled will monitor the LAN
connection and alert you when if no longer detects a
network connection. LAN Monitor by default is set to the
Off position. Once a LAN Connection is no longer
detected an alarm will sound, in addition the display will
toggle ‘LANEr’ in location (E) of the display..
Status Code '03'
Connection Temporarily Lost
Sub values:
'01' – Beacon Timeout
'02' – Deauth Received
'03' - Disassociate Received
LAN Notification Module:
In the event of a LAN Notification Module alert the
display will toggle ‘ANiMOD’ in location (E) of the
display
Status Code '04'
Connection Permanently Lost
Sub values:
Same as Status Code '03'
Status Code '20'
Connection timeout.
A timeout occured attempting connection. Will keep
retrying.
There is no sub value for this parameter.
LAN Disconnected Warning:
Status Code '20'
Connected but DHCP is not bound.
There is no sub value for this parameter.
(For the Wired Internet Module the message 'CABLE' will
toggle when the Module does NOT sense a LAN
connection)
Network Defaults:
IP Address – '192.168.1.105'
IP Mask – '255.255.255.0'
IP Gateway – '192.168.1.10'
DNS – '192.168.1.51'
HTTP Port – '80'
Username: 'NPAdmin' (Case Sensitive)
Password: Unit Serial Number (Case Sensitive)
(For the Wireless Internet Module the message 'WIFI' will
toggle when the Module is not connected to a wireless
router).
In addition, the following WIFI Connection Code will
toggle with 'WIFI'. The code will be in a format of
'XXXX'. The first two digits are the status code, followed
by the last two being the sub code.
Status Code '00'
Still performing initial connection attempt.
There is no sub value for this parameter.
Status Code '01'
Connection Successful
There is no sub value for this parameter.
Status Code '02'
Connection failed.
Sub values:
'02' – Join Failure
8
Wired Network Setup:
Wireless Network Setup:
The NexPump Wired Internet Module is a IEEE 802.3
compatible Ethernet device with a speed of 10Mbps and
accepts a standard RJ45 LAN Cable.
The NexPump Wireless Internet Module is a Wi-Fi
802.11b compatible device. The following will guide you
in the setup so the NexPump can be connected to your
household wireless router. You can also visit the NexPump
Website to view videos on network setup.
The wireless antenna comes disconnected and needs to be
attached. The antenna attaches to the Antenna Jack located
on the left side of the NexPump.
1.
2.
3.
4.
5.
Plug one end into the NexPump LAN Port and
the other end into your LAN Router or Hub. The
'Link LED' should be steady Amber and the
'Activity LED' should blink Green. If you do not
see the LED's active check you hub, router for
cable.
By default 'DHCP' is enabled and in most cases
'DHCP' should be enabled on your network too.
You can verify the NexPump was configured with
DHCP by using Function 'I' as per the LAN
section of this manual. Verify that an IP Address
exists. The displayed address in this manual will
most likely be different then the display on your
system.
Once you have the IP Address of the NexPump
you can go to a browser on your network to
access the NexPump internally. For example, the
IP Address in this manual states '192.168.1.25'.
You would enter '192.168.1.25' in the address bar
of your browser to access the NexPump Web
Interface. The default password in located in the
Function 'I' of the LAN section.
You should change the Username and Password
once you get access to the Web Interface.
Password configuration is location in the 'Web
Configuration Link', see Internet Screens in this
manual.
Manual Configuration can be completed with a
cross-over cable. See Network Defaults (Table
5.1) for default IP Setting.
The antenna screws on to the Jack and should attach easily
(be careful not to strip the threads). Rotate and pivot (90
degrees) the antenna as it appears in the above diagram.
Important: If you want to be alerted of Power Outages
you need to be sure an Uniterruptable Power Supply
(UPS) is connected to your router or hub, in addition
will operate for at least 45 minutes on Battery. Check
with your Internet Provider about Internet Use on
Power Outages. See Appendix
Wireless Connection to your Network
There are two methods of WIFI connection. The WIFI
Config Mode and the WPS Mode. The WPS mode is only
available on WIFI Firmware version 5.00 or greater.
WIFI Config Mode:
You can use a computer with a wireless interface card or a
You can also visit the NexPump Website to view videos on smart phone or tablet with wireless connectivity.
Turn 'WIFI Config Mode' On. Use Function 'K', Press and
network setup.
hold Function Button at this menu, cursor will toggle
Important: If you want to be alerted of Power Outages between 'Y' and 'N'. Release at 'Y')
you need to be sure an Uniterruptable Power Supply
(UPS) is connected to your router or hub, in addition
will operate for at least 45 minutes on Battery. Check
with your Internet Provider about Internet Use on
Power Outages. See Appendix
9
Mode flashing 'W' showing NexPump in WIFI Config
Mode.
Once the NexPump shows Connected you are ready to
connect with your browser.
3. Connect through a Browser:
Open your browser. Enter the IP Address '192.168.1.105'
in the address bar. A Password dialog should pop up.
Defaults: (Case Sensitive)
Username: NPAdmin
Password: Unit Serial Number (Letters Uppercase)
2. Connect to your NexPump:
On a computer you need to find the Icon 'Wireless
Network Connection'. This can be found on the right side
of the Taskbar or in 'Control Panel', 'Network
Connections' (Table 7.1). Right Click the 'Wireless
Network Connection' then click 'View Available Wireless
Networks' (Table 7.2).
Network Connections
Once you enter the correct Username/Password you should
be on the 'Stats and Informational Page'. Click the 'Web
Configuration Link' at the top of the page. Once on the
'Web Configuration Page', scroll down to the dialog 'WIFI
Configuration'. Enter your 'SSID', 'Security Type' and
'Security Key'. Once completed click the 'Submit' button
below the dialog 'WIFI Configuration'
Table 7.1
View Available Wireless Networks
Table 7.2
Highlight 'NexPump' and click Connect (Table 7.2). On a
smart phone or tablet find your Wireless Networks setup
and connect to the same Wireless Network 'NexPump'.
Once you click submit, you should go to the NexPump
Unit as the NexPump will automatically select a Function
'I' once the configuration is complete. Once it enters the
Function 'I' you can verify that the NexPump is connected
to your wireless router. You should see a connection to
your SSID that you just entered, in addition your IP
Address that was assigned, assuming that DHCP is
enabled. Use Function 'I' to verify configured IP Address
If you do not see a connection to your wireless router, you
should run a Function 'I' again after approximately two (2)
minutes. If there still is no connection, repeat this process
again as you may have incorrectly entered some
information.
10
WPS Push Button Mode: (ETH Firmware Revision 5 or
greater)
Turn 'WPS Config Mode' On. Use Function 'K', Press and
hold Function Button at this menu, cursor will toggle
between 'Y' and 'N'. Release at 'Y')
Network Remote Access Setup:
To access your NexPump from outside your household you
will need to configure your Internet Router for an Address
Translation or a Port Forwarding Configuration available
on most Internet Routers. Your router may have already
assigned the NexPump with a public address that can be
used from the outside world. You can check the address
range of Private IP Addresses below..
Private IP Addresses will be in this range:
10.0.0.0 - 10.255.255.255
172.16.0.0 - 172.31.255.255
192.168.0.0 – 192.168.255.255
WPS Config ON
Are U Sure ? Y N
Once the WPS Config is ON you will see the following on
the second line of the LCD Screen:
The below graphic is an example of using Port Forwarding
with a Netgear WNR2000 router to enable access to your
NexPump for remote locations. The NexPump is
configured with a IP Address of '192.168.1.5' and Port
Forwarding is set for Port '80'. Port '80' is the default
Once the NexPump is in the WPS Waiting Mode, press the HTTP port and should not normally be changed unless
WPS Button on the wireless router you would like to have there is a specific reason to do so. The range for HTTP
the NexPump connect to. If you are unfamiliar with the
Ports are Port 80-84 and can be changed using Function
WPS Mode of your wireless router, please refer to the
'K'.
routers user manual for more information.
WPS Waiting
Once the WPS on your wireless router is initiated, you
should see the following on the LCD screen:
WPS In-Progress
Once the LCD switches to WPS In-Progress, it should take
a few minutes to make the connection to your router. Once
a connection is made the NexPump will automatically
select a Function 'I' for you. The Function 'I' will toggle
through many screens. You can verify the wireless
connection from the screen SSID Connection: which now
should show your SSID. The next screen will show the IP
Address of the NexPump, assuming DHCP is enabled.
You may also use a Remote Control Software to remote
control to a PC in your household and use the NexPump
local IP Address for access. Program examples such as, Go
To My PC, VNC for PC, Android or Apple IOS.
Wireless Setup is complete.
11
NexPump Internet Screens:
Status Screen:
Bright Green – System OK
Dark Green – Setting is Off
Red – Alert Condition or Red Flag that Setting is On
Amber – Amber Flag that Setting is On
Purple – Manual Mode is On
Blue – Pump Activated or In Backup Mode
Cyan – In Primary Mode
Web Configuration Screen:
This screen can be used to manually configure IP
Information when DHCP disabled (Experienced Users
Only). HTTP Port can also be changed here.
Web Configuration Screen:
Username, Password Screen
Also lists Network Configuration, Up Time, Test Count,
Serial Number , Firmware Versions, Alert History, Model
Web Configuration Screen (Wireless Version):
Command Screen:
Wireless setup Screen
Run Commands, Set Configuration Parameters or Turn
Functions On/Off from this screen. Not all commands are
available from this screen. Function 'K' from the NexPump
unit provides for all commands.
12
EMail Configuration Screen:
The EMail screen is used to configure where and how
Status Emails are sent. An Email_To, Email_Host,
Email_User and Email_Password are required.
(Note: The EMail settings are not dependent for the
Notification System. The Notification System relies
ONLY on an Internet Connection. These settings are
ONLY for the Status EMails.)
(ETH Firmware 5 or greater)
Time Configuration Screen:
Set Time Configuration to the Format you prefer and the
Time Zone you are in.
Enter EMail_To with a valid EMail Address.
Enter EMail_Host with a valid domain name or valid IP
Address of the Email Host server
If your account requires a login and password then enter
those in the E-Mail User and Password fields.
The EMail Port can be set to 25,465,587.
(ETH Firmware 4 or less)
SSL is not supported. If you do not have an EMail Account
that will work without SSL, please contact NexPump.
(ETH Firmware 5 or greater)
SSL is supported and when enabled the Email Port must be
set to 465.
Recurring time can be set to 0 – 28. This represents a
multiple of the 12 Hour Self-Tests. 0 will disable Status
Email. A setting of 1 will send Status Emails every 12
Hours, 2 every 24 hours, etc.
Alert History:
The last 10 alerts can be recalled here or at the system with
Function 'I', (Display Alert History) ETH Firmware 5 will
show Time and Date of Alert.
Once completed, Hit Submit to save your changes.
13
NOTIFICATION STATUS:
(E) Battery or Notification Status
Notification Status:
Phone Notification
"Busy" - Notification System Lines Busy
"InUse" - Phone line is In Use
"Dial" - Dialing Notification System
"Connd" - Connected to Notification System
"InfoS" - Alert Information sent
"NLine" - No Phone Line Connected
'ANMOD' Phone Notification Module Problem
Phone Monitor
'PHMON' Phone Line not Detected
Internet Notification
'iConn' Attempt Connection to Notification System
'Connd' Connected to Notification System
'InfoS' Alert Information Sent
'CABLE' or 'WIFI' Internet not Connected
'ANiMOD' LAN Notification Module Problem
LAN Monitor
'LANEr' Lost Internet Connection
Clear Notification Module Alerts:
To Clear any Notification Alert, use Function 'C'
Testing:
Notification Modules are tested on 12 Hour Self-Tests or
Manual Tests. Exceptions: Notification is Active.
Normal Alerts:
Pump Activations
AC Power Loss
Notifications: After Approximately thirty (30) Minutes
Critical Alerts:
All Other Alerts
Notifications: After Approximately five (5) Minutes,
except a High Water Alert which is Approximately one (1)
Minute.
Ai NOTIFICATION SYSTEM:
Initial Registration:
You must register your NexPump before Notification use.
Visit the NexPump’s website at 'www.nexpump.com’ and
click ‘Register My NexPump’. Fill in the initial form
using your complete serial number (format
‘NPBxxxxxxxx’) and PIN number. On the following form,
fill in all required information along with the phone
numbers and email addresses you want the Ai Notification
system to use to contact you in event of any alerts. Once
you have registered successfully you will receive an EMail confirming your setting.
Changing Your Setting:
Visit the website at ‘www.nexpump.com’ and click
‘Customer Login’. Once logged in, you can change your
information and update. You can also change your login
password if you want. Once you updated your changes,
you will receive an email confirming the changes.
Notification Detail:
When the NexPump detects an alert the built-in alarm will
start beeping. After approximately thirty (30) Minutes for
Normal Alerts, five (5) Minutes for Critical Alerts and one
(1) Minute for High Water Alerts. If the Alert is cleared or
Silenced (Activation or AC Power Loss) before the
Notification Process timeout has expired the Notification
will NOT take place. This is because the NexPump
assumes someone knows about the Alert since the alarm
was cleared.
Notification Testing:
If you have a NexPump with an Internet Module you can
run a Function 'T' (Manual Test) and at the end of the test
you will be able to schedule a Notification Test. You can
test Notification for a Phone Line by disconnecting a
Sensor and waiting for 5 Minutes.
Notification Process:
Person answers the call:
1. States Alert(s), Pressing 1 Skips the Message
2. Press one (1) to Acknowledge or zero (0) to repeat.
3. Call ends
4. Up to four (4) E-Mails sent with Alerts and Stats
5. Up to four (4) E-Mails sent with Confirmation Status
Answering Machine or Voice Mail answers the call:
1. States Alert(s).
2. Call ends
3. Up to four (4) E-Mails sent with Alerts and Stats
4. Up to four (4) E-Mails sent with Confirmation Status
14
Important information During an event:
During an event we have found that many owners will
continuously clear the error conditions and receive
redundant notification calls. Please review the information
below.
Appendix:
UPS Information:
A UPS is a device to supply AC Power during a power
outage. You will need this if you want to be alerted on
Power Outages with any NexPump Internet Module. A
250w UPS should be capable of powering an internet
router for about 3-4 hours. Using a larger wattage UPS will
increase the time. You need at least have 45 minutes for
power outage alerts.
1. Once an Alert is cleared, the NexPump sets a counter so
repetitive notifications will not occur.
2. Electric Failure, Pump Activation (Backup Mode):
a. To prevent notification from reoccurring, you can
Silence the Alarm, DO NOT CLEAR ALARM. If only
the pump activation alarm is occurring, you can Switch to
the Primary Mode for the duration of the event or if your
main electric pump has failed.
3. High Water Alert:
High Water Alerts should NOT be cleared, however the
NexPump should be allowed to operate under this
condition until the pump(s) are no longer operating
100% of the time. The alarm at this point should be
cleared. If you decided to ‘Disable the Alarm’ you
should monitor the situation.
4. Suspected Clog Alert with high rate of incoming water:
When the incoming water rate is extremely high, the
NexPump may warn of a Suspected Clog Error. This is
indicated with Pump Identifiers 'X' or 'x' and happens in
normal operation. Do not clear this alarm, however
monitor the situation.. Once the water rate slows down
the condition should automatically clear.
15
Surge Protector Installation
(Phone-Line Version Only)
Plug the surge protector into a grounded outlet and plug your NexPump into the surge protector
outlet. Refer to the diagram below to connect the phone line to your NexPump.
Bottom of Surge Protector
Phone Input
Wall Phone Outlet
Phone Outputs
NexPump Phone Jack
Indicator Lights
• The “protected” light should be on when the power is active. If the light goes out at any time
and the power at the outlet is active, it means that the surge protector was sacrificed to
protect your NexPump. Contact NexPump for a replacement surge protector.
Note: If the surge protector was sacrificed and is not supplying power, you should plug in
the NexPump directly into the electrical outlet until a replacement is purchased.
•
•
•
The “grounded” light should be on when the power is active. If this light does not come on
when the surge protector is plugged in and the power at the outlet is active, you may have a
ground-wiring problem and should contact an electrician to properly ground the outlet.
*************** Post-Installation ***************
Perform a Manual Test (Function 'T') on the NexPump once the Phone-Line is installed to
verify the phone line is working correctly.
It is recommended to Enable the Phone Monitor (Function 'K') after installation of the Surge
Protector. This will keep you informed of an operational phone line.