1
PolyLarva Runtime Monitoring Framework
UserManual
Ruth Mizzi
October 12, 2011
1
Contents
1 Introduction
1.1 Runtime Verification . . . .
1.2 Larva Runtime Monitor . .
1.2.1 Larva Architecture
1.2.2 ATM Example . . .
.
.
.
.
.
.
.
.
.
.
.
.
.
.
.
.
.
.
.
.
.
.
.
.
.
.
.
.
.
.
.
.
.
.
.
.
2 PolyLarva Specification Language
2.1 Events . . . . . . . . . . . . . . . . . . . . .
2.1.1 Event Variations . . . . . . . . . . .
2.2 States . . . . . . . . . . . . . . . . . . . . .
2.2.1 Separating Monitor Side and System
2.2.2 Saving Monitor State . . . . . . . .
2.3 Conditions and Actions . . . . . . . . . . .
2.4 Rules . . . . . . . . . . . . . . . . . . . . . .
2.4.1 Enabling / Disabling Rules . . . . .
2.4.2 Extended Rules . . . . . . . . . . . .
2.5 Timers . . . . . . . . . . . . . . . . . . . . .
2.5.1 Timer Events . . . . . . . . . . . . .
2.5.2 Timer Conditions . . . . . . . . . . .
2.5.3 Timer Actions . . . . . . . . . . . .
2.6 Specification Script Setup . . . . . . . . . .
2.7 Contexts . . . . . . . . . . . . . . . . . . . .
2.7.1 Nesting of Contexts . . . . . . . . .
2.8 Internal Events . . . . . . . . . . . . . . . .
2.9 Imports . . . . . . . . . . . . . . . . . . . .
2.10 Comments . . . . . . . . . . . . . . . . . . .
2.11 Sample Script . . . . . . . . . . . . . . . . .
.
.
.
.
.
.
.
.
.
.
.
.
.
.
.
.
.
.
.
.
.
.
.
.
4
4
5
5
8
. . . . . . .
. . . . . . .
. . . . . . .
Side States
. . . . . . .
. . . . . . .
. . . . . . .
. . . . . . .
. . . . . . .
. . . . . . .
. . . . . . .
. . . . . . .
. . . . . . .
. . . . . . .
. . . . . . .
. . . . . . .
. . . . . . .
. . . . . . .
. . . . . . .
. . . . . . .
.
.
.
.
.
.
.
.
.
.
.
.
.
.
.
.
.
.
.
.
.
.
.
.
.
.
.
.
.
.
.
.
.
.
.
.
.
.
.
.
.
.
.
.
.
.
.
.
.
.
.
.
.
.
.
.
.
.
.
.
.
.
.
.
.
.
.
.
.
.
.
.
.
.
.
.
.
.
.
.
.
.
.
.
.
.
.
.
.
.
.
.
.
.
.
.
.
.
.
.
11
11
15
16
16
17
18
20
21
22
22
22
23
23
24
25
25
26
29
30
30
.
.
.
.
.
.
.
.
.
.
.
.
.
.
.
.
.
.
.
.
.
.
.
.
3 Usage
33
3.1 Generating the PolyLarva Monitor . . . . . . . . . . . . . . . . . 33
3.1.1 The PolyLarva Compiler Output . . . . . . . . . . . . . 34
3.1.2 Running the PolyLarva Monitor . . . . . . . . . . . . . . 35
3.1.3 Viewing the PolyLarva Monitor Logs . . . . . . . . . . . 35
3.2 Generating the PolyLarva Language Specific Monitoring Code . 37
3.2.1 The PolyLarva Language Specific Compiler for Java . . . 38
3.2.2 Using PolyLarva to Monitor a System . . . . . . . . . . . 39
3.2.3 Viewing the PolyLarva Monitor Logs on System Side . . 40
3.3 PolyLarva Monitoring Example . . . . . . . . . . . . . . . . . . 42
3.3.1 Pin Validation . . . . . . . . . . . . . . . . . . . . . . . . 43
3.3.2 Cash Withdrawal . . . . . . . . . . . . . . . . . . . . . . . 44
3.3.3 The PolyLarva Monitor Log File for ATM System . . . . 45
3.3.4 The PolyLarva Monitor System Side Log File for ATM
System . . . . . . . . . . . . . . . . . . . . . . . . . . . . 46
2
4 The PolyLarva Language Compiler API
4.1 Introduction . . . . . . . . . . . . . . . . .
4.2 Technical Documentation . . . . . . . . .
4.2.1 MonitorFileWriter API . . . . . .
4.3 Class MonitorFileWriter . . . . . . .
4.3.1 Declaration . . . . . . . . . . .
4.3.2 Constructors . . . . . . . . . .
4.3.3 Methods . . . . . . . . . . . . . .
3
.
.
.
.
.
.
.
.
.
.
.
.
.
.
.
.
.
.
.
.
.
.
.
.
.
.
.
.
.
.
.
.
.
.
.
.
.
.
.
.
.
.
.
.
.
.
.
.
.
.
.
.
.
.
.
.
.
.
.
.
.
.
.
.
.
.
.
.
.
.
.
.
.
.
.
.
.
.
.
.
.
.
.
.
.
.
.
.
.
.
.
46
46
47
48
52
52
52
52
1
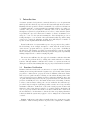
Introduction
A software system’s development is commonly driven by a set of requirements
which specify the behaviour expected from the system throughout its execution.
Ensuring that the specified behavior is maintained by a system at all times is
a daunting task since a system usually has an infinite number of possible executions. The process of testing is commonly carried out at various phases
throughout a system’s development lifecycle in order to ensure that the system
is providing the expected behaviour in a number of diverse circumstances envisaged to occur once the system is running live. Even though the process of
testing attempts to cover as much of the system functionality as possible testing
can never be completely exhaustive and that there will always be a number of
specific execution paths which will remain untested.
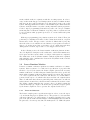
Formal verification of a system with respect to its properties is also possible.
Model checking, as an example, attempts to ensure that all execution traces
derived from a program will obey a specific set of properties. Scalability is
the issue here. The number of possible execution paths for a system, especially
when considering concurrent threads in large-scale systems, grows exponentially
making it impractical to consider verifying all paths.
The next section will introduce the approach of runtime verification that aims
to overcome the problems faced by testing and formal verification of software
systems. Through runtime verification the behavior of a system is monitored
during its execution, thus ensuring that any property violation will be identified.
1.1
Runtime Verification
Runtime verification works on the execution trace of a system. While a system is
running its execution path is matched against a set of previously defined system
properties to ensure that no property is violated. Runtime verification ensures
that every trace path is monitored during execution thus allowing online verification of system properties. During execution, verification is limited only to the
one path currently being traversed by the program and therefore this avoids the
problem of scalability faced by other methods such as model checking. Contrary
to what occurs in software testing, the concern on whether the verification approach is being thorough in replicating possible scenarios is no longer an issue
in runtime verification. Verification occurs on the actual program execution and
this is the only scenario that is required to be verified at that point in time. In
case of a property violation the monitor can issue notifications to warn about
the inconsistencies. An alternative to this is also that of specifying alternative
behaviour which the system may apply in order to mitigate the violation that
occurred.
Runtime verification requires that a formally defined set of system properties
is available. This formal specification is parsed and compiled into a runtime
4
monitor which works, in conjunction with the executing system, in order to
carry out the monitoring process. During system execution, a runtime monitor
will carry out the required verification every time defined events occur on the
system. This suggests that there must be a mechanism in place which allows the
system to notify the monitor every time certain points in the system program are
reached. Aspect programming lends itself very well to the concept of runtime
monitoring since it allows the definition of specific points on a system and can
be used to indicate what program logic needs to be executed when such points
are reached.
With aspect programming, join points in a system can be defined. These join
points may be anything from method calls, returns from methods, exception
throws and so forth. An aspect advice can then be linked with a join point,
where the advice is code which is executed whenever a join point is encountered.
Aspect code is then weaved into a program’s code at compile time such that,
during system execution, aspect advice code is triggered and executed.
In the following section, the Larva runtime verification platform is introduced. A high level description of the architecture of the Larva runtime monitor is given and the reasons behind a re-design of this system are explained.
The architecture of the PolyLarva runtime verification platform is explained
with emphasis on the communication between the PolyLarva monitor and the
system being monitored.
1.2
Larva Runtime Monitor
Larva is a runtime verification platform for runtime verification of software
systems. Given a system to be verified and a specification of properties that
should be obeyed by the system, the Larva compiler generates the necessary
runtime verification code that is integrated with a system in order to provide the
functionality of runtime verification during a system’s execution. The generated
code can be separated into two main sets. The first set of code that must be
generated is the aspect code which is directly weaved into the original system.
This code will ensure that, whenever particular points of interest are encountered
in the system’s execution trace, then the monitor is informed about these events.
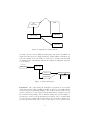
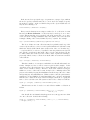
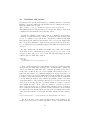
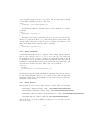
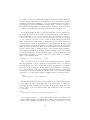
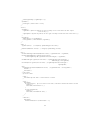
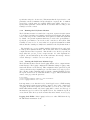
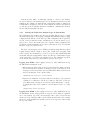
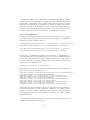
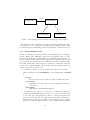
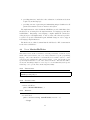
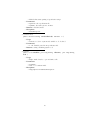
The Larva compiler must then also generate other code which contains the
actual monitoring logic. Figure 1 shows how the specification script is parsed
by the Larva compiler in order to generate the outputs described above.
1.2.1
Larva Architecture
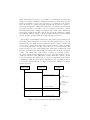
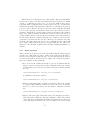
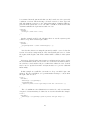
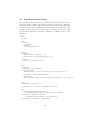
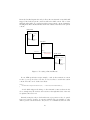
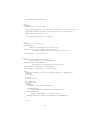
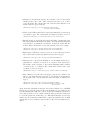
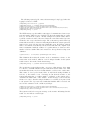
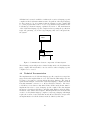
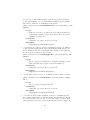
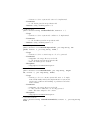
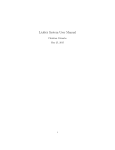
The Larva compiler parses a specification script in order to create the aspect
code and monitoring logic as explained above. The generated code is automatically weaved into the code of the system to be monitored and therefore becomes
part of the system. This is shown in Figure 2 which highlights the fact that all
the generated code is incorporated into the main system code. While the system
5
USER
SYSTEM
LARVA
SPECIFICATION
ASPECT CODE
LARVA Compiler
LARVA Monitor
Figure 1: Outputs from Larva System
meets the objectives of succesfully monitoring system properties at runtime, its
architecture introduces the drawback that the Larva runtime verification system is not flexible: It is only limited to being able to monitor systems which
are written in the Java language which is the language in which the generated
code is written.
provided by user
SPECIFICATION
parsed by
LARVA Compiler
creates
Monitoring Code
Monitoring Code
Aspects
System Program
Aspect Code
Figure 2: Larva Architecture
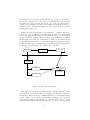
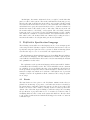
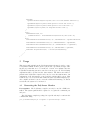
PolyLarva One of the main goals behind the development of a new Larva
monitoring system is that of making it flexible enough to be used with systems
developed in any programming language. The monitor and the monitored system are considered to be two separate systems which interact together to provide
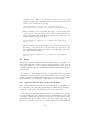
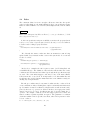
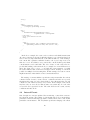
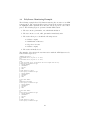
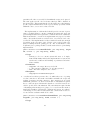
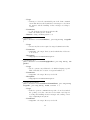
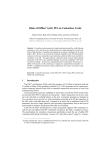
the verification functionality. The PolyLarva architecture, given in Figure 3,
separates the creation of the monitoring logic from that of the code which must
be weaved into the original system. The input to the PolyLarva compiler is one
property specification file. The creation of the aspect code is separated from
6
the creation of the monitoring system and the two outputs are the result of
two separate compilation processes. The code containing the monitoring logic
is generated as a Java program. The aspect code, on the other hand, may be
generated in any language according to the language in which the system to be
monitored is used. A PolyLarva language specific compiler is used to generate
this language specific code.
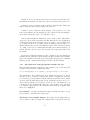
In Figure 3 we show the example of a PolyLarva C++ compiler being used to
generate C++ aspects which are automatically weaved into a program written
in C++. The figure also shows that, together with the aspect code, the language
specific PolyLarva compiler will also generate some additional code that is
automatically weaved into the original system. This code is required for any
possible validations that need to be carried out on system properties as explained
further on in this section. Communication between the system program and the
monitoring code will take place via a TCP socket connection.
provided by user
SPECIFICATION
parsed by
LARVA Compiler
MONITOR
creates
socket conn.
socket conn
parsed
by
LARVA
C++ Compiler
winsock
creates
C++ Aspects
Monitoring Code
Aspects
System Program
creates
C++ Monitoring Code
Figure 3: Architecture of PolyLarva
This architecture allows the PolyLarva runtime verification system to be used
for monitoring of systems regardless of the language in which these systems are
implemented. This can take place assuming that there is a PolyLarva language
specific compiler for the system’s implementation language. The separation
between the generation of monitoring code and that of the aspect code also
means that if the main system is modified but the properties to be monitored and
7
the events which should trigger the monitor checks remain unchanged, there is
no need for modification or recompilation of the main monitor. Only the aspect
code will need to be recompiled and weaved into the system being monitored.
An explanation of the logic contained in the code generated by the PolyLarva
compiler and the way it interacts with the system, is given in the example below.
The following section gives an example list of a specification of properties that
must be obeyed by a dummy ATM System. This example will be referred to
throughout this document to explain various concepts.
1.2.2
ATM Example
An ATM system allows one user to log in by entering his pin number. On entry
of a valid pin number, an ATM session commences. During an ATM session, a
user has the facility to carry out common transactions such as balance enquiries,
cash withdrawals and deposits. The ATM system has the following specified
requirements in relation to user authentication and account maintenance:
• A user’s ATM session will commence only after successful login. Login is
executed by the entry of a user specific pin after card insertion.
• The pin is verified against inserted card. If pin is invalid then user may
try to re-enter a new pin number. A total of no more than 3 bad login
attempts should be allowed.
• A login re-attempt can only take place at least 20 seconds after the last
bad login.
• On successful login a user can choose to execute a number of transactions
- these may be either Enquiry Transactions or Withdrawal Transactions.
• Some users may only have Enquiry access but not Withdrawal access.
• In one session no more than 3 consecutive transactions should be allowed.
• A user ATM session should never be longer than a total of 10 minutes.
• In case of a Deposit Transaction:
– The ATM Session duration is increased to allow a user to prepare his
deposit instructions. The session timer is reset so that the 10 minute
period is restarted.
• In case of Withdrawal Transactions:
– The withdrawal amount cannot be greater than a fixed amount of
$5000.
– The withdrawal amount cannot be greater than the amount in user’s
account.
8
– A withdrawal may not be able to take place if there are no available
funds in ATM
The PolyLarva monitoring system is required to monitor these properties. A
verification script will need to be prepared specifying each of these properties
formally. This script should identify those points on the system, which we refer
to as events, that when met will trigger the monitor validation. In the case of the
user login verification, we can assume that the system code which validates the
user’s pin number entered should be the point at which the monitor is triggered
to carry out its checks related to user login. On an invalid pin number entry, the
monitor should ensure that the accepted number of retries is not exceeded. The
aspect code created will indicate the join point on the system and will provide
the aspect advice that triggers the monitoring logic. On the other hand the
monitoring code will be responsible for the logic that maintains the number of
invalid retries and compares it against the set limit in order to determine what
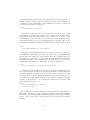
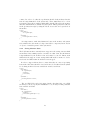
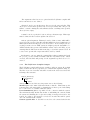
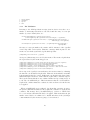
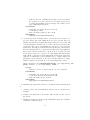
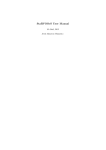
action should be taken. Figure 4 demonstrates the interaction between the code
generated by the PolyLarva compiler and highlights the separation between the
system instrumented with the aspect code and the monitoring logic as explained
in Section 1.2.1.
SYSTEM
ASPECT CODE
verifyPin() called
MONITORING CODE
Increment failedLogins
If (failedLogins < 3)
Report Property Violation
Figure 4: Communication in PolyLarva System
When an event occurs in the system which is relevant to the monitoring,
such as the validation of an entered pin number in our ATM example, data
will be passed between the two systems in order to carry out the necessary
verifications. An aspect join point is called and the associated advice, which
prepares a message to send to the monitor, is executed. The monitoring system
receives the message indicating which particular event has been fired and thus
9
which monitoring logic needs to be evaluated. Communication between the
monitor and system continues if, during its evaluation of monitoring logic, the
monitor determines it needs some properties to be evaluated by the system.
Since the monitor is completely separate from the system it has no reference to
system specific variables or functions and therefore, if evaluation of such system
properties is required, a message needs to be passed from monitor to system
indicating what specific evaluation is required. The result of this evaluation is
then returned, again via the TCP connection, to the monitor which can continue
its evaluation. This processing occurs in a synchronous manner and the original
system execution is stalled while the monitoring logic is executed.
Our example of maintaining a failed login count can help us demonstrate how
the monitor will sometimes need to refer back to the system in order to process
its monitoring logic. While we have explained how the verifyPin() method call
can be used to notify the monitor that a login event has occured, it should
be clear that this method is called even in the case of a succesful login. The
monitor therefore needs to verify whether the return value of this method call
indicates an invalid login. Only in this case should it increment the failedLogin
counter. The return value of the method verifyPin() is a variable bound to
the system and the monitor will therefore need to query the system in order to
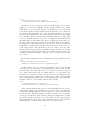
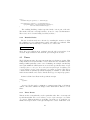
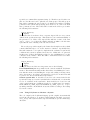
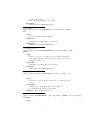
obtain an evaluation of the truth value of that return value. Figure 5 shown
below demonstrates, through the use of a sequence diagram, how the monitor
communicates with the system that is instrumented not only with the aspect
code but also with additional code that can help in the evaluation of system
specific properties.
MODIFIED SYSTEM
ASPECT CODE
MONITOR
Method Call verifyPin()
Inform Monitor (eventID)
Verify
Event (eventID)
Start monitor
verification logic for
(eventID)
Request isPinValid()
Return Pin Invalid
Increment failed
login counter
Send ’Done’ message
Figure 5: Flow of messages in PolyLarva System
10
In this figure, the monitor is informed about a verifyPin() method that has
just been called on the system. The monitor will start its monitoring process,
whereby the result of whether the pin is valid or not is required. Being a stand
alone system, the monitor has no reference to the return value of the method call
and must therefore query the system directly in order to obtain an evaluation of
whether the method call returned a true or false value. This is seen in the call
the monitor makes to isPinValid() on the system. The isPinValid() function
forms part of the code generated by the PolyLarva language specific compiler
and enables the evaluation of a system variable. The system returns a true or
false value back to the monitor which can continue its processing in order to
increment the number of bad logins if the pin entered was invalid.
2
PolyLarva Specification Language
The following section will focus on the language used to create an input specification script for the PolyLarva compiler. As mentioned in Section 1.2 only one
specification script is required in order to generate both the monitoring system
as well as the aspect code to be weaved into the original system’s code.
The PolyLarva specification language proposed is an ECA (Event-ConditionAction) rule-based language. The use of ECA rules to formalise a system specification will also mean that future efforts can be made in automating the analysis
and optimisation of these rules.
The explanation of the specification language and its syntax will be built incrementally in the following sections. The order in which the various constructs
are explained do not necessarily reflect the order in which they should appear
in the specification script since this document attempts to introduce the constructs in a simple way which can be understood through the use of practical
examples. Section 2.11 explains how all the constructs can be merged together
in one script.
2.1
Events
The introduction we have given to the PolyLarva runtime monitor has explained how monitoring of properties occurs when the monitor is notified by
the system that a particular point in the system code has been reached. The
monitor can react to these events by carrying out the necessary specified validations. One of the first steps in building a verification script, after obtaining
the specification of properties that need to be monitored, is therefore that of
identifying which are those events on the system side which are directly related
to the required verifications and which should trigger the monitor to start its
verification logic.
11
In our ATM system example we can identify the fact that our system code
includes a method called verifyPin() which is the method that contains logic
to validate an entered pin number. The identification of such an event in our
specification script may be written as:
events {
verificationEvent() = {*.verifyPin()}
}
In the above syntax, the label verificationEvent is the name given by the
script author to identify this particular event. This is the name that will be
used throughout the rest of the script to refer to this event. verifyPin() is the
actual method call in the system code. In this case we are ignoring the target
of the method (that is, the object on which this method is called). We are also
specifying that this method call has no arguments. If we changed the declaration
to:
events {
verificationEvent(BankDetails d) = {d.verifyPin(*)}
}
We would be specifying that the method verifyPin() is called on an instance
of BankDetails. This syntax would also allow us access to that BankDetails
instance since the variable d is being bound to the target of that method call.
The wildcard “*” is being used to specify that the method may have any number
of arguments which we are not interested in. If we wanted to get access to the
pin number being verified we could specify our event declaration as:
events {
verificationEvent(BankDetails d, String pin) ={d.verifyPin(pin)}
}
In this way we are binding the variable pin to the String argument passed to
the verifyPin method call. However, note that if the method verifyPin has other
arguments, then the event will not fire because the method described here will
not match. If there are any arguments which the user is not interested in, one
can either put a variable name without a type (such as arg2 in the following
example) or the wildcard “*” as a placeholder. Therefore, if our method has
other arguments, it may become:
events {
verificationEvent(BankDetails d, String pin) =
{d.verifyPin(pin, arg2, *)}
}
We can also bind to a variable which is not directly related to the method call.
For example imagine we need to do some processing on a particular argument.
This can be done using the where clause just after the method call. (Another
purpose of the clause will be given in Section 2.7.1) Consider the following
example:
12
events {
verificationEvent(String pin, Double atmfund) =
{*.verifyPin(pin, arg2, *)} where {atmfund = BankDetails.ATMFUND;}
}
In this case, we are not interested in the whole BankDetails object, but we
simply need to know the maximum amount of funds available in the bank’s
ATM. Therefore, we do not bind directly to the BankDetails object but directly
to the static variable atmfund available in the BankDetails object. If there is
more than one statement in the where clause, the statements have to be enclosed
in curly brackets. Furthermore, the parser, will ensure that any variable which
is not directly bound to the method call, is initialized in the where clause. This
is done by checking that there is at least one assignment statement with the
unbound variable on the left-hand side. However, this is the only check done on
the where clause and therefore it is far from being fully validated. For instance
the assignment on the right-hand side is not checked. The reason is that it
is impossible to validate the statements unless the parser is aware of the code
of the target system. The statements in the where clause can be any valid
statement in the target’s system programming language and these can call any
relevant methods from imported packages (more on imports in Section 2.9). The
conclusion is that the user must be cautious on the code that is entered in the
where clause.
The following example shows more valid syntax for our pin verification event.
events {
verificationEvent(String pin, UserAccount acct) =
{BankDetails d.verifyPin(pin)} where {acct = d.getUserAccount(pin);}
}
In this example d was not declared as a parameter of the event. For this
reason we need to provide its type on the right hand side of the declaration. This
shows that there is no rule where the type can appear, as long as it appears
once. If the parser finds no type, it simply takes it to be a placeholder and
treats it as a “*”. Therefore, the type can appear in the event declaration, in the
method call (as in the example) and even in the where clause on the left-hand
side of an assignment statement but not on the right-hand side of the assignment
statement. Therefore, the following syntax would be invalid:
events {
verificationEvent(String pin, UserAccount acct) =
{d.verifyPin(pin)} where {acct = BankDetails d.getUserAccount(pin);}
}
If two variables with the same name are used with different types, an error
will be raised, stating a type mismatch has occurred. It is also very important
to understand that this applies to all the events in one context (explained later
on in Section 2.7). This means that it is enough to specify the type of a variable
once in any event in that context. However, another very important note is that
any variable which is not listed as an event variable (in the event parameter
list) but which is used in the where clause, must have its type declared as in the
system language (even if the same variable is used in other events).
13
If the user needs to specify the type of a parameter or target object, without
the need to specify a variable name, the “*” can be used. For example to specify
the method verifyPin() is the one which belongs to the object BankDetails one
may use the following code:
verificationEvent() = {BankDetails *.verifyPin()}
Every event declaration in our script is considered to be a collection of events
known as an Event Collection. A collection may be made up of one or more
events. This means that, upon a method call on the system side, one or more
event collections can trigger simultaneously. The syntax of an event collection
is simply a listing of the events, delimited by the “|” symbol. For example:
any() = {{verificationEvent()}|{newSession()}|{loginFail(boolean result)}}
The above defines an event collection named any which is made up of the
events verificationEvent, newSession and loginFail which are PolyLarva events
which were already defined in the same events section. Also, one can write any()
= verificationEvent | newSession | loginFail because the parameters are ignored
and only the event name is important. Moreover, the curly brackets can also
be omitted if the sub-events do no have a where clause. Apart from referring to
previously defined events, a collection can itself define an event from a method
call as follows:
any() = {*.doLogin() | newSession()| verificationEvent()}.
This has a number of consequences which the user should understand cautiously. Imagine we have 3 nested events as given in this example. If the
outermost event (collection) has a where clause, this will be added to the where
clause of the contained event(s). Therefore, if the same variable is being set
within one or more of the nested events, it may lead to conflicting values. The
parser resolves this by keeping the initialization in the most specific where clause
and ignoring any other initializations. (Whenever this occurs, the parser issues a
warning (see Section TODO).) To understand this better, one has to understand
that the where clause in an event collection is simply a shortcut to copying the
same code for each sub-event. The syntax of such a where clause is as follows:
any(int j) = {*.doLogin() | newSession()| verificationEvent()} where j = 2;
This shortcut can also be used for a sub-collection within a collection as
follows:
any(int j) = {{newSession()| verificationEvent()} where { j = 1; } | *.doLogin()}
where int j = 2;
One should also understand what happens if an event appears more than
once in a collection. Consider the following:
any(int j) = {{ newSession()| verificationEvent() } where { j = 1; } | verificationEvent()
| *.doLogin() } where j = 2;
14
This is allowed even though it is not really sensible. The parser will always
keep the where clause of the sub-event which is the most deeply nested. In this
case the j = 1 will take precedence over j = 2. To avoid confusion of precedence,
it is advised that a particular method call is declared only once, and then used
in different collections. Unless this rule is adhered to, no guarantees are given as
to the precedence. However, the user is not deterred from doing this. On a final
note on event collection, one should note that if an event collection declares a
parameter, this should be a defined (either bound to the method call or assigned
in the where clause) parameter in all the sub-events. In other words, the set of
possible parameters in an event, is a subset of the intersection of the variables of
the sub-events. However, remember that the where clause for each of the subevents can be specified from the collection. Therefore, if a variable is not found
in all the sub-events, then it is expected to be initialized in the collectionŠs
where clause. This means that the error message which the user will receive
will not be “incompatible argument list” but rather “missing initialization of
variable”.
2.1.1
Event Variations
When a method is declared as an event, it is assumed that the trigger happens
exactly before that method is called. However, the syntax was extended to
allow for other variations of this basic type of event. The syntax is the same as
a normal event with an extra keyword according to the variation in question.
There are a number of these variations:
• If no special event variation keywords are used, it is assumed that the
trigger occurs before the method is called. This same behavior is obtained
by using the keyword call before the method declaration. This means that
the code
verificationEvent(BankDetails d, String pin) ={call d.verifyPin(pin)}
is equivalent to the shorter notation
verificationEvent(BankDetails d, String pin) ={d.verifyPin(pin)}
• Instead of triggering monitor evaluation on method call it is also possible
to delay the trigger until the method is executed. In order to do this the
keyword execution is specified before the method declaration as shown
here.
verificationEvent(BankDetails d, String pin) ={execution d.verifyPin(pin)}
• Instead of the entry point of the method, the event can trigger upon the return of the method. This also offers the possibility to bind to the returned
object. The keyword which indicates this event variation is uponReturning
(added just after the method call). As an example let us review our pin
15
verification event. What we are most interested in is the boolean value
returned by this method call which indicates whether the pin has been
verified or not. In this case we can use:
verificationEvent(result, UserAccount acct) = {d.verifyPin(String pin)
uponReturning(Boolean result)} where {acct = BankDetails d.getUserAccount(pin)};
• Another variation of an event is that the trigger occurs upon the throw
of an exception. The user can also bind to the exception being thrown.
The keyword which indicates this event variation is uponThrowing. An
example with the syntax is as follows:
doTransaction(Session s, ATMException ex) = {s.doTransaction(*)uponThrowing(ex)}
where int i = 0;
• The last variation is upon the handling of an exception. In other words,
the trigger occurs exactly before the entry into the catch block. The
keyword which indicates this event variation is uponHandling. Once more,
an example with the syntax is:
doTransaction(Session s, ATMException ex) = {s.doTransaction(*)uponHandling(ex)}
where int i = 0;
2.2
States
The previous section has explained how the monitor is aware of events that occur
on the system and thus can take action as required when these events occur. In
order for the monitor to be able to validate particular properties it needs a way
of defining variables which it can maintain and which together define the state
of the monitor.
To continue our ATM example, if we have a monitor that needs to keep track
of the number of failed logins in one user session this monitor can define a state
variable loginAttempts which it will increment (or decrement) as required during
the monitoring process according to events which occur on the system.
2.2.1
Separating Monitor Side and System Side States
Since, as was explained in Section 1.2, our monitoring process is split across
two components - the monitoring system and the modified system, it might be
required in certain cases to also maintain states on the system side.
As an example let us assume that the system’s code, written in Java, provides
an object FailedLoginCounter which is reponsible for maintaining a special count
of the failed logins in the system based on specific properties (such as, if the
pin is invalid only by one number then do not add to failed login count). In
this case we would like our monitor to obtain the failed login count using this
16
counter. In order to do this, the specification should clearly indicate that the
state is being maintained on the system side. There must therefore be a clear
separation between those variables which will be handled directly by the monitor
and those which will need evaluation by the system. This separation is achieved
in the specification script by using the labels monitorSide and systemSide as
shown here.
states {
monitorSide {
int loginAttempts;
}
systemSide {
FailedLoginCounter counter;
}
}
It is important to make this distinction between the monitor and system
side variables since the monitor, being a stand-alone component, has no notion
of objects or variables present on the system side.
2.2.2
Saving Monitor State
The PolyLarva monitor currently has no support for the saving of states which
means that, if the running system or monitor are shut down, the information
being maintained by the monitor is lost and cannot be restored. Future work
will include the support of state saving which will enable a monitor to load a
saved state and thus resume from where it was stopped.
In order to support this we have to ensure that there is a way of specifying
how monitor side states should be saved and restored. For this reason the syntax
for declaring monitor side state variables is extended as follows:
states {
monitorSide {
int loginAttempts {
saveWith{}
restoreWith{}
}
}
systemSide {
FailedLoginCounter counter;
}
}
The saveWith block can be left empty. On the other hand, the restoreWith
block may be used to specify the initialisation code (in Java) for that particular
state variable as follows:
states {
monitorSide {
int loginAttempts {
saveWith{}
restoreWith{loginAttempts = 0;}
}
}
systemSide {
FailedLoginCounter counter;
}
}
17
2.3
Conditions and Actions
We introduced the specification language by explaining that it is a rule-based
language. Properties which the system must hold are defined in the form of
ECA rules which can be read as:
When an Event occurs, if a Condition holds then carry out an Action.
This definition therefore implies that we need to have the ability to define both
conditions and actions within our specification script.
As with the definition of states there must be a distinction between those
conditions or actions which can be evaluated on the monitor side and those that
need to be evaluated on the system side. System side evaluation will imply
that system specific functions and variables can be used. It also implies that
any code specified within the condition and action system side blocks needs to
be code written in the programming language with which the system has been
developed.
We will continue with our ATM login example and consider the case when
our monitor needs to confirm that the property A total of no more than 3 login
attempts should be allowed for a user holds. The following snippet shows the
syntax required to define this condition:
conditions {
monitorSide {
loginAttemptsValid = {return loginAttempts
}
}
< 3}
Every condition is assigned a condition name, in this case loginAttemptsValid.
The text enclosed within curly brackets is the code which will be evaluated in
order to determine the truth value of the condition. Note that, in the case of
monitor side conditions, the code enclosed within curly brackets needs to be
written in Java syntax. No additional validation is carried out during code
generation on the text enclosed within curly brackets meaning that care must
be taken to ensure that variables used have been declared and are maintained
correctly within the monitor. The variables used within condition and action
declarations must be either variables that have been declared already in the
states block or else they may also be variables which are bound to events declared within the same context, either as parameters or in the event where
clause. Note that, in the case of conditions using variables bound to events then
those conditions/actions must be evaluated on the system side. As an example
we consider the event discussed in the previous Section 2.1 which verifies a user
entered pin and returns a boolean value indicating whether the pin is valid or
not:
verificationEvent(result) =
{*.verifyPin(String pin) uponReturning(Boolean result)}
The Boolean value result returned by this method call is available to the
monitor and can be used for further validation. Being a variable which has
18
been returned from the system side this can only be made use of in systemSide
conditions or actions. The monitoring code has no reference to these types and
will only maintain a reference to the values using unique identifiers which are
passed from the system side. So we can define a condition on the monitor that
determines whether the login was succesful or not as:
conditions {
systemSide {
failedLogin = {return result == false;}
}
}
Another example would be the following where we use the system specific
counter to keep track of failed login counts:
conditions {
systemSide {
sysloginAttemptsValid = {counter.countFailedLogins() < 3;}
}
}
It is clear here that we are using the system side variable counter declared in
Section 2.2.1 and are using methods of the class FailedLoginCounter to obtain
the required failed logins count. This condition will be evaulated on the system
side.
Actions are declared in the same format as conditions and are used to define
the action which the monitor needs to take once a rule has been matched, that is,
an event has occured and the rule pre-condition has evaluated to true. Actions
may be used to update the monitor and system states or to provide additional
functionality.
In this example we would like our monitor to keep our failed login count
updated. We also would like it to log an information message to console when
the login count exceeds 3.
actions {
monitorSide {
addFailedLogin = {++loginAttempts;}
logLoginCntExceeded =
{System.out.println(‘‘No more login attempts allowed after 3 failed tries.’’);}
}
}
The code within an action definition is not restricted to only one statement.
A sequence of statements may be defined as one action as shown in the example.
actions {
monitorSide {
addFailedLogin = {++loginAttempts; System.out.println(‘‘Bad Login attempt.’’)}
}
}
19
2.4
Rules
The constructs defined so far are enough to allow us to introduce the specification of rules which are the main building blocks of our specification script.
Rules are defined within a rules block and, in its simplest form, a rule is defined
as:
e\c→a
which can be interpreted as When an Event (e) occurs, if a Condition (c) holds
then carry out an Action (a).
So if in our specification script we would like to monitor the property that A
total of no more than 3 login attempts should be allowed for a user we will need
to define a rule for this property as follows:
rules {
ruleTooManyFails= verificationEvent(boolean result) \ !loginAttemptsValid ->
logLoginCntExceeded;
}
We obviously also want to make sure that our transaction count is being
updated with every transaction that occurs on the system side. So a new rule
needs to be added:
rules {
ruleAddFailedLogin= loginFail() -> addFailedLogin;
ruleTooManyFails= loginFail() \ !loginAttemptsValid ->
logLoginCntExceeded;
}
In the above examples the rule is given a name (ruleTooManyFails and
ruleAddFailedLogin). The definition of the rule then follows where the events,
conditions and actions named and defined previously in the specification script
are used. The event which triggers a rule may be any of the named EventCollections in the events block. It is important to note that within the rule
specification the event declaration must match the event definition exactly, including any event parameters.
The rule pre-condition may be any named condition in the conditions block
or any combination of these meaning that complex conditional statements made
up of a number of named conditions (both system side as well as monitor side)
joined by the && or || operator are allowed. In these cases appropriate bracketing is expected to be used. Conditions may also be negated using the ‘ !’
operator. An example of this is seen in the snippet given above where the
named condition loginAttemptsValid is negated. The grammar for condition
declaration within a rule is specified as follows, where BC represents a rule’s
boolean condition:
BC ::== condition_name | !BC | (BC && BC) | (BC || BC)
20
It should be noted that the rule pre-condition is optional. This means that
one can also define rules of the form:
e→a
In this case the action is always executed whenever the system event occurs.
The action that is to be executed if a rule condition evaluates to true may be
any named action in the actions block. Again here combinations of actions are
allowed simply by listing all of the named actions to be executed in a comma
separated list. The example given below shows a rule that is evaluated whenever
the verificationEvent is triggered. The pre-condition for the rule action to be
executed is a composite one. It defined that the login attempt must have failed
and the number of bad logins has still not reached the preset limit. If this
pre-condition evaluates to true then two actions are carried out. The bad login
count is incremented and a timer is reset(see Section 2.5 for further information
on Timers. This rule therefore demonstrates how named conditions can be
combined into one rule pre-condition while a number of actions can be executed
if a rule evaluates to true. All of the conditions and actions named are expected
to have been defined previously in the specification script.
rules {
ruleAddFailedLogin= verificationEvent(boolean result) \
(loginAttemptsValid && failedLogin) ->
addFailedLogin, resetloginTimer;
}
Within a context’s rules block there may be more than one rule that is triggered by the same event. When this occurs the rules are processed sequentially
in the order in which they appear in the specification script.
2.4.1
Enabling / Disabling Rules
The PolyLarva specification language provides a number of commands, which
we refer to as monitor directives, that give a user more flexibility when preparing
specification scripts. The use of these directives introduces new features to the
PolyLarva monitor. A useful feature of the PolyLarva monitoring system is
that of allowing rules to be switched on/off during runtime. Let us say that
we would like the monitor to provide the following behaviour: A user cannot
retry a login after 3 failed retries. If he does, then log the problem and stop
monitoring the user’s failed login count. Such behaviour could be required on
the assumption that, if a problem has occured, then we don’t need to monitor
the property anymore since our condition will keep on returning false. The
monitor directive switchOff(ruleName) will be used to carry out this function.
Monitor directives are always prefixed by the label larva: to highlight the fact
that these are PolyLarva specific commands.
The above behavior can be specified as follows:
21
rules {
ruleAddFailedLogin= loginFail() -> addFailedLogin;
ruleTooManyFails= loginFail() \ !loginAttemptsValid ->
logLoginCntExceeded, larva:switchOff(ruleTooManyFails),
larva:switchoff(ruleAddFailedLogin); ;
}
The enabling/disabling of rules is specified in the ‘action’ part of the rule.
The monitor directive switchOff(ruleName) is used to carry out this function.
The reverse can be obtained using switchOn(ruleName).
2.4.2
Extended Rules
The use of rules is made more effective by extending the notation to allow
the evaluation of post-conditions after a rule’s action has been evaluated. This
means that the rule format may be extended to be of the form:
e \ c → a \ pc \ pa
where the post-condition pc is evaluated after the rule’s actions have been
executed. If pc evaluates to true then the post-action pa is executed.
2.5
Timers
The PolyLarva monitor also supports monitoring of real-time properties. This
is important for those systems whose correct behaviour is also determined by the
timing at which particular events occur. Continuing our example of monitoring
user logins within the ATM system we now add the specification that A login
reattempt cannot occur before 20 seconds after last failed login. In addition, the
session will time out if no login reattempts occur within one minute. The Timers
construct in the PolyLarva specification language is available to define timers
in the monitor which can be used to handle these type of temporal properties.
A timer is defined as follows in the specification script:
timers {
loginTimer
}
A timers block is used to maintain a comma-separated list of all timers
defined. The timer definition is simply a name which will be linked to a new
timer.
2.5.1
Timer Events
Timers can fire events when they reach a particular value. One of our temporal
specifications is that The session will time out if no login reattempts occur within
one minute. This means that we would like our monitor to be notified if one
minute has elapsed and no new login attempts has occured. This timer event
22
can be specified as follows in the events block. The timerTimeOut event will
be fired if the loginTimer reaches a count of 60.
events {
timerTimeOut() = {larva:timerAt(loginTimer, 60)}
}
An alternative syntax for declaring a timer event is using the ‘@’ notation
as follows:
events {
timerTimeOut() = {loginTimer @ 60}
}
We might decide that we want this event to be repeated every 60 seconds.
That is, we want the monitor to be notified if the timer reaches 120 seconds
and then 180 seconds and so forth. In order to do this we can make use of the
Timer Cycle Event whose notation would be as follows:
events {
timerTimeOut() = {loginTimer @% 60}
}
2.5.2
Timer Conditions
Conditional statements can also be applied to Timer values. Our specification
that A login reattempt cannot occur before 20 seconds after last failed login
means that we need to be able to compare our current timer value to the 20
second limit in order to determine if the login reattempts is valid. The methods
available for comparing Timer values are provided by the larva:timerUnder and
larva:timerOver monitor directives. These can be used as follows:
conditions {
monitorSide {
loginTimerInvalid = {larva:timerUnder(loginTimer , 20);}
}
}
Both methods take two arguments which are the timer name and the value in
seconds against which the timer is to be compared. Note that it is important
that timer conditions are always within a monitorSide block since timers are
maintained by the monitor.
2.5.3
Timer Actions
Various methods can be used to apply actions to a timer. These are as follows:
• timerPause : will pause a Timer. Usage : larva:timerPause(timername)
• timerResume: will resume a Timer. Usage : larva:timerResume(timername)
• timerReset: will reset a Timer to start again from zero. Usage: larva:timerReset(timername)
• timerOff: will stop a Timer completely. larva:timerOff(timername)
Any of the above can be used within a declaration of a monitorSide action in
the actions block.
23
2.6
Specification Script Setup
The examples we have introduced so far have shown how a monitor can keep
track of properties. Within a specification script we group all our constructs the states, timers, events, conditions, actions and rules - in order to define what
we refer to as a Context. A simple specification script can be built out of the
examples we have defined so far. The label global is used at the start of the
specification enclosing the declaration of all timers, conditions, actions, events
and rules.
global {
timers {
loginTimer
}
states {
monitorSide {
int loginAttempts {
saveWith {}
restoreWith{loginAttempts = 0;}
}
}
}
conditions {
monitorSide {
loginAttemptsValid = {loginAttempts < 3;}
loginTimerInvalid = {larva:timerUnder(loginTimer , 20);}
}
systemSide {
failedLogin = {return result == false;}
}
}
actions {
monitorSide {
addFailedLogin = {++loginAttempts;}
logLoginCntExceeded =
{System.out.println(‘‘No more login attempts allowed after 3 failed tries.’’);}
resetloginTimer = {larva:timerReset(loginTimer)}
logTimerTimedOut =
{System.out.println(‘‘System timed out. One minute has elapsed without a login attempt.’’);}
}
}
events {
timerTimeOut() = {loginTimer @% 60}
loginFail(result) =
{*.verifyPin(*) uponReturning(boolean result)}
}
rules {
ruleAddFailedLogin= loginFail(boolean result) \
(loginAttemptsValid && failedLogin) -> addFailedLogin, resetloginTimer;
ruleTooManyFails= loginFail(boolean result) \
(!loginAttemptsValid && failedLogin)-> logLoginCntExceeded;
ruleTimerTimedOut= timerTimeOut() ->logTimerTimedOut;
}
}
24
2.7
Contexts
While the specification script given in the previous section can succesfully monitor global properties such as the number of login attempts being executed in
one session, this is obviously a very simplistic example. It does not consider
the fact that, during the execution of a software system, especially in an objectoriented environment, multiple instances of objects are created. If there are
specific properties that must be obeyed by each instance of the object then the
monitor cannot keep only global properties but must maintain a separate set of
states for each instance of the object or property created within the system.
As a practical example we will build on our running example of monitoring an
ATM system. We add the extra specification that the system being monitored
allows multiple users to log in and start a session. In each session a user must
not carry out more than three transactions. This new specification has now
highlighted the fact that a transaction count must be maintained per session
created.
2.7.1
Nesting of Contexts
In order to support this PolyLarva allows nesting of specification blocks otherwise known as Contexts. Every specification script must have at least one
context, the global context. Other sub-contexts are defined within this global
context as necessary.
Studying our specification which states that every time a new user logs in, his
transaction count needs to be monitored, we can see an obvious link between
the starting of a session and the requirement to start a new ‘nested context’
within our monitor. It is therefore the ‘new session’ event occuring on the
system which should trigger an action that replicates the nested context and
associates it with this new session. The state of this replicated context will now
reflect the state of that one particular user session and the monitor will have
a number of instances of this context in various states according to the user
sessions with which they are linked. In the rules block we may therefore have
rules which must indicate that their activation should also imply the loading of
a new context. This can be specified using the upon / load keywords available
in the PolyLarva specification language as follows:
global {
timers {
...
}
states {
...
}
conditions {
...
}
25
actions {
...
}
events {
newSession(ATMSession session) =
{ *.doLogin(*) uponReturning (session)}
}
rules {
upon {
ruleNewSession= newSession(ATMSession session) \
!loginTimerInvalid -> resetloginTimer
} load session {
%% new context definition for user
states {
..
}
events {
addTransaction(trans, sesn) = {ATMSession sesn.doTransaction()
uponReturning (Transaction trans)} where {session = sesn;}
}
..
}
}
}
In the above example, the event newSession fires a rule which in turn starts
off a new context now associated with that Session session that has just been
added. It is very important that the event which is linked to a rule loading a
new context has a parameter which is bound to the object being created - in
this case session. In addition, every event in the context should specify which
context instance it is bound with. The where clause of each event is used to
provide this binding, as shown in the above example for event addTransaction
where the clause where session = sesn binds the event parameter sesn with
the session instance this event has been triggered from. Nesting of contexts is
possible for multiple levels meaning that, in this example, the session context
might in turn have rules which load new contexts themselves.
The nesting of contexts within a specification script means that the various
container blocks of states, events, actions, conditions and rules are repeated
throughout the script, for each context defined. A specification script can only
contain one each of these blocks for every context. As an example, each context
may have only one states block. This, in turn, can contain only one each of the
monitorSide and systemSide blocks. The same holds for the events, actions,
conditions and rules block.
2.8
Internal Events
Our description so far has explained how monitoring occurs when events are
fired from the system. The nesting of contexts introduced above means that a
particular context’s monitoring logic will be evaluated if an event occurs on that
particular context instance. The PolyLarva specification language also allows
26
for events to be fired from within the monitoring logic itself, rather than only
from the system. This gives greater flexibility to the monitoring process since
it allows for monitoring evaluation to occur at particular instances as required,
by triggering an event from within the monitor itself. A common example of
when this internal triggering of events is required is when we want our monitor
to evaluate a particular rule as a result of another rule resolving to true.
In our ATM example we have a specification that has not been considered so
far. This is the behavior expected when a deposit transaction occurs. The specification states that: In case of a Deposit Transaction, the ATM Session duration
is increased to allow a user to prepare his deposit instructions. The session timer
is reset so that the 10 minute period is restarted. The PolyLarva specification
script defines the nested hierarchy of contexts as: global, session, transaction
where the session context is instantiated as soon as a valid login attempt occurs
and a transaction context is instantiated every time a new transaction is started
within a session. In this case, when a deposit transaction is started then the
session context needs to be notified in order to reset its timer. This communication is supported within the PolyLarva monitor and will be carried out by what
we call ‘Internal Events’. An Internal Event may be declared within the events
block in the PolyLarva specification script as for other events. A declaration
will be of the following form:
eventname(param1, ..) = ?eventname(param1, ..) where ...
The ? character is used to prefix the event declaration and serves to indicate
that this particular event is a monitor specific internal event - one which is
internally triggered by other events. This notation was chosen to be standard
with other event declarations. It also allows easy specification of parameters
to be passed with the event. In the ATM specification script, the events block
for the session context will define the internal event increaseSesnTimer which
is expected to be called from somewhere within the same specification script.
events {
increaseSesnTimer() = {?increaseSesnTimer()}
}
The Internal Event will be fired by a rule which may be found in any context,
not necessarily the same context where the event was specified. A context rule
can trigger internal events that may be defined in the global context, any other
parent context or any of its child contexts. The syntax used to fire a rule will
be as follows:
rules {
ruleA= eventA() \ conditionB -> larva:fire(eventname(param1, .. ))
}
fire(eventname(params...)) is the command used to allow event firing across
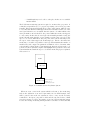
contexts. This is prefixed by the larva: label. Figure 6 demonstrates how a rule
can fire events in multiple contexts irrespective of their position in the context
27
hierarchy. In this diagram the rule fireEvent fires an internal event which will
trigger a rule both in a parent context as well as in a child context. The order in
which the rules will be processed is from the topmost parent context downwards,
meaning that child contexts will have their rule evaluated after that of the parent
context.
Global Context
events {
internalev() = {?ievent();}
}
triggers
rule
rules {
internRule=internalev()−−>
doAction;
}
Sub Context
events {
......
}
fires event
rules {
fireEvent= myevent() −−>
larva:fire(ievent());
Sub sub Context
}
events {
myinterev() = {?ievent();}
}
triggers
rule
rules {
internRule=myinterev()−−>
doAction;
}
Figure 6: Processing of Internal Events
In our ATM specification script example, a rule in the transaction context
needs to be set up in order to fire the increaseSesnTimer event in the session
context. The rule can be defined as follows:
rules {
ruleMoreTime= doDepositTransaction(dt)
}
-> larva:fire(increaseSesnTimer());
A rule which triggers the firing of other internal events as shown in the
above example may also include other actions on the right hand side of the rule
as explained in Section 2.4.
Internal events play a key role when the state of properties needs to be passed
from one Context to another. A context’s variables/states are invisible to other
child or parent contexts and hence they need to be communicated in some form
28
by the originating context if their use is required. An example of this is as
follows. Consider a global context that keeps count of users logged into the
system using:
states {
monitorSide {
int userCount {
saveWith{}
restoreWith{userCount = 0;}
}
}
}
This global context has defined a child context related to each user that is
logged in. One of the properties that needs to be checked at the user level is
that the current overall user count is not greater than a fixed limit. The user
child context has no reference to userCount and therefore, the global context
needs to have the ability to pass this value as required. A rule can be defined
in the global context stating:
rules {
ruleSendUserCount= eventX() \ conditionA -> larva:fire(usercntEvent(int userCount));
%% where userCount is declared in the global context’s states block
}
To listen for and receive this event the user child context must define an ‘Internal
Event’ as:
events {
eventFromGlobal(int userCount) = {?usercntEvent(userCount)}
}
This event can then be used in the user context’s rules to carry out monitoring which also includes reference to the userCount value. In this example
the internal event fired by the global context is received and handled by all instances of the child context. The where clause can be used in the Internal Event
declaration as explained in Section 2.1 to ensure that only particular instances
of a child context will handle the event.
2.9
Imports
Since a specification script can include references to functions and classes declared on the system side it is necessary to define which files need to be imported
into the generated code in order for it to be able to compile and run. Any declarations of imports can be done using an imports block. A specification script
can only include one imports block which, if present, should be at the start
of the script, outside the global context block. The syntax of this block is as
follows:
imports {
import packageA;
import packageB;
}
29
2.10
Comments
Comments may be added throughout the specification script to make it more
readable and maintainable. A comment should be prefixed by ‘%%’. Any text
found on a line after the ‘%%’ character is considered to be a comment and will
be ignored by the parser.
2.11
Sample Script
In this section we provide a sample PolyLarva verification script that makes
use of most of the constructs explained in the previous sections.
It is important to note that there is no fixed ordering of blocks within the context specification unless there is a dependance between a definition in one block
and another. This means that, for example, the events block can be declared
before the states block and vice versa without any compilation problems since
no states are specifically referenced in an event declaration. The same goes for
conditions and actions where there is no direct link between the two constructs.
On the other hand if a monitor condition makes direct reference to a timer,
the PolyLarva compiler will expect to have already parsed a definition for that
timer. In this case it would be necessary for the timers block in that particular
context to be declared before the conditions block. This constraint also implies
that the rules block should be the last block in a context’s specification since it
references events, conditions and actions that are expected to have previously
been defined.
The script given here is a full version of the script used to monitor the property
specifications of an ATM System as given in Section 1.2.2. This is a complete
version of the example that has been used throughout this document to explain
the various PolyLarva language constructs.
imports {
import atm.*;
}
global {
timers {
loginTimer %% timer to maintain duration between login attempts
}
states {
monitorSide {
int loginAttempts {
saveWith {}
restoreWith {loginAttempts = 0;}
}
%% counter to ensure no more than 3 login attempts allowed per user
}
}
conditions {
monitorSide {
loginTimerInvalid = {larva:timerUnder(loginTimer, 20);}
loginAttemptsValid = {loginAttempts < 3;}
30
isFirstLoginAttempt= {loginAttempts == 0;}
}
systemSide {
failedLogin = {return result == false;}
}
}
actions {
systemSide {
logTimerErr = {System.out.println(‘‘A login re-attempt is not allowed before 20s have elapsed
from last try’’);}
logAttemptsErr = {System.out.println(‘‘No more login re-attempts allowed after three failed tries’’);}
}
monitorSide {
addFailedLogin = {++loginAttempts;}
resetloginTimer = {larva:timerReset( loginTimer);}
}
}
events {
loginFail(result) =
{*.verifyPin(*) uponReturning(boolean result)}
newSession(ATMSession session) = { *.doLogin(*) uponReturning (session)}
}
rules {
ruleInvalidTimeLag= newSession(ATMSession session) \ loginTimerInvalid -> logTimerErr;
ruleInvalidTimeLagNewFail= loginFail(boolean result) \
(!isFirstLoginAttempt && loginTimerInvalid && failedLogin) -> logTimerErr;
ruleAddFailedLogin= loginFail(boolean result) \ (loginAttemptsValid && failedLogin) ->
addFailedLogin, resetloginTimer;
ruleTooManyFails= loginFail(boolean result) \ (!loginAttemptsValid && failedLogin)->
logAttemptsErr;
upon {
ruleNewSession= newSession(ATMSession session)
saveWith { }
restoreWith{ }
}
} load session{
%% session context
\ !loginTimerInvalid -> resetloginTimer {
timers {
sessionTimer %% timer used to control duration of session
}
states {
monitorSide {
int transactionCnt { %% In one session no more than 3 consecutive transactions should be allowed
saveWith { }
restoreWith {transactionCnt = 0; }
}
boolean sessionStarted{
saveWith { }
restoreWith {sessionStarted= false; }
}
}
}
conditions {
monitorSide {
isTransactionCntValid = {transactionCnt <
31
3;}
isSessionStarted={sessionStarted==true;}
}
}
actions {
monitorSide {
addNewTransaction = {++transactionCnt;}
logTooManyTransactions={System.out.println(‘‘Number of transactions in one sessions exceeded.’’);}
logSessionExpired={System.out.println(‘‘Session expired Ű max time allowed 10 minutes.’’);}
setSessionStarted={sessionStarted = true;}
resetSessionTimer={larva:timerReset( sessionTimer);}
}
}
events {
timerTrigger()= { sessionTimer @ 30}
showTransMenu(ses) = {
ATMSession ses.showTransMenu()} where {session = ses;}
addTransaction(trans, sesn) = {ATMSession sesn.doTransaction()
uponReturning (WithdrawalTransaction trans)} where {session = sesn;}
increaseSesnTimer() = {?increaseSesnTimer()}
}
rules {
ruleTooManyTrans= addTransaction(trans, sesn) \
!isTransactionCntValid -> logTooManyTransactions;
ruleStartSessionTimer= showTransMenu(ses) \
!isSessionStarted -> setSessionStarted, resetSessionTimer;
ruleSessionExpired= timerTrigger() -> logSessionExpired;
ruleIncreaseTimer= increaseSesnTimer() -> resetSessionTimer;
upon {
ruleNewTrans= addTransaction(trans, sesn) \ isTransactionCntValid
saveWith{}
restoreWith{}
}
} load trans{
%% transaction context
-> addNewTransaction{
%% no context timers
%% no context states
conditions {
systemSide {
isWithdrawAllowed = {return ua.isCanWithdraw();}
isAmountOverMaxLimit=
{return !BankDetails.isWithinLimit(wt.getWithdrawAmount());}
isAmountOverBalance=
{return wt.getWithdrawAmount() >ua.getAccount_Balance();}
isAmountOverFunds={return !BankDetails.isEnoughFunds(wt.getWithdrawAmount());}
}
}
actions {
32
monitorSide {
logTransactionNotAllowed={System.out.println(‘‘User is not allowed Withdrawal Transactions’’);}
logOverMaxLimit={System.out.println(‘‘Amount Specified is over max limit allowed.’’);}
logOverBalance={ System.out.println(‘‘Amount Specified is over account balance.’’);}
logOverFunds={ System.out.println(‘‘Not enough funds available in ATM.’’);}
}
}
events {
doWithdrawTransaction(wt, ua) =
{WithdrawalTransaction
wt.doWithdrawTransaction(UserAccount ua)} where {trans = wt;}
}
rules {
ruleInvalidWithdraw= doWithdrawTransaction(wt, ua) \ !isWithdrawAllowed -> logTransactionNotAllowed;
ruleCheckMaxLimit= doWithdrawTransaction(wt, ua) \ isAmountOverMaxLimit -> logOverMaxLimit;
ruleCheckBalanceLimit= doWithdrawTransaction(wt, ua) \ isAmountOverBalance -> logOverBalance;
ruleCheckFundsLimit= doWithdrawTransaction(wt, ua) \ isAmountOverFunds -> logOverFunds;
ruleMoreTime= doDepositTransaction(dt)
-> larva:fire(increaseSesnTimer());
}
}
}
}
}
}
3
Usage
This section will explain how the PolyLarva framework may be used to create
a PolyLarva runtime monitor given a system and a specification script defining the properties that are to be monitored. Section 1.2.1 explained how the
PolyLarva monitoring system is created in a two-step process. The following
explanation will be separated in the same manner. The first section will explain how the PolyLarva compiler can be used to create the main monitor. An
explanation of the file structure created and its contents will be given. This
is followed by a second section that clarifies how the PolyLarva language specific compiler can then be used to create the additional monitoring code that is
weaved into the system to be monitored.
3.1
Generating the PolyLarva Monitor
Pre-requisites The PolyLarva compiler can only be used if a JDK is installed. The system path should be updated to recognize the commands java
and javac.
The PolyLarva compiler is packaged in a jar file and may be run from the
command line using:
java -jar LarvaMonitorCompiler.jar -d <targetdir> -s <specificationscript> -n <name>
33
The arguments -d and -s are not optional and the PolyLarva compiler will
fail to run if these are not defined.
-d must be used to specify the target directory for the generated files. This
directory is created where specified if it does not previously exist. The process
will not overwrite existing files and will instead issue a warning if the specified
directory is not empty.
-s must be used to specify the location of the specification script. This script
must be written in the notation explained in Section 2.
-n is an optional argument. This may be used to define a ‘name’ which will be
appended to the generated Java files and thus will help in better identification of
which system the monitoring logic created is bound to. As an example, if we are
creating a monitor for an ‘ATM’ system we might specify the SystemID to be
“ATM” such that the generated files will have names of the form ATM_xx.java
ensuring that the link between this monitoring code and the system is clear. If
a name is not specified the script name will be used by default.
An alternative option to using the command line is that of running the batch
file generate_monitor which is available with the PolyLarva release. When
executed, this batch file will prompt for the arguments specified above to be
entered.
3.1.1
The PolyLarva Compiler Output
The PolyLarva compiler will generate a number of files as output, all of which
will be found in the directory specified as a command line argument (using -d ).
The files created are Java files and will be found in the folder larva under the
following folder structure:
target_directory
LarvaMonitor
src
larva
Among the files created the more important ones are the following:
Monitor.java is the main PolyLarva Monitor class file. This starts up the
system monitor and ensures that a communication socket is opened and waiting
for a connection to be establised with the system.
LarvaCommServer.java is reponsible for the connection with the system.
The main functionality in this class is that of establishing the connection with
the system and handling the receipt and sending of messages from and to the
system. According to the messages received, the execution flow will be passed
on to the relevant monitor classes.
Context specific files. A Java file is created for each context defined in the
34
specification script (see Section 2.7). This means that the logic related to each
particular context is maintained independently in a separate file. A suffix is
appended to each file name (for example, ATM_0.java, ATM_1.java etc.) to
specify which particular context this file is associated with according to the
nesting level of the context.
3.1.2
Running the PolyLarva Monitor
The PolyLarva monitor is a stand alone component, separate from the system
to be monitored,and therefore it must be started up independently. The monitor
can be started up via the command line and requires no additional arguments
by default. An optional argument which may be used is the -p argument to
specify the port number to use for the socket connection to the system. This
normally does not need to be reset unless for exceptional circumstances which
indicate that the deafult port (4444) is not available for the PolyLarva monitor.
The batch file run_monitor available with the PolyLarva release can be used
to start up the PolyLarva monitor. On execution the directory containing the
compiled monitor files is requested. This should be the directory specified as
target when the generate_monitor script was run. No other arguments are
required. On succesful start up the monitor will issue the message “Monitor
started. Waiting to establish connection with system”.
3.1.3
Viewing the PolyLarva Monitor Logs
The PolyLarva monitor uses the Java Logging API in order to output informational messages. The logging configuration is initialized using a logging configuration file that is read at start up. This configuration file is generated as part
of the specification script compilation process and is named logconfig.properties.
The contents of this configuration file specify the default formatting used for
the log file and the level of detail that should be logged. This is shown in the
extract of the properties file given here.
# File Logging
java.util.logging.FileHandler.formatter = larva.LarvaFormatter
java.util.logging.FileHandler.level = FINE
It is important to note that the level of detail logged is set to FINE meaning
that all possible logging messages will be output to the log file. If this level
of logging detail is not required, the FileHandler.level can be set to the value
INFO which will mean that only basic logging will be carried out. The type of
information logged at each level is explained below. By default the log file is
created in the same directory as the monitor files and is named monitorlog.log.
Logging level INFO If the logging level is set to value INFO then the log
file will include information about:
35
• Messages received from the system: An event has occured on the system
which is going to fire a rule. This event may form part of one or more
event collections. The context name and eventcollection/s that have been
matched will be logged as follows.
[INFO]Context {atm_script_0} received message that matches Event
Collection {verificationEvent}
• Timer events: When a timer fires because its set limit has been reached, an
event will be logged. The context name and timer fired will be recorded.
[INFO]Context {atm_script_1}
received Timer Event on Timer {sessionTimer}
• Internal events: A context rule may trigger the firing of an internal event.
The log file will show information about the context from which an internal
event was fired, specifying the event name. In turn the log file will also
indicate which contexts have received the internal event for processing.
[INFO]Context {atm_script_2} throwing Internal Event {increaseSesnTimer}
[INFO]Context {atm_script_1} handling Internal Event {increaseSesnTimer}
• Rule triggered: When an event is received one or more rules may be fired.
The context name and the rule which is about to fire is logged.
[INFO]Context {atm_script_0} Rule activated {ruleInvalidTimeLagNewFail}.
• Messages sent to the system: Evaluation of a rule might include the requirement for conditions or actions to be executed on the system side.
The monitor sends a message to the system identifying which condition
or action needs to be evaluated. The context name and the name of the
condition or action are logged.
[INFO]Sending to System : Context {atm_script_0} evaluate Condition {failedLogin}
• Rule evaluation: If a rule has been triggered and its pre-condition evaluates to true then this rule is applied. A log message is shown when a
rule is applied. The context name, rule name and result of evaluation are
logged.
[INFO]Context {atm_script_0} Rule activated {ruleStartSessionTimer}.
[INFO]Context {atm_script_0} Rule {ruleStartSessionTimer} evaluates to TRUE.
Rule Processed.
Apart from these information messages, the monitor will also log a SEVERE
message if it receives an event from the system which it does not know about.
Note that this situation will only occur in exceptional circumstances if the monitor being used has not been compiled with the same specification script used
to create the system side monitoring code. Although monitoring does not stop
in this case, the monitoring results will be completely unreliable and one must
assume that, if severe messages appear in the log file, then investigation is required.
36
Logging level FINE If the logging level is set to value FINE then the log
file will include all the messages that are logged for level INFO as explained
above. In addition, logs of the exact messages received from and sent to the
system are kept. Messages will be in the format shown in the below example
where the event identifiers and variable references are logged for easier tracing
in case of problems.
[FINE]Received from system: 1,5,eadb842b-a6b5-4aff-858b-ce9c2fdcb9e6
The messages passed between monitor and system consist of a string specifying
(message_type, message_id, parameterid_list). In the case of messages sent by
the monitor:
• message_type will specify that this is a condition or action to be evaluated
• message_id indicates the integer identifier of the specific condition or
action to be evaluated
• parameterid_list is a comma separated list of unique string identifiers for
each parameter that is to be passed between monitor and system
In the case of messages received by the monitor:
• message_type will specify whether this is an aspect event occuring from
system or whether it is the result of a condition evaluation
• message_id indicates the integer identifier of the specific aspect event or
condition evaluated (depending on the message_type)
• parameterid_list is a comma separated list of unique string identifiers for
each parameter that is to be passed between monitor and system
3.2
Generating the PolyLarva Language Specific Monitoring Code
The PolyLarva language specific compiler is responsible for parsing the specification script and creating the aspect code and additional system specific monitoring code which is to be weaved into the system to be monitored. A language
specific compiler which generates code in the language with which the system
has been developed is necessary for monitoring of the said system to take place.
Pre-requisites The PolyLarva language specific compiler can only be used
if a JDK is installed. The system path should be updated to recognize the
commands java and javac.
The PolyLarva language specific compiler is run from the command line using:
java -jar LARVALangCompiler.jar -d <targetdir> -s <specificationscript> -l <targetlang> -n <name>
The arguments -d , -s and -l are not optional and the PolyLarva language
specific compiler will fail to run if these are not defined.
37
-d must be used to specify the target directory for the generated files. Note
that this should ideally be the same source directory as that of the system code.
-s must be used to specify the location of the specification script. This script
must be written in the notation explained in Section 2.
-l must be used to define the target language of the generated code. The
next section will introduce the language specific compiler for the Java language.
To use this compiler the option -l java should be used.
-n is an optional argument. This may be used to define a ‘name’ which will be
appended to the generated Java files and thus will help in better identification
of which system the monitoring logic created is bound to. As an example, if we
are creating a monitor for an ‘ATM’ system we might specify the name to be
“ATM” such that the generated files will have names of the form MonitorMethods_ATM_xx.fileextension ensuring that the link between this monitoring code
and the system is clear. If a name is not specified the script name will be used
by default.
At present a PolyLarva language specific compiler for the Java language is
available and the following sections discuss how this PolyLarva Java Compiler
may be used. Further work on the project may include the support for additional
language specific compilers which will provide their own user manual.
3.2.1
The PolyLarva Language Specific Compiler for Java
The PolyLarva Language Compiler for Java, which we refer to as Larva Java
Compiler, is run from the command line using:
java -jar LarvaLangCompiler.jar -d <targetdir> -s <specificationscript> -l java -n <name>
The arguments to the command have been explained in Section 3.2. An alternative option to using the command line is that of running the batch file
generateandrun_javasys which is available with the PolyLarva release. When
executed, this batch file will prompt for the arguments specified above to be
entered. The batch file generateandrun_javasys does not only handle the code
generation but also automatically takes care of the weaving of the generated
code with the original system. The additional environment pre-requisites must
therefore be highlighted:
Pre-requisites An AspectJ distribution must be installed and the tools aj5
and ajc must be available in the system path.
The Larva Java Compiler Output The Larva Java Compiler will generate a number of files as output, all of which will be found in the directory
38
specified as a command line argument (using -d ). The files created by this compiler are Java files and can be split into two main groups. The first group is
that of files containing the aspect related code which is responsible for defining
pointcuts on the system and specifying advice that is to be carried out when
these pointcuts are met. These files will be found in the folder aspects under
the following folder structure:
target_directory
aspects
The decision has been taken to have a separate AspectJ file for every context
defined in the specification script. This allows for better understandability of
the generated code. Each of the AspectJ files will have a name of the form
Aspect_<name>_xx.aj where the number assigned as suffix to the file name
represents the level of nesting of the associated context.
The second group of files output by the Larva Java Compiler are those which
contain additional helper code for the monitor to function. Specifically these
files will contain the code required to implement the evaluation of system side
conditions and actions as explained in Section 2.3. Additional code generated
in this group of files is that which is related to the establishment of a socket
connection to the monitor. These files will be found in the folder larva under
the following folder structure:
target_directory
aspects
larva
Among the files created the more important ones are the following:
LarvaCommClient.java is reponsible for the connection with the PolyLarva
monitor. The main functionality in this class is that of establishing the connection with the monitor and handling the receipt and sending of messages from
and to the monitor. According to the messages received, the execution flow will
be passed on to the relevant monitor helper classes.
Context specific files. A Java file is created for each context defined in the
specification script (see Section 2.7) if this defines conditions and/or actions that
need to be evaluated on the system side. Static methods are created for each
of the required functions. A suffix is appended to each file name (for example,
MonitorMethods_ATM_0.java, MonitorMethods_ATM_1.java etc.) to specify which particular context this file is associated with according to the nesting
level of the context.
3.2.2
Using PolyLarva to Monitor a System
The code output by the PolyLarva language specific compiler is automatically
weaved into the system to be monitored when using the batch file generateandrun_javasys. The system is started up automatically as per its normal usage
directions.
39
At start up there will be an immediate attempt to connect to the Monitor
in order to start up a monitoring session. If a PolyLarva monitor is not found
running at the default port 4444 then the system will continue to function as
normal with no attempts to send out event notifications. On the other hand, if
a connection to the PolyLarva monitor is established, communication between
the two will automatically take place.
3.2.3
Viewing the PolyLarva Monitor Logs on System Side
The PolyLarva Java monitor uses the Java Logging API in order to output
informational messages. The logging configuration is initialized using a logging
configuration file that is read at start up. This configuration file is generated
as part of the specification script compilation process and is named logconfig.properties. As for the monitor side, the contents of this configuration file
specify the default formatting used for the log file and the level of detail that
should be logged (see Section 3.1.3).
The level of detail logged is set to FINE by default meaning that all possible
logging messages will be output to the log file. If this level of logging detail
is not required, the FileHandler.level can be set to the value INFO which will
mean that only basic logging will be carried out. The type of information logged
on the system side at each level is explained below. By default the log file is
created in the target directory and is named systemmonitorlog.log.
Logging level INFO If the logging level is set to value INFO then the log
file will include information about:
• Event messages: Every time an aspect join point is met during execution
the monitor should be notified. A message is logged each time an event
message is sent to the monitor. The log will indicate which event has been
fired by showing the event collection name.
[INFO]Sending event notification: _verificationEvent0
• System side evaluation: A monitor will send a message to the system if
evaluation of conditions or actions are required to take place on the system. When such a message is received the system will log the occurence
specifying the name of the condition or action that is about to be evaluated.
[INFO]Evaluating condition {failedLogin}
Logging level FINE If the logging level is set to value FINE then the log
file will include all the messages that are logged for level INFO as explained
above. In addition, logs of the exact messages sent to and received from the
monitor are kept. Messages will be in the format shown in the below example
where the event identifiers and variable references are logged for easier tracing
in case of problems.
40
The following system log file extract shows messages being logged when the
logging level is set to FINE.
[INFO]Sending event notification: _loginFail0
[FINE]sending message : 1,1,60a8a2e4-d14f-4702-8f31-f82932847820,
[FINE]Received from monitor 2,4,60a8a2e4-d14f-4702-8f31-f82932847820,
0c3f5729-7d27-4065-8e4b-643f698c7c08,56babab9-8edf-4cc7-989e-3c2169f9e97f,null,null,null,
[INFO]Evaluating condition {failedLogin}
[FINE]sending message : 2,4,false
The INFO message specifies which event triggered communication between system and monitor while the more detailed logs show the strings that are transferred to and from the system. In this example the system notifies that a
loginFail event has been fired. It is noted that the event name in the logs is not
identical to the one specified in the script. The event name specified in the logs
starts with an underscore character indicating that this is the system generated
name for the event collection associated with this event. Regardless of this it
will be clear which event this label is associated with since the original event
name is maintained with the addition of a prefix underscore character and a
number added as a suffix. This can be matched to the specification script event
definition:
loginFail(result) =
{*.verifyPin(*) uponReturning(boolean result)}
This definition shows that the monitor needs to maintain a reference to the
return value of the method, which is result. A unique identifier for the system
result is sent to the monitor in the first message.
[FINE]sending message : 1,1,60a8a2e4-d14f-4702-8f31-f82932847820,
The specification script indicates that, on receipt of this message, there must
be a check to determine whether the pin verification was succesful or not. This
means that the monitor needs to identify whether result is a true or false value.
This cannot be done by the monitor since it only has the string identifier as
reference to the variable result. A message is sent from the monitor to the
system indicating that a condition must be evaluated on the system side to
determine the truth value of the variable. In the message received from the
monitor one can see that the unique identifier for result has been passed back
to the system. The object associated with this identifier will be retrieved and
used for the evaluation of the condition failedLogin.
[FINE]Received from monitor 2,4,60a8a2e4-d14f-4702-8f31-f82932847820,
0c3f5729-7d27-4065-8e4b-643f698c7c08,56babab9-8edf-4cc7-989e-3c2169f9e97f,null,null,null,
[INFO]Evaluating condition {failedLogin}
The system sends back a response message to the monitor indicating that the
result does not indicate a failed login.
[FINE]sending message : 2,4,false
41
3.3
PolyLarva Monitoring Example
The following example shows PolyLarva monitoring the execution of an ATM
system session. The various messages passed between the monitor and system
are highlighted with explanations on how the various log traces can be interpreted. The following steps are performed in this ATM Session.
1. The user enters a pin number, 123, which fails validation
2. The user enters a second, valid, pin number immediately after
3. The session then proceeds with the following actions:
• A balance enquiry
• A withdrawal of 100 euros
• A deposit of 50 euros
• A balance enquiry
4. The session is finally closed
The snapshot below shows the user interaction with the ATM System as described in the steps above.
"Running application ... "
Please Enter Pin No (or press ’0’ to exit):
123
Please Enter Pin No (or press ’0’ to exit):
1212
A login re-attempt is not allowed before 20 s have elapsed from last try.
Please specify a transaction type:
1 - Balance Enquiry
2 - Withdrawal
3 - Deposit
4 - Exit
1
Account balance is: 1500.0
Please specify a transaction type:
1 - Balance Enquiry
2 - Withdrawal
3 - Deposit
4 - Exit
2
Please enter emount:
100
funds have been issued.
Please specify a transaction type:
1 - Balance Enquiry
2 - Withdrawal
3 - Deposit
4 - Exit
3
Please enter emount:
50
Please specify a transaction type:
1 - Balance Enquiry
2 - Withdrawal
3 - Deposit
4 - Exit
1
Account balance is: 1450.0
Please specify a transaction type:
42
1
2
3
4
-
Balance Enquiry
Withdrawal
Deposit
Exit
3.3.1
Pin Validation
Referring to the ATM specification script given in Section 2.11, there are a
number of monitoring rules that are associated with the entry of a new pin
number by a user. Namely these are:
ruleInvalidTimeLagNewFail= loginFail(boolean result) \
(!isFirstLoginAttempt && loginTimerInvalid && failedLogin) -> logTimerErr;
ruleAddFailedLogin= loginFail(boolean result) \ (loginAttemptsValid && failedLogin) ->
addFailedLogin, resetloginTimer;
ruleTooManyFails= loginFail(boolean result) \ (!loginAttemptsValid && failedLogin)->
logAttemptsErr;
On entry of a new pin number, the monitor will be informed of the loginFail
event being called on the system. This fires a message which is passed to the
monitor as seen in the system side log file which specifies:
[INFO]Sending event notification: _loginFail0
As expected, this message is received by the monitor. The monitor log file shows
the logic followed by the monitoring process:
[INFO]Context
[INFO]Context
[INFO]Context
[INFO]Sending
[INFO]Context
[INFO]Context
{ATMSystem_0} received message that matches Event Collection {loginFail}
{ATMSystem_0} Rule activated {ruleInvalidTimeLagNewFail}
{ATMSystem_0} Rule activated {ruleAddFailedLogin}
to System : Context {ATMSystem_0} evaluate Condition {failedLogin}
{ATMSystem_0} Rule {ruleAddFailedLogin} evaluates to TRUE. Rule Processed.
{ATMSystem_0} Rule activated {ruleTooManyFails}
On receipt of the loginFail event notification, the monitor starts by evaluating
the first rule ruleInvalidTimeLagNewFail. This rule checks whether an invalid
login attempt has already occured. If this is the case then the time elapsed since
this invalid login is checked to ensure that the required 20 seconds have elapsed.
The logs show that this rule is not evaluated further and processing moves on
to the rule ruleAddFailedLogin. This demonstrates that the ruleInvalidTimeLagNewFail condition must have evaluated to false and hence the rule has not
been applied.
When ruleAddFailedLogin is evaluated, logs show that a message is sent to
the system. This indicates that the rule requires the evaluation of a system side
condition. The message Rule {ruleAddFailedLogin} evaluates to TRUE. Rule
Processed. indicates that this rule has been applied. This means that the pin
number entered has been confirmed to be invalid and therefore the failedLogin
count maintained by the monitor is going to be incremented.
43
The last rule applied, ruleTooManyFails, checks whether the limit of 3 invalid
logins has been reached. This rule is not applied here since this is the first invalid
login attempt. Observation of the complete monitor and system side logs given
in the next sections shows how the monitor repeats the processing of these same
three rules when the next pin number is entered. Once the new pin number is
confirmed to be valid the ATM session commences. The next section describes
how the monitor processes the rules linked to a cash withdrawal action.
3.3.2
Cash Withdrawal
Referring to the ATM specification script given in Section 2.11, there are a number of monitoring rules that are associated with the execution of a withdrawal
transaction by a user. Namely these are:
ruleInvalidWithdraw= doWithdrawTransaction(wt, ua) \ !isWithdrawAllowed -> logTransactionNotAllowed;
ruleCheckMaxLimit= doWithdrawTransaction(wt, ua) \ isAmountOverMaxLimit -> logOverMaxLimit;
ruleCheckBalanceLimit= doWithdrawTransaction(wt, ua) \ isAmountOverBalance -> logOverBalance;
ruleCheckFundsLimit= doWithdrawTransaction(wt, ua) \ isAmountOverFunds -> logOverFunds;
On selection of a withdrawal transaction, the amount to be withdrawn is requested from the user. The system then proceeds to execute a withdrawal transaction. The monitor is informed of the doWithdrawTransaction being called on
the system. This fires a message which is passed to the monitor as seen in the
system side log file which specifies:
[INFO]Sending event notification: _doWithdrawTransaction0
This message is received by the monitor so that the monitor log file shows the
logic followed by the monitoring process:
[INFO]Context
[INFO]Context
[INFO]Sending
[INFO]Context
[INFO]Context
[INFO]Sending
[INFO]Context
[INFO]Sending
[INFO]Context
[INFO]Sending
{ATMSystem_2} received message that matches Event Collection {doWithdrawTransaction}
{ATMSystem_2} Rule activated {ruleInvalidWithdraw}
to System : Context {ATMSystem_2} evaluate Condition {isWithdrawAllowed}
{ATMSystem_2} Rule {ruleInvalidWithdraw} evaluates to TRUE. Rule Processed.
{ATMSystem_2} Rule activated {ruleCheckMaxLimit}
to System : Context {ATMSystem_2} evaluate Condition {isAmountOverMaxLimit}
{ATMSystem_2} Rule activated {ruleCheckBalanceLimit}
to System : Context {ATMSystem_2} evaluate Condition {isAmountOverBalance}
{ATMSystem_2} Rule activated {ruleCheckFundsLimit}
to System : Context {ATMSystem_2} evaluate Condition {isAmountOverFunds}
All the rules associated with this event are processed in sequence and the monitor log file shows how each rule requires its condition to be evaluated on the
system side. Those condition evaluations which return true indicate that the
rule in question should be processed further as occurs in the case of the condition
isWithdrawAllowed.
The system log files also show the receipt of these messages which request
evaluation on the system side as shown:
44
[INFO]Evaluating
[INFO]Evaluating
[INFO]Evaluating
[INFO]Evaluating
condition
condition
condition
condition
{isWithdrawAllowed}
{isAmountOverMaxLimit}
{isAmountOverBalance}
{isAmountOverFunds}
A full listing of both the monitor log file as well as the system side log file are
given here for full reference. Note that both files were recorded with the logging
level set to INFO as explained in Section 3.1.3.
3.3.3
The PolyLarva Monitor Log File for ATM System
[INFO]System start up received.
[INFO]Context {ATMSystem_0} received message that matches Event Collection {verificationEvent}
[INFO]Context {ATMSystem_0} received message that matches Event Collection {loginFail}
[INFO]Context {ATMSystem_0} Rule activated {ruleInvalidTimeLagNewFail}
[INFO]Context {ATMSystem_0} Rule activated {ruleAddFailedLogin}
[INFO]Sending to System : Context {ATMSystem_0} evaluate Condition {failedLogin}
[INFO]Context {ATMSystem_0} Rule {ruleAddFailedLogin} evaluates to TRUE. Rule Processed.
[INFO]Context {ATMSystem_0} Rule activated {ruleTooManyFails}
[INFO]Context {ATMSystem_0} received message that matches Event Collection {verificationEvent}
[INFO]Context {ATMSystem_0} received message that matches Event Collection {loginFail}
[INFO]Context {ATMSystem_0} Rule activated {ruleInvalidTimeLagNewFail}
[INFO]Sending to System : Context {ATMSystem_0} evaluate Condition {failedLogin}
[INFO]Context {ATMSystem_0} Rule activated {ruleAddFailedLogin}
[INFO]Sending to System : Context {ATMSystem_0} evaluate Condition {failedLogin}
[INFO]Context {ATMSystem_0} Rule activated {ruleTooManyFails}
[INFO]Context {ATMSystem_0} received message that matches Event Collection {newSession}
[INFO]Context {ATMSystem_0} Rule activated {ruleInvalidTimeLag}
[INFO]Context {ATMSystem_0} Rule {ruleInvalidTimeLag} evaluates to TRUE. Rule Processed.
[INFO]Sending to System : Context {ATMSystem_0} evaluate Action {logTimerErr}
[INFO]Context {ATMSystem_0} Rule activated {ruleNewSession}
[INFO]Context {ATMSystem_1} received message that matches Event Collection {showTransMenu}
[INFO]Context {ATMSystem_1} Rule activated {ruleStartSessionTimer}
[INFO]Context {ATMSystem_1} Rule {ruleStartSessionTimer} evaluates to TRUE. Rule Processed.
[INFO]Context {ATMSystem_1} received message that matches Event Collection {addTransaction}
[INFO]Context {ATMSystem_1} Rule activated {ruleTooManyTrans}
[INFO]Context {ATMSystem_1} Rule activated {ruleNewTrans}
[INFO]Context {ATMSystem_1} Rule {ruleNewTrans} evaluates to TRUE. Rule Processed.
[INFO]Context {ATMSystem_1} received message that matches Event Collection {showTransMenu}
[INFO]Context {ATMSystem_1} Rule activated {ruleStartSessionTimer}
[INFO]Context {ATMSystem_2} received message that matches Event Collection {doWithdrawTransaction}
[INFO]Context {ATMSystem_2} Rule activated {ruleInvalidWithdraw}
[INFO]Sending to System : Context {ATMSystem_2} evaluate Condition {isWithdrawAllowed}
[INFO]Context {ATMSystem_2} Rule {ruleInvalidWithdraw} evaluates to TRUE. Rule Processed.
[INFO]Context {ATMSystem_2} Rule activated {ruleCheckMaxLimit}
[INFO]Sending to System : Context {ATMSystem_2} evaluate Condition {isAmountOverMaxLimit}
[INFO]Context {ATMSystem_2} Rule activated {ruleCheckBalanceLimit}
[INFO]Sending to System : Context {ATMSystem_2} evaluate Condition {isAmountOverBalance}
[INFO]Context {ATMSystem_2} Rule activated {ruleCheckFundsLimit}
[INFO]Sending to System : Context {ATMSystem_2} evaluate Condition {isAmountOverFunds}
[INFO]Context {ATMSystem_1} received message that matches Event Collection {addTransaction}
[INFO]Context {ATMSystem_1} Rule activated {ruleTooManyTrans}
[INFO]Context {ATMSystem_1} Rule activated {ruleNewTrans}
[INFO]Context {ATMSystem_1} Rule {ruleNewTrans} evaluates to TRUE. Rule Processed.
[INFO]Context {ATMSystem_1} received message that matches Event Collection {showTransMenu}
[INFO]Context {ATMSystem_1} Rule activated {ruleStartSessionTimer}
[INFO]Context {ATMSystem_2} received message that matches Event Collection {doDepositTransaction}
[INFO]Context {ATMSystem_2} Rule activated {ruleMoreTime}
[INFO]Context {ATMSystem_2} Rule {ruleMoreTime} evaluates to TRUE. Rule Processed.
[INFO]Context {ATMSystem_2} throwing Internal Event {increaseSesnTimer}
[INFO]Context {ATMSystem_1} handling Internal Event {increaseSesnTimer}
[INFO]Context {ATMSystem_1} Rule activated {ruleIncreaseTimer}
[INFO]Context {ATMSystem_1} Rule {ruleIncreaseTimer} evaluates to TRUE. Rule Processed.
[INFO]Context {ATMSystem_1} received message that matches Event Collection {addTransaction}
[INFO]Context {ATMSystem_1} Rule activated {ruleTooManyTrans}
[INFO]Context {ATMSystem_1} Rule activated {ruleNewTrans}
45
[INFO]Context {ATMSystem_1}
[INFO]Context {ATMSystem_1}
[INFO]Context {ATMSystem_1}
[INFO]Context {ATMSystem_1}
[INFO]Context {ATMSystem_1}
[INFO]Context {ATMSystem_1}
[INFO]Context {ATMSystem_1}
[INFO]Context {ATMSystem_1}
[INFO]Context {ATMSystem_1}
[INFO]Context {ATMSystem_1}
[INFO]Context {ATMSystem_1}
[INFO]Context {ATMSystem_1}
[INFO]Received message from
3.3.4
Rule {ruleNewTrans} evaluates to TRUE. Rule Processed.
received message that matches Event Collection {showTransMenu}
Rule activated {ruleStartSessionTimer}
received message that matches Event Collection {addTransaction}
Rule activated {ruleTooManyTrans}
Rule {ruleTooManyTrans} evaluates to TRUE. Rule Processed.
Rule activated {ruleNewTrans}
received message that matches Event Collection {showTransMenu}
Rule activated {ruleStartSessionTimer}
received Timer Event on Timer {sessionTimer}
Rule activated {ruleSessionExpired}
Rule {ruleSessionExpired} evaluates to TRUE. Rule Processed.
system - shutdown
The PolyLarva Monitor System Side Log File for ATM System
[INFO]Sending event notification: _verificationEvent0
[INFO]Sending event notification: _loginFail0
[INFO]Evaluating condition {failedLogin}
[INFO]Sending event notification: _verificationEvent0
[INFO]Sending event notification: _loginFail0
[INFO]Evaluating condition {failedLogin}
[INFO]Evaluating condition {failedLogin}
[INFO]Sending event notification: _newSession0
[INFO]Evaluating action {logTimerErr}
[INFO]Sending event notification: _showTransMenu0
[INFO]Sending event notification: _addTransaction0
[INFO]Sending event notification: _showTransMenu0
[INFO]Sending event notification: _doWithdrawTransaction0
[INFO]Evaluating condition {isWithdrawAllowed}
[INFO]Evaluating condition {isAmountOverMaxLimit}
[INFO]Evaluating condition {isAmountOverBalance}
[INFO]Evaluating condition {isAmountOverFunds}
[INFO]Sending event notification: _addTransaction0
[INFO]Sending event notification: _showTransMenu0
[INFO]Sending event notification: _doDepositTransaction0
[INFO]Sending event notification: _addTransaction0
[INFO]Sending event notification: _showTransMenu0
[INFO]Sending event notification: _addTransaction0
[INFO]Sending event notification: _showTransMenu0
4
4.1
The PolyLarva Language Compiler API
Introduction
The PolyLarva runtime verification system is composed of two main components - the PolyLarva monitor and an instrumented system - that are connected
via a TCP connection and communicate together during the system’s execution
in order to provide the monitoring functionality as shown in Figure 7.
The main monitoring code, displayed as the “Monitor” with opened socket
connection in Figure 7, is a Java progrem created by the PolyLarva compiler
as explained in Section 3.1. On the other hand, the code that is to be weaved
into the system to be monitored must be generated in the same language as
that used for the system and therefore a PolyLarva language specific compiler
is required. The following sections explain the PolyLarva language compiler
46
API that has been made available to facilitate the creation of language specific
compilers for the PolyLarva runtime monitor. Regardless of the target language
for the generated code, it is assumed that the language specific compiler will
be a Java program that is able to receive a specification script written in the
PolyLarva specification language explained in Section 2. The main function
of the PolyLarva language specific compiler is that of parsing the specification
script and generating code in the target language that can be integrated into
the system.
Monitor
socket connection
socket conn.
Other
Monitoring
Code
Aspect Code
System
Figure 7: Communication between components of Larva System
The following section will give the technical background to the PolyLarva language compiler API and should be used as reference when a language specific
compiler is to be created.
4.2
Technical Documentation
The implementation of a PolyLarva language specific compiler for a target language involves the implementation of one Java class file which will provide the
necessary code required to generate files in the target language. The class diagram shown in Figure 8 models the PolyLarva language compiler and shows
how this maintains a reference to a MonitorFileWriter instance. The MonitorFileWriter is an abstract class which defines all the methods that must be
implemented in order to create a language specific compiler. The class diagram
shows how a JavaMonitorFileWriter currently exists which provides the implementation of the Larva Java Compiler. This diagram therefore shows how the
creation of a PolyLarva language compiler for any target language will simply
require the creation of a new class that extends MonitorFileWriter and provides
an implementation for all the abstract methods defined by this class.
47
filecreator
LarvaLangCompiler
MonitorFileWriter
JavaMonitorFileWriter
LangFileWriter
Figure 8: Class Diagram of the PolyLarva Language Specific Compiler
The following section explains how the various methods provided by the MonitorFileWriter can be overridden by a language specific implementation. This
section is followed by a full listing of the MonitorFileWriter API in Section 4.3.
4.2.1
MonitorFileWriter API
The MonitorFileWriter describes an API for the implementation of a language
specific compiler class. This will be used by the LarvaLangCompiler to create
the necessary monitoring code that will be weaved with the target system code.
Section 4.3 indicates the abstract methods for which an implementation needs
to be provided. The LarvaLangCompiler will first parse the specification script.
The result of this will be that a reference is obtained to a hierarchy of Context
objects. The compiler will then call the methods in the following sequence in
order to generate the required code:
1. createFolders called to create the required target directories on disk.
public abstract void createFolders( java.lang.String
)
targetdir
• Usage
– Creates any directories required as target destinations for files
• Parameters
– targetdir - the target directory under which these folders are
to be created
• Exceptions
– langcompiler.FileWriterException 2. createUIDGenerator called to generate the code which is reponsible for
creating and maintaining unique reference ids to objects. It is important
to note that any event parameters cannot be passed directly from the
system to the monitor since the PolyLarva monitor will not know how to
handle system specific types. For this reason, a language specific compiler
must also provide the functionality to generate string unique identifiers
48
for each object. This identifier will be passed to the monitor as reference
to the actual variable. A record of the unique identifiers and the variables
they relate to must also be maintained by the system.
public abstract void createUIDGenerator( java.lang.String
getdir )
tar-
• Usage
– method to generate code which can create unique identifiers for
each variable parameter passed from system and to store these
identifiers for future use
• Parameters
– targetdir - the target directory for the file
• Exceptions
– langcompiler.FileWriterException 3. createLangSpecifics called to generate any language specific code which is
required for smooth integration of the system and the monitoring process.
As an example, in the case of the Larva Java compiler, code is generated
for the creation of custom exception classes.
public abstract void createLangSpecifics( java.lang.String
getdir )
tar-
• Usage
– Used to generate any additional code which is language specific
This can include the creation of exception handlers etc.
• Parameters
– targetdir - the target directory for the file
• Exceptions
– langcompiler.FileWriterException 4. createLogFiles called to generate code which is specific to monitor logging.
public abstract void createLogFiles( java.lang.String
dir )
target-
• Usage
– Used to generate logging specific files
• Parameters
– targetdir - the target directory for the file
• Exceptions
– langcompiler.FileWriterException 5. contextToCode starts off the generation of custom code which is specific to
the contexts defined in the specification script. The hierarchy of contexts
is traversed and, for each one, the contextToCode method is called. Only
parts of a defined context are relevant for the language specific compiler. In
49
particular, all of the monitorSide blocks within the script can be ignored.
The same applies for the rules block since this logic will be handled on
the monitor side. This means that the blocks of interest for the language
specific compiler in this method are the imports and any systemSide blocks
within the states, actions and conditions blocks.
The implementation of this method should provide a means of generating code which allows a context to maintain its system side state and
provide implementations for system side condition and action evaluations.
This means that the contextToCode implementation is expected to make
calls to other methods such as variableToCode, actionToCode and conditionToCode. The implementation of these mentioned methods is strongly
dependant on the properties of the Variable, Action and Condition instances resulting from the parsing process. The documentation of the
PolyLarva parser package should act as the main reference point during
implementation.
public abstract void contextToCode( java.lang.String
dir, Context c, java.lang.String name )
target-
• Usage
– Generates code for a context’s system side state to be implemented This mainly includes the implementation of system side
actions and conditions and handling of parameters and where
clause variables
• Parameters
– targetdir - the target directory for the file
– c - The context for which the code is being generated
– name - The name assigned to the context
• Exceptions
– langcompiler.FileWriterException 6. createLarvaCommClient generates the code which takes care of opening
a socket connection to the monitor and which can handle the receipt and
sending of messages via this connection. Since messages are processed
within this generated code there is an amount of customisation required
here too and it is expected that methods such as contextToCommCode are
called to provide these customisations. The customisation required is that
of identifying what messages are going to be received from the monitor,
namely the identifiers of system side conditions and actions. According to
each message received the relevant system side context class needs to be
accessed and its evaluation methods are called.
public abstract void createLarvaCommClient( java.lang.String
targetdir, java.lang.String name, Context c )
• Usage
50
– method to generate communication specific code needs to include
the opening of a socket connection to the monitor and logic for
receiving and handling monitor messages and sending of messages originating from system
• Parameters
– targetdir - the target directory for the file
– c - the global context
– name - the Name assigned to the context
• Exceptions
– langcompiler.FileWriterException 7. contextToAspectCode is finally called to generate the aspect related code
for each context. The event definitions are needed to generate that code
which is responsible for notifying the monitor when an event occurs. All
event and parameter details need to be sent to the monitor via the socket
connection. Since aspect programming is being used to carry out these
notifications, then aspect pointcuts and advice in the aspect extension for
the target language have to be generated from the given event definitions.
Every event collection defined in a context needs to be parsed in order
for an aspect event to be created for it. This implies that this method
must call the eventToAspect method implemented in the same class. Once
again the documentation of the PolyLarva parser package will provide
information on the structure of the Event and EventCollection classes
which is central to the generation of code representing these objects.
public abstract void contextToAspectCode( java.lang.String
getdir, Context c, java.lang.String name )
• Usage
– Generates code for a context’s aspect code to be generated
• Parameters
– targetdir - the target directory for the file
– c - the Context parsed from specification file
– name - the Name given to Context
• Exceptions
– langcompiler.FileWriterException To summarize, the system side generated code will provide the main functions
of:
1. opening a socket connection with the monitor in order to send and receive
messages
2. sending out notifications to the monitor when specified events occur on
the system
3. listening for messages from the monitor which will require the evaluation
of labelled conditions/actions
51
tar-
4. providing functions / methods for the evaluation of conditions and actions
required by monitoring logic
5. providing a means of generating and maintaining unique identifiers for all
parameters transferred between monitor and system
The implementation of the JavaMonitorFileWriter provided with this release
should serve as an example for the implementation of a language specific MonitorFileWriter. Integrating a new language compiler within the current LarvaLangCompiler is straightforward. A factory class called LarvaCompilerFactory has been provided which will require minimal change in order to support
new language implementations.
The final section of this document lists the full Javadoc API documentation
for the MonitorFullWriter.
4.3
Class MonitorFileWriter
This abstract class describes an API for converting a hierarchy of Context objects,
which define system behavior, into a set of files, written in a specific programming
language. These files will then be automatically weaved with a system to enable
connection and communication with a Larva monitor. A sub class should provide
specific implementations for each of the abstract methods. This sub-class will be
used by the LarvaLangCompiler to create aspect code and additional system specific
monitoring code to provide Larva monitoring functionality
4.3.1
Declaration
public abstract class MonitorFileWriter
extends java.lang.Object
4.3.2
Constructors
• MonitorFileWriter
public MonitorFileWriter( )
4.3.3
Methods
• actionToCode
public abstract String actionToCode( Action
– Usage
52
a )
∗ Generates code for a system side action to be implemented
– Parameters
∗ a - the Action parsed from specification file
– Returns - string containing system code
• conditionToCode
public abstract String conditionToCode( Condition
c )
– Usage
∗ Generates code for a system side condition to be implemented
– Parameters
∗ c - the Condition parsed from specification file
– Returns - string containing system code
• contextToAspectCode
public abstract void contextToAspectCode( java.lang.String
getdir, Context c, java.lang.String name )
tar-
– Usage
∗ Generates code for a context’s aspect code to be generated
– Parameters
∗ targetdir - the target directory for the file
∗ c - the Context parsed from specification file
∗ name - the Name given to Context
– Exceptions
∗ langcompiler.FileWriterException • contextToCode
public abstract void contextToCode( java.lang.String
dir, Context c, java.lang.String name )
target-
– Usage
∗ Generates code for a context’s system side state to be implemented This mainly includes the implementation of system side
actions and conditions and handling of parameters and where
clause variables
– Parameters
∗ targetdir - the target directory for the file
∗ c - The context for which the code is being generated
∗ name - The name assigned to the context
– Exceptions
∗ langcompiler.FileWriterException • contextToCommCode
public abstract String contextToCommCode( Context
name )
53
c, java.lang.String
– Usage
∗ Generates code for the customisable part of the client communication This involves the identification of messages received from
the monitor and the handling of these messages according to
context.
– Parameters
∗ c - the Context parsed from specification file
∗ name - the Name given to Context
– Returns - string containing system code
• createFolders
public abstract void createFolders( java.lang.String
)
targetdir
– Usage
∗ Creates any directories required as target destinations for files
– Parameters
∗ targetdir - the target directory under which these folders are
to be created
– Exceptions
∗ langcompiler.FileWriterException • createLangSpecifics
public abstract void createLangSpecifics( java.lang.String
getdir )
tar-
– Usage
∗ Used to generate any additional code which is language specific
This can include the creation of exception handlers etc.
– Parameters
∗ targetdir - the target directory for the file
– Exceptions
∗ langcompiler.FileWriterException • createLarvaCommClient
public abstract void createLarvaCommClient( java.lang.String
targetdir, java.lang.String name, Context c )
– Usage
∗ method to generate communication specific code needs to include
the opening of a socket connection to the monitor and logic for
receiving and handling monitor messages and sending of messages originating from system
– Parameters
∗ targetdir - the target directory for the file
54
∗ c - the global context
∗ name - the Name assigned to the context
– Exceptions
∗ langcompiler.FileWriterException • createLogFiles
public abstract void createLogFiles( java.lang.String
dir )
target-
– Usage
∗ Used to generate logging specific files
– Parameters
∗ targetdir - the target directory for the file
– Exceptions
∗ langcompiler.FileWriterException • createUIDGenerator
public abstract void createUIDGenerator( java.lang.String
getdir )
tar-
– Usage
∗ method to generate code which can create unique identifiers for
each variable parameter passed from system and to store these
identifiers for future use
– Parameters
∗ targetdir - the target directory for the file
– Exceptions
∗ langcompiler.FileWriterException • eventToAspect
public abstract String eventToAspect( Context
c, Event
e )
– Usage
∗ Generates code for an aspect declaration to be built out of an
event
– Parameters
∗ Context - the context which this event forms part of
∗ e - the Event parsed from specification file
– Returns - string containing system code
• parseSpecScript
public Context parseSpecScript( java.lang.String
sysName )
– Usage
55
specfile, java.lang.String
∗ Method that starts parsing of specification script
– Parameters
∗ specfile - the specification file
∗ sysName - the name given to monitor
– Returns - Global Context
– Exceptions
∗ ParseException • variableToCode
public abstract String variableToCode( Variable
v )
– Usage
∗ Generates code for a system side variable to be declared
– Parameters
∗ v - the Variable parsed from specification file
– Returns - string containing system code
• writeFile
public void writeFile( java.lang.String
text )
filename, java.lang.String
– Usage
∗ Helper method used to open and write a file
– Parameters
∗ filename ∗ text - to be written in file
– Exceptions
∗ langcompiler.FileWriterException -
56