1
Larva System User Manual
Christian Colombo
May 25, 2015
1
Contents
1 Introduction
1.1 Runtime Verification . . . . .
1.2 The General Picture . . . . .
1.3 Advantages of the System . .
1.4 Example . . . . . . . . . . . .
1.4.1 Events . . . . . . . . .
1.4.2 Variables and Actions
1.4.3 Conditions . . . . . .
1.5 Document Outline . . . . . .
.
.
.
.
.
.
.
.
.
.
.
.
.
.
.
.
.
.
.
.
.
.
.
.
.
.
.
.
.
.
.
.
.
.
.
.
.
.
.
.
.
.
.
.
.
.
.
.
.
.
.
.
.
.
.
.
.
.
.
.
.
.
.
.
.
.
.
.
.
.
.
.
.
.
.
.
.
.
.
.
.
.
.
.
.
.
.
.
.
.
.
.
.
.
.
.
.
.
.
.
.
.
.
.
.
.
.
.
.
.
.
.
.
.
.
.
.
.
.
.
4
4
4
5
6
6
7
8
8
2 Composing the Script
2.1 Global . . . . . . . . . . . . . . . . . . .
2.1.1 Variables . . . . . . . . . . . . .
2.1.2 Events . . . . . . . . . . . . . . .
2.1.3 Properties . . . . . . . . . . . . .
2.1.4 Foreach . . . . . . . . . . . . . .
2.2 Imports . . . . . . . . . . . . . . . . . .
2.3 Methods . . . . . . . . . . . . . . . . . .
2.4 Clocks . . . . . . . . . . . . . . . . . . .
2.4.1 Syntax . . . . . . . . . . . . . . .
2.4.2 Methods Provided . . . . . . . .
2.4.3 Comparison to Timed Automata
2.5 Channels . . . . . . . . . . . . . . . . .
2.5.1 Syntax . . . . . . . . . . . . . . .
2.6 Other Remarks . . . . . . . . . . . . . .
2.6.1 Comments . . . . . . . . . . . . .
2.6.2 Naming Conventions . . . . . . .
.
.
.
.
.
.
.
.
.
.
.
.
.
.
.
.
.
.
.
.
.
.
.
.
.
.
.
.
.
.
.
.
.
.
.
.
.
.
.
.
.
.
.
.
.
.
.
.
.
.
.
.
.
.
.
.
.
.
.
.
.
.
.
.
.
.
.
.
.
.
.
.
.
.
.
.
.
.
.
.
.
.
.
.
.
.
.
.
.
.
.
.
.
.
.
.
.
.
.
.
.
.
.
.
.
.
.
.
.
.
.
.
.
.
.
.
.
.
.
.
.
.
.
.
.
.
.
.
.
.
.
.
.
.
.
.
.
.
.
.
.
.
.
.
.
.
.
.
.
.
.
.
.
.
.
.
.
.
.
.
.
.
.
.
.
.
.
.
.
.
.
.
.
.
.
.
.
.
.
.
.
.
.
.
.
.
.
.
.
.
.
.
.
.
.
.
.
.
.
.
.
.
.
.
.
.
.
.
.
.
.
.
.
.
.
.
.
.
.
.
.
.
.
.
9
10
10
10
15
18
20
21
21
22
22
22
24
24
24
24
24
3 Using the Compiler
3.1 Command Line Arguments . . . . . . .
3.2 Output Messages . . . . . . . . . . . . .
3.2.1 Warning Messages . . . . . . . .
3.2.2 Error Messages . . . . . . . . . .
3.3 Using the Compiler Output . . . . . . .
3.3.1 Files with Monitoring Code . . .
3.3.2 Files with Diagrams . . . . . . .
3.4 The Output from the Verification Code
.
.
.
.
.
.
.
.
.
.
.
.
.
.
.
.
.
.
.
.
.
.
.
.
.
.
.
.
.
.
.
.
.
.
.
.
.
.
.
.
.
.
.
.
.
.
.
.
.
.
.
.
.
.
.
.
.
.
.
.
.
.
.
.
.
.
.
.
.
.
.
.
.
.
.
.
.
.
.
.
.
.
.
.
.
.
.
.
.
.
.
.
.
.
.
.
.
.
.
.
.
.
.
.
.
.
.
.
.
.
.
.
25
25
25
25
26
27
27
28
28
.
.
.
.
.
.
.
.
.
.
.
.
.
.
.
.
.
.
.
.
.
.
.
.
.
.
.
.
.
.
.
.
.
.
.
.
.
.
.
.
4 A Complete Example
28
4.1 Script . . . . . . . . . . . . . . . . . . . . . . . . . . . . . . . . . 28
4.1.1 The Output of the Verification System . . . . . . . . . . . 33
5 Example with Clocks and Channels
2
33
6 Conclusion
34
3
1
1.1
Introduction
Runtime Verification
The aim of this whole project stems from the need to produce reliable software. Testing alone cannot assure us that a system will handle any possible
unexpected situation. The reason is that no matter how many tests we try out,
we still cannot predict all the possible circumstances under which the system
will operate. Other techniques which have been proposed to ensure software
reliability fall under the header of static analysis (e.g. model checking). This
kind of verification is effective but it is not scalable for large systems.
A compromise between testing and static analysis is the use of runtime verification. This technique will monitor the system while it is running so that if
a system property is violated, an action can be triggered instantly to mitigate
the problem. Another possibility is that rather than having the mitigation done
automatically, the monitoring system issues reports to the administrator. Then
it will be up to the administrator to take the necessary actions.
As part of academic research, we have come up with a language named Larva
which allows the user to specify and monitor system properties. This document
will explain the syntax and semantics of this language, providing examples to
illustrate its use.
1.2
The General Picture
Larva is a language allowing the user to specify a number of events which
will be monitored, and a number of properties to be verified. These will be
automatically translated into the necessary Java code using the Larva compiler.
This code will include two main components: the code which extracts the events
and the code which verifies the extracted events. To extract the events we are
using AspectJ technology which is proving to be very convenient. The code
which verifies the events is a class whose methods are invoked from the AspectJ
code upon the occurrence of an event.
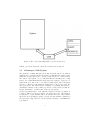
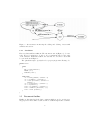
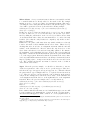
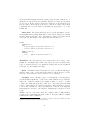
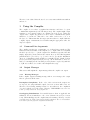
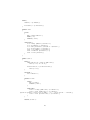
To summarize and illustrate the whole process of using Larva we have the
following diagrams. Figure 1 shows the components which must be provided
by the user. We obviously need the system which will be verified and the
specification in Larva (including the events and the properties to be verified).
More information about the Larva language can be found in the Larva manual
provided.
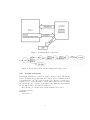
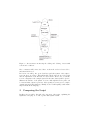
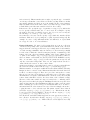
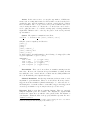
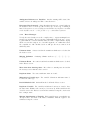
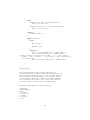
Subsequently, the user should use the compiler to generate the necessary
Java and AspectJ code as shown in Figure 2.
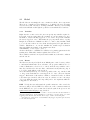
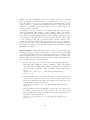
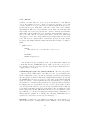
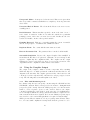
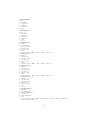
Finally, the system should be simply recompiled together with the compilergenerated code using the AspectJ compiler. This will automatically weave the
monitoring and verifying code with the system code. The end configuration
will be like the one shown in Figure 3. When the system is running, a report of
the monitoring situation (including the states through which the system is going
through and any bad states encountered) is issued in a text file. This information
4
Figure 1: The components which must be provided by the user.
will also provide the stack trace where the bad state was encountered.
1.3
Advantages of the System
The advantage of taking this approach is that the monitoring is done without
changing any code in the system being monitored. This has three main benefits:
firstly, the security issues can be specified separately in one central location
and outside of the system code, secondly that this extra checking can be easily
turned on or off and thirdly that the monitoring can be applied to Java bytecode
(without the need of the source code). Other benefits depend on how the system
is used; i.e. either used only during the testing phase or else it can be used also
after deployment. The latter has the advantage of reassuring that under no
circumstance will any of the security properties be violated. However, this also
has the disadvantage of adding extra overhead to the system.
Another appealing feature of the language is that it was kept as simple as
possible to make it as easy as possible to use. In fact the logic of the language
is equivalent to a state-machine with local variables and some other features.
The parser uses a graphics program to generate the state-machine equivalent of
the logic in the script. Therefore, the user has the advantage of visualizing the
logic written.
5
Figure 2: Generating the Java code using the compiler.
1.4
Example
Now we will give an example whose purpose is to gently introduce the user to
the syntax of Larva. At the same time we hope to show how easy it is to use
Larva. Therefore we will not introduce all the features at once. Rather, we will
introduce the constructs along with the development of the following example.
Imagine we need to monitor a bank system. For the sake of the example all we
need is to verify that there can never be more than 3 users in the bank.
1.4.1
Events
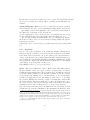
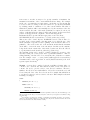
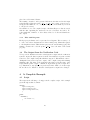
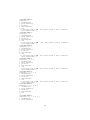
First of all we need to somehow monitor the events which change the count of
users. Basically, these are method calls to methods which add and remove users
from the bank. These can be used as shown in Figure 4 to ensure that no more
than 3 users will be created.
The equivalent script to specify events is given in the following code snippet
(Each event is specified as an arbitrary identifier being assigned to an actual
Java method call.):
EVENTS{
addUser() = {*.addUser()}
deleteUser() = {*.deleteUser()}
allUsers() = {User u.*()}
}
6
Figure 3: Combining all the components.
Figure 4: An automaton monitoring the adding and deleting of users.
1.4.2
Variables and Actions
Now imagine that instead of 3 users, we want to check for 6 users. The automaton becomes much bigger. But what if we want to check for 1000 users? It is
very impractical to use only events for such a case. Therefore we introduce a
variable to keep count of the number of users. This requires an action to update
the variable upon the occurrence of particular events. With these introductions,
the automaton will become as shown in Figure 5.
The following code shows how the required variables are declared.
%[label=variableslst]
VARIABLES {
int userCnt = 0;
}
7
Figure 5: An automaton monitoring the adding and deleting of users with
variables and actions.
1.4.3
Conditions
However, this is still not sufficient. The automaton as it is (Figure 5), does not
work. We need conditions to be able to choose transitions based on the value
of the variables. With this addition, the automaton to check for 6 users will
become as shown in Figure 6.
The equivalent script to specify the above property is given in following code:
PROPERTY users
{
STATES
{
BAD { toomany baddelete }
NORMAL { ok }
STARTING { start }
}
TRANSITIONS{
ok -> toomany [addUser() \userCnt > 5]
ok -> ok [addUser() \ \userCnt++;]
ok -> start [deleteUser() \userCnt == 1
\userCnt--; ]
ok -> ok [deleteUser() \ \userCnt--; ]
ok -> ok [allUsers()]
start -> ok [addUser() \ \userCnt++; ]
start -> baddelete [deleteUser() \ \]
start -> start [allUsers()]
}
}
1.5
Document Outline
Finally, we have introduced the basic constructs which we need to specify security properties. These will be described in more detail throughout the document.
8
Figure 6: An automaton monitoring the adding and deleting of users with
actions and conditions.
More constructs will be introduced later on when the reader is better able to
understand their need.
In Section 2 we will go into great detail as regards the syntax of the script to
represent these properties. This will include all the subsections of the script
and an explanation of the interaction between them. At the end of each subsection, a fragment of the example (started in the introduction) will be given to
illustrate the full use of the syntax. Section 3 will explain how the parser can
be run and what output it generates. Subsequently, Section 4 gives a complete
example sing the Larva language. Finally, Section 6 will explain possible future
improvements in the language.
2
Composing the Script
In this section we will go through each component of the script, explaining the
significance and purpose of each, together with syntax details.
9
2.1
Global
The Global section is simply the outer container for all the other components.
There are no compulsory section which have to be included, however, an empty
Global section, will obviously do nothing worthwhile. Therefore, the following
subsections will take us through the possible sections which Global can have.
2.1.1
Variables
Right after the events’ section, the user can specify any variables required to
keep track of any necessary values. For example, we can use an integer to store
the number of users currently logged in, or a boolean to keep track of whether
the user is logged in or not. This makes the property much easier to specify.
Imagine how much more difficult it would be to write a state-machine which
goes to bad state if there are more than 10 subsequent bad logins without a
variable. Furthermore, one can also initialize the variables upon declaration
just as in JAVA. An example of the syntax is as follows:
VARIABLES { boolean logged = false; }
Another alternative to initialize the variables is by putting statements in the
starting state. This will be further explained in Section 2.1.3.1
These variables can then be freely used in the transitions, both in the conditions
and the actions.
2.1.2
Events
The Events section is probably the most difficult part to write because you have
to understand which methods are relevant to the properties which need to be
verified. Furthermore, there is a lot of freedom in the way variables can be
introduced and therefore the user has to understand exactly what is going on
to be able to make full use of the notation.
An event is always made up of a collection (possibly of size one) of method calls
or other events such that the event triggers if one of the collection elements
triggers2 . Each method call can have a number of variables bound to it. When
a user intercepts a method call as an event, he can have access to the target
object (on which the method is being called) and to the arguments which are
being passed to the method.
BNF To help the user understand the possible variations of the event declarations we will provide the BNF. Note that some of the constructs mentioned
in the BNF have not yet been introduced and the symbols in quotes are the
symbols used in the language being described.
1 However, keep in mind that this code will be executed each time the state-machine reenters the starting state. If the initialization code should be executed exactly once at the
beginning ensure that the state-machine has no way to return to the starting state.
2 Note that at no point can two events simultaneously trigger except through collections,
i.e. the child and its parents.
10
Type
VariableDeclaration
MethodName
EventName
MatchType
ArgumentList
EventVariation
::=
::=
::=
::=
::=
::=
::=
Within
Filter
Where
MethodDeclaration
PrimitiveEvent
EventList
::=
::=
::=
::=
::=
::=
CompoundEvent
Event
Events
EventsBlock
::=
::=
::=
::=
identifier
‘∗’ | identifier | Type identifier
identifier
identifier
call | execution | VariableDeclaration | VariableDeclaration ArgumentList | uponReturning ‘(’ VariableDeclaration ‘)’
| uponThrowing ‘(’ VariableDeclaration ‘)’
| uponHandling ‘(’ VariableDeclaration ‘)’ | within ‘{’ VariableDeclaration ‘}’ | filter ‘{’ statements ‘}’ | where ‘{’ statements ‘}’ | VariableDeclaration ‘.’ MethodName ‘(’ ArgumentList ‘)’
MatchType MethodDeclaration EventVariation Within
PrimitiveEvent | CompoundEvent | EventName
| EventName ‘|’ EventList
‘{’ EventList ‘}’ Filter Where
EventName (ArgumentList) ‘ = ’ CompoundEvent
Event Events | ‘EVENTS’ ‘{’ Events ‘}’
Example For example consider: withdrawEvent() = {*.withdraw()}. The
event withdrawEvent (withdrawEvent is the name given by the user to this
particular event) is made up of the method call withdraw (withdraw is an actual
Java method call in the code to be monitored). In this case we are ignoring
both the target of the method and its arguments. (It is important to note the
brackets enclosing the declaration.) In order to get access to them we change
the syntax to:
withdraw(Account a, double amount) = {a.withdraw(amount)}
In this case we are binding the variable a to the target and amount to the argument. However, note that if the method withdraw has other arguments, then
the event will not fire because the method described here will not match. If
there are any arguments which the user is not interested in, one can either put
a variable name without a type (such as arg1 in the following example) or the
wildcard “*” as a placeholder. Therefore, if our method has other arguments,
it may become:
withdraw(Account a, double amount) = {a.withdraw(arg1,amount,*)}
Filter Clause Sometimes events may need to be ignored without going into
the hassle of using conditions in transitions. To this end, the filter clause can
be used to create an event conditionally, depending on a condition. Consider
the following example:
withdraw(int id, double amount) = {Account a.withdraw(arg1,amount,*)}
filter {amount>100}
In this case, the withdraw event will only trigger if the amount is greater than
100.
11
Where Clause A very convenient feature is that an event variable can bind
to a variable which is not directly related to the method call. For example
imagine we need to do some processing on a particular argument. This can be
done using the where clause just after the method call. (Another purpose of the
clause will be given in Section 2.1.4.) Consider the following example:
withdraw(int id, double amount) = {Account a.withdraw(arg1,amount,*)}
where {id = a.getId();}
In this case, we are not interested in the whole account object, but we simply
need the id. Therefore, we do not bind directly to the account object but to
its id by calling the getId method on the Account object. If there is more than
one statement in the where clause, the statements have to be enclosed in curly
brackets. (Note that the curly brackets are compulsory only if there is more
than one statement.)
Furthermore, the parser, will ensure that any variable which is not directly
bound to the method call, is initialized in the where clause. This is done by
checking that there is at least one assignment statement with the unbound
variable on the left-hand side. However, this is the only check done on the
where clause and therefore it is far from being fully validated. For instance
the assignment on the right-hand side is not checked. The reason is that it is
impossible to validate the statements unless the parser is also given all the JAVA
code of the target system. Remember that the statements in the where clause
can be any valid JAVA statement and these can call any relevant methods from
imported packages (more on imports and methods in Section 2.2 and Section
2.3). The conclusion is that the user must be cautious on the code that is
entered in the where clause.3
Types From the previous example, one should note that since a was not
declared as a parameter of the event, we need to provide its type4 . There is no
rule where the type can appear, as long as it appears once. Remember that if
the parser finds no type it simply takes it to be a placeholder and treats it as
a “*”. Therefore, the type can appear in the event declaration, in the method
call (as in the example) and even in the where clause on the left-hand side
of an assignment statement but not on the right-hand side of the assignment
statement. Hence, the previous example can be correctly written as:
withdraw(id,amount) = {Account a.withdraw(arg1,double amount,*)}
where int id = a.getId();
But not:
withdraw(int id, double amount) = {a.withdraw(arg1,amount,*)}
where id = Account a.getId();
If two variables with the same name are used with different types, an error will
be raised, stating a type mismatch has occurred. It is also very important to
understand that this applies to all the events in one context (explained later on
3 The compiler issues warnings showing the identifiers which the parser does not resolve in
the given context.
4 Arguments of generic types are supported however no spaces should be used when specifying the type, i.e. Map<String> rather than Map <String>.
12
in Section 2.1.4). This means that it is enough to specify the type of a variable
once in any event in that context. However, another very important note is that
any variable which is not listed as an event variable (in the event parameter
list) but which is used in the where clause, must have its type declared as in
normal JAVA (even if the same variable is used in other events).
If the user needs to specify the type of a parameter or target object, without the
need to specify a variable name, the “*” can be used. For example to specify
the method add is the one which belongs to the object Account one may use
the following code: addAcc() = {Account *.add()}.
On a final note, the user can also specify a type which also matches all the
subclasses. This can be done by using the + symbol (as used in AspectJ). For
example: Account+ *.add() will match all the add calls made on objects which
are of type Account or one of its subclasses.
Event Collections We started off by saying that an event is a collection
of methods and possibly other events such that if an element of the collection
triggers, then the event triggers. Therefore, upon a single method call, a number
of events can trigger simultaneously: an element of a collection and potentially
several events of which the element forms part (directly or transitively). The
syntax of an event collection is simply a listing of the events, delimited by the
“|” symbol. For example: any() = {{w()}|{r()}|{i()}} (given that events w, r
and i are Larva events which were already defined in the EVENTS section).
Also, one can write: any() = {w|r|i} because the parameters are ignored and
only the event name is important. Moreover, the curly brackets can also be
omitted if the sub-events do no have a where clause.
Apart from referring to previously defined events, a collection can itself define
an event from a method call as follows: any() = {*.writeToDb()|r()|i()}.
This has a number of consequences which the user should understand cautiously.
Imagine we have a 3 nested events. This means that when the method involved
is called, 3 events are triggered. There is no precedence among these 3 events;
they are processed as a group (array) of events and not as 3 consecutive events.
The immediate consequence of this is that if the outermost event (collection) has
a where clause, this will be added to the where clause of the contained event(s).
Therefore, if the same variable is being set, it may lead to conflicting values.
The parser resolves this by keeping the initialization in the most specific where
clause and ignoring any other initializations. (Whenever this occurs, the parser
issues a warning (see Section 3.2.1).) To understand this better, one have to
understand that the where clause in an event collection is simply a shortcut to
copying the same code for each sub-event. The syntax of such a where clause is
as follows: any(int j) = {w() | r() | i()} where j = 2; . This shortcut can also
be used for a sub-collection within a collection as follows: any(int j) = {{ w()
| r() } where { j = 1; } |i()} where int j = 2; .
One should also understand what happens if an event appears more than once
in a collection. Consider the following: any(int j) = {{ w() | r() } where { j
= 1; } | r() | i() } where j = 2; . This is allowed even though it is not really
13
sensible. The parser will always keep the where clause of sub-event r which is
the most deeply nested. In this case the j = 1 will take precedence over j = 2.
To avoid confusion of precedence, it is advised that a particular method call is
declared only once, and then used in different collections. Unless this rule is
adhered to, no guarantees are given as to the precedence. However, the user is
not deterred from doing this.
On a final note on event collection, one should note that if an event collection
declares a parameter, this should be a defined (either bound to the method
call or assigned in the where clause) parameter in all the sub-events. In other
words, the set of possible parameters in an event, is a subset of the intersection
of the variables of the sub-events. However, remember that the where clause
for each of the sub-events can be specified from the collection. Therefore, if a
variable is not found in all the sub-events, then it is expected to be initialized
in the collection’s where clause. This means that the error message which the
user will receive will not be “incompatible argument list” but rather “missing
initialization of variable”.
Event Variations When a method is declared as an event, it is assumed that
the trigger happens exactly before that method is called (see also the paragraph
about advanced features). However, the syntax was extended to allow for other
variations of this basic type of event. The syntax is the same as a normal event
with an extra keyword following the method call according to the variation in
question. There are three of these variations:
1. Instead of the entry point of the method, the event can trigger upon the return of the method. This also offers the possibility to bind to the returned
object. The keyword which indicates this event variation is uponReturing
(added just after the method call). An example with the syntax is as
follows:
r(Connection c, Object o) = {c.getFromDb()uponReturning(o)}
where int i = 0;
2. Another variation of an event is that the trigger occurs upon the throw
of an exception. The user can also bind to the exception being thrown.
The keyword which indicates this event variation is uponThrowing. An
example with the syntax is as follows:
r(Connection c, Exception ex) = {c.getFromDb()uponThrowing(ex)}
where int i = 0;
3. The last variation is upon the handling of an exception. In other words,
the trigger occurs exactly before the entry into the catch block. The
keyword which indicates this event variation is uponHandling Once more,
an example with the syntax is:
r(Connection c, Exception ex) = {c.getFromDb()uponHandling(ex)}
where int i = 0;
14
In each of the 3 cases, the user can also choose not to bind to the returned/thrown/handled object by leaving the brackets empty or putting an asterisk inside the
brackets.
Advanced Features Further to the above, Larva also exposes two advanced
AspectJ features: the call or execution matching modality, and the this keyword.
An example of the former, matching on the execution side rather than on
the calling side of the method call5 , is as follows:
execution withdraw(Account a, double amount) = {a.withdraw(arg1,amount,*)}
We note that if left unspecified, the default behaviour is that of a call.
The this AspectJ keyword, which binds to the object within whose instance
the method is called, can be accessed as in the following example through the
Larva keyword within 6 :
withdraw(Account a, double amount) = {a.withdraw(arg1,amount,*) within (Bank
b)}
2.1.3
Properties
Now we come to the specification of the actual state-machine. This involves 2
main sections: the declaration of the states and the declaration of the transitions. In the Global section there can be more than one property and therefore
each property should be given a name. This name will be useful when the property is output as a state-machine diagram for visualisation. Furthermore, it will
also appear in the output of the system when it is being monitored. An example
of the syntax of a property named badAccess is:
PROPERTY badAccess { ...the property details... }
States This section will include a list of all the states which will feature in
the state machine. There are 4 types of states: accepting states, bad states,
normal states and starting states. An accepting state is one which is considered
as the state which is desirable for the system to terminate in. On the contrary,
a bad state is a state which is not good for the system to be in. A normal state
is neither accepting and nor bad, but simply a possible state to be in during
the execution. Finally, there should be exactly one starting state; without this,
the system will not know from which state to start. It is important to note
the order: Accepting, Bad, Normal, Starting. This order should be used when
declaring the states, but not all types need to be used (except Starting).
Up to the current version there is no real distinction between accepting, bad and
normal states except in the visualisation. The visualisation is different both in
5 The basic difference is that the call pointcut will also match on calls of methods whose
source code is not available. On the other hand this has the disadvantage of not being able to
distinguish method calls which are performed on a superclass pointer of an object but which
in fact resolves to a method call of a subclass. Example: pointcut():call(Dog.sound()) will not
match a call a.sound() if a is an Animal pointer even if the actual object is a Dog.
6 Not to be confused with the AspectJ within keyword which can be used to match the
packages the class belongs to.
15
the state-machine diagram and in the output generated by the verification code
during the execution. In the state-machine diagram, a bad state is represented
by an octagon. In the output generated the stack trace is shown when a bad
state is reached. Then it is up to the user to take the necessary actions when
a particular state is reached (also by including the appropriate code on the
transitions).
Initial Code The system allows the user to specify any number of statements (within curly brackets) which will be executed upon entry (not necessarily
the first entry) in that state. If no statements are defined, the curly brackets
can be left out. An example of the syntax is in the following code:
STATES{
ACCEPTING{ ok }
BAD{
bad_write {System.out.println("A bad write!!");}
bad_read {System.out.println("A bad read!!");}
}
NORMAL { normal {} }
STARTING{
start
{System.out.println("started!!");}
}
}
Transitions Once the states have been declared, these can be used to create
transitions. A transition has 3 main components: an event (on which it triggers), a condition (checked before transition is taken) and an action (which is
performed once the transition is taken).
Event A transition must at least have an event, on which it will trigger.
Only the name of the event is important; whatever follows is ignored by the
parser (i.e. the parameters of the event need not be rewritten).
Condition Before entering a state, even though the event triggering a
relevant transition might have occurred, the condition still needs to be satisfied.
Unless the condition is satisfied, the transition will not “execute”. A valid
condition is a JAVA statement whose value is a boolean (any statement which
would be valid if placed in a JAVA if statement). This can include references
to the declared variables, to any event variable (not only the event triggering
that transition) 7 and also to the variables constituting the context (see Section
2.1.4).
Similar to the case of the where clause, the condition cannot be fully validated
because it can contain unknown method calls. So the parser will not complain
it if finds unresolvable identifiers.
7 However, note that when referring to variables of another event, these will have the value
updated by the last occurrence of the relevant event.
16
Action In the action section, one can place any number of JAVA statements, each one ending with a semicolon. These will be executed exactly before
entering the state, after the transition’s event has occurred and the condition
has been satisfied. The code (see Section 2.1.3) of the destination state is executed exactly after this code. In fact the code in the state can be used to
avoid copying the same code on all the entering (and/or leaving) transitions.
Again, little validation can be offered by the parser on the action performed
upon transition.
Syntax The syntax of a transition is as follows:
start state —> destination state [ event \ condition \ action ]
Only the event is compulsory, and therefore
[event \ \ ],
[event \ ],
[event],
[event \ condition \ ],
[event \ condition ], and
[event \ \ action ]
are all acceptable. As a full example see the following code snippet (Note that
!logged is equivalent to logged == false.):
TRANSITIONS {
start -> start
start -> start
start -> bad_write
start -> bad_read
}
[
[
[
[
i \
o()\
w \
r \
\ logged = true;]
\ logged = false;]
!logged \ ]
logged == false ]
Determinism There can be more than one transition starting from the
same state. However, the behaviour is kept deterministic by taking the first
successful (the event occurred and the condition was successful) transition in
the order in which they were input in the script.
Chained Transitions Another important issue is that we want to avoid
any infinite loops in transitions. Therefore, we should not allow any events to
trigger from another transition (chained-transitions) to be on the safe side. So,
when using the tool remember that no events will be triggered from the actions
executed upon transition or upon entry in a state (see Section 2.1.3). 8
Diagrams Each property has an equivalent diagram. These are generated
using the Graphviz open source software. The diagrams are output in GIF
format in the output directory with the other generated files. The filename of
each diagram contains the name of the property which it represents. For more
details see Section 3.
8 In later versions of the compiler we might consider allowing the user to use chainedtransitions warning him that this might produce infinite loops.
17
2.1.4
Foreach
Consider a scenario where we need to keep an automaton for each different
object. For example we need to check a property for each user, or for each
account. Therefore, we need some kind of construct which allows the user to
specify such an object. This will be called the context. The events, variables
and transitions will now be in a particular context. Hence, the first important
rule is that each event should specify the context so that the state-machine
which will be affected will be the one belonging to that particular context (e.g.
user or account). This is done in the where clause of each event. This is the
other purpose of the where clause which was previously mentioned in Section
2.1.2. The Foreach construct will be found in the Global section after all the
properties. An example with the syntax is shown in the following code snippet:
GLOBAL
{
FOREACH (User u)
{
EVENTS{
addAccount(User u1) = u1.addAccount(); where u = u1;
}
VARIABLES{}
PROPERTY userproperty {}
}
}
One should notice the declaration of the object which will constitute the
context just after the FOREACH keyword. Only objects can be used to specify contexts because the objects provide the equals method which allow us to
compare them to each other.
Customizing the equals and toString Methods The user can specify a
comparator method which will be used instead of the object’s default equals
method. This method can be specified by inserting equateUsing [methodName]
after the variable declaration. The method implementation must be provided in
the METHODS section (see Section 2.3) of the script. It is assumed that this
method accepts two objects as parameters (of the type which is to be compared)
and returns a boolean (true if the parameters are equal and false if otherwise).
For display purposes, by default we use the object’s toString method. However, the user is also allowed to provide another customized method. This can
be specified by inserting stringUsing [methodName] after specifying the equals
method (if specified at all). This method should accept one parameter (of the
type which is to be shown as a string) and returns a string. Using these constructs with the example above will give the following: FOREACH (User u
equateUsing compareUsers stringUsing userToString){...}
Invariants Consider an object which we are using as a context. Events, conditions and actions are occurring in this context. While the object is progressing
18
from a state to another, we may need to specify a number of invariants. An
invariant is an attribute of the context which should not change. For example
in the case of a transaction we may want to check that once its amount has
been set, it cannot be changed. The user is allowed to specify these invariants
by declaring a method or attribute of one of the context variables. The value of
this method/attribute will be automatically stored by the automaton. Once the
check is enabled, the value of the method/attribute is compared to the stored
value to verify that it has not changed. If the value changes, an Invariant Check
failed!! would appear in the output file of the monitoring system.
Invariants should be specified in their appropriate section as follows:
INVARIANTS{Double invariantName = variable.getAmount();enable}
This section can be found only in a FOREACH section because it has to be
specified on the context variable. It is important to note that the type of the
method/attribute is specified at the beginning of the statement cannot be a
primitive9 . The enable at the end of the statement means that the invariant
check will be on from the start of the automaton. In this case the attribute
being checked is the return value of the method getAmount. It is also allowed
to specify chained methods such as getDetails().getAmount().
The invariant checks can be enabled or disabled during the execution of the
automaton using the enable/disable after a particular transition. This enabling/disabling of checks can be done exactly after the declaration of a transition. For example: state1 —> state2 [setAmountEvent][enable invariantName]
A transition there can be more than one enable/disable statement (each one in
separate squared brackets).10
Nesting So far we have considered only the possibility of having either one
context or not context at all. But what if we want to have more than one
context? We need to provide a way to nest Foreach constructs. Therefore,
similar to the Global section with a number of Foreach sections at the end, each
Foreach may also have other Foreach sections. For example this will allow us
to specify properties for each account for each user. This example is shown in
following code snippet:
GLOBAL
{
VARIABLES{ int cnt = 0; }
FOREACH (User u){
VARIABLES{ int cnt = 0; }
FOREACH (Account a){
9 However,
if the method concerned returns a primitive such as int, the invariant type can
still be declared as an Integer because Java (since version 1.5) is capable of automatic boxing
and unboxing.
10 One should note that upon enabling or disabling an invariant check the object will be
checked on any transition that it goes through (not only in the automaton where the check
was set but in all the automata in that context).
19
EVENTS{
addTransaction(Account a1) = {a1.addTransaction()}
where {a = a1; u = a1.owner;}
VARIABLES{ int cnt = 0; }
PROPERTY accountproperty {}
}
}
One should note that from within the inner context, we also need to specify
not only the immediate context, but also all the super-contexts (in this case, we
had to define the User in the Account event.
Referring to Contexts All these nestings create quite some confusion as to
referring to different variables in different contexts. Therefore, we propose special syntax for the user to be able to specifically refer to particular variables in
a certain context. (This is indispensable if variables in different contexts have
the same name.) An example of the syntax is:
::u::a::cnt
In this case we are specifically referring to the cnt in the Account context. The
initial colon can be left out. However, in order to refer to a variable which is in
global it would be useful to write:
::cnt
The user is given the option to leave out the context specification. In this case,
an automatic search is done, starting from the most immediate context. Therefore, in this case the variable cnt is referred to in the Account context, it will
refer to the cnt in Account.
However, with this approach there still remain an ambiguity. Consider a situation where a variable cnt exists both in the outermost context and in the
innermost context. A reference to cnt in the innermost context can be taken
to refer to the outermost (because the initial colon can be left out) and also
to the innermost context because of the searching mechanism. When such an
ambiguity occurs, the compiler issues a warning (see Section 3.2.1).
This notation can be used in the conditions and the actions of the transitions
and the initial code of the states but not in the where clauses. The reason is that
the code in the where clause cannot be associated to any context. (Recall that
one of the main purposes of the where clause is to set the context variables.)
Cartesian Product In the case where the context is made up of more
than one variable, the context should be referred to as follows: ::u,a::variable.
(Do not insert any brackets.)
2.2
Imports
In the first part of the script before the Global section, one can put a section
titled Imports. The purpose of this section is to import any packages which will
20
be used in any of the other sections. At least there should be an import of a
package of the system to be monitored. Without these imports, it is unlikely
that the generated can do anything useful, unless the package of the generated
files is changed to be the same as that of the target system. The syntax is as
follows:
IMPORTS { import apackage; }
2.3
Methods
To avoid a lot of code on the transitions or in the states, one can also declare
any necessary methods, and refer to them from any code in the script. Access
modifiers (public, protected, private) in the declaration of these methods are not
required, but they won’t do any difference. Note that if a method is declared to
be static, monitor variables will not be accessible within that particular method.
The methods declaration (which should be at the bottom after the Global section) is as follows:
METHODS{ int amethod (int anargument) { //some code } }
For convenience, the user can also import a whole text file full of methods. This
will avoid a lot long scripts which become less manageable. The way to do this
is to write the keyword import (before writing any other method declarations
in the Methods section) followed by the path of the text file which is to be imported, e.g. import C:\code.txt;. Any necessary JAVA imports for the code
must be entered in the Imports section (see Section 2.2).
2.4
Clocks
Clocks can be used in a Larva script to define real-time properties. These
are implemented as Java objects which can trigger events after a particular
time interval. This mechanism can be very convenient for a lot of real-life
applications. For example with clocks we can define that no more than three bad
logins should occur within five minutes. Another example would be specifying
that a transaction which failed should be retried within a maximum of ten
minutes. There are also a lot of real-time applications which are related to
safety critical operations. For example it should be ensured that the train gate
is closed within five seconds after the closing signal was sent. Such a simple
check may prevent a possible tragedy.
The clocks in Larva are contextual. This means that if the clock is declared in
a FOREACH context, then a separate clock will be created for each monitored
object. On the other hand, if it is declared in the GLOBAL context, only one
clock is created and it will be available for all the contexts and automata. This
means that even the generated events will be broadcast to all the sub-contexts
(unlike the other events). Any clocks which are no longer in use should be
switched off using the off method available.
21
2.4.1
Syntax
To use a clock in a Larva script it should be first declared in the VARIABLES
section (see Section 2.1.1). This should be simply done as follows: Clock c;.
Furthermore, in order to declare events based on the clock, one should simply
declare: {c@4} where 4 is the number of seconds after which the clock will trigger an event, each time it is reset. For convenience, one can also declare {c@%4
signifying that the clock event will occur repreatedly after every 4 seconds. Once
the event is declared, it can be used just like all the other events.
2.4.2
Methods Provided
A number of methods are available with the Clock class. These are intended
to make clocks more usable and versatile. These methods can be used just
like normal methods wherever Java code is allowed in the Larva script. For
example: clockName.reset() will cause the clock clockName to be reset.
• The reset method is the one which should be used whenever one requires
to restart the clock. Initially, the clock is automatically started as soon
as its context starts existing. This means that as soon as the monitoring
system starts up, any clock declared in the GLOBAL context is started.
Similarly, upon the start of a new automaton for a particular context, all
the clocks in that context will be automatically started.
• The current method will return a double with the number of seconds
elapsed since the clock was started/reset.
• The compareTo method accepts a double as a parameter and returns an
integer. If the integer is zero, then the current clock value and the parameter are equal. If the integer is positive then the clock value is larger than
the parameter. Otherwise, the clock value is smaller than the parameter.
• A clock can be switched off using the method off. This can be especially
useful for clocks which are set to generate an event repeatedly after a
certain amount of time.
• A clock can be paused using the method pause.
• A clock can be resumed using the method resume.
2.4.3
Comparison to Timed Automata
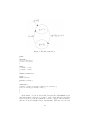
To better explain the semantics of the clocks as used in Larva we will give a
small example and provide its equivalent in timed automata. Imagine we have
two clocks, one which triggers after one second while the other trigger after five
seconds. Also, the trigger of one clock causes the other to reset. This scenario
is depicted in Figure 7.
The equivalent Larva script is shown in following code:
22
Figure 7: The timed automaton.
GLOBAL
{
VARIABLES {
Clock c = new Clock();
Clock d = new Clock();
}
EVENTS {
clockCat1() = {c@1}
clockDat5() = {d@5}
}
PROPERTY timedAutomata {
STATES {
NORMAL { normal }
STARTING { starting }
}
TRANSITIONS {
starting -> normal [clockCat1\c.compareTo(1)>= 0\d.reset();]
normal -> starting [clockDat5\\c.reset();]
}
}
}
In the Larva code, the clocks are first declared in the VARIABLES section
and subsequently events can be declared on the clocks using the @ symbol
followed by the seconds after which the event is to trigger. One should note
that the clocks are initially started automatically. Then the user can reset
23
the clocks using the reset method call in the action of a transition. Also worth
noticing is the Larva equivalent of the condition on one of the timed automaton
transitions. The user can use the compareTo function provided in the Clock class
or optionally the current method which returns the number of seconds which
have elapsed since the last reset of the clock.
2.5
Channels
Channels can be used by the automata to communicate together. For example
one would like to start an automaton upon the completion of another. Or
one would like to trigger a transition upon the another automaton reaching a
particular state.
All the channel are without a context. This means that a channel is always
global in its nature. However, one is still allowed to define a channel within
a context. This would mean that that channel would not be visible from any
higher-level context than the one where it was specified. The channel-generated
events will be broadcast to the current context and below. Hence, a channel
declared in the GLOBAL section would be broadcast to all the automata.
2.5.1
Syntax
Declaring a channel is very similar to declaring a clock. It can be done be
declaring: Channel channelName in the VARIABLES section. In order to
declare an event upon the channel, one should declare an event on the receive
method of the channel (which comes with Channel object implementation). It
is important to note that there are three variations of the receive method: one
with no parameters, one which accepts a string and one which accepts an object.
The string and object can be used by the automata to send information to each
other. This information can be used by the automata to distinguish among
events on the same channel.
The method which should be called to trigger an event is the send method.
This is the counterpart method of receive therefore it also has the corresponding
variations. The send method can be used wherever Java code can appear in the
Larva script.
2.6
2.6.1
Other Remarks
Comments
Any comments can be inserted anywhere in the script by writing %% followed
by the comment. Any text in the line after the %% will be ignored.
2.6.2
Naming Conventions
The compiler sometimes automatically generates event names as part of the
parsing process. All the compiler-generated names start with an underscore.
24
Therefore, it is advised that the user does not use names which start with an
underscore.
3
Using the Compiler
The compiler does not have a graphical user interface and has to be given
command line arguments (see the following section). The compiler might output
warnings or error messages (these are explained in Section 3.2). When the
output of the compiler is generated, it can be used to instrument the system
which is to be monitored. This can be done either on the source code or on
the bytecode. This means that the target system is either recompiled with the
compiler output, or instrumented at load-time using the appropriate call to the
AspectJ compiler.
3.1
Command Line Arguments
The compiler can take upto 3 arguments, one of them being compulsory. The
first is the address and name of the script file to be compiled. The second (which
should be preceded by “-o ”) is the output folder. If this is not specified it would
simply output the generated files in the current directory. The third argument
(which should be preceded by “-g ”) can be used to specify the installation
directory of Graphviz software if this is not installed in the default location
(C:\Program Files\Graphviz2.16\bin\dot.exe). As an alternative to these details, one can simply use the batch file provided (Larva compiler.bat) with the
tool (However, this does not ask for the Graphviz directory).
3.2
Output Messages
This section will explain the output messages that the compiler can output.
3.2.1
Warning Messages
If the compiler outputs a warning message with no error messages, the output
files are generated all the same.
Incomplete Compilation If the order of the sections in the script is not
as expected, the script will still compile, but some sections will be left out.
Therefore, the following warning is issued to user whenever the compilation
does not reach the end of the script: Warning: VARIABLES section was not
found...possibly entered in wrong sequence!!.
Overlapping Initializations If a variable has more than one applicable initialization, the most immediate to the event declaration is used (see Section
2.1.2). When this happens, the compiler issues the warning: Warning: variable
[variable name] in event [event name] already initialized...the second initialization will be ignored! [ignored assignment statement].
25
Ambiguous Reference to Variables Another warning will be issued if a
variable reference is ambiguous. This occurs when 2.1.4
Diagrams Not Generated If the Graphviz software is not found (either in
the default location or in the specified location (see Section 3)), a warning is
issued: Diagram was not successfully generated! Make sure Graphviz is installed
in the default location! ...or else provide a “-g” commandline argument.
3.2.2
Error Messages
To help the user identify errors, the compiler tries to output meaningful error
messages upon failure. An error message will usually include the type of error
together with the context in which it was found. The compiler will not display
all the errors in the script at once, but will output the error which has caused
the compilation to fail. In this section we will give the most common errors
which may arise.
Unknown State A state found in the transitions which was not declared in
the States section.
Missing Delimiter A missing delimiter such as a “{”, “}”, “[”, “]”, “\”,
“—>”, “=”.
Unknown Event An event is found in the transitions which was not declared
in the Events section.
More than One Starting State More than one starting state is found in
the Starting section with the States section.
Duplicate State Two states with same name are found.
Mismatch in Variable type Two variable declarations with same name do
not have the same type.
Invalid Method Call An invalid method call in the Events section.
Duplicate Variable Two variables in different locations are found to have
the same name. Within each context (see Section 2.1.4), all the variables in the
Variables section, the Events section and the variables storing the context must
have a unique name.
Missing Initialization of Variable Each variable in an event which is not
directly bound to the method call, must be initialized. This also applies to the
variables storing the context.
26
Unexpected Token A unexpected token is found. This error is given when
there is a possible construct but which is not compulsory. A case in point is the
where clause.
Unreached End of Events The tokens in the Events section are not successfully parsed.
Invalid Context This means that a specified context of the form “:c1:c2:...”
is not found. A variation of this error is when the variable in a particular
(existing) context of the form “:c1:c2:var” is not found. In this case the error
would read “invalid context for the specified variable”.
Identifier Expected This error occurs when parsing the context of a variable
and the wrong sequence of identifiers and delimiters is found.
Duplicate Event Two events with the same name are found.
Error in Parameter List
The parameter list of a method call is invalid.
Successful Completion If you see the output “Completed Successfully!!!” it
means that the files have been generated. Otherwise, an error message would
appear to explain why the compilation failed. The compiler can also output
warnings (see Section 3.2.1). However, these do not stop the generation of the
output files and the compilation is still considered successful.
3.3
Using the Compiler Output
The output of the compiler consists of 2 basic components: files containing
JAVA and AspectJ code which perform the verification and files related to the
diagrams of the automata. The compiler generates 2 files of the former for each
context (see Section 2.1.4) and 2 files of the latter for each property (see Section
2.1.3). The following subsections will explain each of these.
3.3.1
Files with Monitoring Code
In a Larva script the user can specify contexts using the GLOBAL and the
FOREACH constructs. Each context provide some means to distinguish itself
(except the global context). From the JAVA perspective, we found it was intuitive to create a separate object for each context so that we can compare
contexts by applying the equals method on the respective objects.Furthermore,
we need an aspect with the necessary pointcuts and advises to capture the relevant events from the monitored system. For better modularity a separate aspect
was created for each context although this is not required for functionality.
All the generated files are assumed to belong to a package named Larva. Therefore, for a successful compilation it is imperative that the generated code be
27
placed in a folder named Larva.
The naming convention of the generated files is use the first word in the input
script filename adding the prefix “ cls ” or “ asp ” (for a class or aspect respectively) and the suffix “0”, “1”, etc, representing the context number (“0” refers
to the global context).
On a final note, for each compiled script, a BadStateException class is created
with the aim outputting the stack trace in case a bad state is reached. Together with this, a number of other classes related to clocks and channels are
also output.
3.3.2
Files with Diagrams
Each property in Larva can be represented as a diagram. The necessary code
to create each of these diagrams is stored in a text file (.txt). This is then passed
to the Graphviz software which in turn generates the actual bitmap (.gif). The
naming convention is to add the prefix “ diag ” before the name of the actual
property.
3.4
The Output from the Verification Code
To keep a clear distinction from the actual system’s output and the verification
system’s output, the latter is put in a text file. In actual fact a separate text file
is used for each compiled script file which is being used. This makes it easier to
distinguish between the respective output of the compiled script files running
simultaneously. The name of the script file is the first word in the name of the
script with the prefix “output ”. This file is output in the specified output directory. Furthermore, any System.out.println used in the JAVA code in the script
file is redirected to this file so that the actual system’s output is not changed.
4
4.1
A Complete Example
Script
The script in the following code snippet is the complete script of the example
given throughout this document:
IMPORTS {
import nesting.User;
import nesting.Account;
import nesting.Transaction;
}
GLOBAL
{
VARIABLES {
int userCnt = 0;
}
28
EVENTS {
addUser() = {*.addUser()}
deleteUser() = {*.deleteUser()}
}
PROPERTY users
{
STATES
{
BAD { toomany baddelete }
NORMAL { ok }
STARTING { start }
}
TRANSITIONS {
ok -> toomany [addUser() \userCnt > 5]
ok -> ok [addUser() \ \userCnt++;]
ok -> start [deleteUser() \userCnt == 1 \userCnt--;]
ok -> ok [deleteUser() \ \userCnt--;]
start -> ok [addUser() \ \userCnt++;]
start -> baddelete [deleteUser() \ \]
start -> start [allUsers()]
}
}
FOREACH (User u)
{
EVENTS {
addAccount(int id) = {User u1.addAccount()}
where {u = u1; id = u1.id;}
deleteAccount(u1) = {u1.deleteAccount()}
where {u = u1;}
}
VARIABLES {
int accountCnt = 0;
}
PROPERTY account
{
STATES {
BAD { toomany }
STARTING { start }
}
TRANSITIONS {
start -> toomany [addAccount() \accountCnt > 5]
start -> start [addAccount() \ \accountCnt++;
System.out.println(‘‘I have access to USER ’’ + u + ‘‘ and to usercnt: ’’ +userCnt);]
start -> start [deleteAccount() \ \accountCnt--;]
}
}
FOREACH (Account a)
29
{
EVENTS {
addTransaction(Account a1) = {a1.addTransaction()}
where {a = a1; u=a1.owner;}
deleteTransaction(Account a1) = {a1.deleteTransaction()}
where {a = a1; u=a1.owner;}
}
VARIABLES {
int transactionCnt = 0;
}
PROPERTY transaction
{
STATES {
BAD { toomany }
STARTING { start }
}
TRANSITIONS {
start -> toomany [addTransaction() \transactionCnt > 5]
start -> start [addTransaction() \ \transactionCnt++;
System.out.println(‘‘I still have access to USER: ’’ + u + ‘‘ and to usercnt: ’’
+ userCnt + ‘‘ and to accountcnt: ’’ + u::accountCnt + ‘‘ and to transactioncnt: ’’
+ u::a::transactionCnt);]
start -> start [deleteTransaction() \ \transactionCnt--;]
}
}
}
}
}
\end{lstlisting}
\subsection{The Output from the Generated Monitoring Code}
The following subsections show the output generated by the monitored
system and verification system. First, 2 users were added. Then user
with id \emph{0} is edited. Subsequently, 3 accounts were created
for user \emph{0}. Furthermore, account with id \emph{1} was added
and 7 transactions were created for this account. This caused the
verification system to enter the bad state \emph{too many}.
\subsubsection{The Output of the Monitored System}
\begin{code}
****MAIN MENU****
Users:
1. add user
2. delete user
3. nothing
4. edit user
5. exit
1
30
****MAIN MENU****
Users: 0,
1. add user
2. delete user
3. nothing
4. edit user
5. exit
1
****MAIN MENU****
Users: 0, 1,
1. add user
2. delete user
3. nothing
4. edit user
5. exit
4 Id: 0
****USER MENU****
Accounts:
1. add Account
2. delete Account
3. process all
4. edit Account
5. exit
1 I have access to USER : User
****USER MENU****
Accounts: 0,
1. add Account
2. delete Account
3. process all
4. edit Account
5. exit
1 I have access to USER : User
****USER MENU****
Accounts: 0, 1,
1. add Account
2. delete Account
3. process all
4. edit Account
5. exit
1 I have access to USER : User
****USER MENU****
Accounts: 0, 1, 2,
1. add Account
2. delete Account
3. process all
4. edit Account
5. exit
4 Id: 1
****ACCOUNT MENU****
Transaction:
1. add Transaction
2. delete Transaction
3. process all
4. edit Transaction
5. exit
1 I still have access to USER :
and to transactioncnt: 1
0 and to usercnt: 2
0 and to usercnt: 2
0 and to usercnt: 2
User 0 and to usercnt: 2 and to accountcnt: 3
31
****ACCOUNT MENU****
Transaction: 0,
1. add Transaction
2. delete Transaction
3. process all
4. edit Transaction
5. exit
1 I still have access to USER
and to transactioncnt: 2
****ACCOUNT MENU****
Transaction: 0, 1,
1. add Transaction
2. delete Transaction
3. process all
4. edit Transaction
5. exit
1 I still have access to USER
and to transactioncnt: 3
****ACCOUNT MENU****
Transaction: 0, 1, 2,
1. add Transaction
2. delete Transaction
3. process all
4. edit Transaction
5. exit
1 I still have access to USER
and to transactioncnt: 4
****ACCOUNT MENU****
Transaction: 0, 1, 2, 3,
1. add Transaction
2. delete Transaction
3. process all
4. edit Transaction
5. exit
1 I still have access to USER
and to transactioncnt: 5
****ACCOUNT MENU****
Transaction: 0, 1, 2, 3, 4,
1. add Transaction
2. delete Transaction
3. process all
4. edit Transaction
5. exit
1 I still have access to USER
and to transactioncnt: 6
****ACCOUNT MENU****
Transaction: 0, 1, 2, 3, 4, 5,
1. add Transaction
2. delete Transaction
3. process all
4. edit Transaction
5. exit
1
****ACCOUNT MENU****
Transaction: 0, 1, 2, 3, 4, 5,
1. add Transaction
2. delete Transaction
: User 0 and to usercnt: 2 and to accountcnt: 3
:
User 0 and to usercnt: 2 and to accountcnt: 3
: User 0 and to usercnt: 2 and to accountcnt: 3
: User 0 and to usercnt: 2 and to accountcnt: 3
: User 0 and to usercnt: 2 and to accountcnt: 3
6,
32
3. process all
4. edit Transaction
5. exit
4.1.1
The Output of the Verification System
AUTOMATON::> users() STATE::>start
\\MOVED ON METHODCALL: void nesting.Bank.addUser() TO STATE::> ok
\\AUTOMATON::> users() STATE::>ok
\\MOVED ON METHODCALL: void nesting.Bank.addUser() TO STATE::> ok
\\AUTOMATON::> account(User 0 ) STATE::>start
\\MOVED ON METHODCALL: void nesting.User.addAccount() TO STATE::> start
\\AUTOMATON::> account(User 0 ) STATE::>start
\\MOVED ON METHODCALL: void nesting.User.addAccount() TO STATE::> start
\\AUTOMATON::> account(User 0 ) STATE::>start
\\MOVED ON METHODCALL: void nesting.User.addAccount() TO STATE::> start
\\AUTOMATON::> transaction(Account 1 ) STATE::>start
\\MOVED ON METHODCALL: void nesting.Account.addTransaction() TO STATE::> start
\\AUTOMATON::> transaction(Account 1 ) STATE::>start
\\MOVED ON METHODCALL: void nesting.Account.addTransaction() TO STATE::> start
\\AUTOMATON::> transaction(Account 1 ) STATE::>start
\\MOVED ON METHODCALL: void nesting.Account.addTransaction() TO STATE::> start
\\AUTOMATON::> transaction(Account 1 ) STATE::>start
\\MOVED ON METHODCALL: void nesting.Account.addTransaction() TO STATE::> start
\\AUTOMATON::> transaction(Account 1 ) STATE::>start
\\MOVED ON METHODCALL: void nesting.Account.addTransaction() TO STATE::> start
\\AUTOMATON::> transaction(Account 1 ) STATE::>start
\\MOVED ON METHODCALL: void nesting.Account.addTransaction() TO STATE::> start
\\AUTOMATON::> transaction(Account 1 ) STATE::>start
\\MOVED ON METHODCALL: void nesting.Account.addTransaction() TO STATE::>
!!!SYSTEM REACHED BAD STATE!!! toomany
\\LARVA._asp_bank2.ajc$before$LARVA_asp_bank2$2$12fe72c(_asp_bank2.aj:27)
\\nesting.Account.menu(Account.java:78)
\\nesting.User.accountMenu(User.java:64)
\\nesting.User.menu(User.java:91) nesting.Bank.userMenu(Bank.java:47)
\\nesting.Bank.menu(Bank.java:74) nesting.Bank.main(Bank.java:81)
5
Example with Clocks and Channels
In this section, we will give a small example of how the clocks and channels can
be used. The script shown in the following code:
GLOBAL
{
VARIABLES
Clock c =
Channel d
int count
}
{
new Clock();
= new Channel();
= 0;
EVENTS {
clockC() = {c@1}
channeld(String from) = {d.receive(from)}
}
33
PROPERTY test1
{
STATES {
NORMAL { normal }
STARTING { starting }
}
TRANSITIONS {
starting -> normal [clockC\count > 5\d.send("test1");]
starting -> starting [clockC\\c.reset();count++;]
}
}
PROPERTY test2
{
STATES {
ACCEPTING { ready }
NORMAL { starting }
STARTING { beforestarting }
}
TRANSITIONS {
beforestarting -> starting [channeld\from.equals("test1")\c.reset();]
starting -> ready [clockC\count > 5]
starting -> starting [clockC\\c.reset();count++;]
}
}
}
The above code represents two automata. The first automaton loops over
the clock events (which occurs after a second). After five clock events a signal
is sent to the other automaton on the channel. Upon this signal, the second
automaton starts to loops five times over the clock events in a similar fashion.
6
Conclusion
The Larva language is sill in its experimentation stages and therefore there is
undoubtedly room for improvement. However, we would like to receive ideas
as to how we can make the language more easy to use and if need be more
expressive.
Furthermore, from a practical perspective, we need to provide ways in which
the automata keep their state when the monitored system is switched off. We
cannot assume that the monitored system always starts from an new state.
A practical system which is being monitored usually already has data in its
database. This should probably be taken into account so that the verifying
automata are up-to-date with current state of the monitored system.
Another important field of exploration would be the calculation of the overhead
when using the generated code. This may increase the confidence of the users
in the tool and make it more usable in day-to-day software production. At the
end of the day this is our major aim: to make a practical tool which improves
software’s reliability.
34