1
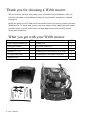
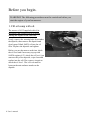
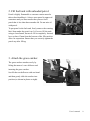
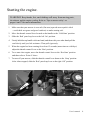
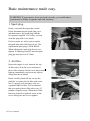
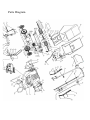
OPERATOR’S MANUAL AND PARTS LIST
PETROL LAWNMOWER - WERR19
Spares & Support: 01793 333212
www.webblawnmower.co.uk
Before use please read & understand this manual, paying particular
attention to the safety instructions.
10/10/2012 v1
2 User’s manual
Contents
What you get with your Webb roller mower................................................................................4
Mower features.............................................................................................................................5
Tips on mower safety ................................................................................................................6-7
Before you begin .......................................................................................................................8-9
Cutting height adjustment............................................................................................................10
Starting the engine .......................................................................................................................11
Basic maintenance made easy ................................................................................................12-14
Technical specifications ...............................................................................................................14
Fast trouble shooting.................................................................................................................... 15
Warranty conditions..................................................................................................................... 16
EC Declaration of Conformity...................................................................................................... 17
Note............................................................................................................................................... 18
Warranty registration card.........................................................................................................19-20
Webb products are monitored and enhanced on an on-going basis to comply with changing
technical standards and requirements. As a result, Webb reserves the right to alter design and
specifications at any time without prior notice.
User’s manual
3
Thank you for choosing a Webb mower
We are sure that you will enjoy many years of trouble-free performance, plus you
have the reassurance of an industry-leading 2-year domestic warranty as outlined
on page 16.
Inside this guide you will find out all you need to know to correctly operate your new
Webb mower. To ensure that you use your new mower safely and get the best results
possible, please read all of the safety and operating instructions carefully before
using your lawnmower.
What you get with your Webb mower
Name
Petrol engine lawnmower
Rear grass catcher
Spark plug socket (21)
Wrench (13~15)
Oil pipe connection
Spanner lever
4 User’s manual
QTY
1
1
1
1
1
1
Name
Clamp bolt
Air filter socket (10)
Cable tie
Flashing nut with buttlerfly bolt assby
Flashing nut with square bolt assby
QTY
1
1
2
2
2
Mower features
1
Drive lever
8
Spark plug
2
Operator presence control lever
9
Exhaust
3
Throttle control
10
Oil filter and dipstick
4
Rear deflector
11
Roller
5
Height adjustment lever
12
Starter rope
6
Fuel tank
13
Grass collection bag
7
Air filter
User’s manual
5
Tips on mower safety
WARNING! The information contained within this safety section is
extremely important. Personal injury to the user and to others may
result if this section is not read and acted upon at all times.
1.
Before starting your mower inspect it carefully to ensure that there are no loose
parts and that it is in good working order.
2. Be sure of your footing. Always walk when operating the lawnmower, never run.
3.
Clear the area to be mowed of any stones, sticks, wire and debris before
beginning, and always ensure that you mow a safe distance away (over 14 metres)
from adults, children and animals.
4. Keep hands, feet and clothing away from the mower’s moving parts, and always
wear appropriate footwear (do not wear sandals, open or soft shoes).
5. Never put your hands or feet underneath the chassis of the lawnmower while the
engine is running.
6.
Be aware that the machine’s exhaust area and other parts of the lawnmower get
very hot during use, and will remain hot after use.
7. Turn off the engine and disconnect the spark plug cap before cleaning,
transporting, or making adjustments, and never leave the mower unattended.
8.
Mow across the face of slopes, not up & down, and avoid mowing on very steep
slopes. We recommend you avoid mowing when it is raining, or after nightfall.
9. Do not operate the machine by pulling it towards you as you risk pulling it on to
your feet. Instead, always push and walk behind your lawnmower.
10. Do not fill the tank, or start the lawnmower indoors, or in a poorly ventilated area,
as exhaust gases contain poisonous substances and petrol fumes are flammable
and dangerous.
11. Use unleaded petrol that is not more than 3 months old. Do not fill the tank completely.
Use a funnel. Clean up any over flow or splashes before starting the engine or storing.
6 User’s manual
12. To inspect the underside of your mower, only tilt the lawnmower backwards when
standing behind it (this is the side where the exhaust is near the ground) otherwise
oil may leak into inappropriate areas of the engine. Never tilt the lawnmower when
the engine is running.
13.
Turn off the engine before emptying the grass-catcher, and before clearing any
grass caught in the rear flap where the catcher fits.
14. Do not alter the engine governing settings or over-rev the engine, as excessive speed
is dangerous and can reduce engine life.
15. Never open the fuel filler cap, or fill the tank, if the engine is still hot after use. And
please ensure that you securely tighten the petrol cap after filling.
16. Do not transport the mower in a vehicle if there is any petrol in the tank.
17. Store fuel and oil in a cool well-ventilated place, away from direct sunlight and not
near gas cylinders or hot water heater systems.
18. Do not smoke when filling the fuel tank, using the machine, or when petrol is in the
immediate area. And never use or store the mower near a naked flame.
19. Webb recommends that you wear a safety helmet, ear protectors, safety goggles
and safety boots when using a lawnmower. These are available on 01793 333212.
20. All servicing and repair work under warranty must be carried out by an Authorised
Webb Dealer, otherwise the 2-year warranty may be void. You can find your
nearest dealer at www.webblawnmowers.co.uk.
User’s manual
7
Before you begin.
WARNING! The following procedures must be carried out before you
start the engine of your lawnmower.
1. Fill oil sump with oil.
The mower is NOT supplied with oil in
the engine, add 569ml SAE30 oil before
starting the engine for the first time.
Firstly, remove the warning label from under
the dipstick, then remove the dipstick and
slowly pour 569ml SAE30 oil into the oil
filler. Replace the dipstick and tighten.
Before you use the mower each time, check
the oil level and if necessary top up with
SAE30 engine oil. To check the oil level, just
unscrew the yellow dipstick, wipe clean and
replace into the oil filler, remove it again to
check the oil level. The oil level must be
between the min and max marks on the
dipstick.
8 User’s manual
2. Fill fuel tank with unleaded petrol.
Petrol is highly flammable so extreme caution must be
taken when handling it. Always store petrol in approved
containers and you must ensure that you use fresh
petrol that is less than three months old. Do not mix oil
with petrol.
To put petrol in the fuel tank, firstly remove the warning
label from under the petrol cap. It’s best to fill the tank
using a clean funnel, but never fill it completely. Instead,
leave at least 13mm from the bottom of the filler neck to
allow for expansion. Ensure that you securely tighten the
petrol cap after filling.
3. Attach the grass catcher.
The grass catcher attaches easily by
lifting the mower’s rear deflector and
inserting the grass catcher.
Just lift the rear deflector with one hand
and then gently slide the catcher into
position (as shown in photo on right).
User’s manual
9
Cutting height adjustment.
WARNING! Turn mower off before adjusting cutting height lever.
Your lawnmower’s height adjustment is positioned on
the rear left side. There is a single 6-position lever
that adjusts all four wheels at the same time.
The lower the level, the shorter the cut. For very thick
or moist grass, you should select a higher setting than
usual to avoid clogging and stalling the lawnmower
under the extra cutting load.
10 User’s manual
Starting the engine.
WARNING! Keep hands, feet, and clothing well away from moving parts,
the exhaust, and the engine cowling. Refer to ‘Tips on mower safety’ on
pages 6 and 7 for more information.
1.
Make sure that your mower is on a safe, flat area (a paved area or path is ideal
– avoid thick wet grass and gravel surfaces) to make starting safe.
2.
Move the throttle control lever located on the handle to the ‘Cold Start’ position.
3. Slide the ‘Red’ petrol tap lever to the left ‘On’ position.
4. Firmly hold the top handle with one hand, and then with your other hand pull the
cord slowly until you feel resistance. Then pull vigorously.
5. When the engine has been running for at least 15 seconds (more time on cold days)
adjust the throttle control lever to the ‘Run’ position.
6. To re-start a hot engine, move the throttle control lever to the ‘Hot Start’ position
and then refer to ‘Point 4’ above.
7. To turn off your mower, slide the throttle control lever down to the ‘Stop’ position.
After it has stopped, slide the ‘Red’ petrol tap lever to the right ‘Off’ position.
User’s manual
11
Basic maintenance made easy.
WARNING! If your mower is not serviced correctly, you could reduce
your mower’s ability to operate and void warranty.
1. Spark plug.
Firstly, wait until the engine has cooled
before disconnecting the spark plug cover
and then remove the spark plug with the
box spanner supplied. If it is dirty, you can
clean the plug with a wire brush.
For best results we advise you to replace
the spark plug after 100 hours of use. The
replacement spark plug is NGK B4LM.
When refitting the spark plug do not overtighten. If adjusting yourself, note the spark
plug gap must be set to 0.75mm.
2. Air filter.
Ensure the engine is cool, unscrew the top
air filter nut, lift up the cover and remove
the air filter element. Put the cover back on the
housing immediately to prevent any objects
falling into the air intake.
Either carefully brush off any excess dirt
particles, or replace the air filter with a new
one. To protect your warranty, only use
a genuine B&S air filter. We recommend
that you replace the air filter after every 12
months of regular usage. When the air filter
has been cleaned or replaced, screw-in the
cover, taking care not to over-tighten.
12 User’s manual
°
3. Cleaning ABS deck often.
As the ABS material can be marked by petrol, please clean the deck immediately whenever you
find petrol on the deck or before storing.
User’s manual
13
Fast trouble shooting
Often, a depleted, loose, or dirty spark plug is responsible for a mower not being able
to start, but there can be a number of other reasons. Refer below to the list of potential
problems you may encounter, along with suggested remedies. For servicing and all
warranty work, contact your local Authorised Webb Dealer.
Problem
Likely cause
Suggested remedy
Throttle lever not set properly
Set to ‘Cold Start’ for cold or a little lower when warm
Out, or almost out, of fuel
Fill tank with unleaded petrol
Spark plug failed
Replace with a suitable new spark plug
Engine does
Spark plug dirty
Clean or replace with a new spark plug
not start.
Spark plug not connected
Press firmly on the terminal cover
Engine stops
often
Flooded engine
Turn fuel ‘off’ then pull cord until it starts, then turn ‘on’
Old petrol in the tank
Drain stale fuel and replace with new unleaded
Water in the fuel tank
Contact an authorised Webb dealer
Blocked fuel supply
Fuel cap is not venting
Ensure the fuel line is not pinched or blocked
You may need to slightly loosen the fuel cap
Wrong type of fuel
Drain petrol tank and fill with new unleaded
Dirty air cleaner filter
Clean or replace with a new Briggs & Stratton air-filter
Incorrect height adjustment
Raise the mower’s cutting height lever
Blocked fuel cap vent holes
Ensure the 3 holes in the fuel tank cap are clear
Mower
Loose cutting blade
Check and tighten bolts and nuts
vibrates
Bent or broken blade
Replace blade
too much
Excessive grass/dirt build-up
Clean and ensure underside clear of build up
Engine loses
power
Blade worn/damaged
Replace blade
Poor cutting
Catcher not fitted correctly
Reattach carefully and also check for damage
catching
Incorrect cutting height set
Adjust the cutting height
Blocked grass catcher vents
Clear and clean the vents
Reinsert carefully and also check for damage
User’s manual
15
Warranty conditions
Please note that your warranty is affected by terms and conditions. Read on to fully
understand what is covered by the warranty and what is not covered. Those items not
covered by the warranty are the responsibility of the owner and any repairs will be at
the owner’s expense.
The warranty does not affect your statutory rights or remedies as outlined in applicable
consumer legislation.
Webb provides an express warranty for this product for a period of 2 years
from your original purchase date with the exception of commercial-use which is for
a period of 90 days. The warranty is not transferable and is only applicable to the
original purchaser that can provide original proof of purchase.
Defective parts will be replaced or repaired by an Authorised Webb Dealer without
charge for labour or materials, subject to conditions. Repairs or adjustments required
by failure to follow the manufacturer’s instructions are chargeable to the owner.
This express warranty does not cover;
• Intentional or unintentional misuse, abuse or breakages
• Normal wear and tear
• Oiled air cleaner or starting difficulty caused by mower incorrectly tipped on its
side
• Consumable items (including oil, blades and spark plugs)
• Defects or faults caused by an act or omission after leaving manufacture
• Incorrect, contaminated or poor quality fuel (older than 3 months) or oil
• Incorrect maintenance or storage of the product
• Water damage or environmental conditions
• Failure to observe safety requirements
• Any loss or damage arising from faulty parts or workmanship
The warranty may become void if any unauthorised person dismantles, repairs, or
modifies the product.
16 User’s manual
Parts Diagram
WERR19 Spare Part List
No.
1
2
3
4
5
6
7
8
9
10
11
12
13
14
15
16
17
18
19
20
21
Model
WE107-01
WE107-02
WE107-03
WE107-04
WE107-05
WE107-06
WE107-07
WE107-08
WE107-09
WE107-10
WE107-11
WE107-12
WE107-13
WE107-14
WE107-15
WE107-16
WE107-17
WE107-18
WE107-19
WE107-20
WE107-21
English Name
BS625 Engine
Screw M6×16
Nut M6
Double-end bolt
Washer
Nut
Grass channel
Self-tapping bolt 5×30F
Belt cover
Self-tapping bolt ST 5×25
Self-tapping bolt ST 5×16
Bush
Washer
Deck
Self-tapping bolt 5×35F
Handle support plate Left
Self-tapping bolt 5×20F
Cover, lower left handle
Bolt M5×12
Height adj fixed plate
Cover, lower right handle
Qty No.
60
1
3
61
5
62
1
63
3
64
1
65
1
66
8
67
1
68
2
69
1
70
3
71
1
72
1
73
5
74
1
75
5
76
1
77
1
78
1
79
1
80
Model
WE107-60
WE107-61
WE107-62
WE107-63
WE107-64
WE107-65
WE107-66
WE107-67
WE107-68
WE107-69
WE107-70
WE107-71
WE107-72
WE107-73
WE107-74
WE107-75
WE107-76
WE107-77
WE107-78
WE107-79
WE107-80
English Name
Bolt M6×30
Screw M6×52
Drive and OPC cable
Throttle control unit
Nut M6
Bearing housing, left
Throttle cable
Lower handle fixer, left
Bolt M8×75
Bolt M8×50
Flashing Nut
Bolt M8×25
Washer 10
Wing bolt M8×35
Washer
Grass bag frame
Grass bag
Rear flap
Spring, rear flap
Rear flap axle
Clip ring 6
Qty
1
1
1
1
2
1
1
1
1
2
4
2
2
2
4
1
1
1
1
1
2
1
1
4
1
1
2
2
2
2
2
2
1
22
WE107-22
Handle support plate Right
1
81
WE107-81
Metal plate
23
24
25
26
27
28
29
30
31
32
33
WE107-23
WE107-24
WE107-25
WE107-26
WE107-27
WE107-28
WE107-29
WE107-30
WE107-31
WE107-32
WE107-33
Lock nut 3/8"-24UNF-2B
Washer 10
Washer φ10.5×φ30×3
Cutter blade
Blade flange
Key 4.8×6.5×16
Front belt pulley
Belt A787
Key 3×5×13
Sprocket 11T
Sprocket 20T
1
1
1
1
1
1
1
1
2
1
1
82
83
84
85
86
87
88
89
90
91
92
WE107-82
WE107-83
WE107-84
WE107-85
WE107-86
WE107-87
WE107-88
WE107-89
WE107-90
WE107-91
WE107-92
34
WE107-34
Chain 06B-1×37
1
93
WE107-93
35
36
37
38
39
40
41
42
43
44
45
46
47
48
49
50
51
52
53
54
55
56
57
WE107-35
WE107-36
WE107-37
WE107-38
WE107-39
WE107-40
WE107-41
WE107-42
WE107-43
WE107-44
WE107-45
WE107-46
WE107-47
WE107-48
WE107-49
WE107-50
WE107-51
WE107-52
WE107-53
WE107-54
WE107-55
WE107-56
WE107-57
Drive Cover
Bolt M6×40
Spring, connecting bar
Pin 2×20
Connecting bar
Nut M6
Bolt M6×16
Pin 3.2×20
Height adjustment support
Spring,tensioner
Height adjustment board
Height adj handle knob
Bolt M6×30
Height adjustment lever
Pin pivot B 8×24
Nut M8
Washer 8
Bolt
Flat washer 8
Bolt M8×35
Lower handle fixer,right
Recoil Hook
Padded Handle
1
1
1
3
1
5
3
1
1
2
1
1
2
1
1
5
1
1
2
1
1
1
1
94
95
96
97
98
99
100
101
102
103
104
105
106
107
108
109
110
111
112
113
114
115
116
WE107-94
WE107-95
WE107-96
WE107-97
WE107-98
WE107-99
WE107-100
WE107-101
WE107-102
WE107-103
WE107-104
WE107-105
WE107-106
WE107-107
WE107-108
WE107-109
WE107-110
WE107-111
WE107-112
WE107-113
WE107-114
WE107-115
WE107-116
Spring, rear flap
Rivet ST 3.8×9
Roller axle
Washer 12
Dust shield
Bearing 12×28.6×32
Roller cover
Roller
Washer
Bearing HF-1216
Bearing housing, right
Obturating ring
12.3×3.4×3.4
Roller bearing housing
Bearing 6001-2RS
Clip ring 12
Hub cap
Washer 6
Nut M6
Rear axle
Gear box bearing housing
Gland bush, rear axle
Front wheel cover
Front wheel
Front axle
Gland bush, front axle
Bush
Gear box
Pin 5×40
Bolt M8×60
Rear belt pulley
Rivet ST 5.5×19
Tensioner bracket
Nut M8
Clip
Webb noseplate
58
WE107-58
OPC bar
1
117
WE107-117 Combined washer and bolt M8×88
59
WE107-59
Drive bar
1
2
2
8
4
1
2
1
1
2
2
2
2
1
2
2
1
1
2
1
1
1
1
1
1
1
EC Declaration of Conformity
We, Importer
Handy Distribution
SN3 4NS
Declare that the product
Model: WERR19
Complies with the following directives:
2006/42/EC- Machinery Directive
2004/108/EC- Electromagnetic Compatibility Directive
2000/14/EC amended by 2005/88/EC- Noise Emission in the Environment by Equipment for
Use Outdoors Directive.
The conformity assessment procedure followed was in accordance with
Annex VI of the Directive 2000/14/EC and the Directive 2005/88/EC
Name of the Notified Body:
TÜV SÜD Product Service GmbHAddress: Ridlerstrasse 65-80339 München (Germany)
TÜV SÜD Product Service GmbHAddress: Westendstrasse 65-80686 München (Germany)
-Measured Sound Pressure Level: 94dB(A)
-Guaranteed Sound Power Level: 96dB(A)
Authorised signatory and technical file holder
Date: 24/10/2012
Signature:
Name / title: Mr. Simon Belcher / Managing Director
Hobley Drive, Stratton St Margaret, Swindon, Wiltshire, SN3 4NS.
Notes
User’s manual
Warranty Registration Form
Webb Lawnmowers,
Hobley Drive,
Swindon,
SN3 4NS, United Kingdom.
Telephone: +44 (0) 1793 333220
Fax: +44 (0) 1793 834461
E-mail: [email protected]
www.webblawnmowers.co.uk
Please go to www.webblawnmowers.co.uk select registration and complete the
registration for your machine.
(Alternatively please fill in this form and return to the address above.)
Owner’s Name: …………………..…………………………………………………………………..................
Address: ……………………………………………………………………………………….........................
…………………………… Postcode:………………….. Telephone No.: ……..……………................
Email Address: ……………………......................................
Model: ..................................................................
Agent/ Dealer: ……………………........................................
Product: .......................................................
Engine No:…….....................................................
(Warranty Commences From Date of Delivery)
Serial No: ....................................... .............
Date of Purchase: .........................................
Date of Delivery: .........................................
Webb Lawnmowers
Hobley Drive
Stratton St Margaret
Swindon
Wiltshire
SN3 4NS