1
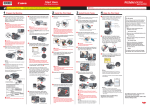
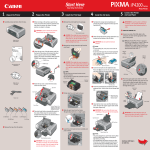
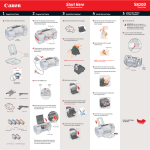
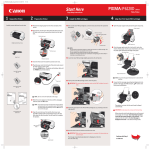
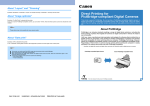
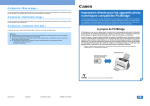
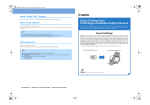
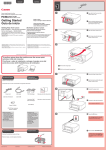
Start Here
Series
Photo Printer
Easy Setup Instructions
1
2
Unpack the Printer
1 Carefully remove all items from the box.
3
Prepare the Printer
1 Remove the shipping materials from the printer.
4
Install the Print Head
1 Remove the Print Head from its package.
Install the Ink Tanks
1 Remove the Black Ink Tank(BCI-15 Black) from its package,
and pull off the Protective Cap.
NOTE: To avoid spilling ink, do not touch the bottom of the tank
once you have removed the Protective Cap.
PIXMA iP90
Photo Printer
2 Remove the Protective Cap from the Print Head.
2 Plug the Power Cord into the AC Adapter. Connect the DC
plug to the printer. Plug the Power Cord into a power outlet.
NOTE: Do not touch the Print Head Nozzles.
AC Adapter
2 Insert the Black Ink Tank into the back slot aligning the
mark with the
Power Cord
mark.
2
1
Power Cord
Nozzles
DC Plug
3 Press in on the Lock Button and raise the gray Lock Lever.
3
Serial Number
AC Adapter
3 Press on the
NOTE: You will need the Serial Number to register the product.
until the Ink Tank clicks into place.
IMPORTANT: For correct printer operation, make sure ink tanks
are secure in slots.
3 Lift open the Paper Support and TURN THE PRINTER ON. The
printer will initialize.
4 Place the Print Head into the holder by aligning the
Paper Support
mark with the
mark.
mark
Print Head
Print Head Cover
4 Repeat the procedure for the Color Ink Tank(BCI-16 Color),
Paper Output Slot Cover
BCI-16 Color
Ink Tanks
BCI-15 Black
Ink Tanks
IMPORTANT: Do not open the Print Head Cover before the printer has finished initializing. Wait until the POWER lamp remains
fully lit.
inserting it into the front slot.
5 Lower the Lock Lever until it clicks into place.
5 Close the Print Head Cover.
Print Head
Cover
4 After the printer finishes initializing, open the Print Head
Cover.
Print Head
Cover
Documentation and
Software Kit
NOTE: The printer will perform a Print Head cleaning after the
cover is closed. Wait until the process is complete before proceeding.
Continue with Step 5
on side two.
5
5
Windows® Printer Driver Installation
Macintosh® Printer Driver Installation
sh
to
n
i
c
Ma
s
ow
d
n
Wi
1 TURN THE PRINTER OFF.
7 When the "Printer Connection" window appears, connect the
USB cable to the computer and the other end to the printer.
2 Turn the computer on and start Windows.
NOTE: The screens below refer to Mac OS X v. 10. 3. x installation. Screens may differ depending on the operating system you
are using.
7 When the "Easy Install" screen appears, click Install.
1 Connect the end of the USB cable to the computer, the other to
NOTE:
·For Windows® XP or Windows 2000, log on to Windows as a
member of Administrator’s group before continuing.
·Close any open software applications including anti-virus,
computer security and other software.
IMPORTANT: If you see the Found New Hardware Wizard,
click Cancel.
the printer.
NOTE: When performing
infrared communication,
make the IrDA port of each
other's device stand opposite to each other. Distance
between the IrDA ports
should be 31.5 inch (80 cm)
or less.
8 Read the License Agreement, then click Yes to continue.
Installation of the printer driver and on-screen manuals will
begin.
9 Follow the on-screen instructions to install the remaining
software.
8 TURN THE PRINTER ON.
10 Follow the on-screen instructions to register your product.
3 Insert the "Setup Software & User's Guide" CD-ROM.
The setup program should run automatically.
NOTE: If the setup program does not run automatically, Click
Start, then Run, then type D:/Msetup4.exe, where D is your
CD-ROM drive.
11 When the "Installation completed successfully" screen
IMPORTANT: If your computer cannnot detect a computer port,
refer to "Troubleshooting" instructions in the Quick Start Guide.
9 Follow the on-screen instructions to install the remaining soft-
ware. When the "Installation Results" window appears, click
OK.
appears, click Restart.
2 Turn on your Mac.
3 Insert the "Setup Software & User's Guide" CD-ROM.
NOTE: If the CD-ROM folder does not open automatically,
double-click the CD-ROM icon on the desktop.
4 When the main menu appears, click Easy Install and follow
4 Double-click the Setup icon.
the on-screen instructions.
12 After restarting the computer, start Printer Setup Utility
10 Follow the on-screen instructions to register your product.
5 When the "Authenticate" screen appears, enter your adminis11 When the "Installation completed successfully" window
appears, click Exit.
NOTE: Select Easy Install in order to install application software, electronic manual, utility and printer drivers. Select
Custom Install in order to choose the options you would like
to install.
trator name and password.
If you do not know your administrator name or password, click
, then follow the on-screen instructions.
NOTE: If a message prompting you to restart the computer
appears, check the check box and click Restart.
(start "Print Center" when you use Mac OS X V10.2.x) and
then check that the name of the printer you want to use is
shown in "Printer List". If the printer name is not displayed,
press the Add button to add the printer.
For more detailed instructions, refer to the Mac on-line
Help.
NOTE: If print quality is not satisfactory after installing the
printer, you may need to align the Print Head. Refer to
"Aligning the Print Head" instructions in the Quick Start
Guide.
5 When the "Easy Install" window appears, click Install.
6 When the main menu appears, click Easy Install and follow on-
screen instructions.
NOTE: If print quality is not satisfactory after installing the printer, you may need to align the Print Head. Refer to "Aligning the
Print Head" instructions in the Quick Start Guide.
6 Read the License Agreement, then click Yes to continue.
Installation of the printer driver and on-screen manuals will
begin.
NOTE: Select Easy Install in order to install application software,
electronic manual, utility and printer drivers. Select Custom
Install in order to choose the options you would like to install.
Part no. QA7-3460-V01 © 2005 Canon Inc. Canon and BCI are registered trademarks and PIXMA is a trademark of Canon Inc. All other products and brand names are registered trademarks or trademarks of their respective owners. Specifications subject to change without notice. Printed in Vietnam.