1
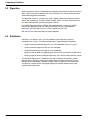
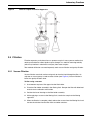
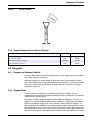
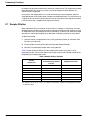
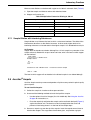
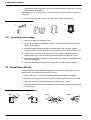
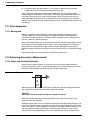
Section 2
Laboratory Practices
2.1 Temperature
Most methods perform most accurately when the sample temperature is between 20 °C
and 25 °C (68 to 77 °F). A note in the individual procedure will state any special
temperature requirements.
2.2 Mixing
Swirling is recommended when mixing samples in a graduated cylinder or a titration flask.
Swirling is the gentlest method of mixing and offers the least chance for atmospheric
contamination when testing for carbon dioxide and other gases.
1. Grip the cylinder (or flask) firmly with the tips of the thumb and first two fingers
(Figure 1).
2. Hold the cylinder at a 45-degree angle and make a circling motion from the wrist.
3. Move the cylinder in an approximately 12-inch circle, creating enough rotation to
complete the mixing in a few turns.
Mixing sample in a square sample cell:
1. Grasp the neck of the cell with the thumb and index finger of one hand. Rest the
concave bottom of the cell on the tip of the index finger of other hand.
2. Mix by rotating the cell quickly one way and then in the reverse direction
Inverting allows for thorough mixing in a capped sample cell or a mixing cylinder.
1. Hold the cell, or cylinder, in a vertical position with the cap on top.
2. Invert so that the cap is on the bottom. Return the cell to its original position
(Figure 1.) Repeat as needed.
Figure 1
Swirling a Cylinder and Inverting a Sample Cell
9
Laboratory Practices
2.3 Digestion
Several procedures require sample digestion. Digestion uses chemicals and heat to break
down a substance into components that can be analyzed. This section briefly describes
three different digestion procedures.
The Digesdahl system is a process that yields a digest suitable for the determination of
metals, total phosphorus, and total Kjeldahl nitrogen (TKN). It is rapid, convenient and is
very effective at destroying interfering organic materials.
For USEPA reporting purposes, USEPA-approved digestions are required. USEPA
presents two digestions (mild and vigorous) for metals analysis. Other digestion
procedures are required for mercury, arsenic, phosphorus and TKN.
See Section 3 for more information on sample digestion.
2.4 Distillation
Distillation is an effective, easy, and safe method of separating some chemical
components for analysis. The following equipment is recommended for distillation:
•
General Purpose Distillation Apparatus (Cat. No. 22653-00), shown in Figure 2
•
Arsenic Distillation Apparatus Set (Cat. No. 22654-00)
•
Cyanide Distillation Apparatus Set (Cat. No. 22658-00)
•
General Purpose Heater and Support Apparatus (Cat. No. 22744-00, 115 VAC, 60 Hz)
•
General Purpose Heater and Support Apparatus (Cat. No. 22744-02, 230 VAC, 50 Hz)
The Distillation Apparatus is suitable for water and wastewater that requires sample
pretreatment by distillation. Applications for the General Purpose Apparatus include:
fluoride, albuminoid nitrogen, ammonia nitrogen, phenols, selenium, and volatile acids.
The General Purpose Heater and Support Apparatus provides efficient heating and
anchoring of the glassware.
10
Laboratory Practices
Figure 2
General Purpose Distillation Apparatus
2.5 Filtration
Filtration separates particulates from an aqueous sample. It uses a porous medium that
retains particulates but allows liquids to pass through. It is useful for removing turbidity
(which may interfere in colorimetric analyses) from water samples.
Two methods of filtration are most frequently used: vacuum filtration and gravity filtration.
2.5.1 Vacuum Filtration
Vacuum filtration uses both suction and gravity to draw the liquid through the filter. An
aspirator or vacuum pump is used to create suction (see Figure 3). Vacuum filtration is
faster than gravity filtration alone.
To filter using a vacuum:
1. Use tweezers to place a filter paper into the filter holder.
2. Place the filter holder assembly in the filtering flask. Dampen the filter with deionized
water to ensure adhesion to the holder.
3. Position the funnel housing on the filter holder assembly.
4. While applying a vacuum to the filtering flask, transfer the sample to the filtering
apparatus.
5. When the filtration is complete, slowly release the vacuum from the filtering flask and
transfer the solution from the filter flask to another container.
11
Laboratory Practices
Figure 3
Vacuum Filtration
2.5.2 Required Apparatus for Vacuum Filtration
Description
Unit
Filter Discs, glass fiber, 47-mm
Cat. No.
100/pkg
2530-00
Filter Holder, membrane, 47-mm
each
13529-00
Flask, filtering, 500-mL
each
546-49
Select one of the following:
Pump, vacuum, hand operated
each
28248-00
Pump, vacuum, portable, 115 VAC
each
14697-00
Pump, vacuum, portable, 230 VAC
each
28248-01
—
20741-45
each
14282-00
Tupbing, vacuum
Tweezers
2.5.3 Gravity Filtration
Many chemical procedures use gravity filtration. This requires only filter paper, a conical
funnel, and a receiving flask (see Figure 4). Gravity filtration is better for retaining fine
particles. The rate of filtration increases as the volume increases in the filter cone, but
never fill the cone more than three-quarters full.
Note: Pretreatment using acid and heat is often necessary for metals testing. Filter paper will not
withstand such an environment; therefore, vacuum filtration with glass fiber filter discs is
recommended. Also, glass filter discs do not retain colored species like the paper filters do.
To filter using gravity:
1. Place a folded filter paper into the funnel.
2. Dampen the filter paper with deionized water so it adheres to the funnel.
3. Place the funnel into an Erlenmeyer flask or graduated cylinder.
4. Pour the sample into the funnel.
12
Laboratory Practices
Figure 4
Gravity Filtration
2.5.4 Required Apparatus for Gravity Filtration
Description
Unit
Cat. No.
Cylinder, graduated, 100-mL
each
508-42
Funnel, poly, 65-mm
each
1083-67
100/pkg
1894-57
each
505-43
Filter Paper, 12.5-cm, pleated
Flask, erlenmeyer, 125-mL
2.6 Reagents
2.6.1 Reagent and Standard Stability
It is always good laboratory practice to date chemicals upon receipt and to rotate supplies
so the older supplies are used first.
Absorption of moisture, carbon dioxide, or other gases from the atmosphere, bacterial
action, high temperatures, or light (with photosensitive compounds) may affect the reagent
shelf life. In some cases, reaction with the storage container or interaction of reagent
components may occur.
2.6.2 Reagent Blank
In several tests, the contribution of the reagent(s) to the final reading is of such a
magnitude that it must be compensated for whenever the test is performed. This produces
a positive error in the test results.
Every effort is made to produce reagents with the lowest possible blank; and, for most
reagents, it is less than 0.009 absorbance units. However, it is sometimes impossible or
impractical to produce reagents with such a low blank. When using such reagents, it is
best to determine the reagent blank by performing the procedure using high-quality water
(deionized, distilled, etc.) to “zero” the instrument. The resulting value is then expressed in
the concentration units of the test and is subtracted from each sample determination that
uses the same reagent lot. Spectrophotometer software allows the reagent blank value to
13
Laboratory Practices
be stored and subtracted automatically from each sample value. The reagent blank needs
to be determined only at first use, when a new lot of reagent has been opened, or if
contamination is suspected.
In most tests, the reagent blank is so small the instrument may be zeroed on either an
untreated portion of the original water sample or on deionized water. This will not result in
a significant loss of accuracy unless the test is for very low levels of the species of interest.
It is then best to use a reagent blank prepared as above.
2.7 Sample Dilution
Most colorimetric tests use volumes of 10 and 25 mL. However, in some tests, the color
developed in the sample may be too intense to be measured due to high levels of analyte,
or unexpected colors may develop due to an interference. In either case, dilute the sample
to produce a measurable endpoint or to determine if interfering substances are present.
To dilute the sample:
1. Pipet the chosen sample portion into a clean graduated cylinder (or volumetric flask
for more accurate work).
2. Fill the cylinder (or flask) to the desired volume with deionized water.
3. Mix well. Use the diluted sample when running the test.
Table 4 shows relative quantities and the multiplication factors to use with a 25 mL
graduated cylinder. The concentration of the sample is equal to the diluted sample result
multiplied by the multiplication factor.
Table 4 Sample Dilution Volumes
1 For
Sample
Volume (mL)
mL Deionized Water
Used to Bring the Volume
to 25 mL
Multiplication Factor
25.0
0.0
1
12.5
12.5
2
10.01
15.0
2.5
5.01
20.0
5
2.51
22.5
10
1.01
24.0
25
0.2501
24.75
100
sample sizes of 10 mL or less, use a pipet to measure the sample into the graduated cylinder
or volumetric flask.
14
Laboratory Practices
More accurate dilutions can be done with a pipet and a 100-mL volumetric flask (Table 5).
1. Pipet the sample and dilute to volume with deionized water.
2. Stopper and invert to mix.
Table 5 Multiplication Factors for Diluting to 100 mL
Sample Volume (mL)
Multiplication Factor
1
100
2
50
5
20
10
10
25
4
50
2
2.7.1 Sample Dilution with Interfering Substances
Sample dilution may influence the level at which a substance interferes. The effect of the
interferences decreases as the dilution increases. In other words, higher levels of an
interfering substance can be tolerated in the original sample if it is diluted before analysis.
An Example:
Copper does not interfere at or below 100 mg/L for a 25 mL sample in a procedure. If the
sample volume is diluted with an equal volume of water, what is the level at which copper
will not interfere?
Total volume
----------------------------------------- = Dilution factor
Sample volume
25 - = 2
---------12.5
Interference Level × Dilution Factor = Interference level in sample
100 × 2 = 200
The level at which copper will not interfere in the diluted sample is at or below 200 mg/L.
2.8 AccuVac® Ampuls
AccuVac Ampuls contain pre-measured powder or liquid vacuum-packed in optical-quality
glass ampules.
To use AccuVac Ampuls:
1. Collect the sample in a beaker or other open container.
2. Use one of the following methods to break the tip off the ampule:
•
Use the optional AccuVac Snapper (Cat. No. 24052-00). See Using the AccuVac
Snapper for instructions, or;
•
Place the ampule tip well below the sample surface and break the tip off (Figure 5)
against the beaker wall. The break must be far enough below the surface to
prevent air from being drawn in as the level of the sample drops.
3. Secure an ampule cap over the tip of the ampule. Invert the ampule several times to
dissolve the reagent. The cap protects from broken glass, and provides a grip for
15
Laboratory Practices
inserting and removing the ampul from the cell holder. Wipe the ampule with a lint-free
cloth to remove fingerprints.
Note: Without the cap, the liquid will stay in the ampule when inverted. DO NOT place fingers over
broken glass!
4. Insert the ampule into the sample cell holder and read the results directly.
Figure 5
Using AccuVac Ampuls
1.
2.
3.
4.
2.8.1 Using the AccuVac Snapper
1. Hold the Snapper with the open end up.
2. Gently slip the ampule into Snapper, point first, until the tip touches the ramp at the
bottom of the Snapper.
3. Hold the Snapper between the index and middle finger (like a syringe). With the
ampule tip down, lower the Snapper into the sample until the ampule shoulder is wet.
4. Press on the flat end of ampule with the thumb (as if depressing the plunger on a
syringe) until the tip snaps. Allow the ampule to fill before removing from sample.
5. Rinse the wet end of the Snapper and ampule with clean water, if desired. Remove the
ampule from Snapper.
6. Knock the ampule tip (retained in the Snapper) into a suitable waste receptacle.
2.9 PermaChem® Pillows
Permachem pillows utilize powdered reagents to minimize deterioration and the risk of
reagent spills. To use PermaChem pillows (Figure 6):
1. Tap the pillow on a hard surface to collect the powdered reagent in the bottom.
2. Locate the tear notch and tear (or cut) across, holding the pillow away from the face.
3. Using two hands, push both sides toward each other to form a spout.
4. Pour the pillow contents into the sample cell and continue the procedure according to
the instructions.
Figure 6
1. Tap
16
Opening PermaChem Pillows
2. Tear
3. Push
4. Pour
Laboratory Practices
2.10 Sample Cells
The same solution in both cells will give the same absorbance (within ± 0.002 Abs for
properly matched cells). For more information, see Matching Sample Cells on page 17.
For accurate results, use only the sample cells specified in each procedure. Due to
differences in cell pathlengths, sample cell substitution will introduce bias in test results.
For example, 1-inch square cells have a pathlength approximately 8% longer than 1-inch
round cells; substitution of round cells for square cells will introduce a bias in the reading.
2.10.1 Orientation of Sample Cells
To minimize measurement variability when using a particular cell, always orient the cell in
the same manner before placing it into the cell holder. The fill marks on the cells can be
used as orientation guides for positioning the cells.
2.10.2 Maintaining Sample Cells
When not in use, store the sample cells in their boxes to protect them from scratches and
breakage. After use, empty and clean the cells; avoid leaving colored solutions in the cells
for extended periods of time.
2.10.3 Cleaning Sample Cells
Most laboratory detergents can be used at recommended concentrations. Neutral
detergents, such as Liquinox, are safer when regular cleaning is required. Cleaning times
are reduced by increasing the temperature or by using an ultrasonic bath. Finish by rinsing
a few times with deionized water and allow to air dry.
Cells may also be cleaned with acid, followed by rinsing thoroughly with deionized water.
Individual procedures may require special cleaning methods. When using a brush to clean
cells, take extra care to avoid scratching the inner surfaces of the cells.
2.10.4 Matching Sample Cells
Although sample cells shipped with the spectrophotometer instrument are distortion-free,
nicks and scratches from handling may cause an optical mismatch between two sample
cells and introduce error into the test results. This type of error may be avoided by optically
matching the sample cells as follows:
Note: Refer to the photometer user manual for specific steps required to select wavelengths and
zero the instrument.
1. Turn the instrument on. Make sure Display Lock is off or the Reading mode is set to
Continuous.
2. Select a wavelength of 510 nm or the wavelength to be used for the test.
3. Pour at least 10 mL (25 mL for 25-mL cells) of deionized water into each of two sample
cells.
4. Place one sample cell into the cell holder with the fill mark toward the front (facing the
user).
5. Zero the instrument.
6. Place the other sample cell into the cell holder with the fill line toward the front.
7. Wait for the value to stabilize and read the absorbance. Record the resulting
absorbance.
17
Laboratory Practices
8. Turn the cell 180° and repeat step 6. Try to achieve an absorbance value within
± 0.002 Abs of the first cell. Note the orientation of the cell.
If the sample cells cannot be matched within ± 0.002 Abs, they may still be used by
compensating for the difference. For example, if the second cell reads 0.003 absorbance
units higher than the first cell, correct future readings (when using these two cells) by
subtracting 0.003 absorbance units (or the equivalent concentration) from the reading.
Likewise, if the second cell reads -0.003 absorbance units, add 0.003 absorbance units to
the reading.
2.11 Other Apparatus
2.11.1 Boiling Aids
Boiling is required in some procedures. Under some conditions bumping may occur
causing sample loss or injury. Bumping is caused by the sudden, almost explosive,
conversion of water to steam as it is heated. Use of a boiling aid, such as Boiling Chips
(Cat. No. 14835-31), reduces bumping.
Make sure the boiling aids will not contaminate the sample. Do not use boiling aids (except
glass beads, Cat. No. 2596-00) more than once. Use a large enough flask or beaker to
allow significant headspace above the solution. Loosely covering the sample during
boiling will prevent splashing, reduce the chances of contamination, and minimize sample
loss.
Individual procedures will recommend the specific boiling aid to use.
2.12 Achieving Accuracy in Measurement
2.12.1 Pipets and Graduated Cylinders
When smaller sample quantities are used, the accuracy of measurements becomes
increasingly important. Figure 7 illustrates the proper way to read the sample level using
the meniscus formed when the liquid wets the cylinder or pipet walls.
Figure 7
Reading the Meniscus
50
45
40
Before filling, rinse the35pipet or cylinder two or three times with the sample to be tested.
Use a pipet filler or pipet bulb to draw the sample into the pipet.
CAUTION
Never pipet chemical reagent solutions or samples by mouth.
When filling a pipet, keep the tip of the pipet below the surface of the sample as the
sample is drawn into the pipet.
Serological pipets have marks that indicate the volume of liquid delivered by the pipet. The
marks may extend to the tip of the pipet or may be only on the straight portion of the tube.
If the marks are only on the straight part of the tube, fill serological pipets to the zero mark
and discharge the sample by draining the sample until the meniscus is level with the
desired mark. If the serological pipet has marks extending to the tip of the pipet, fill the
18
Laboratory Practices
pipet to the desired volume and drain all the sample from the pipet. Then blow the sample
out of the pipet tip with the pipet filler for accurate measurements.
Volumetric (transfer) pipets have a bulb in the middle and a single ring above the bulb to
indicate the volume of liquid when it is filled to the mark. To discharge a volumetric pipet,
hold the tip of the pipet at a slight angle against the container wall and drain. Do not
discharge the solution remaining in the tip of the pipet after draining. Volumetric pipets are
designed to retain a small amount of sample in the pipet tip.
If droplets of sample cling to the walls of the pipet, the pipet is dirty and is not delivering
the correct amount of sample. Wash the pipet thoroughly with a laboratory detergent or
cleaning solution and rinse several times with deionized water.
2.12.2 The Pour-Thru™ Cell
The Pour-Thru Cell is an optional accessory that improves accuracy and makes
measuring more convenient for rapid liquid methods. Methods that use 25-mL samples
and sample cells can use the Pour-Thru Cell if specified in the procedure. The Pour-Thru
Cell cannot be used with 10-mL sample sizes and reagents.
Note:
See the photometer user manual for installation and operation instructions.
•
Pour the solution into the funnel of the installed Pour-Thru Cell Module. Avoid spilling
solution onto the instrument.
•
The funnel height and orientation may be adjusted. The funnel height determines the
speed of sample flow through the cell. The higher the funnel, the faster the flow.
•
To minimize air bubbles, adjust the funnel so that it drains completely with the final
level of liquid in the tube about 5 cm (2 inches) below the tip of the funnel.
•
Take instrument readings after the solution has stopped flowing through the cell.
•
Always rinse the cell thoroughly with deionized water after each series of tests, or as
often as specified in the procedure.
Occasionally, remove the Pour-Thru Cell to check for any accumulation of film on the
windows. If the windows appear hazy, soak the cell in a detergent bath and rinse
thoroughly with deionized water.
19
Visit us at www.hach.com