1
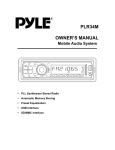
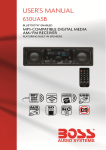
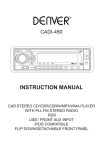
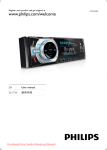
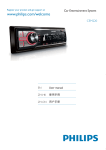
Contents in Box:
The main unit, protective case (with front
panel), wiring harness, mounting metal strip,
release keys, screws, nut, washers,user’s
manual, warranty card included in the gift box.
SDC22A
SDC22A User’s Manual - page 1
53mm
182mm
SDC22A User’s Manual - page 2
SDC22A User’s Manual - page 3
SDC22A User’s Manual - page 4
SDC22A User’s Manual - page 5
Front panel:
The front facet after removing the front panel:
Descriptions of Function Controls
(1) RELEASE( ) Button
(2) (Power on/off ) Button
(3) PLAY/PAUSE ( ), MUTE Button
(4) Eject ( ) key
(5) SCAN (Intro Scan) Button
(6) RPT (Repeat Mode select) Button
(7) SHUF (Shuffle) Button
(8) BAND Selector, LOUD(Loudness) Button
(9) VOL +/- Knob, Audio Select Button
(10) DOWN ( ) Button
Previous track, fast reverse
(11) UP (
) Button
Next track, fast forward
SDC22A User’s Manual - page 6
(12) Mode Button
(13) DISP(Display) Button
(14) MON(Mono/Stereo) Button
(15) LOC(LOC/DX) Button
(16) EQ(Equalizer) Button
(17) Tuning Knob
(18) Disc slot
(19) LCD display
(20) AUX IN (Auxiliary input) Jack
(21) Reset Button
(22) Anti-theft LED Indicator
Press and hold again to turn off loudness.
Turn on/off the unit
Turn on the unit by pressing any button
(except
button (1) and button (4)) or
inserting a disc to disc slot (18).
When system is on, press the button
(2) to turn off the unit.
Sound adjustment
- Rotate the VOL+/- knob (9) to adjust the
volume level.
Press the SELECT button (9) repeatedly
to cycle through the following sound
adjustment choices:
Rotate the VOL+/- knob (9) to adjust the
desired sound quality.
- Press and hold the SELECT button (9)
to enter the menu mode. Once you are in
the menu mode, press the SELECT
button (9) repeatedly to cycle through the
following setup choices:
Displaying/Adjusting time
1. Displaying time:
Press the DISP (13) to show current
information and time on the LCD. R eturn
to original status after 5 seconds.
2. Adjusting time:
Press and hold DISP (13) until the clock
begins blinking. Rotate the VOL+/- knob
(9) counter-clockwise to adjust hour and
rotate it clockwise to adjust minute.
Mute function
In radio or AUX mode, press the MUTE
(3) to silence the sound instantly. Press it
again to return to previous volume level.
Equalization
Press EQ button (16) repeatedly to cycle
through the following equalization mode
choice:
LCD
Exhibits current frequency and activated
functions on the LCD (19).
Rotate the VOL+/- knob (9) to preset the
desired item.
♦ BEEP ON/OFF: The car audio device is
equipped with the beep tone on and beep
tone off function,
- BEEP ON: The beep sound is heard
when a key is pressed.
- BEEP OFF: The beep sound is disabled.
♦ P-VOL: This option allows you to preset
a volume level (volume level when the
unit switches on).
♦ CLK ON /CLK OFF : These options
allow you to choose wether show the
clock on the LCD display or not.
♦ 12/24 Hour: These options allow you to
choose 12 hour or 24 hour display.
Flashing LED
The LED (21) will flash if the front panel is
not inserted properly into the main unit.
RESET FUNCTION
The RESET button is to be activated for
the following reasons:
- Initial installation of the unit when all
wiring is completed.
- All the function buttons do not operate.
- Error symbol on the display.
Note: RESET button (20) must be
activated with either a ballpoint pen or
thin metal object. I f you press RESET
button and the unit still does not work,
please use a cotton swab soaked in
isopropyl alcohol to clean the socket on
the front panel.
Loudness function
Press and hold the BAND/LOUD button
(8) to engage the loudness mode to
reinforce the output of bass frequencies.
SDC22A User’s Manual - page 7
Switching to radio mode
Press the MODE button (12) to select
radio mode. The current band and
frequency appears in the LCD display .
Selecting the frequency band
Press the BAND button (8) to select the
desired band. The reception band will
change between FM and AM .
Tune button
Rotate the TUNING button (17) to select
a broadcasting station.
Stereo/Mono
FM listening is received in stereo mode.
However, if the signal weak or reception
is not as good as you would like,
switching to MONO mode usually
improves the overall sound quality. Press
the MON button (14) choose FM stereo or
mono audio effect.
Local/Distant
In urban settings, most stations are
strong enough and it should be set in
local mode. However, if a stations with
weaker signals, try switching to
distant(DX) mode. Press the LOC button
(15) to switch local or distant reception
mode.
Switching to CD mode
1. If there is no CD/MP3 disc inserted in
the unit:
Gently insert a CD with the printed side
up into the Disc Slot (18) until you feel
some resistance. The disc will be drawn
into the player automatically. The CD
playback begins.
2. If a CD disc is already inserted in the
player, press MODE button (12) to switch
to CD mode.
Loading/Unloading a disc
Insert the disc into the disc slot (18) with
the printed side facing up. The player will
play the disc automatically.
To remove the disc, press the button
(4) to stop playback and eject the disc
from the disc Slot (18).
Selecting tracks
- Press the
(10) or
(11) to skip to the
previous track or the next track.
The track number will show on the LCD.
- Press and hold the
button (10) or
button (11) to fast reverse or fast forward.
To return to the normal mode, release the
button.
Pause playback
Press the
button (3) to pause CD
playback. Press it again to resume
playback.
Introduction scan
Press the SCAN button (5) to play the
first several seconds of each track on the
current disc. Press it again to stop the
introduction scan and listen to the music.
AUX IN Operation
This receiver has a front panel auxiliary
input jack, so it can be connected to an
iPod or another MP3 player or audio
player. If you have plugged such a player
into the AUX IN jack, press the MODE
button (12) to switch the input source to
AUX.
SDC22A User’s Manual - page 8
Repeating the same track
Press the RPT button (6) to set the unit to
repeat the same track. Press it again to
stop the repeat function.
Playing all tracks in random
Press the SHUF button (7) to play all
tracks on the disc in random order. Press
it again to cancel this function.
Red: Right CH RCA output
White: Left CH RCA output
Antenna Socket
Violet to rear right speaker +
Yellow to Battery B+ FUSE (10A)
Violet/Black to rear right
speaker -
Black to GND B-
Grey to front right speaker +
Red to ACC B+
Grey/Black to front right
speaker -
Blue to PWR ANT / Remote turn on
White to front left speaker +
Green to rear left speaker +
White/Black to front left speaker - Green/Black to rear left speaker -
SDC22A User’s Manual - page 9
Trouble Shooting
The following chart will help in solving most problems that may occur. If you still have questions
after going through the checklist, please consult your local customer service representative.
Before going through this check list, refer the wiring and operating procedures.
Symptom
Cause
The car ignition switch have
not turn on.
If the power supply is connected to
the car accessory circuits, but the
engine is not moving, switch the
ignition key to “ACC”.
The fuse has been blown.
Replace a new one.
Presence of CD disc inside
the player.
Remove the disc from the player,
and insert a new one.
Inserting the disc in reverse
direction.
Insert the CD with the label facing
upward.
The surface of CD is extremely
dirty or has been scraped.
Clean the disc or try to replace
a new one.
Temperature inside the car
is too high.
Cool off or until the ambient
temperature return to normal.
Condensation
Leave the player off for an hour or so,
and then try again.
Volume is in minimum .
Adjust volume to a desired level .
The wiring is not properly
connected .
Check wiring connection .
The installation angle is
0
more than 30 .
Adjust the installation angle
0
less than 30 .
The surface of CD is extremely
dirty or has been scraped.
Clean the disc or try to replace
a new one.
1. The built-in microcomputer
is not operating properly due to noise.
1. Press the RESET button
to restore the program.
2. The front panel has not
properly installed.
2. Fixed the front panel into
its place.
The antenna cable is not connected.
Insert the antenna cable firmly into
the antenna socket of this CD player.
No power
Disc can not be loaded
or ejected.
No sound
Sound skips
The operation keys
do not work
No radio reception.
Solution
SDC22A User’s Manual - page 10