1
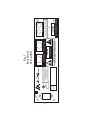
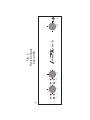
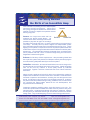
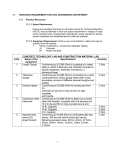
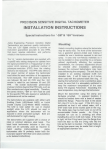
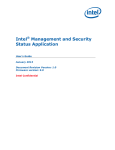
SLC-A300
Audiophile Class AB
High Performance
Home Theater Stereo Amplifier
Featuring the Patented Coyle Electronics
SLC Signal Loss Compensator
USER’S MANUAL
TM
TM
OARING
UDIO
INC.
Congratulations!
You will receive many hours of incredible listening pleasure from this
superbly designed amplifier. It will enable you to hear deeper into all
the rest of your audio system. For maximum enjoyment, performance
and safety, read this manual before operating the amplifier.
Amplification Features
w Careful attention has been paid to phase response at all frequencies.
It is faithful to the original.
w Extremely wide and deep sweet spot. Ideal for home theater seating.
w High current output: floor pounding bass with super dynamic mids
and highs.
w Fast slew rate: no smearing of harmonic detail. You will hear details
in your favorite recordings that have been hidden for years.
w Massive heat sinks eliminate the need for a fan.
w Power supply ripple is so low that you’ll think the amplifier is off when
the source is muted.
SLC Signal L oss Compensator
Patented analog image enhancement provides:
w Acoustic Restoration: smooths out digital grit.
w Enhanced imaging: left and right enhanced outputs combine to form
a solid phantom center channel that is wide and deep.
w Dynamic detailing: increases the perceptual dynamic range, at any
output level.
The SLC-A300 is designed to run all speakers superbly, including exotic
speakers with difficult crossovers, such as ribbons and electrostats.
Special Design Features:
12 VDC Remote Turn-On - From preamp or surround sound
Processor
Soft Start - Low inrush circuit limits turn-on current to about
7 Amps
2
WARNINGS
CAUTION
RISK OF ELECTRIC SHOCK
DO NOT OPEN
!
ATTENTION
RISQUE DE CHOC ELECTRIQUE NE PAS OUVRIR
WARNING: TO REDUCE RISK OF ELECTRIC
SHOCK, DO NOT REMOVE ANY PART OF CASE.
NO USER-SERVICEABLE PARTS INSIDE.
REFER SERVICING TO QUALIFIED SERVICE PERSONNEL.
This symbol is intended to alert the user to the presence of uninsulated
"dangerous voltage" within the product's enclosure that may be of sufficient
magnitude to constitute a risk of electric shock to persons.
!
This symbol is intended to alert the user to the presence of important operating
and maintenance (servicing) instructions in the literature accompanying the
product.
CAUTION: TO PREVENT ELECTRIC SHOCK, MATCH WIDE
BLADE OF PLUG TO WIDE SLOT, FULLY INSERT.
WARNING: TO REDUCE THE RISK OF FIRE OR ELECTRIC SHOCK,
DO NOT EXPOSE THIS EQUIPMENT TO RAIN OR MOISTURE.
This symbol means Double Insulated.
Premium parts are used so a third wire ground is not needed. This eliminates the possibility
of ground loops, making the background quieter and preventing hum.
IMPORTANT SAFETY INSTRUCTIONS
1. Read these instructions.
2. Keep these instructions.
3. Heed all warnings.
4. Follow all instructions.
5. Do not use this apparatus near water.
6. Clean only with dry cloth.
7. Do not block any ventilation openings. Install in accordance with the manufacturer's instructions.
8. Do not install near any heat sources such as radiators, heat registers, stoves, or other apparatus (including
amplifiers) that produce heat.
9. Do not defeat the safety purpose of the polarized or grounding-type plug. A polarized plug has two blades
with one wider than the other. A grounding type plug has two blades and a third grounding prong. The wide
blade or the third prong are provided for your safety. If the provided plug does not fit into your outlet, consult an
electrician for replacement of the obsolete outlet.
10. Protect the power cord from being walked on or pinched particularly at plugs, convenience receptacles, and
the point where they exit from the apparatus.
11. Only use attachments/accessories specified by the manufacturer.
12. Use only with the cart, stand, tripod, bracket, or table specified by the
manufacturer, or sold with the apparatus. When a cart is used, use caution when
moving the cart/appatus combination to avoid injury from tip-over.
13. Unplug this apparatus during lightning storms or when unused for long periods
of time.
14. Refer all servicing to qualified service personnel. Servicing is required when
the apparatus has been damaged in any way, such as power-supply cord or plug is
3
IMPORTANT SAFETY INSTRUCTIONS (cont.)
damaged, liquid has been spilled or objects have fallen into the apparatus, the apparatus has been exposed to
rain or moisture, does not operate normally, or has been dropped.
Power Sources: Due to the large power draw when the amp is being used, use only the supplied 14 gauge
power cord or one that is heavier. ¨ Only operate this unit from the type of power source indicated on the unit
label. ¨ As long as the unit is connected to the wall outlet, it is not disconnected from theAC power source even
if the unit itself is turned OFF. ¨ Always disconnect by grasping the power plug itself, never pull on the cord. ¨
Do not overload wall outlets, extension cords, or other receptacles as this can result in the risk of electric shock
or fire. Please note watts used on unit label.
Moisture & Water: Do not place a container with liquid on top of this unit. ¨ Do not use this unit near water (for
example: a swimming pool, bathtub or sink). ¨ Do not allow water to enter this unit or allow the unit to become
wet.¨ The apparatus shall not be exposed to dripping or splashing.
Liquid & Object Entry: Never push any kind of objects into this unit through openings as they may short-out
parts or may touch dangerous voltage points that could result in an electric shock or a fire. ¨ If any liquid or
object falls into the unit, unplug it and have qualified personnel check it before operating it any further.
Servicing & Replacement Parts: Refer all servicing to qualified service personnel. ¨ Opening or removing
the cover may expose you to dangerous voltage or other hazards. ¨ If replacement parts are needed, make
sure the service personnel use replacement parts specified by the manufacturer or that have the same
characteristics as the original part. Fire, electric shock, other hazards or decrease in performance may result
from unauthorized substitutions. ¨ After any repairs or service to this product, have the service personnel
perform safety checks to make sure that the product is in proper operating condition.
Connections: When connecting the product to other equipment, turn off the power and unplug all of the
equipment from the wall outlet. This will avoid possible electric shock and serious personal injury. ¨ When
making any connections, read and follow the instructions of this manual and the owner's manual of the other
equipment.
Sound Volume and Distortion: Before you turn on the product, reduce the volume to the minimum level. This
will avoid sudden high volume which may cause hearing or speaker damage. ¨ Never allow the product to
output distorted sound for a long time. It may cause speaker overheating and fire. ¨ Your hearing is priceless.
If your ears ring after listening, you are listening too loud for too long..
TRICKS & TIPS FROM THE GOLDEN DESIGN TEAM
(See last page for “The Birth of an Incredible Amp”)
Professor: Dr. Bill Avery explains the scientific reasons for
recommendations in this manual.
Golden Ears: Daniel Kolbet gives ideas that will improve the quality of the
sound in your set-up.
Bean Counter: The CFO complains about added costs. The Golden
Design team always insisted on quality of sound over the cheapest method.
Go to the web site soaringaudio.com to find other Tricks & Tips.
Have some Tricks & Tips of your own? Email them to us and we may add them to the
Tricks & Tip Library.
4
Installation for SLC-A300
For maximum performance and life, keep your amplifier cool.
Ventilation: Heatsinks and openings on the cabinet are provided to ensure reliable
operation and to protect the product from overheating. The openings and heatsinks should
never be blocked or covered. There must be at least 3 inches of free space on both sides,
back, and the top. The front must be open. For proper airflow through the bottom openings
and through the heatsinks, do not place the unit on any soft surface such as a bed, sofa, or
rug.
Professor: The single most important thing you can do to extend the life of
o
o
electronic products is to keep them cool. For every 10 C (18 F) hotter that
equipment runs, the life of the components is cut in half. Since we have
eliminated the need for a fan by using massive external heatsinks and many
internal heatsinks, it is absolutely crucial that there be adequate air flow
around the amplifier. Do not place the amplifier in an enclosed cabinet.
Bean Counter: Our Production Manager emailed us that adding a fan would
lower costs. Heatsinks could have been reduced and many of the expensive
holes in the top and bottom could have been avoided. But a fan means
background nosie and can make speakers buzz, so the fan was vetoed.
Rear Connections (See Fig. 1 on Page 6)
Before connecting the product to other equipment, turn off the power and unplug all of the equipment from the
wall outlet. This will avoid possible electric shock and serious personal injury. When making any connections,
read and follow the instructions of this manual and the owner's manual of the other equipment.
AC Power Connector
In order to achieve the maximum possible performance at the
highest playing levels, it is important to use a heavy duty power cord such as the 14 gauge
one supplied. It is best to plug directly into the wall. If a plug strip or extension cord must
be used, they should be as heavy as the power cord. Use only the power source indicated
on the label.
2 RCA Inputs Red - right. White - left. Turn the VOLUME all the way counterclockwise
before making any connections, otherwise you can injure the speakers. The IN LEDs
reflect the level of the signal going into the RCA Inputs. (See "Front Controls")
You may want to try running inputs directly from the source to the SLC-A300.
This will prevent the sound from being degraded by any piece of equipment
placed in between the source and the SLC-A300. However, some sources may
have too weak of a signal for maximum SLC effect. Ask your dealer or check the
web site for what equipment has been found to work well with the SLC-A300.
Speakers The SLC-A300 will drive speaker loads from 3-16 ohms.
150watts/channel at 4 ohms, 100 watts/channel at 8 ohms
The SLC-A300 is designed to run all speakers superbly, including exotic speakers with
difficult crossovers, such as ribbons and electrostats.
Speaker Wire: The SLC-A300 can supply over 9 amps of current to the
speaker load. This means that with the SLC-A300, we are concerned with
inductance much more than capacitance. In general, wire that is 14 gauge or
heavier with low inductance will give the best performance.
5
6
AC IN
LISTED
UL
US
Serial #
MODEL
OARING
UDIO
INC.
Manufactured under license from
Coyle Electronics, LLC, U.S. Pat.
No. 5,621,581 & 6,560,341 and
other world-wide patents
issued and pending.
AC 120V 60Hz 500W
Audio/Video Apparatus
C/N 46CT
C
TM
TM
+
L
!
+
MADE IN TAIWAN
DESIGNED IN U.S.A.
RISQUE DE CHOC ELECTRIQUE NE PAS OUVRIR
ATTENTION
RISK OF ELECTRIC SHOCK
DO NOT OPEN
CAUTION
SPEAKERS - Class 2 Wiring
R
Fig. 1
Rear Panel
SLC-A300
LEFT
++
+
- - - 12V DC REMOTE TURN-ON
___
-
WARNING: TO REDUCE RISK OF ELECTRIC
SHOCK, DO NOT REMOVE ANY PART OF CASE.
NO USER-SERVICEABLE PARTS INSIDE. REFER
SERVICING TO QUALIFIED SERVICE PERSONNEL.
AUDIO IN
RIGHT
Golden Ears: It is best to use the same length of speaker wire for a pair of
speakers. Not all speaker cables sound the same. Try different ones on your
system.
Speaker Warning: Cone speakers lose their flexibility with age. The powerful bass may
tear older speaker cones. Speaker damage can occur before your hear distortion.
Cardas Speaker connectors Right and Left are in the same orientation as Right-Left RCA
connections. Wires go on either side of the center post between center post and copper. Be
sure to connect the + side of the speaker wire to the side of the Cardas connector embossed
with + . Firmly tightening the screws will give you better sound.
Bean Counter: Cheaper connectors are available overseas. Why buy Cardas
connectors in the USA and ship them overseas to the manufacturer? You
guessed it: the oxygen free copper and short signal path make them sound
better, work better, and look real cool.
Golden Ears: Tighten all connections, as loose connections can cause arcing
and corrosion. Both can degrade the sound. At least once a year, clean all
audio connections on your system with isopropyl alcohol.
12VDC Remote Turn-On This is an optional convenience feature. Two screw terminals on
the lower right can be used to connect to the remote turn-on feature of some preamplifiers
and surround sound systems. Make sure the plus and minus are connected properly. The
amp must be turned Off the same way it is turned On: If remote turn-on is used to turn On the
amp, then it must also be used to turn Off the amp. If the front power button is used to turn On
the amp, then it must also be used to turn Off the amp. The turn-on circuit is designed to
respond to a wide range of voltages. It will work from 3VDC to 18VDC.
What does hum 120dB below the peak output mean? Noise is measured in decibels
(dB). The noise floor of a normal CD is 96dB below peak output, a limitation of
16 bit encoding. If you go from 96 dB to the 120 dB of the SLC-A300, there is a
difference of 24 dB. This is not 25% better, because dB are not like normal
numbers. With dB, every 3 dB lower is half the noise. So the SLC-A300 is over
100 times quieter. (With hum, the more dBs below the peak output, the quieter
it is.) This means that the hum components are not louder than the noise floor at
only 1 watt output. In other words, you can enjoy the full dynamic range of a CD at 1 watt
output without the hum degrading the CD’s noise floor.
Perform the hum test yourself. With the amp knobs where you normally listen and
everything off except the amp, stick your head as close as possible to the center of
the woofer. (Don’t touch it!) With most amps you will hear background hum. The
SLC-A300 is completely quiet. Check your other equipment: Preamp - turn it on
and repeat the test. CD/DVD - plug directly into the amp inputs. Play something,
put it on PAUSE, and then listen for hum, motor noise and background clutter.
Perform the thumb print test yourself. (This is a fanatic’s test for an entire system.) Clean
a CD. Then put a thumb print on the bottom side of the CD. Play the CD and listen
carefully - the CD player will compensate for the thumb print, but it will not make a
perfect correction. Then clean the CD and listen again. If you can hear the
difference with and without the thumb print, then your system is capable of
revealing great spatial detail. If your system does not pass this test, then the fault
is not in the SLC-A300.
7
SIGNAL
CLIP
8
IN
OUT
LEFT
IN
OUT
RIGHT
OARING
UDIO
Fig. 2
Front Controls
SLC-A300
INC.
TM
VOLUME
POWER
Operation of Front Controls
Controls on Right Side
Power Switch: Push ON
Red Power LED Illuminates when ON
Master Volume: Rotary volume control knob on right side
Controls on Left Side: Signal Loss Compensator (SLC)
Two left knobs control the amount of enhancement of the signal for the left and
right channels. Each channel has a set of 4 LEDs:
Input pair on the left - reflect the level of the RCA Inputs.
Adjusted with the output level of the pre-amp.
Output pair on the right - reflect the amount of enhancement.
Adjusted by the two SLC knobs on the left side.
Input Green indicates presence of normal signal level for optimum enhancement.
If Green IN light is not on, signal IN on the rear RCA inputs can be increased. The
unit has been designed so that during normal music passages, the green Input
LED should be on. If it never comes on or only very occasionally, you are probably
not geting the best signal to noise ratio from your system. For good dynamic range
the green input LED will be on most of the time.
Input Red (above the input green) indicates that the maximum level for which the
input was designed has been reached (5 Volts RMS). This will only happen if the
preamp is too high. Clipping occurs just above when the red LED comes on.
Adjust the input level so the IN red LED never comes on. Back down on the output
level of the preamp if the IN red LED comes on.
Output Green indicates a good enhancement to the signal.
Output Red indicates that the maximum design level of enhancement has been
reached. This light should normally not come on, turn the knob down til it goes off.
Initial Set-up of SLC & Phantom Center Channel
1. With power OFF, turn left two knobs to 12 o'clock.
Turn Master Volume all the way down.
WARNING: This amp is capable of blowing out many speakers, so it is vital
that the Master Volume be turned all the way down.
2. Push Power ON and start playing the loudest piece that you are going to play.
3. Wait 30 seconds to warm up, then turn up Master Volume to desired level.
4. IN LEDs: If green IN lights do not come on with a loud passage, increase the input
level from the preamp.
Adjust input level so the red IN lights never come on.
5. Turn up Left SLC knob until OUT red LED blinks occasionally,
then back off a little.
6. Turn Right SLC knob until image is centered.
7. To control volume, use Master Volume or the remote control on the preamp.
8. For less enhancement: turn left & right controls down, then turn the Master
Volume all the way up. Adjust the volume with only the left & right controls
for balance.
9
Troubleshooting
If you are experiencing problems - check the wiring. 90% of all problems are due to
wiring.
RED POWER LED off. The unit is not turned-on. Push-in POWER button or use remote
turn-on remote control. Is the power cord plugged into both the back of the unit and into a
suitable power outlet? The simplest way to check for power at the outlet is to unplug the
amp and plug in a light.
There is no output. Has the unit warmed up? It takes about 30 seconds from when the
POWER button in pushed in. Is the MASTER VOLUME turned-up? (Never start with it
turned up - you can damage the speakers or your ears!) Is there signal into the RCA jacks?
Use a volt meter or plug into another piece of equipment to confirm that a signal is present.
GREEN INPUT LED does not come on. Signal IN on the rear RCA inputs can be
increased. (See Operation of Front Controls.)
RED INPUT LED comes on. Signal IN on the rear RCA inputs is too high; reduce the
level from the source. These LEDs should never come on. (See Operation of Front
Controls.)
GREEN OUTPUT LED does not come on. Turn up the channel knobs on the left side.
RED OUTPUT LED comes on. Turn down the channel knobs on the right side.
The Amplifier shuts off unexpectedly. There are two possibilities that you can fix.
1) Blown circuit breaker: Check to make sure there is power to the amp from the outlet (the
circuit breaker may have blown). The simplest way to check for power is to unplug the amp
and plug in a light. If the light does not work, the circuit breaker has tripped because there
are too many appliances on the circuit. 2) Thermal shut-down: The left and right channels
each have a thermal protector that will turn the amplifier off if either side gets too hot. The
amplifier is very conservatively designed and can continuously put out 150 watts to each
channel indefinitely without getting too hot, even while sitting in a 100oF room. The only
way that the thermal protector can operate is if a component failed in the amplifier or the
amplifier has been placed in a confined space blocking proper ventilation. If the amplifier is
placed on a shelf, there must be at least 3” clearance on both sides, the back, and the top.
The front of the amplifier should be near the front of the shelf and the whole front area must
be open. To see whether the thermal protection shut off the amplifier, very briefly - much
less than one second - touch the fins. If you can hold your hand or a finger for one second
comfortably, then it is probably not hot enough to have tripped the thermal sensors. If it
feels very hot, the sensors could have tripped. In that case, turn off or disconnect the
amplifier and wait fifteen minutes. After the amplifier has cooled, relocate it in a more open
place and try plugging it in and turning it on. If the fins are now comfortably cool to the
touch, and you know that the power is good to the outlet, and if after pressing the power ON
button the red LED does not come on, then contact your dealer for information on how to
obtain help from qualified service personnel.
Fuses There are six fuses which can be replaced by qualified service personnel. The
circuits are very conservatively designed. The fuses will not blow in normal operation. If a
fuse has blown, it is probably because another component which is not user replaceable
has failed.
10
Typical Specifications SLC-A300
(Amplifier with SLC Processor - 300 watts)
Load Impedance: Rated for 3 to 16 ohms in Stereo mode
Output Power per Channel: 150 watts at 4 ohms RMS
100 watts at 8 ohms RMS
Input Level: 1-4 volts RMS
Required AC Mains: 60Hz 120VAC
Weight: 38 pounds Watts: 6 plugged in; 60 on-idling; 500 full power
Frequency Response: -3dB from 0.1 Hz to 300 kHz at 1 watt
Hum: typically over 120dB below peak output (Over a 100 times quieter
than the noise floor of a CD.)
Grounding: Double insulated. Premium parts used so a third wire
ground is not needed. This eliminates the possibility of ground loops,
making the background quieter and preventing hum.
UL Listed: Designed in accordance with UL6500 Audio/Video
Apparatus - a more stringent worldwide standard
Options: Rack mount kit ¨ Balanced Input ¨ 240 VAC
Warranty
2 Year Parts and Labor
5 Year Parts (See web site for current Labor rate.)
Warranty is for any manufacturing defects or early component failures and is
limited to repair or replacement of the unit. Soaring Audio is not responsible for
any consequential damage due to not following the instructions in this manual.
Read the Troubleshooting section of this manual and check the web site for FAQ.
Call your dealer before shipping the unit to us, as some things may be able to be
handled by local qualified service personnel. You may also email us about your
problem ([email protected]) and technical support will offer
suggestions
Ship the unit to us prepaid and insured using BOTH of the original shipping
containers. Include a copy of the receipt and indicate what the problem is. Be
sure to include your return address, phone number and email. Most repairs will be
completed within two business days. We pay return shipping for warranty repairs.
Problems caused by user error (e.g. water in the unit) will be billed parts, labor and
return shipping. We will contact you before beginning repairs with an estimate
and to receive your credit card information.
11
The Story Behind
the Birth of an Incredible Amp
Over a decade in the making, the SLC-A300 amplifier
was not the work of just one person. It arose out of
the synergy among three brilliant men whose talents
meshed to make an amplifier that provides intense
listening enjoyment.
Inventor
Inventor: Jan Coyle loves audio and has
Professor
Golden Ears
collected over 80,000 record albums. He
owned a stereo store and thought it should be
possible to play back all types of recordings
and make them sound their best. He spent years hooking up components in
novel ways. He finally came up with the Signal Loss Compensator system
(SLC) that makes the performer seem to be standing right in front of you. When
applying for the patent, his experience with his 19 previous patents made him
realize that an expert in the given field made a world of difference with the patent
bureaucracy. He contacted the University of Nevada, Reno, and asked if they
had a professor that had a Ph.D. in Electrical Engineering who was also a
Registered Professional Engineer.
Professor: Dr. Bill Avery fit these requirements. After persuading himself that
the Coyle SLC system really worked, Dr. Bill spent several years analyzing the
circuit and working with patent attorneys to secure the patent.
Golden Ears: Meanwhile, Jan had met Daniel Kolbet, who was in charge of the
sound system at one of the large Reno casino show rooms. Daniel has golden
ears: he can hear tiny nuances in sound quality caused by individual
components. Together the three of them built what none of them could have
done alone.
After they built a stand-alone Coyle SLC device, they realized they needed an
amplifier with low distortion to show off the SLC to its fullest. Daniel listened to
hundreds of capacitors and transistors, choosing the ones that gave the best
sound. Dr. Bill drew on his forty years of circuit design experience, combining
the parts to eliminate problems with grounding, feedback, hum, heat and noise.
Jan continued the patent battles, tested all the new developments, and
supported the whole undertaking.
Customers wanted the amplifier and the Coyle SLC device in one unit. The
combination produced the incredible SLC-A300, which out-performs many more
expensive amps. Anything played through the system is enhanced. Now the
sound system you have been dreaming of will cost less, thanks to the Golden
Design Team. They are still designing, so look for more exciting products soon.
2900 Fantasy Lane ¨ Sparks NV 89441
WEB www.soaringaudio.com
PHONE 775-425-8000 ¨ FAX 775-425-3000 ¨ EMAIL [email protected]
Copyright 2014 Soaring Audio Inc. All rights reserved. Products, features and specifications subject to change without notice