1
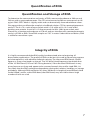
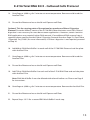
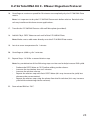
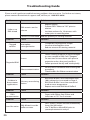
E-Z 96 Total RNA Kit II
Table of Contents
Introduction and Overview.......................................................2
Kit Contents/Storage and Stability.........................................3
Important Notes.............................................................................4
Tissue Homogenization Techniques......................................5
Quantification of RNA..................................................................7
Guideline for Vacuum Manifold................................................8
Preparing Reagents.......................................................................9
Cultured Cell Protocol...............................................................10
Animal Tissue Protocol..............................................................15
Vacuum Protocol.........................................................................20
DNase I Digestion Protocol......................................................23
Troubleshooting Guide.............................................................26
Ordering....................................................................................27
Manual Revision: August 2012
Innovations in nucleic acid isolation
1
Introduction and Overview
E-Z 96 Total RNA Kit II is designed to isolate total cellular RNA from all types of animal
and human tissues. This kit allows simultaneous purification of 96 samples in less than 60
minutes. RNA purified using this kit is ready for applications such as RT-PCR*, Northern
blotting, poly A+ RNA (mRNA) purification, nuclease protection, and in vitro translation.
The E-Z 96 Total RNA Kit II provides a fast and easy method for high throughput RNA
isolation. This kit integrates efficient lysis of a phenol/guanidine buffer and the reversible
binding properties of HiBind® matrix, a silica-based material, with the speed of the E-Z 96
plate format for fast processing of large sample numbers. Cells or tissues are homogenized
with RNA-Solv® Reagent that inactivates RNases. Chloroform is added to separate the
homogenate into aqueous and organic phases via centrifugation. The aqueous phase,
which contains RNA, is adjusted with ethanol and then applied to the E-Z 96 RNA Plate to
bind total RNA, while cellular debris and other contaminants are effectively washed away.
High-quality RNA is eluted in DEPC Water.
New in this Edition: This manual has been edited for content and redesigned to enhance
user readability.
2
Kit Contents
Product
R6935-00
R6935-01
R6935-02
1 x 96
4 x 96
20 x 96
E-Z 96 RNA Plate
1
4
20
96-well Square-well Plate (2.2 mL)
1
4
20
96-well Microplate (500 µL)
1
4
20
Sealing Film
1
4
20
Aera Seal Film
3
12
60
4 x 25 mL
4 x 100 mL
10 x 200 mL
RNA Wash Buffer I
90 mL
360 mL
2 x 900 mL
RNA Wash Buffer II
35 mL
140 mL
5 x 140 mL
DEPC Water
20 mL
60 mL
350 mL
User Manual
P
P
P
Purifications
RNA-Solv® Reagent*
*Warning: RNA-Solv® Reagent contains guanidine thiocyanate and phenol. Handle with
care.
Storage and Stability
All of the E-Z 96 Total RNA Kit II components are guaranteed for at least 12 months from
the date of purchase when stored as follows. RNA-Solv® Reagent should be stored at 2-8°C
for long-term use. All other components should be stored at room temperature.
3
Important Notes
Please take a few minutes to read this booklet in its entirety to become familiar with the
procedures. Prepare all materials required before starting to minimize RNA degradation.
•
Whenever working with RNA, always wear gloves to minimize RNase contamination.
Use only clean RNase-free disposable plastic pipette tips when using the supplied
reagents.
•
Equilibrate samples and reagents to room temperature before beginning this
protocol. All steps should be carried out at room temperature unless otherwise
noted. Work quickly, but carefully.
•
Carefully apply the sample or solution to the center of each well of the E-Z 96 RNA
Plate. Avoid touching the membrane with pipet tips.
•
For long-term storage of whole tissue, flash-freeze samples in liquid nitrogen and
immediately transfer to -70°C. Tissue can be stored for up to 6 months at -70°C. To
process frozen tissue samples, do not thaw the sample during weighing or handing
prior to the disruption with RNA-Solv® Reagent.
•
Tissue samples homogenized in RNA-Solv® Reagent can be stored at -70°C for at least
6 months. To process frozen tissue homogenates, thaw the sample at 37°C until it is
completely thawed and all salts in the lysis buffer are dissolved. Do not extend the
treatment in 37°C because it can cause chemical degradation of RNA.
4
Tissue Homogenization Techniques
Efficient tissue sample disruption and homogenization is essential for successful total RNA
isolation. Cell wall and plasma membrane disruption is necessary for the release of RNA
from the sample and homogenization is necessary to reduce the viscosity of the lysates.
Homogenization shears genomic DNA and other high-molecular-weight cell components
creating a homogeneous lysate. Incomplete homogenization can cause the E-Z 96 RNA
Plate to clog resulting in low or no yield.
Liquid Nitrogen Method
1.
Wear appropriate gloves and take great care when working with liquid nitrogen.
2.
Excise tissue and promptly freeze in a small volume of liquid nitrogen.
3.
Grind tissue with a ceramic mortar and pestle under approximately 10 mL liquid
nitrogen.
4.
Pour the suspension into a pre-cooled 15 mL polypropylene tube.
Note: Unless the tube is pre-cooled in liquid nitrogen, the suspension will boil
vigorously and may cause loss of tissue.
5.
Allow the liquid nitrogen to completely evaporate and add RNA-Solv® Reagent.
6.
Proceed to one of the homogenization steps below.
Choose a homogenization step below:
1.
2.
Omega Homogenizer Plates (HCR9601-01 or HCR9601-02)
•
Load the lysate into a homogenizer plate placed on a 96-well deep-well
plate (not provided).
•
Centrifuge at maximum speed for 5 minutes. Save the filtrate and discard
the plate.
•
Proceed to Step 1 of the “Animal Tissue Protocol” on Page 15.
Syringe and Needle
•
Shear high-molecular-weight DNA by passing the lysate through a narrow
needle (19-21 gauge) 5-10 times. Save the lysate.
•
Proceed to Step 1 of the “Animal Tissue Protocol” on Page 15.
5
Tissue Homogenization Techniques
Rotor-Stator Homogenizer: Sample Disruption and Homogenization
Using a rotor-stator homogenizer for sample disruption and homogenization can
simultaneously disrupt and homogenize most samples. The process usually takes less
than a minute depending on sample type. Many rotor-stator homogenizers operate
with differently sized probes or generators that allow sample processing in 50 mL
tubes.
Bead Milling: Sample Disruption and Homogenization
By using bead milling, cells and tissue can be disrupted and homogenized by rapid
agitation in the presence of glass beads and a lysis buffer. The optimal size of glass
beads to use for RNA isolation are 0.5 mm for yeast/unicellular cells and 4-8 mm for
animal tissue samples.
6
Quantification of RNA
Quantification and Storage of RNA
To determine the concentration and purity of RNA, measure absorbance at 260 nm and
280 nm with a spectrophotometer. One OD unit measured at 260 nm corresponds to 40
μg/mL RNA. DEPC Water is slightly acidic and can dramatically lower absorbance values.
We suggest that you dilute the sample in a buffered solution (TE) for spectrophotometric
analysis. The A260/A280 ratio of pure nucleic acids is 2.0, while an A260/A280 ratio of 0.6
denotes pure protein. A ratio of 1.8-2.0 corresponds to 90%-100% pure nucleic acid.
Phenol has a maximum absorbance at 270 nm and can interfere with spectrophotometric
analysis of DNA or RNA. Store RNA samples at -70°C in water. Under these conditions, RNA
is stable for more than a year.
Integrity of RNA
It is highly recommended that RNA quality be determined prior to beginning all
downstream applications. The quality of RNA can be best assessed by denaturing agarose
gel electrophoresis with ethidium bromide staining. The ribosomal RNA bands should
appear as sharp, clear bands on the gel. The 28S band should appear to be double that
of the 18S RNA band (23S and 16S if using bacteria). If the ribosomal RNA bands in any
given lane are not sharp and appear to be smeared towards the smaller sized RNA, it is
very likely that the RNA undergone degradation during the isolation, handling, or storage
procedure. Although RNA molecules less than 200 bases in length do not efficiently bind
to the HiBind® matrix, a third RNA band, the tRNA band, may be visible when a large
number of cells are used.
7
Guideline for Vacuum Manifold
The following is required for use with the Vacuum Protocol:
A) Vacuum Manifold (We recommend Omega Bio-tek’s VAC-03)
Other Compatible Vacuum Manifolds: Qiagen QIAvac24, Sigma AldrichVM20, Promega Vacman®, or manifold with standard Luer connector
B) Vacuum Flask
C) Vacuum Tubing
D) Vacuum Source (review tables below for pressure settings)
Manifold
Recommended Pressure (mbar)
VAC-03
-200 to -400
Conversion from millibars:
Multiply by:
Millimeters of Mercury (mmHg)
0.75
Kilopascals (kPa)
0.1
Inches of Mercury (inchHg)
0.0295
Torrs (Torr)
0.75
Atmospheres (atmos)
0.000987
Pounds per Square Inch (psi)
0.0145
Illustrated Vacuum Setup:
Innovations in nucleic acid isolation
Omega Bio-tek’s VAC-03
C) Vacuum Tubing
D) Vacuum Source
A) Vacuum Manifold
B) Vacuum Flask
8
Preparing Reagents
•
•
Dilute RNA Wash Buffer II with 100% ethanol as follows and store at room
temperature.
Kit
100% Ethanol to be Added
R6935-00
140 mL
R6935-01
560 mL
R6935-02
640 mL per bottle
Add 20 μL 2-mercaptoethanol per 1 mL RNA-Solv® Reagent.
9
E-Z 96 Total RNA Kit II - Cultured Cells Protocol
E-Z 96 Total RNA Kit II Protocol - Cultured Cell Protocol
Materials and Equipment to be Supplied by User:
•
•
•
•
•
•
•
•
•
Centrifuge capable of 4,000 x g with 96-well plate adaptor
RNase-free pipet tips
Multichannel pipette
Disposable reservoirs
96-well deep-well plates (1 or 2 mL)
14.3M 2-mercaptoethanol (β-mercaptoethanol)
Chloroform
100% ethanol
70% ethanol in sterile DEPC-treated water
Before Starting:
•
Prepare RNA Wash Buffer II and RNA-Solv® Reagent according to the “Preparing
Reagents” section on Page 9.
1.
Determine the proper amount of starting material.
Note: It is critical to use the correct number of cells to obtain optimal yield and purity
with the E-Z 96 RNA Plate. The maximum amount of cells that can be processed
with the Total RNA Protocol is dependent on the cell line and its RNA content. The
maximum binding capacity for each well in the E-Z 96 RNA Plate is 100 μg. The
maximum number of the cells that RNA-Solv® Reagent can efficiently lyse is 1x10⁷.
Use the table on the following page as a guideline to select the correct amount of
starting material. If no information regarding your starting material is available, begin
with 1 x 10⁶ cells. Based on RNA yield and quality obtained from 1 x 10⁶ cells, the
starting amount can be adjusted for the next purification.
10
Average Yield of Total Cellular RNA
Source
Number of Cells
RNA Yield (μg)
IC21
1x10⁶
12
HeLa
1x10
15
293HEK
6
1x10
10
HIN3T3
1x10⁶
15
6
E-Z 96 Total RNA Kit II - Cultured Cells Protocol
2.
Harvest Cells:
Note: Incomplete removal of the cell-culture medium will inhibit lysis and dilute the
lysate. This will affect the conditions for binding of RNA to the E-Z 96 RNA Plate and
may reduce RNA yield.
A. For cells grown in suspension:
1. Count cells.
2. Transfer ~1 x 10⁶ cells (no more than 1 x 10⁷ cells) to a 15 mL centrifuge
tube.
3. Centrifuge at 500 x g for 5 minutes.
4. Aspirate and discard the media.
5. Continue to Step 3 on Page 12.
B.
For cells grown in a mono-layer:
Note: These cells can either be lysed directly in the cell culture dish or
trypsinized and collected as a cell pellet prior to lysis. Cells grown in cell culture
flasks should always be trypsinized.
•
For direct cell lysis:
1. Determine the number of cells.
2. Aspirate and discard the cell culture medium.
3. Immediately proceed to Step 3 on Page 12.
•
To trypsinize and collect cells:
1.
2.
Determine the number of cells.
Aspirate and discard the cell-culture medium and wash the cells with
PBS.
Note: Incomplete removal of the cell-culture medium will inhibit
trypsin. Multiple washes may be necessary for cells that are difficult to
detach.
3.
4.
5.
6.
7.
8.
9.
Add 0.1-0.25% Trypsin in a balanced salt solution.
Incubate for 3-5 minutes to allow cells to detach. Check cells for
detachment before proceeding to the next step.
Add an equal volume of cell-culture medium containing serum to
inactivate the trypsin.
Transfer cells to an RNase-free glass or polypropylene centrifuge tube
(not supplied).
Centrifuge at 500 x g for 5 minutes.
Aspirate the supernatant.
Proceed to Step 3 on Page 12.
11
E-Z 96 Total RNA Kit II - Cultured Cells Protocol
3.
Add 800 μL RNA-Solv® Reagent. Vortex or pipet up and down to mix thoroughly.
Important: RNA-Solv® Reagent must be mixed with 2-mercaptoethanol before use.
Please see Page 9 for instructions.
Note: For pelleted cells, loosen the cell pellet thoroughly by flicking the tube before
adding RNA-Solv® Reagent. To directly lyse the cells in the culture dish, add RNASolv® Reagent directly to the dish. Proceed to Step 4 below.
4.
Collect the cell lysates with a rubber policemen and transfer to a 96-well deep-well
plate (not provided).
5.
Let sit at room temperature for 5 minutes.
6.
Add 160 μL chloroform to each sample. Pipet up and down to mix thoroughly.
7.
Let sit at room temperature for 2-3 minutes.
8.
Seal the plate with Sealing Film.
9.
Centrifuge at 4,000 x g for 20 minutes at 4°C to separate the aqueous and organic
phase.
Note: The sample should separate into 3 phases: an upper colorless aqueous phase
which contains RNA, a white interphase, and a lower blue organic phase.
10. Transfer the upper aqueous phase (~350-400 μL) into a new 96-well deep-well plate.
11. Add 1 volume 70% ethanol to each well. Pipet up and down 20-30 to mix thoroughly.
A precipitate may form at this point. This will not interfere with the RNA purification.
12. Place an E-Z 96 RNA Plate on top of a 96-well Square-well Plate (supplied).
13. Transfer the samples to the E-Z 96 RNA Plate and seal the plate with AeraSeal Film.
12
E-Z 96 Total RNA Kit II - Cultured Cells Protocol
14. Centrifuge at 4,000 x g for 5 minutes at room temperature. Remove and discard the
AeraSeal Film.
15. Discard the filtrate and reuse the 96-well Square-well Plate.
Optional: This the starting point of the optional on-membrane DNase I Digestion
Protocol. Since the HiBind® matrix of the E-Z 96 RNA Plate eliminates most DNA, DNase I
digestion is not necessary for most downstream applications. However, certain sensitive
RNA applications may require further DNA removal. If an additional RNA removal step is
required, please continue to the DNase I Digestion Protocol found on Page 23. (See DNase
I Digestion Set, (E1091) for more information). If DNase I digestion is not required, proceed
to Step 16.
16. Add 600 μL RNA Wash Buffer I to each well of the E-Z 96 RNA Plate and seal the plate
with AeraSeal Film.
17. Centrifuge at 4,000 x g for 5 minutes at room temperature. Remove and discard the
AeraSeal Film.
18. Discard the filtrate and reuse the 96-well Square-well Plate.
19. Add 750 μL RNA Wash Buffer II to each well of the E-Z 96 RNA Plate and seal the plate
with AeraSeal Film.
Note: RNA Wash Buffer II must be diluted with ethanol before use. Please see Page 9
for instructions.
20. Centrifuge at 4,000 x g for 5 minutes at room temperature. Remove the AeraSeal Film.
21. Discard the filtrate and reuse the 96-well Square-well Plate.
22. Repeat Steps 19-21 for a second RNA Wash Buffer II wash step.
13
E-Z 96 Total RNA Kit II - Cultured Cells Protocol
23. Centrifuge at maximum speed for 20 minutes to completely dry the E-Z 96 RNA Plate
matrix.
Note: It is important to dry the E-Z 96 RNA Plate matrix before elution. Residual
ethanol may interfere with downstream applications.
24. Transfer the E-Z 96 RNA Plate to a 96-well Microplate (provided).
25. Add 40-70 μL DEPC Water to each well of the E-Z 96 RNA Plate.
Note: Make sure to add water directly onto the E-Z 96 RNA Plate matrix.
26. Let sit at room temperature for 1 minute.
27. Centrifuge at 4,000 x g for 3 minutes.
28. Repeat Steps 25-27 for a second elution step.
Note: Any combination of the following steps can be used to help increase RNA yield.
•
•
•
•
•
Preheat the DEPC Water to 70°C before adding to the column.
Increase the incubation time to 5 minutes.
Increase the elution volume.
Repeat the elution step with fresh DEPC Water (this may increase the yield, but
decrease the concentration).
Repeat the elution step using the eluate from the first elution (this may increase
yield while maintaining elution volume).
29. Store eluted RNA at -70°C.
14
E-Z 96 Total RNA Kit II - Animal Tissue Protocol
E-Z 96 Total RNA Kit II Protocol - Animal Tissue Protocol
Materials and Equipment to be Supplied by User:
•
•
•
•
•
•
•
•
•
•
Centrifuge capable of 4,000 x g with 96-well plate adaptor
RNase-free pipet tips
Multichannel pipette
Disposable reservoirs
96-well Deep-well Plates (1 or 2 mL)
14.3M 2-mercaptoethanol (β-mercaptoethanol)
Chloroform
100% ethanol
70% ethanol in sterile DEPC-treated water
Homogenization Equipment
•
Omega Homogenizer Plates (HCR9601)
•
Needle and syringe
•
Mortar and pestle
•
Glass beads
•
Rotor-stator homogenizer
Before Starting:
•
Prepare RNA Wash Buffer II and RNA-Solv® Reagent according to the “Preparing
Reagents” section on Page 9.
1.
Determine the proper amount of starting material.
Note: It is critical to use the correct number of cells to obtain optimal yield and purity
with the E-Z 96 RNA Plate. The maximum amount of tissue that can be processed
with the Total RNA Protocol is dependent on the type of tissue and its RNA content.
The maximum binding capacity for each well in the E-Z 96 RNA Plate is 100 μg. The
maximum amount of tissue that RNA-Solv® Reagent can efficiently lyse is 50 mg. For
liver or spleen, only 25 mg tissue should be used. Use the table on the following page
as a guideline to select the correct amount of starting material. If no information
regarding your starting material is available, begin with 10 mg tissue. Based on RNA
yield and quality obtained from 10 mg, the starting amount can be adjusted for the
next purification.
15
E-Z 96 Total RNA Kit II - Animal Tissue Protocol
2.
Average Yield of Total Cellular RNA
Mouse Tissue Sample
Amount of Tissue
(mg)
RNA Yield (μg)
Brain
10
7-20
Kidney
10
5-30
Liver
10
10-75
Heart
10
5-25
Spleen
10
15-80
Lung
10
5-45
Pancreas
10
15-80
Adipose Tissue
10
0.2-2
Homogenize and disrupt the tissue in 800 µL RNA-Solv® Reagent according to one of
the following methods described below. Do not let the sample to thaw before adding
the RNA-Solv® Reagent.
Important: RNA-Solv® Reagent must be mixed with 2-mercaptoethanol before use.
Please see Page 9 for instructions.
A. Rotor-Stator Homogenizer: Homogenize tissue with a rotor-stator homogenizer
until the sample is uniformly homogenized. See Page 6 for details.
B.
Liquid Nitrogen Method: See Page 5 for detailed protocol.
1.
Syringe and Needle: Shear high molecular-weight DNA by passing the
lysate through a narrow needle (19-21 gauge) 5-10 times.
2.
Omega Homogenizer Plate (HCR9601): Load the lysate into a homogenizer
plate placed on a 96-well deep-well plate (not provided). Centrifuge at
maximum speed for 5 minutes. Save the filtrate. Discard the plate.
Note: Incomplete homogenization of the sample may cause the column to
clog resulting in decreased yield. It is recommended to homogenize the tissue
samples with a rotor-stator homogenizer as this method normally produces
better yields.
3.
Let sit at room temperature for 5 minutes.
4.
Transfer the tissue lysates to a 96-well deep-well plate (not provided).
16
E-Z 96 Total RNA Kit II - Animal Tissue Protocol
5.
Add 160 μL chloroform. Vortex to mix thoroughly.
6.
Let sit at room temperature for 2-3 minutes.
7.
Seal the plate with Sealing Film.
8.
Centrifuge at ≥4,000 x g for 20 minutes at 4°C to separate the aqueous and organic
phase.
Note: The sample should separate into 3 phases: an upper colorless aqueous phase
which contains RNA, a white interphase, and a lower blue organic phase.
9.
Transfer the upper aqueous phase (~350-400 μL) into a new 96-well deep-well plate.
10. Add 1 volume 70% ethanol to each well. Pipet up and down 20-30 to mix thoroughly.
A precipitate may form at this point. This will not interfere with the RNA purification.
11. Place an E-Z 96 RNA Plate on top of a 96-well Square-well Plate (supplied).
12. Transfer the samples to the E-Z 96 RNA Plate and seal the plate with AeraSeal Film.
13. Centrifuge at 4,000 x g for 5 minutes at room temperature. Remove and discard the
AeraSeal Film.
14. Discard the filtrate and reuse the 96-well Square-well Plate.
Optional: This the starting point of the optional on-membrane DNase I Digestion
Protocol. Since the HiBind® matrix of the E-Z 96 RNA Plate eliminates most DNA, DNase I
digestion is not necessary for most downstream applications. However, certain sensitive
RNA applications may require further DNA removal. If an additional RNA removal step is
required, please continue to the DNase I Digestion Protocol found on Page 23. (See DNase
I Digestion Set, (E1091) for more information). If DNase I digestion is not required, proceed
to Step 15.
17
E-Z 96 Total RNA Kit II - Animal Tissue Protocol
15. Add 600 μL RNA Wash Buffer I to each well of the E-Z 96 RNA Plate and seal the plate
with AeraSeal Film.
16. Centrifuge at 4,000 x g for 5 minutes at room temperature. Remove and discard the
AeraSeal Film.
17. Discard the filtrate and reuse the 96-well Square-well Plate.
18. Add 750 μL RNA Wash Buffer II to each well of the E-Z 96 RNA Plate and seal the plate
with AeraSeal Film.
Note: RNA Wash Buffer II must be diluted with ethanol before use. Please see Page 9
for instructions.
19. Centrifuge at 4,000 x g for 5 minutes at room temperature. Remove the AeraSeal Film.
20. Discard the filtrate and reuse the 96-well Square-well Plate.
21. Repeat Steps 18-20 for a second RNA Wash Buffer II wash step.
22. Centrifuge at maximum speed for 20 minutes to completely dry the E-Z 96 RNA Plate
matrix.
Note: It is important to dry the E-Z 96 RNA Plate matrix before elution. Residual
ethanol may interfere with downstream applications.
23. Transfer the E-Z 96 RNA Plate to a 96-well Microplate (provided).
24. Add 40-70 μL DEPC Water to each well of the E-Z 96 RNA Plate.
Note: Make sure to add water directly onto the E-Z 96 RNA Plate matrix.
25. Let sit at room temperature for 1 minute.
18
E-Z 96 Total RNA Kit II - Animal Tissue Protocol
26. Centrifuge at 4,000 x g for 3 minutes.
27. Repeat Steps 24-26 for a second elution step.
Note: Any combination of the following steps can be used to help increase RNA yield.
•
•
•
•
•
Preheat the DEPC Water to 70°C before adding to the column.
Increase the incubation time to 5 minutes.
Increase the elution volume.
Repeat the elution step with fresh DEPC Water (this may increase the yield, but
decrease the concentration).
Repeat the elution step using the eluate from the first elution (this may increase
yield while maintaining elution volume).
28. Store eluted RNA at -70°C.
19
E-Z 96 Total RNA Kit II - Vacuum Protocol
E.Z.N.A.® Total RNA Kit I Protocol - Vacuum Method
All centrifugation steps used are performed at room temperature.
Materials and Equipment to be Supplied by User:
•
•
•
•
•
•
•
•
•
•
•
•
Vacuum Manifold
Vacuum Source
Centrifuge capable of 4,000 x g with 96-well plate adaptor
RNase-free pipet tips
Multichannel pipette
Disposable reservoirs
96-well Deep-well Plates (1 or 2 mL)
14.3M 2-mercaptoethanol (β-mercaptoethanol)
Chloroform
100% ethanol
70% ethanol in sterile DEPC-treated water
Homogenization Equipment for Animal Tissue Protocol
•
Omega Homogenizer Plates (HCR9601)
•
Needle and syringe
•
Mortar and pestle
•
Glass beads
•
Rotor-stator homogenizer
Before Starting:
•
•
Prepare RNA Wash Buffer II and RNA-Solv® Reagent according to the “Preparing
Reagents” section on Page 9.
Assemble vacuum manifold (see Page 8 for details)
Note: Please read through previous sections of this manual before proceeding with this
protocol. Steps 1-11 from the Cultured Cell Protocol should be completed or Steps 1-10
from the Animal Tissue Protocol should be completed before loading the sample to the
E-Z 96 RNA Plate. Instead of continuing with centrifugation, follow the steps below. Do not
use more than 1x10⁶ cells or 10 mg tissue for the vacuum protocol.
1.
Prepare the vacuum manifold according to manufacturer’s instructions.
2.
Connect the E-Z 96 RNA Plate to the vacuum manifold.
20
E-Z 96 Total RNA Kit II - Vacuum Protocol
3.
Transfer the samples from Step 11 (Cultured Cell Protocol) or Step 10 (Animal Tissue
Protocol) to the E-Z 96 RNA Plate.
4.
Switch on the vacuum source to draw the sample through the column.
5.
Turn off the vacuum.
6.
Add 500 μL RNA Wash Buffer I to the E-Z 96 RNA Plate.
7.
Switch on the vacuum source to draw the RNA Wash Buffer I through the column.
8.
Turn off the vacuum.
9.
Add 750 μL RNA Wash Buffer II to the E-Z 96 RNA Plate.
Note: RNA Wash Buffer II must be diluted with ethanol before use. Please see Page 8
for instructions.
10. Switch on the vacuum source to draw the RNA Wash Buffer I through the column.
11. Repeat Steps 8-10 for a second RNA Wash Buffer II wash step.
12. Continue to apply the vacuum for 15 minutes after all liquid has passed through the
E-Z 96 RNA Plate.
Note: It is important to dry the E-Z 96 RNA Plate matrix before elution. Residual
ethanol may interfere with downstream applications.
13. Transfer the E-Z 96 RNA Plate to a 96-well Microplate provided with this kit.
14. Add 40-70 μL DEPC Water to each well of the E-Z 96 RNA Plate.
Note: Make sure to add water directly onto the E-Z 96 RNA Plate matrix.
21
E-Z 96 Total RNA Kit II - Vacuum Protocol
15. Let sit at room temperature for 1 minute.
16. Centrifuge at 4,000 x g for 3 minutes.
17. Repeat Steps 23-25 for a second elution step.
Note: Any combination of the following steps can be used to help increase RNA yield.
•
•
•
•
•
Preheat the DEPC Water to 70°C before adding to the column.
Increase the incubation time to 5 minutes.
Increase the elution volume.
Repeat the elution step with fresh DEPC Water (this may increase the yield, but
decrease the concentration).
Repeat the elution step using the eluate from the first elution (this may increase
yield while maintaining elution volume).
18. Store eluted RNA at -70°C.
22
E-Z 96 Total RNA Kit II - DNase I Digestion Protocol
E.Z.N.A.® Total RNA Kit I - DNase I Digestion Protocol
Since the HiBind® matrix of the RNA Mini Column eliminates most DNA, DNase I digestion
is not necessary for most downstream applications. However, certain sensitive RNA
applications may require further DNA removal. (See DNase I Digestion Set, Cat# E1091 for
further information).
After completing Steps 1-15 of the Cell Cultured Protocol (Pages 10-13) or Steps 1-14 of
the Animal Tissue Protocol (Pages 15-17), proceed with the following protocol.
User Supplied Material:
•
DNase I Digestion Set (E1091)
1. For each E-Z 96 RNA Plate, prepare the DNase I stock solution as follows:
Buffer
Volume per Prep
E.Z.N.A.® DNase I Digestion Buffer
73.5 μL
RNase-free DNase I (20 Kunitz/µL)
1.5 μL
Total Volume
75 μL
Important Notes:
2.
•
DNase I is very sensitive and prone to physical denaturing. Do not vortex the
DNase I mixture. Mix gently by inverting the tube.
•
Freshly prepare DNase I stock solution right before RNA isolation.
•
Standard DNase buffers are not compatible with on-membrane DNase I
digestion. The use of other buffers may affect the binding of RNA to the HiBind®
matrix and may reduce RNA yields and purity.
•
All steps must be carried out at room temperature. Work quickly, but carefully.
Place the E-Z 96 RNA Plate containing the sample onto a 96-well Square-well Plate.
23
E-Z 96 Total RNA Kit II - DNase I Digestion Protocol
3.
Add 300 µL RNA Wash Buffer I to each well of the E-Z 96 RNA Plate.
4.
Let sit at room temperature for 2 minutes.
5.
Centrifuge at 4,000 x g for 3 minutes.
6.
Add 75 μL DNase I digestion mixture directly onto the surface of the membrane of
the E-Z 96 RNA Plate.
Note: Pipet the DNase I directly onto the membrane. DNA digestion will not be
complete if some of the mixture is retained on the wall of the E-Z 96 RNA Plate.
7.
Let sit at room temperature for 15 minutes.
8.
Add 300 µL RNA Wash Buffer I to each well of the E-Z 96 RNA Plate.
9.
Let sit at room temperature for 2 minutes.
10. Centrifuge at 4,000 x g for 3 minutes.
11. Discard the filtrate and reuse the 96-well Square-well Plate.
12. Add 750 μL RNA Wash Buffer II to each well of the E-Z 96 RNA Plate.
Note: RNA Wash Buffer II must be diluted with ethanol before use. Please see Page 8
for instructions.
13. Centrifuge at 4,000 x g for 3 minutes.
14. Discard the filtrate and reuse the 96-well Square-well Plate.
15. Repeat Steps 12-14 for a second RNA Wash Buffer II wash step.
24
E-Z 96 Total RNA Kit II - DNase I Digestion Protocol
16. Centrifuge at maximum speed for 20 minutes to completely dry the E-Z 96 RNA Plate
matrix.
Note: It is important to dry the E-Z 96 RNA Plate matrix before elution. Residual ethanol may interfere with downstream applications.
17. Transfer the E-Z 96 RNA Plate to a 96-well Microplate (provided).
18. Add 40-70 μL DEPC Water to each well of the E-Z 96 RNA Plate.
Note: Make sure to add water directly onto the E-Z 96 RNA Plate matrix.
19. Let sit at room temperature for 1 minute.
20. Centrifuge at 4,000 x g for 3 minutes.
21. Repeat Steps 18-20 for a second elution step.
Note: Any combination of the following steps can be used to help increase RNA yield.
•
•
•
•
•
Preheat the DEPC Water to 70°C before adding to the column.
Increase the incubation time to 5 minutes.
Increase the elution volume.
Repeat the elution step with fresh DEPC Water (this may increase the yield, but
decrease the concentration).
Repeat the elution step using the eluate from the first elution (this may increase
yield while maintaining elution volume).
22. Store eluted RNA at -70°C.
25
Troubleshooting Guide
Please use this guide to troubleshoot any problems that may arise. For further assistance,
please contact the technical support staff, toll free, at 1-800-832-8896.
Problem
Little or no
RNA eluted
Cause
RNA remains on the
column
Solution
•
•
•
Repeat elution
Preheat DEPC Water to 70°C prior to
elution
Incubate column for 10 minutes with
water prior to centrifugation.
Column is overloaded Reduce quantity of starting material.
Problem
Clogged
column
Problem
Cause
Solution
Incomplete
homogenization
•
•
•
Cause
Solution
•
Source
Degraded RNA
•
•
•
RNase contamination
•
Problem
Cause
Salt carry-over during
•
elution
•
Problem
Cause
DNA
contamination
Problem
26
RNA Wash Buffer II must be diluted with
100% ethanol as instructed on Page 9
RNA Wash Buffer II must be stored and
used at room temperature
Repeat wash with RNA Wash Buffer II
Digest with RNase-free DNase and
inactivate at 75°C for 5 minutes
Solution
•
RNA diluted in acidic
Low Abs ratios
buffer or water
Ensure not to introduce RNase during the
procedure
Check buffers for RNase contamination
Solution
•
Cause
Freeze starting material in liquid nitrogen
or store sample in RNA-Solv® Reagent
Do not store tissue culture cells prior to
extraction unless they are lysed first
Follow protocol closely and work quickly
Solution
•
Problem in
downstream
applications
Completely homogenize sample
Increase centrifugation time
Reduce amount of starting material
•
DEPC water is acidic and can dramatically
lower Abs260 values
Use TE buffer to dilute RNA prior to
spectrophotometric analysis
Ordering Information
The following components are available for purchase separately.
(Call Toll Free at 1-800-832-8896)
Product
Part Number
RNA Wash Buffer II, 25 mL
PR031
DEPC Water, 100 mL
PR032
Vacuum Manifold
VAC-03
Disposable Reservoirs, 100/pk
E-Z 96 Homogenizer Plates
AC1331-01
HCR9601
96-well Square-well Plate (2.2 mL)
EZ9602
96-well Microplate (500 µL)
EZ9604
HiBind®, E.Z.N.A.®, and MicroElute® are registered trademarks of Omega Bio-tek, Inc.
Qiagen®, QIAvac® and Vacman® are all trademarks of their respective companies.
PCR is a patented process of Hoffman-La Roche. Use of the PCR process requires a license.
27
Notes:
28