1
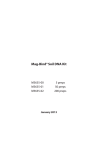
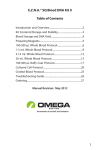
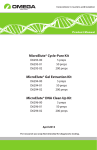
E-Z 96 Plant DNA Kit
D1086-01
D1086-02
D1086-03
1 x 96 preps
4 x 96 preps
20 x 96 preps
April 2013
E-Z 96 Plant DNA Kit
Table of Contents
Introduction....................................................................................2
Illustrated Protocols......................................................................3
Kit Contents / Storage and Stability.......................................4
Preparing Reagents / Cleaning Plates....................................5
Guidelines for Vacuum Manifold.............................................6
Disruption of Plant Tissues.........................................................8
E-Z 96 Plant DNA Centrifugation Protocol........................10
E-Z 96 Plant DNA Vacuum Protocol.....................................14
Troubleshooting Guide.............................................................19
Ordering.........................................................................................20
Manual Revision: April 2013
Innovations in nucleic acid isolation
1
Introduction
E-Z 96 Plant DNA Kit allows for the rapid and reliable isolation of high-quality total cellular
DNA from a wide variety of plant species and tissues in a 96-well plate format. E-Z 96 Plant
DNA Kit adapted the buffer system from Omega Bio-tek’s SP Plant DNA system which is
used to process a variety of plant types, particularly those with unusually high levels of
phenolic compounds or polysaccharides such as cotton, pine, and peanut samples. Up
to 50 mg wet tissue (or 12 mg dry tissue) can be processed in each well in less than one
hour. The system combines the reversible nucleic acid-binding properties of the HiBind®
matrix with the speed and versatility of the E-Z 96 DNA Plate to eliminate polysaccharides,
phenolic compounds, and enzyme inhibitors from plant tissue lysates. Purified DNA is
suitable for PCR, restriction digestion, and hybridization applications.
If using the E- Z 96 Plant DNA Kit for the first time, please read this booklet to become
familiar with the procedures. Dry or fresh plant tissue is disrupted and lysed in a specially
formulated buffer containing a proprietary detergent mixture. Proteins, polysaccharides,
and cellular debris are precipitated. Binding conditions are adjusted and the sample is
transferred to the E-Z 96 DNA Plate. Two rapid wash steps remove trace contaminants
such as residual polysaccharides and pure DNA is eluted in water or low ionic strength
buffer. Purified DNA can be used directly in downstream applications without the need
for further purification. Optional E-Z 96 Lysate Clearance Plates (Product No. FL96-01) are
available for use with this kit.
New In this Edition
•
•
2
Equilibration Buffer is no longer included with this kit. An optional Column
Equilibration Protocol has been added to the protocol for your convenience.
Equilibration Buffer is replaced with 3M NaOH provided by the user.
Centrifugation Protocol
Vacuum Protocol
Collect Plant Tissue
and Homogenize
Collect Plant Tissue
and Homogenize
Lyse and Precipitate
Polysaccharides
Lyse and Precipitate
Polysaccharides
Transfer Cleared
Lysate and Adjust
Binding Conditions
Transfer Cleared
Lysate and Adjust
Binding Conditions
Bind and Wash 2X
Bind and Wash 2X
Innovations in nucleic acid isolation
Vacuum
Dry Membrane
Dry Membrane
Innovations in nucleic acid isolation
Elute
Elute
3
Kit Contents
Product Number
D1086-01
D1086-02
D1086-03
E-Z 96 DNA Plate
1
4
20
96-well Round-well Plate (1.2 mL)
1
4
20
24 x 8
96 x 8
480 x 8
2
8
40
36 x 8
144 x 8
720 x 8
AeraSeal Film
4
16
80
96-well Square-well Plate (2.2 mL)*
1
2
10
SP1 Buffer
60 mL
240 mL
2 x 600 mL
SP2 Buffer
20 mL
80 mL
440 mL
SP3 Buffer
30 mL
100 mL
2 x 250 mL
SPW Wash Buffer
40 mL
160 mL
4 x 200 mL
Elution Buffer
50 mL
150 mL
800 mL
RNase A
450 μL
1.35 mL
6 mL
P
P
P
Caps for Round-well Plate
96-well Racked Microtubes (1.2 mL)
Caps for Racked Microtubes
User Manual
* 96-well Square-well Plates (2.2 mL) are reusable; see Page 5 for cleaning instructions.
Storage and Stability
All components of the E-Z 96 Plant DNA Kit are guaranteed for at least 12 months from
date of purchase when stored as follows. Store RNase A at 2-8° C. All other components
should be stored at room temperature. During shipment or storage in cool ambient
conditions, precipitates may form in SP1 Buffer and SP3 Buffer. Dissolve such deposits by
warming the solution at 37°C and gently shaking.
4
Preparing Reagents
•
•
•
Dilute SP3 Buffer with 100% ethanol as follows and store at room temperature.
Kit
100% Ethanol to be Added
D1086-01
60 mL
D1086-02
200 mL
D1086-03
500 mL per bottle
Dilute SPW Wash Buffer with 100% ethanol as follows and store at room temperature.
Kit
100% Ethanol to be Added
D1086-01
160 mL
D1086-02
640 mL
D1086-03
800 mL per bottle
Prepare SP1 Buffer: Add 2 μL RNase A per 400 μL SP1 Buffer
Cleaning Instructions for 96-well Square-well Plates
96-well Square-well Plates can be used to collect filtrate from the E-Z 96 DNA Plate. They
are designed for repeated use. Wash the plates thoroughly in tap water after each use. Let
sit for 5 minutes at room temperature in 0.5M HCl. Rinse with distilled water. Used plates
can also be autoclaved after washing.
5
Guidelines for Vacuum Manifold
The following is required for use with the Vacuum Protocol:
A) Vacuum Manifold (We recommend Omega Bio-tek’s VAC-03)
Other Compatible Vacuum Manifolds: Qiagen QIAvac24, Sigma AldrichVM20, Promega Vacman®, or manifold with standard Luer connector
B) Vacuum Flask
C) Vacuum Tubing
D) Vacuum Source (review tables below for pressure settings)
Manifold
Recommended Pressure (mbar)
VAC-03
-200 to -400
Conversion from millibars:
Multiply by:
Millimeters of Mercury (mmHg)
0.75
Kilopascals (kPa)
0.1
Inches of Mercury (inchHg)
0.0295
Torrs (Torr)
0.75
Atmospheres (atmos)
0.000987
Pounds per Square Inch (psi)
0.0145
Illustrated Vacuum Setup
Innovations in nucleic acid isolation
Omega Bio-tek’s VAC-03
C) Vacuum Tubing
D) Vacuum Source
A) Vacuum Manifold
B) Vacuum Flask
6
Guidelines for Vacuum Manifold
DNA Bind and Wash Setup
E-Z 96 DNA Plate
Vacuum Manifold Top
Innovations in nucleic acid isolation
Waste Collection
Vacuum Manifold Base
Standard Elution Setup
Optional Elution Setup
E-Z 96 DNA Plate
E-Z 96 DNA Plate
Vacuum Manifold Top
Innovations in nucleic acid isolation
Vacuum Manifold Top
Innovations in nucleic acid isolation
Racked Microtubes
Microplate (300 µL)
Vacuum Manifold
Base
Microplate (300 µL)
Racked Microtubes
Vacuum Manifold
Base
7
Disruption of Plant Tissues
1.
Grind samples with pestle
A) Dry Specimens
Drying allows storage of field specimens for prolonged periods of time prior
to processing. Samples can be dried overnight in a 45°C oven, powdered, and
stored dry at room temperature. To prepare dried samples, place ~15 mg of
dried tissues into a microcentrifuge tube (1.5 mL tubes are recommended) and
grind using a pellet pestle. Disposable Kontes pestles work well and are available
from Omega Bio-tek (Cat# SSI-1014-39 & SSI-1015-39). For critical work such
as PCR and cloning, pestles are best used a single time then soaked in a dilute
bleach solution immediately after use until clean. Disposable pestles may be
autoclaved several times. A fine powder will ensure optimal DNA extraction and
yield.
B) Fresh/Frozen Specimens
Due to the tremendous variation in water and polysaccharide content of plants,
sample size should be limited to ~50 mg for first time users. It is very important
to not overload the E-Z 96 DNA Plate. Too much starting material will decrease
the yield and purity due to inefficient lysis. However, for some plant species,
increasing the starting material can increase DNA yield. We recommend starting
with 50 mg tissue. If results obtained are satisfactory, then increase amount of
starting material. Best results are obtained with young leaves or needles.
Although various means of sample disruption can be used for this kit, such as
beads or pestles, we recommend grinding the sample in liquid nitrogen. To
prepare samples, collect tissue in a 1.5 mL or 2 mL microcentrifuge tube and
dip the tube in liquid nitrogen with a pair of tweezers to fill the tube. Grind the
tissue using disposable Kontes pellet pestles, which are available from OBI (Cat#
SSI-1015-39). Alternatively, allow the liquid nitrogen to evaporate and store the
samples at -70°C for later use. For critical work such as PCR and cloning, pestles
are best used a single time then soaked in a dilute bleach solution immediately
after use until clean. Disposable pestles may be autoclaved several times. For
standard Southern analysis, the same pestle can be reused several times to grind
multiple tissue samples by rinsing with ethanol and carefully wiping the surfaces
clean between samples. Transfer the ground sample into a 96-well racked
microtubes or 96-well deep-well plate.
Note: Do not allow the sample to thaw during handling and weighing. To
prevent the sample from thawing, keep the rack or plate on a bed of dry ice.
8
Disruption of Plant Tissues
2.
Disrupt Samples With Commercial Homogenizers
Fresh, frozen, and dried plant tissue can be effectively disrupted and homogenized
by rapid agitation in the presence of beads.
For Fresh, Frozen and Lyophilized/Dried Tissue
1.
Add one 3-4 mm stainless steel bead to each well of a 96-well round-well plate.
2.
Close the individual tubes with Cap Strips.
3.
Freeze the sample in liquid nitrogen.
Note: Lyophilized/Dried samples do not require freezing with liquid nitrogen.
4.
Place the racks or plates into the clamps of the homogenizer.
5.
Homogenize for 60-90 seconds at 30 Hz. Tissue samples are disrupted and
simultaneously homogenized with the shearing and crushing action of the
beads. Refer to manufacturer’s protocol regarding use of liquid nitrogen with the
homogenizer.
9
E-Z 96 Plant DNA Kit Protocols
E-Z 96 Plant DNA Kit Protocol - Centrifugation Protocol
Materials and Equipment to be Supplied by User:
•
•
•
•
•
•
•
•
Centrifuge equipped with swing-bucket rotor capable of at least 3,000 x g
Water baths, ovens, or incubators capable of 80°C
Vortexer
100% ethanol
Liquid nitrogen for freezing/disrupting samples (for fresh/frozen specimens)
Equipment for disrupting plant tissue
Ice, freezer, or 96-well cryorack at -20°C
Optional: 3M NaOH
Before Starting:
•
•
•
Prepare SP1 Buffer, SP3 Buffer, and SPW Wash Buffer according to Preparing Reagents
section on Page 5
Set a water bath, oven, or incubator to 65°C
Heat SP1 Buffer and Elution Buffer to 65°C (SP1 Buffer should be equilibrated to 80°C
if liquid nitrogen is used for sample disruption)
1.
Homogenize plant tissue following one of the methods described in the Disruption
of Plant Tissue section on Pages 8-9.
2.
Transfer up to 15 mg dry powdered tissue or 50 mg fresh (or frozen) tissue to a 96well Round-well Plate (provided).
Note: No more than 50 mg (wet weight) or 15 mg (dry weight) starting material is
recommended. More or less can be used depending on results. Water content (and
buffer absorption) of samples affect optimal starting amounts.
3.
Add 400 μL SP1 Buffer to each sample. Seal the wells with Caps for Round-well Plate
(provided). Vortex to mix thoroughly.
Note: SP1 Buffer must be mixed with RNase A before use. Please see the Preparing
Reagents section on Page 5 for instructions. Ensure that all the samples are
completely suspended and that there are no clumps in the solution. Clumps will
result in low yields.
10
E-Z 96 Plant DNA Kit Protocols
4.
Incubate at 65°C for 10 minutes. Mix samples twice during incubation by briefly
shaking the plate side to side.
5.
Centrifuge briefly to collect any drops of liquid from the caps. Do not prolong this
step.
6.
Remove and discard the caps.
7.
Add 140 μL SP2 Buffer to each lysate.
8.
Seal the wells with new Caps for Round-well Plate. Vortex at maximum speed or
shake the plate side to side vigorously for 20 seconds.
9.
Centrifuge briefly to collect any drops of liquid from the caps. Do not prolong this
step.
Note: Do not prolong this step. The brief centrifugation prevents the precipitates
from freezing to the caps making it difficult to open the caps after incubation at -20°C
in next step.
10. Incubate at -20°C for 10 minutes.
11. Centrifuge at 3,000-6,000 x g for 10 minutes.
Note: Optional E-Z 96 Lysate Clearance Plates (Cat# FL9601) are available for use
with this kit at this step. Briefly, place an E-Z 96 Lysate Clearance Plate on top of the
96-well Racked Microtubes (provided). Transfer the desired volume of supernatant
following the -20°C incubation in Step 10 to the E-Z 96 Lysate Clearance Plate.
Centrifuge at 3,000-5,000 x g for 5 minutes. Proceed to Step 13.
12. Remove and discard the caps.
13. Transfer 400 μL supernatant to the 96-well Racked Microtubes. If less than 400 µL
supernatant is recovered, adjust the volume of SP3 Buffer in Step 14.
11
E-Z 96 Plant DNA Kit Protocols
14. Add 1.5 volumes SP3 Buffer. A precipitate may form at this point; it will not interfere
with DNA isolation.
Note: For example, if 400 μL lysate was transferred, add 600 μL SP3 Buffer.
15. Seal the microtubes with Caps for Racked Microtubes (provided). Vortex at maximum
speed or shake the plate side to side vigorously for 20 seconds.
16. Centrifuge briefly to collect any drops of liquid from the caps. Do not prolong this
step.
17. Place the E-Z 96 DNA Plate on to a 96-well Square-well Plate (provided).
Optional Protocol for Plate Equilibration:
1.
2.
3.
4.
Add 150 µL 3M NaOH to each well.
Let sit at room temperature for 4 minutes.
Centrifuge at 3,000-5,000 x g for 2 minutes.
Discard the filtrate and reuse the 96-well Square-well Plate.
18. Carefully transfer 1 mL sample to the E-Z 96 DNA Plate. Be careful not to spill sample
liquid onto the rims of the wells during the transfer.
19. Seal the E-Z 96 DNA Plate with AeraSeal Film (provided).
20. Centrifuge at 3,000-5,000 x g for 5 minutes or until all the sample has passed through
the HiBind® membrane.
21. Discard the filtrate and reuse the 96-well Square-well Plate.
22. Remove the AeraSeal Film.
23. Add 800 μL SPW Wash Buffer to each well of the E-Z 96 DNA Plate. Seal the plate with
new AeraSeal Film.
12
Note: SPW Wash Buffer must be diluted with 100% ethanol prior to use. Please see
Page 5 for instructions.
E-Z 96 Plant DNA Kit Protocols
24. Centrifuge at 3,000-5,000 x g for 5 minutes.
25. Discard the filtrate and reuse the 96-well Square-well Plate.
26. Repeat Steps 23-25 for a second SPW Wash Buffer wash step.
27. Centrifuge at 3,000-5,000 x g for 15 minutes to dry the plate.
Note: It is important to dry the plate membrane before elution. Residual ethanol may
interfere with downstream applications.
28. Remove the AeraSeal Film.
29. Transfer the E-Z 96 DNA Plate to new 96-well Racked Microtubes (provided) or a 96well microplate (not provided).
30. Add 100 μL Elution Buffer heated at 65°C to each well. Seal the plate with new
AeraSeal Film.
31. Incubate at 65°C for 5 minutes.
32. Centrifuge at 5,000 x g for 5 minutes.
33. Repeat Steps 30-32 for a second elution step.
Note: To maintain higher DNA concentration, second elution may be performed
with first eluate.
34. Seal the 96-well Racked Microtubes with Caps for Racked Microtubes.
35. Store DNA at -20°C.
13
E-Z 96 Plant DNA Kit Protocols
E-Z 96 Plant DNA Kit - Vacuum Protocol
The following protocol is based on using Omega Bio-tek’s vacuum manifold (Cat# VAC-03).
Materials and Equipment to be Supplied by User:
•
•
•
•
•
•
•
•
•
•
Vacuum manifold and vacuum source
Centrifuge equipped with swing-bucket rotor capable of at least 3,000 x g
Water bath, oven, or incubator capable of 80°C
Vortexer
100% ethanol
Liquid nitrogen for freezing/disrupting samples (For Fresh/Frozen Specimens)
Equipment for disrupting plant tissue
Ice, freezer, or 96-well cryorack at -20°C
Sealing film
Optional: 3M NaOH
Before Starting:
•
•
•
Prepare SP1 Buffer, SP3 Buffer, and SPW Wash Buffer according to Preparing Reagents
section on Page 5
Set a water bath, oven, or incubator to 65°C
Heat SP1 Buffer and Elution Buffer to 65°C (SP1 Buffer should be equilibrated to 80°C
if liquid nitrogen is used for sample disruption)
1.
Homogenize plant tissue following one of the methods described in the Disruption
of Plant Tissue section on Pages 8-9.
2.
Transfer up to 15 mg dry powdered tissue or 50 mg fresh (or frozen) tissue to a 96well Round-well Plate (provided).
Note: No more than 50 mg (wet weight) or 15 mg (dry weight) starting material is
recommended. More or less can be used depending on results. Water content (and
buffer absorption) of samples affect optimal starting amounts.
14
E-Z 96 Plant DNA Kit Protocols
3.
Add 400 μL SP1 Buffer to each sample. Seal the wells with Caps for Round-well Plate
(provided). Vortex to mix thoroughly.
Note: SP1 Buffer must be mixed with RNase A before use. Please see the Preparing
Reagents section on Page 5 for instructions. Ensure that all the samples are
completely suspended and that there are no clumps in the solution. Clumps will
result in low yields.
4.
Incubate at 65°C for 10 minutes. Mix samples twice during incubation by briefly
shaking the plate side to side.
5.
Centrifuge briefly to collect any drops of liquid from the caps. Do not prolong this
step.
6.
Remove and discard the caps.
7.
Add 140 μL SP2 Buffer to each lysate.
8.
Seal the wells with new Caps for Round-well Plate. Vortex at maximum speed or
shake the plate side to side vigorously for 20 seconds.
9.
Centrifuge briefly to collect any drops of liquid from the caps. Do not prolong this
step.
Note: Do not prolong this step. The brief centrifugation prevents the precipitates
from freezing to the caps making it difficult to open the caps after incubation at -20°C
in next step.
10. Incubate at -20°C for 10 minutes.
11. Centrifuge at 3,000-6,000 x g for 10 minutes.
Note: Optional E-Z 96 Lysate Clearance Plates (Cat# FL9601) are available for use
with this kit at this step. Briefly, place an E-Z 96 Lysate Clearance Plate on top of the
96-well Racked Microtubes (provided). Transfer the desired volume of supernatant
following the -20°C incubation in Step 10 to the E-Z 96 Lysate Clearance Plate.
Centrifuge at 3,000-5,000 x g for 5 minutes. Proceed to Step 13.
15
E-Z 96 Plant DNA Kit Protocols
12. Remove and discard the caps.
13. Transfer 400 μL supernatant to the 96-well Racked Microtubes. If less than 400 µL
supernatant is recovered, adjust the volume of SP3 Buffer in Step 14.
14. Add 1.5 volumes SP3 Buffer. A precipitate may form at this point; it will not interfere
with DNA isolation.
Note: For example, if 400 μL lysate was transferred, add 600 μL SP3 Buffer.
15. Prepare the vacuum manifold according to manufacturer’s instructions.
16. Place an E-Z 96 DNA Plate on the top part of the vacuum manifold. Place the waste
collection tray inside the base of the manifold. Seal any unused wells with sealing
film (not provided).
Optional Protocol for Plate Equilibration:
1.
2.
3.
4.
Add 150 µL 3M NaOH to each well.
Let sit at room temperature for 4 minutes.
Turn on the vacuum source to draw the NaOH through the column.
Turn off the vacuum.
17. Transfer 1 mL sample (including any precipitate that may have formed) from Step 14
to the E-Z 96 DNA Plate.
18. Turn on the vacuum source to draw the sample through the plate.
19. Turn off the vacuum.
20. Repeat Steps 17-19 until all the sample has been transferred to the E-Z 96 DNA Plate.
16
E-Z 96 Plant DNA Kit Protocols
21. Add 800 µL SPW Wash Buffer to each well.
Note: SPW Wash Buffer must be diluted with 100% ethanol prior to use. Please see
Page 5 for instructions.
22. Turn on the vacuum source to draw the SPW Wash Buffer through the plate.
23. Turn off the vacuum.
24. Repeat Steps 21-23 for a second SPW Wash Buffer wash step.
25. Add 400 µL 100% ethanol to each well.
26. Turn on the vacuum source to draw the ethanol through the plate.
27. Turn off the vacuum.
28. Continue to apply the vacuum for 10 minutes after all liquid has passed through the
E-Z 96 DNA Plate.
29. Turn off the vacuum.
30. Discard the filtrate and collection plate.
31. Place the E-Z 96 DNA Plate upside down on a stack of paper towels and tap several
times to remove any residual ethanol.
Note: It is very important to completely dry the E-Z 96 DNA Plate before elution. If a
swing bucket centrifuge with a 96-well plate adaptor is available, centrifuge at 5,000
x g for 5 minutes to dry the plate. Or if an oven/incubator is available, dry the plate at
70°C for 10 minutes.
32. Place the 96-well Racked Microtubes inside the base of the manifold.
17
E-Z 96 Plant DNA Kit Protocols
33. Place the E-Z 96 DNA Plate on top of the manifold.
34. Add 100 µL Elution Buffer heated to 65°C to each well.
35. Let sit at room temperature for 5 minutes.
36. Turn on the vacuum source to draw the Elution Buffer through the plate.
37. Turn off the vacuum.
Optional: Repeat Steps 34-37 for a second elution step.
Note: 100 µL Elution Buffer is sufficient to elute up to 85% of the DNA from each well
of the E-Z 96 DNA Plate. A second elution step with same 100 µL elute containing
DNA, reheated to 65°C, will increase yield by up to 10-15%. Total DNA yields vary
depending on type and quantity of sample.
38. Seal the 96-well Racked Microtubes with Caps for Racked Microtubes (provided).
39. Store DNA at -20°C.
18
Troubleshooting Guide
Please use this guide to troubleshoot any problems that may arise. For further assistance,
please contact the technical support staff, toll free, at 1-800-832-8896.
Possible Problems and Suggestions
Problem
Clogged well
Cause
Solution
Debris carryover
Following precipitation with SP2 Buffer,
make sure no particulate material is
transferred.
Sample too viscous
Do not exceed suggested amount of
starting material.
Incomplete precipitation
Increase RCF or time of centrifugation
following addition of SP2
after addition of SP2 Buffer.
Buffer
Problem
Cause
Solution
Incomplete disruption of
Completely homogenize sample.
starting material
Low DNA yield
Problem
Problems in
downstream
applications
Poor lysis of tissue
Decrease the amount of starting material
or increase the amount of SP1 Buffer and
SP2 Buffer.
DNA remains bound to
column
Increase elution volume to 200 µL and
incubate the plate at 65°C for 5 minutes
before centrifugation.
DNA washed off
Dilute SPW Wash Buffer by adding
appropriate volume of 100% ethanol
prior to use (Page 5).
Cause
Solution
Salt carryover
Repeat wash step with SPW Wash Buffer.
Ethanol carryover
Following the second wash spin, ensure
that the plate is completely dried before
elution.
19
Ordering Information
The following components are available for purchase separately.
(Call Toll free at 1-800-832-8896)
Product
Part Number
SP1 Buffer (250 mL)
PD072
SP2 Buffer (60 mL)
PD073
SP3 Buffer (100 mL)
PD074
Elution Buffer (100 mL)
PDR048
SPW Wash Buffer (25 mL)
PDR045
RNase A (400 µL)
AC117
Sealing Film
AC1200
AeraSeal Film
AC1201
96-well Square-well Plate (2.2 mL)
EZ9602
96-well Round-well Plate (1.2 mL)
SSI-1780
RNase A (400 µL)
E-Z 96 Homogenizer Plates (4 x 96)
AC117
HCR9601-02
E-Z 96 Lysate Clearance Plates (10 x 96)
FL9601
Vacuum Manifold
VAC-03
HiBind®, E.Z.N.A.®, and MicroElute® are registered trademarks of Omega Bio-tek, Inc.
Qiagen®, QIAvac® and Vacman® are all trademarks of their respected companies.
PCR is a patented process of Hoffman-La Roche. Use of the PCR process requires a license.
20