1
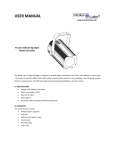
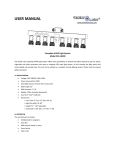
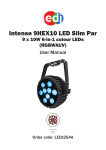
USER MANUAL
www.mcmelectronics.com
DMX PAR64 Lamp DMX LED
Model 555-16220
The Stellar Labs DMX LED Par64 lamp offers many possibilities to achieve the effects which you want. It is for DJs, bands,
nightclubs and other performers who want a complete LED wash light system. Please read the manual before operation.
A. SPECIFICATIONS
1.
Power consumption:32W
2.
Voltage: AC 110V/240V, 50Hz/60Hz
3.
LED’s: Red: 30, Green: 48, Blue: 54, Amber: 45
4.
Modes: DMX512 control, Master/Slave, Auto Run, Built-In Program, Sound Activated, Static Color
5.
Beam angle: 30°
6.
DMX channels: 1 / 4 / 5 / 7
7.
Weight: 3.5 lbs
8.
Size: 11.4” x 11.8” x 4.1”
B. OPERATION
This product provides six different modes of operation, making is suitable for use in simple stand-alone environments,
as well as sophisticated DMX controlled systems.
•
built-in programs
•
auto running
•
DMX mode (DMX control or master control of other lamps)
•
slave mode (DMX control or control from another lamp)
•
sound active
•
static color
1.
Built-in Program Mode
Press the “MODE” button multiple times until the display shows Pr.01
Press the “UP” or “DOWN” buttons to select from the ten available programs: Pr.01 through Pr.10.
Each of these preset programs offers a variety of color patterns with hard and fade changes, as well as fixed colors.
While in this mode, press the “SETUP” button, the display will read a speed setting between SP.01 and SP.99, with SP.FL
being the equivalent of 100.
Using the “UP” or “DOWN” button, you can adjust the speed from the slowest to fastest
rate.
Press the “SETUP” again and the display will show strobe speed between F500 and F599. Pressing the “UP” or “DOWN”
button will allow setting of the strobe speed.
2.
Auto Run Mode
Press the “MODE”, button multiple times until the display reads
, for Auto Mode. In this mode, the fixture will
automatically cycle through its ten built-in programs. Using the same method as above, the user can set their running
speed, strobe speed in auto running speed, the preset effect will operate in turn in auto running mode.
Note that when the unit is in Built-in Program Mode, or Auto Run Mode, it will also act as a DMX master controller.
Any matching units connected in sequence to this unit will mimic this units operation.
3.
DMX Mode
Press the “MODE” button multiple times until d.001 appears, to enter the DMX mode menu.
Press the “UP” or “DOWN” button to set the starting DMX address, from d.001 to d.512.
Press the “SETUP” button to select the DMX working mode.
Press the “UP” or “DOWN” buttons to select 1CH, 4CH, 5CH or 7CH DMX mode.
DMX channel assignment
One-Channel mode
CH1
NO.
DMX value
FUNCTION
1
0
No use
2
1-22
Red
3
23-45
Green
4
46-68
Blue
5
69-91
Amber
6
92-114
Cyan
7
115-137
Yellow
8
138-160
Orange
9
161-183
Pink
10
184-206
Purple
11
207-229
Dark blue
12
230-252
Light green
13
253-255
White
DMX channel assignment
Four-Channel mode
CHANNEL
VALUE
FUNCTION
CH1
0-255
RED
CH2
0-255
GREEN
CH3
0-255
BLUE
CH4
0-255
AMBER
CHANNEL
VALUE
FUNCTION
CH1
0-255
MASTER DIMMER
CH2
0-255
RED
CH3
0-255
GREEN
CH4
0-255
BLUE
CH5
0-255
AMBER
DMX channel assignment
Five-Channel mode
DMX channel assignment
Seven-Channel mode
CHANNEL
VALUE
FUNCTION
CH1
0-255
Master dimming
Red dimming
CH2
0-255
Red dimming0-255
0-8
R(255)
9-17
R(255) G(50)A(10)
18-26
R(255) G(150) A(50)
27-35
R(255) G(255)
36-44
R(200) G(255)
45-53
R(100) G(255)A(20)
54-62
R(40) G(255)
63-71
G(255)
Different static
72-80
G(255) B(50)
color optional
81-89
G(255) B(150)
(when CH6 0-24 is
90-98
G(255) B(255)
available)
99-107
G(150) B(255)
108-116
G(50) B(255)
117-125
B(255)A(20)
126-134
R(50) B(255)
135-143
R(150) B(250)
144-152
R(255) B(255)
153-161
R(220) B(50)
162-170
R(150) G(50) B(100)
171-179
R(50) G(180) B(220)
180-188
R(50) G(220) B(100)
189-197
R(150) G(220)
198-206
R(150) B(220)
207-215
G(180) B(220)
216-224
G(220) B(50)
225-233
R(220) G(100) B(50) A(50)
234-242
R(220) G(200) B(100) A(100)
243-251
R(255) G(200) B(150) A(150)
252-255
R(255) G(255) B(255) A(255)
Speed
adjustment(control
CH6(22-241)
0-255
0—255 slow—fast
When CH6 in the
range of
250-255,the
0-255
sound active
Sound active sensitivity adjustment
sensitivity could be
changed
CH3
0-255
Green dimming 0-255
CH4
0-255
Blue dimming 0-255
CH5
0-255
Amber dimming0-255
CH6
CH7
4.
0-9
10-255
N0 FUNCTION
STROBE (slow—fast)
0-21
To choose 29 static colors through CH2
22-43
Pr01(22 colors gradual change)
44-65
Pr02(4 colors gradual change)
66-87
Pr03(11 colors step change)
88-109
Pr04(4 colors step change)
110-131
Pr05(fantasy 1)
132-153
Pr06(fantasy 2)
154-175
Pr07(red gradual change)
176-197
Pr08(green gradual change)
198-219
Pr09(blue gradual change)
220-241
Pr10(amber gradual change)
242-255
Sound active
Master/slave Mode
Press the “MODE” button multiple times until
another light or from the DMX controller.
appears, this unit is now ready to accept commands from
5.
Sound-Active Mode
Press the “MODE” button multiple times until SU.00 through SU.31 appears. This is the Sound Activated mode.
Press the “UP” or “DOWN”, the user can set the sound active sensitivity, higher number increases the sensitivity.
6.
Static Color Mode
Press the “MODE” button multiple times until
appears.
This is the static color mode. In this mode, you can
individually set each red, green, blue and amber light brightness to achieve virtually any desired color.
Each time you press the Press the “SETUP” button, you will see R, G, B or A, with a number from 0 to 255. This allows
you to set the brightness of each red, green, blue and amber color from OFF (0) to full brightness (255).
of each of these four colors is set, press the SETUP button again until
Once the level
appears, this will display the resulting
blend of the four colors.
7.
Connections
POWER
On the right side of the rear panel, locate the POWER IN and POWER OUT sockets. POWER IN is for connection of the
supplied AC power cord. This unit will operate on voltages between 100~240VAC, 50Hz or 60Hz, meaning it will work
anywhere in the world. The supplied power cord is for use in North America.
The POWER OUT socket is provided to allow connection of a string of DMX lamps from single power cord. Up to 15
lamps can be in a single chain
DMX Control
DMX input and output connections are made via industry standard 3-Pin XLR connectors. The cable required to properly
carry these signals is single pair, 110ohm DMX cable. While microphone or standard audio cables may function, they
may allow interference and can cause erratic operation. It is strongly recommended that only cable specified for DMX
use be utilized.
If using a DMX controller, the controller will connect to the DMX IN on the first lamp. Run your DMX cable from the DMX
OUT of that lamp, tot the DMX in of the second lamp, from the DMX OUT of the second lamp, to the DMX IN of the
third, and so on.
Up to 32 lamps may be connected together in a single chain.
In any DMX Chain, even if only one lamp is used, a DMX terminator should be connected to the DMX OUT of the last
lamp.
NOTE:
The display board will shut display if four buttons are not pressed in 20 seconds. If any buttons are pressed under this
condition, display will go back to the condition before it is shut down, then each button will regain its original function.
When first powering the lamp, system version code will be displayed for approximately two seconds.
8.
Warranty
This Stellar Labs device is warranted, by MCM Electronics against defects for a period of 365 days from the date of
purchase. This warranty includes manufacture defects and failure due to normal use and operation. Failure due to
misuse, excessive wear or damage, improper installation or other external factors is not covered under this warranty.
MCM Electronics is not responsible for any consequential on inconsequential damage to any other unit or component
incorporated with this device. There are no other warranties, express or implied, which extend beyond this unit, and
there are no warranties of fitness for any particular purpose.
The warranty does not cover consequential damage due
to defective or improper use of products.
Distributed Exclusively by
MCM Electronics
650 Congress Park Drive
Centerville, Ohio 45459
www.mcmelectronics.com