1
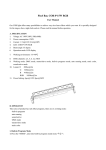
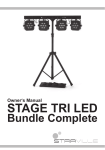
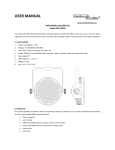
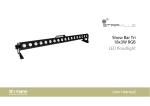
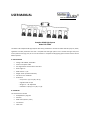
USER MANUAL
www.mcmelectronics.com
Complete 8-PAR Light System
Model 555-16200
The Stellar Labs Complete 8-PAR Light System offers many possibilities to achieve the effects desired by top DJs, bands,
nightclubs and other performers who want a complete LED wash light system. As this includes the light stand, foot
control pedal and carrying case, this unit can be utilized as a complete turnkey lighting system. Please read the manual
before operation.
A. SPECIFICATIONS
•
Voltage: 100~240VAC, 50Hz~60Hz
•
Power consumption: 90W
•
LED: Eight fixtures of three 3W tri-color LED’s
•
Beam angle: 25°
•
DMX channels: 7 / 26
•
Weight: 20 lbx. (includes footswitch)
•
Size: 90.2* 25.4* 6.938 CM
•
Dimensions:
o Carry Case: 5” (H) x 12” (W) x 38” (L)
o Light Bar width: 35-1/2”
o Height: 51” ~ 90” Adjustable
o Footswitch: 2-1/2” (H) x 17” (W) x 7” (D)
B. OPERATION
This unit features six modes:
•
Multiple Built-in programs
•
Auto Run
•
DMX control (master / slave)
•
Sound active
•
Static color
C. PROGRAM MENU
•
Press MODE to choose the desired operating mode. Repeatedly pressing the MODE button will scroll through
•
Once in a desired mode, press SETUP to make changes, using the UP or DOWN buttons
the various modes: DMX Channel, Slave, Sound Activated, Static Color, Preprogrammed, and Automatic
Built-in Program Mode
•
Press the MODE button multiple times until Prxx is displayed (default is Pr01)
•
There are 22 available programs, each with a unique sequence of lighting fades, chases and color changes.
•
If any program is selected, other than PR01, you can control the speed of those changes. While the program is
Without pressing the SETUP key, press UP or DOWN keys to choose Pr01 through Pr22
running, press the SETUP key, the display will show SPxx. Using the UP or DOWN keys, you can choose any
numerical value from 00 to 99 to adjust the speed (99 is fastest).
•
Pr01 is the static color mode. If Pr01 is selected, you have seven colors to choose from, black (off) being the
default. When in Pr01 mode, press the SETUP one time, the display will read 800F (Read Color #8, OFF).
Press
the UP or DOWN keys to scroll through the seven preset colors. At this time, a single color will be displayed,
steady on.
•
From this point, to strobe these colors, press the SETUP key, the display will read F500. Using the UP and
DOWN keys, you can set the unit to strobe. F500 is full on, F501 is slowest rate, F599 is fastest
Auto Run Mode
• Press MODE button multiple times until the display shows AUTO. In this mode, the unit automatically
sequences through its 22 available programs described above.
• While in the Auto Running Mode, you can adjust the speed in which the programs change, as well as set a
strobe rate, if desired. This is accomplished in exactly the same manner as described in the Built-in
Program Mode.
DMX Mode – for use with DMX controller
•
There are two DMX modes, 7-channel and 26-channel. While 26 channel mode offers much greater control
flexibility, it also adds additional complication to programming and setup. The best mode to select will depend
upon specific needs
•
Press the MODE button multiple times until dxxx appears (d001 is default). The “d” will be blinking
•
Press the SETUP key and the channel mode will display, either 7-CH or 26-CH. Use the UP and DOWN keys to
•
Once the channel mode is set, you can set the beginning DMX channel
•
Press the SETUP key again, the display will again display d001, with the blinking “d”. Using the UP and DOWN
toggle between these two modes
keys, you can set the beginning DMX channel. The ”d” will continue to blink until a DMX controller is connected
and sends a signal
DMX Channel Allocations
7CH Mode
CH1
CH2
CH3
CH4
Master
dimmer
R
G
B
0—255
0—255
dimming
dimming
(0 =
0=OFF
OFF)
0—255
0—255
dimming dimming
0=OFF
0=OFF
CH5
NO.
DMX
value
FUNCTION
1
0—7
OFF
2
8—15
red
3
16—23
Yellow
4
24—31
Green
5
32—39
Cyan
6
40—47
Blue
7
48—55
Purple
8
56—63
White
9
64—71
PROGRAM01
10
72—79
PROGRAM02
11
80--87
PROGRAM03
12
88—95
PROGRAM04
13
96—103
PROGRAM05
14
104—111
PROGRAM06
15
112—119
PROGRAM07
16
120—127
PROGRAM08
17
128—135
PROGRAM09
18
136—143
PROGRAM10
19
144—151
PROGRAM11
20
152—159
PROGRAM12
21
160—167
PROGRAM13
22
168—175
PROGRAM14
23
176—183
PROGRAM15
24
184—191
PROGRAM16
25
192—199
PROGRAM17
26
200—207
PROGRAM18
27
208—215
PROGRAM19
28
216—223
PROGRAM20
29
224—231
PROGRAM21
30
232--255
Sound Mode
CH6
CH7
SPEED
Strobe
NO USE
NO USE
0-9 no
use
SPEED
0—255
10-255
Strobe
Sensitivity
0--255
DMX Channel Allocations
26CH Mode
CH1
CH2
CH3
CH4
CH5
CH6
CH7
CH8
CH9
Master
dimmer
R
G
B
R
G
B
R
G
0—255
dimming
0—255
dimming
0—255
dimming
0—255
dimming
0—255
dimming
0—255
dimming
0—255
dimming
0—255
dimming
CH10
CH11
CH12
CH13
CH14
CH15
CH16
CH17
CH18
B
R
G
B
R
G
B
R
G
0—255
dimming
0—255
dimming
0—255
dimming
0—255
dimming
0—255
dimming
0—255
dimming
0—255
dimming
0—255
dimming
0—255
dimming
CH19
CH20
CH21
CH23
CH24
CH25
CH26
B
R
G
B
R
G
B
strobe
0—255
dimming
0—255
dimming
0—255
dimming
0—255
dimming
0—255
dimming
0—255
dimming
0—255
Dimming
0-9 no
use
10-255
Strobe
CH22
0—25
dimming
Master / Slave Mode
Repeatedly press the MODE button until SLAv appears, this ensures the unit is in the slave mode. In this mode, all
internal programming is disabled and the unit will follow standard DMX-512 protocol. It may be controlled either by
another identical light fixture or by a standard DMX controller.
Sound-Activated Mode
•
Repeatedly press the MODE button until the display shows SUxx. The display range is SU01~SU31. This is the
sound activated mode, the SUxx number represents the sensitivity, with 31 being the most sensitive
•
•
Press the UP or DOWN buttons to adjust the sensitivity
Press the SETUP button to set the speed in which the sound active actions occur. The display will read SPxx,
with the available range being SP-1 to SP10
Static Color Mode
•
•
•
•
Repeatedly press the MODE button until the display reads Colr
Press the SETUP key repeatedly, the display will scroll between rxxx, gxxx and bxxx, for RED, GREEN
and BLUE
The “xxx” represents any value between 000 and 255, which indicates the brightness of that
particular color
By pressing the UP or DOWN keys you can adjust the RGB LED’s to display virtually any color
Footswitch Control
While connection of the footswitch is not required, using it will provide added convenience, especially stage
environments.
•
•
•
•
Auto Run – Toggles the unit in/out of the Auto Run mode
Sound Activate – Toggles the unit in/out of the Sound Activated mode
Freeze – Holds the lights in whatever state are currently in. Pressing again will remove the “Freeze”
Blackout – Blacks out all LED’s and holds the unit in whatever state it is in.
Warranty
This Stellar Labs device is warranted, by MCM Electronics against defects for a period of 365 days from the date of
purchase. This warranty includes manufacture defects and failure due to normal use and operation. Failure due to
misuse, excessive wear or damage, improper installation or other external factors is not covered under this
warranty. MCM Electronics is not responsible for any consequential on inconsequential damage to any other unit
or component incorporated with this device. There are no other warranties, express or implied, which extend
beyond this unit, and there are no warranties of fitness for any particular purpose. The warranty does not cover
consequential damage due to defective or improper use of products.
Distributed Exclusively by
MCM Electronics
650 Congress Park Drive
Centerville, Ohio 45459
www.mcmelectronics.com