1
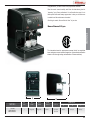
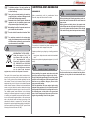
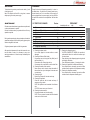
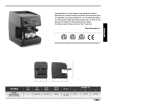
LIBRETTO ISTRUZIONI
USER HANDBOOK
MANUEL D’INSTRUCTIONS
GEBRAUCHANWEISUNGEN
INSTRUCCIONES DE MANEJO
Congratulations, you have chosen a truly spectacular machine.
Read the user's manual carefully and follow the instructions given for
"preparing" your Oscar professional. You will realize how easy it is to
have superb coffee and creamy cappuccinos. In time you will also come
to realize how little maintenance is needed.
One thing is certain, Oscar will be the "star" of your bar.
Nuova Simonelli S.p.a.
ENGLISH
The international mark of approvement certifies that all our machines
have undergone severe tests and inspections. (International certification
attests to the thorough testing and calibration of these machines).
C
A
MODELS
OSCAR
SPECIAL MODELS:
DIRECT CONNECTION
B
N. OF
UNITS
NET
WEIGHT
GROSS
WEIGHT
1
14 Kg. 31Lb
17 Kg. 37Lb
HEATING
CAPACITY
1200 W
DIMENSION mm
VOLTS/Hz
115 - 230V
50 - 60 Hz
A
B
C
300 12”
400 15,8”
400 15,8”
11
CONTENTS
ENGLISH
DELIVERY LETTER. . . . . . . . . . . . . . . . . . . . . .
INTRODUCTION AND TECHNICAL FEATURES
GENERAL DELIVERY NOTES . . . . . . . . . . . . . .
SAFETY INDICATIONS . . . . . . . . . . . . . . . . . . .
SHIPPING AND HANDLING . . . . . . . . . . . . . . .
CONTROL PANEL . . . . . . . . . . . . . . . . . . . . . .
INSTALLATION . . . . . . . . . . . . . . . . . . . . . . .
preliminary operations . . . . . . . . .
setting up the machine . . . . . . . . .
START UP
preparing a single cup of coffee. .
preparation of two cups of coffee
how to produce steam . . . . . . . . .
SHUT DOWN. . . . . . . . . . . . . . . . . . . . . . . . .
CLEANING . . . . . . . . . . . . . . . . . . . . . . . . . .
MAINTENANCE. . . . . . . . . . . . . . . . . . . . . . .
TROUBLESHOOTING . . . . . . . . . . . . . . . . . .
DIAGRAM . . . . . . . . . . . . . . . . . . . . . . . . . . .
12
pag.
pag.
pag.
pag.
pag.
pag.
11
11
13
13
15
16
. . . . . . . . . . . . . . . . pag.
. . . . . . . . . . . . . . . . pag.
. . . . . . . . . . . . . . . . pag.
17
17
17
.
.
.
.
.
.
.
.
18
18
18
19
19
19
20
51
.
.
.
.
.
.
.
.
.
.
.
.
.
.
.
.
.
.
.
.
.
.
.
.
.
.
.
.
.
.
.
.
.
.
.
.
.
.
.
.
.
.
.
.
.
.
.
.
.
.
.
.
.
.
.
.
.
.
.
.
.
.
.
.
.
.
.
.
.
.
.
.
.
.
.
.
.
.
.
.
.
.
.
.
.
.
.
.
.
.
.
.
.
.
.
.
.
.
.
.
.
.
.
.
.
.
.
.
.
.
.
.
.
.
.
.
.
.
.
.
.
.
.
.
.
.
.
.
.
.
.
.
.
.
.
.
.
.
.
.
.
.
.
.
.
.
.
.
.
.
.
.
.
.
.
.
.
.
.
.
.
.
.
.
.
.
.
.
.
.
.
.
.
.
.
.
.
.
.
.
.
.
.
.
.
.
.
.
.
.
.
.
.
.
.
.
.
.
.
.
.
.
.
.
pag.
pag.
pag.
pag.
pag.
pag.
pag.
pag.
GENERAL DELIVERY
NOTES
The machine and all parts are generally delivered in palletized cartons. Upon receipt check that:
In case of damage or missing pieces, immediately contact
the manufacturer or its sales agent in your area or its insurance company.
SAFETY
INDICATIONS
The present manual is an integral and essential
part of the product and is to be delivered to the
user. Carefully read all warnings in the manual as
they provide important information required to
install, use and maintain the unit safely. Keep this
manual in a safe place for further consultation.
After having removed the packaging, make
certain that the unit is not damaged in any way.
If you have any doubts, do not use the unit and
contact a professionally qualified person.
Always keep all packaging (plastic bags, polystyrene foam, nails, etc.) out of the reach of
children as they are a potential source of danger and never loiter the environment with such
materials.
DANGER OF POLLUTION
The electrician must also check that the line
cables have adequate section to handle the
power absorbed by the unit.
Never use adapters, multiple jacks or extension
cords. When such items prove absolutely necessary, call in a qualified electrician.
When installing the device, it is necessary to use
the parts and materials supplied with the device
itself. Should it be necessary to use other parts,
the installation engineer needs to check their
suitability for use in contact with water for
human consumption.
The machine must be installed in compliance
with the local health standards in force for plumbing systems. Therefore, contact an authorized
plumber.
The device needs to be supplied with water that
is suitable for human consumption and compliant with the regulations in force in the place of
installation. The installation engineer needs
confirmation from the owner/manager of the
system that the water complies with the requirements and standards stated above.
This unit must only be used for the purposes
described in the present manual. The manufacturer cannot be held responsible for any damages caused by improper, mistaken and unreasonable use.
This unit must only be used for the purposes
described in the present manual. The manufacturer cannot be held responsible for any damages caused by improper, mistaken and unreasonable use.
The appliance is not to be used by children or
persons with reduced physical, sensory or mental capabilities, or lack of experience and knowledge, unless they have been given supervision
or instruction.
This appliance is for professional use only.
The operating temperature must be within therange of [+5, +35]°C.
At the end of installation, the device is switched on
and taken to rated operating conditions, leaving it
in a state in which it is “ready for operation”.
The device is then switched off and the whole
hydraulic circuit is bled of the first lot of water in
order to remove any initial impurities.
The device is then refilled and taken to rated
operating conditions.
After reaching the “ready for operation” condition, the following dispensing operations are
carried out:
- 100% of the coffee circuit through the coffee
dispenser (for more than one dispenser, this is
divided equally);
- 100% of the hot water circuit through the water
dispenser (for more than one dispenser, this is
divided equally);
- opening of each steam outlet for 1 minute.
At the end of installation, it is good practice to
draw up a report of the operations.
13
ENGLISH
1) All packaging is intact.
2) The contents are the:
a) Machine
b) Box of accessories:
b1) Filter holder
b2) Filter spring
b3) Two-cup filter
b4) Single-cup filter
b5) Coffee press
b6) Coffee measure
3) The machine and accessories are not damaged in any way.
The machine is can be installed in staff kitchen
areas in shops, offices and other working environments, farm houses by clients in hotels,
motels and other residential type environments
bed and breakfast type environments.
Before turning on the unit make certain that the
rating indicated on the label matches the available power supply. The label is located under the
machine work base at the upper right.
Installation must be performed following the
standards in force in the country where it is
being installed and following the manufacturer's
instructions. Only skilled personnel can install
this unit.
The manufacturer cannot be held responsible for
any damages incurred if the system is not
grounded.
For electrical safety, this machine requires a
ground system. Contact a technically certified
electrician who must check that the line electrical capacity is adequate for the maximum capacity indicated on the unit label.
WARNING
Before using the machine, read this manual in its
entirety or, at the very least, read the safety and set
up instructions.
ENGLISH
There are some basic rules for the use of any
electrical appliance. In particular:
• never touch the unit with wet hands or feet;
• never use the unit with bare feet;
• never use extension cords in areas equipped
with baths or showers;
• never pull on the power supply cord to
unplug the unit;
• never leave the unit exposed to atmospheric
agents (rain, direct sunlight, etc.);
• never let children, unauthorized personnel or
anyone who has not read this manual operate
the unit.
Should it be necessary to replace the power
cord, this replacement operation must only be
performed by an authorized service centre or by
the manufacturer.
Should you decide to stop using this type of unit,
we suggest you render it inoperable by unplugging it and cutting the power supply cord.
DANGER OF POLLUTION
14
Before performing any sort of maintenance, the
authorized technician must turn off the unit and
unplug it from the mains.
Before cleaning the unit set it in a state of "0"
energy: that is, "MACHINE SWITCHED OFF AND
UNPLUGGED". Follow the instructions given in
this manual carefully.
In case of breakdown or poor function, turn off
the unit. Never tamper with the unit. Contact only
professionally qualified personnel.
Only the manufacturer or an authorized service
center can make repairs and only using original
spare parts.
Non compliance with the above can compromise
machine safety.
Upon installation, the qualified electrician must
arrange for an omnipolar switch, as called for by
the safety regulations in force; when open, the
contacts must be 3 mm or more apart.
To prevent dangerous overheating, it is advisable to fully extend the power supply cord.
Never block the intake and/or heat dissipation
grills, in particular those for the cup warmer.
The user must never replace the unit's power
supply cord. If this cord is damaged, turn off the
unit and have it replaced by a professionally
qualified technician.
Never dispose of the machine in the environment: to
dispose of the machine, contact an authorized center or
contact the manufacturer for pertinent indications.
DANGER OF INTOXICATION
Be extremely careful when using the steam
nozzle. Never place your hands under the nozzle
and never touch it right after use.
DANGER OF BURNS
MACHINE ID
Once you have started washing the machine,
complete the job or residues of detergent could
be left inside the dispensing assembly.
When communicating with the manufacturer Nuova
Simonelli, always cite the machine ID number.
CAUTION
Remember that to install, maintain, unload and
regulate the unit, the qualified operator must
always wear work gloves and safety shoes.
When adding the coffee, the operator must never
put his hands into the container.
DANGER OF IMPACT OR PINCHING
Before performing the following operations, make certain that the load is in stable and will not fall when the
straps are cut.
Wearing gloves and safety shoes, the operator must
cut the straps and store the product. During this operation, see the product technical features for the weight
of the machine being stored and proceed as necessary.
The noise level of the machine is less than 70db.
DANGER OF POLLUTION
For machines connected to the mains water
supply, the minimum pressure must be 0.6 MPa
and the maximum pressure for correct machine
operation must not exceed 1.3MPa.
CAUTION
INFORMATION TO THE USERS
Under the senses of art. 13 of
Law Decree 25th July 2005, n.
151 “Implementation of the
Directives/ Guidelines 2002/95/
CE, 2002/96/CE and 2003/108/
CE, concerning the reduction of
the use of dangerous substances in electric and electronic
equipment, as well as the disposal of wastes“.
The symbol of the crossed large rubbish container that is
present on the machine points out that the product at the
end of its life cycle must be collected separately from the
other wastes. The user for this reason will have to give the
equipment that got to its life cycle to the suitable separate
waste collection centres of electronic and electrotechnical
wastes, or to give it back to the seller or dealer when buying
a new equipment of equivalent type, in terms of one to one.
The suitable separate waste collection for the following
sending of the disused equipment to recycling, the dealing
or handling and compatible environment disposal contributes to avoid possible negative effects on the environment
and on the people's health and helps the recycling of the
materials the machine is composed of. The user's illegal
disposal of the product implies the application of administrative fines as stated in Law Decree n.22/1997” (article 50 and
followings of the Law Decree n.22/1997).
ENGLISH
SHIPPING AND HANDLING
To facilitate aeration of the unit, position the
aeration portion of the machine 15 cm from walls
or other machinery.
The machine is transported on pallets containing several
machines inside cartons strapped to the pallet.
Operators performing any shipping or handling operations
must
• wear gloves, safety shoes and overalls with elasticized
cuffs.
Always move pallets using adequate equipment (i.e. fork lift
trucks).
CAUTION
DANGER OF IMPACT OR PINCHING
During handling, the operator must make certain that
there are no persons, things or objects in the vicinity.
Slowly lift the pallet approximately 30 cm off the ground
and drive to the loading zone. After having made certain
that there are no obstacles, things or persons in the
way, proceed with loading.
Once the destination has been reached, again using
adequate lifting equipment (i.e. fork lift truck) and after
having made certain that there is nothing and no one in
the unloading area, set the pallet on the ground and
move it to the storage area; always carry the load at a
height of approximately 30 cm from the ground.
Once the machine has been released from the pallet or
container, do not pollute the environment with these
items.
15
DESCRIPTION OF CONTROL PANEL AND OPERATIONS
12
11
b4
b3
b2
ENGLISH
b5
b1
3
8
b6
b0
2
65
1
74
9
13
10a
10
14
15
1)
2)
3)
4)
5)
16
Main switch.
- When pressed this switch powers the machine
(light 2 on) and starts boiler heating (light 7 on).
- Pressing this switch again turns the machine off
(light 2 off), and stops boiler heating (light 7 off).
Unit ON light.
- When this light is ON, the machine is powered and
operative.
- When this light is OFF the machine is off.
Power supply plug.
Coffee dispensing button.
- Press this button and the unit starts dispensing
coffee (and continues for as long as it remains
pressed) (light 5 on).
- Press the button again and the unit stops dispensing coffee (light 5 off).
Coffee dispensing light.
- This light remains on while coffee is being dispensed.
6)
Reservoir empty light.
- When this light is on, the water reservoir (12)
needs to be refilled.
7) Heating element light.
- ON: the heating element is functioning.
- OFF: the boiler has reached operating temperature or the machine is off.
8) Steam knob.
- Turn the knob and adjust the jet of steam.
9) Delivery assembly attachment.
Filter holder housing (b1).
10) Moveable steam nozzle with insulated
outlet (10a).
Delivers steam to heat liquids in containers.
11) Water reservoir hatch.
12) Water reservoir.
The reservoir can hold 2.3 liters of water.
Although the unit can operate with any type of water, the
13)
14)
15)
16)
lower the water hardness the onger the unit will last.
Cup warming grill.
Cup warming shelf.
Cup support grill.
Water drain tank.
b0)
b1)
b2)
b3)
b4)
b5)
b6)
Coffee nozzle.
Filter holder.
Spring.
Two-cup filter.
Single-cup filter.
Coffee press.
Coffee measure.
INSTALLATION
a) tall cups.
Before installing the unit, carefully read the safety instructions at the beginning of this manual; in particular read how
to set the unit in a STATE OF ZERO ENERGY and the
PRELIMINARY OPERATIONS.
1) Once the machine has been withdrawn from the
packaging, follow the instructions given in the
"GENERAL DELIVERY NOTES".
2) Position the unit on a horizontal surface.
b) normal cups.
NOTE: if the sequence indicated below does not take
place, see the chapter entitled "TROUBLESHOOTING".
After having completed the preliminary operations:
1) Make certain that the steam valve (8) is closed.
2) Press the main switch (1) to turn on the unit; the
machine automatically feeds water into the boiler (initial time: approximately 3 min), once the water has
reached the set level, the units starts heating and the
heating light goes on.
Note: the machine has an electronic level valve so it
automatically feeds in water to the boiler as needed to
restore the level.
DANGER OF POLLUTION
3)
4)
Make certain that the cup support grill (15) is positioned
squarely and is level.
11) Make certain that the steam knob (8) is closed.
12) Make certain that the two buttons (1 and 4) protrude
and are not pressed.
Tank Model
6) Open the hatch (11) and take out the reservoir (12).
7) Especially the first time, wash the reservoir with soap
and water. Fill the reservoir with water and make
certain that the outside of the reservoir is dry.
8) Return the reservoir (12) to its housing and close the
hatch (11).
Model for Direct connection to the water mains
6) Remove the tube from the hatch on the top part of the
machine.
7) Connect the shaped end of the Teflon tube to the
union on the base of the machine.
8) Connect the other end of the tube with the 1/8” union
to the mains water supply.
9) Make certain that the water drain tank (16) has been
inserted.
10) Two types of cup support grills (15) are possible:
5)
6)
N.B.: the machine safety system shuts down the
machine after the pump has been running steadily
for approximately 2 minutes (this prevents the
pump from overheating). In this case, turn off
themachine by pressing the main switch and then
turn it on again.
While the unit is operating, the ON light (2) and the
heating light (7) are both lit.
Wait until the heating light (7) goes off, indicating that
the water has reached the desired temperature.
Note: if the water light (6) goes on, it means that the
water reservoir (12) is empty or nearly empty.
Note: remember that to obtain a good drink it is best to
use the cup warming shelf (14) to keep the cups warm.
At this point the machine has been set up and is ready
to make coffee or produce steam.
NOTE: At the start of the day’s activities and in any case,
if there are any pauses of more than 8 hours,
then it is necessary to change 100% of the water
in the circuits, using the relevant dispensers.
NOTE: In case of use where service is continuous, make
the above changes at least once a week.
13) Make certain that the line voltage corresponds to the
requirements indicated on the label.
14) Only if the steam valve (8) is closed, buttons (1 and 4)
are not pressed and the line voltage matches the label
requirements, plug the unit into the power supply
outlet.
15) The preliminary operations have been completed and
the machine is ready to be set up.
17
ENGLISH
Arrange the accessories as follows:
3) Insert the ring (b2) into the hollow in the filter holder.
4) Insert one of the two filters (b3 or b4).
5) Caution: danger of pollution.
SETTING UP THE MACHINE
PREPARING A SINGLE CUP
OF COFFEE
PREPARING TWO CUPS
OF COFFEE
NOTE:
NOTE:
if the sequence indicated below does not take
place, see the chapter entitled "TROUBLESHOOTING".
NOTE: if the sequence indicated below does not take
place, see the chapter entitled "TROUBLESHOOTING".
DANGER OF BURNS
1) After having set up the machine, check that the twocup filter (b4) is set in the filter holder (b1).
If necessary replace the filter, perhaps prying it out
with a tool.
ENGLISH
1) After having set up the machine, check that the single-cup filter (b4) is set in the filter holder (b1).
If necessary replace the filter, perhaps prying it out
with a tool.
if the sequence indicated below does not take
place, see the chapter entitled "TROUBLESHOOTING".
HOW TO PRODUCE STEAM
2)
3)
4)
5)
6)
Fill the coffee measure (b6) flush.
Place the coffee into the single-cup filter (b4).
Using the press (b5), compact the coffee uniformly.
Clean the edge of the filter.
Rotating the filter holder (b4) insert it into the attachment (9) until it is tight.
7) Position the cup under the spout.
8) Press the coffee dispensing button (4), light 5 goes on
and coffee starts filling the cup.
9) Once the desired level has been reached, press button 4 to stop the flow and light 5 goes off.
10) Note: if the unit is to be used frequently the coffee can
be left in the filter until the next serving. If it is not
used frequently, empty out the filter and clean it.
11) At this point you have finished preparing of a single
cup of coffee.
18
2)
3)
4)
5)
Fill the coffee measure (b6) flush.
Place the coffee into the two-cup filter (b3).
Fill the coffee measure (b6) a second time.
Place the second dose of coffee into the two-cup
filter (b3).
6) Using the press (b5), compact the coffee uniformly.
7) Clean the edge of the filter.
8) Rotating the filter holder, insert it into the attachment
(9) until it is tight.
9) Position the cups under the spouts.
10) Press the coffee dispensing button (4), light 5 goes on
and wait until coffee starts filling the cups.
11) Once the desired level has been reached, press button 4 to stop the flow and light 5 goes off.
12) Note: if the unit is to be used frequently the coffee can
be left in the filter until the next serving. If it is not
used frequently, empty out the filter and clean it.
13) At this point you have finished preparation of two
cups of coffee.
1) When maneuvering the steam nozzle (10) you must
use the insulated potholder (10a).
2) After having set up the machine, clean the steam
nozzle with a cloth dipped in hot water.
3) Make certain that the spout of the nozzle is within the
grill (15).
4) Gradually open the steam knob (8)carefully and keep
it open until any drops of hot water that may be inside
the nozzle come out and.
5) When only steam comes out of the nozzle, move it
with the insulating holder (10a) and insert it into the
liquid you want to heat.
6) Use knob 8 to adjust the steam as needed. Keep the
nozzle in the liquid while regulating the steam.
7) Once the liquid has been heated, close the steam knob
(8) and remove the nozzle from the heated liquid.
8) Use a cloth dipped in hot water to clean any residues
of the heated liquid from the steam nozzle spout (21).
9) You have finished heating the liquid.
NOTE: Before using the steam wand, always bleed out
any condensation for at least 2 seconds or according to the manufacturer’s instructions.
SHUTDOWN
CLEANING
To shut down the machine, press the main switch (1) and
all the lights go off.
Note: if the machine will be off for a long time, to ensure
safety unplug it from the power supply.
Except for cleaning of dispensing assembly 9 – shown in
the table below – any other form of cleaning must be performed when the unit is in a condition of zero energy (off
and unplugged from the power supply) and only after the
hot parts have cooled to room temperature. See the table
below:
MAINTENANCE
During maintenance/repairs, the parts used must be able to
guarantee compliance with the safety and hygiene requirements envisaged for the device.
Original replacement parts can offer this guarantee.
After repairs to/replacement of a part that comes into contact with foods or water, it is necessary to carry out a
washing procedure or to follow the steps indicated by the
manufacturer.
Part no.
FREQUENCY
immediately after use
1
2
3
4
5
6
7
8
9
Steam nozzle
10
Filter and filter holder
b1,b3,b4
Outside of the machine
a
15
Grill
Liquid tank
16
Water reservoir
12
Dispensing spout
9
Gasket on the dispenser assembly
9
Dispenser assembly
9
1) Cleaning the steam nozzle.
Use a cloth dipped in hot water and/or a neutral
detergent.
2) Cleaning the filter and filter holder.
- If necessary use a tool to pry the filter (b3/b4) out of
the filter holder (b1).
- Rinse under a jet of water (tap) and dry.
- If necessary, use a small brush to clean out the filter.
3) Cleaning the outside of the machine.
- Never use any sort of solvent to clean the outside of
the machine; use only a cloth dipped in hot water and
a neutral soap.
4) Cleaning the grill.
- Brush the grill clean with hot water and soap.
5) Cleaning the liquid tank
- Clean the liquid tank with hot water and soap, if
necessary using a brush.
NOTE: the liquid tank can be washed in the dishwasher.
CAUTION: never use any sort of solvent.
6) Cleaning the water reservoir.
- Use soap and water and rinse thoroughly.
NOTE: if for any reason the water has left undesired
scale, wash out with a swab.
daily
weekly
■
■
■
■
■
■
■
■
■
■
■
■
ENGLISH
If the above-mentioned cleaning operations are performed,
no other maintenance is required.
Contact the dealer where you purchased the unit for any
operations required.
N° ITEM TO BE CLEANED
■
■
■
■
■
■
7) Cleaning the dispensing spout.
- CAUTION: DANGER OF BURNS: this operation is
performed with the unit on and for this reason requires utmost care.
- Clean the holes in the dispensing spout using a brush
with slightly stiff bristles.
- Press the dispensing button (4) to unplug the holes.
8) Cleaning the gasket on the dispenser assembly.
- Use a small brush to clean away any scale or coffee
residues from the gasket on the dispenser assembly.
9) Cleaning the dispenser assembly.
- Use a small brush to clean away any scale or coffee
residues from the dispenser assembly spout.
19
TROUBLESHOOTING
ENGLISH
If your expresso coffee maker is not functioning properly, see if you can find the problem in the troubleshooting list below.
Also reread the corresponding sections in the user's manual.
Problem
Remedy
The machine does not prepare the expresso coffee.
Check whether the reservoir empty light is on:
no water in the reservoir, or reservoir not inserted correctly.
The coffee has been ground too fine or has been pressed too hard.
The spout is plugged.
Scale must be removed from the machine.
The coffee comes out of the sides of the filter holder.
The filter holder was not inserted correctly.
The filter holder was not tightened enough.
Clean coffee grinds away from the gasket (see the section on cleaning).
There is too little or no "cream"
Check the amount of coffee: the measure must be filled level.
The machine is not hot: is the heating element off?
The coffee has not been ground fine enough.
The coffee in the filter has not been pressed correctly
The coffee is not fresh.
The water is not fresh.
The "cream" is too dark and/or the coffee has a burnt
flavor
The coffee has been ground too fine.
The coffee has been pressed too hard.
Too much coffee has been measured.
The coffee is not hot enough
The hot water passes through the filter too quickly. It takes 25-40 seconds to make 2 cups.
The coffee in the filter has not been pressed correctly.
The coffee has not been ground fine enough.
The filter holder is cold. The filter holder should always left inserted in the machine while the unit is heating up and during
use so it remains hot.
The cups are cold. The cups must be placed on the heated shelf or preheated with hot water prior to use.
The boiler safety thermostat has cut in: contact the nearest service center.
The pump does not suck water from the tank
Open the steam tap (8) and push repeatedly the coffee delivery key (4).
20
SCHEMA ELETTRICO “OSCAR”
Legenda
A
B
C
spia accensione
on-off lamp
témoin lumineux d'actionnement
Einschaltkontrolleuchte
luz testigo de encendido
spia erogazione caffè
coffee delivery lamp
témoin lumineux distribution café
Kaffeeausgabe-Kontrolleuchte
luz testigo erogación café
spia mancanza acqua serbatoio
no-water lamp
témoin lumineux manque d'eau dans le réservoir
Kontrolleuchte bei Wassermangel
luz testigo falta de agua depósito
D
spia resistenza
element lamp
témoin lumineux résistance
Heizkontrolleuchte
luz testigo resistencia
LE
elettrovalvola autolivello
level elecrovalve
électrovanne niveau automatique
Füllstandselektroventil
electroválvula de autocarga
MS
interruttore generale
main switch
interrupteur général
Hauptschalter
interruptor general
interruttore erogazione caffè
coffee delivery switch
interrupteur distribution café
Kaffeeausgabeschalter
interruptor erogación café
PR
pressostato
pressure switch
pressostat
Druckwächter
presóstato
TE
termostato
thermostat
thermostat
Thermostat
termostato
EL
resistenza
element
résistance
Heizwiderstand
resistencia
DS
DE
elettrovalvola erogazione caffè
coffee delivery electrovalve
électrovanne distribution café
Kaffeeausgabe-Elektroventil
electroválvula erogación caféù
51
Oscar Timed Programming
ENGLISH
1.
1
5
2
3
4
Preinfusion on/off
•To enter the programming mode, switch
•
on the machine using the I/O button
•
holding down the coffee button
until
•
the water presence light
begins to
flash.
Fig. 1
•Switch the preinfusion on/off by pressing
•
•
the coffee button . When the light
is on/off, the preinfusion mode is also on/
off.
Timed Dose Adjustment
•To enter the programming mode, switch
•
on the machine using the I/O button
•
holding down the 1 coffee button
•
until the light on the coffee button
begins to flash.
•Press the coffee button
to begin
pouring and press it again when the
poured dose is as required.
•
•To exit the programming mode, switch
•
off the machine using the I/O button
and then switch it on again.
2
•To exit the programming mode, switch
•
off the machine using the I/O button
and then switch it on again.
Codice 31000370
Ed. 01 del 09/2009
Nuova Distribution Centre
LLC 6940Salashan PKWY BLDG A 98248
Ferdale, WA
Via M. d’Antegiano, 6
62020 Belforte del Chienti
Macerata Italy
Tel. +1.360.3662226
Fax +1.3603664015
videoconf.+1.360.3188595
www.nuovasimonelli.it
[email protected]
Tel. +39.0733.9501
Fax +39.0733-950242
www.nuovasimonelli.it
E-mail: [email protected]
Graphics by:
X TYPE ENGINEERING S.r.l.
La Nuova Simonelli si riserva di apportare tutte le modifiche ritenute necessarie.