1
Set-up
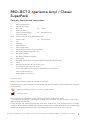
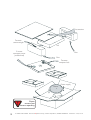
Screw the three feet (23) onto the threaded bolts located on the underside of the plinth. Make sure the
surface you wish to use the turntable on is level (use a spirit level) before placing the turntable on it.
Remove the two red transport screws (1) which secure the motor (22) during transportation. Carefully place
the platter bearing housing over the bearing axle. Level the plinth using a spirit level and the adjustable feet (23).
Fit the drive belt (3) around the platter (5) and the smaller diameter part of the motor pulley (2). Avoid
getting sweat or grease on the belt as these will deteriorate the performance and reduce the belt's lifespan. Use
absorbent kitchen paper to remove any oil or grease from the outer edge of the platter and the belt.
Remove the transport lock (18) from the tonearm. Store it together with the two motor transport locks (1) in
the original packaging so they are available for any future transportation.
Cartridge downforce adjustment
The counterweights (6) supplied are suitable for cartridges weighing between 5 - 7,5g (No. 28), 7 - 10g
(No. 46), 9 - 11g (No. 43) or 10 - 14g (No. 29). Adjust the downforce prior to installing the anti-skating
weight.
Pushing carefully, turn the counterweight onto the rear end of the tonearm tube (9), so that the downforce
scale (6a) shows towards the front of the player. Lower the armlift and position the cartridge in the space
between arm rest and platter. Carefully rotate the counterweight (6) until the armtube balances out. The arm
should return to the balanced position if it is moved up or down. This adjustment must be done carefully. Do
not forget to remove the cartridge protection cap if fitted.
Once the arm is correctly balanced return it to the rest. Hold the counterweight (6) without moving it, and gently
revolve the downforce scale ring (6a) until the zero is in line with the anti-skating prong (15). Check whether the
arm still balances out.
Rotate the counterweight counter clockwise (seen from the front) to adjust the downforce according to the
cartridge manufacturer's recommendations. One mark on the scale represents 1 mN (= 0,1g / 0,1 Pond) of
downforce.
The recommended downforce for the factory fitted cartridge is 15mN.Counterweight No. 46
Adjusting the vertical tracking angle (vta)
** Put a record and the record weight on the platter. When the needle is lowered into the record groove and the
tonearm is not resting on the lift arm, the tube of the tonearm should be parallel to the surface of the record.
If it is not loosen both hexagon screws in the tonearm base just enough to allow vertical movement of the
arm pillar without force and slide the arm up or down until it is parallel.
Carefully retighten the hexagon screws without applying excessive force (which would deform the arm pillar) –
finger tight is quite sufficient.
Adjusting the azimuth
** The cartridge needle must be vertical in the record groove in order to trace
the groove wall modulations correctly.
A small screw at the bearing end of the arm allows incorrect azimuth to be
corrected if your needle is not mounted exactly perpendicular to the cartridge
body (which is often the case).
Slacken off the screw just enough to be able to revolve the arm tube without
applying force. Note! Do not remove the screw completely!
Screw
With the aid of a good magnifying glass adjust the needle until it is vertical in the groove (i.e. perpendicular
to the record's surface). Ideally this should correspond to the top surface of the cartridge body being parallel
to the record surface, but in practice this is often not the case.
When you are satisfied that the needle is vertical retighten the screw carefully.
Under no circumstances should the arm tube be adjusted with the needle still in the record groove!
Irreparable damage may be caused to the cantilever suspension! The arm must be lifted to make
each adjustment and lowered afterwards to check it.
4
© Audio Trade GmbH · Pro-Ject 2 Xperience Acryl / Classic SuperPack / Ortofon 2M Bronze · Revision 1.3.10/1.4.10