1
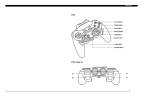
ENGLISH
P2000
4 Buttons
Digital Button
Start Button
Analog Button
Shift Button
8 -Way D Pad
Tilt Button
Analog Stick
Throttle Wheel
P2000 - Head On
R1
L1
R2
L2
1 2
ENGLISH
INTRODUCTION
Congratulations on your purchase of the new Saitek® P2000 Tilt Pad - the ultimate PC
gamepad! The Saitek P2000 delivers you the latest PC Tilt Technology to produce a superior
pad for the discerning gamer. With superb ergonomics, Throttle Wheel and an Analog Stick,
the P2000 offers a fusion of all the latest technology with top-of-the-range styling. For less
experienced users, this pad auto-configures for the game you are playing, and for advanced
users it is fully programmable.
Features:
• Second generation Tilt technology provides simpler and more accurate game control
• Analog Stick and 8-way D-Pad
GETTING STARTED
Dual Compatibility for USB and Game Port Connection
Important Notice: Connect your controller using only ONE of the connectors.
The Saitek P2000 comes with a choice of two connectors. You can either connect with the
conventional game port connector or, if your computer has the capability, connect via the USB
(Universal Serial Bus) connector. It is strongly recommended that if you have USB capability
on your computer, you should use that connector to attach this device.
The USB connector has many benefits over the older game port connector and is rapidly
becoming the standard interface connection for quality computers.
• 4 Triggers and 4 Buttons in a familiar layout
• Throttle Wheel - ideally positioned to give added fingertip control for driving and flying
games
Installing your Saitek P2000
• Direction lock on the Analog Stick for improved control
Important Notice: You must install the software from the Saitek Product Companion Disc
before you connect your game controller to the USB port.
• Pad auto-configures for the game being played - no need for user setup
• Fully programmable for advanced users, using Saitek Gaming Extensions (SGE)
• 3 mode switches for controlling Tilt, Analog and Digital modes
Minimum System Requirements
To operate the Saitek P2000 Gamepad you will need a Pentium class computer with a
minimum of Windows® 95 installed (Windows® 98 for USB operation). Microsoft Internet
Explorer 4.x and DirectX 7.0a or above are required to get the most from your games and
controller. These are available on the Saitek Product Companion Disc that came with this
product.
1
With your computer switched on, close down any programs you are running and insert
the Saitek Product Companion Disc.
2
When the Saitek Product Companion Disc Dialog Box appears, select your Saitek
P2000 from the drop down list and click on the Install button.
3
In the next dialog box, click on Yes to agree with the installation of the Saitek P2000 and
then click on Accept to agree to the license agreement.
Note: For your Saitek P2000 to work, you need to have a minimum of Microsoft® Internet
Explorer 4 and DirectX 7.0a installed on your computer. This installation will automatically
recognize if you already have them loaded on to your machine. However, if they are not
present, you will need to take the following steps:
• If you are prompted to install Microsoft® Internet Explorer, click on Install and follow
the on-screen instructions and then restart your computer when prompted.
Games Compatibility
Your Saitek P2000 is specifically designed to work with games developed for Microsoft
Windows® 98 and 95.
• If you are prompted to install Microsoft® DirectX 7.0a, click on Install and follow the
on-screen instructions and then restart your computer when prompted.
4
5
6
At the Saitek Gaming Extensions screen, click on Install and follow the on-screen
instructions and then restart your computer.
When you are prompted, attach your Saitek P2000 to the computer (using the USB
connector if you have the option) and follow the on-screen instructions.
When the Test screen appears, test your controller's buttons and attributes. Your Saitek
P2000 is now ready for gameplay, but first you should take time to run the Game Profile
Wizard to get the most from your new controller (see next section).
3 4
ENGLISH
Game Profiler Wizard
Using the P2000 in Analog Mode
The Game Profiler Wizard allows you to download game profiles for your favorite games from
either the Saitek Product Companion CD or the Saitek Website. These are profiles written by
our in-house gamers to help you get the most from you new Saitek controller in as little time
as possible. To run the Game Controller Wizard, follow these simple instructions:
In Analog Mode, the Analog stick becomes active with the D-Pad functioning as a hat switch.
After you have completed testing your Saitek P2000, you will then be asked to run the
Game Profiler Wizard, click on Yes to proceed.
At the Welcome dialog box you will be prompted to Import the Game Profiles for your
controller via either the Internet or the CD. Check the box next to CD and click on
Continue. The software will scan your computer for those games you already have
loaded and will load the corresponding profiles.
When the Game Profiler Wizard has completed loading the profiles, click on Next and
then Finish. Your Saitek P2000 is now ready for gameplay.
Important Notice: If you connect the P2000, using the USB connector, before installing the
Saitek Gaming Extensions software, the Saitek P2000 will not operate correctly. To solve this
problem, run the NukeUSB utility (found on the Saitek Product Companion Disc CD) to
remove the P2000 from the Registry, restart the machine and then continue the installation as
detailed above.
Note: To avoid potential problems and conflicts, it is recommended that you remove any other
game controllers from the Game Controllers dialog box. Do this by selecting the previously
installed controller in Game Controllers and clicking on Remove.
ANALOG LED
MODE
ANALOG STICK
D-PAD
ON
ANALOG
FUNCTIONS AS
ANALOG STICK
FUNCTIONS AS
HAT SWITCH
Using the P2000 in Digital Mode
In this mode, the Saitek P2000 works as a standard digital gamepad.
DIGITAL LED
MODE
ANALOG STICK
ON
DIGITAL
N/A
D-PAD
FUNCTIONS AS
D-PAD
Tilt Function
The Tilt function on the Saitek P2000 is a feature that allows the user to perform the left/right
and forward/backward functions by tilting the pad in the relevant direction. The power-up default
setting for Tilt is ON.
To enable/disable the Tilt Function press the Tilt Button. When the gamepad is in Tilt Mode,
the Tilt LED will light up.
SAITEK P2000 FEATURES
Changing the Tilt Settings
Switching Between Digital and Analog Modes
The Tilt Settings can be altered from the factory default to suit your own gaming preferences.
However, it is recommended that you play a game for a while before making any changes to
these settings. If after playing for a while, the gamepad does not behave the way you want it to,
then proceed with making the changes.
The Saitek P2000 comes with an Analog Stick for increased precision, performance and
playing power. Simply select the Analog Mode for complete control in driving and flying
games or any game where accuracy in movement is crucial.
Switch between Digital and Analog Modes by pressing the Analog Button for Analog Mode
and the Digital Button for Digital Mode. The LED next to each button will light up to indicate
what mode the pad is in. The power-up default setting is Analog Mode.
Note: The default zero setting (no movement in any direction) for the Tilt setting on the P2000
is with the pad held in such a way that the top plate is level (horizontal).
To activate the Tilt Set Mode, press the Tilt Button for longer than three seconds until the Tilt
LED flashes continuously. This will allow you to:
• Increase and decrease the range of Tilt (Tilt Sensitivity)
• Set the center or zero position of the Tilt
• Restore the factory default settings
• Save the new Tilt settings
5 6
ENGLISH
Lockable Axis on the Analog Stick
In the Tilt Set Mode, the Tilt LED
flashes constantly. To let you know
when changes to the Tilt Settings
are actually being made, the Tilt LED flashes at twice the rate.
To help with Tilt Set Mode, the Analog LED will light continually to indicate when the
maximum/minimum value is reached on the X or Y axis.
To improve your gaming, Saitek have added a unique feature
to the P2000 – a lockable axis for the Analog Stick. This is
ideal for those situations when the axes need to be separately
controlled, eg, for steering or for accelerator/brake
function. Simply press down the button to the side of the stick and
rotate the dial to the direction lock you require - either “Up/Down” or
“Right/Left” depending on the type of game you are playing. This will especially improve your
control in driving games.
Changes to Tilt Settings
Throttle Wheel
Action
D-Pad up
The Saitek P2000 comes with a Throttle Wheel for improved play - especially in driving and
flying games. It is situated in the optimum position for precision fingertip control. The powerup default setting for the Throttle Wheel is ON.
Effect
Y axis Tilt decrease *
D-Pad down
Y axis Tilt increase *
D-Pad left
X axis Tilt increase *
D-Pad right
X axis Tilt decrease *
D Button
Center/Zero Tilt
Start Button
Exit and restore the factory default settings
Shift Button
Exit and save the current changes
Tilt Button
Exit without saving current changes
* (Each button press will equal a 10% increase/decrease in the range)
To exit the Tilt Set Mode, either press the Shift Button to exit and save the new settings, or
press the Start Button to exit and restore the factory settings. If you press the Tilt Button or
press no button for 60 seconds you will exit the Tilt Set Mode without saving any changes you
have made.
The Center/Zero Tilt option allows the user to set the default center of the Tilt to something
other than the horizontal. This is particularly useful if you have a personal playing style that
means you hold the gamepad at an angle other than that of horizontal. However, please note the
range is set to 70 degrees either way on the X axis and 60 degrees either way on the Y axis with a 20 degree 'dead zone' to stop any false movement in the game. With this in mind the
Zero/Center should not be set to any extreme of deflection. If you have an individual style, it is
worth experimenting with this to find your optimum playing position.
Shift Button
Some controls can be programmed to perform an extra function by use of the Shift Button.
This works in the same way as when you press the Shift Key in conjunction with another key
on your computer keyboard – to assign a new and added function to the key.
By simultaneously pressing the Shift Button with another control, you can assign another
command to that control. This is a simple and effective way of increasing the functionality of
your game controller.
Saitek Gaming Extensions (SGE)
Saitek Gaming Extensions (SGE) is the software Saitek supplies to configure your Saitek
game controller for enhanced functionality. SGE delivers a powerful set of features, allowing
you to tailor your game controller to the ultimate configuration for the ultimate gameplay.
Despite a level of sophistication previously unseen in the market, the software remains simple and intuitive to use.
Features of SGE:
• Automatic profile activation for current game
• Personalize the controller settings for your favorite games
• Configure your controller with an on-screen rotational 3D model and interface
Note: Remember, in the event that you are unhappy with your new settings, you can restore the
factory default settings by pressing the Start Button when in Tilt Set Mode.
• Multiple profile option for each controller (ideal if a controller is used by several people)
7 8
ENGLISH
• Program special moves
with sophisticated timing
features
• Special game setups avail able from the Saitek website
and 3D
the model
Product
of Companion
the
CD game controller
the screen.
3
If you place the mouse pointer on the 3-D model and hold down the left mouse button,
you can rotate the image.
4
Next, click on any control on the controller. You will see that the control turns blue
(indicating that it is ready for programming) and that the text boxes at the bottom of the
screen show its attributes (see the SGE diagram to see what each box denotes).
5
The long bar at the bottom of the screen is the Command Editor. Simply click on and high
light the current keyboard setting and replace it by pressing the new keyboard command.
Note: If you look in the manual that came with your game, it will tell you what keyboard
commands are associated with what actions in the game.
Shift State
Name of Control
Currently Assigned
Button
Command Editor
WARNING: THE SGE AUTOMATICALLY SAVES THE CHANGES YOU MAKE WITHOUT THE
USE OF A SAVE BUTTON. THEREFORE, IF YOU MAKE A MISTAKE, SIMPLY HIGHLIGHT
THE COMMAND LINE AND TYPE IN THE CORRECT ENTRY.
For a full guide to programming your Saitek P2000 with SGE, see the Saitek Gaming
Extensions: User Manual supplied on the Saitek Product Companion CD that came
with this product.
TROUBLE-SHOOTING
Q
My computer is not recognizing the P2000 – what’s wrong?
A
Check the cable connections. Turn off the computer and then unplug your
gamepad. Plug it back in making certain that is securely attached.
Q
Can I have another game controller connected to my PC at the same
time?
A
You will now see a list of all the .exe files on your PC to which SGE can be assigned.
Highlight the name of the game you wish to create a profile for, eg, tomb4.exe, then
click on Next.
To avoid potential problems and conflicts, we recommend that you remove
any existing game controllers before installing the P2000. Do this by
selecting the previously installed controller in the Game Controllers window
and clicking on Remove.
Q
On the following screen, leave both options ticked and click on Next, then highlight the
controller and click on Next again.
I have plugged in my P2000 using the USB connector and it has not been
recognized by the computer.
A
Your USB connection may not be enabled within the computer. You can
switch it on via your computer’s BIOS settings (please check the
documentation that came with your computer). If you are still unsure as to
what to do, contact Technical Support.
Q
I am using my P2000 with SGE programming software and it doesn’t work in
some Electronic Arts games such as Need for Speed 3, Fifa and NHL.
A
To make the controller work with these games, you need to select ‘keyboard’ within
the game rather than ‘game controller’. Alternatively, use the pad without the SGE
and let the pad auto-configure the best setup for the game.
Quick Start Guide to Programming Your Controller with SGE
Creating a Profile for a Game
Open the SGE software by double-clicking on the SGE icon.
Next, double-click on New Game Wizard and then on Next.
Finally, review the information offered on the final screen and click on Finish.
Adding Commands to the Profile
In the Explorer mode you will now see a folder for the your new profile. Double-click on
the folder and you will see it open out to show 2 sub-folders - the Command List and
Saitek P2000.
Click on the folder called Saitek P2000 and a 3-D model of the controller will appear on
9 10
ENGLISH
necessary for us to help you.
TECHNICAL SUPPORT
1
Know the problem - make sure that you are clear about the problem
you are having and can describe events that made it happen
2
Check the Trouble-shooting guide – double-check that your problem is not
covered in the Trouble-shooting section of this manual.
Know your hardware - if it is possible, make sure you have the following
information to hand:
3
The Saitek Website
• The make and model of the computer you are using
If you have access to an Internet connection, many of your technical queries may be answered
with a simple visit to the Saitek Website at:
• The version of the game you are playing
• The motherboard you are using
• The make and model of your sound card
http://www.saitek.com
4
Be ready - if possible, please try and ring whilst sitting at the computer
with all the relevant information and hardware to hand. If you are having
a problem with a particular game, make sure that you have that game
loaded.
5
Be patient - we try our best to deal with queries as fast as we can.
At times it may be necessary to refer queries on to our specialist staff.
Please be patient!
The technical support area will provide you with all the information you need to get the most out
of your gamepad, solve any problems you might have and provide you with the latest game
configurations.
The site also contains regularly updated material including information about:
• Current and forthcoming products
• Links to useful sites
• Driver upgrades
• Game configuration
To contact your local Saitek Technical Support Centre, look up the relevant address on the
separate Technical Support Center sheet that comes packaged with this product.
Contacting Saitek
If you do not have access to the Internet, or if the Website cannot answer your question, you will
need to contact your local Saitek Technical Team.
However, before contacting Technical Support, here are a few tips
to help us to help you:
• Make sure you have followed all the steps shown in this manual
• Check that the gamepad is correctly connected to your computer
• Confirm that your PC is functioning normally
At Saitek, we aim to offer a comprehensive and thorough technical support to all of our users.
So, before you call, follow the guidelines below to ensure that you have all of the information
11 12