1
Neat Image
plug-in for Photoshop (Win)
To make images look better.
User guide
Document version 7.6, September 26, 2014
© 1999-2014 by Neat Image team, ABSoft. All rights reserved.
User Guide
Neat Image plug-in for Photoshop (Win)
Table of contents
1. Introduction...............................................................................................................3
1.1. Overview.......................................................................................................................................................3
1.2. Features .........................................................................................................................................................3
1.3. Requirements ................................................................................................................................................4
2. Key concepts ............................................................................................................5
2.1. What it can do – functionality of Neat Image................................................................................................5
2.2. When it works – types of input images .........................................................................................................5
3. Installing plug-in .......................................................................................................6
4. Filtration process overview .....................................................................................7
4.1. Overview of Neat Image filtration process....................................................................................................7
4.2. Running Neat Image on a sample image .......................................................................................................8
5. Filtration process details .........................................................................................9
5.1. Stage I. Invoke the plug-in from Photoshop ..................................................................................................9
5.2. Stage II. Prepare a device noise profile .........................................................................................................9
5.3. Stage III. Adjust filter settings.....................................................................................................................11
5.4. Stage IV. Adjust Action settings (optional).................................................................................................17
5.5. Stage V. Apply filter ...................................................................................................................................18
6. Using plug-in in actions and smart filters ............................................................19
6.1. Configuring Neat Image in actions and smart filters ...................................................................................19
6.2. Neat Image in action-based batch processing..............................................................................................20
7. Device noise profiles..............................................................................................21
7.1. Getting ready-made noise profiles...............................................................................................................21
7.2. Building a profile for a device mode (standard profiling procedure) ..........................................................21
7.3. Preparing profile set for different device modes .........................................................................................27
7.4. Using noise profiles.....................................................................................................................................31
8. Additional tools.......................................................................................................32
8.1. Alternative modes of image viewer.............................................................................................................32
8.2. Navigator.....................................................................................................................................................32
8.3. Profile Viewer .............................................................................................................................................32
9. Preferences .............................................................................................................33
9.1. General preferences.....................................................................................................................................33
9.2. Profiling preferences ...................................................................................................................................33
9.3. Matching preferences ..................................................................................................................................34
9.4. Performance preferences .............................................................................................................................34
9.5. Folders preferences .....................................................................................................................................35
10. Examples ...............................................................................................................36
10.1. Images to build a noise profile ..................................................................................................................36
10.2. Filtration results ........................................................................................................................................38
11. Questions and answers .......................................................................................39
11.1. General questions ......................................................................................................................................39
11.2. Filtration-related questions........................................................................................................................39
12. Tips and tricks ......................................................................................................40
12.1. Partial filtration .........................................................................................................................................40
13. Information ............................................................................................................40
13.1. Issues and bugs..........................................................................................................................................40
13.2. Plans..........................................................................................................................................................40
13.3. Detailed feature map .................................................................................................................................40
13.4. Contacts.....................................................................................................................................................41
13.5. Legal information......................................................................................................................................41
13.6. Registration ...............................................................................................................................................42
13.7. Acknowledgments.....................................................................................................................................42
14. Index ......................................................................................................................43
2
© 1999-2014 by Neat Image team, ABSoft. All rights reserved.
26-Sep-14
User Guide
Neat Image plug-in for Photoshop (Win)
1. Introduction
1.1. Overview
Neat Image is a digital filter software designed to
reduce visible noise in digital photographic images.
Neat Image incorporates the most advanced noise
reduction algorithms in the industry. Neat Image
detects, analyzes, and reduces image noise. The
quality of Neat Image noise reduction is higher than
that of other methods because Neat Image takes into
account specific characteristics of particular image
acquisition devices, thus making the filtration more
accurate. Using device noise profiles, Neat Image
adapts its noise filter to almost any input device –
digital camera, scanner, etc.
Noise is a serious problem that hinders
high-quality digital image processing. In digital
photography, the consumer- and prosumer-level
cameras produce images with an easily noticeable
noise component. This component is especially
strong in images shot at high ISO rates. The noise
reduces the visual quality of digital images and
resulting printouts. Some image processing
operations, like sharpening, make quality of noisy
images even worse.
Neat Image’s noise filter offers a rich control set to let user adjust all
Online examples of Neat
settings and achieve the desired level of noise reduction. In addition, Neat
Image noise reduction:
Image includes a smart sharpening filter to make images look sharper
www.neatimage.com
without any degradation of image quality (which is usually inevitable with
noisy images). The combination of the sharpening and noise filters makes such an effect possible.
Neat Image plug-in for Photoshop is currently produced in three editions: Demo, Home and Pro. All
editions provide top-quality noise reduction and sharpening. The difference is the following:
Demo plug-in is a free edition of the software with limited functionality
Home plug-in processes only 8-bit images and does not support Photoshop actions
Pro plug-in supports 8-bit, 16-bit and 32-bit images as well as Photoshop actions and smart filters
1.2. Features
Photoshop plug-in
To selectively apply noise reduction to layers, channels, selections (areas of interest)
To automate your workflow using Photoshop actions including Neat Image noise reduction
To enable noise reduction in Photoshop action-based batches
32-bit and 64-bit versions of Photoshop supported
Noise Reduction and Image Sharpening
Advanced noise filter to reduce noise and grain in digital images
Smart sharpening filter to make images look sharper without amplification of noise
8-bit, 16-bit and 32-bit image support to fully utilize capabilities of modern image acquisition
devices and support HDR post-processing workflows
CUDA and OpenCL acceleration to speed up processing using computation-capable GPUs
Device Noise Profiles
Auto Profile to build noise profiles for your camera or scanner on the fly
Rich set of pre-built noise profiles in the online profile library
Auto Match for selecting the most suitable pre-built noise profiles for input images
Some features are only available in the Home or Pro plug-in. Detailed feature map (page 40) explains
the differences between editions of Neat Image plug-in for Photoshop.
26-Sep-14
© 1999-2014 by Neat Image team, ABSoft. All rights reserved.
3
User Guide
Neat Image plug-in for Photoshop (Win)
1.3. Requirements
1.3.1. Hardware requirements
System requirements for practical use of Neat Image depend on size of input images. The more system
RAM is available the larger the images that can be handled. The processing speed is determined
primarily by the processor number-crunching power and memory speed (clock frequency, number of
cores/processors, cache size), memory speed and availability of CUDA-capable GPU.
Recommended system configuration to process photos produced by modern digital cameras:
Multi-core Intel processor: Core i7, i5, i3, etc.; single or multi-processor
1 GB RAM or more
True color display, resolution 1024x768 or more
Optional CUDA acceleration requires:
CUDA-capable NVIDIA video card;
Recent video driver supporting CUDA v4.2 or newer.
(you can download the latest versions of the video drivers from http://www.nvidia.com)
Optional OpenCL acceleration requires:
Supported video card:
ATI Radeon HD 57xx/58xx/59xx;
AMD Radeon HD 67xx/68xx/69xx;
AMD Radeon HD 77xx/78xx/79xx;
AMD Radeon HD 87xx/88xx/89xx;
AMD Radeon R7 260X;
AMD Radeon R9 270X/280X/290X;
Another AMD/ATI GPU based on one of the following chip series:
Juniper, Cypress, Barts, Cayman, Cape Verde, Pitcairn, Tahiti, Bonaire, Hainan, Hawaii
Latest version of AMD Catalyst Driver
1.3.2. 64-bit plug-in
Recommended OS:
Windows 8.x 64-bit, Windows 7 64-bit, Vista 64-bit, Windows XP 64-bit
The plug-in is compatible with the following plug-in hosts:
Adobe Photoshop CC 2014 / CC / CS6 / CS5.x / CS4 (all 64-bit)
Corel PHOTO-PAINT X7 / X6 (64-bit)
Corel Paint Shop Pro X7 / X6 (64-bit)
PhotoLine (64-bit)
The plug-in may be compatible with other 64-bit hosts as well.
1.3.3. 32-bit plug-in
Recommended OS:
Windows 8, Windows 7, Vista, XP; 32-bit or 64-bit
The plug-in is compatible with the following plug-in hosts:
Adobe Photoshop CC 2014 / CC / CS6 / CS5.x / CS4 / CS3 / CS2 / CS / 7 / 6 / 5 (all 32-bit)
Adobe Photoshop Elements 13 / 12 / 11 / 10 / 9 / 8 / 7 / 6 / 5 / 4 / 3 / 2
Corel / Jasc Paint Shop Pro X7 / X6 / X5 / X4 / X3 / X2 / XI / X / 9 / 8 / 7
CorelDRAW Graphics Suite / Corel PHOTO-PAINT X7 / X6 / X5 / X4 / X3 / 12
Ulead PhotoImpact X3 / 12 / 11 / 10 / XL / 8
Microsoft Digital Image Pro
Microsoft Digital Image Suite 2006
PhotoLine (32-bit)
The plug-in may be compatible with other 32-bit hosts as well.
4
© 1999-2014 by Neat Image team, ABSoft. All rights reserved.
26-Sep-14
User Guide
Neat Image plug-in for Photoshop (Win)
1.3.4. Supported types of images
The following image types are supported:
8-bit / 16-bit / 32-bit per channel RGB images
8-bit / 16-bit / 32-bit per channel grayscale images
Color input images are supposed to be in a flavor of RGB color space, like AdobeRGB, sRGB, etc. If an
input image is in some flavor of RGB color space then Neat Image produces the output image in exactly
the same flavor of RGB color space.
Minimum size of an input image is 40x40 pixels; maximum size is usually limited by the amount of
system RAM available.
The plug-in can work with images stored using any file format that can be opened by Photoshop: PSD,
TIFF, RAW, JPEG, etc.
2. Key concepts
2.1. What it can do – functionality of Neat Image
Neat Image is a digital image filter. Its main function is to reduce noise in digital images.
Neat Image can work with images produced by any imaging devices – digital cameras, scanners, etc.
Neat Image can be adjusted to a particular device by means of a device noise profile, which describes
the noise characteristics of the device working in a certain mode.
A device noise profile is built by analyzing featureless image areas that contain no visible (or important)
details. Usually the software can find such areas completely automatically. In a difficult case, you can
assist it and select featureless areas manually. Finding such areas is very easy for human eyes but may
sometimes be a bit difficult for software.
By analyzing found or specified featureless areas, the Auto Profile function in Neat Image builds a profile
which describes the noise in these areas. Using this profile, Neat Image’s noise filter can efficiently
reduce noise in the whole image.
When several such profiles for different device modes are available, the Auto Match function can
automatically select the profile that matches given input image. In this way, you can skip noise analysis
and simply re-use one of profiles built earlier.
Smart Profile
combines the power of Auto Profile and Auto Match by preparing two candidate profiles and
then selecting the better one for actual image processing. This improves automated image processing
and helps to achieve great results in more cases.
The noise filter processes images in three spatial frequency ranges. This makes possible reducing noise
in one frequency range even if details are present in other ranges. The filter can also selectively process
any of the color channels components of the input images.
In addition to the noise filter, there is the smart sharpening filter, which only sharpens image details
without increasing the level of noise. This filter also uses the noise profile to tell noise from details, so
applying the noise and sharpening filters together saves time and produces better overall results.
2.2. When it works – types of input images
Neat Image is designed to reduce noise in images produced by digital cameras and scanners, and can
also be used to process images from other sources. An input image should satisfy the following
requirements:
Noise must be uniformly distributed throughout the image, i.e., there should be no strong
surges of noise intensity in some areas of the image or significant changes of noise characteristics
across the image.
Neat Image works fine, for example, on images with high ISO noise because such noise usually
uniformly covers the whole image area. However, ‘hot’ or ‘dead’ pixels (produced by single
‘broken’ elements of image sensor) do not satisfy the uniformity condition and, therefore, are not
efficiently removed by Neat Image.
26-Sep-14
© 1999-2014 by Neat Image team, ABSoft. All rights reserved.
5
User Guide
Neat Image plug-in for Photoshop (Win)
Another frequent source of noise is JPEG compression. The JPEG noise is approximately uniform
when high quality setting (low compression rate, larger file size) is used. However, low
compression quality makes noise non-uniform. Therefore, we recommend using the highest
quality levels whenever possible. Try to avoid visible artifacts ('squares' or ‘blocks’ introduced by
JPEG compression) in input images beginning from the early stages of image processing. If you
can, use lossless file formats such as TIFF or RAW (any file format supported by Photoshop can
be used with the Neat Image plug-in in Photoshop environment).
Noise should be concentrated in high and medium spatial frequencies. This condition is
usually met by images produced by modern digital cameras. This condition may not be completely
satisfied if you use the strong (e.g., x2-x3 and more) digital zoom features of digital cameras.
3. Installing plug-in
Normally, the Neat Image plug-in is automatically installed to Photoshop (or another compatible
image editor) when you download and use the standard Neat Image install package corresponding to
your version of Photoshop.
If for some reason the plug-in is not automatically installed, then you can install it manually using the
guidelines below.
3.1.1. Manual installation: 64-bit version
To manually install Neat Image plug-in to 64-bit host application:
Photoshop CC 2014 / CC / CS6 / CS5.x / CS4 64-bit
Copy the NeatImage.8bf file from the Neat Image installation folder
1
(typically, C:\Program Files\Neat Image for Photoshop\ ) into the Plug-Ins subfolder inside the
Photoshop folder.
Then re-start Photoshop (make sure you start the 64-bit version of Photoshop, as there may be two
Photoshop versions available, 32-bit and 64-bit one) and find Neat Image in the menu:
Filter > Neat Image > Reduce Noise.
3.1.2. Manual installation: 32-bit version
To manually install Neat Image plug-in to 32-bit host application:
32-bit Photoshop / Photoshop Elements
Copy the NeatImage.8bf file from the Neat Image installation folder
(typically, C:\Program Files\Neat Image for Photoshop\ in 32-bit Windows
or C:\Program Files (x86)\Neat Image for Photoshop\ if you use 64-bit Windows) into Plugins or
1
Plug-Ins subfolder inside the Photoshop / Photoshop Elements folder.
Then re-start Photoshop and find Neat Image in the menu: Filter > Neat Image > Reduce Noise.
Corel Paint Shop Pro
In Paint Shop Pro, open the File menu, select Preferences > File locations > Plug-ins (PSP8 or newer),
Preferences > File locations (PSP7) or Preferences > Plug-in Filters (PSP4-6) and select the Neat Image
installation folder (usually, C:\Program Files\Neat Image for Photoshop\ in 32-bit Windows or
C:\Program Files (x86)\Neat Image for Photoshop\ if you use 64-bit Windows).
Press OK and then check the menu: Effects > Plug-in Filters > Neat Image > Reduce Noise.
Other image editors (plug-in hosts)
Please refer to the documentation of the corresponding plug-in host to find the correct way to install
1
If the language of Photoshop is not English, you may have to use another Plug-Ins folder, for example, "Modules
externes" in French, "Zusatzmodule" in German version, "Insteekmodules" in Dutch, "Plug-In" in Italian, etc.
6
© 1999-2014 by Neat Image team, ABSoft. All rights reserved.
26-Sep-14
User Guide
Neat Image plug-in for Photoshop (Win)
a third-party Photoshop-compatible plug-in (8BF-type). You can find the Neat Image plug-in itself
(NeatImage.8bf) in the Neat Image installation folder.
4. Filtration process overview
4.1. Overview of Neat Image filtration process
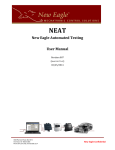
1. Prepare image
- in Photoshop, open the image to be
processed;
- use the Filter > Neat Image > Reduce
Noise… menu item to open Neat
Image;
2. Prepare a noise profile
Build a new profile on the spot or load a
pre-built one.
To build a new profile:
- click the Auto Profile button;
this will automatically find, select and
analyze a featureless (noise-only)
image area;
if you see that the automatically
selected area includes any important
image details then move the selection
to an area without details and click the
Auto Profile button again;
3. Adjust the filter settings
- switch to the Noise Filter Settings tab;
- adjust the filter settings to achieve
desired level of noise reduction:
- try to vary the setting:
Noise Reduction Amounts: Luminance
and see how the preview changes;
4. When you are happy with preview results, apply the filter to the image: click the Apply button.
26-Sep-14
© 1999-2014 by Neat Image team, ABSoft. All rights reserved.
7
User Guide
Neat Image plug-in for Photoshop (Win)
4.2. Running Neat Image on a sample image
You can download a test-kit prepared to help you start using Neat Image plug-in:
http://www.neatimage.net/files/Testkit5.zip, 250KB. Please download and unzip it to a new folder on
the hard disk. The test-kit contains a sample image: SampleImage.jpg. This image is a part of typical
photo taken with a digital camera. The detailed information about the test image is available in the
SampleImageInfo.txt file.
Please go through the stages below to see how the image can be improved by Neat Image:
Stage 1. Open the sample image in Photoshop and invoke Neat Image
1.
Open the sample image (SampleImage.jpg) in Photoshop;
You will see that there is strong noise in the image, especially in the sky area (use zoom and
scroll to better see it). This is the typical noise produced by a digital camera. The task of Neat
Image is to reduce this noise.
2.
Select the Filter > Neat Image > Reduce Noise… menu in Photoshop to open Neat Image plug-in.
Stage 2. Load the sample noise profile in Neat Image plug-in
To reduce noise in the image Neat Image generally needs a noise profile describing the noise properties
of the image. For this sample image, we have prepared such a noise profile in the test-kit in advance:
SampleProfile.dnp. Using this profile, Neat Image can efficiently reduce the noise in the image.
1.
In the Device Noise Profile tab
button);
(the Load Profile
2.
Then in the Load Device Noise Profile dialog, navigate to the folder where the noise profile has
been unzipped and select the SampleProfile.dnp file.
, click
Now the sample noise profile is loaded and Neat Image is almost ready to filter the image. Usually, you
would adjust the filter settings at this stage. To make things easier for the first run of Neat Image, we
have prepared a sample preset with “good” settings to process the sample image.
Stage 3. Load the sample filter preset in Neat Image plug-in
1.
Switch to the Noise Filter Settings tab
button) in the Filter Settings box;
and click
(the Load Filter
Preset
2.
Then in the Load Filter Preset dialog, navigate to the folder where the sample filter preset has
been unzipped and select the SamplePreset.nfp file.
Now the sample filter preset is loaded and the filter settings are adjusted to process the sample image.
Stage 4. Apply the filter to the image
1.
Click
in the bottom of the plug-in window and wait until the image processing is
completed. Processing may take a few seconds. After that the filtered image is displayed in
Photoshop. Notice that the noise – especially in the sky – has been significantly reduced while
the real image details have been preserved.
Please be aware that the sample noise profile and sample filter preset supplied with the test-kit are
suitable only for images taken with that particular digital camera working in that particular mode. Neat
Image can perform similar noise reduction on images captured or acquired by any other camera (or
scanner) working in any mode. To be able to do that Neat Image needs device noise profiles that
describe the noise characteristics of those devices. The software can build these profiles on the fly using
the Auto Profile function. Also, you can find ready-made noise profiles for many cameras and scanners in
the Profiles section of the Neat Image web page:
http://www.neatimage.com/win/photoshop/profiles.html
The next sections – Filtration process details, page 9, and Device noise profiles, page 21,– contain
detailed descriptions of the filtration and profiling processes. There are also examples of profiling and
filtration in the Neat Image web page:
http://www.neatimage.com/win/photoshop/examples.html
8
© 1999-2014 by Neat Image team, ABSoft. All rights reserved.
26-Sep-14
User Guide
Neat Image plug-in for Photoshop (Win)
5. Filtration process details
The Neat Image plug-in can be used in Photoshop to process one or several images. This section
describes the key stages of using the Neat Image plug-in to process one image. There is also a way to
automatically process many images (see the Using plug-in in actions and smart filters section, page 19).
5.1. Stage I. Invoke the plug-in from Photoshop
In Photoshop, open and select an image to be processed (it will be called ‘input image’ hereafter) and
then invoke the Neat Image plug-in using the standard method:
Select the Filter > Neat Image > Reduce Noise… menu item in Photoshop.
The Neat Image plug-in window will open and show the input image.
To scroll and pan the image
press the spacebar and drag the image with the left mouse button.
To change the image zoom level
use the mouse wheel when mouse is over the viewer;
use the zoom control under the image viewer;
use the Ctrl+Plus, Ctrl+Minus, Ctrl+0 (zero), Ctrl+Alt+0 (zero) keyboard shortcuts;
5.2. Stage II. Prepare a device noise profile
To filter the input image, Neat Image needs to know the characteristics of noise produced by the image
acquisition device (digital camera, scanner, etc.) that the image comes from. The noise characteristics of
a device working in a certain mode are stored in a device noise profile.
There are several ways to get a device noise profile that suits the input image:
1.
Auto Profile:
to build a new profile by analyzing the input image (or a specially prepared test
image);
2.
3.
4.
Auto Match: to automatically select the most suitable device noise profile from a pre-built set of
profiles (when it is available);
Smart Profile: to use both Auto Profile and Auto Match (with Auto Fine-Tune) to prepare two
candidate profiles and then automatically select the better of two profiles;
Load Profile: to manually select a suitable profile from a pre-built set of profiles.
The first option is often the easiest one provided the input image includes uniform featureless areas that
1
contain noise but no visible or important details. Auto Profile will try to automatically find such image
areas and analyze them to build a noise profile. When the image does contain featureless areas, this
automatic way of preparing a noise profile is the most accurate and therefore recommended. If the input
image includes no such areas, another image with featureless areas can be used to build a profile.
The other options are available once you have a pre-built reusable set of profiles. You can find some
pre-built profile sets for different cameras and scanners in:
Profiles section of the Neat Image web page:
http://www.neatimage.com/win/photoshop/profiles.html
Device noise profiles section of the Neat Image community forum:
http://www.neatimage.net/forum/viewforum.php?f=5
Other digital imaging forums and web pages from users of Neat Image.
If you cannot find a pre-built set of profiles for your camera or scanner, you can easily build such
profiles yourself. Moreover, please be aware that using profiles built by other people may produce less
than optimal results with your images because of possible slight differences in noise properties of
cameras (scanners) as well as due to different image processing workflows used. Therefore, we advise
to use profiles built by others only as a starting point to learn how to use Neat Image. To achieve better
1
You can see some examples of featureless image areas in the Examples section, page 36.
26-Sep-14
© 1999-2014 by Neat Image team, ABSoft. All rights reserved.
9
User Guide
Neat Image plug-in for Photoshop (Win)
results consider building your own reusable profiles.
You can build a set of profiles for different device modes or just one profile to process one image. You
can find more details about profiling in the Device noise profiles section, page 21.
Once you have a set of profiles for different modes of your imaging device, you can (automatically or
manually) select a profile that matches the input image. Or if you have just built a singe profile
specifically for the input image, then you can directly use the profile to process the image in the Stages
III-V below.
Auto Profile: build a new profile using the input image
Make sure you have switched to the Device Noise Profile tab:
Click
Regular Image
(the Auto Profile button) in the toolbar, or use the Profile > Auto Profile with
menu item, or press F2.
Neat Image will find and highlight the image area selected by Auto Profile for main analysis. Neat
Image will then automatically analyze the noise in that area as well as in the whole image and will
build a new noise profile.
To build a profile, Neat Image is looking for a flat uniform featureless area in the input image. In
difficult cases, Neat Image may have trouble finding a uniform featureless area in the input image
and then the auto-selected area will contain some important image details. In such a case, move the
selection to an area that does not contain any image details (you can make a new selection or resize
the old one) and then click the same Auto Profile button again.
After the profile is built, check the Quality indicator in the Device Noise Profile box. A profile built
using a uniform and featureless image area will show a high value in this indicator. If the profile
quality is high (for example, higher than 75%) then you can be sure that the noise profile is accurate.
In this case, consider the noise profile ready and proceed to Stage III. Adjust filter settings, page 11.
If the quality is not high, try to select another uniform image area and use Auto Profile once again.
That may not help still, especially if the input image contains only a few featureless areas. In this
case, consider building a noise profile using an alternative image or special test image prepared
with the Calibration Target. Please see the Device noise profiles section, page 21, to learn how to
use the Calibration Target to build device noise profiles. You can also try to load some pre-built
profile using one of the methods described below.
Auto Match: select matching noise profile from a pre-built profile set
Click
(the Auto Match button) or use the Profile > Auto Match menu item.
The Auto Match function uses the EXIF data fields of the input image to automatically select and load
the device noise profile that matches the device mode of the image. The most matching profile is
1
selected from profiles stored in a special folder. By default, this folder is in your Documents :
Documents\Neat Image for Photoshop\Profiles\
Auto Match will look for matching profiles in that folder as well as all its subfolders (where you can
place profiles built by you or downloaded from the Internet).
After a profile is loaded by Auto Match, the degree of match between the current input image and
loaded noise profile is displayed in the Device Noise Profile box. Higher Match values mean better
match, leading to more accurate filtration.
Smart Profile: prepare two profiles and select the better one
Use the Profile > Smart Profile menu item, or press the F5 key.
Smart Profile uses both Auto Profile and Auto Match (with Auto Fine-Tune) to prepare two candidate
profiles and then selects the better of two profiles. For Smart Profile to be fully efficient, the input
image must contain flat featureless areas with noise for Auto Profile to analyze, and also there must be
1
You can check and adjust the location of that folder using the menu Tools > Preferences > Matching.
10
© 1999-2014 by Neat Image team, ABSoft. All rights reserved.
26-Sep-14
User Guide
Neat Image plug-in for Photoshop (Win)
several pre-built profiles to help Auto Match find the most matching noise profile, as described
above. You can adjust settings of Smart Profile function in Preferences.
To manually select a noise profile from a pre-built profile set
Click
(the Load Profile button) or use the Profile > Load Profile… menu item. Then
select a profile in the Load Device Noise Profile dialog.
or
(the drop-down button) in the Device Noise Profile box to open the popup menu with all
Click
available profiles and then select one of the available profiles.
Please note that you have either to build your own profiles or download some pre-built profiles and
place them to the Neat Image’s Profile folder to make this drop-down button and popup menu truly
1
work. By default the Profile folder is located in the Documents folder :
Documents\Neat Image for Photoshop\Profiles\
If you build or download some pre-built profiles, place (unzip the profile set if necessary) them to
the above folder. Neat Image will recognize and display those profiles in the popup menu to help
you quickly load any of them when needed.
When manually selecting a profile for input image, use the profile file names and sub-folder
structure to guide your search. See Preparing profile set for different device modes: Stage III.
Structuring profile set, page 29, for more information on profile set structuring.
To additionally fine-tune the loaded or matched profile
You may want to additionally fine-tune the profile after it has been loaded either automatically
(using Auto Match) or manually (using Load Profile). Fine-tuning the profile to the current image
usually makes the profile more accurate and better reflecting the image’s noise properties. Please
note that you do not need to fine-tune a profile if you have built it using Auto Profile. Auto Profile
automatically applies fine-tuning so you do not need to repeat it.
(the Auto Fine-Tune button) or use the Profile > Auto Fine-Tune menu item to
Click
fine-tune the profile to the current input image.
There is no need to select any area in the input image because Auto Fine-Tune automatically analyzes
the whole image.
Once you have loaded the profile that matches the input image or you have just built a new profile
specifically for the current input image, proceed to process the image in the Stages III-V below.
5.3. Stage III. Adjust filter settings
As soon as the noise profile is ready you can use the noise and sharpening filters. These filters have
several adjustable settings. The default settings usually produce good results. You may want to
additionally vary the filter settings to achieve the filtration results that look best to your eyes.
Switch to the Noise Filter Settings tab:
5.3.1. Use preview when adjusting filter settings
The image viewer in the Noise Filter Settings tab shows a part of the image processed by the noise and
sharpening filters. If you change any filter settings then the preview is automatically updated (provided
(the Preview button) in the toolbar is depressed). You can zoom in and out, drag, scroll
1
You can check and adjust the location of the Profile folder using the menu Tools > Preferences > Folders.
26-Sep-14
© 1999-2014 by Neat Image team, ABSoft. All rights reserved.
11
User Guide
Neat Image plug-in for Photoshop (Win)
and pan the image to see how the filtration affects different parts of the image. If you manually select an
area in the image then only the selected area will be processed for preview.
When the preview is ready (the preview area shows “Filtered”), you can click inside the preview image
area to temporarily switch back to the original for comparison.
5.3.2. Standard and Advanced modes
Neat Image has two sets of filter controls; they are available in the Standard mode and Advanced mode
(you can select the mode using the Tools > Standard mode and Advanced Mode menu items). The Standard
mode provides a simple control set, recommended for beginners who just start using Neat Image. The
Advanced mode provides the most complete control set with maximum manual control over noise
profiling and filtration processes. The Advanced mode is recommended for power users. Adjusting filter
settings is described below separately for the Standard and Advanced mode. We recommend starting with
the part about the Standard mode and then proceeding to the part about the Advanced mode if you are going
to use the complete control set.
5.3.3. Adjust filter settings in Standard mode
There are two main filters in Neat Image: noise reduction filter and sharpening filter. These two filters
can be used together and each of them can be used independently. You can enable, disable and adjust
these filters using the guidelines in the subsections below.
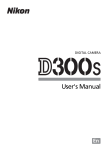
Adjusting noise filter settings in Standard mode
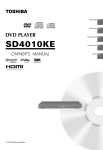
If you work with a color image then two major image components can be distinguished: the luminance
and chrominance component. This distinction is very useful from the standpoint of noise reduction
because it allows processing luminance and chrominance information separately.
Some color images are represented in color spaces that enable direct separation of the luminance and
chrominance components (for example, Lab, YCrCb, etc.). Other images (including RGB images that
Neat Image takes as input) have to be converted to another representation to enable separation of the
luminance and chrominance components. Neat Image applies an internal color space conversion to
achieve that. Once luminance and chrominance components of the input image are separated, Neat
Image can treat them individually. Neat Image provides separate luminance and chrominance settings in
the noise filter (see the figure on the right).
In the Standard mode, the noise reduction applied to each image component (either luminance or
chrominance component) is controlled by the corresponding noise reduction amount setting.
A noise reduction amount tells the filter how much of the detected
noise should be reduced. For example, if the noise reduction
amount is set to 50% then all image elements that are considered
(by the filter) to be noise are reduced (made weaker or less visible)
in half. The noise reduction amount value of 100% tells the filter
to remove the detected noise completely.
The default noise reduction amounts usually produce good
1
filtration results provided the noise profile is accurate . By default,
the noise filter removes 60% of detected noise in the luminance
component of the input image and 100% of noise in the
chrominance component. Our experience shows that the default
noise reduction amounts usually provide a good balance between noise removal and preserving natural
(not over-processed) appearance of filtered images.
Decreasing the noise reduction amounts may have a positive effect if the input image contains some
natural noise. For example, when you filter images of asphalt, sand, or anything else that contains fine
natural noise-like features, it may be helpful to reduce amounts down to 30-50%.
1
Use the Quality and Match indicators in the Device Noise Profile box to estimate the accuracy of the profile. The
Quality indicator shows how accurate and complete is the noise analysis itself. The Match indicator shows how closely
this profile corresponds to current the input image. Both indicators have to show high values for the noise reduction to
be accurate.
12
© 1999-2014 by Neat Image team, ABSoft. All rights reserved.
26-Sep-14
User Guide
Neat Image plug-in for Photoshop (Win)
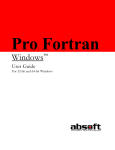
Adjust noise reduction amounts
1
Use the Noise Reduction Amounts: Luminance and Chrominance sliders.
You can vary the noise reduction amount for both luminance and
chrominance component of the input image. The higher a certain As human vision is not very
sensitive to variations of colors,
noise reduction amount, the more of the detected noise is
strong filtration in the
removed in the corresponding image component. Be careful,
chrominance component does
setting the noise reduction amounts too high, especially in the
not noticeably distort image, but
luminance component, may lead to loss of fine details and
efficiently removes color noise.
unnaturally looking (over-smooth, plastic-like) results. Too low
amounts may be not enough to sufficiently reduce the objectionable part of the noise. You have to
balance the noise reduction amounts (most importantly, the amount of noise reduction in the
luminance component) to get the result that looks best to your eyes.
Use preview
As you make changes in the noise filter parameters, check preview on different parts of the image to
get a better feeling for the prospective results of noise reduction.
If the noise filtration looks too strong try to decrease the noise reduction amounts. If the noise
filtration is not sufficient then increase the amounts.
Adjusting sharpening settings in Standard mode (optional)
The sharpening filter in Neat Image increases image sharpness without increasing the noise strength.
The sharpening filter is disabled (sharpening amount is set to 0%) by default. Increase the sharpening
amount to sharpen the image. Like with any sharpening method, you have to balance the sharpening
amount to avoid over-sharpening.
Use the preview when adjusting the sharpening settings.
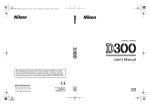
Adjust sharpening amount
Use the Sharpening: Amount slider.
Specify how much sharpening should be applied to the input
image.
Use preview
As you make changes to the sharpening setting, check preview
on different parts of the image to get a better feeling for the
results of sharpening.
As soon as you are happy with the preview results regarding both noise reduction and sharpening,
proceed to save the filter settings into a preset (see page 16), or directly to the Stage V. Apply filter,
page 18.
5.3.4. Adjust filter settings in Advanced mode
As said above, Neat Image has two sets of filter controls, that are available in the Standard mode and
Advanced mode (you can select the mode using the Tools > Standard mode and Advanced Mode menu items).
The Standard mode described above provides a simple control set, recommended for beginners who just
start using Neat Image. The Advanced mode provides the most complete control set with maximum
manual control over noise profiling and filtration processes. The Advanced mode is recommended for
power users. If you want to use the Advanced mode then please read this sub-section, otherwise skip it
and proceed to page 16 for the next stage.
As compared with the Standard mode, the Advanced mode offers a more extensive set of filter controls.
1
We recommend disabling the sharpening filter when adjusting the noise filter. To disable the sharpening filter, set the
Sharpening: Amount to 0%.
26-Sep-14
© 1999-2014 by Neat Image team, ABSoft. All rights reserved.
13
User Guide
Neat Image plug-in for Photoshop (Win)
There are also two filters – noise reduction filter and sharpening filter – but these have more settings
now. Please follow the guidelines below to adjust both filters.
Adjusting noise filter settings in Advanced mode
In Advanced mode, the noise filter has separate settings for all frequency and channel components of the
input image. There are also pairs of noise level - noise reduction amount controls for each of these
image components. The meaning of each noise level - noise reduction amount pair is the following:
a noise level control adjusts the threshold that determines which image elements are considered
noise in the corresponding image component and which elements are considered not noise;
a noise reduction amount control determines how much reduction is applied to the image elements
identified as noise in the same image component.
In Advanced mode, you can adjust the noise levels as well as noise
reduction amounts for each image component. The noise levels are
adjusted relative to the noise levels of the current noise profile that
have been measured during profiling.
For example, the noise level of the Y (luminance) channel could be
1
measured in the noise profile at 8.55 units. This number tells the
noise filter which image elements should be considered noise and
which – image details: the image elements that are weaker than
8.55 units are considered noise and reduced by the noise filter; the
image elements that are stronger than 8.55 units are considered
details and not reduced.
If you do not change the default noise filter settings (Noise Levels:
+0%) then noise reduction in the Y channel is completely
determined by the measured number from the noise profile (8.55
units). However, if you do adjust the filter setting for the Y noise
level then this adjustment is also taken into account. For example,
if you set the Noise Levels: Y control to +15% then what is
considered by the noise filter as the actual noise level is:
Y:
8.55 * (100% + 15%) => 9.83 units
With this adjustment, the image elements in the Y channel that are weaker than 9.83 units are considered
noise and reduced, and elements that are stronger than 9.83 units are preserved.
Thus, with a noise level - noise reduction amount pair of settings you can adjust what should be
considered noise in a component of the input image and how much of this noise should be reduced. You
have access to six such pairs – three for channel components (Y, Cr, Cb) and three for spatial frequency
components (High, Mid, Low) of the input image.
Because the noise level controls are relative to the device noise profile, the default filter settings usually
2
produce good results when the noise profile is accurate . The noise level defaults are 0%, which means
the noise levels are completely determined by the noise profile. When you adjust the level controls, the
noise level estimations are raised or lowered accordingly. A noise level control can be in the range from
–100%, which means no image elements are considered noise, and therefore, no noise reduction is
applied in the corresponding image component; to +150%, which means noise reduction is applied to
the image elements that are weaker than 250% of the noise profile’s noise level.
Noise reduction amounts can be in the range from 0% (none of the detected noise is removed) to 100%
(all the detected noise is removed). By default, the noise filter removes 100% of detected noise in all but
the luminance (Y) channel where only 60% of detected noise is removed.
Decreasing the noise reduction amounts can have a positive effect if the input image contains some
natural noise. For example, when you filter images of asphalt, sand, or anything else that contains fine
natural noise-like features, it may be helpful to reduce amounts down to 30-50%. Our experience shows
that these values generally provide a good balance between preserving image details and noise removal.
1
All measured noise levels are shown in the Profile Viewer (use the menu Profile > Profile Viewer to open it).
2
Use the Quality and Match indicators in the Device Noise Profile box to estimate the accuracy of the profile. The
Quality indicator shows how accurate and complete is the noise profile itself. The Match indicator shows how closely
this profile corresponds to the input image. Both indicators have to show high values for the noise reduction to be
accurate.
14
© 1999-2014 by Neat Image team, ABSoft. All rights reserved.
26-Sep-14
User Guide
Neat Image plug-in for Photoshop (Win)
Adjust noise reduction amounts
1
Use the Noise Reduction Amounts: High, Mid, Low; Y, Cr, Cb sliders.
You can vary the noise reduction amount for each
As human vision is not very sensitive to
frequency and channel component of the input
variations of colors, strong filtration in the Cr
image. The higher a certain noise reduction amount,
and Cb channels does not noticeably distort an
the more of the detected noise is removed in the
image, but efficiently removes color noise.
corresponding image component. Be
careful, setting the noise reduction amounts Noise samples of different frequency/size
are shown in the Noise Filter Settings box.
too high can lead to unnaturally looking
(over-smooth, plastic-like) results. Too low These are examples of grainy structures
typically regarded as noise.
amounts may be not enough to sufficiently
remove the objectionable part of the noise.
You have to balance the noise reduction amounts (most importantly, the amount of noise reduction
in the Y channel) to get the result that looks best to your eyes.
If the input image has only fine (high frequency) noise then you can utilize only the high frequency
filter and switch off the filters for other frequencies by setting their amounts to 0%.
Adjust additional filter settings (optional)
If the input image contains strong low frequency noise (for example, a very coarse-grained color
splotches) then you may want to switch on the very low frequency filter (check the Very low freq
checkbox in the Filter Settings box).
Check the Smooth edges checkbox to make edges and lines look smoother.
Check the High quality checkbox to enable the higher-quality noise reduction filter. This will slightly
slow down processing but will deliver the most accurate results in return.
Check the High resolution checkbox to enable the higher-resolution noise filter. This may be useful
when processing images with very fine details that should be better preserved by the filter.
Use preview
As you make changes to the noise filter parameters, check preview on different parts of the image to
get a better feeling for the results of noise reduction.
If the noise filtration looks too aggressive try to decrease the noise reduction amounts for
appropriate channels or frequency components. If the noise filtration is not sufficient then increase
the amounts.
Adjust noise levels (only when necessary)
Usually it is not necessary to change the noise levels if the noise profile is accurate. You only have
to adjust the noise levels if you see that some noise elements are not reduced even if you set the
noise reduction amounts to 100%. Such residual noise elements are usually caused by inaccurate
noise profile (providing inaccurate estimations of actual noise levels). This may be compensated by
adjusting (increasing) the noise levels in the filter settings.
Use the Noise Levels: High, Mid, Low; Y, Cr, Cb sliders.
The noise filter has access to three frequency components and three channel components of the
input image. The corresponding sliders adjust the estimated noise levels of these components.
The higher a certain noise level, the more image elements in the corresponding image component
are considered noise. Be careful, setting a noise level setting too high can lead to removal of
important image details. Setting a noise level setting too low can lead to incomplete filtration:
residual noise and compression artifacts can stay in the output image.
As a rule, if the device noise profile has been built properly, it is not necessary to increase the noise
levels by more than 50%. If the input image contains strong surges of noise in the high frequency
1
We recommend disabling the sharpening filter when adjusting the noise filter. To disable the sharpening filter,
uncheck all channels in the Sharpening Settings box.
26-Sep-14
© 1999-2014 by Neat Image team, ABSoft. All rights reserved.
15
User Guide
Neat Image plug-in for Photoshop (Win)
range, it is recommended to increase the high frequency noise level up to +20 to 40%.
If the input image contains strong color noise, it is recommended to increase the Cr and Cb noise
levels to +30%. In some cases, it may be useful to increase these noise levels up to +100%.
If adjusting noise levels still does not help and some noise elements remain visible in the preview
and output image, probably the device noise profile is not good at all. Return to Stage II, page 9, and
additionally fine-tune the device noise profile or simply rebuild the profile from scratch.
Adjusting sharpening settings in Advanced mode (optional)
The sharpening filter is designed to increase image sharpness without increasing the noise strength.
The default values of the sharpening settings should produce satisfactory results (when sharpening is
enabled for any of the channel components) but you are encouraged to vary the settings to find values
that produce the desired level of sharpness. Zero sharpening amounts will not sharpen the image at all.
The non-zero sharpening amounts will apply sharpening of the specified strength. Use sharpening
controls for different frequency components to sharpen fine, medium or large image details. As with
any other sharpening method, you have to balance the amounts to avoid over-sharpening.
Use the preview when adjusting the sharpening settings.
Select color channels to be sharpened
Use checkboxes in the Sharpening section.
Usually you only want to sharpen the luminance channel – Y.
Select sharpening mode
Check the Conservative checkbox to enable more accurate
sharpening, which produces much less halo effect around sharpened image details.
Adjust sharpening amounts
Use the High, Mid and Low sliders in the Sharpening section.
Specify how much sharpening should be applied to each frequency component of the image.
The standard sharpening settings used by many graphic editors are 100% for high frequency and
0% for medium and low frequencies (used by default).
As soon as you are happy with the preview results regarding both noise reduction and sharpening,
proceed to save the filter settings into a preset (see the subsection below), or directly to the Stage V.
Apply filter, page 18.
5.3.5. Save filter settings into a preset (optional)
To save the current filter settings into a preset
Click
(the Save filter settings as preset… button, pink disk) in the Filter Settings box or use
the Filter > Save Filter Preset… menu item.
In the Save Filter Preset As dialog box, specify the name of the file to save the preset. The filter
presets are stored as *.nfp files.
Saved filter preset includes the noise filter and sharpening settings. By re-opening a preset, you can
reproduce exactly the same filter settings later on. Also, you can exchange filter presets with other
users of Neat Image. Together, a device noise profile and a filter preset can be used to precisely
reproduce the filtration results.
To load a previously saved filter preset
Click
Preset…
(the Load filter preset… button, pink disk) in the Filter Preset box or use the Filter > Load Filter
menu item. In the Load Filter Preset dialog box, specify the name of the filter preset to be
loaded.
16
© 1999-2014 by Neat Image team, ABSoft. All rights reserved.
26-Sep-14
User Guide
Neat Image plug-in for Photoshop (Win)
or
(the drop-down button) in the Filter Settings box to open the popup menu with all
Click
available presets and then select one of them.
1
There are several pre-written filter presets in the following sub-folder in your Documents folder:
Documents\Neat Image for Photoshop\Presets\
Please explore these presets to see what combinations and values of the noise and sharpening
filter’s settings can be used to solve typical tasks (names of the presets explain these tasks).
5.4. Stage IV. Adjust Action settings 2 (optional)
At this point in the workflow, the noise profile is ready, filter settings are adjusted and, therefore, the
filter is ready to be applied to the image. However, before applying the filter, you may want to adjust the
Action Setup settings accessible via the Action Setup button:
These settings specify which noise profile and filter preset should be used by the plug-in on startup
when you use the plug-in next time. For example, you can have Neat Image automatically build a new
noise profile using Auto Profile when you open the plug-in.
The following options are available for noise profiles:
Use Current Profile
Neat Image will use the currently loaded/built profile;
Auto Match
Neat Image will use Auto Match to find and
load the best matching profile from the
profile set on the disk;
Auto Profile
Neat Image will use Auto Profile to build a
profile using the input image;
Smart Profile (Auto Profile and Auto Match)
Neat Image will use both Auto Profile and Auto
Match to prepare two noise profiles and then
will select the better of two resulting profiles.
This provides higher overall quality at
expense of slightly longer processing time.
To be fully efficient, this option also needs a
pre-built set of noise profiles (for Auto Match
to work). You can configure the behavior of
the Smart Profile function using the settings link.
Auto Fine-Tune
Neat Image will additionally apply Auto Fine-Tune to adapt the loaded profile to the input image;
this option is available when you use either Use Current Profile or Auto Match (Auto Profile applies Auto
Fine-Tune automatically);
The plug-in will always use the current filter settings as the default filter preset for the next run.
1
2
You can check and adjust the location of that folder using the menu Tools > Preferences > Folders > Preset folder.
This subsection applies to Neat Image Pro plug-in only.
26-Sep-14
© 1999-2014 by Neat Image team, ABSoft. All rights reserved.
17
User Guide
Neat Image plug-in for Photoshop (Win)
5.5. Stage V. Apply filter
To apply filter to the image
Click
(the Apply button in the bottom of the plug-in window).
The plug-in window will be closed and filtration
will start. Processing may take some time (from
seconds to minutes, depending on the speed of
your computer's processor and size of the image).
Then the filtered output image is displayed in
Photoshop and you can continue your Photoshop
workflow.
Neat Image is a processor-intensive image filter,
so the processor's speed is the most important.
On Core 2 Duo 2GHz, processing a
10-megapixel image takes about 5 seconds (Neat
Image v7 plug-in for Photoshop). On a computer
of typical configuration, the processing time is
linear with respect to image size (when measured
in megapixels).
After filtration, the Neat Image plug-in will also automatically save the current settings such as
device noise profile, filter preset, Action Setup settings, which will enable re-applying the plug-in
(for example, using the Ctrl+F shortcut in Photoshop) with the same settings without re-doing the
stages II-III. Also, you can open the plug-in manually and continue to work with the last used
parameters.
18
© 1999-2014 by Neat Image team, ABSoft. All rights reserved.
26-Sep-14
User Guide
Neat Image plug-in for Photoshop (Win)
6. Using plug-in in actions and smart filters 1
6.1. Configuring Neat Image in actions and smart filters
The Neat Image plug-in can be used in Photoshop actions and smart filters along with the built-in
Photoshop filters. The plug-in has two parameters when used in an action or smart filter: Profile and
Preset. The Profile parameter tells Neat Image which device noise profile should be used, the Preset
parameter specifies which filter preset should be used.
When you record an action or configure a smart
filter that includes the Neat Image plug-in, you can
select the source of noise profile and filter preset
that should be used by the plug-in. To do that click
(the Action Setup button) in the main
plug-in window and then select the corresponding
options in the Action Setup window. You can later
return and check which options are selected in the
current action or smart filter using that window.
To specify how Neat Image should prepare
noise profile(s) for the input image(s)
processed by this action or smart filter, select
one of the following options in the Device
Noise Profile box:
Use Current Profile
The plug-in will use a fixed noise profile that has been created or loaded into plug-in at the time of
action recording (configuring the smart filter) and is currently available in the Device Noise Profile
box in the main plug-in window; the plug-in will record that noise profile into the action or smart
filter and will then always use it when the action is played or smart filter is (re-)applied.
Auto Match
The plug-in will use Auto Match to search and load the best matching profile(s) for input image(s)
2
from the profile set on the disk.
Auto Profile
The plug-in will use Auto Profile to build new noise profile(s) for the input image(s) when the action
is played or smart filter is (re-)applied. The input image(s) must contain enough flat featureless
noise-only areas suitable for noise analysis.
Smart Profile (Auto Profile and Auto Match)
Neat Image will use both Auto Profile and Auto Match to prepare two noise profiles and then will
select the better of two resulting profiles. This provides higher overall quality at expense of
slightly longer processing time. To be fully efficient, this option also needs a pre-built set of noise
profiles (for Auto Match to work). You can configure the behavior of the Smart Profile function using
the settings link.
Auto Fine-Tune
The plug-in will additionally apply Auto Fine-Tune to adapt the loaded profile(s) to the input
image(s), to make the profile(s) more accurate. This option is available when you select Use
Current Profile or Auto Match.
1
Using the plug-in in Photoshop actions and smart filters is only supported in Neat Image Pro plug-in (Detailed feature
map, page 40). Also, smart filters are only supported by the most recent versions of Photoshop.
2
For this option to work, several noise profiles should be available on the hard drive. The profiles should be stored in
the folder specified in Preferences (you can check and modify its location using the menu Tools > Preferences >
Matching > Profile Matching). These can be profiles downloaded from the Neat Image online profile library or from
other sources. You can also use profiles built by you. The input images as well as profiles in the profile set should
contain the EXIF information to make profile-image matching possible. Most noise profiles available in the profile
library in Neat Image website do contain the EXIF data. New noise profiles built with the latest versions of Neat
Image plug-in will also contain the EXIF data (from the images used for profiling). Profiles built with older versions
of Neat Image plug-in may not contain the EXIF data, so it may be useful to re-build them using the latest version.
26-Sep-14
© 1999-2014 by Neat Image team, ABSoft. All rights reserved.
19
User Guide
Neat Image plug-in for Photoshop (Win)
The action or smart filter will use the filter preset created or loaded into plug-in at the time of action
recording (or configuring the smart filter). This filter preset will be recorded into the action or smart
filter and will then always be used when the action is played or smart filter is (re-)applied. When
used in an action, the Preset parameter contains the name of that preset. The preset name is also
shown in the Filter Settings box in the main plug-in window. You can change this preset using the
controls in the Filter Settings box and then the new or modified preset will be recorded into the action
or smart filter.
When you complete the adjustments in the Action Setup window, click the Apply button to save them in
the action or smart filter that you currently record or configure.
6.2. Neat Image in action-based batch processing
The Neat Image plug-in for Photoshop can be used to process several images at a time using
Photoshop’s action-based batching facility.
To use this kind of batching you must do the following:
1) Pick one image from the series of images that you want to process and manually apply Neat Image
filtration to this image to make sure you get the filtration results that you like. Then undo the
changes done to the image.
2) Start recording a new action in Photoshop
(if necessary consult Photoshop’s documentation to check how you can create, record and play
actions in your version of Photoshop).
3) While recording the action, repeat the step (1) and before applying the Neat Image plug-in click the
Action Setup button in Neat Image plug-in window and make sure the settings there correctly
describe the way you want Neat Image to prepare noise profile(s) and filter preset when the action
will be played. After configuring the Action Setup settings, click the Apply button in the Action Setup
window, and then click the Apply button in the main plug-in window.
4) Stop recording the action in Photoshop.
You will now have a ready for use action that includes Neat Image with configured parameters.
5) In Photoshop, go to the menu File > Automate > Batch. This will open the Batch window where you
can configure a new batch that will process your series of images.
6) In the Set / Action fields of the Batch window, select the action that you have just recorded.
7) Configure the rest of the Batch options according to the Photoshop user guide and then start the
batch processing.
Photoshop’s Batch tool will then process your images using the action that you have prepared. Since
Neat Image is a part of that action, the Batch tool will apply Neat Image filtration to every image in the
batch.
Since it is possible that some of the images may not be automatically processed by Neat Image (or other
filters that may be used in your action) due to some errors, use the log options to save a log of the batch
and then check which image(s) failed. If they failed because Neat Image could not process them, you
can find out why that happened by manually running the action on one of those images. Make sure you
run the action with GUI/dialog enabled to make Neat Image open its main window and display the error
messages that will explain the problem to help you resolve it. After the problem is resolved, run the
batch again using the steps 5-7 above.
20
© 1999-2014 by Neat Image team, ABSoft. All rights reserved.
26-Sep-14
User Guide
Neat Image plug-in for Photoshop (Win)
7. Device noise profiles
A device noise profile (or noise profile, or simply profile) describes the properties of noise produced by
an imaging device (e.g., digital camera, scanner, etc.) working in a certain mode. Several noise profiles
corresponding to different modes of a device constitute a profile set. Neat Image can use profiles from
such a set to process images produced in any of the modes covered by the set.
You can find some pre-built noise profiles or build your own profiles for your camera or scanner. Learn
how to find, build and use device noise profiles in Neat Image in the subsections 7.1-7.4 below.
7.1. Getting ready-made noise profiles
You can find some pre-built profile sets for different cameras and scanners in:
Profiles section of the Neat Image web page:
http://www.neatimage.com/win/photoshop/profiles.html
Device noise profiles section of the Neat Image community forum:
http://www.neatimage.net/forum/viewforum.php?f=5
Other digital imaging forums and web pages from users of Neat Image.
To use a profile set from one of these sources, download the archive with profiles and unzip all profiles
1
to the following folder and/or its sub-folder(s) in your Documents folder:
Documents\Neat Image for Photoshop\Profiles\
After that you can use individual profiles from this set in Neat Image to process images produced in
device modes covered by this profile set.
Please be aware that using ready-made profiles built by other people may produce less than optimal
results with your images because of possible slight differences in noise properties of cameras (scanners)
as well as due to different imaging processing workflows used. Therefore, we advise to use ready-made
noise profiles built by others only as a starting point to learn how to use Neat Image. To achieve the best
results consider building your own profiles as explained in the subsections below.
7.2. Building a profile for a device mode (standard
profiling procedure)
In this subsection, you will find out how to build a single noise profile for an image produced in a
certain shooting or scanning mode (such a profile can also be called “a profile for a certain mode of the
device”).
Building a new noise profile generally consists of three stages:
Stage I. Building a profile;
Stage II. Documenting the profile;
Stage III. Saving the profile.
The Stage I, building a profile, can be done with the use of a regular image (for example, the image that
you want to denoise or any other regular image) or with the use of the Calibration Target. These two
cases are described as two alternative versions of the Stage I:
Stage I. Case of building a profile using a regular image
Stage I. Case of building a profile using the Calibration Target
You may want to follow the case of building a noise profile using a regular image if you only need a
single-use profile to process selected input image. In this case, the input image (or an alternative regular
image from the same series; it should be produced by the same device working in the same mode)
should contain enough uniform featureless areas for noise analysis.
A uniform area (with minor variation in all channels of the image) may be overcast sky, clear sky
(without clouds and birds), or any other part of the image, where there are no visually perceptible details
(except the noise). Neat Image needs uniform featureless areas of around 128x128 pixels (the minimum
1
You can check and adjust the location of the Profile folder using the menu Tools > Preferences > Folders.
26-Sep-14
© 1999-2014 by Neat Image team, ABSoft. All rights reserved.
21
User Guide
Neat Image plug-in for Photoshop (Win)
is 32x32 pixels). You can see some examples of such areas in the Examples section, page 32.
If the input image does not contain such areas and you have no suitable alternative regular image that
contains such areas, you can prepare a special test image and follow the case of building a noise profile
using the Calibration Target. That is also recommended if you want to prepare a reusable noise profile
for a certain mode of your camera or scanner.
7.2.1. Stage I. Case of building a profile using a regular image
To build a noise profile using a regular image you have to take 2 steps:
Step 1. Preparing a regular image for noise analysis;
Step 2. Analyzing the image noise.
Step 1. Preparing a regular image for noise analysis
To analyze noise in a regular image, you can use the input image or an alternative regular image that
was produced by the same camera (or scanner) in the same or similar shooting (scanning) mode. Using
the input image usually produces most accurate noise profile that perfectly matches the noise properties
of this input image. However, if there are not enough flat featureless areas in the input image then you
have to use an alternative regular image.
Case of using the input image
In this case, simply open the input image in the plug-in and proceed to the step 2 below.
Case of using an alternative image
If there is no large enough uniform featureless areas in the input image, use an alternative image.
The alternative image is supposed to be produced by the same device working in the same or similar
mode. This can be just another image from the same series; the image should contain at least one
large enough uniform featureless area suitable for analysis.
Open an alternative image in Photoshop and then open this image in Neat Image plug-in for
analysis below.
Step 2. Analyzing image noise (profiling)
Analyzing noise is the main part of building a noise profile for an imaging device working in a certain
mode. The current version of Neat Image plug-in for Photoshop offers three ways of conducting the
noise analysis (profiling): automatic, semi-automatic and manual one. Using automatic profiling is
easier and therefore recommended for beginners. In difficult cases (for example if Neat Image cannot
automatically find a uniform featureless area in analyzed image), automatic profiling may not work well
or may produce less than perfect results. You can always override automatics and use semi-automatic or
manual profiling.
Make sure you use the Device Noise Profile tab:
Case of automatic profiling
To analyze noise properties, Neat Image uses uniform image areas that contain noise but no visible
or important details. With automatic profiling, Neat Image tries to find one such area automatically
and then uses this area to analyze image noise.
Click
Regular Image
(the Auto Profile button) in the toolbar, or use the Profile > Auto Profile with
menu item, or press F2.
Neat Image will try to automatically find image areas suitable for analysis and will analyze them,
first the primary selected area and then the rest of the image. If the primary selected area shown in
viewer indeed contains no visible details then the resulting noise profile will be accurate.
To be sure, check the profile Quality indicator in the bottom of the Device Noise Profile box. A profile
built using a uniform and featureless image area will show a high value in this indicator.
22
© 1999-2014 by Neat Image team, ABSoft. All rights reserved.
26-Sep-14
User Guide
Neat Image plug-in for Photoshop (Win)
If the profile quality is high (for example, higher than 70%) then you can be sure that the noise
profile is accurate. Please proceed to Stage II. Documenting noise profile, page 26.
If the automatically-selected image area does contain visible details or the profile quality is not very
high then try to use the semi-automatic profiling instead (see below).
Case of semi-automatic profiling
1) Find a uniform featureless image area
Manually find and select an image area that contains no visible details.
1
The area should be at least 32x32 pixels large. That is the minimum size; the recommended size is
128x128 pixels or more (you can resize the selection frame).
Scroll, pan, zoom the image to find a uniform image area and then select this area for analysis.
If you cannot find a large enough uniform area in the input image, consider using an alternative
regular image or use the Calibration Target as explained in the next section (Stage I. Case of
building a profile using the Calibration Target, page 24).
2) Analyze selected image area
Click
(the Auto Profile button).
Neat Image will automatically analyze the selected image area and the rest of the image.
The profile is now ready. Please proceed to Stage II. Documenting noise profile, page 26.
2
Case of manual profiling (Advanced mode only )
1) Find a uniform featureless area
Manually find and select an area that contains no visible details.
The area should be at least 32x32 pixels large. This is the minimum size; the recommended size is
128x128 pixels or more (you can resize the selection frame).
2) Analyze selected area
Click
(the Auto Profile button).
Neat Image will automatically analyze the selected area and build a noise profile.
3) Additionally manually fine-tune the profile
Fine-tuning uses additional flat featureless frame areas to make the noise profile more accurate.
You must manually select and analyze several such areas one after another.
1) Find and select a uniform featureless area
Scroll, pan, zoom the frame in the viewer in the Device Noise Profile tab to find a new uniform area.
The size of an area may be from 16x16 to 256x256 pixels. Using larger areas makes fine-tuning
more accurate. The selection edges will change their thickness according to the selection size.
1
2
You can see some examples of uniform featureless image areas in the section Examples, page 36.
You can enable Advanced mode using the Tools > Advanced Mode menu item.
26-Sep-14
© 1999-2014 by Neat Image team, ABSoft. All rights reserved.
23
User Guide
Neat Image plug-in for Photoshop (Win)
2) Analyze selected area with Manual Fine-Tune
Click
(the Manual Fine-Tune button) or use the Profile > Fine-Tune Using Selected Area menu item.
The analysis results will be shown in the noise profile equalizer: the graphs of the equalizer will
change some of the values (see the picture on the right). You can switch from one channel to
another in the equalizer to better see a specific channel’s
graph, or select to show them all together.
The goal of manual fine-tuning is to fill the equalizer with
measured values (shown as graph-color knots) in all points of
the graphs. The previous steps (specifically, the Auto Profile
function) may have already filled some of the values. Manual
fine-tuning can further improve the analysis by filling out the
still missing or interpolated values (shown as yellow knots)
and/or making some of already measured values more precise.
3) Repeat 1-2 above with other uniform areas of different brightness
To make the device noise profile more accurate, fine-tune it using several uniform image areas.
Select areas of different brightness for best results. Try to choose and analyze uniform areas to
cover all or most elements of the equalizer in all its color channels. The more elements of profile are
analyzed, the higher is the quality of the profile.
4) Complete fine-tuning using Auto Complete
(the Auto Complete button) or use the Profile > Auto Complete menu item to automatically
Click
complete the fine-tuning by adjusting the unmeasured values using interpolation based on the
measured data.
At this point the profile is ready. Proceed to Stage II. Documenting noise profile, page 26.
7.2.2. Stage I. Case of building a profile using the Calibration
Target
The Calibration Target is specially designed to enable easy profiling of various imaging devices. It can
be used to build a single profile for a certain device mode or a set of profiles for different modes.
Follow the steps below to prepare a single profile using the Calibration Target.
Step 1. Preparing the Calibration Target
To use the Calibration Target, go to menu Tools > Calibration Target and then click
Display target… button), or download the image of the Target from the Neat Image web page:
http://www.neatimage.com/win/photoshop/testtarget.html
(the
There are two ways of using the Calibration Target: you can open it on the screen and take a shot (with
a digital or film camera, depending on your workflow) or you can print it out and shoot the hardcopy.
Shooting the Calibration Target off the screen is faster, especially with a digital camera. However, be
careful when shooting it off the screen of a CRT monitor because you may occasionally capture scan
bands. These bands may spoil a part of the shot. If you cannot avoid these bands, prepare a printed
version of the Calibration Target or shot it off an LCD monitor, which does not produce this effect.
Also, try to avoid glares when using a monitor with a glass or glossy screen.
Case of shooting the Calibration Target off the screen
Open the Calibration Target image on the screen (menu Tools > Calibration Target and then click the
Display target… button). Then use the displayed Calibration Target in the Step 2 below.
Case of shooting the printed Calibration Target
Open the Calibration Target image in an image editor and print out the image on a sheet of white
24
© 1999-2014 by Neat Image team, ABSoft. All rights reserved.
26-Sep-14
User Guide
Neat Image plug-in for Photoshop (Win)
matte paper; make the image fill the whole page. Then use the printed target in the Step 2 below.
Step 2. Preparing a shot or scan of the Calibration Target
Case of digital camera
Use the displayed or printed Calibration Target to prepare a test shot for building a device noise
profile for your camera:
1.
Set the camera to a certain shooting mode (ISO level, etc.) you want to build a profile for;
2.
Important: set the focusing system on infinity or in macro mode to get a
slightly-out-of-focus image of the target;
3.
Make sure the Calibration Target fills the whole frame and make a shot;
4.
Open the resulting shot in Neat Image plug-in.
Case of flatbed scanner
Use the printed Calibration Target to prepare a test scan for building a device noise profile for your
flatbed scanner:
1.
Set the scanner to a certain scanning mode (resolution, light level, etc.) you want to build a
profile for;
2.
If possible set the scanner slightly out of focus (an out of focus scan is preferred for
profiling); a possible way to achieve this is to raise the page over the scanner glass a bit;
3.
Scan the printed Calibration Target;
4.
Open the resulting scan in Neat Image plug-in.
Case of slide scanner
Use the displayed or printed Calibration Target to prepare a test scan for building a device noise
profile for your film scanner:
1.
Set the camera to a certain shooting mode (film type, exposure, etc.) you want to build a
profile for;
2.
Important: set the focusing system on infinity or in macro mode to get a
slightly-out-of-focus image of the target;
3.
Make sure the Calibration Target fills the whole frame and make a shot;
4.
Develop the slide and put it into the scanner;
5.
Set the scanner to a certain scanning mode (resolution, light level, etc.) that you want to
build a profile for and scan the slide;
6.
Open the resulting scan in Neat Image plug-in.
Step 3. Analyzing image noise
Having the shot or scan of the Calibration Target, Neat Image can build a noise profile automatically:
Use the Profile > Auto Profile with Calibration Target menu item.
After the analysis is completed, proceed to the Stage II below.
26-Sep-14
© 1999-2014 by Neat Image team, ABSoft. All rights reserved.
25
User Guide
Neat Image plug-in for Photoshop (Win)
7.2.3. Stage II. Documenting noise profile
At this point of building the noise profile for your camera or
scanner, the noise analysis is done and all important noise
characteristics are gathered in the profile. You may still want to
manually document the profile if Neat Image has not done this
automatically. With most images from digital cameras, Neat Image
is able to automatically extract the crucial information about the
camera mode from the EXIF data fields of the analyzed image and
put this information to the noise profile (you can see that in the
Device Name and Mode fields in the Device Noise Profile box.
If Neat Image has not automatically placed any information to the
fields after noise analysis, you can fill out
these fields manually.
Device Name and Mode
Use the Device Name and Mode fields in the Device Noise Profile box. Here, you can specify the model
of the image acquisition device and describe the device mode, which can be something like the data
in the picture on the right.
About the Device name and mode notes
It is highly recommended to specify these details to keep record of devices, device modes, and
corresponding device noise profiles that you use.
The noise characteristics of any two devices can be extremely different. Even a single device in
different modes can produce significantly different noise. Therefore, it is always better to use
separate noise profiles for different devices and device modes to avoid inaccurate filtration and
artifacts. Commenting on the device name and device mode parameters helps you keep track of
them when you do manual profile matching, i.e., when you manually select a suitable profile to
process an image.
Automatic profile matching available in Neat Image uses the EXIF information from the image
files and profiles, not the Device Name and Mode fields, so filling out these fields may not be
necessary for automatic profile matching. However, filling out these fields is highly advisable
both for the clarity purposes and for the cases of EXIF-less input images (in such cases, you have
to manually select a suitable profile based on the Device Name and Mode fields).
See the Preparing profile set for different device modes section below to learn more about camera
and scanner parameters that may need to be documented in the Device Name and Mode fields.
7.2.4. Stage III. Saving the noise profile
Use
(the Save Device Noise Profile As… button, blue disk) in the Device Noise Profile box or use the
Profile > Save As… menu item.
In the Save Device Noise Profile As… dialog box, select the desired file name for this profile. The
default name is based on the device name and device mode when these are available from the EXIF
data fields of the analyzed image. If the EXIF data are not available then the default profile name is
based on the name of analyzed image file. Use the suggested default or change the name of the file
to store the device noise profile. Device noise profiles are saved as *.dnp files.
File naming considerations
If you are going to re-use a device noise profile later on, select a good file name explaining the
device name and mode so that you could easily recognize this profile by its file name.
Alternatively, you can use special folder structuring to keep many device noise profiles arranged
according to their device modes.
See Preparing profile set for different device modes: Stage III. Structuring profile set, page 29,
for additional information.
A saved noise profile includes the complete noise analysis. Therefore, by re-opening the noise
profile, you can reproduce exactly the same conditions for image processing later on.
26
© 1999-2014 by Neat Image team, ABSoft. All rights reserved.
26-Sep-14
User Guide
Neat Image plug-in for Photoshop (Win)
7.3. Preparing profile set for different device modes
Usually an imaging device can work in several different modes. Therefore, there should be several
device noise profiles covering different modes to enable accurate processing of arbitrary images
produced by this device. If a set of profiles covers all modes of the device then any image from this
device can be processed by using one of the profiles from the set.
This subsection explains how you can prepare a reusable set of profiles for a range of modes of an
imaging device.
As an owner of a certain imaging device you are in perfect position to prepare a profile set because you
have direct access to the device hardware, you can adjust its shooting mode and take test shots.
Moreover, using your own set of profiles makes noise reduction more accurate because such profiles
better reflect the specifics of the camera or scanner as well as the workflow you use.
When building a set of profiles, please follow the guidelines below that will help you structure the
1
profile set in such a way as to make consequent reuse of the set easy for you .
7.3.1. Stage I. Selecting device parameters for profile set
To build a set of profiles for particular camera or scanner, you must identify the device parameters that
affect the noise characteristics and that you will take into account during profiling. There may be many
device parameters but not all of them influence image noise and those that do differ by the strength of
their influence. Naturally, you are only interested in those parameters that appreciably affect noise.
Different noise profiles should be prepared for different values of important parameters, so you have to
identify these parameters in the first place.
The tables below describe the parameters that appreciably affect noise characteristics (from the most to
the less important ones) of digital cameras and scanners:
Digital camera parameters in the order of decreasing importance
1
ISO rate
50, 100, 200, 400, etc.; depends on
a camera
Higher ISO rate produces more noise.
Camera noise
reduction
High, Normal, Low, etc.;
depends on a camera
In-camera noise reduction can reduce levels of noise in
photos (usually at expense of some details).
Sharpness
adjustment
Low, Normal, High, etc.; depends
on a camera
Internal sharpness adjustment of a camera makes noise
more intensive. Using no internal sharpness adjustment
produces least noise.
Compression
1:1 (or Uncompressed),
1:5 (or Fine), 1:10 (or Normal),
1:20 (or Basic), etc.
or
2 bits/pixel, 4 bits/pixel, etc.
depends on a camera
Strong JPEG compression typically produces more
JPEG artifacts and destroys image elements including
noise; weaker compression preserves more image
elements including noise created by the image sensor.
It is preferable to use the lowest amount of
compression for the best results.
Resolution
1:1 (original resolution, like
4288x2848), 1:2 (downsized in
camera, e.g., 2144x1424), 2:1
(digital zoom, 2x), etc.
Camera’s internal interpolation (both downsizing and
upsizing, e.g., that of digital zoom) changes many
characteristics of noise.
White balance
Sun, Cloudy, Incandescent,
Fluorescent, etc.;
depends on a camera
White balancing changes characteristics of noise
(mainly of color noise) slightly.
Exposure
1/16s, 1.0s, 16s;
Longer exposures produce more hot-pixel noise; also,
some cameras switch on the automatic noise reduction
when exposure is longer than a certain threshold – this
may affect the noise levels.
..and other people if you decide to share your results. Please do share because in this way you will help people with the
same camera or scanner model. You can submit a set of profiles to the Neat Image team to publish the set in the
profile library in www.neatimage.com (see Contacts, page 41) or just share them with other people directly.
26-Sep-14
© 1999-2014 by Neat Image team, ABSoft. All rights reserved.
27
User Guide
Neat Image plug-in for Photoshop (Win)
Scanner / camera parameters in the order of decreasing importance
Film type
For example, Kodak Tmax 400,
Kodak Tri-X Professional 320,
Fuji Superia 200, etc.
Every film type produces specific grain pattern, which
depend on film materials. Strength of the grain depends on
ASA/ISO rate of the film.
Scanning
resolution
For example, 300 dpi, 3200 dpi,
4000 dpi, etc.
Higher scanner resolution emphasized film grain and
makes it more evident in the scanner image.
Number of
scan passes
Single pass,
2x pass,
4x pass, etc.
Multi-pass scanning can potentially produce less grainy
images.
If two images were captured in the same or similar conditions (most of the above device mode
parameters are the same) then the noise of these two images should be very similar. If you have built a
device noise profile using one of these images, you can use this profile to filter both images with good
results. If the shooting or scanning conditions were different then the noise in two images could be
significantly different. In this case, cross-use of one noise profile is not recommended. Instead, two
different profiles should be built and used to filter these two images.
Based on these considerations and tables above, identify the device mode parameters of your camera or
scanner that (1) are important from the noise standpoint and (2) are changed in your imaging tasks. For
example, if you never change the sharpness adjustment of your digital camera then there is no need to
build profiles for different values of the sharpness adjustment parameter. On the other hand, if you do
shoot with different ISO rates then you have to build profiles for every ISO rate you use. Some
parameters are less important (for example, the White Balance or Exposure) and you may simply
choose to ignore the difference in noise characteristics caused by such device mode parameters.
Identify and make a list of the device mode parameters that are important for your needs. For example,
you could include the ISO rate: ISO 100, 200, 400; and JPEG compression level: HQ, SHQ. Then it is
straightforward to write down all combinations of the selected parameters:
JPEG HQ, ISO 100
JPEG HQ, ISO 200
JPEG HQ, ISO 400
JPEG SHQ, ISO 100
JPEG SHQ, ISO 200
JPEG SHQ, ISO 400
Then prepare an individual profile for each combination from this list. Please proceed to the Stage II to
build profiles for all combinations.
7.3.2. Stage II. Building individual profiles
To build individual profiles for the profile set, you can either use the standard profiling procedure
described earlier, or employ a special Neat Image tool – the Batch Profiler.
Using standard profiling procedure
To build individual profiles using the standard profiling procedure, follow the guidelines of the
Building a profile for a device mode section, page 21. Using those guidelines, build a new profile for
every combination of the device mode parameters included in your list as described in the Stage I above.
The resulting set of noise profiles (several *.dnp files on the disk) can be further structured as explained
in the Stage III below.
Using Batch Profiler
The Batch Profiler is a dedicated tool that can automatically build several noise profiles using shots or
scans of the Calibration Target (please note that the Batch Profiler is not for regular images). To use this
tool, you must prepare several shots (scans) and then analyze them all at once using the Batch Profiler.
1. Preparing set of images of the Calibration Target
To prepare shot or scan of the Calibration Target for every combination of device mode parameters,
28
© 1999-2014 by Neat Image team, ABSoft. All rights reserved.
26-Sep-14
User Guide
Neat Image plug-in for Photoshop (Win)
please follow the two initial steps of Stage I. Case of building a profile using the Calibration Target:
Step 1. Preparing the Calibration Target, see page 24.
Step 2. Preparing a shot or scan of the Calibration Target, see page 25.
Do the Step 2 for every combination of device parameters in your list. Then place all resulting image
files (*.jpg, *.tiff, *.png) to a new folder (and its subfolders if necessary) on the hard drive, for example:
Documents\Target Images\
2. Preparing profiles
To prepare profiles using the images of the Calibration Target:
1.
Select the Tools > Batch Profiler… menu item to open the Batch Profiler window.
2.
In the Batch Profiler window, specify the folder with images of the Calibration Target and the folder
where the Batch Profiler should save prepared device noise profiles.
3.
Click the Start button to initiate profiling process.
When profiling is finished, new noise profiles are saved in the selected target folder.
4.
Click the Close button to close the Batch Profiler window.
As the result, you have a set of noise profiles (several *.dnp files on the hard drive) that can be further
structured as described in the Stage III below.
7.3.3. Stage III. Structuring profile set
In the Stage II, you have prepared a set of profiles, they are now saved on the disk. You have assigned
names to these profiles that reflect the device modes they correspond to.
For example, profiles for Olympus C5050Z could be named like the following:
– disk folder
Olympus C5050Z
C5050Z (ISO100; JPEG HQ; SharpNormal; 2560x1696).dnp
C5050Z (ISO100; JPEG HQ; SharpNormal; 2560x1920).dnp
C5050Z (ISO100; JPEG SHQ; SharpNormal; 2560x1696).dnp
C5050Z (ISO100; JPEG SHQ; SharpNormal; 2560x1920).dnp
C5050Z (ISO200; JPEG HQ; SharpNormal; 2560x1696).dnp
C5050Z
– camera name
ISO ###
– ISO rate of camera mode
C5050Z (ISO200; JPEG HQ; SharpNormal; 2560x1920).dnp
C5050Z (ISO200; JPEG SHQ; SharpNormal; 2560x1696).dnp
C5050Z (ISO200; JPEG SHQ; SharpNormal; 2560x1920).dnp
C5050Z (ISO400; JPEG HQ; SharpNormal; 2560x1696).dnp
C5050Z (ISO400; JPEG HQ; SharpNormal; 2560x1920).dnp
C5050Z (ISO400; JPEG SHQ; SharpNormal; 2560x1696).dnp
C5050Z (ISO400; JPEG SHQ; SharpNormal; 2560x1920).dnp
JPEG SHQ / JPEG HQ /
TIFF
– file format and
compression level
Sharp#####
– sharpness adjustment
C5050Z (ISO100; TIFF; SharpNormal; 2288x1712).dnp
C5050Z (ISO100; TIFF; SharpNormal; 2560x1696).dnp
C5050Z (ISO100; TIFF; SharpNormal; 2560x1920).dnp
#### x ####
– image size
C5050Z (ISO200; TIFF; SharpNormal; 2288x1712).dnp
C5050Z (ISO200; TIFF; SharpNormal; 2560x1696).dnp
C5050Z (ISO200; TIFF; SharpNormal; 2560x1920).dnp
C5050Z (ISO400; TIFF; SharpNormal; 2288x1712).dnp
C5050Z (ISO400; TIFF; SharpNormal; 2560x1696).dnp
C5050Z (ISO400; TIFF; SharpNormal; 2560x1920).dnp
When the profiles are named like this, manual selection of a suitable profile is simple. You can check
the device mode of the input image in Photoshop or in Neat Image (using
button in the bottom of the
image viewer) and then select a profile for this mode from the popup menu.
26-Sep-14
© 1999-2014 by Neat Image team, ABSoft. All rights reserved.
29
User Guide
Neat Image plug-in for Photoshop (Win)
There is also another way to select profile for an image, based on structuring the profile set using the
disk folders. For example, the above Olympus C5050Z profile set could be structured like this:
– disk folder
Olympus C5050Z
TIFF
2288x1712
ISO 100.dnp
ISO 200.dnp
ISO 400.dnp
2560x1696
ISO 100.dnp
ISO 200.dnp
Olympus C5050Z,
JPEG / TIFF,
#### x ####
- the names of disk subfolders containing
device noise profiles for corresponding
device modes;
ISO ###.dnp
- device noise profiles;
ISO 400.dnp
2560x1920
ISO 100.dnp
ISO 200.dnp
ISO 400.dnp
JPEG
HQ
2560x1696
Note that constant parameter (Sharpness
adjustment) is not reflected in the folder
structure. However, if there were profiles
with different values of these parameters
then additional subfolder should be added.
Parameters that can be disregarded, such
as exposure time, are not reflected in the
folder structure too.
ISO 100.dnp
ISO 200.dnp
ISO 400.dnp
2560x1920
ISO 100.dnp
ISO 200.dnp
ISO 400.dnp
SHQ
2560x1696
ISO 100.dnp
ISO 200.dnp
ISO 400.dnp
2560x1920
ISO 100.dnp
ISO 200.dnp
ISO 400.dnp
In this case, the folder tree stores device noise profiles in a structured way, which helps to select one
profile from the set given the device mode of the input image.
Note that the automatic profile matching provided by Neat Image does work well in both cases: you can
keep the whole set of profiles as a flat list of files in one folder, or you can structure the files into
subfolders. This choice only affects the convenience of manual selection of profiles, while automatic
profile matching can handle both cases equally well.
If the automatic profile matching is not available (for example, if the images or profiles contain no EXIF
information or the available EXIF details are incomplete) then you have to select profiles manually.
Therefore, we recommend to structure profiles according to one of the methods above to make your
manual work easier.
7.3.4. Stage IV. Documenting profile set
Along with the text comments inside the device noise profiles and their file names, we recommend to
document the whole profile set with a plain text file explaining the following points:
Author of the profile set and profiling date
Device name, firmware version
Device modes that have been profiled in this set
Device mode parameters that change within the profile set
Device mode parameters that are constant for all profiles in the set
Post-processing applied (after receiving image from imaging device and before Neat Image)
30
© 1999-2014 by Neat Image team, ABSoft. All rights reserved.
26-Sep-14
User Guide
Neat Image plug-in for Photoshop (Win)
An example of such a description is below:
Olympus C5050Z noise profiles
by John Smith, September 26, 2014
A set of profiles for Olympus C5050Z TIFF and JPEG files. The profiles were built using shots of the Calibration Target for
the following file formats and image sizes:
TIFF: 2048x1536 / 2288x1712 / 2560x1696 / 2560x1920
JPEG HQ / SHQ: 2560x1696 / 2560x1920
For each file format and image size above, shots with different ISO rates (100, 200 and 400) were made and used to build
profiles.
Default camera settings were used for Sharpness, Contrast, and Saturation. In-camera noise reduction was switched off. The
white balance was set to daylight.
No post processing was applied; the calibration target shots directly from the camera were opened in Neat Image to build
profiles.
Such kind of summary would help you figure out any set of profiles you prepared as well as let other
people understand your results if you decided to share your profiles.
7.4. Using noise profiles
When you have a set of profiles for your camera or scanner, you can directly use these profiles to
process images in Neat Image. Usually there is only one profile that is most suitable to process a given
input image. Therefore it is very important to select the right profile, which would provide the best
match between profile and image. Profiles in a set usually correspond to different modes of the imaging
device. To make a perfect match between a profile and image, the device mode of a profile should be the
same or very close to the device mode used to capture the image.
There are two ways to select a device noise profile that matches the input image:
To automatically select the most suitable profile from a pre-built set of profiles using Auto Match
(see page 10 to learn how to use Auto Match);
To manually select the most suitable profile from a pre-built profile set based on mode comments
(see page 10 for details).
When you select and load a profile in either way, Neat Image shows the degree of match between the
profile and input image. This degree is shown by the Match indicator in the Device Noise Profile box. The
match degree is calculated on the basis of the image and profile’s metadata (the EXIF data fields). If the
profile’s device mode is exactly the same as device mode used to capture the image then the match is
100%. There is always 100% match between an image and profile built using this very image (Neat
Image displays that using the note “(AP)” in the Match indicator). If the device modes of a profile and
image are very close then the match degree is close to 100%. The more different the device modes of
profile and image are, the lower the match degree is. Use the match degree as an indication of match
accuracy. If the match degree is low then it is likely that building a new profile (using the current input
image or the Calibration Target shot in current device mode) would produce better noise reduction
results.
Obviously it is preferable to build a new noise profile for each new input image (unless the image does
not allow building a quality profile because it contains no large uniform areas for analysis), because
such a profile would perfectly match the noise of that image. Nevertheless, any noise profile can, with
some degree of accuracy, be used to process other images captured by the same device working in the
same or similar mode. This is less accurate than building a profile for each image but saves time because
building a new quality profile can take more time than re-using a pre-built one. This is especially
important if one profile is re-used many times, for example to process a series of images produced in
one device mode. Also, it may not always be possible to build an accurate profile using input image
when it contains no flat featureless areas.
When using pre-built profiles, you may also want to pay attention to the Quality indicator in the Device
box. A properly-built and fine-tuned profile will show a high value in this indicator. If the
profile quality is high (for example, higher than 70%) then you can be sure that the profile is accurate.
Noise Profile
Both Quality and Match indicators should usually show high values for the noise reduction of the current
input image using the current noise profile to be accurate.
26-Sep-14
© 1999-2014 by Neat Image team, ABSoft. All rights reserved.
31
User Guide
Neat Image plug-in for Photoshop (Win)
8. Additional tools
8.1. Alternative modes of image viewer
The image viewer in Neat Image can show the currently processed image in several alternative modes to
enable detailed examination of both channel and frequency components. Examining the components
helps to find flat featureless image areas for noise analysis. Also, that allows to visually compare the
original and filtered version of each component and to find optimum filter settings for the corresponding
component easier and faster.
Use
viewer mode.
(Viewer mode button) in the viewer toolbar to select the desired
The viewer mode will change accordingly and will display the image
components separately or as one composite image.
Examine individual channel and frequency components of the image, check the
presence of noise in individual components. Working in the Noise Filter Settings
tab, you can use the separately displayed components to identify those components that do not get
enough (or get too much) noise reduction and adjust the corresponding filter settings.
You can also adjust the brightness of the viewer to easier see image details and noise in very dark or
very bright areas of the image:
(the viewer brightness controls) in the viewer toolbar to adjust and/or reset the
Use
viewer brightness to better see the noise and details in very dark or very bright areas of the image.
Please note that this adjustment does not change the underlying image data in any way. The
adjustment only affects the image viewer, i.e., the way the images are displayed in it.
8.2. Navigator
The image viewer has an additional Navigator panel, which offers an easy way to locate and navigate to
an area of interest in a large image that does not entirely fit into the viewer, for example when you zoom
into the image to see its fine details. When using Navigator you don't need to zoom out and then again
zoom in (though such an approach to locating an area of interest can be used as well).
(the Navigator button in top-left corner of the viewer), the Tools > Navigator menu item or
Use
press F8 to open or close the Navigator panel.
Use the mouse pointer to drag the visible area frame to the desired image position within the
Navigator panel. This will make the main viewer navigate to the same position in the image.
8.3. Profile Viewer
The Profile Viewer provides detailed information
about the currently used noise profile.
Use
(the Profile viewer button) in the
Device Noise Profile box in the Device Noise
Profile tab to open the Profile Viewer window.
The Profile Viewer provides the following details:
32
Overall Profile Quality – this is an
estimation of the overall quality of the
noise analysis contained in this profile.
The higher this value the better this
profile seems to be. A quality profile is
necessary for quality noise reduction.
© 1999-2014 by Neat Image team, ABSoft. All rights reserved.
26-Sep-14
User Guide
Neat Image plug-in for Photoshop (Win)
Noise Sample – this is an optional noise sample (a crop from the image used to build this profile).
The noise sample helps you visually evaluate the noise described by this profile. Also, you can
easily see whether any details are present in this area, which makes the profile less accurate
(only flat featureless areas without any details should be used for profiling, so the sample should
contain no visible details).
– this indicator tells whether there is any clipping in the analyzed image area. Clipping
occurs when the sample contains pixels that are very close to or in fact are entirely white (or
entirely black). Clipping reduces the overall profile quality.
Uniformity – these values show how uniform the noise sample is in all color channels. The
uniformity is low when any details are present in the area. Low uniformity reduces the overall
profile quality.
Fine-Tuning – this indicator tells how well this profile is fine-tuned. Fine-tuning is a part of
profiling process (both automatic and manual) and the more complete and accurate the
fine-tuning the higher the overall profiling quality. If you work with Neat Image in Advanced
mode then you can see that the more equalizer values are filled in with measured data the higher
the overall profile quality is. You can improve the profile quality by additional fine-tuning.
Clipping
Noise Levels – these figures show the actual noise levels measured by the noise analyzers during
profiling. There are the overall noise level and noise levels in channel and frequency
components. These figures are a good indication of how noisy an image source is.
Image Metadata – this box contains the EXIF information associated with the image used to build
this profile. This information is used by Neat Image to find a profile that matches an input image.
9. Preferences
There are several preferences that adjust the behavior of the Neat Image plug-in.
Use the Tools > Preferences… menu item to open the Preferences dialog box.
9.1. General preferences
Auto zoom to fit on image open
Check this option to make the image viewer automatically adjust zoom level to fit the image into the
window.
Show hints over interface controls
This option switches on/off the hints. The hints are displayed when the mouse pointer is placed over any
control in the Neat Image interface.
Color theme
Normal brightness
Neat Image will display its interface elements using the current color theme of the OS.
Reduced brightness
Select this option to switch Neat Image to a custom color theme with reduced brightness.
9.2. Profiling preferences
Save noise samples in profiles
Enable this option to make Neat Image save a noise sample from the analyzed image area into device
noise profile (*.dnp file). This will increase the size of the *.dnp file but will also improve the
compatibility with the future versions of the software (Neat Image will be able to re-build the profile
26-Sep-14
© 1999-2014 by Neat Image team, ABSoft. All rights reserved.
33
User Guide
Neat Image plug-in for Photoshop (Win)
using the saved noise sample).
Show warnings about selected image area
Enable this option to let Neat Image display warnings about selected image area during profiling. For
example, Neat Image may warn you about clipping or non-uniformity detected in the selected area, thus
helping you select a better area for profiling.
Smart Profile
Smart Profile is one of the possible ways to prepare a noise profile to process an input image. Smart Profile
uses both Auto Profile and Auto Match (with Auto Fine-Tune) to prepare two candidate profiles and then
selects the better of two profiles.
Use the settings in the Smart Profile box to configure the behavior of the Smart Profile function.
Automatically select the best profile
Use this option to let Neat Image automatically decide which noise profile to use.
Prefer profile prepared by Auto Profile
Let Neat Image preferably select the profile prepared by Auto Profile when it can find a good area for
analysis in the input image. When the area is not very good then Neat Image will use the profile
prepared by Auto Match with Auto Fine-Tune.
Prefer profile prepared by Auto Match and Auto Fine-Tune
Let Neat Image preferably select the profile prepared by Auto Match when it can find a matching profile
among the pre-built noise profiles, even when Auto Profile provides a good profile as well.
9.3. Matching preferences
9.3.1. Profile Matching
Use profile matching preferences to adjust the way Neat Image matches noise profiles to input images.
Look for noise profiles in the following folder
If you select this option then Neat Image will look for matching noise profiles in the specified folder. If
you have several sub-folders with profiles, select the topmost folder of all those subfolders to let Neat
Image search in all of them.
By default, the folder used to store profiles (see the Folders > Profile folder setting in the same Preferences
window) is used for matching. You can use any other (sub-)folder for profile matching as well.
Matching parameters priorities
To automatically match profiles to the input image, Neat Image compares the device parameters of the
input image and candidate profiles selected from the folder specified by the above options. Different
parameters usually have to be matched with different priorities. Using Matching parameters priorities
controls, you can select the priorities of such parameters as Input device, ISO rate, Compression, Resolution,
Sharpness, Exposure:
Match
High
Low
Ignore
– the parameter should match exactly;
– it is highly important that the parameter is very close or matches exactly;
– it is preferable that the parameter is close or matches exactly;
– the parameter is not important at all.
9.4. Performance preferences
The first group of settings in this tab selects the computing devices to be used for image processing. This
group of settings is optional, it is shown only if at least one supported GPU (graphic processing unit) is
available along with the regular CPU (central processing unit, or processor). This group includes the
34
© 1999-2014 by Neat Image team, ABSoft. All rights reserved.
26-Sep-14
User Guide
Neat Image plug-in for Photoshop (Win)
following items:
Use CPU only
This option makes Neat Image perform all image processing using only CPU.
Use GPU only
This option makes Neat Image perform all image processing using only GPU.
Use CPU and GPU
If you select this option then Neat Image will process images using both CPU and GPU.
Depending on individual performance of each computing device (CPU and GPU), each of the above
options may be the most efficient. You can try different settings and measure the resulting speed using the
Benchmark tool below.
CPU
Number of used cores
This option adjusts the number of CPU cores used by Neat Image for processing. The number of used
cores can go up to the total number of cores in all CPUs in your computer (like 2 cores in Core Duo, 4
cores in Core Quad, 8 cores in a desktop version of i7 with enabled hyperthreading, etc.). If the
computer includes two physical CPUs then the number of cores is correspondingly higher. Ideally,
using all cores should provide the best overall performance. In some cases however, processing speed
may be even higher if fewer cores are used (especially on CPUs with hyperthreading). For example,
using fewer than all 8 virtual cores in i7 is in some cases faster, so you may want to test different values
of this setting.
GPU
In this box, yon can specify which of the available computation-capable GPU devices (CUDA-capable
NVIDIA cards and/or supported OpenCL-capable AMD/ATI cards) should be used for image
processing (in addition to CPU or instead of CPU). When you have one or more GPUs, you can allow
Neat Image to use it and specify how much GPU memory may be used for Neat Image’s image
processing. When you also have other software using the GPU, you may want to reserve only a part of
the GPU memory for Neat Image and leave the rest free for other purposes. In any case, you can try
different values and see which setting gives the best results.
Benchmark
Use the Benchmark button to measure the image processing speed with the current settings specified in
the CPU and GPU boxes.
Optimize
Use the Optimize… button to open a specialized dialog designed to measure image processing speeds
achieved with different combinations of the CPU and GPU settings. It allows to automatically
benchmark all possible combinations of settings and to identify the best combination. This is the easiest
way to optimize the performance of Neat Image for specific CPU and GPU hardware.
9.5. Folders preferences
Profile folder
Select the folder where Neat Image must look for device noise profiles. This should be the topmost
folder of all the (sub)folders with device noise profiles. Neat Image will display all profiles (stored in all
subfolders of the specified folder) in the popup menu in the Device noise profile panel of the plug-in
window and in other parts of Neat Image.
By default, the Profile folder is located in your Documents folder:
Documents\Neat Image for Photoshop\Profiles\
You can select another location to store and use your Neat Image profiles if you prefer.
26-Sep-14
© 1999-2014 by Neat Image team, ABSoft. All rights reserved.
35
User Guide
Neat Image plug-in for Photoshop (Win)
Preset folder
Select the folder where Neat Image must look for filter presets. This should be the topmost folder of all
the (sub)folders with filter presets. Neat Image will display all presets (stored in all subfolders of the
specified folder) in the popup menu in the Filter Settings panel of the plug-in window and in other parts of
Neat Image.
By default, the Preset folder is located in your Documents folder:
Documents\Neat Image for Photoshop\Presets\
You can select another location to store and use your Neat Image presets if you prefer.
10. Examples
10.1. Images to build a noise profile
The image below contains examples of areas that are “good” and “bad” from the standpoint of profiling.
Here, “good” image areas are highlighted in green, these should be at least 32x32 pixels large,
preferably more than 128x128 pixels; “bad” ones are highlighted in red. If the input image you have
does contain similar ‘good’ flat featureless noise-only areas as shown in the example then you can be
sure that automatic profiling will produce an accurate noise profile. However if there are no such flat
featureless areas in the input image, then automatic profiling will not work well with the image because
building a profile using an area with details produces an inaccurate profile that will then lead to very
inaccurate filtration. In such a case, you have to use either an alternative image with flat featureless
areas or to use the Calibration Target to produce test images with flat featureless areas.
Additional comments regarding the “good” and “bad” areas in this example are in the next page.
36
© 1999-2014 by Neat Image team, ABSoft. All rights reserved.
26-Sep-14
User Guide
Neat Image plug-in for Photoshop (Win)
These image areas are good to build device noise profiles, as they contain no visible details:
– GOOD, because this area contains no important details
– GOOD, no important details (this area is from another image)
Examples of “bad” areas that contain visible details:
– NOT RECOMMENDED, because this area contains a
detail: corner – junction of wall and ceiling
– UNACCEPTABLE, because this area contains many details
– NOT RECOMMENDED, because this area contains some
details: clouds (this area is from another image)
26-Sep-14
© 1999-2014 by Neat Image team, ABSoft. All rights reserved.
37
User Guide
Neat Image plug-in for Photoshop (Win)
10.2. Filtration results
Here are some examples of Neat Image performance.
Input
Output
This is a small portion of a digital photo taken with a compact digital camera. The original image
contains easily visible noise. In this case, the source of noise is the camera's image sensor (CCD)
working in high ISO mode.
Input
Output
This image was also taken with a digital camera. Along with the strong high ISO noise, there is an
image degradation caused by the JPEG compression. Even though Neat Image tries to do its best to
clean up such images, please avoid using strong JPEG compression.
See more filtration examples in the Neat Image web page:
http://www.neatimage.com/win/photoshop/examples.html
38
© 1999-2014 by Neat Image team, ABSoft. All rights reserved.
26-Sep-14
User Guide
Neat Image plug-in for Photoshop (Win)
11. Questions and answers
11.1. General questions
Q
What is the difference between Demo, Home and Pro plug-in?
A
The Demo plug-in is limited by size of image area that can be processed: it only processes a part of the
input image if the image is larger than 1024x1024 pixels. The Home plug-in is not limited by size of
image area but only processes 8-bit images. The Pro plug-in additionally supports 16-bit and 32-bit
images. The Pro plug-in (unlike Demo and Home) also supports Photoshop actions and smart filters (in
the recent versions of Photoshop). Please also see the Detailed feature map, page 40, for more details.
Q
Should I uninstall Demo plug-in prior to installing Home / Pro plug-in?
A
That is not necessary. The Home / Pro plug-in can be installed over the Demo plug-in.
Q
Should I uninstall the older version of Neat Image prior to installing a newer one?
A
Usually that is not necessary. A newer version can be installed over the older one; it will replace the old
version.
Q
I think I have found a bug. How can I submit a bug report?
A
Please use the online bug report form: http://www.neatimage.com/win/photoshop/brf.html
Please fill it out to let us know all the details necessary to reproduce the problem.
See more information about bugs in the Issues subsection, page 40, and about bug fixes in the
WhatsNew.txt file supplied with the software. Also see the history section in the Neat Image web page
for the most up to date information: http://www.neatimage.com/win/photoshop/history.html
11.2. Filtration-related questions
Q
Why do I receive some crystal-like artifacts in the filtered image?
A
Presence of many residual noise elements is usually a consequence of using a poorly built noise profile
or a profile built for another device and/or device mode. Using a more accurate profile usually helps.
The crystal-like artifacts (usually these are the residual JPEG compression artifacts) look like thin lines
in the filtered image. They can be easily eliminated by increasing the high frequency noise level in the
filter settings.
Q
Filtered image looks 'plastic'. Why?
A
The reason is that too much filtration was applied. Let Neat Image keep some noise to produce
natural-looking results. Adjust the noise reduction amounts; for example, reduce the noise reduction
amount in the luminance channel to 50% or lower. Also, make sure the device noise profile does match
the image processed. Using an incorrectly chosen or poorly built profile can either produce
plastic-looking results or leave residual artifacts (see the previous question).
Q
How to filter only the color noise (not the brightness noise)?
A
Set the value of the luminance (Y) noise reduction amount to 0%. This will disable filtration in the
luminance (brightness) image component.
Q
Is processing via Neat Image best done before or after any other processing (i.e. tonal/color
correction)?
A
Such operations as tonal/color correction are quite conservative from the standpoint of noise, i.e., they
do not significantly change the noise characteristics of the image. Therefore, filtering before or after
makes little difference – as long as the noise profile is built and applied at the same stage of image
processing. For example, do not use a device noise profile built with an unprocessed (with the color
correction not yet applied) image to filter a processed image.
Some digital cameras apply some color correction internally. Other cameras allow access to
unprocessed RAW data. Neat Image is a generic filter, which can be applied in both cases. The only
26-Sep-14
© 1999-2014 by Neat Image team, ABSoft. All rights reserved.
39
User Guide
Neat Image plug-in for Photoshop (Win)
requirement is to use profile that matches the device mode of the input image.
On the other hand, image sharpening applied to a noisy image makes it much noisier. It is best to apply
Neat Image filtration before sharpening. However, the sharpening and noise filters of Neat Image can
be used together because the sharpening is applied AFTER noise filtration.
If you are not sure, try to use Neat Image as close to the source of the input image as possible.
12. Tips and tricks
12.1. Partial filtration
Some images contain both noisy and clean areas and it may be preferable to filter only noisy areas. This
can be manually done by combining two images – original and filtered one – using two layers in
Photoshop. For example, the following steps can be used:
1.
2.
3.
4.
5.
Open the input image in your image editor;
Copy the input image in a new layer on top of the original image;
Apply Neat Image noise reduction to the top layer;
Adjust the transparency of the top layer so that noisy areas look fine;
Select and delete the areas of the top layer where filtration is not necessary or excessive (you
may want to use the eraser tool with adjustable transparency and shape).
13. Information
13.1. Issues and bugs
Please report any bugs or issues you encounter while working with Neat Image. Use the online bug
report form: http://www.neatimage.com/win/photoshop/brf.html
Your feedback will greatly help us improve the software and provide you with newer and better
versions of Neat Image.
13.2. Plans
The current version of Neat Image plug-in for Photoshop is going to be further improved in the
consequent updates. We continue to work on the core noise reduction algorithms to improve the quality
and speed of noise reduction.
Please let us know if you have ideas that can make Neat Image better for you. Participate in discussions
in the Neat Image community forum, express your opinion, make suggestions, and ask questions. The
more people that ask for a feature the more likely that it will be implemented.
13.3. Detailed feature map
Features
Images
8 bit/channel (24-bit RGB, 8-bit Grayscale)
16 bit/channel (48-bit RGB, 16-bit Grayscale)
32 bit/channel (96-bit RGB, 32-bit Grayscale)
Workflow
Support for Photoshop actions and smart filters
File formats supported
Demo plug-in
+*
–
–
Edition
Home plug-in
+
–
–
Pro plug-in
+
+
+
–
–
+
all formats supported by plug-in host
Device noise Automatic and semi-automatic profiling
profiles
Automatic matching profiles to images
Channel-wise (Lum/Chr; Y, Cr, Cb)
Noise
reduction
Frequency-wise (High, Mid, Low, Very low)
Channel-wise (Y, Cr, Cb)
Smart
sharpening
Frequency-wise (High, Mid, Low)
Filter presets (reusable filter settings)
+
+
+
+
+
+
+
* - a limited part of the input image is processed if the image is larger than 1024x1024 pixels.
40
© 1999-2014 by Neat Image team, ABSoft. All rights reserved.
26-Sep-14
User Guide
Neat Image plug-in for Photoshop (Win)
13.4. Contacts
We really appreciate your opinion of Neat Image. Please let us know what you think about the software.
Feel free to ask questions regarding Neat Image. To share your opinion or to receive support regarding
Neat Image, use any of the following means:
E-mails
[email protected]
— for general inquiries
[email protected]
— for inquiries regarding use of Neat Image for Photoshop (Win)
[email protected]
— for inquiries regarding purchase of licenses for Neat Image
Community forum
Register in Neat Image community forum ( http://www.neatimage.net/forum/ ), and participate in
discussions on the use and development of Neat Image. Such topics are covered in the forum as:
announcements of new and updated versions of the software;
questions about use of Neat Image;
examples of Neat Image performance with comments and suggestions;
feedback from Neat Image users: suggestions of new features and improvements;
contacts and general comments.
Web page
http://www.neatimage.com/win/photoshop/index.html
13.5. Legal information
Copyright
Neat Image © 1999-2014 by Neat Image team, ABSoft. All rights reserved.
License agreement
By downloading and/or using the Neat Image plug-in for Photoshop (Win) software (called “Neat Image”
hereunder in this agreement) you indicate that you accept this license agreement. If you are unable or unwilling to
accept this license agreement then you may not use Neat Image and must return and/or destroy all copies of Neat
Image in your possession.
You may
Use the Demo edition of Neat Image free of charge for non-commercial purposes only.
Copy and distribute the Demo edition of Neat Image.
Run the Home or Pro edition of Neat Image on one (or more, up to the number specified in your license) computer
(computers) at a time for commercial and other purposes provided you are a registered user and you have a valid
license for the corresponding edition of Neat Image.
You may not
Sublicense, rent, lease and sell any version or edition of Neat Image or any portion of it including the license data
without the explicit written permission from the Neat Image team, ABSoft.
Copy, share and distribute the Home and Pro edition of Neat Image or any portion of it including the license data
without the explicit written permission from the Neat Image team, ABSoft.
Decompile, disassemble, reverse engineer, modify, clone and emulate any version or edition of Neat Image or any
portion of it including the license data.
Use the Home or Pro edition of Neat Image if you are not registered user of the corresponding edition of Neat
Image.
Term and termination
If you are a registered user of the Home or Pro edition of Neat Image and you have purchased a license for a certain
major version and edition of Neat Image then you may use this major version (including all minor updates of the
26-Sep-14
© 1999-2014 by Neat Image team, ABSoft. All rights reserved.
41
User Guide
Neat Image plug-in for Photoshop (Win)
same major version) and edition of the software without time limitations provided you observe this license
agreement.
A license for a certain major version of the Home or Pro edition of Neat Image may be extended to a higher major
version. By decision of the Neat Image team, ABSoft, this extension may be automatic and free or may involve an
upgrade fee.
You may terminate this license agreement at any time by returning or destroying all copies of Neat Image in your
possession and notifying the Neat Image team.
This license agreement will terminate immediately if you infringe upon the Neat Image team, ABSoft’s copyrights
or breach this agreement. Copyright infringement or breaching this agreement may also result in criminal or civil
prosecution.
Disclaimer of warranty
The authors make no warranty or representation, either express or implied, with respect to this software, its quality,
accuracy, merchantability, or fitness for a particular purpose. This software is provided "as is", and you, its user,
assume the entire risk as to its quality and accuracy.
Distribution
The Demo edition of Neat Image may be distributed unmodified provided any charge is to cover distribution costs
only.
The Demo edition of Neat Image may be placed on magazine CDs, etc. as long as the Neat Image team is informed.
13.6. Registration
By becoming a registered user of Neat Image plug-in for Photoshop you will:
Encourage the authors to further develop and improve the software;
Get access to advanced functionality of Neat Image (see the Detailed feature map, page 40);
Be able to use Neat Image for commercial and other purposes;
Get free access to updates of the software with the same major version number (at least);
Enjoy reduced upgrade prices for new major versions of Neat Image or will get a free upgrade;
Receive the primary attention of Neat Image support group;
Receive the primary attention of Neat Image development group
(tell us what you want to see in the next version).
Message from the Neat Image team
By becoming a registered user you are helping us to further develop and improve the software.
Become a registered user and we will make Neat Image better for you!
13.7. Acknowledgments
Thank you to all the users who have contributed to Neat Image plug-in for Photoshop by proposing
improvements and new features.
Thanks to all the people who help us to find and fix bugs in Neat Image plug-in for Photoshop.
Thank you to all the users who stimulate the development of Neat Image by their word and deed.
Neat Image wouldn’t be neat without all of you!
Neat Image team, ABSoft
42
© 1999-2014 by Neat Image team, ABSoft. All rights reserved.
26-Sep-14
User Guide
Neat Image plug-in for Photoshop (Win)
14. Index
range, 5, 13, 15, 37
very low, 15
compatibility, 4
component viewer, 32
license agreement, 41
device noise profile, 9
batch profiler, 28
building, 21
automatic, 22
for a certain mode, 21
for different modes, 27
using calibration target, 24
using regular image, 22
ready-made, 21
viewer, 32
examples, 36
features, 3, 40
filter preset, 8, 16
frequency, 15
high, 15, 39
low, 15, 16
26-Sep-14
noise
color, 16, 39
filter, 5, 14
high ISO, 5, 38
level, 14
reduction, 14
amount, 12, 14
partial filtration, 40
plug-in, 6
profile matching, 10, 31
registration, 42
sharpening filter, 13, 16
system requirements, 4
© 1999-2014 by Neat Image team, ABSoft. All rights reserved.
43